Backup and Restore

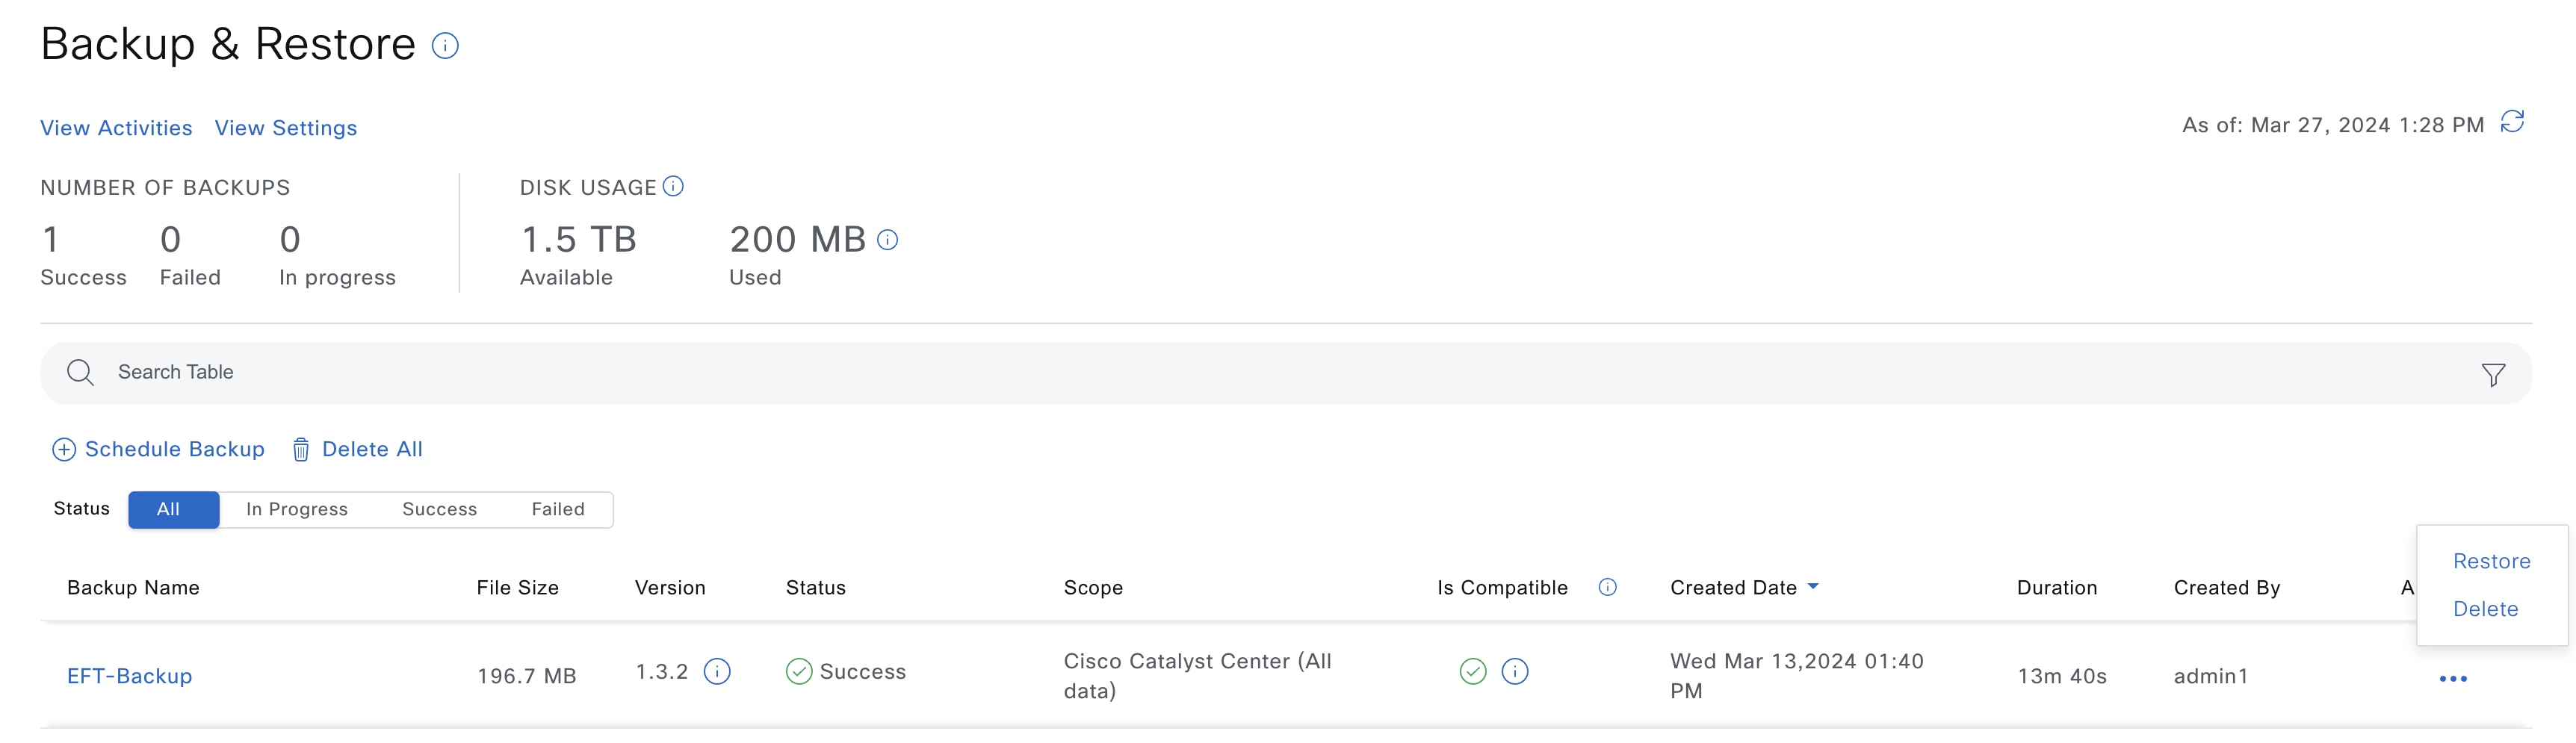
About Backup and Restore

You can use the backup and restore functions to create the backup files and to restore to the same or different virtual appliance (if required for your network configuration).

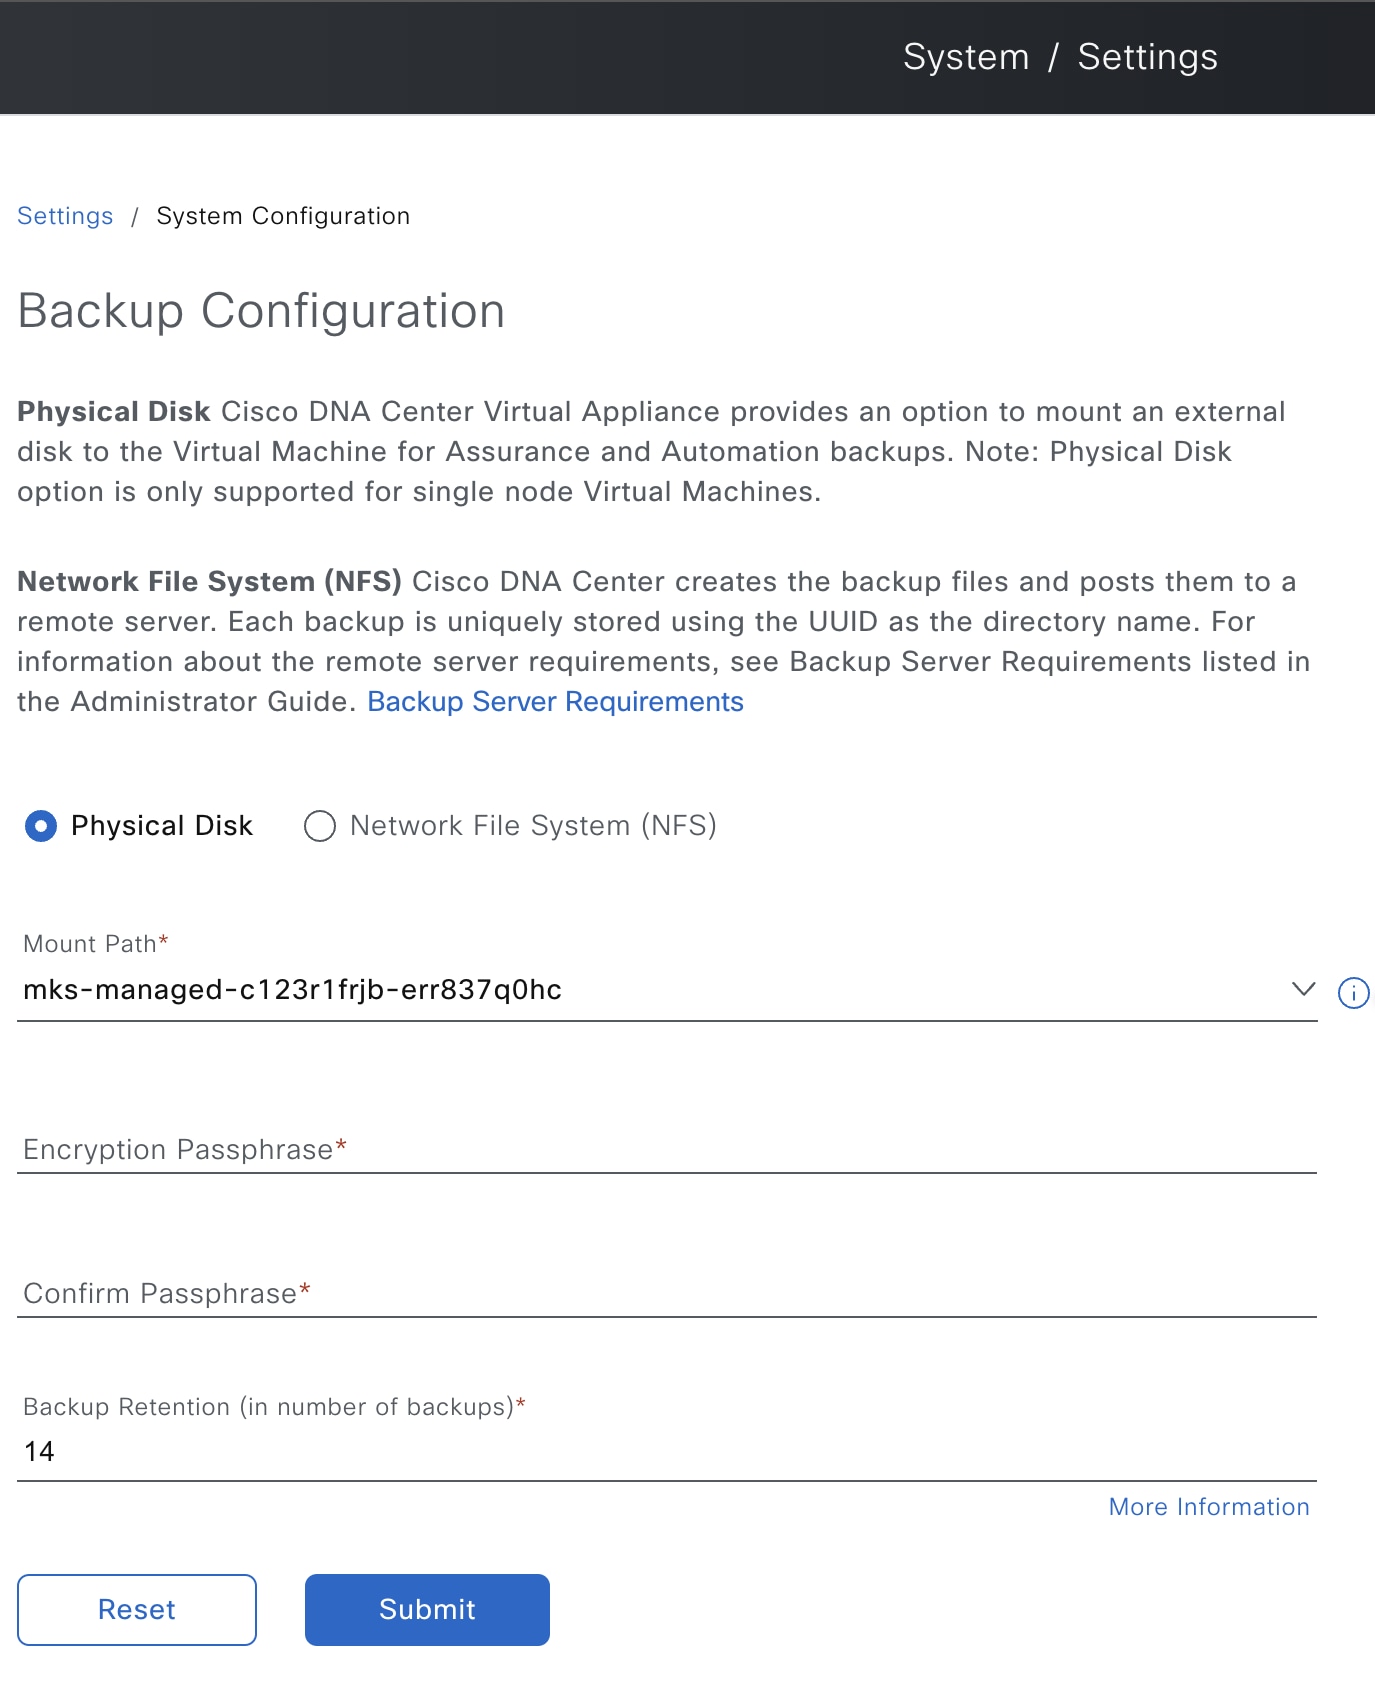
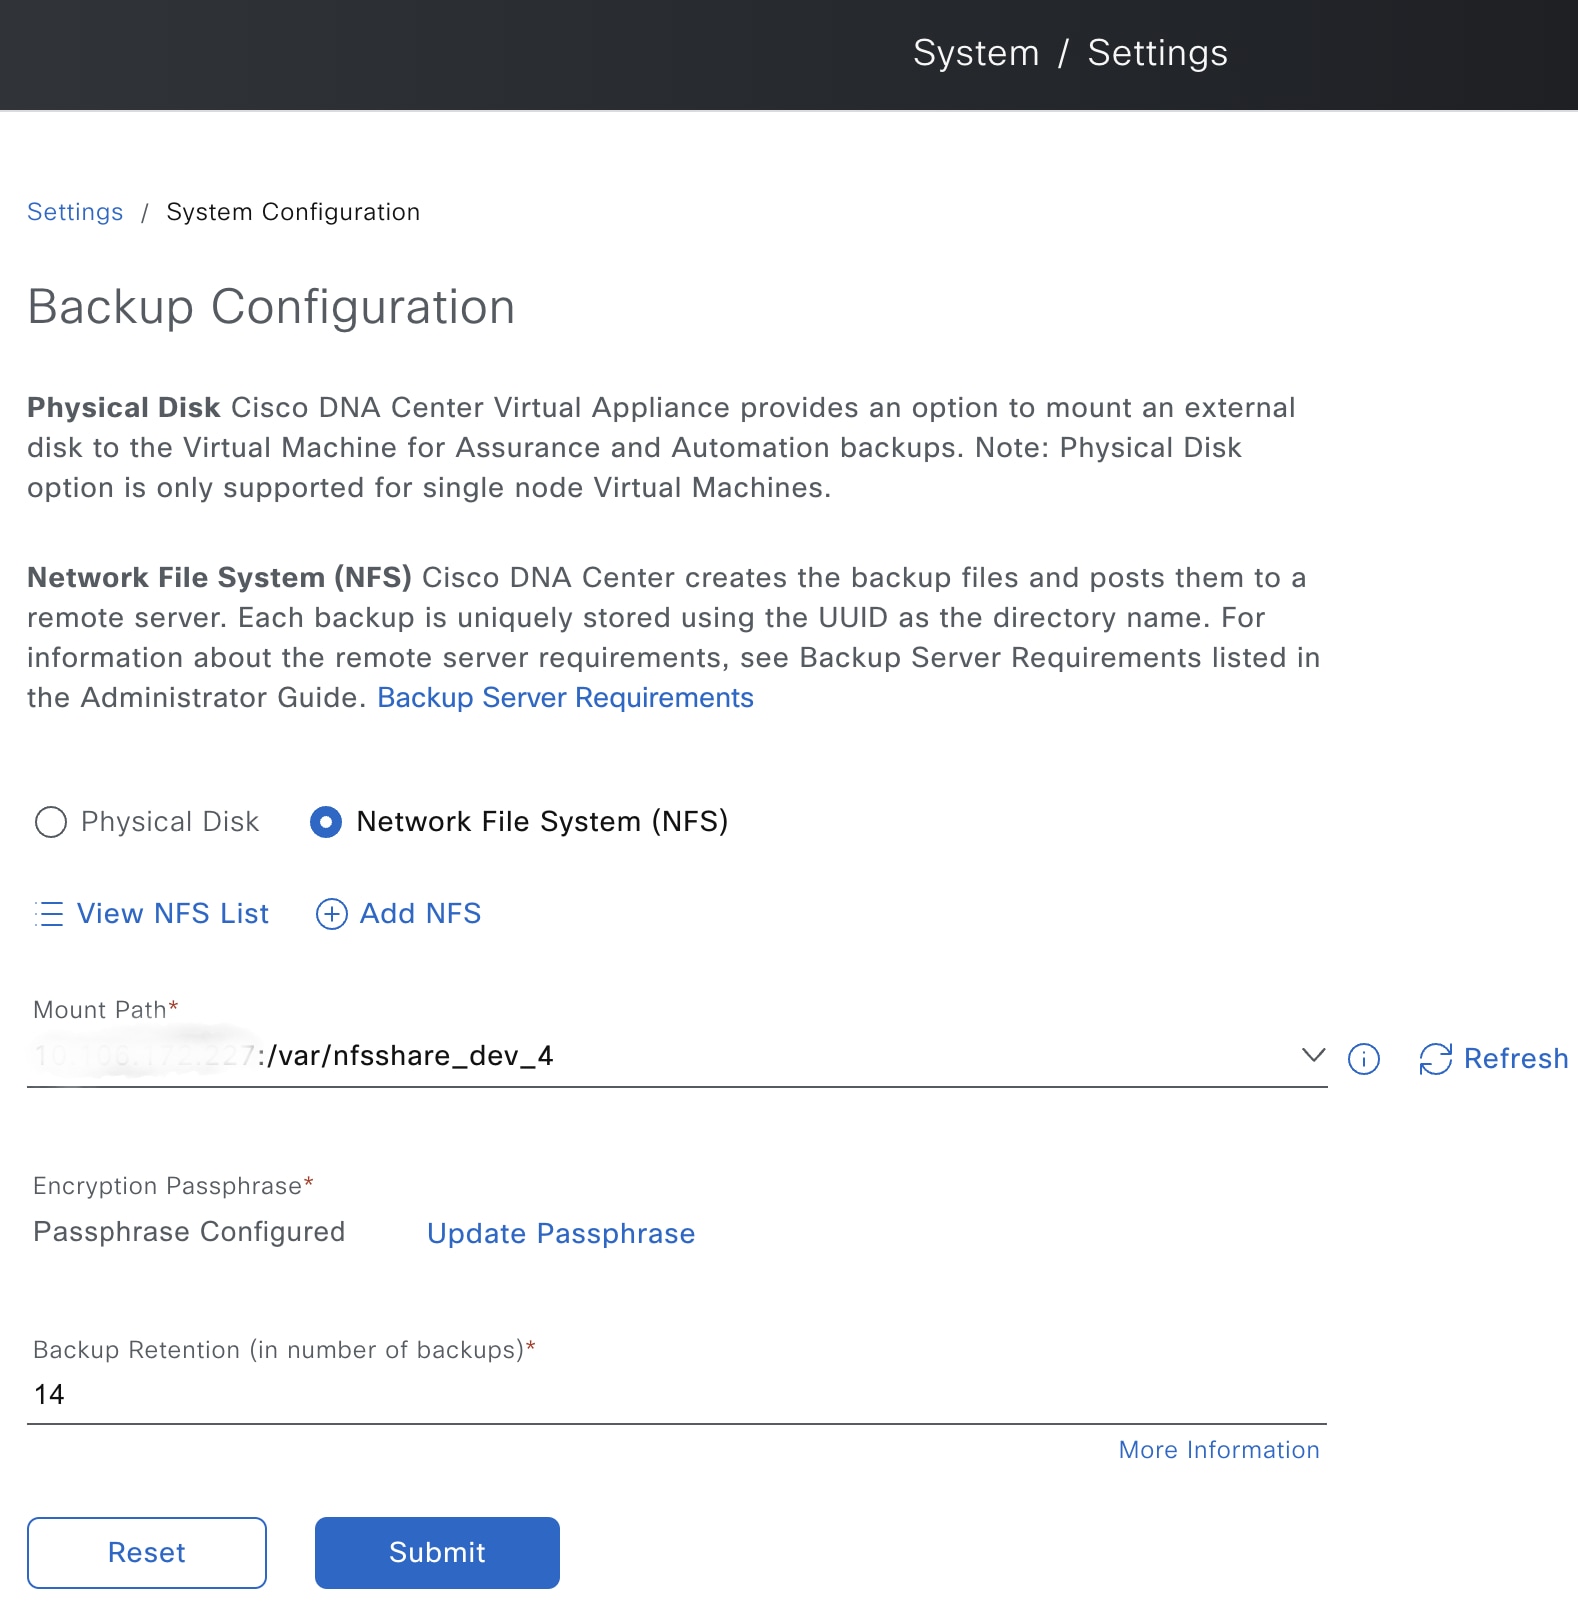
Automation and Assurance data are unified to use a single data storage device. The data can be stored on a physical disk that is attached to the virtual machine or on a remote Network File System (NFS) server.

Backup

You can back up both automation and Assurance data.


Important


NetFlow data is not backed up when you back up Catalyst Center's automation and Assurance data.


Automation data consists of Catalyst Center databases, credentials, file systems, and files. The automation backup is always a full backup.

Assurance data consists of network assurance and analytics data. The first backup of Assurance data is a full backup. After that, backups are incremental.


Note


Do not modify the backup files. If you do, you might not be able to restore the backup files to Catalyst Center.


Catalyst Center creates the backup files and posts them to a physical disk or an NFS server.

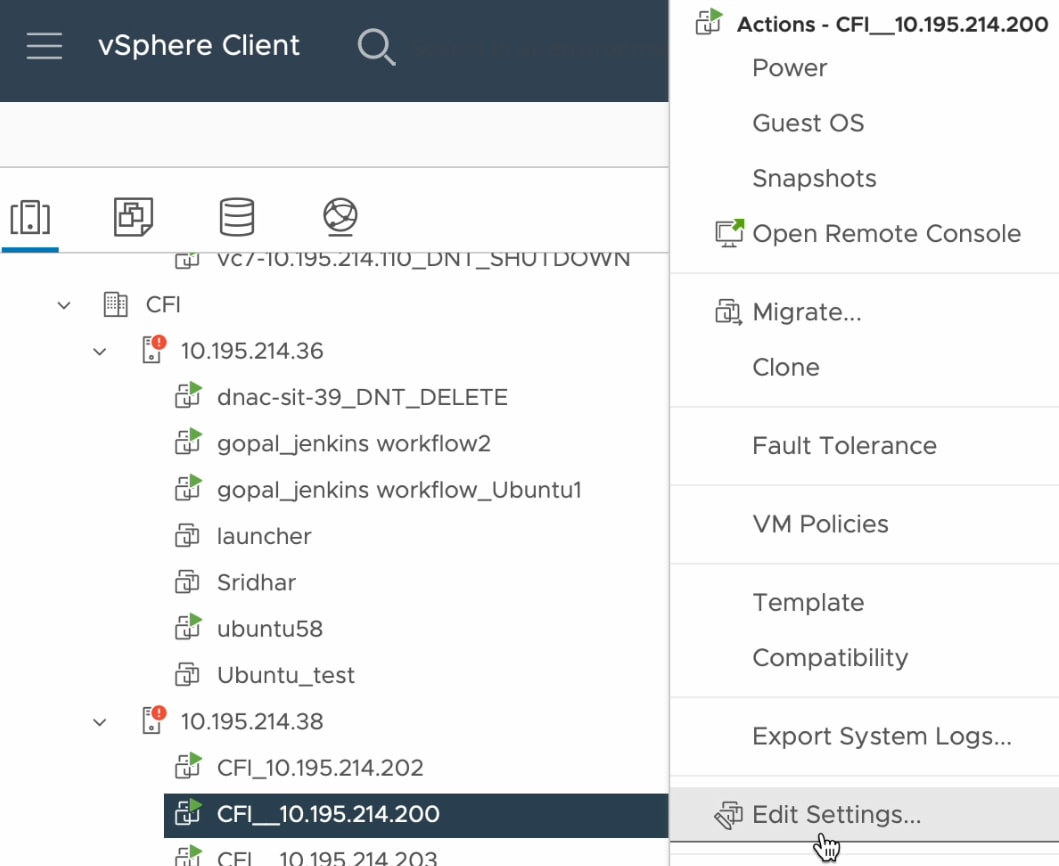
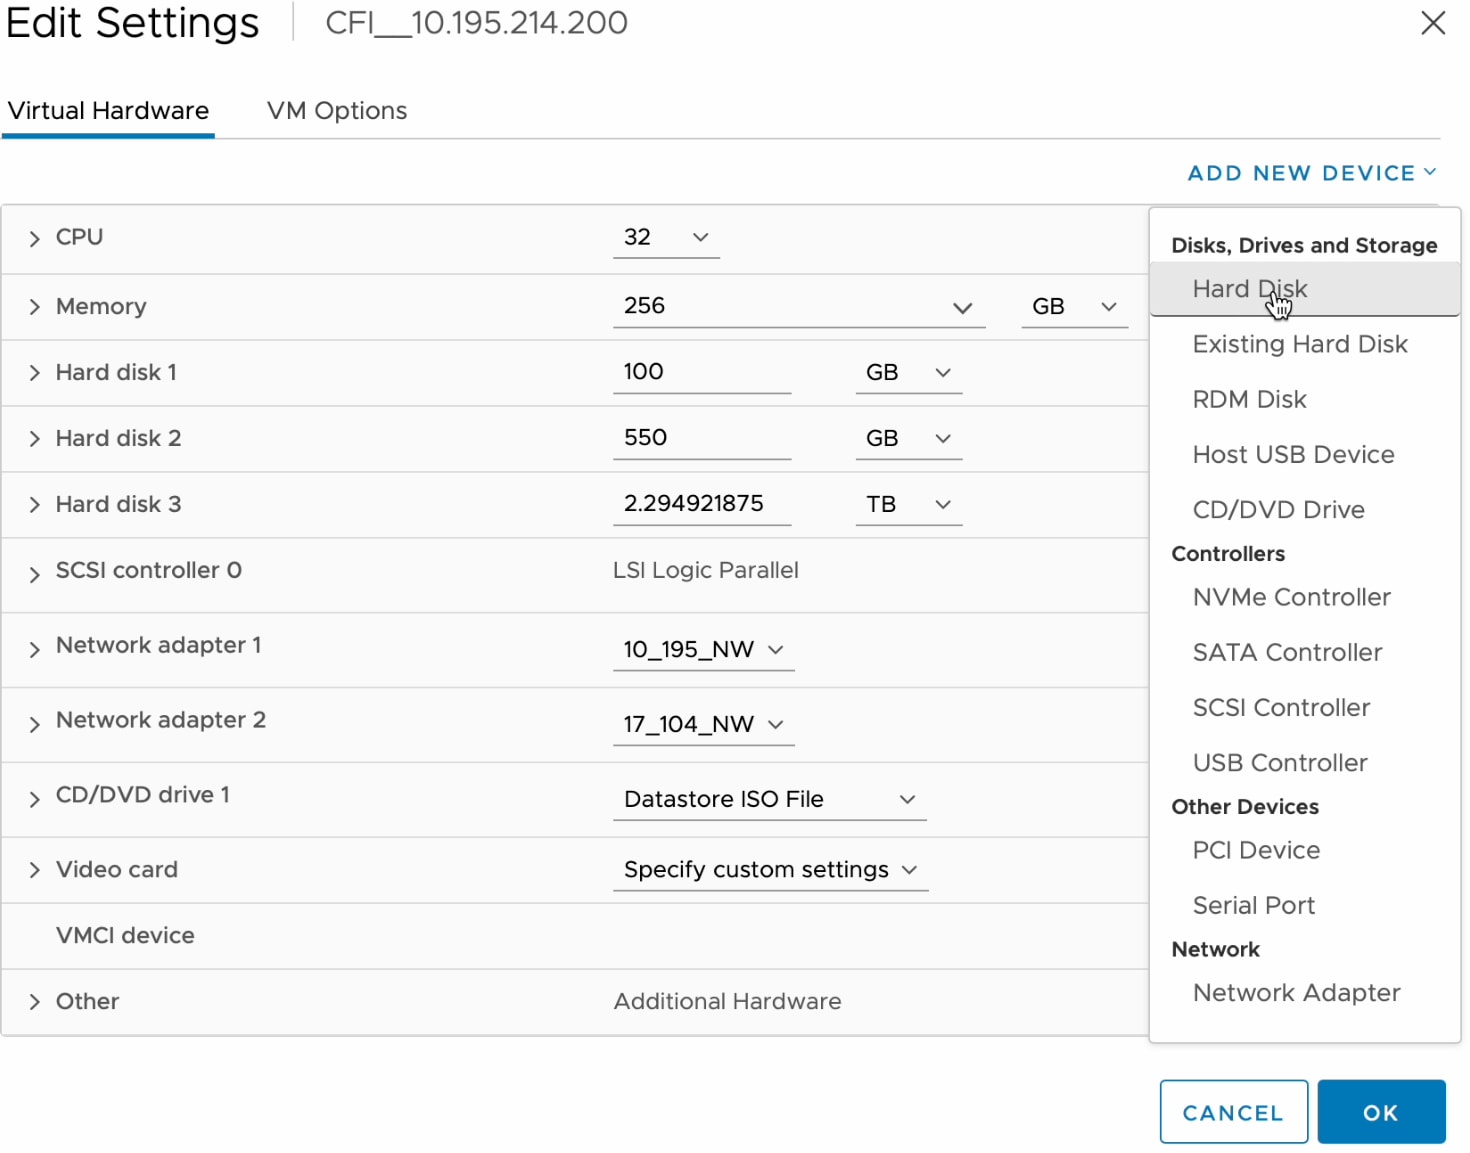
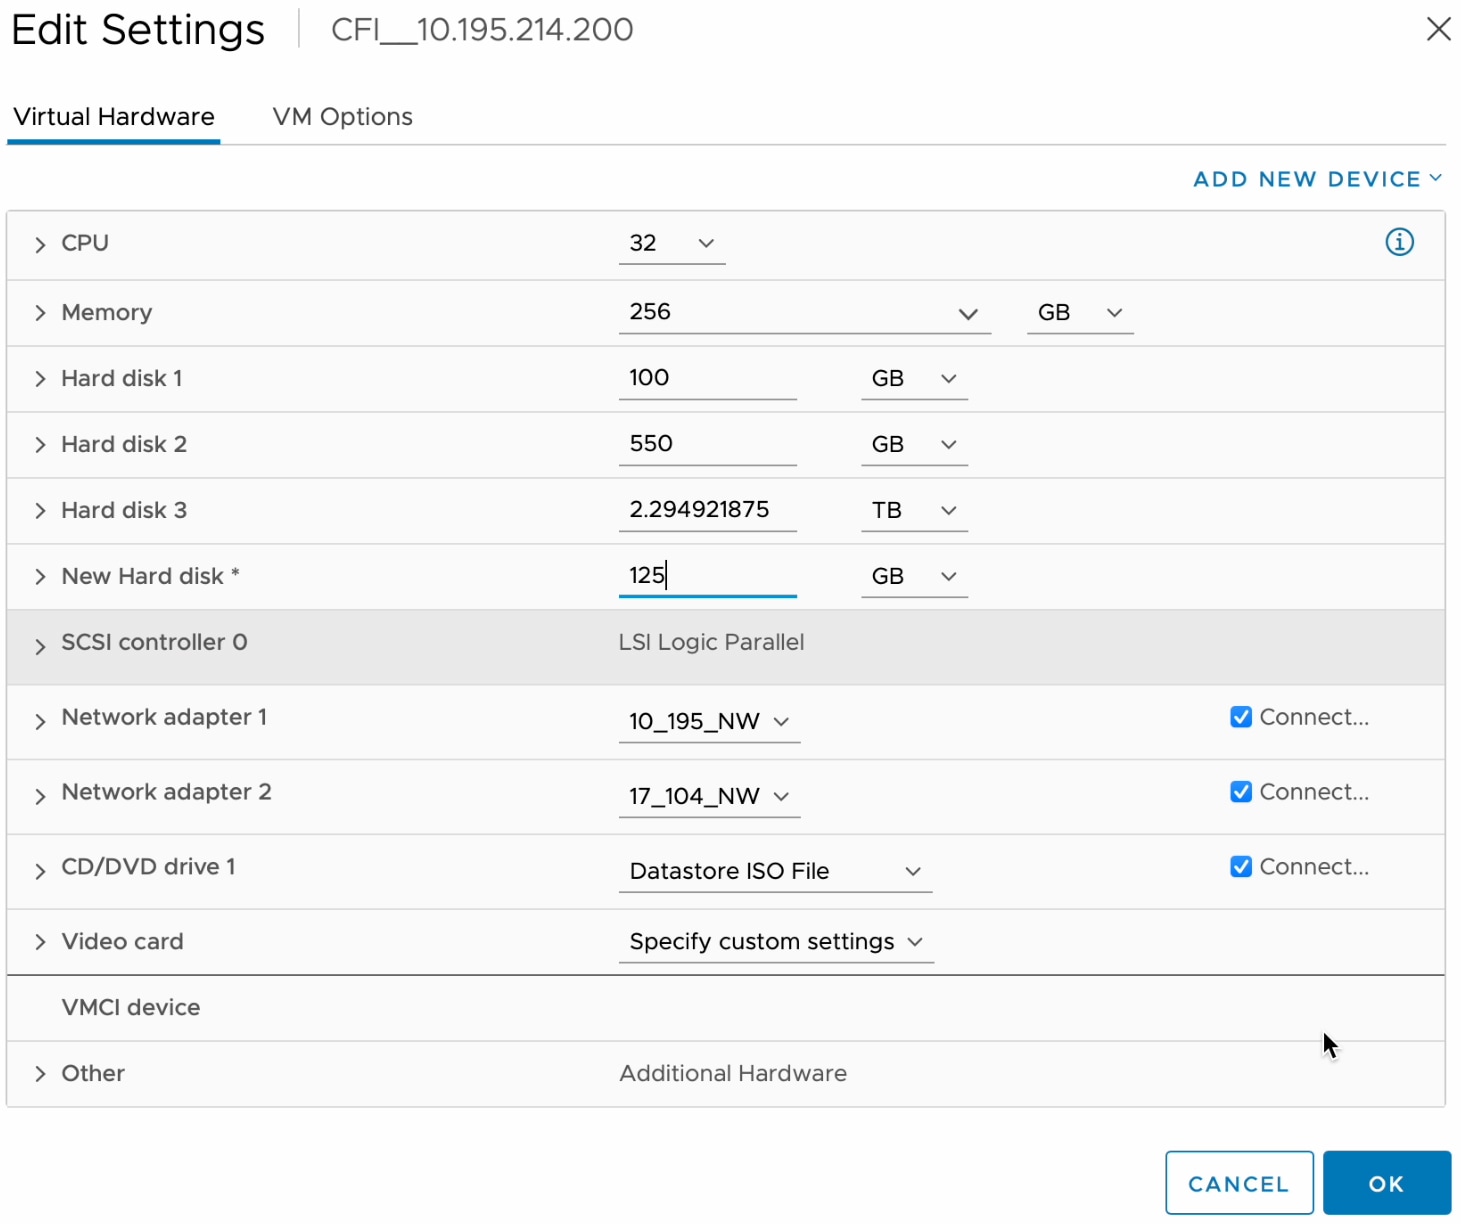
You can add multiple physical disks for backup. If the previous backup disk runs out of disk space, you can use the other added disks for backup. For information on how to add a physical disk, see Add a Physical Disk for Backup and Restore. You must change the disk in the System > Settings > Backup Configuration window, and save changes for the new disk to be used as a backup location. For information on how to change the physical disk, see Configure the Location to Store Backup Files.

You can also add multiple NFS servers for backup. For information on how to add an NFS server, see Add the NFS Server. You must change the NFS server in the System > Settings > Backup Configuration window, and save changes for the new NFS server to be used as a backup location. For information on how to change the NFS server, see Configure the Location to Store Backup Files.


Note


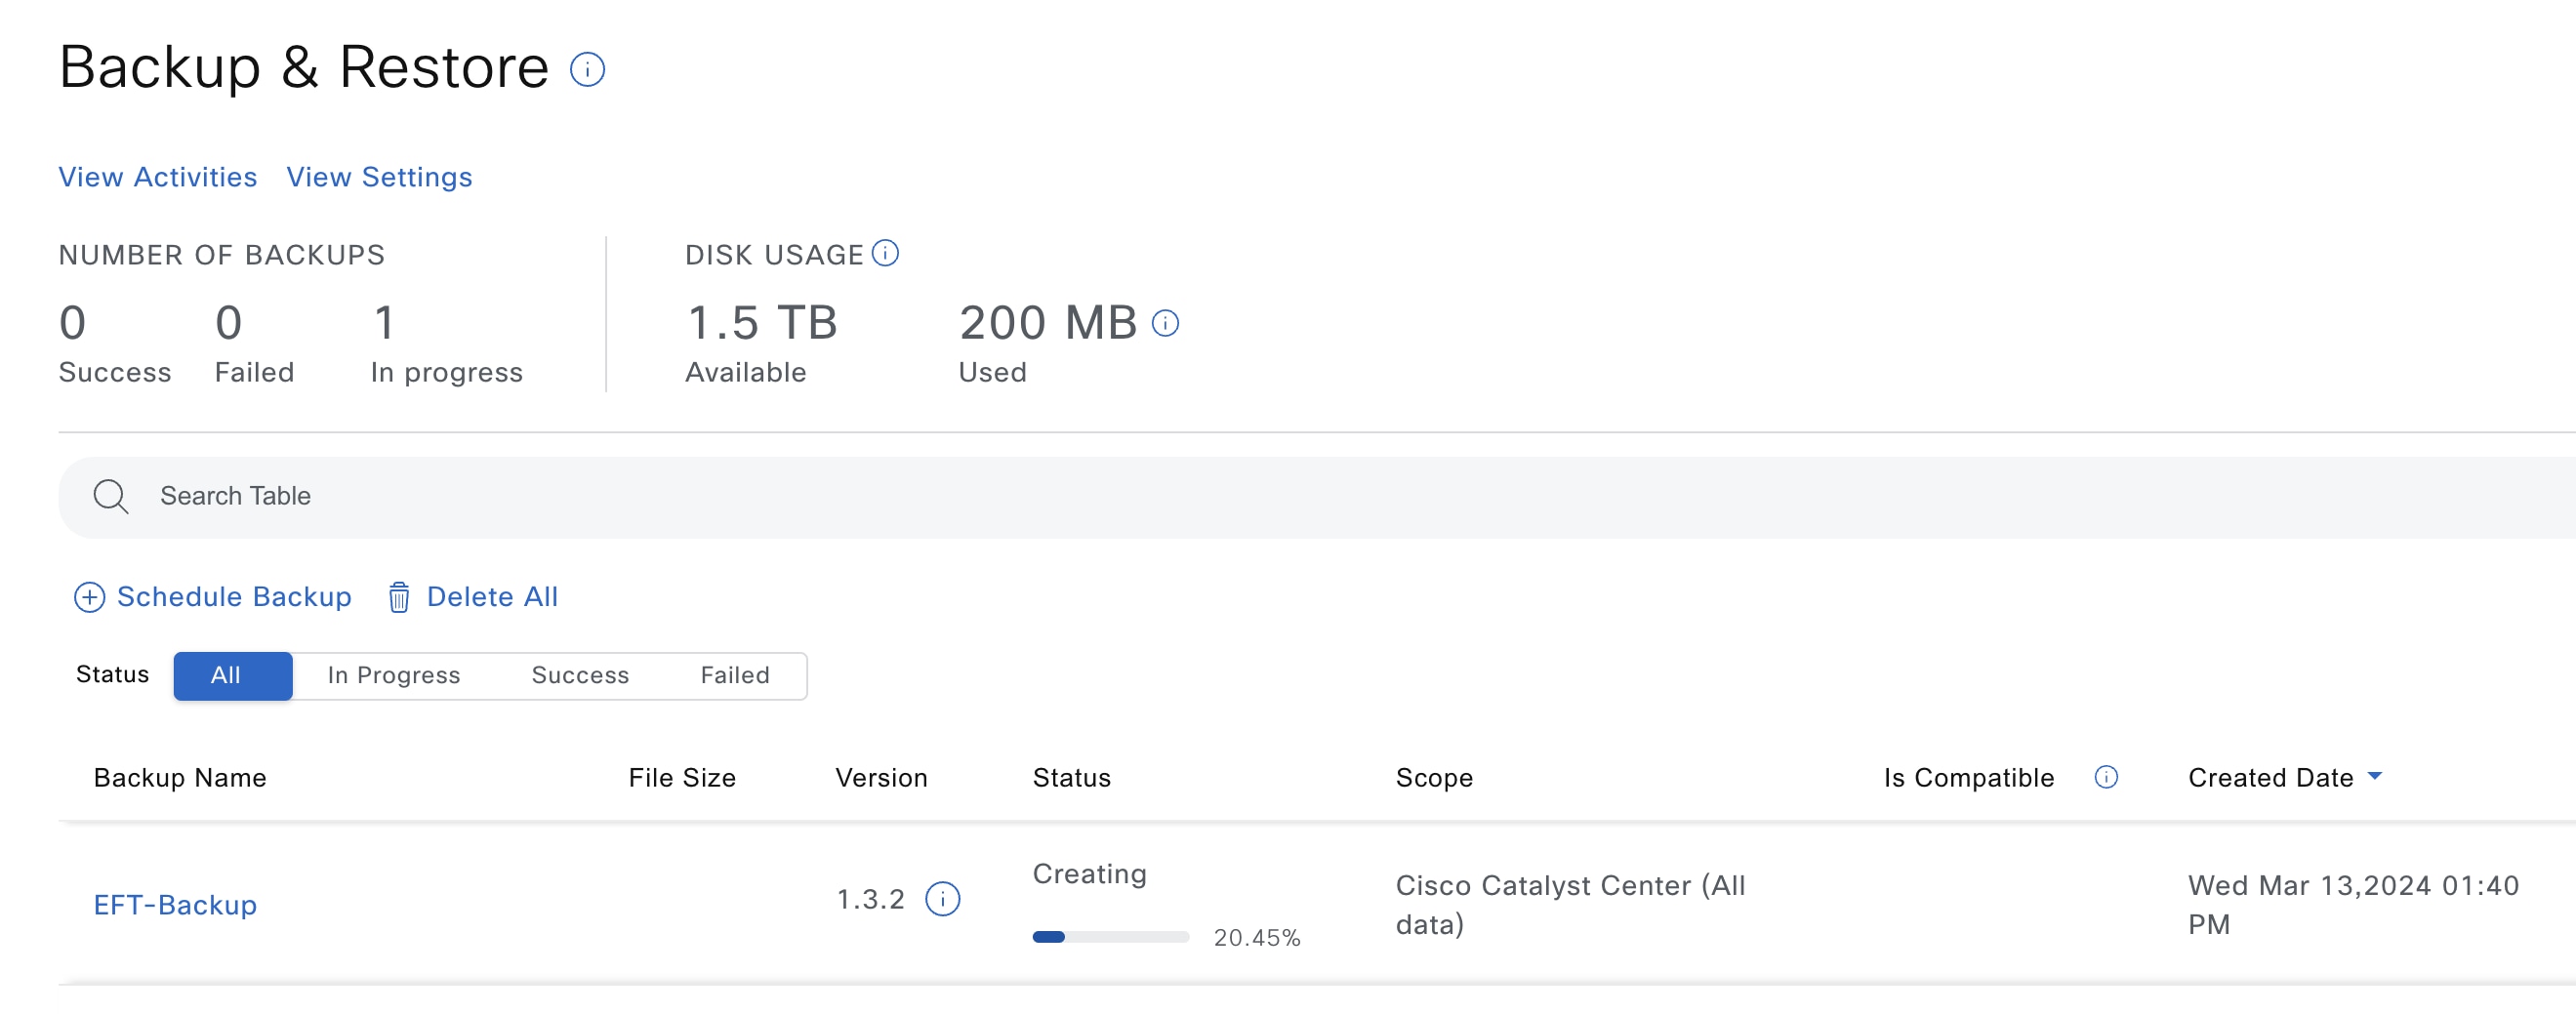
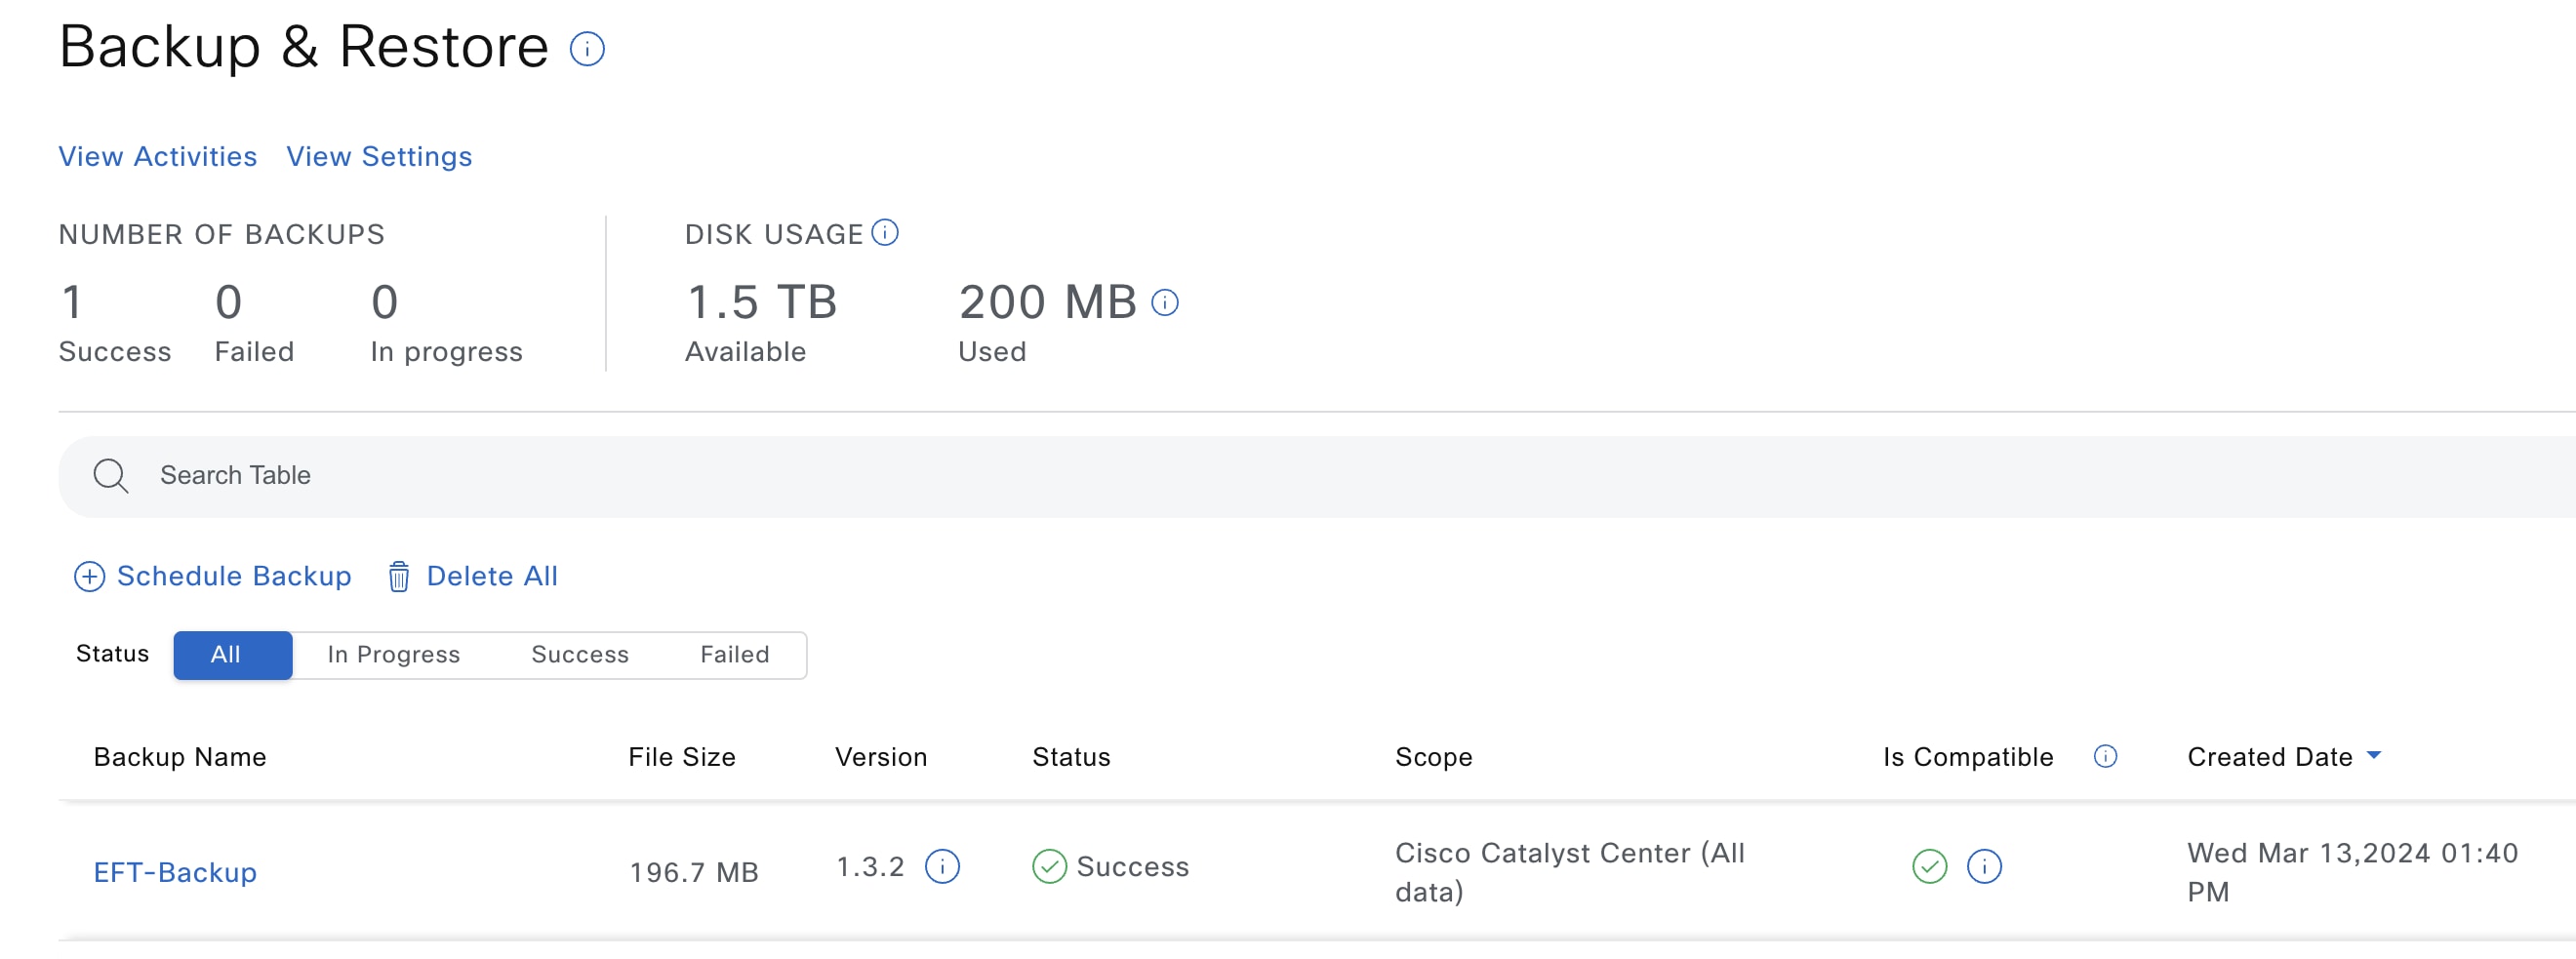
Only a single backup can be performed at a time. Performing multiple backups at once is not supported.


When a backup is being performed, you cannot delete the files that have been uploaded to the backup server, and changes that you make to these files might not be captured by the backup process.

We recommend the following:

  • Perform a daily backup to maintain a current version of your database and files.

  • Perform a backup after making changes to your configuration, for example, when changing or creating a new policy on a device.

  • Perform a backup only during a low-impact or maintenance period.

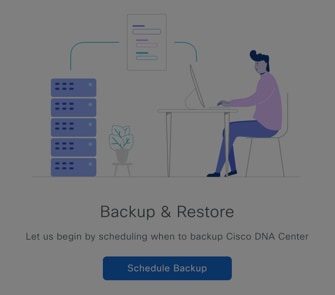
You can schedule weekly backups on a specific day of the week and time.

Restore

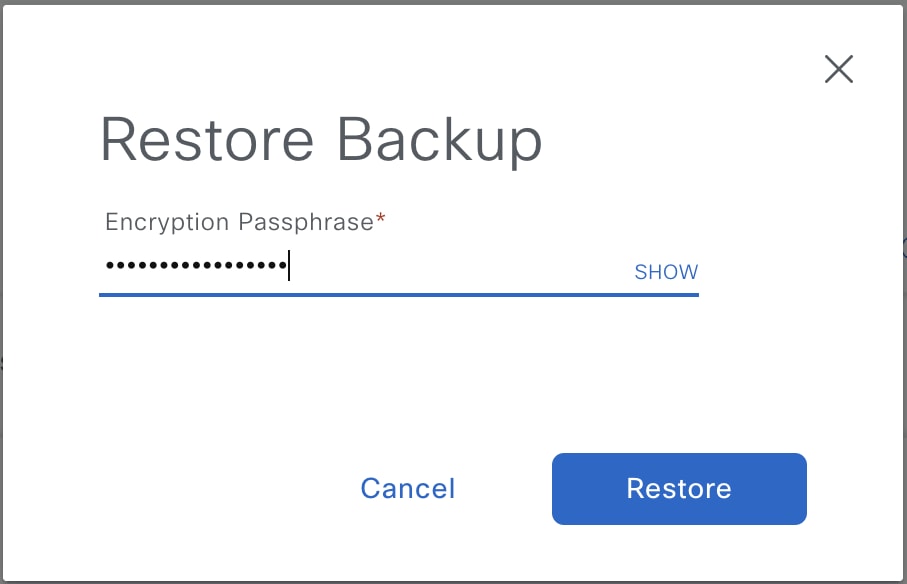
You can restore backup files from the physical disk or NFS server using Catalyst Center.

Catalyst Center on ESXi supports cross-version backup and restore; that is, you can create a backup on one version of Catalyst Center on ESXi and restore it to another version of Catalyst Center on ESXi. For example, a backup on Catalyst Center on ESXi 2.3.7.0-75530 version can be restored to Catalyst Center on ESXi 2.3.7.3-75176 version. The same applies to the later releases of Catalyst Center on ESXi.


Note


A backup created on a virtual machine can only be restored on a virtual machine with the same or later software version.


When you restore the backup files, Catalyst Center removes and replaces the existing database and files with the backup database and files. While a restore is being performed, Catalyst Center is unavailable.

You can restore the backup files of a failed or faulty virtual appliance. For more information, see Restore Data from a Physical Disk for a Faulty Virtual Appliance and Restore Data from an NFS Server for a Faulty Virtual Appliance.

Also, you can restore a backup to a Catalyst Center appliance with a different IP address.


Note


After a backup and restore of Catalyst Center, you must access the Integration Settings window and update (if necessary) the Callback URL Host Name or IP Address.


Backup and Restore Event Notifications

You can receive a notification whenever a backup or restore event takes place. To configure and subscribe to these notifications, complete the steps described in the "Work with Event Notifications" topic of the Cisco Catalyst Center Platform User Guide. When completing this procedure, ensure that you select and subscribe to the SYSTEM-BACKUP and SYSTEM-RESTORE events.

Operation Event

Backup

The process to create a backup file for your system has started.

A backup file could not be created for your system.

  • This event typically happens because the necessary disk space is not available on remote storage.

  • You encountered connectivity issues or latency while creating a backup file on your system.

Restore

The process to restore a backup file has started.

The restoration of a backup file failed.

  • This event typically happens because the backup file has become corrupted.

  • You encountered connectivity issues or latency while creating a backup file from your system.

NFS Backup Server Requirements

To support data backups on the NFS server, the server must be a Linux-based NFS server that meets the following requirements:

  • Support NFS v4 and NFS v3. (To verify this support, from the server, enter nfsstat -s.)

  • Have read and write permissions on the NFS export directory.

  • Have a stable network connection between Catalyst Center on ESXi and the NFS server.

  • Have sufficient network speed between Catalyst Center on ESXi and the NFS server.


Note


You cannot use an NFS-mounted directory as the backup server. A cascaded NFS mount adds a layer of latency and is therefore not supported.


Requirements for Multiple Catalyst Center on ESXi Deployments

If your network includes multiple Catalyst Center clusters, the following example configuration shows how to name your NFS server backup directory structure:

Resource Example Configuration

Catalyst Center on ESXi clusters

  1. cluster1

  2. cluster2

Backup server hosting automation and Assurance backups

The example directory is /data/, which has ample space to host both types of backups.

NFS export configuration

The content of the /etc/exports file:

/data/cluster1 *(rw,sync,no_subtree_check,all_squash)
/data/cluster2 *(rw,sync,no_subtree_check,all_squash)

Backup Physical Disk Nomenclature

To use a physical disk for backup, you must add a physical disk to the virtual machine. To easily identify the physical disks for backups, UUID is used.

UUID is a unique identifier that is associated with the disk, which does not change across reboots. A disk that is removed and added to a different cluster will have the same UUID, as long as it is not formatted again.

The disk is explicitly labeled as mks-managed.

You can view the physical disks available for backup in the System > Settings > Backup Configuration window, under the Mount Path drop-down list.

Hover over the i icon to view the physical disk nomenclature, which is shown in the following format:

/data/external/disk-<uuid>

Backup Storage Requirements

Catalyst Center on ESXi stores backup copies of Assurance and automation data on a physical disk that is attached to the virtual machine or a remote NFS server. You must allocate enough external storage for your backups to cover the required retention. We recommend the following storage.

Virtual Appliance Assurance Data Storage (14 Days Incremental)

Automation Data Storage (Daily Full)

Physical Disk/NFS Server (Assurance and Automation) Storage

DN-SW-APL

1.75 TB

50 GB

1.75 TB + 50 GB

Additional notes:

  • The preceding table assumes fully loaded virtual appliance configurations that support the maximum number of access points and network devices for each appliance.

  • The automation backup sizing is estimated for one daily backup. If you want to retain backups for additional days, multiply the required storage by the additional number of days. For example, if you have a DN-SW-APL virtual appliance and you want to store five copies of automation data backups generated once each day, the total storage required is 5 * 50 GB = 250 GB.

  • The total backup time varies depending on your daily data load and the amount of historical data that you want to retain.

  • The write path to Catalyst Center depends on the network throughput from Catalyst Center to the NFS server. The NFS server must have a throughput of at least 100 MB/sec.

  • As with any other IT service, monitoring NFS performance is required to ensure optimal performance.

Add a Physical Disk for Backup and Restore

Use this procedure to add a physical disk that can be used for backup and restore operations.

Procedure


Step 1

If your appliance is running on the machine that's hosting Catalyst Center on ESXi, power off the appliance's virtual machine.

Step 2

Log in to VMware vSphere.

Step 3

From the vSphere client's left pane, right-click the ESXi host and then choose Edit Settings.

The Edit Settings option in the list of available actions.

Step 4

In the Edit Settings dialog box, click Add New Device and then choose Hard Disk.

The Hard Disk option in the Add New Device drop-down list.

Step 5

In the New Hard disk field, enter the desired storage size.

The New Hard disk field shows the storage size set to 125 GB.

Note


For information on the recommended storage space for backup, see Backup Storage Requirements.

Step 6

Click OK.

Step 7

Power on the appliance's virtual machine.

The Power On option is shown in the list of available actions.

What to do next

You can now configure the added physical disk for backup. For information on how to configure the physical disk, see Configure the Location to Store Backup Files.

Add the NFS Server

Catalyst Center allows you to add multiple Network File System (NFS) servers for backup purposes. Use this procedure to add an NFS server that can be used for the backup operation.

Procedure


Step 1

From the top-left corner, click the menu icon and choose System > Settings > Backup Configuration.

Step 2

Click Add NFS.

Step 3

In the Add NFS slide-in pane, do the following:

  1. Enter the Server Host and Source Path in the respective fields.

  2. Choose NFS Version from the drop-down list.

  3. The Port is added by default. You can leave the field empty.

  4. (Optional) Enter the Port Mapper number.

  5. Click Save.

Step 4

Click View NFS List to view the available NFS servers.

The NFS slide-in pane displays the list of NFS servers, along with details.

Step 5

In the NFS slide-in pane, click the ellipsis under Actions to Delete the NFS server.

Note


You can delete the NFS server only when there is no backup job in progress.


What to do next

Configure the added NFS server for backup. For more information, see Configure the Location to Store Backup Files.

Configure the Location to Store Backup Files

Catalyst Center allows you to configure backups for automation and Assurance data.

Use this procedure to configure the storage location for backup files.

Before you begin

Make sure that the following requirements are met:

  • Only a user with SUPER-ADMIN-ROLE permissions can perform this procedure.

  • The data backup server must meet the requirements described in NFS Backup Server Requirements.

Procedure


Step 1

From the top-left corner, click the menu icon and choose System > Backup and Restore.

You can view the following window:

Step 2

Click Configure Settings.

Alternatively, choose System > Settings > System Configuration > Backup Configuration.

Step 3

Choose the Physical Disk or NFS server option.

The Backup Configuration page shows the physical disk option, mount path, encryption passphrase, and backup retention.

Step 4

Physical Disk: Catalyst Center provides an option to mount an external disk to the virtual machine, to store a backup copy of Assurance and automation data. To configure a physical disk, click the Physical Disk radio button and define the following settings:

Note


The physical disk option is only supported for single-node virtual machines.

Field Description

Mount Path

Location of the external disk.

Encryption Passphrase

Passphrase used to encrypt the security-sensitive components of the backup. These security-sensitive components include certificates and credentials.

This passphrase is required, and you will be prompted to enter this passphrase when restoring the backup files. Without this passphrase, backup files are not restored.

After the passphrase is configured, if you want to change the passphrase, click Update Passphrase.

Backup Retention

Number of backups for which the data is retained.

Data older than the specified number of backups is deleted.

Step 5

NFS: Catalyst Center creates the backup files and posts them to a remote NFS server. For information about the remote server requirements, see NFS Backup Server Requirements. To configure an NFS backup server, click the NFS radio button and define the following settings:

Field Description

Mount Path

Location of the remote server.

Encryption Passphrase

Passphrase used to encrypt the security-sensitive components of the backup. These security-sensitive components include certificates and credentials.

This passphrase is required, and you will be prompted to enter this passphrase when restoring the backup files. Without this passphrase, backup files are not restored.

After the passphrase is configured, if you want to change the passphrase, click Update Passphrase.

Backup Retention

Number of backups for which the data is retained.

Data older than the specified number of backups is deleted.

Step 6

Click Submit.

After the request is submitted, you can view the configured physical disk or NFS server under System > Backup & Restore.


Create a Backup

Use this procedure to create a backup of your virtual appliance.

Before you begin

You must configure the backup location. For more information, see Configure the Location to Store Backup Files.

Procedure


Step 1

From the top-left corner, click the menu icon and choose System > Backup & Restore.

Step 2

Click Schedule Backup.

The day-zero view of the Backup and Restore window.

The Schedule Backup slide-in pane opens.

Do the following in the Schedule Backup slide-in pane:

  1. Enter a unique name for the backup.

  2. In the Schedule Type area, choose one of the following options:

    • Backup Now: To immediately create a backup.

    • Schedule Backup Daily: To schedule the backup on a daily basis.

    • Schedule Backup Weekly: To schedule the backup on a weekly basis.

  3. In the Scope area, choose one of the following options:

    • Cisco Catalyst Center (All Data): Choose this option to create a backup for automation and Assurance data.

    • Cisco Catalyst Center (Without Assurance Data): Choose this option to create a backup only for automation data.

  4. Click Save.

Step 3

Catalyst Center begins the backup process. An entry for the backup is added to the Backup & Restore window.

The window displays the list of backups created.

When the backup is complete, its status changes from Creating to Success.

The image displays the status of the backup task.

Restore Data from Backups

Use this procedure to restore backup data from your virtual appliance. To restore backup data from a failed or faulty virtual appliance, see Restore Data from a Physical Disk for a Faulty Virtual Appliance.

Caution


The Catalyst Center restore process restores only the database and files. The restore process does not restore your network state or any changes that were made since the last backup, including any new or updated network policies, passwords, certificates, or trustpool bundles.


Before you begin

Make sure that the following requirements are met:

  • Only a user with SUPER-ADMIN-ROLE permissions can perform this procedure.

  • You have backups from which to restore data.

When you restore data, Catalyst Center on ESXi enters maintenance mode and is unavailable until the restore process completes. Make sure that you restore data at a time when Catalyst Center on ESXi can be unavailable.

Procedure


Step 1

From the top-left corner, click the menu icon and choose System > Backup & Restore.

If you have created a backup, it appears in the Backup & Restore window.

Step 2

In the Backup Name column, locate the backup that you want to restore.

Step 3

In the Actions column, click the ellipsis and choose Restore.

This image displays Restore option in Backup & Restore window.

Step 4

In the Restore Backup dialog box, enter the Encryption Passphrase that you used while configuring the backup location and click Restore.

Enter the passphrase used while configuring backup settings.

The appliance goes into maintenance mode and starts the restore process.

When the restore operation is complete, its status in the Backup & Restore window table changes to Success.

Step 5

After the restore operation completes, click Log In to log back in to Catalyst Center on ESXi.

Step 6

Enter the admin user's username and password, then click Login.


Restore Data from a Physical Disk for a Faulty Virtual Appliance

Use this procedure to restore data from a physical disk for a virtual appliance that has failed or is faulty.

Procedure


Step 1

For your new virtual appliance, do the following to configure Catalyst Center on ESXi to use the storage disk that you configured for the faulty virtual appliance:

  1. Power OFF the appliance's virtual machine.

  2. Open a vSphere Client, right-click the Catalyst Center on ESXi virtual machine in the left pane, and then choose Edit Settings.

  3. In the Edit Settings dialog box, click Add New Device and then choose Existing Hard Disk.

  4. In the Select File dialog box, click your ESXi host, click the storage disk (.vmdk) that was created, and then click OK.

  5. Power on the appliance's virtual machine.

It takes approximately 45 minutes for all the services to restart.

Note


After the virtual machine comes back up, run the magctl appstack status command to confirm that the services are running.

Step 2

To configure the storage location for the backup, do the following:

  1. From the Catalyst Center on ESXi menu, choose System > Settings > System Configuration > Backup Configuration.

  2. Click the Physical Disk radio button.

  3. Choose the physical disk from the Mount Path drop-down list.

    This image shows the configuration settings for physical disk backup.
  4. Enter the passphrase that will be used to encrypt the security-sensitive components of the backup (such as certificates and credentials).

    Important


    Make sure that you don't lose this passphrase. You'll need to enter it later in the succeeding steps and won't be able to restore the backup you're about to create without it.

  5. Set how long backup files are kept before they are deleted.

  6. Click Submit.

Step 3

To restore the backup, do the following:

  1. From the Catalyst Center on ESXi menu, choose System > Backup & Restore.

  2. Locate the backup in the Backup & Restore window, click the ellipsis under Actions column, and choose Restore.

    This image displays the Restore option for the backup created.
  3. Enter the same encryption passphrase that you entered in the preceding step, and click Restore.

    The appliance goes into maintenance mode and starts the restore process.

    When the restore operation is complete, its status in the Backup & Restore window changes to Success.

  4. After the restore operation completes, click Log In to log back in to Catalyst Center on ESXi.

  5. Enter the admin user's username and password, then click Login.


Restore Data from an NFS Server for a Faulty Virtual Appliance

Use this procedure to restore data from an NFS server for a virtual appliance that has failed or is faulty.

Procedure


Step 1

For your new virtual appliance, do the following to configure Catalyst Center on ESXi to use the NFS server that you configured for the faulty virtual appliance:

  1. From the Catalyst Center on ESXi menu, choose System > Settings > System Configuration > Backup Configuration.

  2. Click the NFS radio button.

  3. Choose the NFS server from the Mount Path drop-down list.

    This image shows the configuration required for NFS server.
  4. Enter the passphrase that will be used to encrypt the security-sensitive components of the backup (such as certificates and credentials).

    After the passphrase is configured, if you want to change the passphrase, click Update Passphrase.

    Important


    Make sure that you don't lose this passphrase. You'll need to enter it later in the succeeding steps and won't be able to restore the backup you're about to create without it.

  5. Set how long backup files are kept before they are deleted.

  6. Click Submit.

Step 2

To restore the backup, do the following:

  1. From the Catalyst Center on ESXi menu, choose System > Backup & Restore.

  2. Locate the backup in the Backup & Restore window, click the ellipsis under the Actions column, and choose Restore.

    This image shows Restore option for the backup created.
  3. Enter the same encryption passphrase that you entered in the preceding step, and click Restore.

    The appliance goes into maintenance mode and starts the restore process.

    When the restore operation is complete, its status in the Backup & Restore window changes to Success.

  4. After the restore operation completes, click Log In to log back in to Catalyst Center on ESXi.

  5. Enter the admin user's username and password, then click Login.


Schedule Data Backup

You can schedule recurring backups and define the day of the week and the time of day when they will occur.

Before you begin

Make sure that the following requirements are met:

Procedure


Step 1

From the top-left corner, click the menu icon and choose System > Backup & Restore.

The Backup & Restore window is displayed.

Step 2

Click Schedule Backup.

Note


You can schedule a new backup only when there is no backup job in progress.

This image shows the Schedule Backup button in Backup & Restore window.

Step 3

In the Schedule Backup slide-in pane, do the following:

  1. In the Backup Name field, enter a unique name for the backup.

  2. Choose a schedule option:

    • Schedule Backup Daily: To schedule a daily backup job, choose the time of day when you want the backup to occur.

    • Schedule Backup Weekly: To schedule a weekly backup job, choose the days of the week and time of day when you want the backup to occur.

  3. Define the scope of the backup:

    • Cisco Catalyst Center (All data): This option allows the system administrator to create a backup for automation, Assurance, and system-specific sets.

    • Cisco Catalyst Center (without Assurance data): This option allows the administrator to create a backup for automation and system-specific sets.

  4. Click Save.

The Backup & Restore window displays a banner message that shows the day and time for which the backup is scheduled.

Step 4

(Optional) Click View Upcoming Backups to make any changes to the upcoming schedules. If you don't want the backup to occur on a scheduled date and time, in the Upcoming Schedules slide-in pane, click the toggle button to disable a particular schedule.

Step 5

(Optional) Click Edit Schedule to edit the schedule.

Step 6

(Optional) Click Delete Schedule to delete the schedule.

Step 7

After the backup starts, it appears in the Backup & Restore window. Click the backup name to view the lists of steps executed.

Alternatively, you can click View Activities at the top left of the Backup & Restore window and click the Execution ID. The Create Backup Details slide-in pane opens and shows the list of steps executed.

Step 8

In the Backup & Restore window, click the In Progress, Success, or Failure tab to filter the list of backups to show only those tasks with a status of In Progress, Success, or Failure.

During the backup process, Catalyst Center creates the backup database and files. The backup files are saved to the specified location. You are not limited to a single set of backup files, but can create multiple backup files that are identified with their unique names. The status of the backup job changes from In Progress to Success when the process is finished.

Note


If the backup process fails, there is no impact to the appliance or its database. The most common reason for a failed backup is insufficient disk space. If your backup process fails, make sure that there is sufficient disk space on the remote server and attempt another backup.