|
Step 1
|
Log in to Cisco Global Launchpad using one of the following methods:
-
IAM Login: This method uses user roles to define user access privileges. Cisco Global Launchpad supports multi-factor authentication (MFA) as an optional, additional form of authentication, if your company requires it.
For more information, see "Log In to Cisco Global Launchpad Using IAM" in the Cisco Global Launchpad Administrator Guide.
-
Federated Login: This method uses one identity to gain access to networks or applications managed by other operators. For more information, see "Generate Federated User Credentials Using saml2aws" or "Generate Federated User Credentials Using
AWS CLI" in the Cisco Global Launchpad Administrator Guide.
For information about how to get an Access Key ID and Secret Access Key, see the AWS
Managing access keys topic in the AWS Identity and Access Management User Guide on the AWS website.
If you encounter any login errors, you need to resolve them and log in again. For more information, see Troubleshoot Login Errors.
|
|
Step 2
|
If you are an admin user logging in for the first time, enter your email address in the Email ID field and click Submit. If you are a subuser, proceed to Step 3.
You can subscribe to the Amazon SNS to receive alerts about deployed resources, changes, and resource over-utilization. Further, alarms can be set up to notify
you if Amazon CloudWatch detects any unusual behavior in Cisco Global Launchpad. In addition, AWS Config evaluates and assesses your configured resources and sends audit logs of the results as well. For more information, see "Subscribe to the Amazon SNS Email Subscription" and "View Amazon CloudWatch Alarms" in the Cisco Global Launchpad Administrator Guide.
After you enter your email, several processes happen:
-
The CiscoDNACenter user group is created in your AWS account with all the required policies attached. The admin user can add subusers to this group to allow subusers to log in
to Cisco Global Launchpad.
-
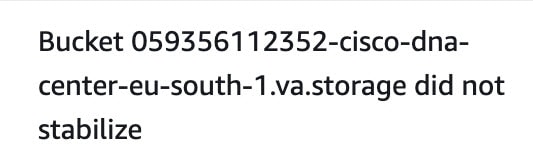
An Amazon S3 bucket is automatically created to store the state of the deployment. We recommend that you do not delete this or any other
bucket from the AWS account, either globally or for each region. Doing so could impact the Cisco Global Launchpad deployment workflow.
-
If you are logging in to a region for the first time, Cisco Global Launchpad creates several resources in AWS. This process can take some time, depending on whether the region was previously enabled or not. Until the process completes,
you cannot create a new VA pod. During this time, the following message is displayed: "Setting up the initial region configuration. This might take a couple of minutes."
After you log in successfully, the Dashboard pane is displayed.
|
|
Step 3
|
Click + Add VA pod.
|
|
Step 4
|
Choose the region where you want to create the new VA pod by completing the following steps in the Select a Region dialog box:
-
From the Region drop-down list, choose a region.
 If you already chose one region from the left navigation pane's Region drop-down list, this region is automatically chosen.
-
Click Next.
If you are logging in to a region for the first time, Cisco Global Launchpad creates several resources in AWS. This process
can take some time, depending on whether the region was previously enabled or not. Until the process completes, you cannot
create a new VA pod. During this time, the following message is displayed: "Setting up the initial region configuration. This might take a couple of minutes."
|
|
Step 5
|
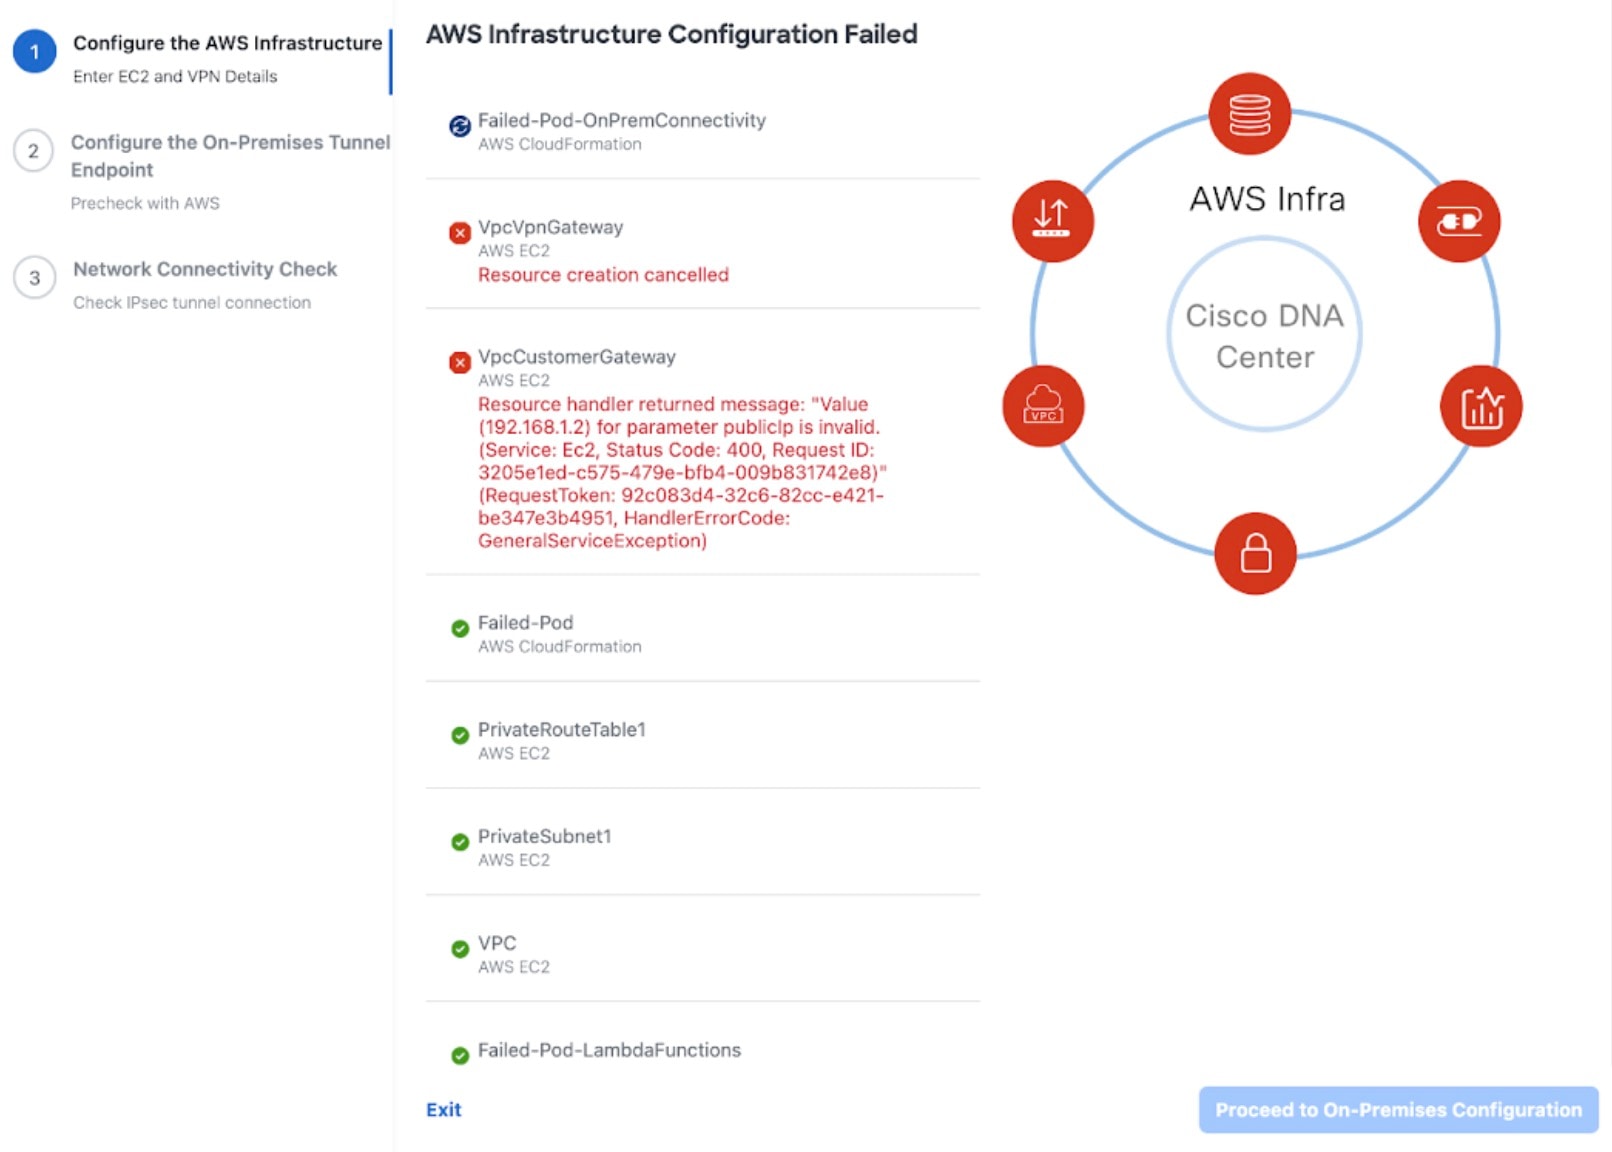
Configure the AWS infrastructure, which includes the VPC, private subnet, routing table, security group, virtual gateway, and CGW, by completing
the following steps:
-
In the VA Pod Environmental Details fields, configure the following fields:
-
VA Pod Name: Assign a name to the new VA pod. Keep the following restrictions in mind:
-
The name must be unique within the region. (This means that you can use the same name across multiple regions.)
-
The name must have at least four characters and can have at most 12 characters.
-
The name can include letters (A-Z), numbers (0-9), and dashes (-).
-
Availability Zone: Click this drop-down list and choose an availability zone, which is an isolated location within your selected region.
-
AWS VPC CIDR: Enter a unique VPC subnet to use to launch the AWS resources. Keep the following guidelines in mind:
-
The recommended CIDR range is /25.
-
In IPv4 CIDR notation, the last octet (the fourth octet) of the IP address can only have the values 0 or 128.
-
This subnet should not overlap with your corporate subnet.
-
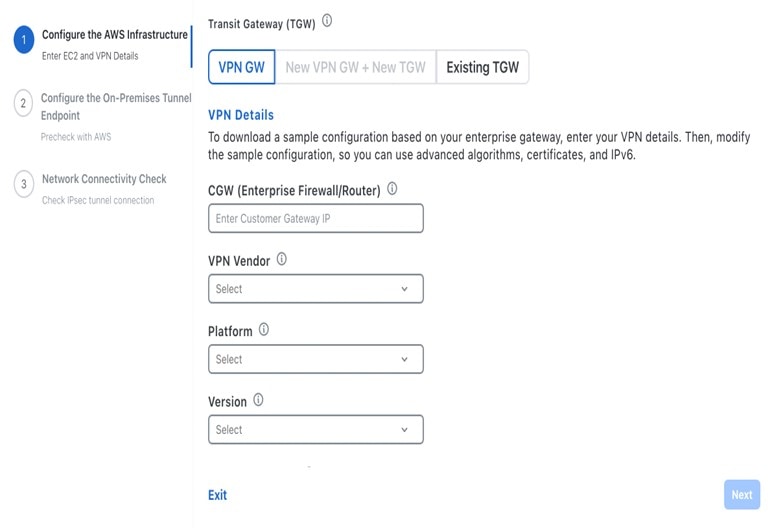
Under Transit Gateway (TGW), choose one of the following options:
-
VPN GW: Choose this option if you have a single VA pod, and you want to use a VPN gateway. A VPN GW is the VPN endpoint on the Amazon
side of your Site-to-Site VPN connection. It can be attached to only a single VPC.
-
New VPN GW + New TGW: Choose this option if you have multiple VA pods or VPCs, and you want to use the TGW as a transit hub to interconnect multiple
VPCs and on-premises networks. It can also be used as a VPN endpoint for the Amazon side of the Site-to-Site VPN connection.
|
Note
|
You can create only one TGW per region.
|
-
Existing TGW: Choose this option if you have an existing TGW that you want to use to create a new VA pod, and then choose one of the following
options:
-
New VPN GW: Choose this option if you want to create a new VPN gateway for your existing TGW.
-
Existing Attachment: Choose this option if you want to use an existing VPN or direct-connect attachment. From the Select Attachment ID, drop-down list, choose an attachment ID.
If you choose this option, you must also configure the routing on the existing TGW and CGW. For information, see Manually Configure Routing on Existing Transit and Customer Gateways.
-
Do one of the following:
-
If you selected Existing TGW and Existing Attachments as your preferred connectivity options, proceed to Step 5.d.
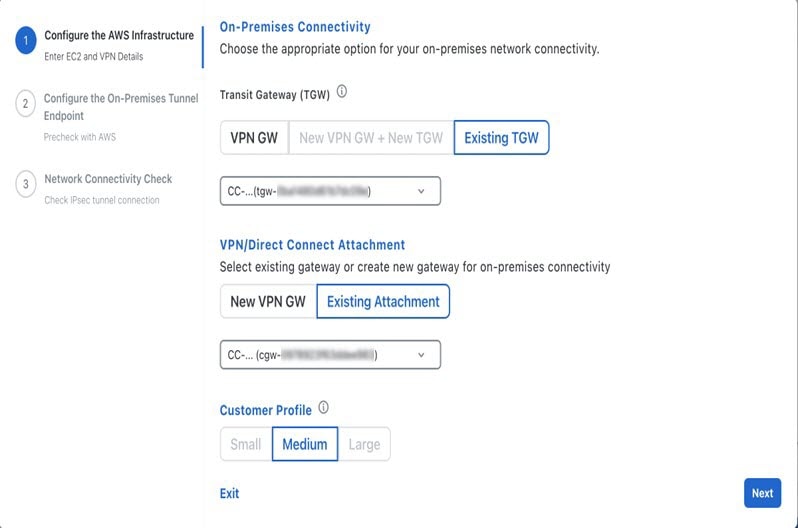
-
If you selected VPN GW, New VPN GW + New TGW, or Existing TGW + New VPN GW, provide the following VPN details:
-
CGW (Enterprise Firewall/Router): Enter the IP address of your Enterprise firewall or router to form an IPsec tunnel with the AWS VPN gateway.
-
VPN Vendor: From the drop-down list, choose a VPN vendor.
The following VPN vendors are not supported: Barracuda, Sophos, Vyatta, and Zyxel. For more information, see Troubleshoot VA Pod Configuration Errors.
-
Platform: From the drop-down list, choose a platform.
-
Software: From the drop-down list, choose a software.
-
For the Customer Profile size, leave the default Medium setting.
The customer profile size applies to both the Cisco DNA Center VA instance and the backup instance. The Medium configures the instances as follows:
-
Cisco Catalyst Center Instance: r5a.8xlarge, 32 vCPU, 256-GB RAM, and 4-TB storage.
|
Important
|
Cisco DNA Center supports only the r5a.8xlarge instance size. Any changes to this configuration aren't supported. Additionally, the r5a.8xlarge
instance size isn't supported in specific availability zones. To view the list of unsupported availability zones, see the
Release Notes for Cisco Global Launchpad 1.8.0.
|
-
Backup Instance: T3.micro, 2 vCPU, 500-GB storage, and 1-GB RAM
-
For the Backup Target, choose one of the following options as the destination for the backups of your Cisco DNA Center databases and files:
-
Enterprise Backup (NFS): Choose this option if you want the backup to be stored in the on-premises servers.
-
Cloud Backup (NFS): Choose this option if you want the backup to be stored in AWS.
Note the following backup details. You will use this information later to log in to the cloud backup server:
-
SSH IP Address: <BACKUP VM IP>
-
SSH Port: 22
-
Server Path: /var/catalyst-backup/
|
Note
|
The directory is not automatically created in Cisco Global Launchpad, Release 1.8. You need to create the folder as required for configuring the backup. For more information, see "Configure
an NFS Server" in Cisco Global Launchpad Administrator Guide.
|
-
Username: maglev
-
Password: <xxxx##########>
Your backup server password is dynamically created. The password is composed of the first four characters of the VA pod name
and the backup server's IP address without the periods.
For example, if the VA pod name is DNAC-SJC and the backup server's IP address is 10.0.0.1, the backup server password is
DNAC10001.
|
Note
|
-
You can find the VA pod name on the Dashboard pane after you choose the region that it's deployed in.
-
You can find the backup server's IP address on the View Catalyst Center pane. For more information, see "View Catalyst Center VA Details" in the Cisco Global Launchpad Administrator Guide.
|
-
Passphrase: <Passphrase>
Your passphrase is used to encrypt the security-sensitive components of the backup. These security-sensitive components include
certificates and credentials.
This passphrase is required and you will be prompted to enter this passphrase when restoring the backup files. Without this
passphrase, backup files are not restored.
-
Open Ports: 22, 2049, 873, and 111

-
Click Next.
The Summary pane is displayed.
-
Review the environment and VPN details that you entered. If you are satisfied, click Start Configuring AWS Infrastructure.
|
Important
|
This setup takes about 20 minutes to complete.
You can exit the screen to any other page in Cisco Global Launchpad, and the process continues in the background. However, if you close the tab or window or refresh the page, any active background
process pauses.
|
-
After the AWS infrastructure is successfully configured, the AWS Infrastructure Configured pane is displayed.
|
|
Step 6
|
Download the on-premises configuration file by completing the following steps:
-
After the AWS infrastructure is successfully configured, click Proceed to On-Premises Configuration.
-
In the Configure the On-Premises Tunnel Endpoint pane, click Download Configuration File. Forward this file to your network administrator to configure the on-premises-side IPsec tunnel.
This file is generated based on the on-premises vendor, platform, and version that were selected during the configuration
of the AWS infrastructure. The file contains the unique VPN connection IDs that were created for theVPC. Only a few things
need to be modified according to on-premise firewall/router. For example,if you have an ASA firewall/router needs to be modified,
you need to modify the static route configuration to the VPC subnet that you have choosen.
route Tunnel-int-vpn-0bbef6e1331a37048-0 10.0.0.0 255.255.0.0 169.254.184.85 100
Make sure your network administrator configures only one IPsec tunnel.
|
Note
|
-
The network administrator can make the necessary changes to this configuration file and apply it to your Enterprise firewall
or router to bring up the IPsec tunnels.
The provided configuration file enables you to bring up two tunnels between AWS and the Enterprise router or firewall.
-
Most virtual private gateway solutions have one tunnel up and the other down. You can have both tunnels up and use the Equal
Cost Multiple Path (ECMP) networking feature. ECMP processing enables the firewall or router to use equal-cost routes to transmit
traffic to the same destination. To do this, your router or firewall must support ECMP. Without ECMP, we recommend that you
either keep one tunnel down and manually failover or use a solution, such as an IP SLA, to automatically bring up the tunnel
in a failover scenario.
|
-
Click Proceed to Network Connectivity Check button.
|
|
Step 7
|
Check the status of your network configuration based on the on-premises connectivity preferences that you selected during
the AWS infrastructure configuration by completing one of the following actions:
-
If you selected VPN GW as your preferred on-premises connectivity option, the IPsec tunnel configuration status is displayed, as follows:
-
If the network administrator hasn't configured the IPsec tunnel yet, a padlock is displayed on the IPsec tunnel: 
-
Ask your network administrator to verify that the IPsec tunnel on the Enterprise firewall or router is up. After the IPsec
tunnel comes up, the IPsec tunnel turns green:

|
Note
|
If the IPsec tunnel is up and you cannot access Cisco DNA Center from the CGW, check that the correct values were passed during the IPsec tunnel configuration. Cisco Global Launchpad reports the tunnel status from AWS and doesn't perform additional checks.
|
-
If you selected New VPN GW + New TGW or Existing TGW and New VPN GW as your preferred on-premises connectivity option, Cisco Global Launchpad checks whether your VPC is connected to the TGW, which in turn is connected to your on-premises firewall or router.
|
Note
|
For the TGW-to-Enterprise firewall or router connection to succeed, your network administrator must add the configuration
to your on-premises firewall or router.
|
The connection status is displayed, as follows:
-
If the connection from the TGW to your on-premises firewall or router isn't connected yet, it's grayed out: 
-
After TGW connectivity is successfully established, the TGW connection is green: 
-
If you selected Existing TGW and Existing Attachment as your preferred on-premises connectivity option, make sure that routing is configured between the existing TGW and the
newly attached VPC, where Cisco DNA Center is launched. For information, see Manually Configure Routing on Existing Transit and Customer Gateways.
The connection status is displayed, as follows:
-
If your VPC is not attached to the TGW, the TGW connection is grayed out: 
-
After TGW connectivity is successfully established, the TGW connection is green: 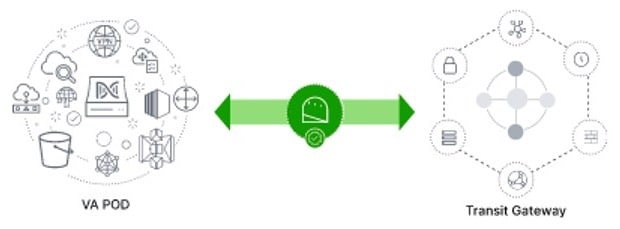
|
|
Step 8
|
Click Go to Dashboard to return to the Dashboard pane, where you can create more VA pods and manage your existing ones.
|


 Feedback