Deploy Using Cisco Global Launchpad 2.0

Use Cisco Global Launchpad to Automatically Deploy Catalyst Center on AWS

You provide Cisco Global Launchpad with the needed details to create the AWS infrastructure in your AWS account, which includes a VPC, an IPsec VPN tunnel, gateways, subnets, and security groups. As a result, Cisco Global Launchpad deploys the Catalyst Center AMI as an Amazon EC2 instance with the prescribed configuration in a separate VPC. The configuration includes the subnets, transit gateways, and other essential resources like AWS CloudFormation for monitoring, Amazon DynamoDB for state storage, and security groups.

Using Cisco Global Launchpad, you can also access and manage your VAs, as well as manage the user settings. For information, see the Cisco Global Launchpad 2.0 Administrator Guide.

Automated Deployment Workflow

To deploy Catalyst Center on AWS using the automated method, follow these high-level steps:

  1. Meet the prerequisites. See Prerequisites for Automated Deployment.

  2. (Optional) Integrate Cisco ISE on AWS and your Catalyst Center VA together. See Guidelines for Integrating Cisco ISE on AWS with Catalyst Center on AWS.

  3. Install Cisco Global Launchpad or access Cisco Global Launchpad hosted by Cisco. See Install Cisco Global Launchpad or Access Hosted Cisco Global Launchpad.

  4. Create a new VA pod to contain your Catalyst Center VA instance. See Create a New VA Pod.

  5. If you're using an existing TGW and existing attachments, such as a VPC, as your preferred on-premises connectivity option, manually configure the TGW routing table on AWS and add the routing configuration to your existing Customer Gateway (CGW). See Manually Configure Routing on Your Existing Gateway or Direct Connect Attachment.

  6. Create your new instance of Catalyst Center. See Create a New Catalyst Center VA.

  7. (Optional) If necessary, troubleshoot any issues that arise during the deployment. See Troubleshoot the Deployment.

  8. Manage your Catalyst Center VA using Cisco Global Launchpad. See the Cisco Global Launchpad 2.0 Administrator Guide.

Prerequisites for Automated Deployment

Before you can begin to deploy Catalyst Center on AWS using Cisco Global Launchpad, make sure that the following requirements are met:

  • Install Docker Community Edition (CE) on your platform.

    Cisco Global Launchpad supports Docker CE on Mac, Windows, and Linux platforms. See the documentation on the Docker website for the specific procedure for your platform.

  • Regardless of how you access Cisco Global Launchpad, your Catalyst Center VA must meet the following minimum resource requirements:

    • Cisco DNA Center Instance:

      • r5a.8xlarge


        Important


        Catalyst Center supports only the r5a.8xlarge instance size. Any changes to this configuration aren't supported. Additionally, the r5a.8xlarge instance size isn't supported in specific availability zones. To view the list of unsupported availability zones, see the Release Notes for Cisco Global Launchpad 2.0.0.


      • 32 vCPUs

      • 256-GB RAM

      • 4-TB storage (EBS-gp3)

      • 2500 disk input/output operations per second (IOPS)

      • 180-MBps disk bandwidth

    • Backup Instance: T3.micro, 2 vCPUs, 500-GB storage, and 1-GB RAM

  • You have valid credentials to access your AWS account.

  • Your AWS account is a subaccount (a child account) to maintain resource independence and isolation. With a subaccount, this ensures that the Catalyst Center deployment doesn't impact your existing resources.

  • Important: Your AWS account is subscribed to Cisco DNA Center Virtual Appliance - Bring Your Own License (BYOL) in AWS Marketplace.

  • If you're an admin user, you must have administrator access permission for your AWS account. (In AWS, the policy name is displayed as AdministratorAccess.)

    The administrator access policy must be attached to your AWS account directly and not to a group. The application doesn't enumerate through a group policy. So, if you are added to a group with the administrator access permission, you will not be able to create the required infrastructure.

    In the AWS Identity and Access Management (IAM) dashboard, you can find user permission policies. The administrator access policy displays as "AdministratorAccess".
  • If you're a subuser, your administrator must add you to the CiscoDNACenter user group.

    When an admin user logs in to Cisco Global Launchpad for the first time, the CiscoDNACenter user group is created on their AWS account with all the required policies attached. The admin user can add subusers to this group to allow them to log in to Cisco Global Launchpad.

    The following policies are attached to the CiscoDNACenter user group:

    • AmazonDynamoDBFullAccess

    • IAMReadOnlyAccess

    • AmazonEC2FullAccess

    • AWSCloudFormationFullAccess

    • AWSLambda_FullAccess

    • CloudWatchFullAccess

    • ServiceQuotasFullAccess

    • AmazonEventBridgeFullAccess

    • service-role/AWS_ConfigRole

    • AmazonS3FullAccess

    • ClientVPNServiceRolePolicy (Version: 2012-10-17)

      This policy allows the following rules:

      • ec2:CreateNetworkInterface

      • ec2:CreateNetworkInterfacePermission

      • ec2:DescribeSecurityGroups

      • ec2:DescribeVpcs

      • ec2:DescribeSubnets

      • ec2:DescribeInternetGateways

      • ec2:ModifyNetworkInterfaceAttribute

      • ec2:DeleteNetworkInterface

      • ec2:DescribeAccountAttributes

      • ds:AuthorizeApplication

      • ds:DescribeDirectories

      • ds:GetDirectoryLimits

      • ds:UnauthorizeApplication

      • logs:DescribeLogStreams

      • logs:CreateLogStream

      • logs:PutLogEvents

      • logs:DescribeLogGroups

      • acm:GetCertificate

      • acm:DescribeCertificate

      • iam:GetSAMLProvider

      • lambda:GetFunctionConfiguration

    • ConfigPermission (Version: 2012-10-17, Sid: VisualEditor0)

      This policy allows the following rules:

      • config:Get

      • config:*

      • config:*ConfigurationRecorder

      • config:Describe*

      • config:Deliver*

      • config:List*

      • config:Select*

      • tag:GetResources

      • tag:GetTagKeys

      • cloudtrail:DescribeTrails

      • cloudtrail:GetTrailStatus

      • cloudtrail:LookupEvents

      • config:PutConfigRule

      • config:DeleteConfigRule

      • config:DeleteEvaluationResults

    • PassRole (Version: 2012-10-17, Sid: VisualEditor0)

      This policy allows the following rules:

      • iam:GetRole

      • iam:PassRole

Install Cisco Global Launchpad

This procedure shows you how to install Cisco Global Launchpad using Docker containers for the server and client applications.

Before you begin

Make sure you have Docker CE installed on your machine. For information, see Prerequisites for Automated Deployment.

Procedure


Step 1

Go to the Cisco Software Download site and download the following file:

  • Launchpad-desktop-client-2.0.0.tar.gz

Step 2

Verify that the TAR file is genuine and from Cisco. For detailed steps, see Verify the Cisco DNA Center VA TAR File.

Step 3

Load the Docker images from the downloaded files:

docker load < Launchpad-desktop-client-2.0.0.tar.gz

docker load < Launchpad-desktop-server-2.0.0.tar.gz

Step 4

Use the docker images command to display a list of the Docker images in the repository and verify that you have the latest copies of the server and client applications. In the files, the TAG column should display the numbers starting with 2.0.

For example:

$ docker images

The output of $ docker images displays a list of the Docker images in the repository, along with the TAG column listing the number starting with 2.0.

Step 5

Run the server application:

docker run -d -p <server-port-number>:8080 -e DEBUG=true --name server <server_image_id>

For example:

$ docker run -d -p 9090:8080 -e DEBUG=true --name server 7a8ef127dd8d

Step 6

Run the client application:

docker run -d -p <client-port-number>:80 -e CHOKIDAR_USEPOLLING=true -e REACT_APP_API_URL=http://localhost:<server-port-number> --name client <client_image_id>

For example:

$ docker run -d -p 90:80 -e CHOKIDAR_USEPOLLING=true 
-e REACT_APP_API_URL=http://localhost:9090 --name client 09357ca299b1

Note


Make sure that the exposed server port number and the REACT_APP_API_URL port number are the same. In Step 5 and Step 6, port number 9090 is used in both examples.

Step 7

Use the docker ps -a command to verify that the server and client applications are running. The STATUS column should show that the applications are up.

For example:

$ docker ps -a

REPOSITORY                                                                 TAG    IMAGE ID      CREATED      SIZE
466518672524.dkr.ecr.us-west-2.amazonaws.com/val/valaunchpad-server                 2.0.0  7a8ef127dd8d  7 hours ago  555MB
466518672524.dkr.ecr.us-west-2.amazonaws.com/platform-ui/valaunchpad-client-docker  2.0.0  09357ca299b1  3 days ago   2.12GB

Note


If you encounter an issue while running the server or client applications, see Troubleshoot Docker Errors.

Step 8

Verify that the server application is accessible by entering the URL in the following format:

http://<localhost>:<server-port-number>/api/valaunchpad/aws/v1/api-docs/

For example:

http://192.0.2.2:9090/api/valaunchpad/aws/v1/api-docs/

The application programming interfaces (APIs) being used for the Catalyst Center VA are displayed in the window.

Step 9

Verify that the client application is accessible by entering the URL in the following format:

http://<localhost>:<client-port-number>/valaunchpad

For example:

http://192.0.2.1:90/valaunchpad

The Cisco Global Launchpad login window is displayed.

Note


It can take a few minutes to load the Cisco Global Launchpad login window while the client and server applications load the artifacts.


Access Hosted Cisco Global Launchpad

You can access Cisco Global Launchpad through Cisco DNA Portal.

If you are new to Cisco DNA Portal, you must create a Cisco account and a Cisco DNA Portal account. Then you can log in to Cisco DNA Portal to access Cisco Global Launchpad.

If you are familiar with Cisco DNA Portal and have a Cisco account and a Cisco DNA Portal account, you can directly log in to Cisco DNA Portal to access Cisco Global Launchpad.

Create a Cisco Account

To access Cisco Global Launchpad through Cisco DNA Portal, you must create a Cisco account first.

Procedure


Step 1

In your browser, enter:

dna.cisco.com

The Cisco DNA Portal login window is displayed.

The Cisco DNA Portal login window displays the options to log in with Cisco or create a new account.

Step 2

Click Create a new account.

Step 3

On the Cisco DNA Portal Welcome window, click Create a Cisco account.

Step 4

On the Create Account window, complete the required fields and then click Register.

Step 5

Verify your account by going to the email that you registered your account with and clicking Activate Account.

A Cisco email welcomes you to Cisco, requesting that you activate your account by clicking Activate Account.

Create a Cisco DNA Portal Account

To access Cisco Global Launchpad through Cisco DNA Portal, you must create a Cisco DNA Portal account.

Before you begin

Make sure that you have a Cisco account. For more information, see Create a Cisco Account.

Procedure


Step 1

In your browser, enter:

dna.cisco.com

The Cisco DNA Portal login window is displayed.

The Cisco DNA Portal login window displays the option to log in with Cisco.

Step 2

Click Log In With Cisco.

Step 3

Enter your Cisco account's email in the Email field, and click Next.

Step 4

Enter your Cisco account's password in the Password field.

Step 5

Click Log in.

Step 6

On the Cisco DNA Portal Welcome window, enter the name of your organization or team in the Name your account field. Then click Continue.

Step 7

On the Cisco DNA Portal Confirm CCO Profile window, do the following:

  1. Verify the details are correct.

  2. After reading, acknowledging, and agreeing with the conditions, check the check box.

  3. Click Create Account.

    After successfully creating an account, the Cisco DNA Portal home page is displayed.

    The Cisco DNA Portal home page is displayed with the message, "Subscribe and maintain your offers more efficiently with Cisco DNA Portal. Select an offer below and enjoy your trip with Cisco DNA Portal."

Log In to the Cisco DNA Portal with Cisco

To access Cisco Global Launchpad through Cisco DNA Portal, you must log in to Cisco DNA Portal.

Before you begin

Make sure that you have a Cisco account and a Cisco DNA Portal account. For more information, see Create a Cisco Account and Create a Cisco DNA Portal Account.

Procedure


Step 1

In your browser, enter:

dna.cisco.com

The Cisco DNA Portal login window is displayed.

The Cisco DNA Portal login window displays the option to log in with Cisco.

Step 2

Click Log In With Cisco.

Step 3

Enter your Cisco account's email in the Email field, and click Next.

Step 4

Enter your Cisco account's password in the Password field.

Step 5

Click Log in.

If you have only one Cisco DNA Portal account, the Cisco DNA Portal home page is displayed.

Step 6

(Optional) If you have multiple Cisco DNA Portal accounts, choose the account that you want to log in to by clicking the account's adjacent Continue button.

The Cisco DNA Portal home page is displayed.

The Cisco DNA Portal home page is displayed with the message, "Subscribe and maintain your offers more efficiently with Cisco DNA Portal. Select an offer below and enjoy your trip with Cisco DNA Portal."

Create a New VA Pod

A VA pod is the AWS hosting environment for the Catalyst Center VA. The hosting environment includes AWS resources, such as the Catalyst Center VA EC2 instance, Amazon Elastic Block Storage (EBS), backup NFS server, security groups, routing tables, Amazon CloudWatch logs, Amazon Simple Notification System (SNS), VPN Gateway (VPN GW), TGW, and so on.

Using Cisco Global Launchpad, you can create multiple VA pods—one VA pod for each Catalyst Center VA.


Note


  • The AWS Super Administrator user can set a limit on the number of VA pods that can be created in each region. The VPCs used for resources outside of Cisco Global Launchpad contribute to this number as well. For example, if your AWS account has a limit of five VPCs and two are in use, you can only create three more VA pods in the selected region.

  • On some steps, all the resources must be set up successfully to proceed to the next step. If all the resources haven't been set up successfully, the proceed button is disabled. If all the resources have been set up successfully and the proceed button is disabled, wait a few seconds because the resources are still loading. After all the configurations are complete, the button is enabled.

  • Your VA pod configuration doesn't change when you update Cisco Global Launchpad to a later release, you downgrade to an earlier Cisco Global Launchpad release, or you update the region setup where your VA pod is located.

    For example, if you created a VA pod in Cisco Global Launchpad, Release 2.0.0, the backup password is a combination of the backup instance's stack name and the backup server's IP address. If you access this VA pod in an earlier release, such as Release 1.9.0, the backup password doesn't change.


This procedure guides you through the steps to create a new VA pod.

Before you begin

Your AWS account must have administrator access permission to perform this procedure. For information, see Prerequisites for Automated Deployment.

Procedure


Step 1

Log in to Cisco Global Launchpad using one of the following methods:

  • IAM Login: This method uses user roles to define user access privileges. Cisco Global Launchpad supports multifactor authentication (MFA) as an optional, additional form of authentication, if your company requires it. For more information, see "Log In to Cisco Global Launchpad Using IAM" in the Cisco Global Launchpad Administrator Guide.

  • Federated Login: This method uses one identity to gain access to networks or applications managed by other operators. For more information, see "Generate Federated User Credentials Using saml2aws" or "Generate Federated User Credentials Using AWS CLI" in the Cisco Global Launchpad Administrator Guide.

For information about how to get an Access Key ID and Secret Access Key, see the AWS Managing access keys topic in the AWS Identity and Access Management User Guide on the AWS website.

If you encounter any login errors, you need to resolve them and log in again. For more information, see Troubleshoot Login Errors.

Step 2

If you are an admin user logging in for the first time, enter your email address in the Email ID field and click Submit.

You can subscribe to the Amazon SNS to receive alerts about deployed resources, changes, and resource over-utilization. Alarms can be set up to notify you if Amazon CloudWatch detects any unusual behavior in Cisco Global Launchpad. In addition, AWS Config evaluates and assesses your configured resources and sends audit logs of the results. For more information, see "Subscribe to the Amazon SNS Email Subscription" and "View Amazon CloudWatch Alarms" in the Cisco Global Launchpad Administrator Guide.

After you enter your email, several processes happen:

  • The CiscoDNACenter user group is created in your AWS account with all the required policies attached. The admin user can add subusers to this group to allow subusers to log in to Cisco Global Launchpad.

  • An Amazon S3 bucket is automatically created to store the state of the deployment. We recommend that you do not delete this or any other bucket from the AWS account, either globally or for each region. Doing so could impact the Cisco Global Launchpad deployment workflow.

  • If you are logging in to a region for the first time, Cisco Global Launchpad creates several resources in AWS. This process can take some time, depending on whether the region was previously enabled. Until the process completes, you cannot create a new VA pod. During this time, the following message is displayed: "Setting up the initial region configuration. This might take a couple of minutes."

After you log in successfully, the Dashboard pane is displayed.

Note


If you're prompted to update the region setup, follow the prompts to complete the update. For more information, see "Update a Region Setup" in the Cisco Global Launchpad Administrator Guide.

By default, Cisco Global Launchpad displays the navigation pane on the left and the Dashboard pane on the right. The Dashboard pane displays a map of the regions and VA pods and below the map, displays all created VA pods.

Step 3

Click + Add a VA pod.

Step 4

Configure the AWS infrastructure, which includes the region, VPC, private subnet, routing table, security group, virtual gateway, and CGW, by completing the following steps:

  1. Configure the following VA pod environment details fields:

    • Region name: Choose a region from the drop-down list.

    • VA pod name: Assign a name to the new VA pod. Keep the following restrictions in mind:

      • The name must be unique within the region. (This means that you can use the same name across multiple regions.)

      • The name must from four to 12 characters.

      • The name can include letters (A-Z), numbers (0-9), and hyphens (-).

    • Availability zone: Click this drop-down list and choose an availability zone, which is an isolated location within your selected region.

    • AWS VPC CIDR: Enter a unique VPC subnet to use to launch the AWS resources. Keep the following guidelines in mind:

      • The recommended CIDR range is /25.

      • In IPv4 CIDR notation, the last octet (the fourth octet) of the IP address can only have the values 0 or 128.

      • This subnet should not overlap with your corporate subnet.

  2. Under Transit gateway (TGW), choose one of the following options:

    • VPN GW: Choose this option if you have a single VA pod, and you want to use a VPN gateway. A VPN GW is the VPN endpoint on the Amazon side of your Site-to-Site VPN connection. It can be attached to only a single VPC.

    • New VPN GW + New TGW: Choose this option if you have multiple VA pods or VPCs, and you want to use the TGW as a transit hub to interconnect multiple VPCs and on-premises networks. It can also be used as a VPN endpoint for the Amazon side of the Site-to-Site VPN connection.

      Note


      You can create only one TGW per region.

    • Existing TGW: Choose this option if you have an existing TGW that you want to use to create a new VA pod, and then choose one of the following options:

      • New VPN GW: Choose this option if you want to create a new VPN gateway for your existing TGW.

      • Existing attachment: Choose this option if you want to use an existing VPN or direct-connect attachment. From the Select attachment ID, drop-down list, choose an attachment ID. To view the direct connect gateway name in the drop-down list, you must log in to Cisco Global Launchpad with an administrator account to grant the required permissions.

        If you choose this option, you must also configure routing on your existing gateway or direct connect attachment.

        For information, see Manually Configure Routing on Your Existing Gateway or Direct Connect Attachment.

  3. Do one of the following:

    • If you selected Existing TGW and Existing attachments as your preferred connectivity options, proceed to the next substep.

    • If you selected VPN GW, New VPN GW + New TGW, or Existing TGW + New VPN GW, provide the following VPN details:

      • Customer gateway (Enterprise firewall/router): Enter the IP address of your Enterprise firewall or router to form an IPsec tunnel with the AWS VPN gateway.

      • VPN vendor: From the drop-down list, choose a VPN vendor.

        The following VPN vendors are not supported: Barracuda, Sophos, Vyatta, and Zyxel. For more information, see Troubleshoot VA Pod Configuration Errors.

      • Platform: From the drop-down list, choose a platform.

      • Software: From the drop-down list, choose a software.

  4. For the Customer profile size, leave the default Medium setting.

    The customer profile size applies to both the Catalyst Center VA instance and the backup instance. The Medium configures the instances as follows:

    • Cisco Catalyst Center instance: r5a.8xlarge, 32 vCPU, 256-GB RAM, and 4-TB storage.

      Important


      Catalyst Center VA supports only the r5a.8xlarge instance size. Any changes to this configuration aren't supported. Additionally, the r5a.8xlarge instance size isn't supported in specific availability zones. To view the list of unsupported availability zones, see the Release Notes for Cisco Global Launchpad 2.0.0.

    • Backup instance: T3.micro, 2 vCPU, 500-GB storage, and 1-GB RAM

  5. For the Backup target (NFS), choose one of the following options as the destination for your backups:

    • Enterprise backup: Choose this option if you want the backup to be stored in the on-premises servers.

    • Cloud backup: Choose this option if you want the backup to be stored in AWS.

      Note the following backup details. You will use this information later to log in to the cloud backup server:

      • SSH IP address: <BACKUP VM IP>

      • SSH port: 22

      • Server path: /var/catalyst-backup/

      • Username: maglev

      • Password: <xxxx##########>

        Your backup server password is dynamically created. The password is composed of the first four characters of the VA pod name and the backup server's IP address without the periods.

        For example, if the VA pod name is DNAC-SJC and the backup server's IP address is 10.0.0.1, the backup server password is DNAC10001.

        Note

         
        • You can find the VA pod name on the Dashboard pane after you choose the region that it's deployed in.

        • You can find the backup server's IP address on the View Catalyst Center pane. For more information, see "View Catalyst Center VA Details" in the Cisco Global Launchpad Administrator Guide.

      • Passphrase: <Passphrase>

        Your passphrase is used to encrypt the security-sensitive components of the backup. These security-sensitive components include certificates and credentials.

        This passphrase is required and you will be prompted to enter this passphrase when restoring the backup files. Without this passphrase, backup files are not restored.

      • Open ports: 22, 2049, 873, and 111

  6. Click Next.

    The Summary pane is displayed.

  7. Review the environment and VPN details that you entered. If you're satisfied, click Start configuring AWS infrastructure.

    Important


    This setup takes about 20 minutes to complete.

    You can exit the screen to any other page in Cisco Global Launchpad, and the process continues in the background. However, if you close the tab or window or refresh the page, any active background process pauses.

  8. After the AWS infrastructure is successfully configured, the AWS Infrastructure Configured pane is displayed.

    The Add a VA Pod pane displays fields that must be configured to create a VA pod. In step three, Cisco Global Launchpad checks the IPsec tunnel connectivity.

    If the AWS infrastructure configuration fails, exit Cisco Global Launchpad and see Troubleshoot VA Pod Configuration Errors for information about possible causes and solutions.

    The AWS infrastructure configuration fails, and the AWS infrastructure diagram is red.

Step 5

Download the on-premises configuration file by completing the following steps:

  1. After the AWS infrastructure is successfully configured, click Proceed to on-premises configuration.

  2. In the Configure the On-Premises Tunnel Endpoint pane, click Download configuration file. Forward this file to your network administrator to configure the on-premises-side IPsec tunnel.

    This file is generated based on the on-premises vendor, platform, and version that were selected during the configuration of the AWS infrastructure. The file contains the unique VPN connection IDs that were created for the VPC. Only a few things need to be modified according to on-premise firewall/router. For example, if you have an ASA firewall/router needs to be modified, you need to modify the static route configuration to the VPC subnet that you have chosen.

    route Tunnel-int-vpn-0bbef6e1331a37048-0 10.0.0.0 255.255.0.0 169.254.184.85 100

    Make sure your network administrator configures only one IPsec tunnel.

    Note

     
    • The network administrator can make the necessary changes to this configuration file and apply it to your Enterprise firewall or router to bring up the IPsec tunnels.

      The provided configuration file enables you to bring up two tunnels between AWS and the Enterprise router or firewall.

    • Most virtual private gateway solutions have one tunnel up and the other down. You can have both tunnels up and use the Equal Cost Multiple Path (ECMP) networking feature. ECMP processing enables the firewall or router to use equal-cost routes to transmit traffic to the same destination. To do this, your router or firewall must support ECMP. Without ECMP, we recommend that you either keep one tunnel down and manually failover or use a solution, such as an IP SLA, to automatically bring up the tunnel in a failover scenario.

  3. Click Proceed to network connectivity check button.

Step 6

Check the status of your network configuration based on the on-premises connectivity preferences that you selected during the AWS infrastructure configuration by completing one of the following actions:

  • If you selected VPN GW as your preferred on-premises connectivity option, the IPsec tunnel configuration status is displayed, as follows:

    • If the network administrator hasn't configured the IPsec tunnel yet, a padlock is displayed on the IPsec tunnel:

      The IPsec tunnel connecting the VA pod and enterprise firewall or router is gray with a padlock, meaning it's not configured.
    • Ask your network administrator to verify that the IPsec tunnel on the Enterprise firewall or router is up. After the IPsec tunnel comes up, the IPsec tunnel turns green:

      The IPsec tunnel connecting the VA pod and enterprise firewall or router is green, meaning the tunnel is up.

    Note


    If the IPsec tunnel is up and you cannot access Catalyst Center VA from the CGW, check that the correct values were passed during the IPsec tunnel configuration. Cisco Global Launchpad reports the tunnel status from AWS and doesn't perform additional checks.

  • If you selected New VPN GW + New TGW or Existing TGW and new VPN GW as your preferred on-premises connectivity option, Cisco Global Launchpad checks whether your VPC is connected to the TGW, which in turn is connected to your on-premises firewall or router.

    Note


    For the TGW-to-Enterprise firewall or router connection to succeed, your network administrator must add the configuration to your on-premises firewall or router.

    The connection status is displayed, as follows:

    • If the connection from the TGW to your on-premises firewall or router isn't connected yet, it's grayed out:

      The connection between the TGW and your on-premises firewall or router is gray, meaning they're not connected.
    • After TGW connectivity is successfully established, the TGW connection is green:

      The connection between the TGW and your on-premises firewall or router is green, meaning they're connected.
  • If you selected Existing TGW and Existing Attachment as your preferred on-premises connectivity option, make sure that routing is configured between the existing TGW and the newly attached VPC, where Catalyst Center VA is launched. For information, see Manually Configure Routing on Your Existing Gateway or Direct Connect Attachment.

    The connection status is displayed, as follows:

    • If your VPC is not attached to the TGW, the TGW connection is grayed out:

      The connection between the VA pod and the TGW is gray, meaning they're not connected.
    • After TGW connectivity is successfully established, the TGW connection is green:

      The connection between the VA pod and the TGW is green, meaning they're connected.

Step 7

Click Go to dashboard to return to the Dashboard pane, where you can create more VA pods and manage your existing ones.


Manually Configure Routing on Your Existing Gateway or Direct Connect Attachment

If you selected Existing Transit Gateway and Existing Attachments as your preferred connectivity option while creating a new VA pod, Cisco Global Launchpad creates a VPC to launch Catalyst Center and attaches this VPC to your existing TGW.

For Cisco Global Launchpad to establish the TGW connection, you must manually configure the TGW routing table on AWS and add the routing configuration of your existing CGW or direct connect attachment.

Procedure


Step 1

From the AWS console, go to VPC service.

Step 2

In the left navigation pane, under Transit Gateways, choose Transit gateway route tables and select the existing TGW route table.

Step 3

In the Transit gateway route tables window, click the Associations tab, choose the attachment to associate from the drop-down list, and then click Create association.

The association can be your existing CGW or direct connect attachment.

In the Transit gateway route tables window, the Create association button is in the upper-right corner of the Associations pane.

Step 4

In the Transit gateway route tables window, click the Propagations tab and then click Create propagation.

In the Transit gateway route tables window, the Create propagation button is in the upper-right corner of the Propagations pane.

Step 5

To ensure that the static route between the respective VPC and VPN is active, click the Routes tab and then click Create static route.

Step 6

Ensure that your on-premises router configuration is updated to route the network traffic destined for the CIDR ranges that are allocated to your CGW or direct connect attachment in your AWS environment.

For example: route tunnel-int-vpn-0b57b508d80a07291-1 10.0.0.0 255.255.0.0 192.168.44.37 200


Create a New Catalyst Center VA

Use this procedure to configure a new Catalyst Center VA.

Procedure


Step 1

In the Dashboard pane, below the map, locate the VA pod where you want to create your Catalyst Center VA.

The Dashboard pane displays a map of all the regions and, below the map, displays a list of all existing VA pods.

Step 2

In the VA pod card, click Create/Manage Catalyst Center(s).

Step 3

In the VA Pod Dashboard pane, click + Create a new Catalyst Center.

Step 4

Enter the following details:

  • Catalyst Center version: From the drop-down list, choose a version.

  • Enterprise DNS: Enter the IP address of your Enterprise DNS. Ensure that the Enterprise DNS is reachable from the VA pod in which you're creating the Catalyst Center VA.

    Note

     
    • Cisco Global Launchpad checks the on-premises network connection using UDP port 53 with the DNS server IP address that you entered.

    • The DNS server cannot be updated through Cisco Global Launchpad after deploying Catalyst Center VA on AWS. However, you can update the DNS server using the AWS console. For more information, see Update the DNS Server on a Catalyst Center VA Using the AWS Console.

  • Catalyst Center IP address: IP address of Catalyst Center. To access Catalyst Center directly using its domain name instead of its IP address, add an A record (address record) to the Enterprise DNS with the FQDN and this IP address.

  • FQDN (Fully Qualified Domain Name): Enter the FQDN for the Catalyst Center VA as configured on your DNS server.

  • Proxy details: Select one of the following HTTPS network proxy options:

    • No proxy: No proxy server is used.

    • Unauthenticated: The proxy server does not require authentication. Enter the URL and port number of the proxy server.

    • Proxy authentication: The proxy server requires authentication. Enter the URL, port number, username, and password details for the proxy server.

  • Catalyst Center virtual appliance credentials: Enter a CLI password to use to log in to the Catalyst Center VA.

    The password must conform to the following constraints:

    • Cannot contain any tab or line breaks.

    • Must have at least 8 characters

    • Must have a character from at least three of the following categories:

      • Lowercase letter

      • Uppercase letter

      • Number

      • Special character

    Save this password for future reference.

    Note


    The username is maglev.

Step 5

Click Validate to validate the Enterprise DNS server and FQDN configured on the DNS server.

Note


If the DNS server, proxy server, or FQDN checks fail, continue with your configuration as follows:

  • If the DNS server validation fails, you cannot continue creating your Catalyst Center VA. Make sure that the entered DNS server IP address is reachable from the VA pod.

  • If the proxy server validation fails, you can still continue with your configuration because even if the invalid proxy details aren’t fixed, the Catalyst Center VA works.

  • If the FQDN validation fails, you can still continue with creating your Catalyst Center VA. However, you need to fix the FQDN configuration.

Step 6

In the Summary window, review the configuration details.

Note


The Catalyst Center IP address is a statically assigned IP address that is maintained across AWS availability zone outages to ensure uninterrupted connectivity and to minimize disruptions during critical network operations.

Step 7

If you're satisfied with the configuration, click Generate PEM key file.

Step 8

In the Download PEM key file dialog box, click Download PEM key file. If you click Cancel, you're returned to the Summary window.

Important


Because the PEM key isn't stored in your AWS account, you need to download it. You need the PEM key to access the Catalyst Center VA that is being created.

Step 9

After you downloaded the PEM file, click Start Catalyst Center configuration.

Cisco Global Launchpad configures the Catalyst Center VA environment. After the environment is configured, Catalyst Center VA boots. Initially, Cisco Global Launchpad displays the outer ring in gray. When Port 2222 is validated, the image turns amber. When Port 443 is validated, the image turns green.

Note


This process takes 45-60 minutes.

You can exit the screen to any other page in Cisco Global Launchpad, and the process continues in the background. However, if you close the tab or window or refresh the page, any active background process pauses.

After Catalyst Center VA is done booting, the configuration is complete. You can now view your Catalyst Center VA details.

The Catalyst Center Configuration In Progress window displays Catalyst Center details and a diagram where the outer ring is green and the inner ring is amber.

Tip


While the Catalyst Center configuration in progress window is displayed, record the backup server's IP address for later use. Your backup server password is a combination of the first four characters of the VA pod name and the backup server's IP address without the periods.

If the configuration fails, exit to the VA pod dashboard pane. For information, see Troubleshoot Catalyst Center VA Configuration Errors.

If the configuration fails, the Cisco Catalyst Center Configuration In Progress window displays "Environment Setup failed" and a diagram where the outer ring is green and the inner ring is red.

Step 10

To return to the VA Pod Dashboard pane, click Back to VA Pod dashboard.


Troubleshoot the Deployment

Cisco Global Launchpad is designed to help you seamlessly configure Cisco DNA Center on AWS with minimal intervention. This section shows you how to troubleshoot common issues during the deployment of Cisco DNA Center on AWS.


Note


We recommend against making manual changes with Cisco Global Launchpad through the AWS console, because it can lead to issues that Cisco Global Launchpad cannot resolve.


If you have any issues that are not addressed in this section, contact Cisco TAC.

Troubleshoot Docker Errors

If the error "port is already in use" displays while running the Docker images for Cisco Global Launchpad, you can troubleshoot it with the following possible solutions:

Error

Possible Solution

If you receive the following error while running the server application:

port is already in use

On Docker, run the server application:

docker run -d -p <server-port-number>:8080 -e SECRET_KEY=<your-secret-key> --name server --pull=always dockerhub.cisco.com/maglev-docker/server:x.x.x-latest

Note


You can use any available server port.

While running the server application, run the client application:

docker run -d -p 90:80 -e REACT_APP_API_URL=http://localhost:<client-port-number> --name client --pull=always dockerhub.cisco.com/maglev- docker/client:x.x.x

Note


You must use the same port number that you used to run the server application.

If you receive the following error while running the client application:

port is already in use

On Docker, run the client application:

docker run -d -p <client-port-name>:80 --name client --pull=always dockerhub.cisco.com/maglev-docker/client:x.x.x

Note


You can use any available server port.

Troubleshoot Login Errors

When you log in to Cisco Global Launchpad, you may encounter a login error. You can troubleshoot common login errors with the following possible solutions:

Error Possible Solution

Invalid credentials.

Re-enter your credentials and check that they're entered correctly.

You don't have enough access.

For admin users, verify that your account has administrator access permission.

For subusers, verify that your administrator added you to the CiscoDNACenter user group.

An operation to delete is in progress, please try again after some time.

If an admin user deletes the <AccountId>-cisco-dna-center global bucket from your AWS account and then tries to log in, this login error can occur. Wait 5 minutes for the deletion to complete.

Troubleshoot a Hosted Cisco Global Launchpad Error

On hosted Cisco Global Launchpad, when you trigger a root cause analysis (RCA) from the Trigger RCA pane, the Rate exceeded error can occur.

Error Possible Solution

Rate exceeded.

This error displays when a region receives the maximum number of API requests (10,000 per second).

To resolve this issue, increase the limit in AWS with the Service Quotas service, or retry the operation after a few seconds.

Troubleshoot Region Issues

You can troubleshoot region issues with the following possible solutions:

Issue Possible Solution

While creating a new VA pod in a new region, Cisco Global Launchpad displays an error message or the screen freezes for more than 5 minutes and does not display a configuration-in-progress message.

Make sure that any manual process on the AWS console has completed successfully, and try this step again. If the problem persists, contact Cisco TAC.

Note


To avoid such conflicts, we recommend that you don't make any manual changes to the VA pods. Instead, use the Cisco Global Launchpad for all actions.

Your region setup fails and Cisco Global Launchpad displays a Bucket [name] did not stabilize error similar to the following:

Bucket 059356112352-cisco-dna-center-eu-south-1.va.storage did not stabilize.

Open a case with AWS and ask that they delete the failed resources from the back end.

Troubleshoot VA Pod Configuration Errors

You can troubleshoot VA pod configuration errors with the following possible solutions:

Error Possible Solution

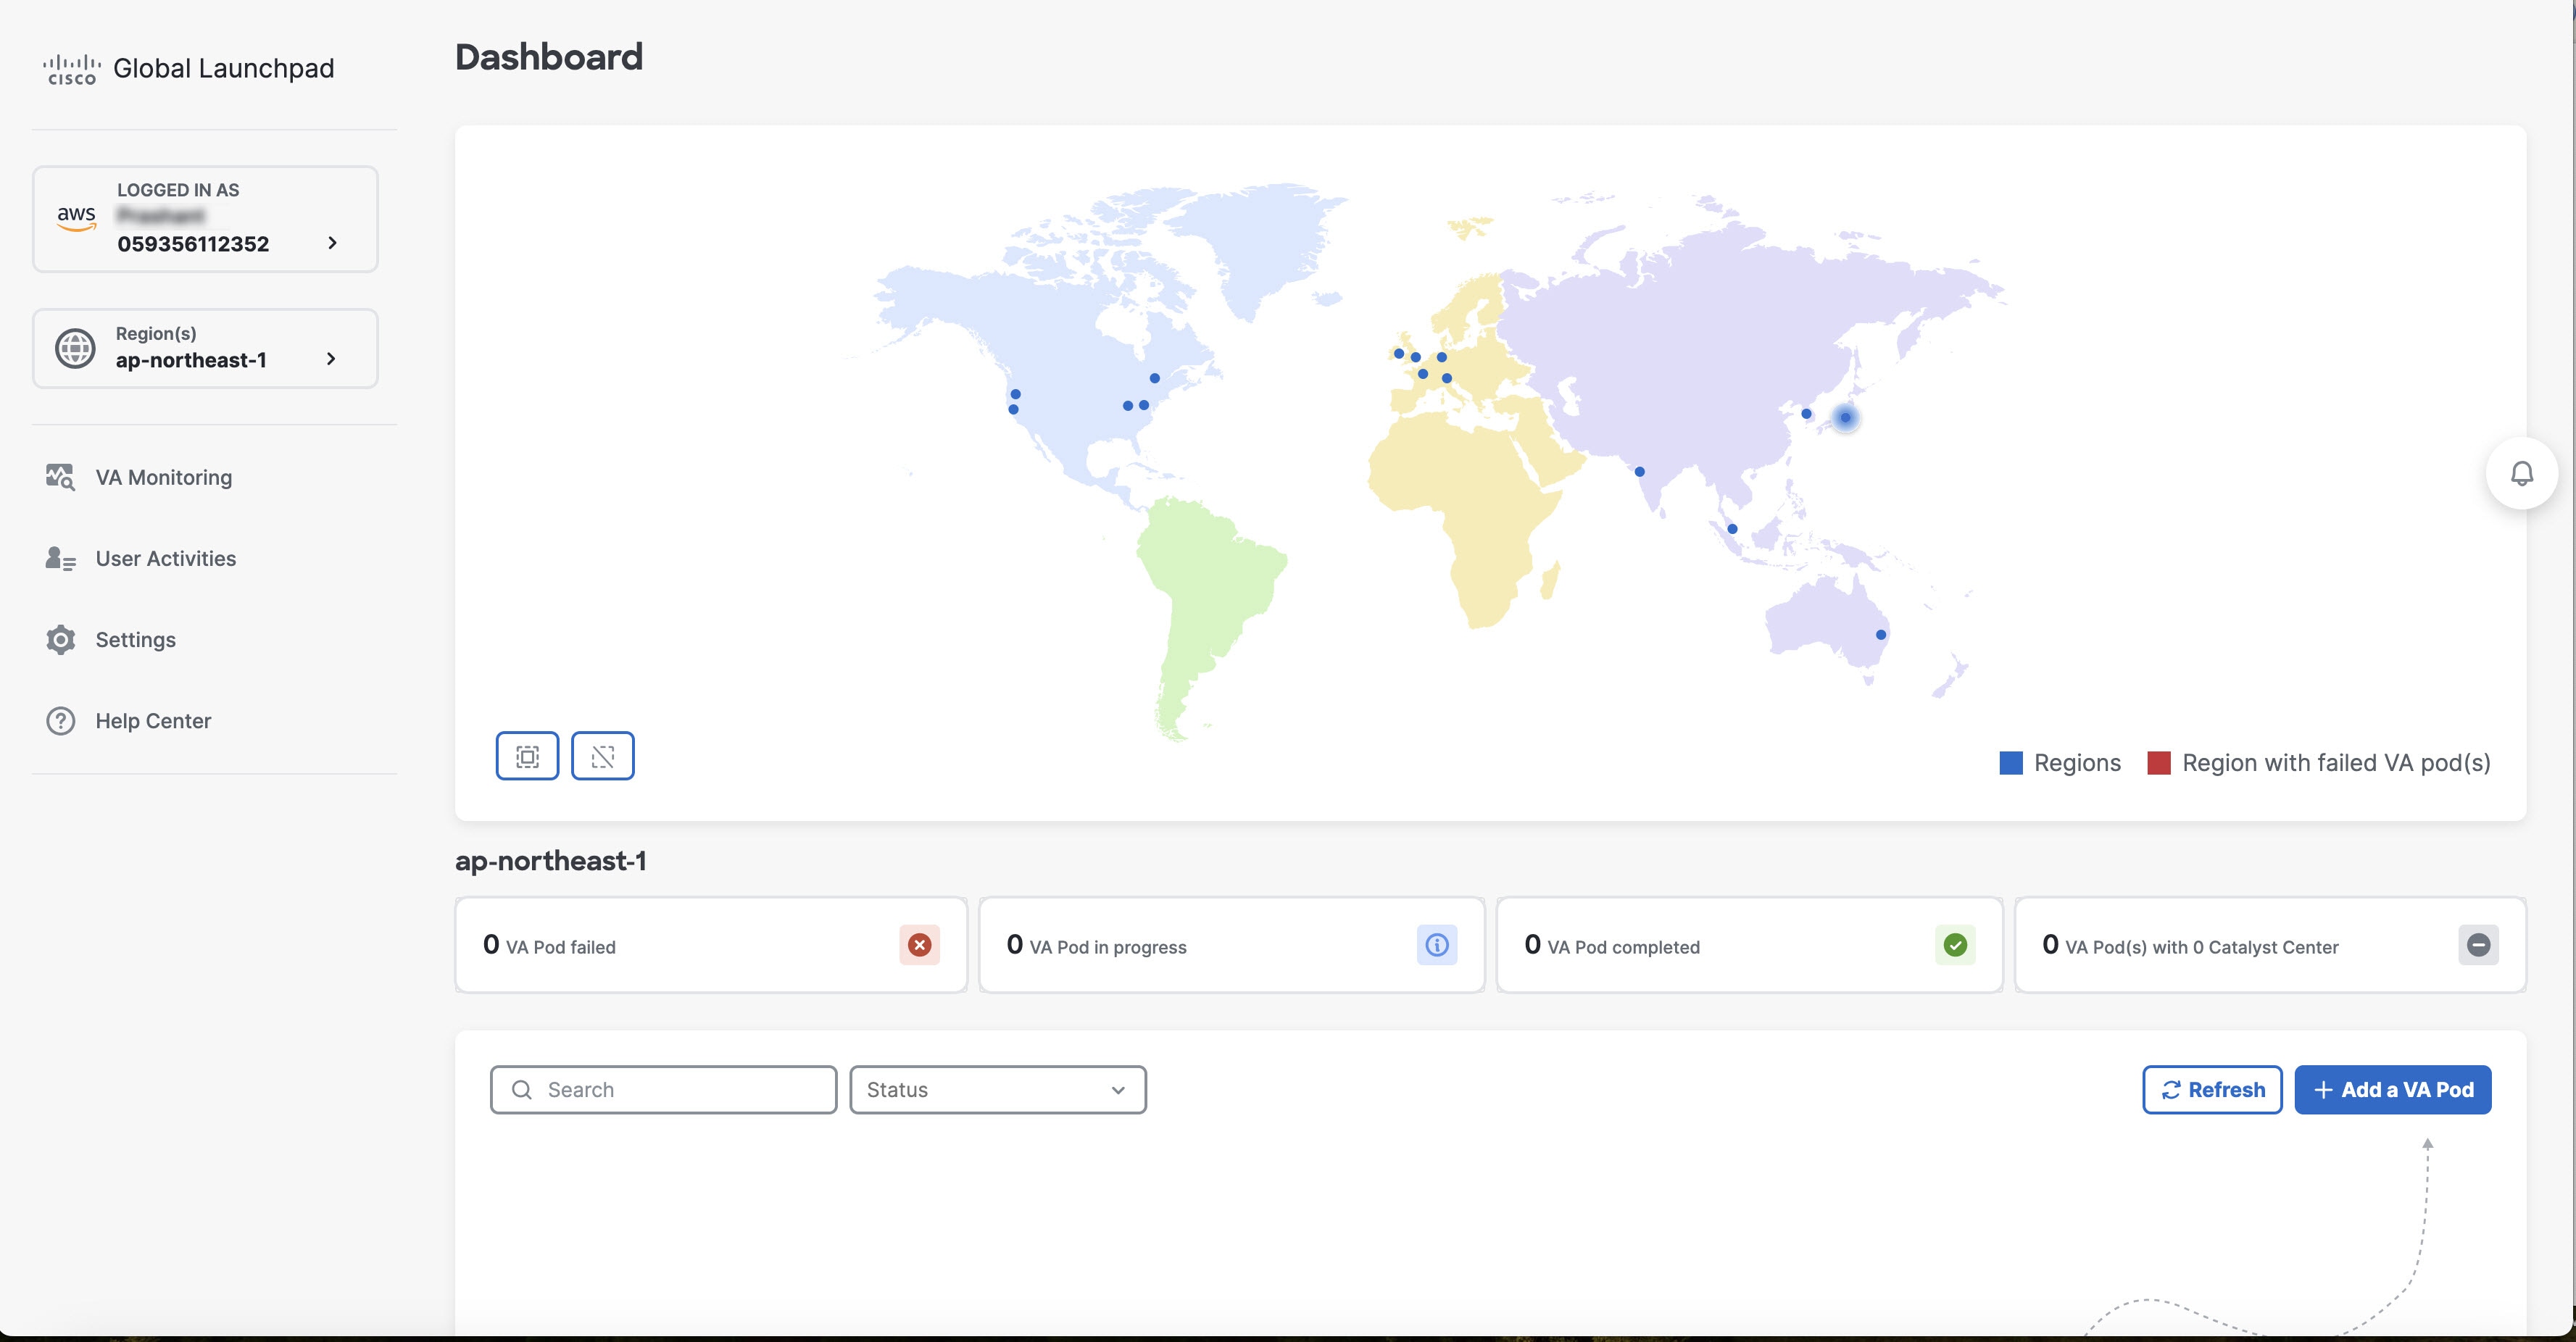
+ Create VA Pod button disabled

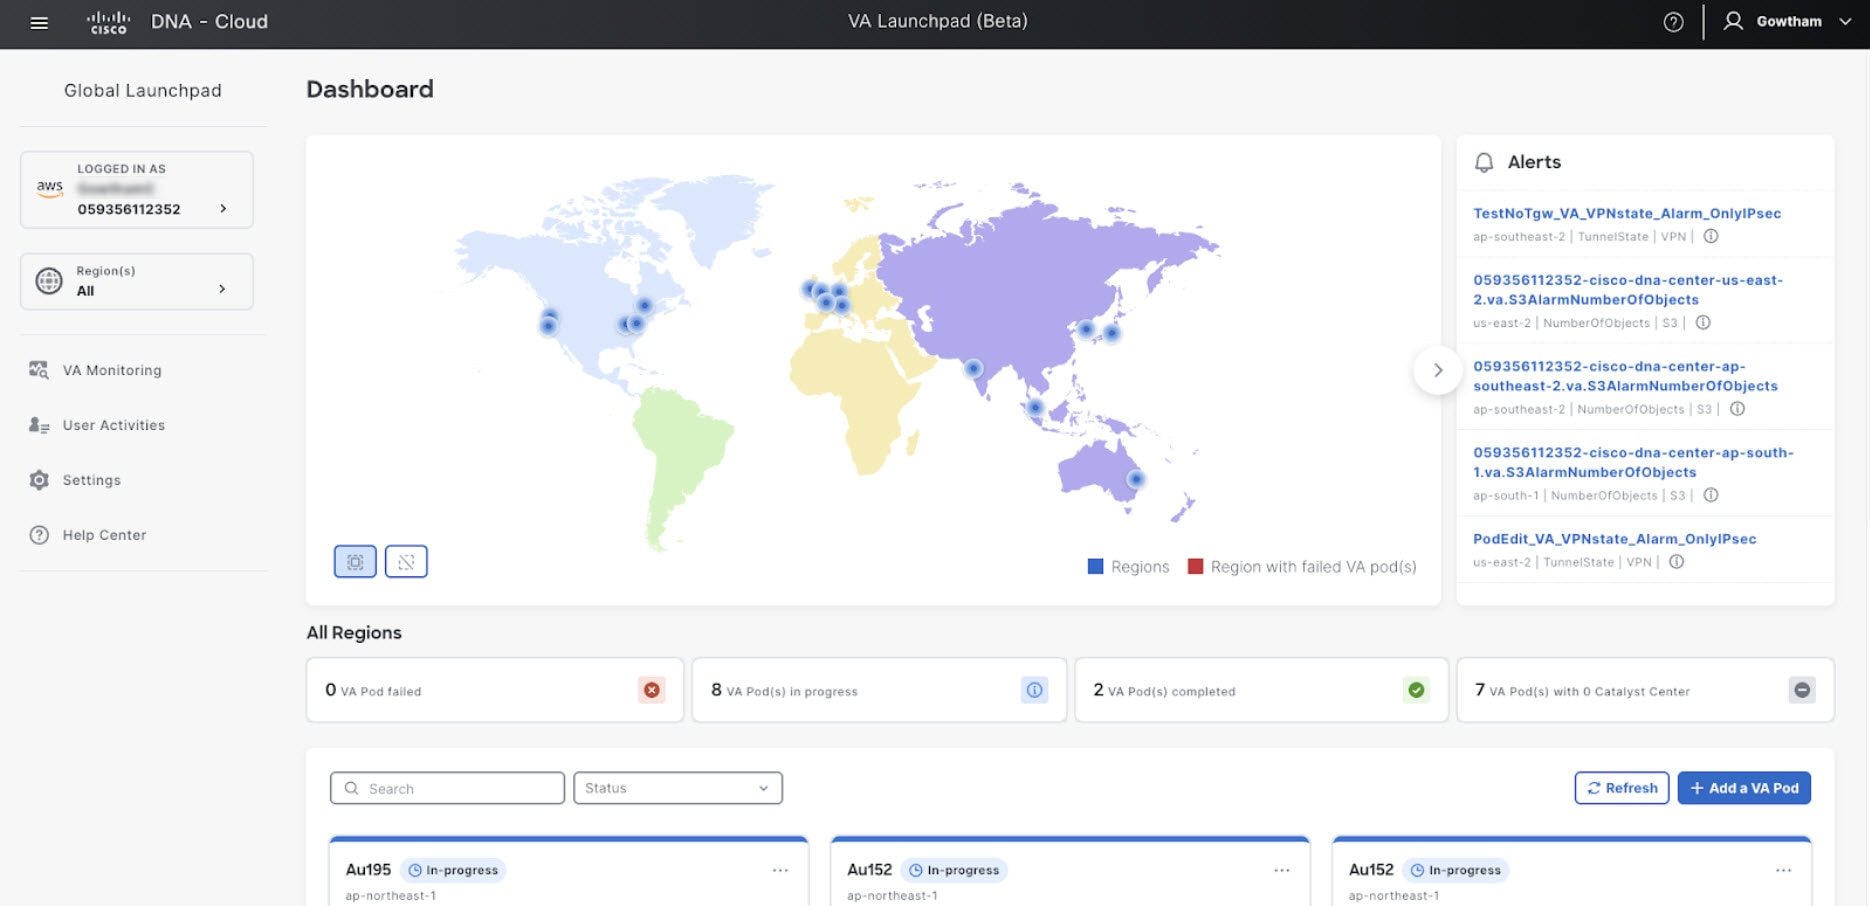
Hover your cursor over the disabled button to learn more about why it's disabled.

The following are likely reasons why you can't create a new VA pod:

  • You have reached the limit of VPC service quota: For every region, a limit is set by your AWS administrator for how many VPCs can be created. Typically, there are 5 VPCs per region, and each VPC can have only one VA pod. However, you may want to contact your AWS administrator for the exact number.

    Note that any VPC used for resources outside of Cisco Global Launchpad contributes to this limit. For example, if your AWS account has a limit of five VPCs and two are in use, you can only create three more VA pods in the selected region.

    To create new VA pods, ask your AWS administrator to change the limit or delete some of your existing VA pods or VPCs on your AWS account. For more information, see the AWS Creating a service quota increase topic in the AWS Support User Guide on the AWS website.

  • Pod deletion in progress: The deletion of the last VA pod in the region is in progress. Wait a few minutes, and then retry creating a new VA pod.

AMI ID for this region is not available for your account.

When you click + Create a new VA pod, Cisco Global Launchpad validates the AMI ID for your selected region.

If you encounter this error, the validation failed and you can't create a new pod in this region. Contact Cisco TAC to help you resolve the issue.

Your VPN configuration is invalid. At this step you cannot update it so please delete the instance and create a new one.

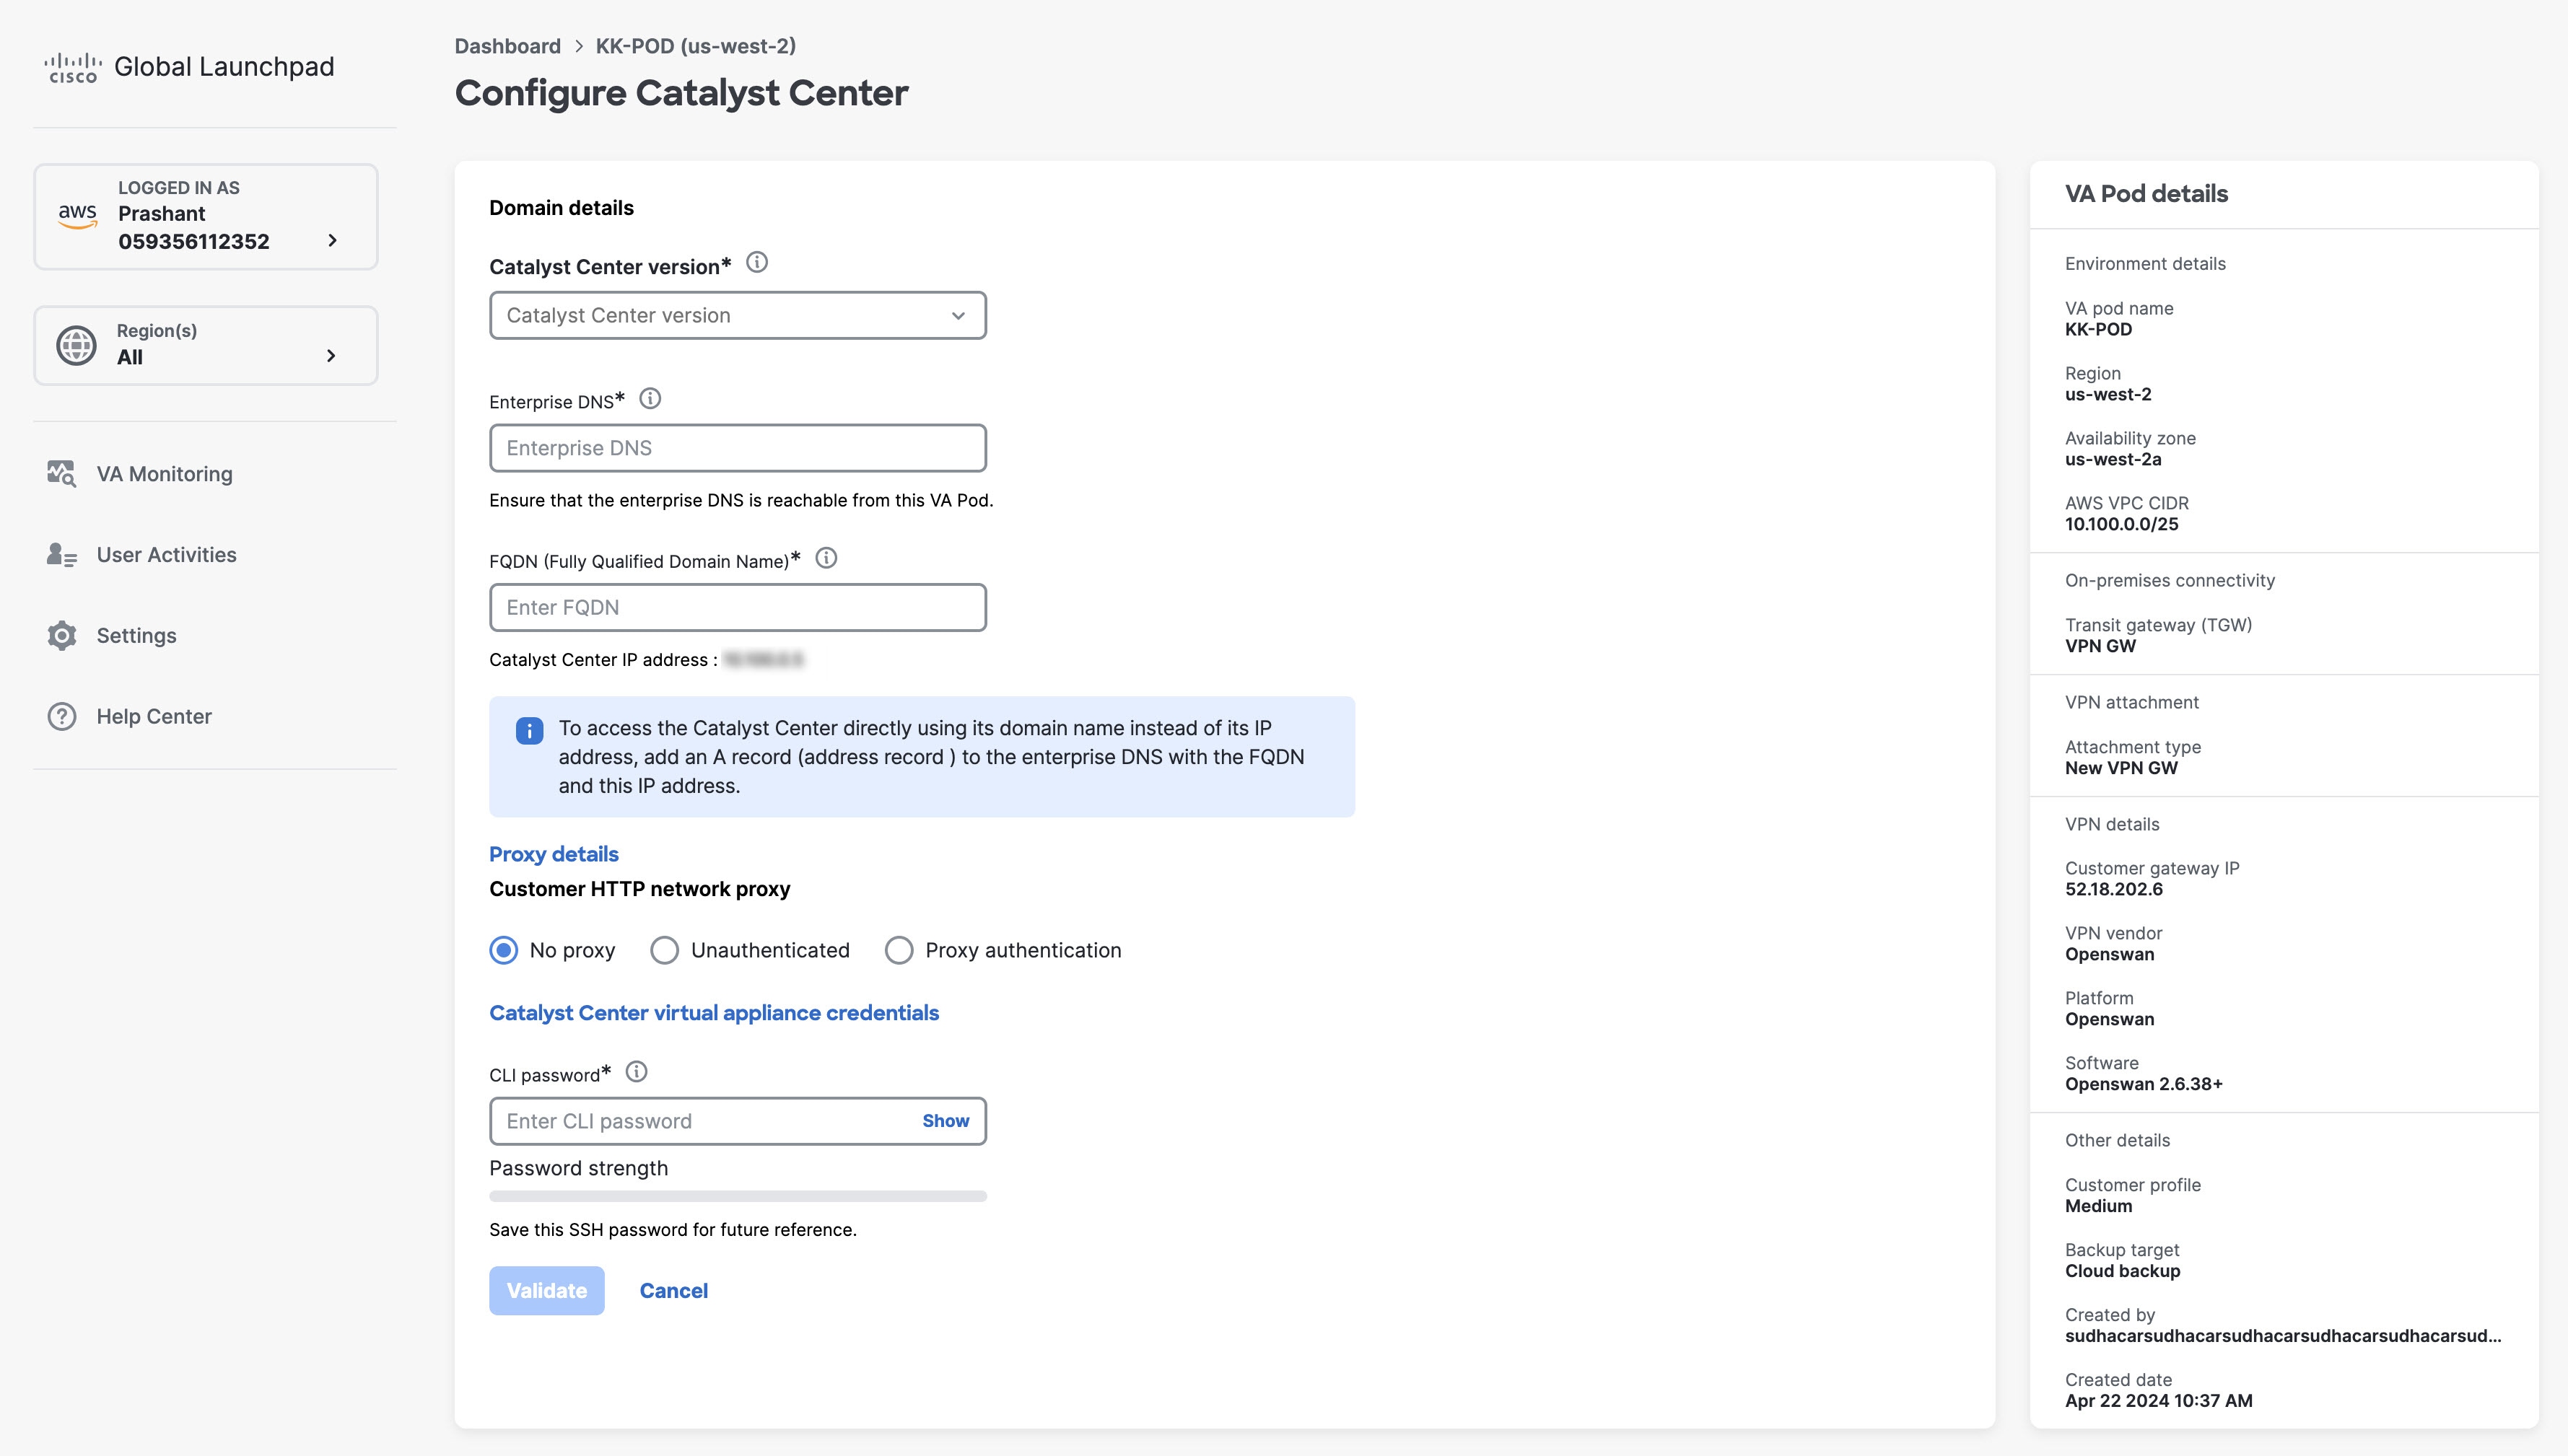
When configuring a VA pod, the following VPN vendors are not supported:

  • Barracuda

  • Sophos

  • Vyatta

  • Zyxel

If you are using an unsupported VPN vendor, the following error message is displayed on the Configure the on-premises tunnel endpoint window:

Your VPN configuration is invalid. At this step, you cannot update it, 
so please delete the instance and create a new one.

CustomerGateway with type "ipsec.1", ip-address "xx.xx.xx.xx", and bgp-asn "65000" already exists (RequestToken: f78ad45d-b4f8-d02b-9040-f29e5f5f86cf, HandlerErrorCode: AlreadyExists)

You may encounter this error if you try to create more than one VA pod at a time.

To resolve this error, delete the failed VA pod and recreate it. Ensure that you create only one VA pod at a time.

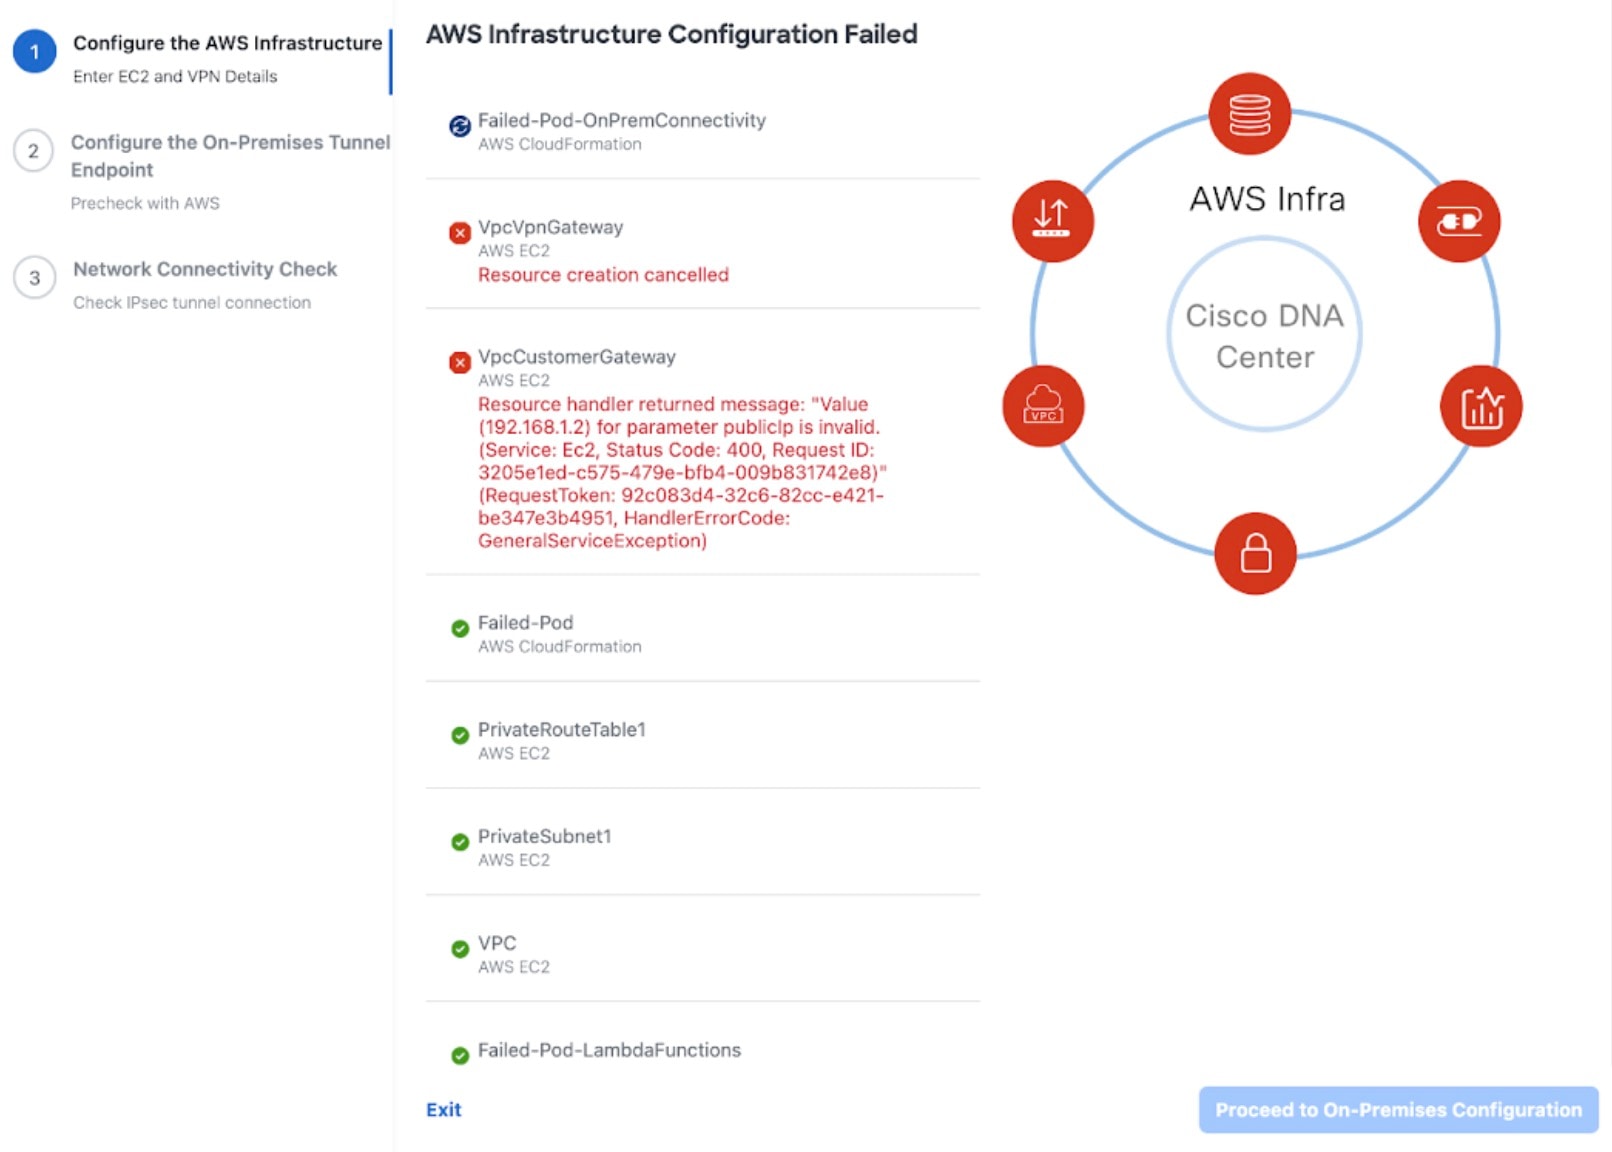
AWS infrastructure failed.

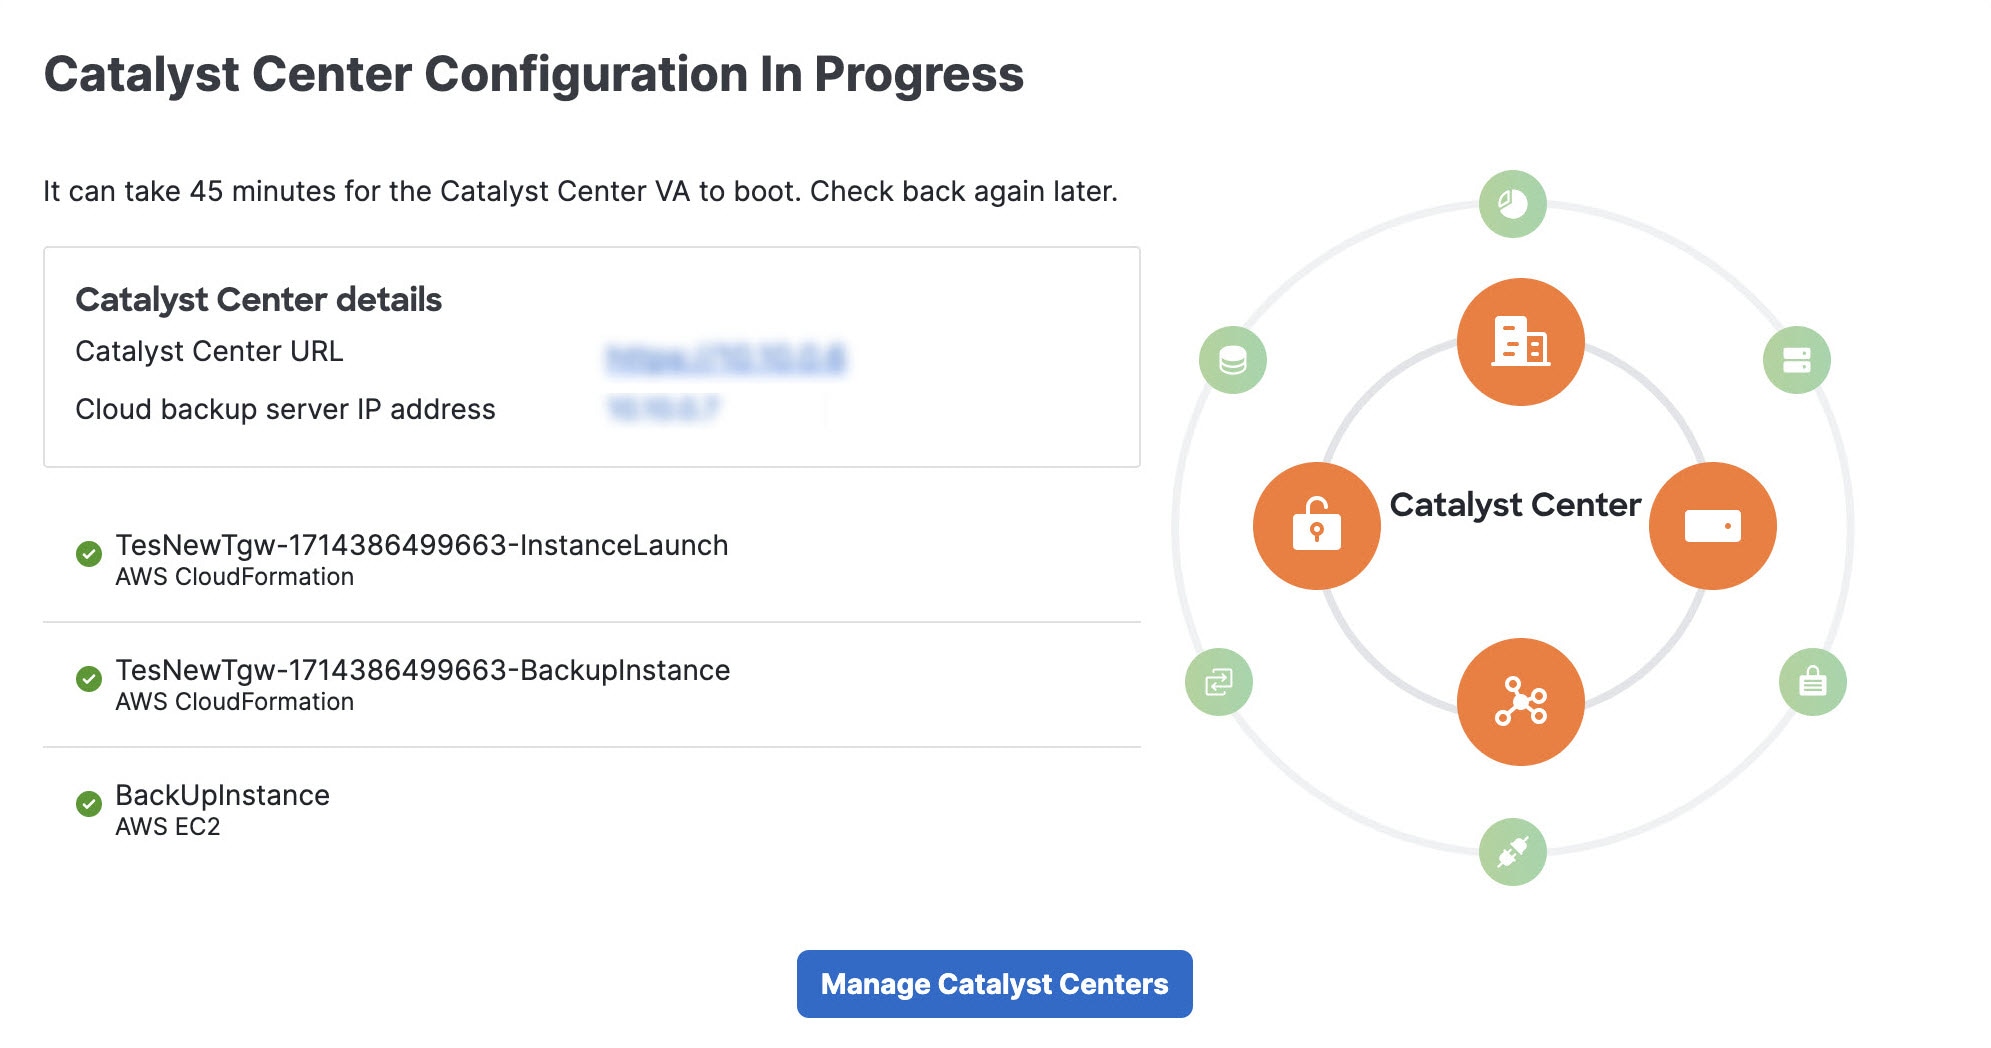
If the AWS configuration fails, return to the Dashboard pane and create a new VA pod. For more information, see Create a New VA Pod.

Note


You can delete the VA pod that failed to configure.

AWS configuration fails when editing a VA Pod

Make sure that any manual process on the AWS console completed successfully, and try this step again. If the problem persists, contact Cisco TAC.

Note


To avoid such conflicts, we recommend that you do not make any manual changes to the VA pods. Instead, use Cisco Global Launchpad for all actions.

Deleting VA Pod has failed

Make sure that any manual process on the AWS console completed successfully, and try this step again. If the problem persists, contact Cisco TAC.

Note


To avoid such conflicts, we recommend that you do not make any manual changes to the VA pods. Instead, use Cisco Global Launchpad for all actions.

The resource you are trying to delete has been modified recently. Please refresh the page to get the latest changes and try again.

If you encounter this error while deleting a VA pod, contact Cisco TAC.

Troubleshoot a Network Connectivity Error

While creating a VA pod, if the IPsec tunnel or TGW connection isn't established, make sure that the tunnel is up on your on-premises firewall or router.

If the tunnel from the VA pod to TWG is green and the tunnel from the TWG to CGW is gray, make sure that:

The diagram displays the two tunnels connecting the VA pod to the TGW to your on-premises firewall or router. The tunnel between the VA pod and TGW is green, meaning this tunnel is up. The tunnel between the TGW and your on-premises firewall or router is gray, meaning this tunnel isn't up.
  • You forwarded the correct configuration file to your network administrator.

  • Your network administrator made the necessary changes to the configuration file.

  • Your network administrator finished applying this configuration to your Enterprise firewall or router.

  • If you chose Existing TGW and Existing Attachments as your network connectivity preference, make sure that you correctly followed Manually Configure Routing on Your Existing Gateway or Direct Connect Attachment.

Troubleshoot Catalyst Center VA Configuration Errors

You can troubleshoot errors that occur while configuring a Catalyst Center VA with the following possible solutions:

Error Possible Solution

Environment Setup failed

  1. On Cisco Global Launchpad, return to the Create/Manage Cisco Catalyst Center(s) pane.

  2. Delete the Catalyst Center VA.

  3. Create a new Catalyst Center VA.

Delete Failed

If the Catalyst Center VA deletion fails, contact Cisco TAC.

Troubleshoot Concurrency Errors

You troubleshoot the concurrency errors with the following possible solutions:

Error Possible Solution

Unable to delete a Pod or a Cisco DNA Center created by another user.

You cannot delete a component, such as a VA pod or Cisco DNA Center VA, that another user created while a different action is in progress on the component. After the action completes, you or any other user can delete the component.

For example, you cannot delete a VA pod or Cisco DNA Center VA while it is in any of the following processes or states:

  • Another user is in the process of creating the Cisco DNA Center VA.

  • Another user is in the process of deleting the Cisco DNA Center VA.

  • The Cisco DNA Center VA is in a failed state after a deletion attempt.

The status of a Pod has been changed recently.

If you tried to delete a VA pod, the original user account that created the VA pod may have performed a concurrent action. This concurrency issue changes the status of the selected VA pod.

To view the updated status of the VA pod, click Refresh.

Troubleshoot Transit Gateway Attachment Errors

You troubleshoot transit gateway attachment errors with the following possible solutions:

Error Possible Solution

The transit gateway attachment for this VA pod is in "modifying" state. Check the attachment on your AWS console to resolve this issue.

If you receive this error while creating a new pod, it means that the transit gateway attachment was modified on the AWS portal.

You must wait for the state to change to Complete before you can continue creating the VA pod.

The transit gateway attachment for this VA pod is not found.

If you receive this error, it means that the transit gateway attachment was manually deleted. To resolve this, you must delete this VA pod and create a new one with the transit gateway attachment.

Troubleshoot Other Deployment Issues

You can troubleshoot other issues that occur while deploying a Catalyst Center VA on AWS with the following possible solutions:

Issue Possible Reasons and Solutions

Resources are green, but the Proceed button is disabled.

On some steps, you can only proceed if all the resources have been set up successfully. To ensure the integrity of the deployment, the Proceed button remains disabled until the setup is complete and all the resources have been configured and loaded.

Sometimes, the screen shows that the resources have been successfully set up, but the Proceed button is still disabled. In this case, you need to wait a few more seconds for some resources to load. After all the resources have been configured and loaded, the Proceed button is enabled.

Failure when deploying multiple VA pods with the same CGW in single region.

Make sure that:

  • The CGW IP address is the IP address of your Enterprise firewall or router.

  • The CGW IP address is a valid public address.

  • The CGW IP address hasn’t been used for another VA pod within the same region. In each region, multiple VA pods cannot have the same CGW IP address. To use the same CGW IP address for more than one VA pod, deploy each VA pod in a different region.

Unable to SSH or ping the Cisco DNA Center VA.

You cannot connect via SSH or ping the Catalyst Center VA, although the tunnel is up and the application status is complete (green). This issue might occur if the on-premises CGW is configured incorrectly. Verify the CGW configuration and try again.

Session ended

If your session times out while operations are in progress, such as triggering an RCA, the operations may abruptly end and display a Session ended notification.

If your session times out, click Ok, log back in, and restart the operations.