Cisco Network Insights Advisor Setup and Settings

This chapter contains the following sections:

About Cisco Network Insights Advisor on Cisco DCNM

The Cisco Network Insights Advisor (Cisco NIA) application monitors a data center network and pinpoints issues that can be addressed to maintain availability and reduce surprise outages. Cisco NIA's understanding of your network allows it to provide proactive advice with a focus on maintaining availability and alerting customers about potential issues that can impact up-time.

The Cisco NIA app collects the CPU, device name, device pid, serial number, version, memory, device type, and disk usage information for the nodes in the fabric

The Cisco NIA app provides TAC Assist functionalities which are useful when working with Cisco TAC. It provides a way for Cisco Customers to collect tech support across multiple devices and upload those tech supports to Cisco Cloud. These tech support are accessible to our TAC teams when helping customers through a resolution of a Service Request. Additionally, it enables capability for our TAC teams to collect tech support on demand for a particular device.

Cisco NIA app consists of the following components:

  • Advisories

    • Software Upgrades

    • Cisco Recommendations

  • Notices

    • EoL/EoS Dates

    • Field Notices

  • Issues

    • Bug/PSIRT Reports

  • Devices

  • TAC Assist

    • Log Collection

    • Technical Support to Cloud

    • Enhanced TAC Assist

  • Jobs

    • Fabric

    • Global (Flow State Validator)


Note

In this chapter, a "network" refers to a fabric in a LAN fabric and a switch group in a Classic LAN.


Guidelines and Limitations

The following are the guidelines and limitations for the Cisco Network Insights Advisor (Cisco NIA) application in the Cisco DCNM:

  • IPv6 is not supported for Cisco NIA application in the Cisco DCNM.

  • The Cisco NIA application requires that physical servers hosting Cisco DCNM computes as VMs are atleast Cisco C220-M4 category. It is also required that a compute be hosted on a data store with a dedicated hard disk of atleast 500GB.

  • Cisco NIA app retains the collected logs using TAC Assist for 24 hours.

  • Cisco NIA app retains the collected technical support information using bag scan for 24 hours.

  • Cisco NIA does not support mulit-site domain fabric type.

  • Cisco NIA does not support nodes with IPv6 management address on Cisco DCNM.

  • For remote authentication of Cisco NIA on AAA or TACAS or LDAP:

    • You must have admin credentials.

    • The LAN credentials must be properly set.

Cisco NIA Initial Setup

This section contains the steps required to set up Cisco NIA app in the Cisco DCNM. This set up is required for Cisco NIA app to show important information and gather relevant data.

Procedure


Step 1

Once Cisco NIA app is installed and after your first log in, a welcome dialog appears. Click Begin Setup.

A Setup dialog appears.

Step 2

In Data Collection Setup, click Configure.

The Data Collection Setup dialog appears. In the Fabrics list are fabrics that were discovered during the Cisco NIA application installation.

Step 3

Check only the fabrics you want visible to the Cisco NIA application.

Step 4

Click Ok.

The Setup dialog appears with the selected fabrics appearing in Data Collection Setup. You can edit the selected fabric(s) by clicking Edit configuration. You can return to the setup utility anytime by clicking the settings icon and choose Rerun Setup.


Setting Up the Device Connector

This section describes setting up the device connector for Cisco NIA app on Cisco DCNM.

About Device Connector

Devices are connected to the Intersight portal through a Device Connector that is embedded in the management controller of each system. Device Connector provides a secure way for the connected devices to send information and receive control instructions from the Cisco Intersight portal, using a secure Internet connection.

When an Intersight-enabled device or application starts, the Device Connector starts at boot by default, and attempts to connect to the cloud service. If the Auto Update option is enabled, the Device Connector is automatically updated to the latest version through a refresh by the Intersight service when you connect to Intersight. Auto Update is enabled by default for Cisco DCNM. For more information on the Auto Update option, see Configuring the Intersight Device Connector.

Configuring the Intersight Device Connector

Cisco NIA application is connected to the Cisco Intersight cloud portal through a Device Connector which is embedded in the management controller of the Cisco DCNM platform. Cisco Intersight is a virtual appliance that helps manage and monitor devices through the Cisco NIA app. The Device Connector provides a secure way for connected Cisco DCNM to send and receive information from the Cisco Intersight portal, using a secure Internet connection.

To setup the Device Connector, follow these steps:

Procedure


Step 1

On the Cisco DCNM navigation pane, click Administration.

Step 2

Under the Cisco DCNM Server list, click Device Connector.

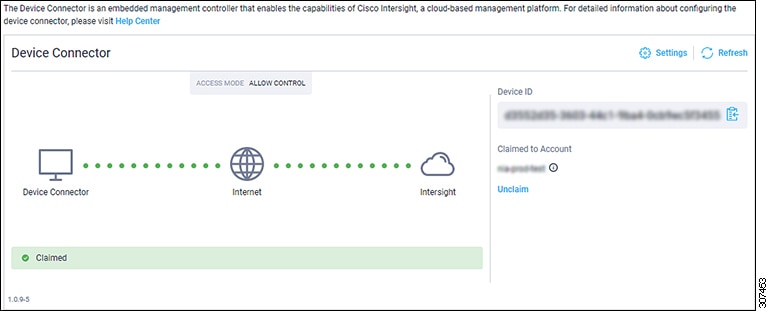
The Device Connector work pane appears:

Step 3

At the far right of the screen, click Settings.

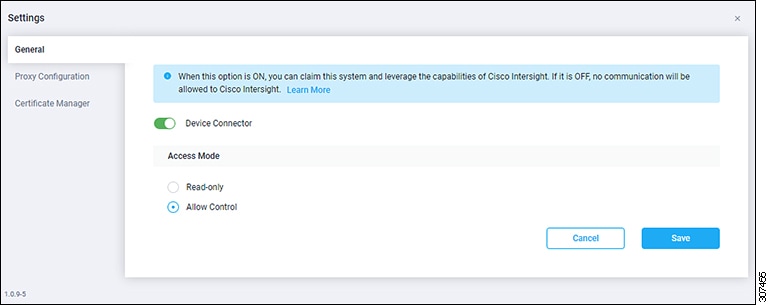
The Settings - General dialog appears:

The DC version for Cisco DCNM is 1.0.9-286.

Device Connector (switch)

This is the main switch for the Device Connector communication with Cisco Intersight. When the switch is on (green highlight), the system is claimed and the capabilities of the Cisco Intersight can be leveraged. If the switch is off (gray highlight), no communication can occur between the platform and Cisco intersight.

Access Mode

Read-only: This option ensures that no changes are made to this device from Intersight. For example, actions such as upgrading firmware or a profile deployment will not be allowed in the Read-Only mode. However, the actions depend on the features available for a particular system.

Allow Control: This option (selected by default) enables you to perform full read/write operations from the appliance, based on the features available in Cisco Intersight. This function is not used for changes from Cisco Cloud to customer network.

Step 4

Set the Device Connector to on (green highlight) and choose Allow Control.

Step 5

Click Proxy Configuration.

The Settings - Proxy Configuration dialog appears.

Enable Proxy (switch)

Enable HTTPS Proxy to configure the proxy settings.

Proxy Hostname/IP* and Proxy Port*: Enter a proxy hostname or IP address, and a proxy port number.

Authentication (switch)

Enable proxy access through authentication. When the switch is on (green highlight), authentication to the proxy server is required. If the switch is off (gray highlight), no authentication is required.

Username* and Password: Enter a user name and password for authentication.

Note 

Proxy settings are required for Network Insights.

Step 6

Enable the proxy (green highlight) and enter a hostname and port number.

Step 7

Optional: If proxy authentication is required, enable it (green highlight) and enter a username and password.

Step 8

Click Save.


Claiming a Device

Before you begin

Configure the Intersight Device Connector information from the Cisco DCNM site using the instructions provided in Configuring the Intersight Device Connector.

Procedure


Step 1

Log into the Cisco Intersight cloud site:

https://www.intersight.com

Step 2

In the Cisco Intersight cloud site, under the Devices tab, click Claim a New Device.

The Claim a New Device page appears.

Step 3

Go back to the Cisco DCNM site and navigate back to the Intersight - Device Connector page.

  1. On the menu bar, choose System > System Settings.

  2. In the Navigation pane, click Intersight.

Step 4

Copy the Device ID and Claim Code from the Cisco DCNM site and paste them into the proper fields in the Claim a New Device page in the Intersight cloud site.

Click on the clipboard next to the fields in the Cisco DCNM site to copy the field information into the clipboard.

Step 5

In the Claim a New Device page in the Intersight cloud site, click Claim.

You should see the message "Your device has been successfully claimed" in the Claim a New Device page. Also, in the main page, you should see your Cisco DCNM system, with Connected shown in the Status column.

Step 6

Go back to the Intersight - Device Connector page in the Cisco DCNM GUI and verify that the system was claimed successfully.

You should see green dotted lines connecting Internet to Intersight in the Device Connector graphic, and the text Claimed underneath the graphic.

Note 

You may have to click Refresh in the Intersight - Device Connector page to update the information in the page to the current state.

If you decide to unclaim this device for some reason, locate the Unclaim link in the Intersight - Device Connector page and click that link.


Cisco NIA Settings

Settings

Displayed across the top of the work pane is a group of icons and a list menu comprising the Cisco NIA app settings. The following table describes each:

Property Description

Fabric

Choose a fabric containing the devices you want visible to the Cisco NIA application.

Device Connector Status: Identifies the current connection status of the Cisco NIA application to the Cisco Intersight cloud and the device connector claim condition. Possible connection statuses are:

  • Not Connected: The Cisco NIA application is not connected to the Cisco Intersight cloud.

  • Connected / Not Claimed: The Cisco NIA application is connected to the Cisco Intersight cloud but the device connector has not been claimed by the customer.

  • Connected / Claimed: The Cisco NIA application is connected to the Cisco Intersight cloud and the device connector has been claimed by the customer.

For more information, see Configuring the Intersight Device Connector.

Inbox: View messages from Cisco regarding software upgrades or other relevant information about devices on your network.

Note 

This is a preview feature.

Clicking on this icon invokes a list menu allowing you to make changes to the following:

  • About Network Insights—Displays an information dialog identifying the version number of the Cisco NIA application. Click Update to Latest to fetch the latest metadata published version. This requires that the using of the Cisco Intersight Device Connecter is connected and claimed. See Configuring the Intersight Device Connector for details.

  • Rerun Setup—Allows you to edit the Data Collection Setup by adding or removing the fabrics.

Displays the online help for Cisco NIA application.

Navigating Cisco NIA

The Cisco NIA application window is divided into two parts: the Navigation pane and the Work pane.

Navigation Pane

The Cisco NIA app navigation pane divides the collected data into seven categories:

1 Dashboard: The main dashboard for the Cisco NIA application providing immediate access to total advisories, issues, notices, and collected TAC assist logs.

2 Advisories: Displays hardware, software, and hardening check advisories applicable to your network.

3 Notices: Displays notices applicable to the hardware and software in your network.

4 Issues: Displays anomalies, bugs, and Product Security Incident Response Team (PSIRT) alerts.

5 Devices: Sorts devices by issue, platform/version, or maintenance score.

6 TAC Assist: Collects logs for specified devices that can be attached to service requests.

7 Jobs: Provides access to configure and schedule bug scan and compliance check jobs that run for a specific fabric.

Additional functions are :

1 Dashboard View icon: Provides immediate access to top usage or issues for the selected information type.

2 Browse View icon: Provides a detailed view of the information and access to more granular detail.

Work Pane

The work pane is the main viewing location in the Cisco NIA application. All information tiles, graphs, charts, and lists appear in the work pane.

Dashboard Work Pane

In an information tile, you can usually click on a numeric value to switch to the Browse work pane:

1 Launches the Browse work pane with all of the items displayed from the graph in the information tile.

2 Launches the Browse work pane with only the selected items displayed from the number in the information tile.

Browse Work Pane

The Browse work pane isolates the data for the parameter chosen on the Dashboard. The Browse work pane displays a top node lists, graphs over time, and lists all the nodes in an order defined by the anomaly score:

Clicking on one of the nodes in the list opens the Details work pane for that selection.

Details Work Pane

The Details work pane provides resource details about the item selected in the event list on the Browse work pane. The Details work pane consists of:

  • General Information: Includes information about the selected object. This varies based on which browse window the details work pane was initiated.

  • Notices: Includes notices affecting devices in your network.

  • Devices Affected: Displays the number of affected devices in your network.

Devices

The Devices page displays the devices by device name, serial number, IP address, version, and platform.

TAC Assist

The TAC Assist work pane lets you collect logs for specified devices that can be attached to service requests using the Cisco Intersight Cloud. It lets you check the device(s) for which you can collect logs to assist TAC.

The Log Collection section displays the new job triggered for TAC Assist. The Job Details page lists the TAC Assist logs.

All information about TAC Assist job including, status, devices, fabric, start time, job id, device name, log location, and cloud upload appear in the work pane.

Jobs

The configuration icon from the Jobs > Fabric lets you configure a scheduled bug scan and compliance check for the selected fabric.

The browse icon from the Jobs > Fabric lets you view the scheduled jobs for the selected fabric and time range from the Fabric Job List page.

The configuration icon from the Jobs > Global lets you configure and schedule Flow State Validator jobs that run across the network. The Flow State Validator gathers information about flow related issues.