Microsoft NLB

This chapter contains the following sections:

About Microsoft NLB

The Microsoft Network Load Balancing (NLB) feature distributes the client traffic across many servers, with each server running its individual copy of the application. Network Load Balancing uses Layer 2 unknown unicast or multicast to simultaneously distribute the incoming network traffic to all cluster hosts.

A group of Microsoft NLB nodes is collectively known as an NLB cluster. An NLB cluster serves one or more virtual IP (VIP) addresses. Nodes in the NLB cluster use a load-balancing algorithm to decide which individual node will service the particular traffic flow that is destined for the NLB VIP. Every node within the cluster receives every packet of traffic, but only one node services a request.

The following figure shows a graphical representation of how Microsoft NLB is implemented with Cisco APIC.
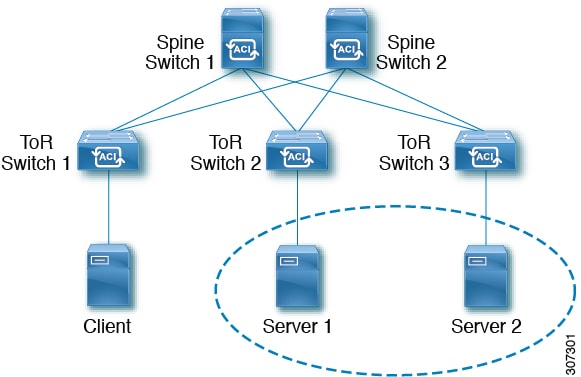
In this figure, Server 1 and Server 2 are in the MS NLB cluster. These servers appear as a single-host server to outside clients. All servers in the MS NLB cluster receive all incoming requests, then MS NLB distributes the load between the servers.

Microsoft NLB functions in three different operational modes:

  • Unicast Mode: In this mode, each NLB cluster VIP is assigned a unicast MAC address. This mode relies on unknown unicast flooding to deliver traffic to the cluster.

  • Multicast Mode: In this mode, each NLB cluster VIP is assigned a non-Internet Assigned Numbers Authority (IANA) multicast MAC address (03xx.xxxx.xxxx).

  • IGMP Mode: In this mode, an NLB cluster VIP is assigned a unique IPv4 multicast group address. The multicast MAC address for this is derived from the standard MAC derivation for IPv4 multicast addresses.

Understanding Unicast Mode

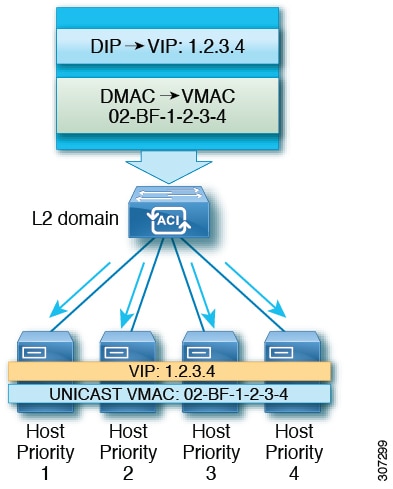
In the unicast mode of operation, Network Load Balancing reassigns the MAC address of the network adapter on which it is enabled (called the cluster adapter), and all cluster hosts are assigned the same MAC address. This MAC address is derived from the cluster's primary IP address. For example, for a primary IP address of 1.2.3.4, the unicast MAC address is set to 02-BF-1-2-3-4.

Network Load Balancing's unicast mode induces switch flooding in order to simultaneously deliver incoming network traffic to all cluster hosts, as shown in the following figure.
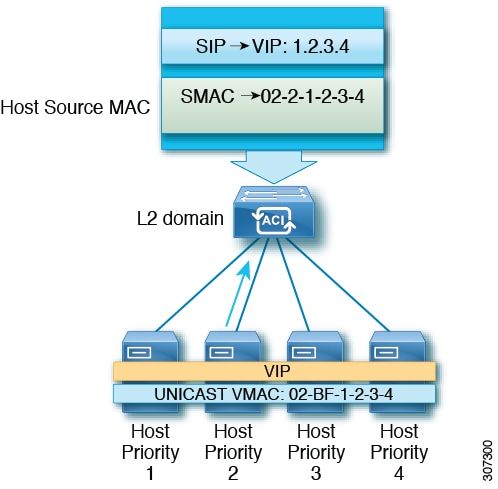
The use of a common MAC address would normally create a conflict, since Layer 2 switches expect to see unique source MAC addresses on all switch ports. To avoid this problem, Network Load Balancing uniquely modifies the source MAC address for outgoing packets. If the cluster MAC address is 02-BF-1-2-3-4, then each host's source MAC address is set to 02-x-1-2-3-4, where x is the host's priority within the cluster, as shown in the following figure.
Understanding Multicast Mode

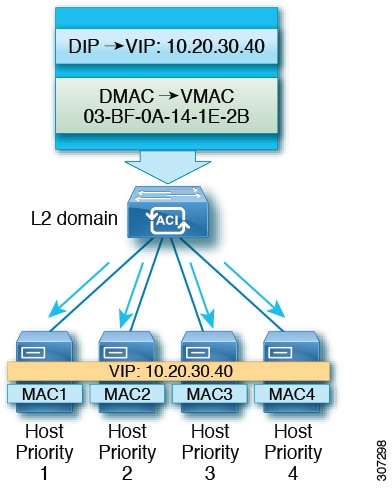
Network Load Balancing also provides multicast mode for distributing incoming network traffic to all cluster hosts. Multicast mode assigns a Layer 2 multicast address to the cluster adapter instead of changing the adapter's MAC address. For example, the multicast MAC address could be set to 03-BF-0A-14-1E-28 for a cluster's primary IP address of 10.20.30.40. Cluster communication doesn't require a separate adapter.
Understanding IGMP Mode

Microsoft NLB servers can also be configured to use IGMP to join the multicast group. This, combined with a querier on a switch and IGMP snooping, can optimize the scope of the flooding of multicast messages.

Microsoft NLB servers send IGMP joins to a multicast group address, where the last two octets of the multicast address correspond to the last two octets of the cluster IP. For example, in a situation where the Microsoft NLB servers send IGMP joins to a multicast address of 239.255.x.x, the following would occur:

  • Cluster IP: 10.20.30.40

  • IGMP sent to 239.255.30.40

  • MAC used in client-to-server direction: 0100.5E7F.1E28

  • Cluster communication doesn't require a separate adapter
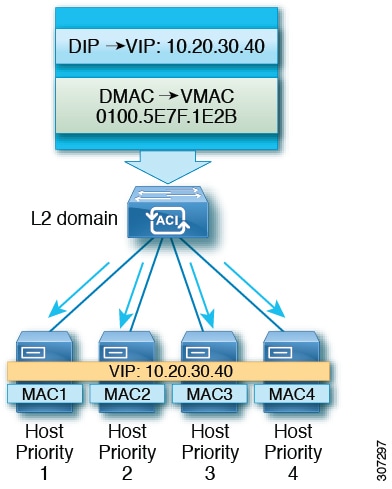
Cisco ACI Configuration for Microsoft NLB Servers

Prior to Release 4.1, Microsoft NLB deployment requires the Cisco ACI fabric to be Layer 2 only and uses an external router as the Layer 3 gateway for endpoints. Starting with Release 4.1, the Cisco ACI fabric can be a Layer 3 gateway for Microsoft NLB deployment.

The following table summarizes the deployment considerations for each Microsoft NLB deployment mode.

Table 1. Cisco ACI Deployment Modes with Microsoft NLB

Unicast Mode

Multicast Mode

IGMP Mode

Cisco ACI as a Layer 2 Network, With External Router as Layer 3 Gateway

Supported on leaf switch models with -EX, -FX, or -FX2 at the end of the switch name.

Supported on leaf switch models with -EX, -FX, or -FX2 at the end of the switch name, as well as leaf switch models that do not have a suffix at the end of the switch name.

Supported on leaf switch models with -EX, -FX, or -FX2 at the end of the switch name, as well as leaf switch models that do not have a suffix at the end of the switch name. However, Microsoft NLB traffic is not scoped by IGMP, but rather is flooded instead.

Cisco ACI as a Layer 3 Gateway

Supported on Release 4.1 and later.

Supported on Release 4.1 and later.

Supported on Release 4.1 and later.

The following table provides more information on the configuration options available for deploying Microsoft NLB using Cisco ACI as Layer 2.

Table 2. External Router and ACI Bridge Domain Configuration for the Three Microsoft NLB Modes

Unicast Mode

Multicast Mode

IGMP Mode1

ACI Bridge Domain Configuration

  • Bridge domain configured for unknown unicast flooding (not hw-proxy)

  • No IP routing

  • Bridge domain configured for unknown unicast flooding (not hw-proxy)

  • No IP routing

  • Layer 3 unknown multicast: flood (even with optimized multicast flooding, Microsoft NLB traffic is flooded)

  • IGMP snooping configuration: Not applicable

  • Bridge domain configured for unknown unicast flooding (not hw-proxy)

  • No IP routing

  • Layer3 unknown multicast: Optional, but can be configured for future compatibility

  • Querier configuration: Optional, but can be enabled for future compatibility; Configure subnet under the bridge domain, no need for IP routing

  • IGMP snooping configuration: Optional, but can be enabled for future compatibility

External Router ARP Table Configuration

  • No special ARP configuration

  • External router learns VIP to VMAC mapping

Static ARP configuration for unicast VIP to multicast MAC

Static ARP configuration for unicast VIP to multicast MAC

1 As of Release 3.2, using Microsoft NLB IGMP mode compared with Microsoft NLB multicast mode offers no benefits in terms of scoping of the multi-destination traffic

Beginning with Release 4.1, configuring Cisco ACI to connect Microsoft NLB servers consists of the following general tasks:

  • Configuring the VRF, where you can configure the VRF in egress or ingress mode.

  • Configuring a bridge domain (BD) for the Microsoft NLB servers, with L2 unknown unicast in flooding mode and not in hardware-proxy mode.

  • Defining an EPG for all the Microsoft NLB servers that share the same VIP. You must associate this EPG with the previously defined BD.

  • Entering the Microsoft NLB VIP as a subnet under the EPG. You can configure the Microsoft NLB in the following modes:

    • Unicast mode: You will enter the unicast MAC address as part of the Microsoft NLB VIP configuration. In this mode, the traffic from the client to the Microsoft NLB VIP is flooded to all the EPGs in the Microsoft NLB BD.

    • Multicast mode: You will enter the multicast MAC address while configuring the Microsoft NLB VIP itself. You will go to the static ports under the Microsoft NLB EPG and add the Microsoft NLB multicast MAC to the EPG ports where the Microsoft NLB servers are connected. In this mode, the traffic is forwarded to the ports that have the static MAC binding.

    • IGMP mode: You will enter a Microsoft NLB group address while configuring the Microsoft NLB VIP itself. In this mode, the traffic from the client to the Microsoft NLB VIP is forwarded to the ports where the IGMP join is received for the Microsoft NLB group address.

  • Configuring a contract between the Microsoft NLB EPG and the client EPG. You must configure the Microsoft NLB EPG as the provider side of the contract and the client EPG as the consumer side of the contract.

Microsoft NLB is a route plus flood solution. Traffic from the client to the Microsoft NLB VIP is first routed at the consumer ToR switch, and is then flooded on the Microsoft NLB BD toward the provider ToR switch.

Once traffic leaves the consumer ToR switch, traffic is flooded and contracts cannot be applied to flood traffic. Therefore, the contract enforcements must be done on consumer ToR switch.

For a VRF in ingress mode, intra-VRF traffic from the L3Out to the Microsoft NLB EPG may be dropped on the consumer ToR switch because the border leaf switch (consumer ToR switch) does not have a policy. To work around this issue, use one of the following options:

  • Option 1: Configure the VRF in egress mode. When you configure the VRF in egress mode, the policy is downloaded on the border leaf switch.

  • Option 2: Add the Microsoft NLB EPG and L3external of the L3Out in a preferred group. Traffic will hit the default-allow policy on the consumer ToR switch.

  • Option 3: Deploy the Microsoft NLB EPG on an unused port that is in an up state, or on a port connected to a Microsoft NLB server on the border leaf switch. By doing so, the Microsoft NLB EPG becomes a local endpoint on the border leaf switch. The policy is downloaded for local endpoints, so the border leaf switch would therefore have the policy downloaded.

  • Option 4: Use a shared service. Deploy an L3Out in the consumer VRF, which is different from the provider Microsoft NLB VRF. For the Microsoft NLB VIP under the Microsoft NLB EPG, check the Shared between VRFs box. Configure a contract between L3Out from the consumer VRF and the Microsoft NLB EPG. By using a shared service, the policy is downloaded on the border leaf switch.

The following table provides more information on supported EPG and BD configurations for the Microsoft NLB modes.

Table 3. Cisco ACI EPG and BD Configurations for the Microsoft NLB Modes

Unicast Mode

Multicast Mode

IGMP Mode

Bridge Domain Configuration

  • IP routing on

  • Bridge domain configured for unknown unicast flooding (not hw-proxy)

  • Do not change the bridge domain MAC address

  • IP routing on

  • Bridge domain configured for unknown unicast flooding (not hw-proxy)

  • Do not change the bridge domain MAC address

  • IP routing on

  • Bridge domain configured for unknown unicast flooding (not hw-proxy)

  • Do not change the bridge domain MAC address

EPG Configuration

  • Subnet for the VIP

  • Unicast MAC address defined as part of the subnet

  • Subnet for the VIP

  • Multicast MAC address defined as part of the subnet

  • Static binding to the ports where the servers are

  • Static group MAC address on each path

  • Subnet for the VIP

  • No need to enter a MAC address

  • You can choose dynamic group or static group

  • If you choose the static group option, then enter static paths and enter the multicast group in each path

VMM Domain

You can enter a VMM domain

Multicast mode requires a static path, so you cannot use a VMM domain in this situation

In dynamic group mode, you can use a VMM domain

Microsoft Network Load Balancing Guidelines and Limitations

Following are the guidelines and limitations for Microsoft Network Load Balancing (NLB):

  • In a bridge domain's Policy > Advanced/Troubleshooting properties, you must disable the Drop ARP with Multicast SMAC knob if the Microsoft NLB VIP address is configured under any EPG in that bridge domain.

  • Microsoft NLB is not supported when a bridge domain's multi-destination flooding is set to drop.

  • For an existing bridge domain that is created before the upgrade, Drop ARP with Multicast SMAC knob is disabled by default. For bridge domains created after the upgrade, this knob is enabled by default. If you create a bridge domain for the Microsoft NLB after the upgrade you must disable this knob for Microsoft NLB to work.

  • Layer 3 multicast is not supported (you cannot enable PIM on the Microsoft NLB bridge domain).

  • For IGMP, the allowable mode group is IPv4 (IPv6 is not supported).

  • Only Cisco Nexus 9000 series switches with names that end in EX and later are supported.

  • Shared services and microsegment (uSeg) EPGs are supported with Microsoft NLB.

  • Cisco ACI Multi-Site is currently not supported.

  • You must configure Microsoft NLB in layer 2 unknown unicast flooding mode.

    If you configure the bridge domain for hardware-proxy instead, Cisco ACI raises a fault, which is cleared by fixing the bridge domain configuration. If you leave the bridge domain incorrectly configured for hardware-proxy, ACI tries to get the faulty configuration up every 30 seconds, which is an unnecessary overhead for the switch.

  • You should configure Microsoft NLB bridge domain with the default SVI MAC address. Under layer 3 configurations, you should configure the bridge domain MAC address with the default setting of 00:22:BD:F8:19:FF. Do not modify this default SVI MAC address for the Microsoft NLB bridge domain.

  • There is a hardware limit of 128 Microsoft NLB VIPs per fabric.

  • Virtualized servers that are configured for Microsoft NLB can connect to Cisco ACI with static binding in all modes (unicast, multicast, and IGMP).

  • Virtualized servers that are configured for Microsoft NLB can connect to Cisco ACI through VMM integration in unicast mode and IGMP mode.

  • Microsoft NLB unicast mode is not supported with VMM integration behind Cisco UCS B-Series Blade Servers in end-host mode.

    Microsoft NLB in unicast mode relies on unknown unicast flooding for delivery of cluster-bound packets. Unicast mode will not work on Cisco UCS B-Series Blade Servers when the fabric interconnect is in end-host mode, because unknown unicast frames are not flooded as required by this mode. For more details on the layer 2 forwarding behavior of Cisco UCS B-Series Blade Servers in end-host mode, see:

    https://www.cisco.com/c/en/us/solutions/collateral/data-center-virtualization/unified-computing/whitepaper_c11-701962.html

Configuring Microsoft NLB in Unicast Mode Using the GUI

This task configures Microsoft NLB to flood all of the ports in the bridge domain.

Before you begin

Have the following information available before proceeding with these procedures:

  • Microsoft NLB cluster VIP

  • Microsoft NLB cluster MAC address

Procedure


Step 1

In the Navigation pane, choose Tenant > tenant_name > Application Profiles > application_profile_name > Application EPGs > application_EPG_name > Subnets.

Step 2

Right-click Subnets and select Create EPG Subnet.

Step 3

In the Create EPG Subnet dialog box, fill in the following fields:

  1. In the Default Gateway IP field, enter the Microsoft NLB cluster VIP.

    For example, 192.0.2.1/32.

  2. In the Scope area, for shared services, check Shared between VRFs.

    Uncheck Private to VRF, if it is selected.

  3. Under Subnet Control, check the No Default SVI Gateway check box.

  4. In the Type Behind Subnet area, click EpNlb.

    The Mode field appears.

  5. From the Mode drop-down list, choose NLB in unicast mode.

    The MAC Address field appears.

  6. In the MAC Address field, enter the Microsoft NLB cluster MAC address.

    For example, 00:01:02:03:04:05.

Step 4

Click Submit.


Configuring Microsoft NLB in Multicast Mode Using the GUI

This task configures Microsoft NLB to flood only on certain ports in the bridge domain.

Before you begin

Have the following information available before proceeding with these procedures:

  • Microsoft NLB cluster VIP

  • Microsoft NLB cluster MAC address

Procedure


Step 1

In the Navigation pane, choose Tenant > tenant_name > Application Profiles > application_profile_name > Application EPGs > application_EPG_name > Subnets.

Step 2

Right-click Subnets and select Create EPG Subnet.

Step 3

In the Create EPG Subnet dialog box, fill in the following fields:

  1. In the Default Gateway IP field, enter the Microsoft NLB cluster VIP.

    For example, 192.0.2.1/32.

  2. In the Scope area, for shared services, check Shared between VRFs.

    Uncheck Private to VRF, if it is selected.

  3. Under Subnet Control, check the No Default SVI Gateway check box.

  4. In the Type Behind Subnet area, click MSNLB.

    The Mode field appears.

  5. From the Mode drop-down list, choose NLB in static multicast mode.

    The MAC Address field appears.

  6. In the MAC Address field, enter the Microsoft NLB cluster MAC address.

    For the Microsoft NLB cluster MAC address for the multicast mode, the cluster MAC address has to start with 03.

    For example, 03:BF:01:02:03:04.

  7. Copy the Microsoft NLB cluster MAC address that you entered in this field for the multicast mode.

Step 4

Click Submit.

Step 5

In the Navigation pane, choose Tenant tenant_name > Application Profiles > application_profile_name > Application EPGs > application_EPG_name > Static Ports > static_port.

Choose the static port that you want to configure Microsoft NLB to flood onto in the bridge domain.

Step 6

On the Static Path page for this port, fill in the following field:

  1. In the NLB Static Group area, click + (Create), then paste the MAC address that you copied from 3.g into the Mac Address field.

  2. Click Update underneath the Mac Address field.

Step 7

In the Static Path page, click Submit.

Any traffic to this Microsoft NLB cluster MAC address will now go out on this static port.


Configuring Microsoft NLB in IGMP Mode Using the GUI

This task configures Microsoft NLB to flood only on certain ports in the bridge domain.

Before you begin

Have the following information available before proceeding with these procedures:

  • Microsoft NLB cluster VIP

Procedure


Step 1

In the Navigation pane, choose Tenant > tenant_name > Application Profiles > application_profile_name > Application EPGs > application_EPG_name > Subnets.

Step 2

Right-click Subnets and select Create EPG Subnet.

Step 3

In the Create EPG Subnet dialog box, fill in the following fields:

  1. In the Default Gateway IP field, enter the Microsoft NLB cluster VIP.

    For example, 192.0.2.1/32.

  2. In the Scope area, for shared services, check Shared between VRFs.

    Uncheck Private to VRF, if it is selected.

  3. Under Subnet Control, check the No Default SVI Gateway check box.

  4. In the Type Behind Subnet area, click EpNlb.

    The Mode field appears.

  5. From the Mode drop-down list, choose NLB in IGMP mode.

    The Group Id field appears.

  6. In the Group Id field, enter the Microsoft NLB multicast group address.

    For the Microsoft NLB multicast group address, the last two octets of the address correspond to the last two octets of the instance cluster IP address. For example, if the instance cluster IP address is 10.20.30.40, then the Microsoft NLB multicast group address that you would enter into this field might be 239.255.30.40.

Step 4

Click Submit.

Traffic to the Microsoft NLB cluster VIP will be flooded to the outgoing interface list that is either configured statically from the APIC or dynamically based on IGMP joins from the NLB cluster.

Step 5

Determine if you want to have a static join or a dynamic join.

You can have a combination of static joins and dynamic joins, where some ports can have a static join and other ports can have a dynamic join.

  • Dynamic Join: In the dynamic join, the join is sent by the Microsoft NLB cluster on the respective ports, then the switch dynamically comes up with that outgoing interface list.

  • Static Join: In the static join, traffic to the Microsoft NLB cluster VIP will go to the ports that you configure in the following steps.

    If you want to have a static join:

    1. Copy the Microsoft NLB multicast group address that you entered in the Group Id field in 3.f.

    2. In the Navigation pane, choose Tenant > tenant_name > Application Profiles > application_profile_name > Application EPGs > application_EPG_name > Static Ports > static_port.

      Choose the static port that you want to configure Microsoft NLB to flood onto in the bridge domain.

    3. On the Static Path page for this port, fill in the following field:

      • In the IGMP Snoop Static Group area, click + (Create), then paste the group address that you copied from 3.f into the Group Address field.

      • Click Update underneath the Group Address field.

    4. In the Static Path page, click Submit.

IGMP snooping is enabled by default on the bridge domain because the IGMP snooping policy default that is associated with the bridge domain has Enabled as the administrative state of the policy. For more information, see Configuring an IGMP Snooping Policy Using the GUI.