Using Cisco IOS XE Software
This chapter provides information to help you configure the Cisco ASR 1000 Series Modular Ethernet Line Card using the Cisco IOS XE software. It includes the following sections:
- Accessing the CLI Using a Router Console
- Using Keyboard Shortcuts
- Using the History Buffer to Recall Commands
- Understanding Command Modes
- Getting Help
- Using the no and default Forms of Commands
- Saving Configuration Changes
- Filtering the Output of the show and more Commands
- Finding Support Information for Platforms and Cisco Software Images
Accessing the CLI Using a Router Console
The following sections describe how to access the command-line interface (CLI) using a directly-connected console or by using Telnet to obtain a remote console:
For detailed information about configuring and accessing a router through various services, refer to the http://www.cisco.com/en/US/docs/ios/termserv/configuration/guide/12_4/tsv_12_4_book.html Cisco IOS Terminal Services Configuration Guide and the http://www.cisco.com/en/US/docs/ios/12_2/termserv/command/reference/ftersv_r.html Cisco IOS Terminal Services Command Reference document.
- Accessing the CLI Using a Directly-Connected Console
- Accessing the CLI from a Remote Console Using Telnet
Accessing the CLI Using a Directly-Connected Console
This section describes how to connect to the console port on the router and use the console interface to access the CLI.
The console port on a Cisco ASR 1000 Series Router is an EIA/TIA-232 asynchronous, serial connection with no flow control and an RJ-45 connector. The console port is located on the front panel of each Route Processor, as shown in Figure 1.
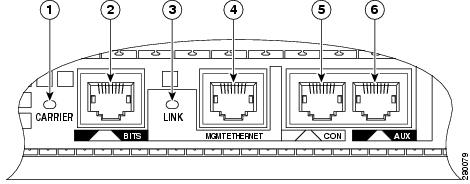
|
1 |
CARRIER LED |
4 |
MGMT Ethernet connector |
|
2 |
BITS connector |
5 |
CON connector |
|
3 |
LINK LED |
6 |
AUX connector |
Connecting to the Console Port
Before you connect to the console interface on a router through a terminal or a PC, perform the following steps:
1. Configure your terminal emulation software with the following settings:
2. Connect to the console port using the RJ-45-to-RJ-45 cable and the RJ-45-to-DB-25 DTE adapter or by using the RJ-45-to-DB-9 DTE adapter (labeled terminal).
DETAILED STEPS
| Step 1 |
Configure your terminal emulation software with the following settings:
| ||
| Step 2 | Connect to the console port using the RJ-45-to-RJ-45 cable and the RJ-45-to-DB-25 DTE adapter or by using the RJ-45-to-DB-9 DTE adapter (labeled terminal). |
Accessing the CLI using the Console Interface
To access the CLI using the console interface, complete the following steps:
1. After you attach the terminal hardware to the console port on a router and configure your terminal emulation software with the correct settings, the ‘following prompt appears:
2. Press Return to enter the user EXEC configuration mode. The following prompt appears:
3. From the user EXEC configuration mode, enter the enable command as shown in the following example:
4. At the password prompt, enter your system password, as shown here:
5. When your password is accepted, the privileged EXEC mode prompt appears:
6. You now have access to the CLI in privileged EXEC mode and you can enter the necessary commands to complete your desired tasks.
7. To exit the console session, enter the quit command as shown in the following example:
DETAILED STEPS
| Step 1 |
After you attach the terminal hardware to the console port on a router and configure your terminal emulation software with the correct settings, the ‘following prompt appears: Example: Press Return for Console prompt |
| Step 2 |
Press Return to enter the user EXEC configuration mode. The following prompt appears: Example: Router> |
| Step 3 |
From the user EXEC configuration mode, enter the enable command as shown in the following example: Example: Router> enable |
| Step 4 |
At the password prompt, enter your system password, as shown here: Example: Password: enablepass |
| Step 5 |
When your password is accepted, the privileged EXEC mode prompt appears: Example: Router# |
| Step 6 | You now have access to the CLI in privileged EXEC mode and you can enter the necessary commands to complete your desired tasks. |
| Step 7 |
To exit the console session, enter the quit command as shown in the following example: Example: Router# quit |
Accessing the CLI from a Remote Console Using Telnet
This section describes how to connect to the console interface on a router using Telnet to access the CLI.
Preparing to Connect to a Router Console Using Telnet
Before you can access a router remotely using Telnet from a TCP/IP network, you need to configure a router to support virtual terminal lines using the line vty global configuration command. You should also configure the virtual terminal lines to required login.
 Note | To prevent a login from being disabled on the line, specify a password with the password command when you configure the login line configuration command. If you are using authentication, authorization, and accounting (AAA), configure the login authentication line configuration command. To prevent login from being disabled on the line for AAA authentication when you configure a list with the login authentication command, you must also configure that list using the aaa authentication login global configuration command. For more information about AAA services, refer to the http://www.cisco.com/en/US/docs/ios/12_2/security/configuration/guide/scfaaa.html Cisco IOS Security Configuration Guide and the http://www.cisco.com/en/US/docs/ios/security/command/reference/sec_book.html Cisco IOS Security Command Reference documents. |
In addition, before you make a Telnet connection to a router, you must have a valid hostname for a router or have an IP address configured on a router. For more information about the requirements for connecting to a router using Telnet, information about customizing your Telnet services, and using Telnet key sequences, refer to thehttp://www.cisco.com/en/US/docs/ios/termserv/configuration/guide/12_4/tsv_12_4_book.html Cisco IOS Terminal Services Configuration Guide .
Using Telnet to Access a Console Interface
To access a console interface using Telnet, complete the following steps:
1. From your terminal or PC, enter one of the following commands:
2. At the password prompt, enter your login password. If no password has been configured, press Return. The following example shows the use of the password mypass:
3. From the user EXEC mode, enter the enable command as shown in the following example:
4. At the password prompt, enter your system password. The following example shows the use of the password enablepass:
5. When the password is accepted, the privileged EXEC mode prompt appears:
6. You now have access to the CLI in the privileged EXEC mode.You can enter the necessary commands to complete your tasks.
7. To exit the Telnet session, use the exit or the logout command, as shown in the following example:
DETAILED STEPS
| Step 1 |
From your terminal or PC, enter one of the following commands:
In this syntax, host is a router hostname or an IP address, port is a decimal port number (23 is the default), and keyword is a supported keyword. For more information, refer to the Cisco IOS Terminal Services Command Reference .
The following example shows how the telnet command is used to connect to a router named router : Example: unix_host% telnet router Trying 172.20.52.40... Connected to 172.20.52.40. Escape character is '^]'. unix_host% connect | ||
| Step 2 |
At the password prompt, enter your login password. If no password has been configured, press Return. The following example shows the use of the password mypass: Example: User Access Verification Password: mypass | ||
| Step 3 |
From the user EXEC mode, enter the enable command as shown in the following example: Example: Router> enable | ||
| Step 4 |
At the password prompt, enter your system password. The following example shows the use of the password enablepass: Example: Password: enablepass | ||
| Step 5 |
When the password is accepted, the privileged EXEC mode prompt appears: Example: Router# | ||
| Step 6 | You now have access to the CLI in the privileged EXEC mode.You can enter the necessary commands to complete your tasks. | ||
| Step 7 |
To exit the Telnet session, use the exit or the logout command, as shown in the following example: Example: Router# logout |
Using Keyboard Shortcuts
Commands are not case sensitive. You can abbreviate commands and parameters if the abbreviations contain enough letters to be different from any other currently available commands or parameters.
Table 1 lists the keyboard shortcuts for entering and editing commands.
|
Keystrokes |
Purpose |
|---|---|
|
Ctrl-B or the Left Arrow key1 |
Move the cursor back one character. |
|
Ctrl-F orthe Right Arrow key 1 |
Move the cursor forward one character. |
|
Ctrl-A |
Move the cursor to the beginning of the command line. |
|
Ctrl-E |
Move the cursor to the end of the command line. |
|
Esc B |
Move the cursor back one word. |
|
Esc F |
Move the cursor forward one word. |
Using the History Buffer to Recall Commands
The history buffer stores the last 20 commands you entered. History substitution allows you to access these commands without retyping them, by using special abbreviated commands.
Table 1 lists the history substitution commands.
|
Command |
Purpose |
|---|---|
|
Ctrl-P or the Up Arrow key2 |
Recall commands in the history buffer, beginning with the most recent command. Repeat the key sequence to recall successively older commands. |
|
Ctrl-N or the Down Arrow key 1 |
Return to more recent commands in the history buffer after recalling commands with Ctrl-P or the Up Arrow key. |
Router# show history
|
While in the EXEC mode, list the last several commands you have just entered. |
Understanding Command Modes
Use the CLI to access Cisco IOS XE software. Because the CLI is divided into many different modes, the commands available to you at any given time depend on the mode that you are currently in. Entering a question mark (?) at the CLI prompt allows you to obtain a list of commands available for each command mode.
When you log in to the CLI, you are in the user EXEC mode, which contains only a limited subset of commands. To have access to all the commands, you must enter privileged EXEC mode, normally by using a password. From privileged EXEC mode, you can issue any EXEC command—user or privileged mode—or you can enter the global configuration mode. Most EXEC commands are one-time commands. For example, show commands show important status information, and clear commands clear counters or interfaces. The EXEC commands are not saved when the software reboots.
Configuration modes allow you to make changes to the running configuration. If required, you can save the running configuration to the startup configuration. The changed commands are stored when the software is rebooted. To enter specific configuration modes, you must start at the global configuration mode. From the global configuration mode, you can enter the interface configuration mode and a variety of other modes, such as protocol-specific modes.
ROM monitor mode is a separate mode used when the Cisco IOS XE software cannot load properly. If a valid software image is not found when the software boots or if the configuration file is corrupted at startup, the software might enter the ROM monitor mode.
Table 1 describes how to access and exit various common command modes of the Cisco IOS XE software. It also shows examples of the prompts displayed for each mode.
|
Command Mode |
Access Method |
Prompt |
Exit Method |
|---|---|---|---|
|
User EXEC |
Log in. |
Router> |
Use the logout command. |
|
Privileged EXEC |
From the user EXEC mode, use the enable EXEC command. |
Router# |
To return to the user EXEC mode, use the disable command. |
|
Global configuration |
From the privileged EXEC mode, use the configure terminal privileged EXEC command. |
Router(config)# |
To return to the privileged EXEC mode from the global configuration mode, use the exit or end command. |
|
Interface configuration |
From the global configuration mode, specify an interface using an interface command. |
Router(config-if)# |
To return to the global configuration mode, use the exit command. To return to the privileged EXEC mode, use the end command. |
|
ROM monitor |
From the privileged EXEC mode, use the reload EXEC command. Press the Break key during the first 60 seconds while the system is booting. |
> |
To exit the ROM monitor mode, use the continue command. |
For more information on command modes, refer to the “Using the Command-Line Interface” chapter in the http://www.cisco.com/en/US/docs/ios/fundamentals/configuration/guide/12_4/cf_12_4_book.html Cisco IOS Configuration Fundamentals Configuration Guide .
Getting Help
You can get a list of keywords and arguments associated with a command by using the context-sensitive help feature.
To get help that is specific to a command mode, a command, a keyword, or an argument, use one of the following commands shown in Table 1:
|
Command |
Purpose |
|---|---|
help |
Provides a brief description of the help system in any command mode. |
abbreviated-command-entry ? |
Provides a list of commands that begin with a particular character string. (No space between command and question mark.) |
abbreviated-command-entry <Tab > |
Completes a partial command name. |
? |
Lists all the commands available for a particular command mode. |
command ? |
Lists the keywords or arguments that you must enter next on the command line. (Space between command and question mark.) |
Displaying Command Options: An Example
This section provides an example of how to display the syntax for a command. The syntax can consist of optional or required keywords and arguments. The Cisco IOS XE software displays a list and brief description of the available keywords and arguments. For example, if you were in the global configuration mode and wanted to see all the keywords or arguments for the arap command, you should type arap ? .
The <cr> symbol in the command help output stands for carriage return. On older keyboards, the carriage return key is the Return key. On most modern keyboards, the carriage return key is the Enter key. The <cr> symbol at the end of command help output indicates that you have the option to press Enter to complete the command and that the arguments and keywords in the list preceding the <cr> symbol are optional. The <cr> symbol by itself indicates that no more arguments or keywords are available, and that you must press Enter to complete the command.
Table 1 shows examples of how you can use the question mark (?) to assist you in entering command.
|
Command |
Comment |
|---|---|
Router> enable Password: <password> Router# |
Enter the enable command and password to access the privileged EXEC commands. You are in the privileged EXEC mode when the prompt changes to a # from the > ; for example, Router> to Router# . |
Router# configure terminal Enter configuration commands, one per line. End with CNTL/Z. Router(config)# |
Enter the configure terminal privileged EXEC command to enter the global configuration mode. You are in the global configuration mode when the prompt changes to Router(config)# . |
Router(config)# interface TenGigabitEthernet ? <0-5> TenGigabitEthernet interface number Router(config)# interface TenGigabitEthernet 4 ? <cr> Router(config)# interface TenGigabitEthernet 4/0/0 Router(config-if)# |
Enter the interface configuration mode by specifying the interface that you want to configure using the interface TenGigabitEthernet global configuration command. Enter ? to display what you must enter next on the command line. In this example, you must enter the interface slot number, subslot number, and port number, separated by a forward slash. When the <cr> symbol is displayed, you can press Enter to complete the command. You are in the interface configuration mode when the prompt changes to Router(config-if)# . |
Router(config-if)# ?
Interface configuration commands:
  ip                  Interface Internet Protocol config commands
  keepalive           Enable keepalive
  lan-name            LAN Name command
  llc2                LLC2 Interface Subcommands
  load-interval       Specify interval for load calculation for an
                      interface
  locaddr-priority    Assign a priority group
  logging             Configure logging for interface
  loopback            Configure internal loopback on an interface
  mac-address         Manually set interface MAC address
  mls                 mls router sub/interface commands
  mpoa                MPOA interface configuration commands
  mtu                 Set the interface Maximum Transmission Unit (MTU)
  netbios             Use a defined NETBIOS access list or enable
                      name-caching
  no                  Negate a command or set its defaults
  nrzi-encoding       Enable use of NRZI encoding
  ntp                 Configure NTP
Router(config-if)#
|
Enter ? to display a list of all the interface configuration commands available for the serial interface. This example shows only some of the available interface configuration commands. |
Router(config-if)# ip ? Interface IP configuration subcommands: access-group Specify access control for packets accounting Enable IP accounting on this interface address Set the IP address of an interface authentication authentication subcommands bandwidth-percent Set EIGRP bandwidth limit broadcast-address Set the broadcast address of an interface cgmp Enable/disable CGMP directed-broadcast Enable forwarding of directed broadcasts dvmrp DVMRP interface commands hello-interval Configures IP-EIGRP hello interval helper-address Specify a destination address for UDP broadcasts hold-time Configures IP-EIGRP hold time Router(config-if)# ip |
Enter the command that you want to configure for the interface. This example uses the ip command. Enter ? to display what you must enter next on the command line. This example shows only some of the available interface IP configuration commands. |
Router(config-if)# ip address ? A.B.C.D IP address negotiated IP Address negotiated over PPP Router(config-if)# ip address |
Enter the command that you want to configure for the interface. This example uses the ip address command. Enter ? to display what you must enter next on the command line. In this example, you must enter an IP address or the negotiated keyword. A carriage return (<cr>) is not displayed; therefore, you must enter additional keywords or arguments to complete the command. |
Router(config-if)# ip address 172.16.0.1 ? A.B.C.D IP subnet mask Router(config-if)# ip address 172.16.0.1 |
Enter the keyword or argument that you want to use. This example uses the 172.16.0.1 IP address. Enter ? to display what you must enter next on the command line. In this example, you must enter an IP subnet mask. A <cr> is not displayed; therefore, you must enter additional keywords or arguments to complete the command. |
Router(config-if)# ip address 172.16.0.1 255.255.255.0 ? secondary Make this IP address a secondary address <cr> Router(config-if)# ip address 172.16.0.1 255.255.255.0 |
Enter the IP subnet mask. This example uses the 255.255.255.0 IP subnet mask. Enter ? to display what you must enter next on the command line. In this example, you can enter the secondary keyword, or you can press Enter. A <cr> is displayed; you can press Enter to complete the command, or you can enter another keyword. |
Router(config-if)# ip address 172.16.0.1 255.255.255.0 Router(config-if)# |
Press Enter to complete the command. |
Using the no and default Forms of Commands
Almost every configuration command has a no form. In general, use the no form to disable a function. Use the command without the no keyword to re-enable a disabled function or to enable a function that is disabled by default. For example, IP routing is enabled by default. To disable IP routing, use the no ip routing command; to re-enable IP routing, use the ip routing command. The Cisco IOS software command reference document provide the complete syntax for the configuration commands and describe what the no form of a command does.
Many CLI commands also have a default form. By issuing the command default command-name , you can configure the command to its default setting. The Cisco IOS software command reference document describes the function of the default form of the command when the default form performs a different function than the plain and no forms of the command. To see what default commands are available on your system, enter default ? in the appropriate command mode.
Saving Configuration Changes
Use the copy running-config startup-config command to save your configuration changes to the startup configuration so that the changes will not be lost if the software reloads or a power outage occurs. For example:
Router# copy running-config startup-config
Building configuration...
It might take a minute or two to save the configuration. After the configuration has been saved, the following output appears:
[OK]
Router#
On most platforms, this task saves the configuration to NVRAM. On the Class A Flash file system platforms, this task saves the configuration to the location specified by the CONFIG_FILE environment variable. The CONFIG_FILE variable defaults to NVRAM.
Filtering the Output of the show and more Commands
You can search and filter the output of the show and more commands. This functionality is useful if you need to sort through large amounts of output or if you want to exclude output that you need not see.
To use this functionality, enter a show or more command followed by the pipe character ( | ); one of the keywords begin, include, or exclude; and a regular expression with which you want to search or filter (the expression is case sensitive):
show command | {begin | include | exclude} regular-expression
The output matches certain lines of information in the configuration file. The following example illustrates how to use output modifiers with the show interfaces command when you want the output to include only the lines in which the expression “protocol” appears:
Router# show interfaces | include  protocol
TenGigabitEthernet0/0/0 is up, line protocol is up
     0 unknown protocol drops
TenGigabitEthernet0/0/1 is administratively down, line protocol is down
     0 unknown protocol drops
TenGigabitEthernet0/0/2 is administratively down, line protocol is down
     0 unknown protocol drops
TenGigabitEthernet0/0/3 is administratively down, line protocol is down
     0 unknown protocol drops
TenGigabitEthernet0/0/4 is administratively down, line protocol is down
     0 unknown protocol drops
TenGigabitEthernet0/0/5 is administratively down, line protocol is down
     0 unknown protocol drops
TenGigabitEthernet0/0/6 is administratively down, line protocol is down
     0 unknown protocol drops
TenGigabitEthernet0/0/7 is administratively down, line protocol is down
     0 unknown protocol drops
TenGigabitEthernet0/0/8 is administratively down, line protocol is down
     0 unknown protocol drops
TenGigabitEthernet0/0/9 is administratively down, line protocol is down
     0 unknown protocol drops
For more information on the search and filter functionality, refer to the Using the Command-Line Interface chapter in the Cisco IOS Configuration Fundamentals Configuration Guide .
Finding Support Information for Platforms and Cisco Software Images
Cisco software is packaged in feature sets consisting of software images that support specific platforms. The feature sets available for a specific platform depend on which Cisco software images are included in a release. To identify the set of software images available in a specific release or to find out if a feature is available in a given Cisco IOS XE software image, you can use Cisco Feature Navigator or the software release notes.
Using the Cisco Feature Navigator
Use the Cisco Feature Navigator to find information about platform support and Cisco IOS software image support. Access the Cisco Feature Navigator at http://tools.cisco.com/ITDIT/CFN/jsp/index.jsp . You must have an account on Cisco.com. If you do not have an account or have forgotten your username or password, click the appropriate button in the login dialog box and follow the instructions that appear.
Using the Software Advisor
To see if a feature is supported by a Cisco IOS release, to locate the software document for that feature, or to check the minimum software requirements of Cisco IOS software with the hardware installed on your router, Cisco maintains the Software Advisor tool on Cisco.com at:
http://tools.cisco.com/Support/Fusion/FusionHome.do
You must be a registered user on Cisco.com to access this tool.
Using Software Release Notes
Cisco IOS XE software releases include release notes that provide the following information:
- Platform support information
- Memory recommendations
- New feature information
- Open and resolved severity 1 and 2 caveats for all platforms
Release notes are intended to be release-specific for the most current release. However, the information provided in these documents may not be cumulative in providing information about the features that first appeared in previous releases. Refer to the Cisco Feature Navigator for cumulative feature information.
 Feedback