Installing the NCS 5000 Router

This chapter describes how to install the Cisco NCS 5000 Series routers. This chapter includes the following sections:

Installation Guidelines

When installing the Cisco NCS 5000 routers, follow these guidelines:

  • Ensure that there is adequate space around the router to allow for servicing the router and for adequate airflow Technical Specifications,lists the service and airflow requirements.

  • Ensure that the air-conditioning meets the heat dissipation requirements listed in Technical Specifications

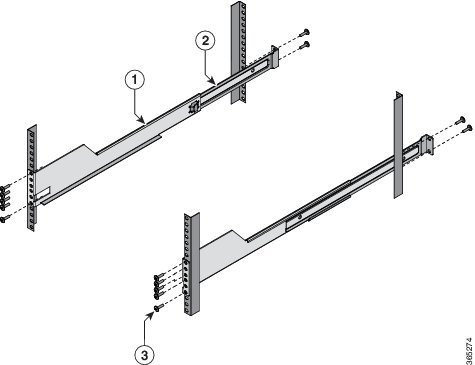
  • Ensure that the cabinet or rack meets the requirements listed in Cabinet and Rack Installation


    Note


    Jumper power cords are available for use in a cabinet. See the Jumper Power Cord section.


  • Ensure that the chassis can be adequately grounded. If the router is not mounted in a grounded rack, we recommend connecting both the system ground on the chassis and the power supply ground directly to an earth ground.

  • Ensure that the site power meets the power requirements listed in Technical Specifications. If available, you can use an uninterruptible power supply (UPS) to protect against power failures.

  • Ensure that circuits are sized according to local and national codes. For North America, the power supply requires a 15-A or 20-A circuit.

    The input fuse rating for each 650W AC power supply is either 12.5A or 15A/250V. The recommended current rating of the protective device as part of the building installation is 16A (20A for US/CSA). The input fuse rating for each 930W DC power supply is 40A/80V. The recommended current rating of the protective device as part of the building installation is 50A.


Note


Caution

To prevent loss of input power, ensure the total maximum loads on the circuits supplying power to the router are within the current ratings for the wiring and breakers.


Installing Cisco NCS 5000

The following sections describe how to install the Cisco NCS 5000 Series routers.

Installing Cisco NCS 5001

This section describes how to use the rack-mount kit provided with the router to install the Cisco NCS 5001 router into a cabinet or rack that meets the requirements described in Cabinet and Rack Installation.


Note


Warning

If the rack is on wheels, ensure that the brakes are engaged or that the rack is otherwise stabilized.


The following table lists the items contained in the rack-mount kit provided with the Cisco NCS 5001 router.

Table 1. Cisco NCS 5001 Router Rack-Mount Kit

Quantity

Part Description

4

Rack-mount brackets

16

M4 x 0.7 x 7-mm Phillips flat-head screws

4

Rack-mount guides

2

Slider rails

Procedure


Step 1

Install the front rack-mount brackets on the chassis as follows:

  1. Position a front rack-mount bracket on the side of the chassis with its four holes aligned to four of the six screw holes on the front side of the chassis, and then use four M4 screws to attach the bracket to the chassis.

    Note


    You can align any four of the holes in the front rack-mount bracket to four of the six screw holes in the chassis. The holes that you use depend on the requirements of your rack.

  2. Repeat Step 1a with the other front rack-mount bracket on the other side of the router.

    Figure 1. Rack-mount brackets at the front on Cisco NCS 5001

Step 2

Install the rear rack-mount guides on the chassis as follows:

  1. Position a rear rack-mount bracket on the side of the chassis with its four holes aligned to four of the six screw holes on the side of the chassis, and then use four M4 screws to attach the bracket to the chassis.

  2. Repeat Step 2a with the other rear rack-mount bracket on the other side of the router.

    Figure 2. Rack-mount brackets at the rear side on Cisco NCS 5001

Step 3

Install the slider rails to the rack as follows:

  1. Position the slider rails at the desired levels on the back side of the rack and use two 12-24 screws or two 10-32 screws, depending on the rack thread type, to attach the rails to the rack.

    Note


    For racks with square holes, you might need to position a 12-24 cage nut behind each mounting hole in a slider rail before using a 12-24 screw.

  2. Repeat with the other slider rail on the other side of the rack.

  3. Use the tape measure and level to verify that the rails are at the same height and horizontal.

Step 4

Insert the router into the rack and attach it as follows:

  1. Holding the router with both hands, position the back of the router between the front posts of the rack.

  2. Align the two rear rack-mount guides on either side of the router with the slider rails installed in the rack. Slide the rack-mount guides onto the slider rails, and then gently slide the router all the way into the rack.

    Note

     
    If the router does not slide easily, try realigning the rack-mount guides on the slider rails.
  3. Holding the chassis level, insert two screws (12-24 or 10-32, depending on the rack type) through the cage nuts and the holes in one of the front rack-mount brackets and into the threaded holes in the rack-mounting rail.

  4. Repeat for the other front rack-mount bracket on the other side of the router.


Installing Cisco NCS 5002

This section describes how to use the rack-mount kit provided with the router to install the Cisco NCS 5002 router into a cabinet or rack that meets the requirements described in Cabinet and Rack Installation.


Note


Caution

If the rack is on wheels, ensure that the brakes are engaged or that the rack is otherwise stabilized.


The following table lists the items contained in the rack-mount kit provided with the Cisco NCS 5002 router.

Table 2. Cisco NCS 5002 Router Rack-Mount Kit

Quantity

Part Description

4

Rack-mount brackets

16

M4 x 0.7 x 7-mm Phillips flat-head screws

4

Rack-mount guides

2

Slider rails

Procedure


Step 1

Install the front rack-mount brackets on the router as follows:

  1. Position a front rack-mount bracket on the side of the router with its two holes aligned to two holes on the front side of the router, and then use two M4 screws to attach the bracket to the router.

  2. Repeat Step 1a with the other front rack-mount bracket on the other side of the router.

    Figure 3. Rack-Mount Brackets on the Front Side on Cisco NCS 5002

    1 - Rack mount bracket

    2 - Screws

Step 2

Install the rear rack-mount guides on the rack as follows:

  1. Assemble the rack mount and slider using 5 screws (12-24 screws or 10-32 screws depending on the rack type) in front and 2 screws (12-24 screws or 10-32 screws depending on the rack type) on the back.

  2. Repeat Step 2a for the other side of the router.

    Figure 4. Assembling Rack Mount and Slider

    1 - Slider

    2 - Rack mount

    3 - Screws

Step 3

Install the slider rails to the rack as follows:

  1. Position the router with the front rack mounts aligned at the location shown in the following image and assemble on rack using one screw on either side (12-24 screws or 10-32 screws depending on the rack type.

    Figure 5. Slide the Cisco NCS 5002 Router

    Note


    For racks with square holes, you might need to position a 12-24 cage nut behind each mounting hole in a slider rail before using a 12-24 screw.

  2. Repeat with the other slider rail on the other side of the rack.

  3. Use the tape measure and level to verify that the rails are at the same height and horizontal.

Step 4

Insert the router into the rack and attach it as follows:

  1. Holding the router with both hands, position the back of the router between the front posts of the rack.

  2. Align the two rear rack-mount guides on either side of the router with the slider rails installed in the rack. Slide the rack-mount guides onto the slider rails, and then gently slide the router all the way into the rack.

    Note

     
    If the router does not slide easily, try realigning the rack-mount guides on the slider rails.
  3. Holding the router level, insert two screws (12-24 or 10-32, depending on the rack type) through the cage nuts and the holes in one of the front rack-mount brackets and into the threaded holes in the rack-mounting rail.

  4. Repeat for the other front rack-mount bracket on the other side of the router.


Installing Cisco NCS 5011

This section describes how to use the rack-mount kit provided with the router to install the Cisco NCS 5011 router into a cabinet or rack that meets the requirements described in Cabinet and Rack Installation.


Caution


If the rack is on wheels, ensure that the brakes are engaged or that the rack is otherwise stabilized.

The following table lists the items contained in the rack-mount kit provided with the Cisco NCS 5011 router.

Table 3. Cisco NCS 5011 Router Rack-Mount Kit

Quantity

Part Description

4

Rack-mount brackets

16

M4 x 0.7 x 7-mm Phillips flat-head screws

4

Rack-mount guides

2

Slider rails

Procedure


Step 1

Install the front rack-mount brackets on the router as follows:

  1. Determine which end of the chassis is to be located in the cold aisle as follows:

    • If the router has port-side intake modules, position the module so that its ports will be in the cold aisle.

    • If the router has port-side exhaust modules, position the module so that its fan and power supply modules will be in the cold aisle.

  2. Position a front rack-mount bracket so that four of its screw holes are aligned to the screw holes on the side of the router, and then use four M4 screws to attach the bracket to the router.

    Note

     
    You can align any four of the holes in the front rack-mount bracket to four of the six screw holes in the chassis. The holes that you use depend on the requirements of your rack.
  3. Repeat Step 1a with the other front rack-mount bracket on the other side of the router.

    Figure 6. Rack-Mount Brackets on the Front Side on Cisco NCS 5011

Step 2

Install the rear rack-mount brackets on the rack as follows:

  1. Align the two screw holes on a rear rack-mount bracket to the middle two screw holes in the remaining six screw holes on a side of the chassis, and use two M4 screws to attach the bracket to the router.

  2. Repeat Step 2a for the other side of the router.

    Figure 7. Rack-mount brackets at the rear side on Cisco NCS 5011

Step 3

Install the slider rails to the rack as follows:

  1. Position the router with the front rack mounts aligned at the location shown in the following image and assemble on rack using one screw on either side (12-24 screws or 10-32 screws depending on the rack type.

  2. Repeat with the other slider rail on the other side of the rack.

  3. Use the tape measure and level to verify that the rails are at the same height and horizontal.

Step 4

Insert the router into the rack and attach it as follows:

  1. Holding the router with both hands, position the back of the router between the front posts of the rack.

  2. Align the two rear rack-mount guides on either side of the router with the slider rails installed in the rack. Slide the rack-mount guides onto the slider rails, and then gently slide the router all the way into the rack.

    Note

     
    If the router does not slide easily, try realigning the rack-mount guides on the slider rails.
  3. Holding the router level, insert two screws (12-24 or 10-32, depending on the rack type) through the cage nuts and the holes in one of the front rack-mount brackets and into the threaded holes in the rack-mounting rail.


Grounding Cisco NCS 5000

This section describes how to ground the Cisco NCS 5000 series routers.

Procedure


Step 1

On Cisco NCS 5001, NCS 5011 remove the label on the rear side (fan side) of the router to expose the ground mounting holes (as shown in the figure). On Cisco NCS 5002, remove the label on the right side of the front side (port side) of the router to expose the ground mounting holes (as shown in the figure).

Figure 8. Grounding the Cisco NCS 5001 Router

1 - Ground Lug

2 - Ground Lug bracket

3 - Label

Figure 9. Grounding the Cisco NCS 5002 Router


1 - Ground Lug

2 - Label

Figure 10. Grounding the Cisco NCS 5011 Router

1 - Ground Lug

2 - Ground Lug bracket

3 - Label

Step 2

(Only for NCS 5001 and NCS 5011) Install the ground lug bracket to the mounting holes with two flat head M4 X 7mm screws.

Step 3

(Only for NCS 5001 and NCS 5011) Install ground lug to the ground lug bracket with two pan head M4 screws.

Step 4

(Only for NCS 5002) Place the grounding lug against the grounding pad so that there is solid metal-to-metal contact, and insert the two M4 screws with washers through the holes in the grounding lug and into the grounding pad.

Step 5

Using a wire-stripping tool, remove the covering from one end of the grounding cable and insert the stripped end of the grounding cable to the open end of the grounding lug.

Step 6

Prepare the other end of the ground cable and connect it to an appropriate grounding point in your site to ensure adequate earth ground.


Starting Cisco NCS 5000

This section provides instructions for powering up the Cisco NCS 5000 series routers and verifying their component installation.


Note


Do not connect the Ethernet port to the LAN until the initial router configuration has been performed.


Note


Warning

When installing or replacing the unit, the ground connection must always be made first and disconnected last.


To power up the router and verify hardware operation, follow these steps:

Procedure


Step 1

Verify that the power supply and the fan modules are installed.

Note


Depending on the outlet receptacle on your power distribution unit, you may need the optional jumper power cord to connect the router to your outlet receptacle. See the Jumper Power Cord section.

Step 2

Ensure that the router is adequately grounded as described in the Grounding Cisco NCS 5000, and that the power cables are connected to outlets that have the required AC power voltages (see Power Specifications)

Step 3

For the router, insert each end of the power clip (from the accessory kit) into holes on tabs located on either side of the power connectors.

Step 4

Connect each power cable to the power connectors on the router and an AC power source. Press the power cable into the power clip to ensure that the power cable stays connected to the router when bumped. The router should power on as soon as you connect the power cable.

Step 5

Check if the fans are operational; they should begin operating when the power cable is plugged in.

Step 6

After the router boots up, verify that the power supply Status LED is green. After initialization, the system status LED is green, indicating that all router environmental monitors are reporting that the system is operational. If this LED is orange or red, then one or more environmental monitor is reporting a problem.

Note


The Link LEDs for the Ethernet connector should not be ON unless the cable is connected.

Step 7

Try removing and reinstalling a component that is not operating correctly. If it still does not operate correctly, contact your customer service representative for a replacement.

Note


If you purchased this product through a Cisco reseller, contact the reseller directly for technical support. If you purchased this product directly from Cisco, contact Cisco Technical Support at this URL: http://www.cisco.com/en/US/support/tsd_cisco_worldwide_contacts.html.

Step 8

Verify that the system software has booted and the router has initialized without error messages.

If you cannot resolve an issue, contact your customer service representative.