Implementing Secure Shell
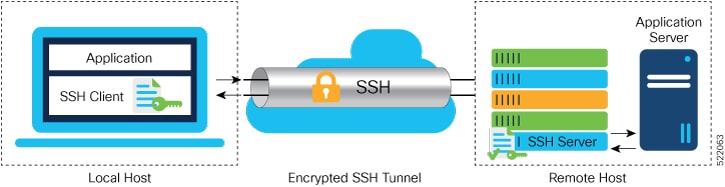
Secure Shell (SSH) is an application and a protocol that provides a secure replacement to the Berkeley r-tools. The protocol secures sessions using standard cryptographic mechanisms, and the application can be used similarly to the Berkeley rexec and rsh tools.
Two versions of the SSH server are available: SSH Version 1 (SSHv1) and SSH Version 2 (SSHv2). SSHv1 uses Rivest, Shamir, and Adelman (RSA) keys and SSHv2 uses either Digital Signature Algorithm (DSA) keys or Rivest, Shamir, and Adelman (RSA) keys. Cisco software supports both SSHv1 and SSHv2.
This module describes how to implement Secure Shell.
 Note |
Any reference to CiscoSSH in this chapter implies OpenSSH-based implementation of SSH that is available on some of the Cisco IOS XR router variants from Cisco IOS XR Software Release 7.3.2 and later. CiscoSSH replaces Cisco IOS XR SSH, which is the older SSH implementation that existed prior to this release. For more information, see the CiscoSSH section later in this chapter. |
Information About Implementing Secure Shell
To implement SSH, you should understand the following concepts:
SSH Server
The SSH server feature enables an SSH client to make a secure, encrypted connection to a Cisco router. This connection provides functionality that is similar to that of an inbound Telnet connection. Before SSH, security was limited to Telnet security. SSH allows a strong encryption to be used with the Cisco software authentication. The SSH server in Cisco software works with publicly and commercially available SSH clients.
SSH Client
The SSH client feature is an application running over the SSH protocol to provide device authentication and encryption. The SSH client enables a Cisco router to make a secure, encrypted connection to another Cisco router or to any other device running the SSH server. This connection provides functionality that is similar to that of an outbound Telnet connection except that the connection is encrypted. With authentication and encryption, the SSH client allows for a secure communication over an insecure network.
The SSH client works with publicly and commercially available SSH servers. The SSH client supports the ciphers of AES, 3DES, message digest algorithm 5 (MD5), SHA1, and password authentication. User authentication is performed in the Telnet session to the router. The user authentication mechanisms supported for SSH are RADIUS, TACACS+, and the use of locally stored usernames and passwords.
The SSH client supports setting DSCP value in the outgoing packets.
ssh client dscp <value from 0 – 63>If not configured, the default DSCP value set in packets is 16 (for both client and server).
The SSH client supports the following options:
- DSCP—DSCP value for SSH
client sessions.
RP/0/5/CPU0:router#configure RP/0/5/CPU0:router(config)#ssh ? client Provide SSH client service server Provide SSH server service timeout Set timeout value for SSH RP/0/5/CPU0:router(config)#ssh client ? - Knownhost—Enable the host pubkey check by local database.
- Source-interface—Source
interface for SSH client sessions.
RP/0/5/CPU0:router(config)#ssh client source-interface ?
  ATM                  ATM Network Interface(s)
  BVI                  Bridge-Group Virtual Interface
  Bundle-Ether         Aggregated Ethernet interface(s)
  CEM                  Circuit Emulation interface(s)
  GigabitEthernet      GigabitEthernet/IEEE 802.3 interface(s)
  IMA                  ATM Network Interface(s)
  IMtestmain           IM Test Interface
  Loopback             Loopback interface(s)
  MgmtEth              Ethernet/IEEE 802.3 interface(s)
  Multilink            Multilink network interface(s)
  Null                 Null interface
  PFItestmain          PFI Test Interface
  PFItestnothw         PFI Test Not-HW Interface
  PW-Ether             PWHE Ethernet Interface
  PW-IW                PWHE VC11 IP Interworking Interface
  Serial               Serial network interface(s)
  VASILeft             VASI Left interface(s)
  VASIRight            VASI Right interface(s)
  test-bundle-channel  Aggregated Test Bundle interface(s)
  tunnel-ipsec         IPSec Tunnel interface(s)
  tunnel-mte           MPLS Traffic Engineering P2MP Tunnel interface(s)
  tunnel-te            MPLS Traffic Engineering Tunnel interface(s)
  tunnel-tp            MPLS Transport Protocol Tunnel interface
RP/0/5/CPU0:router(config)#ssh client source-interface
RP/0/5/CPU0:router(config)#
RP/0/5/CPU0:router#ssh ?
  A.B.C.D  IPv4 (A.B.C.D) address
  WORD     Hostname of the remote node
  X:X::X   IPv6 (A:B:C:D...:D) address
  vrf      vrf table for the route lookup
RP/0/5/CPU0:router#ssh 10.1.1.1 ?
  cipher            Accept cipher type
  command           Specify remote command (non-interactive)
  source-interface  Specify source interface
  username          Accept userid for authentication
  <cr>
RP/0/5/CPU0:router#ssh 192.68.46.6 username admin command "show redundancy sum"
Password:


Wed Jan  9 07:05:27.997 PST
    Active Node    Standby Node
    -----------    ------------
       0/4/CPU0        0/5/CPU0 (Node Ready, NSR: Not Configured)

RP/0/5/CPU0:router#
SFTP Feature Overview
SSH includes support for standard file transfer protocol (SFTP) , a new standard file transfer protocol introduced in SSHv2. This feature provides a secure and authenticated method for copying router configuration or router image files.
The SFTP client functionality is provided as part of the SSH component and is always enabled on the router. Therefore, a user with the appropriate level can copy files to and from the router. Like the copy command, the sftp command can be used only in XR EXEC mode.
The SFTP client is VRF-aware, and you may configure the secure FTP client to use the VRF associated with a particular source interface during connections attempts. The SFTP client also supports interactive mode, where the user can log on to the server to perform specific tasks via the Unix server.
The SFTP Server is a sub-system of the SSH server. In other words, when an SSH server receives an SFTP server request, the SFTP API creates the SFTP server as a child process to the SSH server. A new SFTP server instance is created with each new request.
The SFTP requests for a new SFTP server in the following steps:
-
The user runs the sftp command with the required arguments
-
The SFTP API internally creates a child session that interacts with the SSH server
-
The SSH server creates the SFTP server child process
-
The SFTP server and client interact with each other in an encrypted format
-
The SFTP transfer is subject to LPTS policer "SSH-Known". Low policer values will affect SFTP transfer speeds
Note |
In IOS-XR SW release 4.3.1 onwards the default policer value for SSH-Known has been reset from 2500pps to 300pps. Slower transfers are expected due to this change. You can adjust the lpts policer value for this punt cause to higher values that will allow faster transfers |
When the SSH server establishes a new connection with the SSH client, the server daemon creates a new SSH server child process. The child server process builds a secure communications channel between the SSH client and server via key exchange and user authentication processes. If the SSH server receives a request for the sub-system to be an SFTP server, the SSH server daemon creates the SFTP server child process. For each incoming SFTP server subsystem request, a new SSH server child and a SFTP server instance is created. The SFTP server authenticates the user session and initiates a connection. It sets the environment for the client and the default directory for the user.
Once the initialization occurs, the SFTP server waits for the SSH_FXP_INIT message from the client, which is essential to start the file communication session. This message may then be followed by any message based on the client request. Here, the protocol adopts a 'request-response' model, where the client sends a request to the server; the server processes this request and sends a response.
The SFTP server displays the following responses:
-
Status Response
-
Handle Response
-
Data Response
-
Name Response
Note |
The server must be running in order to accept incoming SFTP connections. |
RSA Based Host Authentication
Verifying the authenticity of a server is the first step to a secure SSH connection. This process is called the host authentication, and is conducted to ensure that a client connects to a valid server.
The host authentication is performed using the public key of a server. The server, during the key-exchange phase, provides its public key to the client. The client checks its database for known hosts of this server and the corresponding public-key. If the client fails to find the server's IP address, it displays a warning message to the user, offering an option to either save the public key or discard it. If the server’s IP address is found, but the public-key does not match, the client closes the connection. If the public key is valid, the server is verified and a secure SSH connection is established.
The IOS XR SSH server and client had support for DSA based host authentication. But for compatibility with other products, like IOS, RSA based host authentication support is also added.
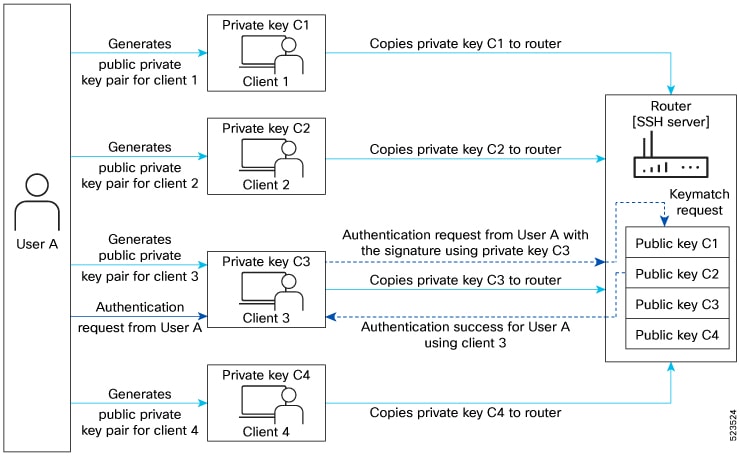
RSA Based User Authentication
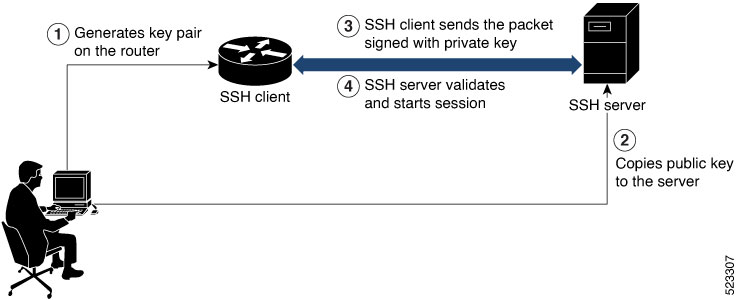
One of the method for authenticating the user in SSH protocol is RSA public-key based user authentication. The possession of a private key serves as the authentication of the user. This method works by sending a signature created with a private key of the user. Each user has a RSA keypair on the client machine. The private key of the RSA keypair remains on the client machine.
The user generates an RSA public-private key pair on a unix client using a standard key generation mechanism such as ssh-keygen. The max length of the keys supported is 4096 bits, and the minimum length is 512 bits. The following example displays a typical key generation activity:
bash-2.05b$ ssh-keygen –b 1024 –t rsa
Generating RSA private key, 1024 bit long modulus
To correctly import the public key into the chassis, the public key must be in one of the following formats:
-
SSH RSA Public key format
-
Base64 encoded (binary) format
-
PEM PKCS1 format
-
PEM PKCS8 format
Note |
You can use third party tools available on the Internet to convert the key to the binary format. |
Once the public key is imported to the router, the SSH client can choose to use the public key authentication method by specifying the request using the “-o” option in the SSH client. For example:
client$ ssh -o PreferredAuthentications=publickey 1.2.3.4
If a public key is not imported to a router using the RSA method, the SSH server initiates the password based authentication. If a public key is imported, the server proposes the use of both the methods. The SSH client then chooses to use either method to establish the connection. The system allows only 10 outgoing SSH client connections.
Currently, only SSH version 2 and SFTP server support the RSA based authentication.
Note |
The preferred method of authentication would be as stated in the SSH RFC. The RSA based authentication support is only for local authentication, and not for TACACS/RADIUS servers. |
Authentication, Authorization, and Accounting (AAA) is a suite of network security services that provide the primary framework through which access control can be set up on your Cisco router or access server.
SSHv2 Client Keyboard-Interactive Authentication
An authentication method in which the authentication information is entered using a keyboard is known as keyboard-interactive authentication. This method is an interactive authentication method in the SSH protocol. This type of authentication allows the SSH client to support different methods of authentication without having to be aware of their underlying mechanisms.
Currently, the SSHv2 client supports the keyboard-interactive authentication. This type of authentication works only for interactive applications.
Note |
The password authentication is the default authentication method. The keyboard-interactive authentication method is selected if the server is configured to support only the keyboard-interactive authentication. |
Prerequisites for Implementing Secure Shell
The following prerequisites are required to implement Secure Shell:
-
Download the required image on your router. The SSH server and SSH client require you to have a a crypto package (data encryption standard [DES], 3DES and AES) from Cisco downloaded on your router.
Note
From Cisco IOS XR Software Release 7.0.1 and later, the SSH and SFTP components are available in the baseline Cisco IOS XR software image itself. For details, see, SSH and SFTP in Baseline Cisco IOS XR Software Image.
-
Configure user authentication for local or remote access. You can configure authentication with or without authentication, authorization, and accounting (AAA).
-
AAA authentication and authorization must be configured correctly for Secure Shell File Transfer Protocol (SFTP) to work.
SSH and SFTP in Baseline Cisco IOS XR Software Image
From Cisco IOS XR Software Release 7.0.1 and later, the management plane and control plane components that were part of the Cisco IOS XR security package (k9sec package) are moved to the base Cisco IOS XR software image. These include SSH, SCP and SFTP. However, 802.1X protocol (Port-Based Network Access Control) and data plane components remain as a part of the security package as per the export compliance regulations.This segregation of package components makes the software more modular. It also gives you the flexibility of including or excluding the security package as per your requirements.
The base package and the security package allow FIPS, so that the control plane can negotiate FIPS-approved algorithms.
Note |
This feature is not supported on the following variants of Cisco NCS 540 Series Routers:
|
CiscoSSH
|
Feature Name |
Release Information |
Feature Description |
||
|---|---|---|---|---|
|
CiscoSSH |
Release 7.3.2 |
This release introduces CiscoSSH, a newer implementation of SSH on NCS 540 Small Density, NCS 540 Large Density, NCS 540 Medium Density (except N540-ACC-SYS, NC540X-ACC-SYS, and N540-24Z8Q2C-SYS). CiscoSSH leverages OpenSSH implementation, by using the Linux TCP/IP stack to transmit and receive SSH packets over the management Ethernet interface and line card interfaces on the router. CiscoSSH provides additional security features like FIPS compliance and X.509 digital certification. It supports packet path features like MPP, ACL and VRF support, and ensures interoperability with various existing SSH implementations.
|
Note |
CiscoSSH is not supported on the following Cisco NCS 540 router variants:
|
Note |
Any reference to CiscoSSH in this chapter implies OpenSSH-based implementation of SSH that is available on this platform from Cisco IOS XR Software Release 7.3.2 and later. CiscoSSH replaces Cisco IOS XR SSH, which is the older SSH implementation that existed prior to this release. |
OpenSSH is a stable, widely deployed open-source implementation of SSH. CiscoSSH implementation leverages the key features of openSSH such as strong authentication, cryptography, encryption, port forwarding, and so on, to provide secured management access to the router. CiscoSSH provides additional security features like FIPS compliance and support for X.509 digital certificate.
For more information on SSH in general, see Information About Implementing Secure Shell and Configure SSH.
The CiscoSSH implementation also ensures backward compatibility for all the existing Cisco IOS XR SSH configuration and management. You can continue to use SSH the way it was existing before. The functionality and configuration commands of CiscoSSH and Cisco IOS XR SSH remain the same for majority of the part. However, certain behavioral changes exist between CiscoSSH and Cisco IOS XR SSH. For details, see the subsequent sections.
This table lists the behavioral changes introduced by CiscoSSH as compared to Cisco IOS XR SSH. Also, see Guidelines for Using CiscoSSH.
| Functionality |
CiscoSSH |
Cisco IOS XR SSH |
|---|---|---|
|
Port number for Netconf server |
The system uses the port numbers 830 (the default IANA-assigned TCP port number for Netconf over SSH) or 22 (the default port number for SSH) for the Netconf server. You cannot configure this value. |
You can explicitly configure the desired port number for Netconf server using the ssh server netconf port command. |
|
Username syntax |
Because CiscoSSH considers ':' (colon ) as a delimiter in certain types of user authentication, it does not support authentication of usernames having ':' (colon ) in it. |
No restriction for using ':' (colon ) in username syntax. |
|
Configuring unsupported algorithms |
You cannot enable unsupported algorithms using any configuration command. |
You can explicitly enable unsupported algorithms using the ssh server enable cipher command. |
|
SSH session timeout |
The SSH session initiated from the router to an unreachable host times out after 120 seconds. |
The SSH session initiated from the router to an unreachable host times out after 60 seconds. |
|
SSH session timeout criteria |
The SSH timeout configuration considers the total timeout value for the maximum number of login attempts allowed. |
The SSH timeout configuration considers the timeout value for individual login attempt. |
|
Time-based rekey of SSH sessions |
The router triggers time-based rekey of SSH sessions only when it receives a packet after the timer expiry. |
The router triggers time-based rekey of SSH sessions immediately after the timer expiry. |
|
LPTS policer rate for port-forwarded SSH sessions |
When using SSH port forwarding feature, the router considers the traffic flows corresponding to port-forwarded SSH sessions as third party applications. Hence, the LPTS polices those traffic flows at a medium rate. |
The LPTS polices the traffic flows corresponding to port-forwarded SSH sessions at a high rate. |
|
Port-forwarded channels |
No limit to the number of port-forwarded channels supported with CiscoSSH. But, the show ssh command displays a maximum of only 16 entries. | Supports a maximum of 16 port-forwarded channels. |
|
File transfer through SCP |
While using SCP with CiscoSSH, the router checks for the presence of system files after authentication. |
The router checks for the presence of system files before authentication. |
|
File transfer through SFTP |
With non-interactive SFTP session initiated from the router, you can transfer files from an external device to the router; not from the router to external device. |
You can transfer files from an external device to the router, and the other way round. |
Restrictions for Cisco SSH
-
Does not support SSH version 1
-
Does not support back up SSH server
-
Does not allow to use secondary IPv4 addresses because they are not currently synchronized to Linux (prior to Cisco IOS XR Software Release 7.7.1)
-
Does not support BVI interfaces as source or destination for the SSH connections (prior to Cisco IOS XR Software Release 7.7.1)
-
Does not support these algorithms:
-
The cipher algorithms, aes128-cbc , aes192-cbc, aes256-cbc, and 3des-cbc
-
The key-exchange algorithm, diffie-hellman-group1-sha1
-
-
Does not support these commands:
-
show ssh history
-
show ssh history details
-
clear ssh stale sessions
-
Guidelines for Using CiscoSSH
The following section lists certain functionality aspects and guidelines for using CiscoSSH.
-
Netconf Request: You must follow a specific syntax when you send Netconf request over CLI. Add the subsystem (netconf or sftp ) name as the last argument while issuing an SSH command.
For example,
ssh username@ipaddress -p 830 -s netconf ---> Correct usagessh username@ipaddress netconf -p 830 -s ---> Incorrect usage -
Configuring unsupported algorithms: Configuring CiscoSSH server only with unsupported algorithms (3des-cbc or diffie-hellman-group1-sha1 ) results in commit failure. Hence, you must remove such configurations on your router as a part of the pre-upgrade procedure.
For example,
Router(config)#ssh server algorithms cipher 3des-cbc

!!% Operation not permitted: 3des-cbc is not supported in ciscossh, SSH cannot work with this option only
Similarly, if you configure CiscoSSH server with both supported and unsupported algorithms, then the router issues the following warning and removes the unsupported algorithm:
Router(config)#ssh server algorithms cipher aes128-ctr aes192-ctr 3des-cbc ssh_conf_proxy[1193]: %SECURITY-SSHD_CONF_PRX-3-ERR_GENERAL : 3des-cbc is not supported, will be removed -
SSH session keep alive: By default, the SSH session keep alive functionality is enabled in CiscoSSH, to detect and terminate unresponsive sessions. The default keep alive time is 60 seconds, with a maximum of three attempts allowed, so that the detection time for unresponsive sessions is 180 seconds. These keep alive parameters are not configurable.
-
TCP window scale: Although the router accepts the configuration to change the TCP window scale parameter, the configuration does not have any effect with CiscoSSH. This is because, CiscoSSH uses Linux TCP/IP stack that has dynamic window scaling, and hence it does not require applications to specify the window scale.
-
SSH session limit and rate limit: Although the configuration for SSH session limit and rate limit applies to all VRFs where SSH is enabled, the router enforces the limit for each VRF. However, the maximum number of virtual teletype (VTY) sessions across all VRFs still remains as 200. This in turn limits the total number of SSH sessions that require a VTY interface, across all VRFs. As a result, when upgrading from a release version having Cisco IOS XR SSH to a version having CiscoSSH, the system applies the session limit and rate limit configurations to all VRFs where SSH is enabled. Hence, as part of the post-upgrade procedure, you must reconfigure these limits to achieve the same limit as that of Cisco IOS XR SSH.
-
SSH session limit enforcement: Information on the number of active SSH sessions on the router is not persistent across SSH server process restarts. Hence, SSH session limit enforcement does not consider the existing sessions after an SSH server restart.
-
SSH with ACL or MPP configuration: With SSH ACL or MPP configured on the router, the attempt for client connection that is now allowed as per that configuration times out. The router does not send TCP reset for such blocked SSH connections. This implementation is to enhance security.
-
Default VRFs: Configuring the default SSH VRF using the ssh vrf default command enables only version 2 of CiscoSSH, because version 1 is not supported.
-
Non-default VRFs: If SSH service is enabled on any of the non-default VRFs that is configured on the router, and if you restart the ssh_conf_proxy process, there might be a delay in allowing incoming SSH sessions on that non-default VRF. The session establishment might even timeout in such a scenario. This behavior is due to the delay in programming the LPTS entries for those sessions.
-
Public key-based authentication: In CiscoSSH, the router negotiates public key-based authentication even if there is no public key imported on to the router. So, the authentication attempt from the client using public key fails in such scenarios. The router displays a syslog on the console for this authentication failure. However, the client and server proceed with subsequent authentication methods like keyboard-interactive and password methods. If the router does not have a public key imported, you may choose to disable public key-based authentication from the client side. For details on public key-based authentication, see the Implementing Certification Authority Interoperability chapter in this guide.
-
Modifying SSH configuration: Any change to the SSH configuration results in process restart of SSH server process. However, it does not impact the existing SSH, SCP, SFTP, or Netconf sessions.
-
Clearing SSH sessions: The clear ssh all command clears all incoming sessions.
-
Line-feed option: Adding a line-feed option for Gossh-based clients results in SSH session establishment failure. This is because, the SSH client checks for non-zero window size for session establishment. Whereas CiscoSSH sends window size as 0. The workaround for this issue is to use the option to ignore the window size while initiating an SSH connection from such clients.
-
Virtual IP addresses: After a process restart of xlncd or ip_smiap , there might be a delay in restoring the virtual IP addresses.
-
More-specific Routes: Routes that are more specific than a connected route will not be available through Linux.
For example:
XR routing table:

10.0.0.0/24   via 10.0.0.2 (connected route)
10.0.0.192/28 via 20.0.0.1 (static route)
The expected behavior is as follows:
Table 3. Expected Behavior of More-specific Routes with CiscoSSH Destination IP Range
Cisco IOS XR OS Sends to:
Linux Sends to:
Match
(Yes/No)
10.0.0.1 - 10.0.0.191
10.0.0.2
10.0.0.2
Yes
10.0.0.193 - 10.0.0.206
20.0.0.1
10.0.0.2
No
10.0.0.207 - 10.0.0.255
10.0.0.2
10.0.0.2
Yes
-
Verification commands: During stress test on the router, certain show commands like show ssh , show ssh session details , and show ssh rekey might time out. The console displays the following error message in such cases:
"Error: Timed out to obtain information about one or more incoming/outgoing session. please retry." -
Process restart:
-
You cannot restart the CiscoSSH server process using the process restart ssh_server command, because it is a Linux process. Use the kill command on the Linux shell to restart the process.
-
CiscoSSH has ssh_conf_proxy and ssh_syslog_proxy processes that are responsible for processing the SSH configuration and logging syslog messages respectively. You can restart these processes using the process restart command.
-
A restart of XR-TCP process does not have any impact on CiscoSSH functionality, because CiscoSSH uses Linux TCP.
-
-
Debuggability:
-
You can enable 3 levels of debugs for CiscoSSH using the debug ssh server l1/l2/l3 command. Similarly, you can use the debug ssh client l1/l2/l3 command for CiscoSSH client.
-
The SSH server process restarts every time you enable or disable the debugs, because enabling the debugs results in updating the LOGLEVEL in the internal sshd_config file.
-
Syslogs for CiscoSSH
CiscoSSH introduces new syslogs for various SSH session events. The following table gives a comparison of syslogs between CiscoSSH and Cisco IOS XR SSH:
|
Session Event |
Syslogs on CiscoSSH |
Syslogs on Cisco IOS XR SSH |
|---|---|---|
|
Session login |
|
|
|
Session logout |
|
|
|
Session login failure |
|
|
|
Session rekey |
|
|
Restrictions for Implementing Secure Shell
The following are some basic SSH restrictions and limitations of the SFTP feature:
-
In order for an outside client to connect to the router, the router needs to have an RSA (for SSHv1 or SSHv2) or DSA (for SSHv2) key pair configured. DSA and RSA keys are not required if you are initiating an SSH client connection from the router to an outside routing device. The same is true for SFTP: DSA and RSA keys are not required because SFTP operates only in client mode.
-
In order for SFTP to work properly, the remote SSH server must enable the SFTP server functionality. For example, the SSHv2 server is configured to handle the SFTP subsystem with a line such as /etc/ssh2/sshd2_config:
-
subsystem-sftp /usr/local/sbin/sftp-server
-
The SFTP server is usually included as part of SSH packages from public domain and is turned on by default configuration.
-
SFTP is compatible with sftp server version OpenSSH_2.9.9p2 or higher.
-
RSA-based user authentication is supported in the SSH and SFTP servers. The support however, is not extended to the SSH client.
-
Execution shell and SFTP are the only applications supported.
-
The SFTP client does not support remote filenames containing wildcards (* ?, []). The user must issue the sftp command multiple times or list all of the source files from the remote host to download them on to the router. For uploading, the router SFTP client can support multiple files specified using a wildcard provided that the issues mentioned in the first through third bullets in this section are resolved.
-
The cipher preference for the SSH server follows the order AES128, AES192, AES256, and, finally, 3DES. The server rejects any requests by the client for an unsupported cipher, and the SSH session does not proceed.
-
Use of a terminal type other than vt100 is not supported, and the software generates a warning message in this case.
-
Password messages of “none” are unsupported on the SSH client.
-
Files created on the local device lose the original permission information because the router infrastructure does not provide support for UNIX-like file permissions. For files created on the remote file system, the file permission adheres to the umask on the destination host and the modification and last access times are the time of the copy.
Configure SSH
Perform this task to configure SSH.
Note |
For SSHv1 configuration, Step 1 to Step 4 are required. For SSHv2 configuration, Step to Step 4 are optional. |
Note |
From Cisco IOS XR Software Release 7.0.1 and later, the SSH host-key pairs are auto-generated at the time of router boot up. Hence you need not perform steps 5 to 7 to generate the host keys explicilty. See, Automatic Generation of SSH Host-Key Pairs for details. |
Procedure
|
Step 1 |
configure Example:Enters mode. |
||
|
Step 2 |
hostname hostname Example:Configures a hostname for your router. |
||
|
Step 3 |
domain name domain-name Example:Defines a default domain name that the software uses to complete unqualified host names. |
||
|
Step 4 |
Use the commit or end command. commit —Saves the configuration changes and remains within the configuration session.
|
||
|
Step 5 |
crypto key generate rsa [usage keys | general-keys] [keypair-label] Example:Generates an RSA key pair. The RSA key modulus can be in the range of 512 to 4096 bits.
|
||
|
Step 6 |
crypto key generate dsa Example:Enables the SSH server for local and remote authentication on the router. The supported key sizes are: 512, 768 and 1024 bits.
|
||
|
Step 7 |
configure Example:Enters mode. |
||
|
Step 8 |
ssh timeout seconds Example:(Optional) Configures the timeout value for user authentication to AAA.
|
||
|
Step 9 |
Do one of the following:
Example:
|
||
|
Step 10 |
Use the commit or end command. commit —Saves the configuration changes and remains within the configuration session.
|
||
|
Step 11 |
show ssh Example:(Optional) Displays all of the incoming and outgoing SSHv1 and SSHv2 connections to the router. |
||
|
Step 12 |
show ssh session details Example:(Optional) Displays a detailed report of the SSHv2 connections to and from the router. |
Automatic Generation of SSH Host-Key Pairs
This feature brings in the functionality of automatically generating the SSH host-key pairs for the DSA, ECDSA (such as ecdsa-nistp256 , ecdsa-nistp384 , and ecdsa-nistp521 ) and RSA algorithms. This in turn eliminates the need for explicitly generating each SSH host-key pair after the router boots up. Because the keys are already present in the system, the SSH client can establish connection with the SSH server soon after the router boots up with the basic SSH configuration. This is useful especially during zero touch provisioning (ZTP) and Golden ISO boot up scenarios.
Before this automation, you had to execute the crypto key generate command to generate the required host-key pairs.
Although the host-key pairs are auto-generated with the introduction of this feature, you still have the flexibility to select only the required algorithms on the SSH server. You can use the ssh server algorithms host-key command in XR Config mode to achieve the same. Alternatively, you can also use the existing crypto key zeroize command in XR EXEC mode to remove the algorithms that are not required.
Prior to the introduction of this feature, you had to execute the crypto key generate command in XR EXEC mode to generate the required host-key pairs.
Note |
In a system upgrade scenario from version 1 to version 2, the system does not generate the SSH host-key pairs automatically if they were already generated in version 1. The host-key pairs are generated automatically only if they were not generated in version 1. |
Note |
This feature is not supported on the following variants of Cisco NCS 540 Series Routers:
|
Configure the Allowed SSH Host-Key Pair Algorithms
When the SSH client attempts a connection with the SSH server, it sends a list of SSH host-key pair algorithms (in the order of preference) internally in the connection request. The SSH server, in turn, picks the first matching algorithm from this request list. The server establishes a connection only if that host-key pair is already generated in the system, and if it is configured (using the ssh server algorithms host-key command) as the allowed algorithm.
Note |
If this configuration of allowed host-key pairs is not present in the SSH server, then you can consider that the SSH server allows all host-key pairs. In that case, the SSH client can connect with any one of the host-key pairs. Not having this configuration also ensures backward compatibility in system upgrade scenarios. |
Configuration Example
You may perform this (optional) task to specify the allowed SSH host-key pair algorithm (in this example, ecdsa ) from the list of auto-generated host-key pairs on the SSH server:
/* Example to select the ecdsa algorithm */
Router(config)#ssh server algorithms host-key ecdsa-nistp521
Similarly, you may configure other algorithms.
Running Configuration
ssh server algorithms host-key ecdsa-nistp521
!
Verify the SSH Host-Key Pair Algorithms
Note |
With the introduction of the automatic generation of SSH host-key pairs, the output of the show crypto key mypubkey command displays key information of all the keys that are auto-generated. Before its introduction, the output of this show command displayed key information of only those keys that you explicitly generated using the crypto key generate command. |
Router#show crypto key mypubkey ecdsa
Mon Nov 19 12:22:51.762 UTC
Key label: the_default
Type     : ECDSA General Curve Nistp256
Degree   : 256
Created  : 10:59:08 UTC Mon Nov 19 2018
Data     :
04AC7533 3ABE7874 43F024C1 9C24CC66 490E83BE 76CEF4E2 51BBEF11 170CDB26
14289D03 6625FC4F 3E7F8F45 0DA730C3 31E960FE CF511A05 2B0AA63E 9C022482
6E

Key label: the_default
Type     : ECDSA General Curve Nistp384
Degree   : 384
Created  : 10:59:08 UTC Mon Nov 19 2018
Data     :
04B70BAF C096E2CA D848EE72 6562F3CC 9F12FA40 BE09BFE6 AF0CA179 F29F6407
FEE24A43 84C5A5DE D7912208 CB67EE41 58CB9640 05E9421F 2DCDC41C EED31288
6CACC8DD 861DC887 98E535C4 893CB19F 5ED3F6BC 2C90C39B 10EAED57 87E96F78
B6

Key label: the_default
Type     : ECDSA General Curve Nistp521
Degree   : 521
Created  : 10:59:09 UTC Mon Nov 19 2018
Data     :
0400BA39 E3B35E13 810D8AE5 260B8047 84E8087B 5137319A C2865629 8455928F
D3D9CE39 00E097FF 6CA369C3 EE63BA57 A4C49C02 B408F682 C2153B7F AAE53EF8
A2926001 EF113896 5F1DA056 2D62F292 B860FDFB 0314CE72 F87AA2C9 D5DD29F4
DA85AE4D 1CA453AC 412E911A 419E9B43 0A13DAD3 7B7E88E4 7D96794B 369D6247
E3DA7B8A 5E
The following example shows the output for ed25519 :
Router#show crypto key mypubkey ed25519
Wed Dec 16 16:12:21.464 IST
Key label: the_default
Type     : ED25519
Size     : 256
Created  : 15:08:28 IST Tue Oct 13 2020
Data     :
 649CC355 40F85479 AE9BE26F B5B59153 78D171B6 F40AA53D B2E48382 BA30E5A9

Router#
Related Topics
Automatic Generation of SSH Host-Key PairsAssociated Commands
-
ssh server algorithms host-key
-
show crypto key mypubkey
Ed25519 Public-Key Signature Algorithm Support for SSH
|
Feature Name |
Release Information |
Feature Description |
|---|---|---|
|
Ed25519 Public-Key Signature Algorithm Support for SSH |
Release 7.3.1 |
This algorithm is now supported on Cisco IOS XR 64-bit platforms when establishing SSH sessions. It is a modern and secure public-key signature algorithm that provides several benefits, particularly resistance against several side-channel attacks. Prior to this release, DSA, ECDSA, and RSA public-key algorithms were supported. This command is modified for this feature: |
This feature introduces the support for Ed25519 public-key algorithm, when establishing SSH sessions, on Cisco IOS XR 64-bit platforms. This algorithm offers better security with faster performance when compared to DSA or ECDSA signature algorithms.
The order of priority of public-key algorithms during SSH negotiation between the client and the server is:
-
ecdsa-sha2-nistp256
-
ecdsa-sha2-nistp384
-
ecdsa-sha2-nistp521
-
ssh-ed25519
-
ssh-rsa
-
ssh-dsa
Restrictions for ED25519 Public Key for SSH
The Ed25519 public key algorithm is not FIPS-certified. That is, if FIPS mode is enabled on the router, the list of public-key algorithms sent during the SSH key negotiation phase does not contain the Ed25519 key. This behavior is applicable only for new SSH connections. Any existing SSH session that has already negotiated Ed25519 public-key algorithm remains intact and continues to execute until the session is disconnected.
Further, if you have configured the router to negotiate only the Ed25519 public-key algorithm (using the ssh server algorithms host-key command), and if FIPS mode is also enabled, then the SSH connection to the router fails.
How to Generate Ed25519 Public Key for SSH
To generate Ed25519 public key for SSH, see .
You must also specify Ed25519 as the permitted SSH host-key pair algorithm from the list of auto-generated host-key pairs on the SSH server. For details, see .
To remove the Ed25519 key from the router, use the crypto key zeroize ed25519 command in XR EXEC mode.
Configure SSH Client
Perform this task to configure an SSH client.
Procedure
|
Step 1 |
configure Example:Enters mode. |
||
|
Step 2 |
ssh client knownhost device : /filename Example:(Optional) Enables the feature to authenticate and check the server public key (pubkey) at the client end.
|
||
|
Step 3 |
Use the commit or end command. commit —Saves the configuration changes and remains within the configuration session.
|
||
|
Step 4 |
ssh {ipv4-address | ipv6-address | hostname} [ username user- cipher | source-interface type instance] Enables an outbound SSH connection.
|
-
If you are using SSHv1 and your SSH connection is being rejected, the reason could be that the RSA key pair might have been zeroed out. Another reason could be that the SSH server to which the user is connecting to using SSHv1 client does not accept SSHv1 connections. Make sure that you have specified a hostname and domain. Then use the crypto key generate rsa command to generate an RSA host-key pair, and then enable the SSH server.
-
If you are using SSHv2 and your SSH connection is being rejected, the reason could be that the DSA, RSA host-key pair might have been zeroed out. Make sure you follow similar steps as mentioned above to generate the required host-key pairs, and then enable the SSH server.
- When configuring the RSA or DSA key pair, you might encounter the following error messages:
-
No hostname specified
You must configure a hostname for the router using the hostname command.
-
No domain specified
You must configure a host domain for the router using the domain-name command.
-
-
The number of allowable SSH connections is limited to the maximum number of virtual terminal lines configured for the router. Each SSH connection uses a vty resource.
-
SSH uses either local security or the security protocol that is configured through AAA on your router for user authentication. When configuring AAA, you must ensure that the console is not running under AAA by applying a keyword in the global configuration mode to disable AAA on the console.
Note
If you are using Putty version 0.63 or higher to connect to the SSH client, set the 'Chokes on PuTTYs SSH2 winadj request' option under SSH > Bugs in your Putty configuration to 'On.' This helps avoid a possible breakdown of the session whenever some long output is sent from IOS XR to the Putty client.
Configuring Secure Shell
The following example shows how to configure SSHv2 by creating a hostname, defining a domain name, enabling the SSH server for local and remote authentication on the router by generating a DSA key pair, bringing up the SSH server, and saving the configuration commands to the running configuration file.
After SSH has been configured, the SFTP feature is available on the router.
From Cisco IOS XR Software Release 7.0.1 and later, the crypto keys are auto-generated at the time of router boot up. Hence, you need to explicitly generate the host-key pair only if it is not present in the router under some scenarios.
configure
hostname router1
domain name cisco.com
exit
crypto key generate rsa/dsa
configure
ssh server
end
Order of SSH Client Authentication Methods
The default order of authentication methods for SSH clients on Cisco IOS XR routers is as follows:
-
On routers running Cisco IOS XR SSH:
-
public-key , password and keyboard-interactive
-
-
On routers running CiscoSSH (open source-based SSH):
-
public-key , keyboard-interactive and password
-
How to Set the Order of Authentication Methods for SSH Clients
To set the preferred order of authentication methods for SSH clients on Cisco IOS XR routers, use the ssh client auth-method command in the XR Config mode. This command is available from Cisco IOS XR Software Release 7.9.2/Release 7.10.1and later.
Configuration Example
In this example, we set the order of SSH client authentication methods in such a way that public key authentication is negotiated first, followed by keyboard-interactive, and then password-based authentication.
Router#configure
Router(config)#ssh client auth-method public-key keyboard-interactive password
Router(config-ssh)#commit
Running Configuration
Router#show run ssh client auth-methods
Tue Nov 21 17:55:44.688 IST
ssh client auth-methods public-key keyboard-interactive password
Router#
Configuring CBC Mode Ciphers
In Cisco IOS XR Release 7.0.1, you can enable CBC mode ciphers 3DES-CBC and AES-CBC for SSHv2 server and client connections. The ciphers are disabled by default.
Procedure
|
Step 1 |
configure Example:Enters mode. |
|
Step 2 |
ssh server enable cipher aes-cbc 3des-cbc Example: |
|
Step 3 |
ssh client enable cipher aes-cbc 3des-cbc Example: |
|
Step 4 |
Use the commit or end command. commit —Saves the configuration changes and remains within the configuration session.
|
|
Step 5 |
show ssh session details Example: |
Configuring CBC Mode Ciphers
/*Enable CBC mode ciphers 3DES-CBC and AES-CBC */
Router# configure
Router(config)# ssh server enable cipher aes-cbc 3des-cbc
Router(config)# ssh client enable cipher aes-cbc 3des-cbc
Router(config)# commit
Verify CBC Mode Cipher Configuration.
Router# show ssh session details

Thu Sep  6 10:16:26.346 UTC
SSH version : Cisco-2.0

id  key-exchange        pubkey    incipher    outcipher   inmac         outmac
------------------------------------------------------------------------------
Incoming Session
2   ecdh-sha2-nistp256  ssh-rsa   aes128-cbc  aes128-cbc  hmac-sha2-256 hmac-sha2-256
SSH Configuration Option to Restrict Cipher Public Key and HMAC Algorithm
The Cisco IOS XR software provides a new configuration option to control the key algorithms to be negotiated with the peer while establishing an SSH connection with the router. With this feature, you can enable the insecure SSH algorithms on the SSH server, which are otherwise disabled by default. A new configuration option is also available to restrict the SSH client from choosing the HMAC, or hash-based message authentication codes algorithm while trying to connect to the SSH server on the router.
You can also configure a list of ciphers as the default cipher list, thereby having the flexibility to enable or disable any particular cipher.
 Caution |
Use caution in enabling the insecure SSH algorithms to avoid any possible security attack. |
Note |
This feature is not supported on the following variants of Cisco NCS 540 Series Routers:
|
To disable the HMAC algorithm, use the ssh client disable hmac command or the ssh server disable hmac command in XR Config mode.
To enable the required cipher, use the ssh client enable cipher command or the ssh server enable cipher command in XR Config mode.
The supported encryption algorithms (in the order of preference) are:
-
aes128-ctr
-
aes192-ctr
-
aes256-ctr
-
aes128-gcm@openssh.com
-
aes256-gcm@openssh.com
-
aes128-cbc
-
aes192-cbc
-
aes256-cbc
-
3des-cbc
In SSH, the CBC-based ciphers are disabled by default. To enable these, you can use the ssh client enable cipher command or the ssh server enable cipher command with the respective CBC options (aes-cbc or 3des-cbc). All CTR-based and GCM-based ciphers are enabled by default.
Disable HMAC Algorithm
Configuration Example to Disable HMAC Algorithm
Router(config)# ssh server disable hmac hmac-sha1
Router(config)#commit
Router(config)# ssh client disable hmac hmac-sha1
Router(config)#commit
Running Configuration
ssh server disable hmac hmac-sha1
!
ssh client disable hmac hmac-sha1
!
Related Topics
SSH Configuration Option to Restrict Cipher Public Key and HMAC Algorithm
Associated Commands
-
ssh client disable hmac
-
ssh server disable hmac
Enable Cipher Public Key
Configuration Example to Enable Cipher Public Key
To enable all ciphers on the client and the server:
Router 1:
Router(config)# ssh client algorithms cipher aes256-cbc aes256-ctr aes192-ctr aes192-cbc aes128-ctr aes128-cbc aes128-gcm@openssh.com aes256-gcm@openssh.com 3des-cbc
Router 2:
Router(config)# ssh server algorithms cipher aes256-cbc aes256-ctr aes192-ctr aes192-cbc aes128-ctr aes128-cbc aes128-gcm@openssh.com aes256-gcm@openssh.com 3des-cbc
To enable the CTR cipher on the client and the CBC cipher on the server:
Router 1:
Router(config)# ssh client algorithms cipher aes128-ctr aes192-ctr aes256-ctr
Router 2:
Router(config)# ssh server algorithms cipher aes128-cbc aes256-cbc aes192-cbc 3des-cbc
Without any cipher on the client and the server:
Router 1:
Router(config)# no ssh client algorithms cipher
Router 2:
Router(config)# no ssh server algorithms cipher
Enable only the deprecated algorithms on the client and the server:
Router 1:
Router(config)# ssh client algorithms cipher aes128-cbc aes192-cbc aes256-cbc 3des-cbc
Router 2:
Router(config)# ssh server algorithms cipher aes128-cbc aes192-cbc aes256-cbc 3des-cbc
Enable the deprecated algorithm (using enable cipher command) and enable the CTR cipher (using algorithms cipher command) on the client and the server:
Router 1:
Router(config)# ssh client enable cipher aes-cbc 3des-cbc
Router(config)# ssh client algorithms cipher aes128-ctr aes192-ctr aes256-ctr
Router 2:
Router(config)# ssh server enable cipher aes-cbc 3des-cbc
Router(config)# ssh server algorithms cipher aes128-ctr aes192-ctr aes256-ctr
Running Configuration
All ciphers enabled on the client and the server:
Router 1:
ssh client algorithms cipher aes256-cbc aes256-ctr aes192-ctr aes192-cbc aes128-ctr aes128-cbc aes128-gcm@openssh.com aes256-gcm@openssh.com 3des-cbc
!
Router 2:
ssh client algorithms cipher aes256-cbc aes256-ctr aes192-ctr aes192-cbc aes128-ctr aes128-cbc aes128-gcm@openssh.com aes256-gcm@openssh.com 3des-cbc
!
Related Topics
SSH Configuration Option to Restrict Cipher Public Key and HMAC Algorithm
Associated Commands
-
ssh client enable cipher
-
ssh server enable cipher
-
ssh client algorithms cipher
-
ssh server algorithms cipher
User Configurable Maximum Authentication Attempts for SSH
|
Feature Name |
Release Information |
Feature Description |
|---|---|---|
|
User Configurable Maximum Authentication Attempts for SSH |
Release 7.3.1 |
This feature allows you to set a limit on the number of user authentication attempts allowed for SSH connection, using the three authentication methods that are supported by Cisco IOS XR. The limit that you set is an overall limit that covers all the authentication methods together. If the user fails to enter the correct login credentials within the configured number of attempts, the connection is denied and the session is terminated. This command is introduced for this feature: |
The three SSH authentication methods that are supported by Cisco IOS XR are public-key (which includes certificate-based authentication), keyboard-interactive, and password authentication. The limit count that you set as part of this feature comes into effect whichever combination of authentication methods you use. The limit ranges from 3 to 20; default being 20 (prior to Cisco IOS XR Software Release 7.3.2, the limit range was from 4 to 20).
Restrictions for Configuring Maximum Authentication Attempts for SSH
These restrictions apply to configuring maximum authentication attempts for SSH:
-
This feature is available only for Cisco IOS XR routers functioning as SSH server; not for the ones functioning as SSH clients.
-
This configuration is not user-specific; the limit remains same for all the users.
-
Due to security reasons, the SSH server limits the number of authentication attempts that explicitly uses the password authentication method to a maximum of 3. You cannot change this particular limit of 3 by configuring the maximum authentication attempts limit for SSH.
For example, even if you configure the maximum authentication attempts limit as 5, the number of authentication attempts allowed using the password authentication method still remain as 3.
Configure Maximum Authentication Attempts for SSH
You can use the ssh server max-auth-limit command to specify the maximum number of authentication attempts allowed for SSH connection.
Configuration Example
Router#configure
Router(config)#ssh server max-auth-limit 5
Router(config)#commit
Running Configuration
Router#show running-configuration ssh
ssh server max-auth-limit 5
ssh server v2
!
Verification
The system displays the following SYSLOG on the router console when maximum authentication attempts is reached:
RP/0/RP0/CPU0:Oct 6 10:03:58.029 UTC: SSHD_[68125]: %SECURITY-SSHD-3-ERR_GENERAL : Max authentication tries reached-exiting
Associated Commands
-
ssh server max-auth-limit
X.509v3 Certificate-based Authentication for SSH
|
Feature Name |
Release Information |
Feature Description |
|---|---|---|
|
X.509v3 Certificate-based Authentication for SSH |
Release 7.3.1 |
This feature adds new public-key algorithms that use X.509v3 digital certificates for SSH authentication. These certificates use a chain of signatures by a trusted certification authority to bind a public key to the digital identity of the user who is authenticating with the SSH server. These certificates are difficult to falsify and therefore used for identity management and access control across many applications and networks. Commands introduced for this feature are: This command is modified for this feature: |
This feature adds new public-key algorithms that use X.509v3 digital certificates for SSH authentication. This feature support is available for the SSH server for server and user authentication.
The X.509v3 certificate-based authentication for SSH feature supports the following public-key algorithms:
-
x509v3-ssh-dss
-
x509v3-ssh-rsa
-
x509v3-ecdsa-sha2-nistp256
-
x509v3-ecdsa-sha2-nistp384
-
x509v3-ecdsa-sha2-nistp521
Note |
While user authentication by using X.509v3 certificate-based authentication for the SSH server is supported using all algorithms listed above, server authentication is supported only with the x509v3-ssh-rsa algorithm. |
There are two SSH protocols that use public-key cryptography for authentication:
-
Transport Layer Protocol (TLP) described in RFC4253—this protocol mandates that you use a digital signature algorithm (called the public-key algorithm) to authenticate the server to the client.
-
User Authentication Protocol (UAP) described in RFC4252—this protocol allows the use of a digital signature to authenticate the client to the server (public-key authentication).
For TLP, the Cisco IOS XR SSH server provides its server certificate to the client, and the client verifies the certificate. Similarly, for UAP, the client provides an X.509 certificate to the server. The peer checks the validity and revocation status of the certificate. Based on the result, access is allowed or denied.
Server Authentication using X.509v3 Certificate
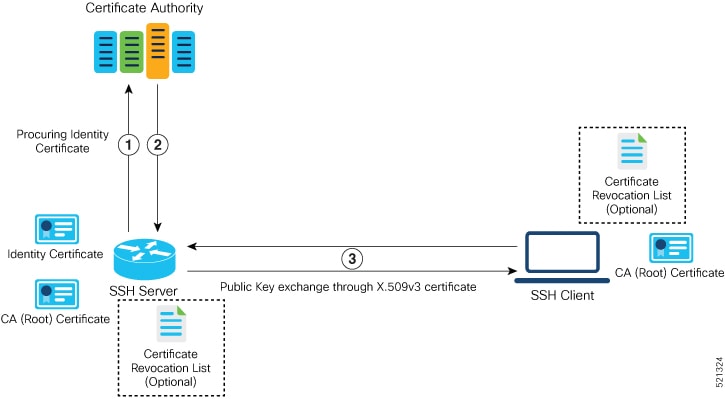
The server authentication process involves these steps:
-
The SSH server procures a valid identity certificate from a well-known certificate authority. This certificate can be obtained manually (through cut-and-paste mechanism) or through protocol implementations such as Simple Certificate Enrollment Protocol (SCEP).
-
The certificate authority provides valid identity certificates and associated root certificates. The requesting device stores these certificates locally.
-
The SSH server presents the certificate to the SSH client for verification.
-
The SSH client validates the certificate and starts the next phase of the SSH connection.
User Authentication using X.509v3 Certificate
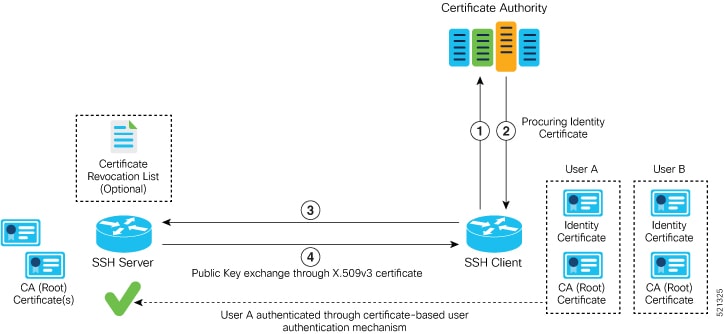
The user authentication phase starts after the SSH transport layer is established. At the beginning of this phase, the client sends the user authentication request to the SSH server with required parameters. The user authentication process involves these steps:
-
The SSH client requests a valid identity certificate from a well-known certificate authority.
-
The certificate authority provides valid identity certificates and associated root certificates. The requesting device stores these certificates locally.
-
The SSH client presents the certificate to the SSH server for verification.
-
The SSH server validates the certificate and starts the next phase of the SSH connection.
The certificate-based authentication uses public key as the authentication method. The certificate validation process by the SSH server involves these steps:
-
The SSH server retrieves the user authentication parameters, verifies the certificate, and also checks for the certificate revocation list (CRL).
-
The SSH server extracts the username from the certificate attributes, such as subject name or subject alternate name (SAN) and presents them to the AAA server for authorization.
-
The SSH server then takes the extracted username and validates it against the incoming username string present in the SSH connection parameter list.
Restrictions for X.509v3 Certificate-based Authentication for SSH
These restrictions apply to the X.509v3 certificate-based authentication feature for SSH:
-
Supported only for Cisco IOS XR devices acting as the SSH server; not for the Cisco IOS XR devices acting as the SSH client.
-
Supported only for local users because TACACS and RADIUS server do not support public-key authentication. As a result, you must include the local option for AAA authentication configuration.
Note
Although this feature supports only local authentication, you can enforce remote authorization and accounting using the TACACS server.
-
Certificate verification using the Online Certificate Status Protocol (OCSP) is currently not supported. The revocation status of certificates is checked using a certificate revocation list (CRL).
-
To avoid user authentication failure, the chain length of the user certificate must not exceed the maximum limit of 9.
Configure X.509v3 Certificate-based Authentication for SSH
To enable X.509v3 certificate-based authentication for SSH, these tasks for server and user authentication:
Server Authentication:
-
Configure the list of host key algorithms—With this configuration, the SSH server decides the list of host keys to be offered to the client. In the absence of this configuration, the SSH server sends all available algorithms to the user as host key algorithms. The SSH server sends these algorithms based on the availability of the key or the certificate.
-
Configure the SSH trust point for server authentication—With this configuration, the SSH server uses the given trust point certificate for server authentication. In the absence of this configuration, the SSH server does not send x509v3-ssh-rsa as a method for server verification. This configuration is not VRF-specific; it is applicable to SSH running in all VRFs.
The above two tasks are for server authentication and the following ones are for user authentication.
User Authentication:
-
Configure the trust points for user authentication—With this configuration, the SSH server uses the given trust point for user authentication. This configuration is not user-specific; the configured trust points are used for all users. In the absence of this configuration, the SSH server does not authenticate using certificates. This configuration is not specific to a VRF; it is applicable to SSH running in all VRFs.
You can configure up to ten user trust points.
-
Specify the username to be picked up from the certificate—This configuration specifies which field in the certificate is to be considered as the username . The common-name from the subject name or the user-principle-name(othername) from the subject alternate name , or both can be configured.
-
Specify the maximum number of authentication attempts allowed by the SSH server—The value ranges from 4 to 20. The default value is 20. The server closes the connection if the number of user attempts exceed the configured value.
-
AAA authentication configuration—The AAA configuration for public key is the same as that for the regular or keyboard-interactive authentication, except that it mandates local method in the authentication method list.
Configuration Example
In this example, the x509v3-ssh-rsa is specified as the allowed host key algorithm to be sent to the client. Similarly, you can configure other algorithms, such as ecdsa-sha2-nistp521, ecdsa-sha2-nistp384, ecdsa-sha2-nistp256, ssh-rsa , and ssh-dsa .
/* Configure the lits of host key algorithms */
Router#configure
Router(config)#ssh server algorithms host-key x509v3-ssh-rsa
Router(config)#commit
/* Configure the SSH trustpoint for server authentication */
Router#configure
Router(config)#ssh server certificate trustpoint host tp1
Router(config)#commit
/* Configure the trustpoints to be used for user authentication */
Router#configure
Router(config)#ssh server trustpoint user tp1
Router(config)#ssh server trustpoint user tp2
Router(config)#commit
/* Specifies the username to be picked up from the certificate.
In this example, it specifies the user common name to be picked up from the subject name field */
Router#configure
Router(config)#ssh server certificate username common-name
Router(config)#commit
/* Specifies the maximum authentication limit for the SSH server */
Router#configure
Router(config)#ssh server max-auth-limit 5
Router(config)#commit
/* AAA configuration for local authentication with certificate and
remote authorization with TACACS+ or RADIUS */
Router#configure
Router(config)#aaa authentication login default group tacacs+ local
Router(config)#aaa authorization exec default group radius group tacacs+
Router(config)#commit
Running Configuration
ssh server algorithms host-key x509v3-ssh-rsa
!
ssh server certificate trustpoint host tp1
!
ssh server trustpoint user tp1
ssh server trustpoint user tp2
!
ssh server certificate username common-name
!
ssh server max-auth-limit 5
!
Verification of Certificate-based Authentication for SSH
You can use the show ssh server command to see various parameters of the SSH server. For certificate-based authentication for SSH, the Certificate Based field displays Yes . Also, the two new fields, Host Trustpoint and User Trustpoints , display the respective trust point names.
Router#show ssh server
Wed Feb 19 15:23:38.752 IST
---------------------
SSH Server Parameters
---------------------

Current supported versions := v2
                  SSH port := 22
                  SSH vrfs := vrfname:=default(v4-acl:=, v6-acl:=)
              Netconf Port := 830
              Netconf Vrfs := vrfname:=default(v4-acl:=, v6-acl:=)

 Algorithms
---------------
        Hostkey Algorithms := x509v3-ssh-rsa, ecdsa-sha2-nistp521,ecdsa-sha2-nistp384,ecdsa-sha2-nistp256,ssh-rsa,ssh-dsa
   Key-Exchange Algorithms := ecdh-sha2-nistp521,ecdh-sha2-nistp384,ecdh-sha2-nistp256,diffie-hellman-group14-sha1
     Encryption Algorithms := aes128-ctr,aes192-ctr,aes256-ctr,aes128-gcm@openssh.com,aes256-gcm@openssh.com
            Mac Algorithms := hmac-sha2-512,hmac-sha2-256,hmac-sha1

 Authetication Method Supported
------------------------------------
                 PublicKey := Yes
                  Password := Yes
      Keyboard-Interactive := Yes
         Certificate Based := Yes

 Others
------------
                     DSCP  := 16
                Ratelimit  := 60
             Sessionlimit  := 100
                Rekeytime  := 60
       Server rekeyvolume  := 1024
  TCP window scale factor  := 1
            Backup Server  := Enabled, vrf:=default, port:=11000
Host Trustpoint            := tp1
User Trustpoints           := tp1 tp2
You can use the show ssh session details command to see the chosen algorithm for an SSH session:
Router#show ssh session details
Wed Feb 19 15:33:00.405 IST
SSH version : Cisco-2.0

id      key-exchange           pubkey               incipher    outcipher   inmac         outmac
----------------------------------------------------------------------------------------------------
Incoming Sessions
1       ecdh-sha2-nistp256     x509v3-ssh-rsa       aes128-ctr  aes128-ctr  hmac-sha2-256 hmac-sha2-256
Similarly, you can use the show ssh command to verify the authentication method used. In this example, it shows as x509-rsa-pubkey :
Router#show ssh
Sun Sep 20 18:14:04.122 UTC
SSH version : Cisco-2.0

id  chan pty  location   state         userid    host           ver authentication connection type
----------------------------------------------------------------------------------------------------------------------------
Incoming sessions
4   1    vty0 0/RP0/CPU0 SESSION_OPEN  9chainuser 10.105.230.198 v2  x509-rsa-pubkey Command-Line-Interface

Outgoing sessions
SYSLOGS
You can observe relevant SYSLOGS on the router console in various scenarios listed here:
-
On successful verification of peer certificate:
RP/0/RP0/CPU0:Aug 10 15:01:34.793 UTC: locald_DLRSC[133]: %SECURITY-PKI-6-LOG_INFO : Peer certificate verified successfully -
When user certificate CA is not found in the trust point:
RP/0/RP0/CPU0:Aug 9 22:06:43.714 UTC: locald_DLRSC[260]: %SECURITY-PKI-3-ERR_GENERAL : issuer not found in trustpoints configured RP/0/RP0/CPU0:Aug 9 22:06:43.714 UTC: locald_DLRSC[260]: %SECURITY-PKI-3-ERR_ERRNO : Error:='Crypto Engine' detected the 'warning' condition 'Invalid trustpoint or trustpoint not exist'(0x4214c000), cert verificationn failed -
When there is no CA certificate or host certificate in the trust point:
RP/0/RP1/CPU0:Aug 10 00:23:28.053 IST: SSHD_[69552]: %SECURITY-SSHD-4-WARNING_X509 : could not get the host cert chain, 'sysdb' detected the 'warning' condition 'A SysDB client tried to access a nonexistent item or list an empty directory', x509 host auth will not be used
RP/0/RP1/CPU0:Aug 10 00:23:30.442 IST: locald_DLRSC[326]: %SECURITY-PKI-3-ERR_ERRNO : Error:='Crypto Engine' detected the 'warning' condition 'Invalid trustpoint or trustpoint not exist'(0x4214c000), Failed to get trustpoint name from
How to Disable X.509v3 Certificate-based Authentication for SSH
-
Server Authentication — You can disable X.509v3 certificate-based server authentication for SSH by using the ssh server algorithms host-key command. From the list of auto-generated host-key pairs algorithms on the SSH server, this command configures allowed SSH host-key pair algorithms. Hence, if you have this configuration without specifying the x509-ssh-rsa option in the preceding command, it is equivalent to disabling the X.509v3 certificate-based server authentication for the SSH server.
-
User Authentication — You can remove the user trust point configuration (ssh server trustpoint user ) so that the SSH server does not allow the X.509v3 certificate-based authentication.
Failure Modes for X.509v3 Certificate-based Authentication for SSH
If the ssh server certificate trustpoint host configuration is missing, or if the configuration is present, but the router certificate is not present under the trust point, then the SSH server does not add x509-ssh-rsa to the list of supported host key methods during key exchange.
Also, the user authentication fails with an error message if:
-
User certificate is in an incorrect format.
-
The chain length of the user certificate is more than the maximum limit of 9.
-
Certificate verification fails due to any reason.
Related Topics
Associated Commands
-
ssh server algorithms hostkey
-
ssh server certificate username
-
ssh server max-auth-limit
-
ssh server trustpoint host
-
ssh server trustpoint user
-
show ssh server
-
show ssh session details
Importing Public Key
Public key can be imported in EXEC or any configuration modes. To correctly import a public key into the chassis, the public key must be in one of the following formats:
-
SSH RSA Public key format—Supported in configuration mode and in EXEC mode as text and file.
-
Base64 encoded (binary) format—Supported as EXEC mode as file.
Note
Base64 format is not supported if you press enter and copy paste the key.
-
PEM PKCS8 format—Supported in EXEC mode as text and file.
-
PEM PKCS1 format—Supported in EXEC mode as text and file.
Only the users belonging to user groups with admin and crypto task ID can import public key for other users.
Only the users belonging to groups root-lr, netadmin, maintenance, sysadmin can import public key for other users.
Import Public Key in EXEC Mode
Use the following command to import public key for currently logged in user:
      Crypto key import authentication rsa file_path
      Crypto key import authentication rsa  <press enter here>
Use the following command to import public key for other users:
      Crypto key import authentication rsa username username file_path
      Crypto key authentication rsa username <press enter here>
Remove Public Key Imported in EXEC Mode
Public Keys imported in EXEC mode can be zeroized and removed by using the following commands:
-
For currently logged in user:
crypto key zeroize authentication rsa -
For other users:
crypto key zeroize authentication rsa username username -
For all users:
crypto key zeroize authentication rsa all
Import Public Key in Configuration Mode
Note |
User must be present in the database to which the keys are imported. |
Note |
Only SSH RSA Public key format is supported in configuration mode. |
Use the following command to import public key in configuration mode:
ssh server username username keystring ssh-rsa pubkeyRemove Public Key Imported in Configuration Mode
Use the following command to remove public key in configuration mode:
no ssh server username usernameVerify the Import of Public Key
Use the following commands to display public keys imported from both configuration and EXEC modes.
-
For currently logged in user:
show crypto key authentication rsa -
For other users:
show crypto key authentication rsa username username -
For all users:
show crypto key authentication rsa all


 Feedback