Install the Cisco NCS 1020 Modules

This chapter contains procedures to install the modules of Cisco NCS 1020.


Note


In this chapter, "front fan tray" refers to the NCS1010-FAN tray, "rear fan tray" refers to the NCS1020-FAN tray, and "filler fan tray" refers to the NCS1020-FAN-BLANK tray. Front fan trays and rear fan trays contain a different set of fan units. Slots for the front fan trays and rear fan trays are not interchangeable.


Note


In this chapter, "Type 1 line card" refers to "NCS 1010 line card" and "Type 2 line card" refers to "NCS 1014 line card".


Install the Controller/Controller Filler

Use this procedure to install the controller into the Cisco NCS 1020 chassis. The chassis can accommodate up to two controllers.


Note


This procedure also applies to controller filler installation.

Attention


The following table shows controller assignment for the Type 1 line and filler cards.
Table 1. Supported Controller Slots for Controller and Controller Filler

CNTLR Slot

Module

Supported Card

0

Controller

Top Type 1 line card

1

Controller

Bottom Type 2 line card

Controller filler

Bottom Type 2 filler card

Procedure


Step 1

Orient the controller appropriately before inserting. Check for the This Side Up label.

Step 2

Support the bottom of the controller with hands and insert the controller into the slot.
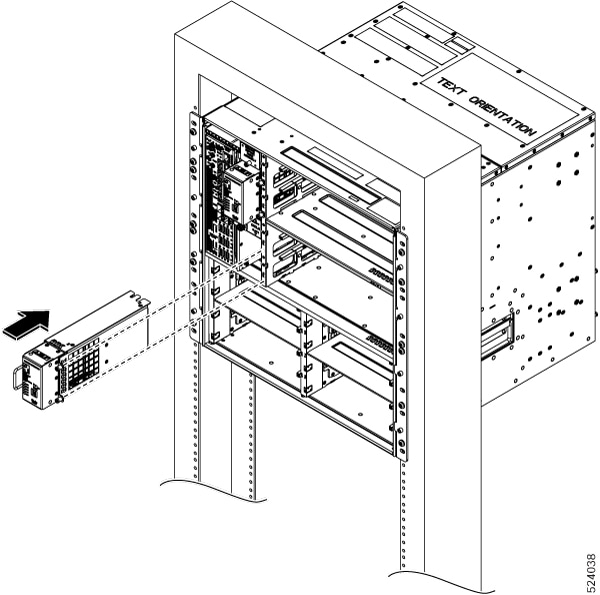
Figure 1. Installing the Controller
The image shows the installation of the controller into the Cisco NCS 1020 chassis.

Step 3

Using a screwdriver, tighten the two captive screws to a torque value of 0.65 N-m (5.75 lbs-in).


What to do next

Install the Type 1 Line/Filler Card

Install the Type 1 Line/Filler Card

Use this procedure to install the Type 1 line card into the Cisco NCS 1020 chassis. The chassis can accommodate up to two Type 1 line cards. See Cisco NCS 1020 Chassis Overview for Type 1 line cards.


Note


This procedure also applies to both type 1 active and passive filler installation.

Attention


The following table shows the Type 1 card slots supported for the Type 1 line and filler cards.
Table 2. Supported Card Slots for Type 1 Line Card and Filler

Type 1 Card Slot

Type 1 Card

0

Type 1 line card

1

Type 1 line card

Type 1 active filler

Type 1 passive filler


Attention


Type 1 card slot 0 must always have the Type 1 line card. In slot 1, install the Type 1 active filler when controller is in controller slot 1 and passive filler when contoller filler is in controller slot 1.


Before you begin

Secure the chassis to the rack.

Required tools and equipment:

  • Phillips screwdriver with a torque capability (customer supplied)

  • Type 1 line/filler card (NCS 1010 line card, NCS 1010 Active filler, or NCS 1010 Passive filler)

Procedure


Step 1

Orient the line card.

Step 2

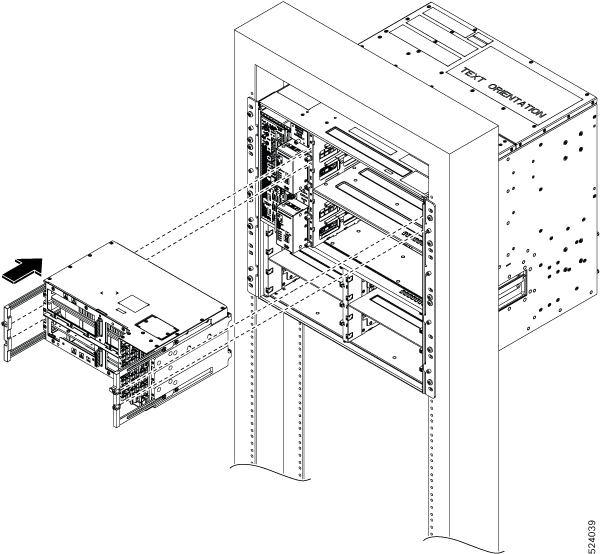
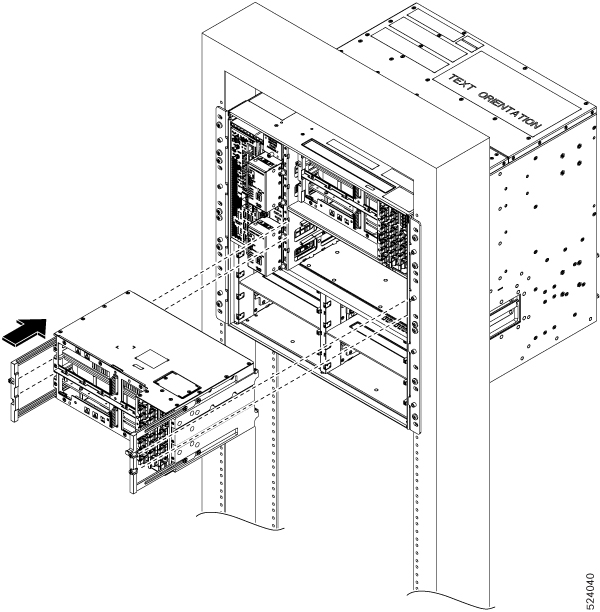
Align the grooves in both sides of the line card with the slide guides available inside the chassis.

Figure 2. Inserting the C-Band Type 1 Line Card
This image shows the installation of the C-band line card into the Cisco NCS 1020 chassis.
Figure 3. Inserting the L-Band Type 1 Line Card
This image shows the installation of the C-band line card into the Cisco NCS 1020 chassis.

Step 3

Insert the line card into the chassis.

Caution


Use the handle only to push and pull out the line card from the chassis. Do not use the handle to carry the line card. To prevent any accidental drop, support the bottom of the line card with your hand while you remove or insert it.

Step 4

Tighten the captive screws available in the left and right side handles of the line card, using a screw driver with a torque value of 1.5 N-m (13.3 lbs-in).


What to do next

After installing the Type 1 line card or active filler Install the Front Fan Trays.

Install the Front Fan Trays

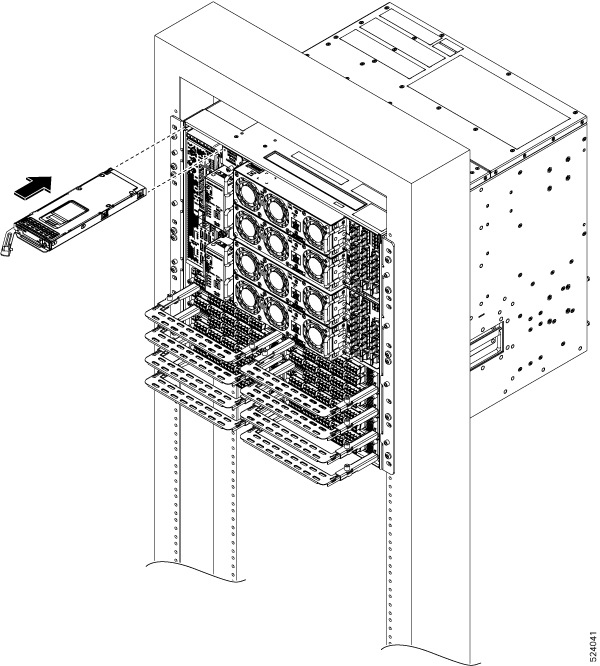
Use this procedure to install the front fan trays into the chassis. The chassis can accommodate up to four fan trays at the front.

Procedure


Step 1

Orient the fan tray using the guide pins on both sides available in the fan tray, before inserting. Check for the This Side Up label.

Step 2

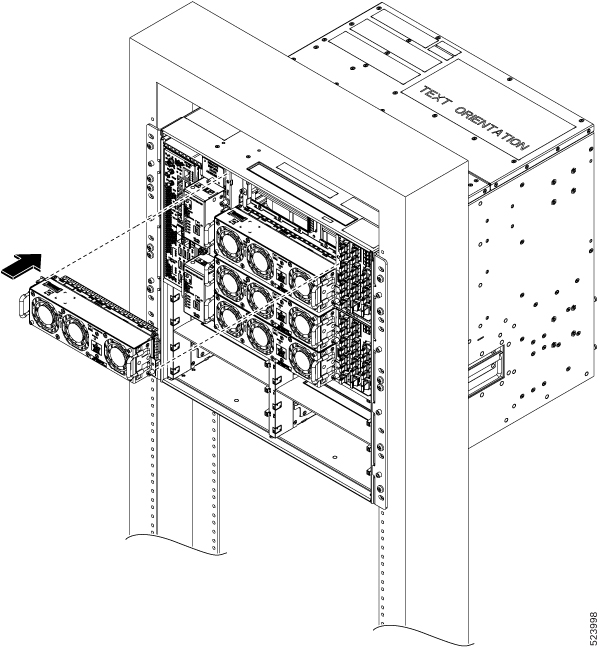
Holding the handles with both hands, insert the fan tray into the slot on the front side of the chassis.

Figure 4. Installing the Front Fan Tray

Step 3

Using the screw driver, tighten the captive screws at the corners of the fan tray, to a torque value 0.65 N-m (5.75 lbs-in).

The left captive screw goes into the chassis and the right captive screw goes into the line card.

Step 4

Repeat the preceding steps to insert and fix the second fan tray.


Attach the Fiber Management Bracket

Use this procedure to attach a fiber management bracket to a Type 2 line card or filler card.

The fiber management brackets are available in the package. Each Type 2 line card or filler card comes with its own fiber management bracket. Do not interchange the fiber management brackets. The Type 2 line or filler cards have adjustable fiber management brackets.

Procedure


Step 1

Attach the fiber management bracket to the card (line card or filler card). To attach:

  1. Orient the captive screws in the fiber management bracket to the line card.

    Ensure that the fiber management bracket is in the correct orientation. Incorrect orientation obstructs accessibility to the ports.

  2. Seat the bracket captive screws in the line card screw holes.

Step 2

Using a torque-limiting T15 Torx screwdriver, tighten the two M3 T15 Torx screws of the fiber management bracket to a torque value of 0.65 N-m (5.75 lbs-in).

We recommend that you do not remove the fiber management brackets after installing the line card into the chassis.


What to do next

Install the Type 2 Line/Filler Card

Install the Type 2 Line/Filler Card

Use this procedure to install an Type 2 line card into the Cisco NCS 1020 chassis. The Cisco NCS 1020 chassis supports a maximum of eight Type 2 line cards. Install the Type 2 line cards in the slot order starting from slot 2 to slot 9.

Before you begin

It is mandatory to attach the fiber management brackets to the Type 2 filler cards and line cards before you install the cards into the chassis. For a detailed procedure, see Attach the Fiber Management Bracket.


Note


The following procedure is not required if the chassis is shipped with preinstalled Type 2 line cards.

The following procedure also applies to Type 2 filler cards installation.


Procedure


Step 1

Before inserting the line card into the slot, use the This Side Up label to help yourself orient the line card correctly.

Step 2

Use both the hands while inserting a line card. To insert the line card, perform the following actions:

  1. Use one hand to support the bottom of the line card.

  2. Use the other hand to hold the fiber management bracket.

  3. With both hands, guide the line card into the slot.

Caution


Use the fiber management brackets only for pulling out or pushing in the line cards or filler cards. Do not use the fiber management brackets to carry the cards. Always support the line card and filler card at the bottom with your hand.

Step 3

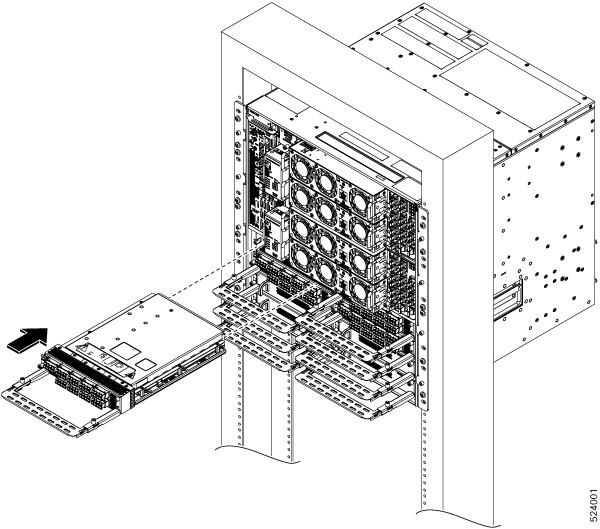
Slide the line card completely inside, into the slide guide till it engages in the chassis.

Step 4

Using the torque-limiting T-15 six lobe/slot screwdriver, tighten the two captive screws of the line card to a torque value of 0.44 N-m (3.89 lbs-in) to secure the line card.

Figure 5. Inserting the Type 2 Line Card

Install the Solid State Drive (SSD)

Use this procedure to install the SSD into the Cisco NCS 1020 chassis.

Procedure


Step 1

Before inserting the SSD into the slot, use the UP label to help you orient the module correctly.

Step 2

Grasp the ejector handle and align the ejector to chassis hinge point and then rotate inwards to latch the SSD into the slot.

Figure 6. Installing the SSD

Step 3

Using a T15 six lobe/slot screwdriver, tighten the lone captive screw to a torque value of 0.65 N-m (5.75 lbs-in).


What to do next

Install the Power Supply Units (PSUs)

Install the Power Supply Units (PSUs)

Use this procedure to install the PSUs into the Cisco NCS 1020 chassis.

Procedure


Step 1

Orient the PSU correctly before inserting. Check for the This Side Up label.

Step 2

Slide the PSU into the slot as follows:

  1. Support the PSU at the bottom with one hand.

  2. Hold the handle with your other hand.

  3. Push the PSU in until you hear a click sound; see the following figure for direction of insertion.

    The click sound indicates that the unit has latched.

    Note

     
    Press and release the locking latch only for removing the PSU.
Figure 7. Installation of AC PSU
Figure 8. Installation of the DC PSU

Connect AC Power to the Cisco NCS 1020 Chassis


Caution


The Cisco NCS 1020 chassis relies on the protective devices in the building installation to protect against short circuit, overcurrent, and ground faults. Ensure that the protective devices comply with local and National Electrical Codes.


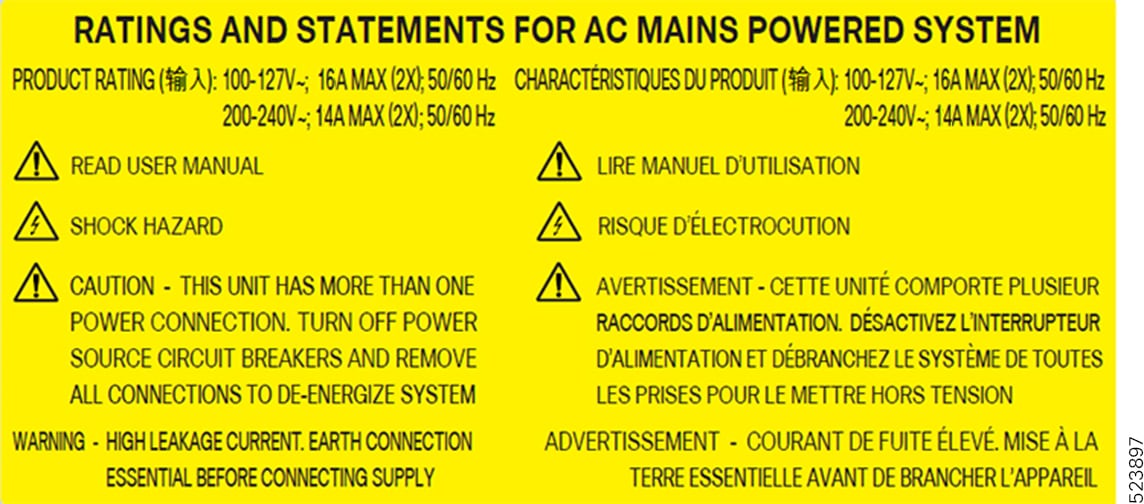
Figure 9. Rating Label for AC Power

The voltage rating value for AC power ranges either 200–230 or 100–120 V~ depending on the standards in various countries.


Note


You need a dual pole breaker for the installation. The rating of the dual pole breaker for each feed is 14 A for input voltage 200–230 V~, and 20 A for input voltage 100–120 V~.


Procedure


Step 1

Verify that the AC cable is installed in the correct AC source panel. Ensure that either the fuse is removed or the circuit breaker is in the off position and locked out.

Step 2

Attach the AC power cable to the cable connector in the AC power module.

Step 3

Close the cable retention clips to secure the power cables and to prevent their accidental removal.


Connect DC Power to the Cisco NCS 1020 Chassis


Caution


The Cisco NCS 1020 chassis relies on the protective devices in the building installation to protect against short circuit, overcurrent, and ground faults. Ensure that the protective devices comply with local and National Electrical Codes (NEC).


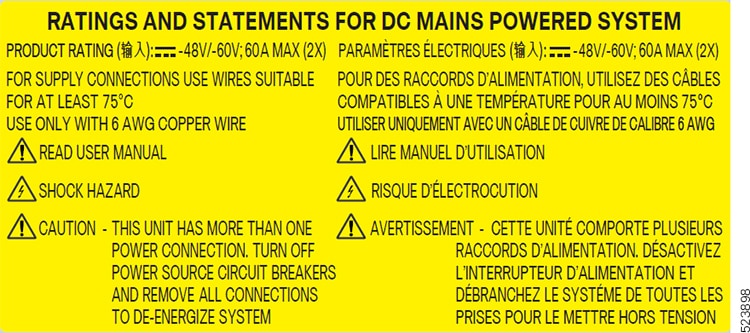
Figure 10. Rating Label for DC Power

Procedure


Step 1

Verify that the correct fuse panel is installed in the top mounting space.

Step 2

Measure and cut the cables as needed to reach the Cisco NCS 1020 chassis from the fuse panel.

Step 3

Dress the power according to local practice.

Step 4

Connect the office battery and return cables according to the fuse panel engineering specifications.

Step 5

Affix the power lug on the unit with two screws. Tighten the screws using torque of 2.7 N-m ± 0.3 N-m (21.69–28.09 lbs-in.).

Caution


Torque level greater than 3.0 N-m can damage the unit.

Use #6AWG cables.

Step 6

Use protection covers to keep the lugs in place.

Snap fit the protection cover towards the top for 90-degree lugs and push it down for straight (180-degree) lugs.


Install the Rear Fan/Filler Fan Trays

Use this procedure to install the rear fan trays to cool the type 2 line cards. The chassis can accommodate up to four rear fan trays.


Note


The following procedure also applies to the filler fan tray installation.


Install the rear fan trays in the slot order, FT4 to FT7. Add the rear fan trays as per the installed type 2 line cards. The following table shows the required rear fan trays for each type 2 line card slot.

Type 2 Line Card Slots

Fan Trays

2, 3, 4, 5

FT4, FT5

6, 7, 8, 9

FT6, FT7


Note


You must install the rear fan trays in pairs. If you intend to use only one type 2 line card in any of the slots above, you must install both rear fan trays for the respective slot. For type 2 filler cards, install the filler fan trays.


Procedure


Step 1

Before inserting the fan tray, use the This Side Up label to help yourself orient the fan tray correctly.

Step 2

Use one hand to support the fan tray at the bottom. Then use the other hand to hold the cross handle and insert the fan tray into the slot.

Figure 11. Installation of the Rear Fan Tray

Step 3

Using the torque-limiting screwdriver, tighten the captive screws at the sides of the fan tray to a torque value of 0.65 N-m (5.75 lbs-in).

Step 4

Repeat the preceding steps to insert and fix the required number of fan trays.


Install the Front Door

Use this procedure to attach the front door onto the NCS 1020 chassis.

Before you begin

Required tools and equipment:

  • Phillips screwdriver with torque handling (customer supplied)

  • NCS1020-DR= Door kit

Procedure


Step 1

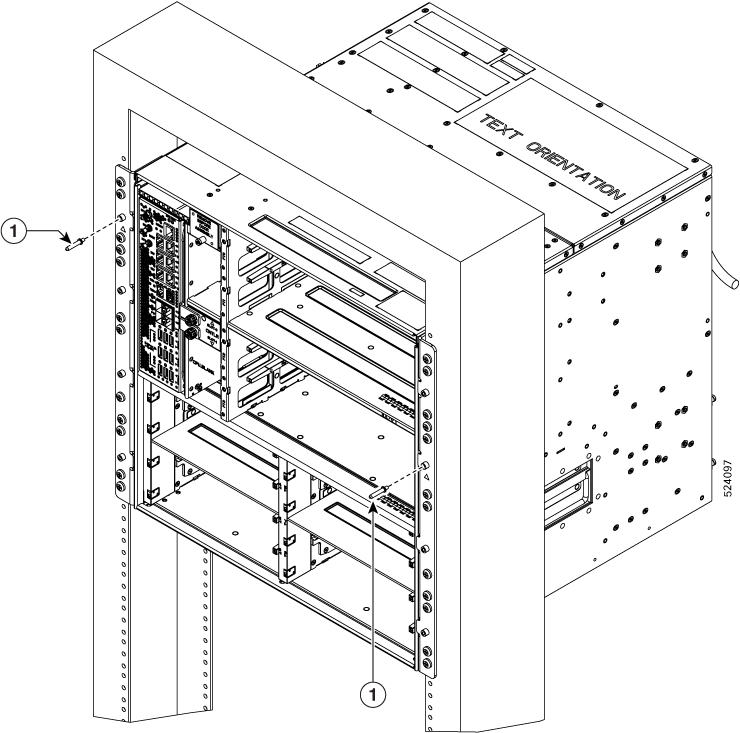
Install the two guide pins above the triangle markings on the chassis.

Figure 12. Guide Pins
1 Guide pins

Step 2

Assemble the door frames. Perform the following steps:

  1. Use the This Side UP label to orient the cable management brackets.

    Make sure the This Side UP labels on the brackets are on the outside.

  2. Position the top hood brackets facing down between the cable management brackets. Use the screw holes to align the top hood and the side brackets.

  3. Align the bottom screw holes in the cable management brackets with the bottom cover screw holes.

    Figure 13. Aligning Top Hood and Bottom Cover with Side Brackets
    This image shows the alignment of the top hood and bottom cover with the side frames of the front door.

    1

    Left side frame

    2

    Top hood and bottom cover screws

    3

    Right side frame

    4

    Top hood

    5

    Bottom cover

  4. Using the screws provided with the door kit, bind the cable management brackets to the top hood and bottom cover.

  5. Using a screwdriver, tighten the screws to a torque value of 1.5 N-m (13.28 lbs-in).

Step 3

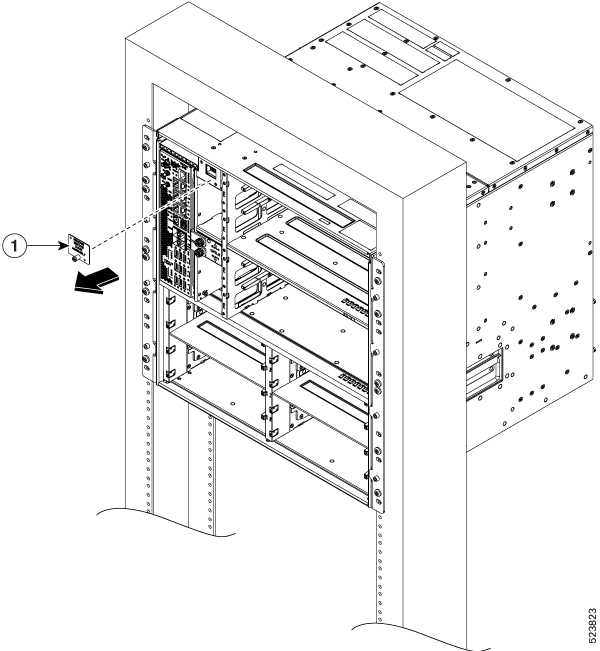
Remove the sensor cover above the controller in CNTLR slot 0. Perform the following steps:

Note


Removing the sensor cover creates space to mate the door frame connector with the chassis connector.

  1. Loosen the captive screw using a screwdriver.

  2. Pull the sensor cover away from the chassis.

Figure 14. Removing the Sensor Cover
This image shows the removal of the sensor cover above the active controller.

1

Sensor cover

Step 4

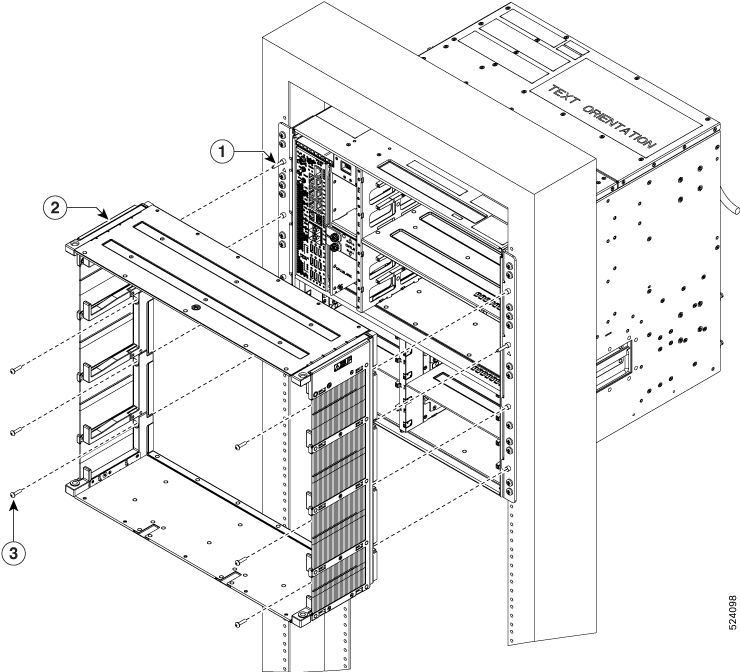
Attach the door frame. Perform the following steps:

  1. Before attaching the door frame on to the chassis, use the This Side Up label to help yourself orient the door frame correctly.

  2. Align the eight screw holes on either side of the cable management brackets with the six protruding standoffs and two diagonal guide pins on the chassis.

  3. Insert the screws on the screw holes to bind the door frame on to the chassis.

    1 Guide pins 3 Pan head screws
    2 Door frame
  4. Using a screwdriver, tighten the six pan head screws.

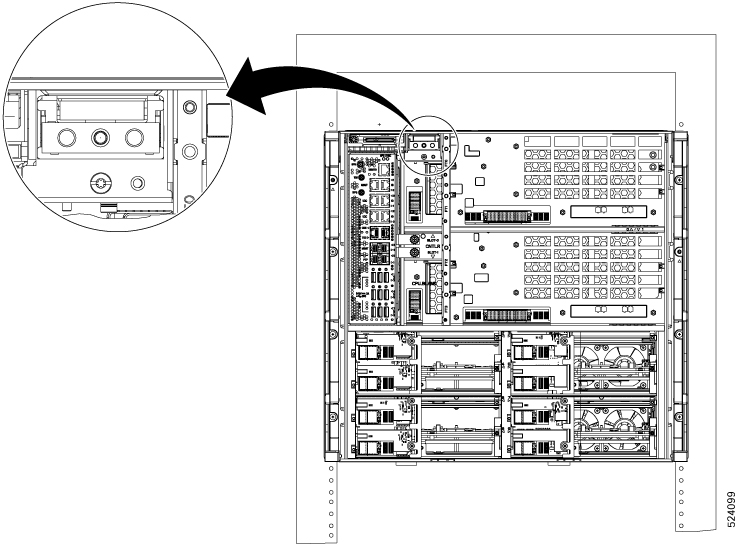
    Note


    The connectors on the door frame and chassis must align and mate properly to have a reliable connection between the chassis and the front door. Tighten the screw close to the connector to keep connector mating secured.

    Figure 15. Connector

Step 5

Install the door on to the door frame. Perform the following steps:

  1. Using the UP arrow, orient the doors correctly.

  2. Push the door hinges in the opposite direction.

    Pull the top hinge pin down and the bottom hinge pin up.

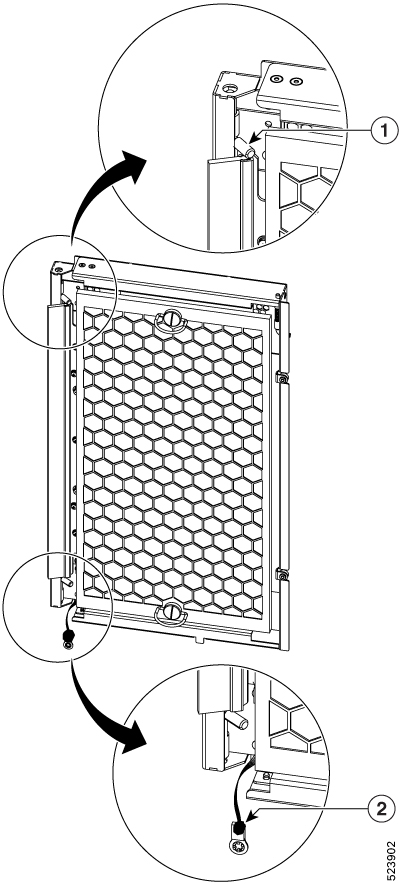
    Figure 16. Front Door with Hinge and Ground strap

    1

    Door hinge

    2

    Ground strap cable

  3. Using the hinges, guide the door on to the frame.

    Figure 17. Installing the Door onto the Frame
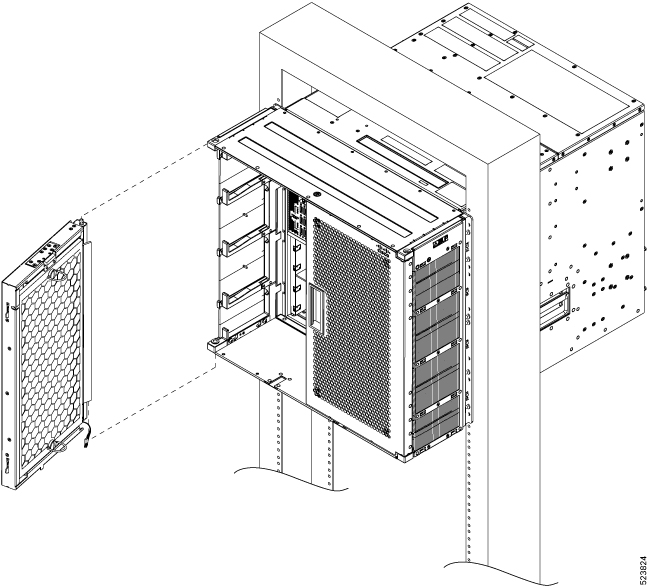
    This image shows the installation of the door onto the frame.
  4. Release the hinges to lock the door into the frame.

Step 6

Ground the front door. Perform the following steps:

  1. Look for the ground strap cable towards the side of the front door.

  2. Connect the other end of the ground strap cable to a grounding point on the chassis and insert the screw.

    The ground strap cable comes preinstalled on the door.

  3. Using a screwdriver, tighten the screw to lock the cable.

  4. Repeat the preceding steps for the other door.

  5. Use the remaining hinges to close the door.