- Information About Certificates
- Generating and Exporting Certificates
- Installing the Certificates
Generating and Installing Certificates
This section describes how to generate and install certificates, and includes the following topics:
■![]() Information About Certificates
Information About Certificates
■![]() Generating and Exporting Certificates
Generating and Exporting Certificates
■![]() Configuring IoT FND to Access the Keystore
Configuring IoT FND to Access the Keystore
■![]() Configuring the TPS Proxy to Access the Keystore
Configuring the TPS Proxy to Access the Keystore
■![]() Configuring the HSM Group Name and Password
Configuring the HSM Group Name and Password
Information About Certificates
The following topics provide information on certificates:
Role of Certificates
All communications between the CGR1000, IR800s, C800s, ESR C5921s, and the Cisco Connected IoT Field Network Director (IoT FND) must be authenticated in both directions through mutual authentication. Before mutual authentication can occur, the Cisco IoT FND and the device must each have a certificate signed by the same Certificate Authority (CA). You can employ either a root CA or subordinate CA (subCA).
For details on generating certificates for CGRs, refer to the Certificate Enrollment Guide for the Cisco 1000 Series Connected Grid Routers.
Generating certificates for IoT FND also involves generating and loading certificates on the IoT FND TPS Proxy (tpsproxy). After generating the certificates, import them into the storage location on the TPS proxy and IoT FND known as the Keystore.
Keystore
The Keystore provides details for a specific system (such as IoT FND or the TPS proxy) and includes the following items:
■![]() The certificate for that system (such as the IoT FND certificate or TPS proxy certificate)
The certificate for that system (such as the IoT FND certificate or TPS proxy certificate)
■![]() The private key for the system
The private key for the system
■![]() The certificate chain (path to the CA or subCA)
The certificate chain (path to the CA or subCA)
The IoT FND key and certificates are stored in the cgms_keystore file on the IoT FND server in the
/opt/cgms/server/cgms/conf directory.
Generating and Exporting Certificates
Note: The IoT FND certificate encrypts data in the database. Do not lose this certificate!![]() Loss of this certificate results in some database data that will not be able to be decrypted.
Loss of this certificate results in some database data that will not be able to be decrypted.
Complete the following procedures to generate and export certificates:
■![]() Configuring a Certificate Template for IoT FND and the IoT FND TPS Proxy
Configuring a Certificate Template for IoT FND and the IoT FND TPS Proxy
■![]() Enabling a Certificate Template
Enabling a Certificate Template
■![]() Generating Certificates for IoT FND and the IoT FND TPS Proxy
Generating Certificates for IoT FND and the IoT FND TPS Proxy
■![]() Command Authorization Support
Command Authorization Support
■![]() Configuring a Custom CA for HSM
Configuring a Custom CA for HSM
■![]() Configuring a Custom CA for SSM
Configuring a Custom CA for SSM
Configuring a Certificate Template for IoT FND and the IoT FND TPS Proxy
On the CA (or subCA) you must create certificate templates to generate certificates for the IoT FND and TPS proxy.
To create a certificate template:
1.![]() Open the Certificate Authority application on a Windows Server 2008 R2 system operating with the Enterprise edition.
Open the Certificate Authority application on a Windows Server 2008 R2 system operating with the Enterprise edition.
The Certificate Authority application is standard on the above noted Windows Server version.
2.![]() Expand the menu to view the Certificate Templates folder.
Expand the menu to view the Certificate Templates folder.
3.![]() Right-click Certificate Templates and choose Manage from the context menu.
Right-click Certificate Templates and choose Manage from the context menu.
4.![]() In the right-pane, right-click Computer, choose Duplicate Template from the context menu, and enter NMS.
In the right-pane, right-click Computer, choose Duplicate Template from the context menu, and enter NMS.
5.![]() In the Duplicate Template pane, select Windows Server 2008 Enterprise.
In the Duplicate Template pane, select Windows Server 2008 Enterprise.
7.![]() Click the NMS Properties > General tab, and do the following:
Click the NMS Properties > General tab, and do the following:
a.![]() Enter NMS in the Template display name and Template name fields.
Enter NMS in the Template display name and Template name fields.
b.![]() Enter an appropriate Validity period, which defines the lifetime of the certificate.
Enter an appropriate Validity period, which defines the lifetime of the certificate.
c.![]() Check the Publish certificate in Active Directory check box.
Check the Publish certificate in Active Directory check box.
8.![]() Click the NMS Properties > Extensions tab, and do the following:
Click the NMS Properties > Extensions tab, and do the following:
a.![]() Select Application Policies in the Extensions pane.
Select Application Policies in the Extensions pane.
b.![]() In the Application Policies pane, verify that Client Authentication and Server Authentication appear in the bottom pane.
In the Application Policies pane, verify that Client Authentication and Server Authentication appear in the bottom pane.
c.![]() Select Key Usage in the Extensions top pane and click Edit.
Select Key Usage in the Extensions top pane and click Edit.
d.![]() In the Edit Key Usage Extension pane, clear the Make this extension critical check box.
In the Edit Key Usage Extension pane, clear the Make this extension critical check box.
9.![]() Click the NMS Properties > Request Handling tab, and do the following:
Click the NMS Properties > Request Handling tab, and do the following:
a.![]() Choose Signature and encryption from the Purpose drop-down menu.
Choose Signature and encryption from the Purpose drop-down menu.
b.![]() Check the Allow private key to be exported check box.
Check the Allow private key to be exported check box.
10.![]() Click the NMS Properties > Security tab, and do the following:
Click the NMS Properties > Security tab, and do the following:
a.![]() Select Administrator within the Group or user names pane.
Select Administrator within the Group or user names pane.
b.![]() For each group or user names item listed (such as authenticated users, administrator, domain administrators, enterprise administrators) check the Allow check box for all permissions (full control, read, write, enroll, autoenroll).
For each group or user names item listed (such as authenticated users, administrator, domain administrators, enterprise administrators) check the Allow check box for all permissions (full control, read, write, enroll, autoenroll).
11.![]() Click the NMS Properties > Cryptography tab, and retain the following default settings:
Click the NMS Properties > Cryptography tab, and retain the following default settings:
■![]() Cryptographic provider: Requests can use any provider available on the subject computer
Cryptographic provider: Requests can use any provider available on the subject computer
13.![]() Click the NMS Properties > Subject Name tab, and retain the following default settings:
Click the NMS Properties > Subject Name tab, and retain the following default settings:
■![]() Radio button for Supply in the request radio button selected
Radio button for Supply in the request radio button selected
■![]() Check box checked for Use subject information from existing certificates for autoenrollment renewal requests
Check box checked for Use subject information from existing certificates for autoenrollment renewal requests
Note: Retain the default settings for the remaining tabs: Superseded Templates, Server, and Issuance Requirements.
Enabling a Certificate Template
Before you can create a certificate, you must enable the certificate template.
To enable the certificate template:
1.![]() Configure a certificate template (see Configuring a Certificate Template for IoT FND and the IoT FND TPS Proxy).
Configure a certificate template (see Configuring a Certificate Template for IoT FND and the IoT FND TPS Proxy).
2.![]() Open the Certificate Authority application on the Windows Server.
Open the Certificate Authority application on the Windows Server.
3.![]() Expand the menu to view the Certificate Templates folder.
Expand the menu to view the Certificate Templates folder.
4.![]() Right-click Certificate Templates and choose New > Certificate Template to Issue from the context menu.
Right-click Certificate Templates and choose New > Certificate Template to Issue from the context menu.
5.![]() In the Enable Certificate Templates window, highlight the new NMS template.
In the Enable Certificate Templates window, highlight the new NMS template.
Generating Certificates for IoT FND and the IoT FND TPS Proxy
Follow the same steps for generating a certificate for IoT FND and for the TPS proxy by using the configuration template that you previously created.
Go through the steps in this section twice: once to generate the IoT FND certificate, and once to generate the TPS proxy certificate.
Tip: In In the Certificate Properties window, click the Subject tab, and do the following:In the Value field, add the fully-qualified domain name (FQDN): the value you enter depends on whether you are creating a certificate for the IoT FND or the TPS proxy.
After creating these two certificates, securely transfer the IoT FND certificate to the IoT FND application server, and securely copy the TPS proxy certificate to the TPS proxy server.
1.![]() Configure a certificate template (see Configuring a Certificate Template for IoT FND and the IoT FND TPS Proxy).
Configure a certificate template (see Configuring a Certificate Template for IoT FND and the IoT FND TPS Proxy).
2.![]() Enable the certificate template (see Enabling a Certificate Template).
Enable the certificate template (see Enabling a Certificate Template).
3.![]() From a server running Windows Server 2008, choose Start > Run and enter mmc to open the MMC console.
From a server running Windows Server 2008, choose Start > Run and enter mmc to open the MMC console.
4.![]() In the Console 1 window, expand the Certificates > Personal folders.
In the Console 1 window, expand the Certificates > Personal folders.
5.![]() Right-click Certificates and choose All Tasks > Request New Certificate from the context menu.
Right-click Certificates and choose All Tasks > Request New Certificate from the context menu.
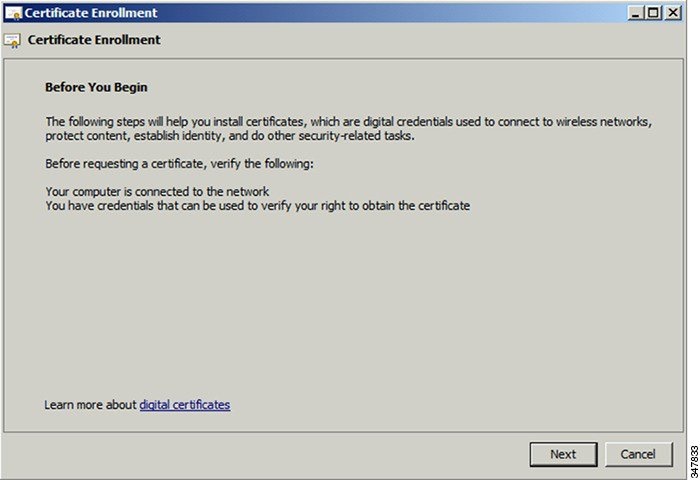
6.![]() In the Before You Begin window, click Next.
In the Before You Begin window, click Next.
7.![]() In the Select Certificate Enrollment Policy window, choose Active Directory Enrollment Policy.
In the Select Certificate Enrollment Policy window, choose Active Directory Enrollment Policy.
Click Next.
8.![]() In the Request Certificates window, do the following:
In the Request Certificates window, do the following:
b.![]() Click the More information... link.
Click the More information... link.
9.![]() In the Certificate Properties window, click the Subject tab, and do the following:
In the Certificate Properties window, click the Subject tab, and do the following:
a.![]() From the Type drop-down menu, choose Common name (CN).
From the Type drop-down menu, choose Common name (CN).
b.![]() In the Value field, add the fully-qualified domain name (FQDN):
In the Value field, add the fully-qualified domain name (FQDN):
c.![]() Click Add and the Common Name appears in the right-pane.
Click Add and the Common Name appears in the right-pane.
d.![]() From the Type drop-down menu, choose Organization (O).
From the Type drop-down menu, choose Organization (O).
e.![]() In the Value field, add the company name or organization for the IoT FND or TPS proxy.
In the Value field, add the company name or organization for the IoT FND or TPS proxy.
f.![]() Click Add and the organization appears in the right-pane.
Click Add and the organization appears in the right-pane.
Figure 1 Defining a Common Name and Organization for IoT FND

11.![]() In the Certificate Enrollment window, check the NMS check box and click Enroll.
In the Certificate Enrollment window, check the NMS check box and click Enroll.
12.![]() After enrollment completes, click Finish.
After enrollment completes, click Finish.
13.![]() In the MMC console (Console 1), expand the Certificates folder.
In the MMC console (Console 1), expand the Certificates folder.
14.![]() Choose Personal > Certificates.
Choose Personal > Certificates.
15.![]() In the Issued To pane, right-click the new certificate and choose All Tasks > Export from the context menu.
In the Issued To pane, right-click the new certificate and choose All Tasks > Export from the context menu.
The Export Wizard window appears.
Figure 2 Issued To Pane Showing Supported Certificates

16.![]() Initiate the Export Wizard.
Initiate the Export Wizard.
17.![]() At the Export Private Key window, select the Yes, export the private key radio button. Click Next.
At the Export Private Key window, select the Yes, export the private key radio button. Click Next.
18.![]() At the Export File Format window, do the following:
At the Export File Format window, do the following:
a.![]() Click the Personal Information Exchange radio button.
Click the Personal Information Exchange radio button.
b.![]() Check the Include all certificates in the certification path if possible check box.
Check the Include all certificates in the certification path if possible check box.
This option includes the full certificate chain within the certificate.
19.![]() In the password window, enter keystore and re-enter to confirm.
In the password window, enter keystore and re-enter to confirm.
The password is the default password that the IoT FND and the TPS proxy use to read this file.
21.![]() In the File to Export window, enter the file name (such as nms_cert or tps_cert) and click Next.
In the File to Export window, enter the file name (such as nms_cert or tps_cert) and click Next.
22.![]() In the Completing the Certificate Export Wizard, click Finish.
In the Completing the Certificate Export Wizard, click Finish.
Files with a *.pfx extension are automatically saved to the Desktop. PFX refers to the Personal Information Exchange format, which is also known as PKCS_#12 format. PFX is an industry-standard format that allows certificates and their private keys to be transferred (exported) from one computer to another.
23.![]() Securely transfer the two certificate files (such as nms_cert.pfx and tps_cert.pfx) from the Windows Desktop to the IoT FND ( nms_cert.pfx) and TPS proxy (tps_cert.pfx), respectively.
Securely transfer the two certificate files (such as nms_cert.pfx and tps_cert.pfx) from the Windows Desktop to the IoT FND ( nms_cert.pfx) and TPS proxy (tps_cert.pfx), respectively.
Note: For heightened security, after a successful transfer delete the *.pfx files from the Windows Desktop and empty the Recycle bin.
Command Authorization Support
The Cisco Connected Grid Routers (CGRs) are managed by IoT FND over a WAN backhaul connection such as 3G, 4G, or WiMAX. For CG-OS CGRs, you define an OID value to enable administrative privileges for IoT FND.
The OID for this policy is 1.3.6.1.4.1.9.21.3.3.1. This element appears in the certificate if IoT FND is authorized to issue management commands to the CGR with administrative privileges. When IoT FND communicates with the CGR over a secured session, such as TLS, the CGR can execute these commands as if they were issued by the network administrator.
This section discusses the following topics:
■![]() Enabling Command Authorization Using NMS/TPS Certificates
Enabling Command Authorization Using NMS/TPS Certificates
Enabling Command Authorization Using NMS/TPS Certificates
Follow this procedure to authorize the command authorization (CA) feature of the router, and complete registration with IoT FND.
1.![]() Generate new NMS/TPS certificates (see Generating Certificates for IoT FND and the IoT FND TPS Proxy) or renew the existing NMS/TPS certificate (see Renewing Certificates).
Generate new NMS/TPS certificates (see Generating Certificates for IoT FND and the IoT FND TPS Proxy) or renew the existing NMS/TPS certificate (see Renewing Certificates).
2.![]() Add an OID value to the CA certificate (see Adding an OID Value to the CA Certificate).
Add an OID value to the CA certificate (see Adding an OID Value to the CA Certificate).
3.![]() Generate a new.pfx file for the NMS/TPS certificate (see Generating Certificates for IoT FND and the IoT FND TPS Proxy).
Generate a new.pfx file for the NMS/TPS certificate (see Generating Certificates for IoT FND and the IoT FND TPS Proxy).
4.![]() Stop IoT FND (see Stopping IoT FND).
Stop IoT FND (see Stopping IoT FND).
5.![]() Rename the existing cgms_keystore file (for example, cgms_keystore_no_oid).
Rename the existing cgms_keystore file (for example, cgms_keystore_no_oid).
6.![]() Export the.pfx file to IoT FND and create a new cgms_keystore file (see Using Keytool to Create the cgms_keystore File).
Export the.pfx file to IoT FND and create a new cgms_keystore file (see Using Keytool to Create the cgms_keystore File).
7.![]() Install the new certificates (see Installing the Certificates).
Install the new certificates (see Installing the Certificates).
8.![]() Add the new cgms_keystore file to IoT FND (see Copying the cgms_keystore File to IoT FND).
Add the new cgms_keystore file to IoT FND (see Copying the cgms_keystore File to IoT FND).
9.![]() Start IoT FND (see Starting IoT FND).
Start IoT FND (see Starting IoT FND).
Adding an OID Value to the CA Certificate
You must add an OID value to the CA certificate to allow IoT FND to use the admin role for command authorization on the router.
To add an OID value to the CA certificate:
1.![]() On the CA server, open a cmd console and type:
On the CA server, open a cmd console and type:
3.![]() In the Select Certificate Enrollment Policy window, choose Active Directory Enrollment Policy and click Next.
In the Select Certificate Enrollment Policy window, choose Active Directory Enrollment Policy and click Next.
4.![]() In the Request Certificates window, do the following:
In the Request Certificates window, do the following:
b.![]() Click the More information... link.
Click the More information... link.
5.![]() In the Certificate Properties window, click the Subject tab and complete the fields.
In the Certificate Properties window, click the Subject tab and complete the fields.
6.![]() In the Certificate Properties window, click the Extensions tab and click the Custom extension definition button to expand the section.
In the Certificate Properties window, click the Extensions tab and click the Custom extension definition button to expand the section.

7.![]() Type the following in the Object ID field:
Type the following in the Object ID field:

The OID and Value are added to the field at the right as custom extensions.
10.![]() Ensure that these values are correct, and then click Apply.
Ensure that these values are correct, and then click Apply.
Renewing Certificates
To renew certificates and add the OID value:
1.![]() From the RSA CA server with the original NMS/TPS certificate, type the following open command at the command prompt:
From the RSA CA server with the original NMS/TPS certificate, type the following open command at the command prompt:
3.![]() Open the certificate console in the MMC.
Open the certificate console in the MMC.
4.![]() Locate the issued NMS/TPS certificate in the Personal folder on the CA server.
Locate the issued NMS/TPS certificate in the Personal folder on the CA server.
5.![]() Right-click on the server icon, and select All Tasks > Advanced Operations > Renew This Certificate with the Same Key option from the context menu.
Right-click on the server icon, and select All Tasks > Advanced Operations > Renew This Certificate with the Same Key option from the context menu.
6.![]() In the Certificate Enrollment window, click Next.
In the Certificate Enrollment window, click Next.
9.![]() Enter the OID and its value, and click OK.
Enter the OID and its value, and click OK.

10.![]() Click Add >, and then click OK.
Click Add >, and then click OK.
11.![]() At Request Certificates panel, click Enroll.
At Request Certificates panel, click Enroll.

Configuring a Custom CA for HSM
This section describes configuring a custom CA for the hardware security module (HSM) for signing CSMP messages sent from IoT FND to mesh devices.
■![]() Ensure that you install the SafeNet client software version listed in the system requirements in the IoT FND Release Notes on the IOT-FND server.
Ensure that you install the SafeNet client software version listed in the system requirements in the IoT FND Release Notes on the IOT-FND server.
■![]() You must have your own CA (for example, Microsoft or OpenSSL).
You must have your own CA (for example, Microsoft or OpenSSL).
To configure a custom CA for generating HSM certificates:
1.![]() Create a new partition on the HSM and assign it to your IoT FND client (see Setting Up an HSM Client).
Create a new partition on the HSM and assign it to your IoT FND client (see Setting Up an HSM Client).
2.![]() Generate a keypair on the HSM and export a CSR for that keypair (see Keystore).
Generate a keypair on the HSM and export a CSR for that keypair (see Keystore).
All commands run from the Luna client on the IoT FND server. You do not have to log in to the HSM machine.
3.![]() Save the generated CSR to your CA and sign the certificate.
Save the generated CSR to your CA and sign the certificate.
Note: Ensure that the certificate is signed for 30 years. Mesh nodes reject any certificate signed for less than 30 years. You can use the root CA that is used for 802.1x authentication for node admission.
4.![]() Copy the signed certificate to the IoT FND server and import it to the HSM.
Copy the signed certificate to the IoT FND server and import it to the HSM.
5.![]() Configure IoT FND to use this new certificate.
Configure IoT FND to use this new certificate.
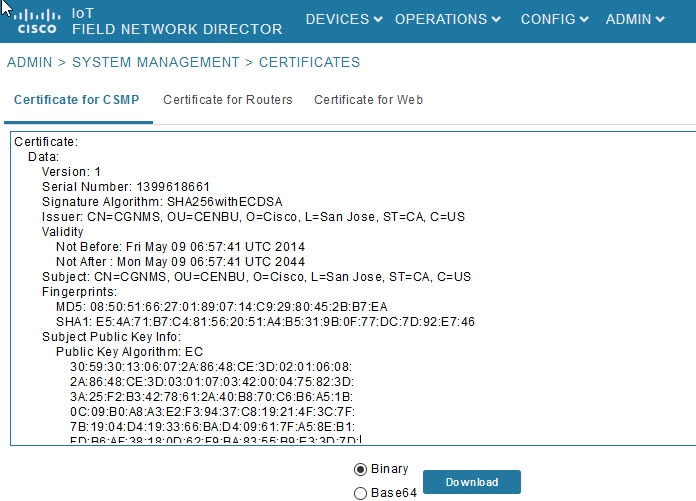
6.![]() Verify that the certificate appears on the Certificates for CSMP tab (ADMIN > System Management > Certificates).
Verify that the certificate appears on the Certificates for CSMP tab (ADMIN > System Management > Certificates).
7.![]() Configure your mesh nodes to use this certificate for signatures.
Configure your mesh nodes to use this certificate for signatures.
Configuring a Custom CA for SSM
This section describes configuring a custom CA for the software security module (SSM) for signing CSMP messages sent from IoT FND to mesh devices.
■![]() Ensure that you install the SafeNet client software version listed in the system requirements in the IoT FND Release Notes on the IOT-FND server.
Ensure that you install the SafeNet client software version listed in the system requirements in the IoT FND Release Notes on the IOT-FND server.
■![]() Only SSM versions 2.2.0-37 and above are supported.
Only SSM versions 2.2.0-37 and above are supported.
■![]() You must have your own CA (for example, Microsoft or OpenSSL).
You must have your own CA (for example, Microsoft or OpenSSL).
To configure a custom CA for generating SSM certificates:
2.![]() Use the ssm_setup.sh script to configure a new keypair with a specific alias and generate a CSR:
Use the ssm_setup.sh script to configure a new keypair with a specific alias and generate a CSR:
3.![]() Save the generated CSR to your CA and sign the certificate.
Save the generated CSR to your CA and sign the certificate.
Note: Ensure that the certificate is signed for 30 years. Mesh nodes reject any certificate signed for less than 30 years. You can use the root CA that is used for 802.1x authentication for node admission.
4.![]() Copy the signed certificate to the IoT FND server and import it to the SSM.
Copy the signed certificate to the IoT FND server and import it to the SSM.
5.![]() Use the ssm_setup.sh script to import the two certificates to the SSM keystore:
Use the ssm_setup.sh script to import the two certificates to the SSM keystore:
6.![]() Use the ssm_setup.sh script to import the signed certificate for the alias:
Use the ssm_setup.sh script to import the signed certificate for the alias:
7.![]() Update cgms.properties file with following parameters to configure IoT FND to use this certificate on the SSM for signatures:
Update cgms.properties file with following parameters to configure IoT FND to use this certificate on the SSM for signatures:
8.![]() Verify that the certificate appears on the Certificates for CSMP tab (ADMIN >System Management > Certificates).
Verify that the certificate appears on the Certificates for CSMP tab (ADMIN >System Management > Certificates).
9.![]() Configure your mesh nodes to use this certificate for signatures.
Configure your mesh nodes to use this certificate for signatures.
Exporting the CA Certificate
To export the certificate from the Certificate Authority or subordinate CA to the IoT FND:
1.![]() Open the Certificate Authority application on a Windows Server 2008 R2 system operating with the Enterprise Edition.
Open the Certificate Authority application on a Windows Server 2008 R2 system operating with the Enterprise Edition.
2.![]() Expand the menu to view the Certificates (Local Computer) > Personal > Certificates folder.
Expand the menu to view the Certificates (Local Computer) > Personal > Certificates folder.
3.![]() Locate the certificate whose fingerprint matches that in use by the Cisco CGR 1000 and
Locate the certificate whose fingerprint matches that in use by the Cisco CGR 1000 and
Cisco ASR.
4.![]() Right-click the certificate and choose All Tasks > Export from the context menu.
Right-click the certificate and choose All Tasks > Export from the context menu.
5.![]() In the Certificate Export Wizard window, click Next.
In the Certificate Export Wizard window, click Next.
6.![]() In the Export Private Key window, select the No, do not export the private key radio button. Click Next.
In the Export Private Key window, select the No, do not export the private key radio button. Click Next.
7.![]() In the Export File Format window, select the Base-64 encoded X.509 (.CER) radio button. Click Next.
In the Export File Format window, select the Base-64 encoded X.509 (.CER) radio button. Click Next.
8.![]() In the File to Export window, assign a name for the file that you want to export. Click Next.
In the File to Export window, assign a name for the file that you want to export. Click Next.
9.![]() In the File to Export window, enter the file name (such as ca_cert or subca_cert) and click Next.
In the File to Export window, enter the file name (such as ca_cert or subca_cert) and click Next.
10.![]() In the Completing the Certificate Export Wizard, click Finish.
In the Completing the Certificate Export Wizard, click Finish.
Files with a *.cer extension are automatically saved to the Desktop.
11.![]() Securely transfer the certificate file (such as ca_cert.cer) from the Windows Desktop to IoT FND.
Securely transfer the certificate file (such as ca_cert.cer) from the Windows Desktop to IoT FND.
Note: For heightened security, after a successful transfer delete the *.cer file from the Windows Desktop and empty the Recycle bin.
Installing the Certificates
You must create a cgms_keystore file on both the servers running IoT FND and IoT FND TPS Proxy.
■![]() IoT FND —When creating the cgms_keystore file, you import the IoT FND certificate, its private key, and the certificate chain. After creating the cgms_keystore file, you copy it into a specific directory on the server.
IoT FND —When creating the cgms_keystore file, you import the IoT FND certificate, its private key, and the certificate chain. After creating the cgms_keystore file, you copy it into a specific directory on the server.
■![]() IoT FND TPS Proxy —When you create the cgms_keystore file, you import the IoT FND TPS Proxy certificate, its private key, and the certificate chain. After you create the cgms_keystore file, you copy it into a specific directory on the TPS proxy.
IoT FND TPS Proxy —When you create the cgms_keystore file, you import the IoT FND TPS Proxy certificate, its private key, and the certificate chain. After you create the cgms_keystore file, you copy it into a specific directory on the TPS proxy.
To create the cgms_keystore file for the TPS proxy and IoT FND, use Keytool and complete the following procedures:
Determine the password to use for the keystore. The examples in this chapter refer to this password as keystore_password.
■![]() Using Keytool to Create the cgms_keystore File
Using Keytool to Create the cgms_keystore File
■![]() Copying the cgms_keystore File to IoT FND
Copying the cgms_keystore File to IoT FND
■![]() Installing Custom Browser Certificates
Installing Custom Browser Certificates
Using Keytool to Create the cgms_keystore File
To create the cgms_keystore file for both IoT FND and the TPS proxy:
1.![]() As root, view the contents of the.pfx file by entering the following command on the server (IoT FND and TPS proxy):
As root, view the contents of the.pfx file by entering the following command on the server (IoT FND and TPS proxy):
[root@ tps_server ~]# keytool -list -v -keystore nms_cert.pfx -srcstoretype pkcs12
Note: Viewing the.pfx provides the Alias Name required during the import.
2.![]() Enter the keystore password when prompted.
Enter the keystore password when prompted.
This is the same password entered when creating the.pfx file.
The information that displays (see the following Example) includes the alias_name needed for Enter the following command to import the certificates into the cgms_keystore file:
3.![]() Enter the following command to import the certificates into the cgms_keystore file:
Enter the following command to import the certificates into the cgms_keystore file:
4.![]() At the prompt, enter the destination keystore password.
At the prompt, enter the destination keystore password.
5.![]() Re-enter the keystore password when prompted.
Re-enter the keystore password when prompted.
6.![]() Enter the password used when creating the.pfx file (either nms_cert.pfx or tps_cert.pfx) when prompted for the source keystore password.
Enter the password used when creating the.pfx file (either nms_cert.pfx or tps_cert.pfx) when prompted for the source keystore password.
Note: In this example, keystore was the password when we created the .pfx file.
To view the nms_cert.pfx file and access the Alias name, enter the following commands as root:
Note: This example shows the steps for the nms_cert.pfx. To view the details on the tps_cert.pfx and import the certificates to the TPS proxy, use the same commands but replace the references to nms_cert.pfx with tps_cert.pfx, and use the Alias name from the tps_cert.pfx file.
To import the certificates to the cgms_keystore file on IoT FND, enter the following commands as root:
Note: The storing cgms _keystore text indicates successful completion.
Copying the cgms_keystore File to IoT FND
To copy the cgms_keystore file into the following IoT FND and TPS proxy directories:
1.![]() For IoT FND, copy the cgms_keystore file to this directory: /opt/cgms/server/cgms/conf/
For IoT FND, copy the cgms_keystore file to this directory: /opt/cgms/server/cgms/conf/
2.![]() For the TPS proxy, copy the cgms_keystore file to this directory: /opt/cgms-tpsproxy/conf/
For the TPS proxy, copy the cgms_keystore file to this directory: /opt/cgms-tpsproxy/conf/
Note: For these certificates to be active and enforceable, they must be in the correct directory.
Importing the CA Certificate
In addition to importing the NMS certificate, you must import the CA or (subCA) certificate to the cgms_keystore.
To import the CA certificate into the cgms_keystore:
1.![]() On the IoT FND application server, log in as root.
On the IoT FND application server, log in as root.
2.![]() Change directory to /opt/cgms/server/cgms/conf, where you have placed the cgms_keystore file:
Change directory to /opt/cgms/server/cgms/conf, where you have placed the cgms_keystore file:
A script displays on the screen.
4.![]() Enter the keystore password when prompted.
Enter the keystore password when prompted.
6.![]() Enter yes when prompted to trust the certificate.
Enter yes when prompted to trust the certificate.
The certificate is added to the Keystore.
To import the CA certificate, enter the following commands as root:
Importing the CA Certificate into the IoT FND TPS Proxy Keystore
Follow the same steps as in Importing the CA Certificate to import the CA certificate into cgms_keystore on the IoT FND TPS proxy.
Installing Custom Browser Certificates
Default IoT FND installations use a self-signed certificate for HTTP(S) communication using either a client Web browser or the NB API client. If required, you can use certificates signed by your CA servers. This section presents installation procedures for these custom certificates.
This section covers the following topics:
■![]() Installing Custom Certificates in the Browser Client
Installing Custom Certificates in the Browser Client
■![]() Importing Custom Certificates with the North Bound API Client (Windows)
Importing Custom Certificates with the North Bound API Client (Windows)
■![]() Importing Custom Certificates with Windows IE
Importing Custom Certificates with Windows IE
■![]() Managing North Bound API Events
Managing North Bound API Events
■![]() Clear the client browser cache.
Clear the client browser cache.
■![]() Remove existing certificates for the NMS server (by IP and DNS) on the client browser.
Remove existing certificates for the NMS server (by IP and DNS) on the client browser.
In Firefox for example, select Preferences > Advanced > Encryption > View Certifications. Remove the certificates in the list for the respective server.
■![]() Choose a common name to use in the signed certificate.
Choose a common name to use in the signed certificate.
This name requires a DNS entry that resolves to the NMS server IP address.
■![]() Generate the new certificates and export them to a.PFX file.
Generate the new certificates and export them to a.PFX file.
This file must contain the private keys, public certificate, and CA server certificates.
See Using Keytool to Create the cgms_keystore File for the procedure to generate the private and public keys for the cgms_keystore file and export them to a.PFX file.
Installing Custom Certificates in the Browser Client
1.![]() On the NMS server, copy the existing jbossas.keystore and jbossas.keystore.password files from the /opt/cgms/server/cgms/conf/ directory to a safe location.
On the NMS server, copy the existing jbossas.keystore and jbossas.keystore.password files from the /opt/cgms/server/cgms/conf/ directory to a safe location.
2.![]() Delete the existing jbossas.keystore and jbossas.keystore.password files from the /opt/cgms/server/cgms/conf / directory.
Delete the existing jbossas.keystore and jbossas.keystore.password files from the /opt/cgms/server/cgms/conf / directory.
3.![]() Determine the alias in the.PFX file that you plan to import into the jbossas.keystore file:
Determine the alias in the.PFX file that you plan to import into the jbossas.keystore file:
Enter the keystore password: keystore_password_when_pfx_file_was_created
4.![]() Import the new custom certificate, in.pfx file format into a new jbossas.keystore file; and, at the same time change the alias name to jboss. Follow the prompts:
Import the new custom certificate, in.pfx file format into a new jbossas.keystore file; and, at the same time change the alias name to jboss. Follow the prompts:
5.![]() (Optional) Define a salt.
(Optional) Define a salt.
Note: If salt is unchanged, then you can skip this step.
The salt defines the strength of the encrypted password and must be at least 8 characters long.
For example: A1a1B2b2C3c3D4dE5e5F6f6G7g7H8h8I9i9J10j10K11k11L12l12M13m13N14n14O15
a.![]() Copy the file /opt/cgms/server/cgms/deploy/ security-service.xml to a safe location.
Copy the file /opt/cgms/server/cgms/deploy/ security-service.xml to a safe location.
b.![]() Update the salt in the /opt/cgms/server/cgms/deploy/security-service.xml file.
Update the salt in the /opt/cgms/server/cgms/deploy/security-service.xml file.
NOTE: Select either Step 6 or Step 7 below, based on the NMS release you are running.
6.![]() CG-NMS Releases earlier than 2.1.0 store the keystore password in the following file: /opt/cgms/server/cgms/conf/jbossas.keystore.password
CG-NMS Releases earlier than 2.1.0 store the keystore password in the following file: /opt/cgms/server/cgms/conf/jbossas.keystore.password
This step encrypts the password that will be stored in the jbossas.keystore.password file.
The password is used to open the jbossas.keystore that has the new custom certificate imported in Step Import the new custom certificate, in.pfx file format into a new jbossas.keystore file; and, at the same time change the alias name to jboss. Follow the prompts:
a.![]() Run /opt/cgms/bin/encrypt-password.sh script with the following parameters:
Run /opt/cgms/bin/encrypt-password.sh script with the following parameters:
–![]() Specify the new salt defined in step (Optional) Define a salt. or use the existing one in the /opt/cgms/server/cgms/deploy/ security-service.xml file.
Specify the new salt defined in step (Optional) Define a salt. or use the existing one in the /opt/cgms/server/cgms/deploy/ security-service.xml file.
–![]() Set the password file to jbossas.keystore.password.
Set the password file to jbossas.keystore.password.
b.![]() Move or copy the jbossas.keystore.password to the /opt/cgms/server/cgms/conf directory.
Move or copy the jbossas.keystore.password to the /opt/cgms/server/cgms/conf directory.
7.![]() CG-NMS releases later than 2.1.0 or IoT FND 3.0 release or later, store the keystore password in the /opt/cgms/server/cgms/conf/VAULT.dat file
CG-NMS releases later than 2.1.0 or IoT FND 3.0 release or later, store the keystore password in the /opt/cgms/server/cgms/conf/VAULT.dat file
Perform the following steps to update the password to match the one entered in Step 4 (your_keystore_password):
a.![]() Backup the VAULT.dat and vault.keystore files in /opt/cgms/server/cgms/conf to a safe location.
Backup the VAULT.dat and vault.keystore files in /opt/cgms/server/cgms/conf to a safe location.
b.![]() Update the VAULT.dat file with the new password:
Update the VAULT.dat file with the new password:
where vault.keystore contains the reference to VAULT.dat and VAULT.dat stores and hides the jboss keystore password. This command creates a new VAULT.dat file that contains the new jboss.keytsore password. The default password to open vault.keystore is cgnms123.
9.![]() Use your browser to connect to the NMS server.
Use your browser to connect to the NMS server.
Importing Custom Certificates with the North Bound API Client (Windows)
For an NB API client running on a Windows Server, import the CA public certificate to the Certificate Store on your local computer. Matching CA public certificates ensures that the client machine communicates with IoT FND using the NB API client.
Importing Custom Certificates with Windows IE
1.![]() In IE, enter the https URL address of the NMS server.
In IE, enter the https URL address of the NMS server.
The URL name must match the Common Name on the NMS Server certificate.
2.![]() In the Security Alert window, click OK.
In the Security Alert window, click OK.
3.![]() In the security certificate warning window, click the Continue to this Website (Not Recommended) link.
In the security certificate warning window, click the Continue to this Website (Not Recommended) link.
4.![]() In the Security Alert window, click OK.
In the Security Alert window, click OK.
5.![]() Click the Certificate error section of the address bar.
Click the Certificate error section of the address bar.

6.![]() In the Certificate Invalid window, click View certificates.
In the Certificate Invalid window, click View certificates.

The Certificate window lists the device certificate issued to the NMS server and signed by the issuing CA (or sub CA) server.
7.![]() Select the Certification Path tab, and look for the invalid certificate (that is, the one with a red cross).
Select the Certification Path tab, and look for the invalid certificate (that is, the one with a red cross).
8.![]() Select the invalid certificate, and select the General tab.
Select the invalid certificate, and select the General tab.
10.![]() In the Certificate Install Wizard window, click Next.
In the Certificate Install Wizard window, click Next.
11.![]() Select the Place all certificates in the Following Store option, and then click Browse.
Select the Place all certificates in the Following Store option, and then click Browse.

12.![]() In the Certificate Store window, check the Show physical stores check box, open the Trusted Root Certification Authorities folder, select Local Computer, and then click OK.
In the Certificate Store window, check the Show physical stores check box, open the Trusted Root Certification Authorities folder, select Local Computer, and then click OK.

16.![]() In the Certificate window, click Install Certificate.
In the Certificate window, click Install Certificate.
17.![]() Select the Place all certificates in the Following Store option, and then click Browse.
Select the Place all certificates in the Following Store option, and then click Browse.
18.![]() In the Certificate Store window, check the Show physical stores check box, open the Trusted Root Certification Authorities folder, select Local Computer, and then click OK.
In the Certificate Store window, check the Show physical stores check box, open the Trusted Root Certification Authorities folder, select Local Computer, and then click OK.
22.![]() In the Certificate window, click OK.
In the Certificate window, click OK.
23.![]() Repeat the previous steps if the Certificate error section of the address bar still appears.
Repeat the previous steps if the Certificate error section of the address bar still appears.
24.![]() Close and restart the browser.
Close and restart the browser.
25.![]() Enter the IoT FND server secure URL in the address bar.
Enter the IoT FND server secure URL in the address bar.
The IoT FND login page displays without the security screen.
Managing Custom Certificates
1.![]() Back up the following files that are overwritten when you upgrade or perform a fresh installation of IoT FND:
Back up the following files that are overwritten when you upgrade or perform a fresh installation of IoT FND:
| This is the file where you added the salt value in Installing Custom Certificates in the Browser Client). |
|
2.![]() Perform the IoT FND upgrade or new installation (see Upgrading IoT FND).
Perform the IoT FND upgrade or new installation (see Upgrading IoT FND).
3.![]() Copy the above files to their respective folders, and restart IoT FND.
Copy the above files to their respective folders, and restart IoT FND.
Managing North Bound API Events
The North Bound (NB) API client can send events using HTTPS. NB API clients must subscribe to IoT FND by providing a valid HTTPS URL over which IoT FND will send events. IoT FND accepts SSL certificates and handshakes published by the NB API client.
Configuring IoT FND to Access the Keystore
After you create cgms_keystore and import the NMS and CA certificates to it, configure IoT FND to access the cgms_keystore file.
2.![]() Run the setupCgms.sh script:
Run the setupCgms.sh script:
This script saves the password set in the cgms.properties file.
Tip: To protect the cgms_keystore and cgms.properties files, set their permissions to root read only.
Caution: Protect your system! Ensure that only root has access to the IoT FND server. Your firewall should only allow SSH access from internal hosts.
Configuring the TPS Proxy to Access the Keystore
To configure the TPS proxy to access the keystore:
1.![]() Change to the tpsproxy bin directory:
Change to the tpsproxy bin directory:
2.![]() Convert your chosen password into encrypted form:
Convert your chosen password into encrypted form:
3.![]() Copy the encrypted password into the tpsproxy.properties file:
Copy the encrypted password into the tpsproxy.properties file:
In this example, the encrypted keystore_password is “7jlXPniVpMvat+TrDWqh1w==”.
Setting Up an HSM Client
Complete the following procedures to set up the HSM client:
■![]() Installing an HSM Client on the IoT FND ServerInstalling an HSM Client on the IoT FND Server
Installing an HSM Client on the IoT FND ServerInstalling an HSM Client on the IoT FND Server
■![]() Installing an HSM Client on the IoT FND ServerConfiguring an HSM HA Client
Installing an HSM Client on the IoT FND ServerConfiguring an HSM HA Client
Note: If your installation uses SSM for CSMP-based messaging, see Installing and Setting Up the SSM.
Installing an HSM Client on the IoT FND Server
The Hardware Security Module (HSM) works as a security server listening at port 1792. For IoT FND to communicate with HSM:
1.![]() Install an HSM client on the IoT FND server.
Install an HSM client on the IoT FND server.
2.![]() Configure the HSM client to have the certificate for HSM.
Configure the HSM client to have the certificate for HSM.
3.![]() Upload the certificate to HSM.
Upload the certificate to HSM.
This section describes how to install and configure an HSM client, assuming that HSM is at 172.16.0.1 and the client at 172.31.255.254.
To install and set up an HSM client:
1.![]() Get the HSM client package, unpack it, and run the installation script:
Get the HSM client package, unpack it, and run the installation script:
2.![]() Change to the /usr/lunasa/bin directory:
Change to the /usr/lunasa/bin directory:
3.![]() Create the client certificate:
Create the client certificate:
4.![]() Download the HSM certificate from the HSM server:
Download the HSM certificate from the HSM server:
5.![]() Upload the client certificate to the HSM server:
Upload the client certificate to the HSM server:
7.![]() Ensure that the HSM server is added:
Ensure that the HSM server is added:
8.![]() From the HSM client, use SSH to log in to the HSM server:
From the HSM client, use SSH to log in to the HSM server:
9.![]() Use SSH to perform these steps on the HSM server:
Use SSH to perform these steps on the HSM server:
a.![]() Add the client to the HSM server:
Add the client to the HSM server:
b.![]() List the clients defined on the server and ensure that the client was added:
List the clients defined on the server and ensure that the client was added:
c.![]() Assign the client to a partition:
Assign the client to a partition:
10.![]() On the server running the HSM client, verify the HSM client installation:
On the server running the HSM client, verify the HSM client installation:
11.![]() After the HSM client installation completes, run the test suite ckdemo.
After the HSM client installation completes, run the test suite ckdemo.
Configuring an HSM HA Client
Note: You must perform the steps in this section even if you only have one HSM server. You must also create a group that contains the HSM server.
To configure an HSM HA client:
1.![]() Configure the HSM client so that it connects with both HSM servers, as described in Installing an HSM Client on the IoT FND Server.
Configure the HSM client so that it connects with both HSM servers, as described in Installing an HSM Client on the IoT FND Server.
2.![]() Change to the /usr/safenet/lunaclient/bin/ directory:
Change to the /usr/safenet/lunaclient/bin/ directory:
3.![]() Create a group that contains only the partition of the first HSM server by running this command and providing the serial number ( serial_num) of the HSM server obtained by running the ./vtl verify command (On the server running the HSM client, verify the HSM client installation:), the name of the group ( group_name), and the password ( prtn_password) for accessing the partition:
Create a group that contains only the partition of the first HSM server by running this command and providing the serial number ( serial_num) of the HSM server obtained by running the ./vtl verify command (On the server running the HSM client, verify the HSM client installation:), the name of the group ( group_name), and the password ( prtn_password) for accessing the partition:
4.![]() Add the partition of the second HSM to the group.
Add the partition of the second HSM to the group.
5.![]() Verify that both partitions can be listed:
Verify that both partitions can be listed:
–![]() Set the retry value between -1 and 500 where, -1 is an infinite number of retries and 0 disables auto recovery.
Set the retry value between -1 and 500 where, -1 is an infinite number of retries and 0 disables auto recovery.
–![]() Specify the auto recovery poll interval in seconds.
Specify the auto recovery poll interval in seconds.
Configuring the HSM Group Name and Password
The HSM Group name and password is provided by Cisco at manufacture.
To allow the HSM Group name and password to be configured by the user:
1.![]() Edit the cgms.properties file to add the following properties:
Edit the cgms.properties file to add the following properties:
■![]() hsm-keystore-password <encrypted password>
hsm-keystore-password <encrypted password>
Tip: You can use the same HSM server for multiple IoT FND installations by creating multiple partitions on the HSM server, configuring the HSM client, and specifying the partition name and partition password in the cgms.properties file.
2.![]() Save the cgms.properties file.
Save the cgms.properties file.
3.![]() To apply these changes, start the cgms service:
To apply these changes, start the cgms service:
 Feedback