- Before You Install IoT FND
- Installing and Setting Up the IoT FND Database
Installing Cisco IoT FND
This chapter provides an overview of the steps required to install Cisco IoT Field Network Director (Cisco IoT FND) in your network.
Note: For an overview of the features and functionality of the application and details on how to configure features and manage the Cisco IoT Field Network Director after its installation, refer to the Cisco IoT Field Network Director User Guide, Release 4.1.x.
How to install IoT FND and related software:
■![]() Installing and Setting Up the IoT FND Database
Installing and Setting Up the IoT FND Database
■![]() Installing and Setting Up IoT FND
Installing and Setting Up IoT FND
■![]() Installing and Configuring the IoT FND TPS Proxy
Installing and Configuring the IoT FND TPS Proxy
■![]() Backing Up and Restoring the IoT FND Database
Backing Up and Restoring the IoT FND Database
■![]() Deploying IoT FND/Oracle/TPS Virtual Machines on ESX 5.x
Deploying IoT FND/Oracle/TPS Virtual Machines on ESX 5.x
Before You Install IoT FND
Use the procedures in the following sections to prepare for your IoT FND installation:
■![]() IoT FND Map View Requirements
IoT FND Map View Requirements
■![]() Obtaining IoT FND and CNR Licenses
Obtaining IoT FND and CNR Licenses
■![]() Installing the Linux Packages Required for Installing Oracle
Installing the Linux Packages Required for Installing Oracle
■![]() Obtaining IoT FND RPM Packages
Obtaining IoT FND RPM Packages
■![]() IoT FND Installation Overview
IoT FND Installation Overview
IoT FND Map View Requirements
On any device tab, click the Map button in the main pane to display a GIS map of device locations. In its Map View pane, IoT FND uses a GIS map to display device locations. However, before you can use this feature, you must configure your firewall to enable access for all IoT FND operator systems to Cisco-provided GIS map tile servers. Only IoT FND operator browsers are allowed access to the GIS map tile servers.
Note: The operator browsers will not have access to other Google sites. No Internet access is required for the IoT FND application server.
You must also assign a fully qualified domain name (FQDN) for each IoT FND server installation and provide Cisco at ask-fnd-pm-external@cisco.com with the following:
■![]() The number of IoT FND installation environments (test and production)
The number of IoT FND installation environments (test and production)
■![]() The FQDN of the IoT FND server
The FQDN of the IoT FND server
■![]() For cluster deployments, the FQDN of any load balancer in the deployment
For cluster deployments, the FQDN of any load balancer in the deployment
Note: The FQDN is only used to provision and authorize access to the licensed Cisco IoT FND installation and make API calls to Enterprise Google Map to download the map tiles. No utility operational data or asset information is ever used (that is, sent over Internet) to retrieve Google map tiles. Map tiles are retrieved only using geographic location information.
For example, your non-cluster installation has a domain named UtilityA.com, and cgnms1 as the hostname with an FQDN of cgms1.UtilityA.com. You would email ask-fnd-pm-external@cisco.com and include the FQDN, cgms1.UtilityA.com.
In a cluster deployment with one or more IoT FND servers and a load balancer with the FQDN of loadbalancer-vip, which directs traffic to the cgnms-main or cnms-dr cluster (DR installations), you would email ask-fnd-pm-external@cisco.com and include the FQDN, loadbalancer-vip.UtilityA.com.
System Requirements
Refer to the IoT FND Release Notes for the latest details on hardware and software requirements, as well as requirements for large scale deployments.
Obtaining IoT FND and CNR Licenses
■![]() Contact your Cisco partner to obtain the necessary licenses to use IoT FND and CNR.
Contact your Cisco partner to obtain the necessary licenses to use IoT FND and CNR.
■![]() Obtain a license to use SafeNet as your HSM for mesh endpoint security.
Obtain a license to use SafeNet as your HSM for mesh endpoint security.
Installing the Linux Packages Required for Installing Oracle
Install these packages in this order before you install the Oracle database:
1.![]() libaio-devel-0.3.106-5.i386.rpm
libaio-devel-0.3.106-5.i386.rpm
2.![]() libaio-devel-0.3.106-5.x86_64.rpm
libaio-devel-0.3.106-5.x86_64.rpm
3.![]() sysstat-7.0.2-11.el5.x86_64.rpm
sysstat-7.0.2-11.el5.x86_64.rpm
4.![]() unixODBC-libs-2.2.11-10.el5.i386.rpm
unixODBC-libs-2.2.11-10.el5.i386.rpm
5.![]() unixODBC-libs-2.2.11-10.el5.x86_64.rpm
unixODBC-libs-2.2.11-10.el5.x86_64.rpm
6.![]() unixODBC-2.2.11-10.el5.i386.rpm
unixODBC-2.2.11-10.el5.i386.rpm
7.![]() unixODBC-2.2.11-10.el5.x86_64.rpm
unixODBC-2.2.11-10.el5.x86_64.rpm
Obtaining IoT FND RPM Packages
Before you install and set up your IoT FND system, ensure that you have the following packages:
Configuring NTP Service
Configure all RHEL servers (including all servers that run IoT FND) in your IoT FND deployment to have their NTP service enabled and configured to use the same time servers as the rest of the system.
Caution: Before certificates are generated, synchronize the clocks of all system components.
To configure NTP on your RHEL servers:
1.![]() Configure the /etc/ntp.conf file.
Configure the /etc/ntp.conf file.
2.![]() Restart the NTP daemon and ensure that it is set to run at boot time.
Restart the NTP daemon and ensure that it is set to run at boot time.
3.![]() Check the configuration changes by checking the status of the NTP daemon.
Check the configuration changes by checking the status of the NTP daemon.
This example shows that the system at 192.0.2.1 is configured to be a local NTP server. This server synchronizes its time using the NTP server at 10.0.0.0.
For information about configuring NTP on RHEL servers, refer to RHEL documentation.
IoT FND Installation Overview
Complete the following procedures to install IoT FND:
1.![]() Installing and Setting Up the IoT FND Database.
Installing and Setting Up the IoT FND Database.
Installing and Setting Up the IoT FND Database
Complete the following procedures to finish your IoT FND installation:
■![]() Installation and Setup Overview
Installation and Setup Overview
■![]() Downloading and Unpacking Oracle Database
Downloading and Unpacking Oracle Database
■![]() Running the Oracle Database Installer
Running the Oracle Database Installer
■![]() Setting Up the IoT FND Database
Setting Up the IoT FND Database
■![]() Additional IoT FND Database Topics
Additional IoT FND Database Topics
Installation and Setup Overview
The following topics provide an overview of IoT FND deployment:
Single-Server Deployment
To install and set up IoT FND database for a single-server database deployment:
1.![]() Log in to the database server.
Log in to the database server.
2.![]() Downloading and Unpacking Oracle Database.
Downloading and Unpacking Oracle Database.
High Availability Deployment
To install and set up IoT FND database for HA:
1.![]() Log in to the primary IoT FND database server.
Log in to the primary IoT FND database server.
2.![]() Downloading and Unpacking Oracle Database.
Downloading and Unpacking Oracle Database.
3.![]() Running the Oracle Database Installer.
Running the Oracle Database Installer.
4.![]() Log in to the standby database server.
Log in to the standby database server.
5.![]() Downloading and Unpacking Oracle Database.
Downloading and Unpacking Oracle Database.
Downloading and Unpacking Oracle Database
To download the Oracle database:
1.![]() Log in to your server as root.
Log in to your server as root.
2.![]() Download Oracle 11g Enterprise Edition (11.2.0.3 64-bit) or Oracle12c Enterprise Edition Release 12.1.0.2.0 - 64bit Production (with Patch 20830993).
Download Oracle 11g Enterprise Edition (11.2.0.3 64-bit) or Oracle12c Enterprise Edition Release 12.1.0.2.0 - 64bit Production (with Patch 20830993).
3.![]() To avoid display-related errors when installing the Oracle Database software, as root run this command:
To avoid display-related errors when installing the Oracle Database software, as root run this command:
4.![]() Create the oracle user and dba group:
Create the oracle user and dba group:
5.![]() Unpack the Oracle Database zip archives.
Unpack the Oracle Database zip archives.
Running the Oracle Database Installer
Note: Before running the Oracle installer, disable the firewall.
To install the Oracle database:
1.![]() Switch to user oracle and run the Oracle database installer:
Switch to user oracle and run the Oracle database installer:
2.![]() Click Yes, and then click Next.
Click Yes, and then click Next.
3.![]() Click Install database software only, and then click Next.
Click Install database software only, and then click Next.
4.![]() Click Single instance database installation, and then click Next.
Click Single instance database installation, and then click Next.
5.![]() Select English as the language in which the database runs, and then click Next.
Select English as the language in which the database runs, and then click Next.
6.![]() Click Enterprise Edition (4.29GB (Oracle 11g) or 6.4GB (Oracle12c), and then click Next.
Click Enterprise Edition (4.29GB (Oracle 11g) or 6.4GB (Oracle12c), and then click Next.
7.![]() Select the following two default installation values, Oracle Base and Software Location (11.2.0 or 12.1.0), and then click Next.
Select the following two default installation values, Oracle Base and Software Location (11.2.0 or 12.1.0), and then click Next.
| ■ |
| ■ |
Later you will create the environment variables ORACLE_BASE and ORACLE_HOME based on the values of the Oracle Base and Software Location properties.
8.![]() On the Create Inventory page, keep the default values, and then click Next.
On the Create Inventory page, keep the default values, and then click Next.
9.![]() On the Privileged Operating System Groups page, keep the default values, and then click Next.
On the Privileged Operating System Groups page, keep the default values, and then click Next.
| Database Backup and Recovery (OSBACKUPDBA) group— dba (12c only) |
| ■ |
10.![]() (optional) On the Perform Prerequisite Checks page, install any required software or run supplied scripts.
(optional) On the Perform Prerequisite Checks page, install any required software or run supplied scripts.
The installer might require the installation of additional software based on your system kernel settings, and may also instruct you to run scripts to configure your system and complete the database installation.
Note: If no missing packages are noted or you see the message “This is a prerequisite condition to test whether the package “ksh” is available on the system, check the Ignore All box.
11.![]() After installing any missing packages, click Fix & Check Again.
After installing any missing packages, click Fix & Check Again.
Keep doing this until all requirements are met.
Caution: Do not ignore errors on this page. If there are errors during database installation, IoT FND may not function properly.
13.![]() On the Summary page, verify the database settings, and then click Finish (11g) or Install (12c) to start the installation process.
On the Summary page, verify the database settings, and then click Finish (11g) or Install (12c) to start the installation process.
14.![]() At the prompts, run the supplied configuration scripts.
At the prompts, run the supplied configuration scripts.
Because the installer runs as the user oracle, it cannot perform certain installation operations that require root privileges. For these operations, you will be prompted to run scripts to complete the installation process. When prompted, open a terminal window and run the scripts as root.
15.![]() If the installation succeeds, click Close on the Finish page.
If the installation succeeds, click Close on the Finish page.
Note: If performing a new installation of Oracle 12c or upgrading from Oracle 11g, you must install the Oracle 12c Patch 20830993. Go to (Mandatory) Installing 12c Patch.
(Mandatory) Installing 12c Patch
For all new Oracle 12c database installations and all Oracle 11g upgrades, you must install the 12c patch.
1.![]() Stop IoT FND application if running.
Stop IoT FND application if running.
2.![]() Stop Oracle service if running.
Stop Oracle service if running.
3.![]() Run the following commands to verify inventory of installed Oracle software components and patches. No patches are applied at this stage. The following displays at the end: There are no interim patches installed in this Oracle Home.
Run the following commands to verify inventory of installed Oracle software components and patches. No patches are applied at this stage. The following displays at the end: There are no interim patches installed in this Oracle Home.
a.![]() On the database machine. Copy the patch file : “p20830993_121020_Linux-x86-64.zip”
On the database machine. Copy the patch file : “p20830993_121020_Linux-x86-64.zip”
b.![]() Run a prerequisite check. It should pass.
Run a prerequisite check. It should pass.
d.![]() Run Opatch utility to verify that the patch is now recognized. Notice the mention of "Interim Patch" at the end of following output.
Run Opatch utility to verify that the patch is now recognized. Notice the mention of "Interim Patch" at the end of following output.
Continue to Setting Up the IoT FND Database
Setting Up the IoT FND Database
Complete the following procedures to set up the IoT FND database:
■![]() IoT FND Database Setup Overview
IoT FND Database Setup Overview
■![]() Defining Oracle Database Environment Variables
Defining Oracle Database Environment Variables
■![]() Installing IoT FND Oracle Database Scripts
Installing IoT FND Oracle Database Scripts
IoT FND Database Setup Overview
To set up the IoT FND database:
1.![]() Defining Oracle Database Environment Variables.
Defining Oracle Database Environment Variables.
2.![]() Installing IoT FND Oracle Database Scripts.
Installing IoT FND Oracle Database Scripts.
Defining Oracle Database Environment Variables
Before installing the IoT FND Oracle database, switch to the oracle user account and define the following Oracle database environment variables.
You can set these variables manually, as shown in the following example:
Installing IoT FND Oracle Database Scripts
IoT FND is packaged with scripts and Oracle database templates.
To install the Oracle scripts on your Oracle server:
2.![]() Securely copy the IoT FND Oracle script RPM to your Oracle server:
Securely copy the IoT FND Oracle script RPM to your Oracle server:
3.![]() Create the cgms directory and download the scripts and templates to it:
Create the cgms directory and download the scripts and templates to it:
Creating the IoT FND Oracle Database
To create the IoT FND Oracle database in a single-database-server deployment, run the setupCgmsDb.sh script as the user oracle. This script starts the Oracle Database and creates the IoT FND database.
This script creates the user cgms_dev used by IoT FND to access the database. The default password for this user account is cgms123.
The default password for the sys DBA account is cgmsDba123.
Note: We strongly recommend that you change all default passwords. Do not use special characters such as, @, #, !, or + when using the encryption_util.sh script. The script cannot encrypt special characters.
Note: This script might run for several minutes. To check the setup progress, run the command:
$ tail -f /tmp/cgmsdb_setup.log
Starting the IoT FND Oracle Database
To start the IoT FND Oracle database:
2.![]() Configure a cron job that starts IoT FND database at bootup by running this script:
Configure a cron job that starts IoT FND database at bootup by running this script:
Additional IoT FND Database Topics
The following procedures discuss database management:
■![]() Stopping the IoT FND Oracle Database
Stopping the IoT FND Oracle Database
■![]() Removing the IoT FND Database
Removing the IoT FND Database
■![]() Upgrading the IoT FND Database
Upgrading the IoT FND Database
Stopping the IoT FND Oracle Database
Typically, you do not have to stop the Oracle database during the installation procedure. However, if it becomes necessary to stop the Oracle database, use the stop script in the scripts directory:
Removing the IoT FND Database
Caution: The following script is destructive. Do not use this script during normal operation.
To remove the IoT FND database, run this script:
Upgrading the IoT FND Database
To upgrade the IoT FND database:
1.![]() Add the database files (a total of 15 files).
Add the database files (a total of 15 files).
This is required for scaling the system.
2.![]() Enable block-change tracking (required for incremental backup):
Enable block-change tracking (required for incremental backup):
3.![]() Disable parallel execution:
Disable parallel execution:
Caution: The incremental IoT FND backup script enables the Oracle block-change tracking feature to improve backup performance. To take advantage of this feature, delete your IoT FND database and run the setupCgmsDb.sh script before performing the first incremental backup. To avoid losing data, run these commands:
Changing the SYS DBA and IoT FND Database Passwords
To change default IoT FND database password for the cgms_dba user:
1.![]() On the IoT FND server, run the setupCgms.sh script and change the password for the cgms_dba user.
On the IoT FND server, run the setupCgms.sh script and change the password for the cgms_dba user.
Caution: The password for the IoT FND database and the cgnms_dba user password must match or IoT FND cannot access the database.
For information about running the setupCgms.sh script, see Setting Up IoT FND.
2.![]() On the Oracle server, run the change_password.sh script and change the password for the cgms_dba user:
On the Oracle server, run the change_password.sh script and change the password for the cgms_dba user:
Note: As root, you can also use this script to change the password for the sys user (SYS DBA).
3.![]() On the IoT FND server, run the cgms_status.sh script to verify the connection between IoT FND and the IoT FND database:
On the IoT FND server, run the cgms_status.sh script to verify the connection between IoT FND and the IoT FND database:
IoT FND Database Helper Scripts
IoT FND Database Helper Scripts describes helper IoT FND database scripts available in the $ORACLE_BASE/cgms/scripts/ directory:
Installing and Setting Up the SSM
The Software Security Module (SSM) is a low-cost alternative to a Hardware Security Module (HSM). IoT FND uses the CSMP protocol to communicate with meters, DA Gateway (IR500 devices), and range extenders. SSM uses CiscoJ to provide cryptographic services such as signing and verifying CSMP messages, and CSMP Keystore management. SSM ensures Federal Information Processing Standards (FIPS) compliance, while providing services. You install SSM on the IoT FND application server or other remote server. SSM remote-machine installations use HTTPS to securely communicate with IoT FND.
This section describes SSM installation and set up, including:
■![]() Installing or Upgrading the SSM Server
Installing or Upgrading the SSM Server
With the SSM server installed, configured, and started and with IoT FND configured for SSM, you can view the CSMP certificate on Admin > Certificates > Certificate for CSMP.
Note: See Setting Up an HSM Client for information on the Hardware Security Module (HSM).
Ensure that the installation meets the hardware and software requirements listed in the IoT FND Release Notes.
Installing or Upgrading the SSM Server
1.![]() Run the cgms-ssm-<version>-<release>.<architecture>.rpm rpm script:
Run the cgms-ssm-<version>-<release>.<architecture>.rpm rpm script:
2.![]() Get the IoT FND configuration details for the SSM. SSM ships with following default credentials:
Get the IoT FND configuration details for the SSM. SSM ships with following default credentials:
3.![]() Enter 5 at the prompt, and complete the following when prompted:
Enter 5 at the prompt, and complete the following when prompted:
4.![]() To connect to this SSM server, copy paste the output from Enter 5 at the prompt, and complete the following when prompted: into the cgms.properties file.
To connect to this SSM server, copy paste the output from Enter 5 at the prompt, and complete the following when prompted: into the cgms.properties file.
Note: You must include the IPv4 address of the interface for IoT FND to use to connect to the SSM server.
5.![]() (Optional) Run the ssm_setup.sh script to:
(Optional) Run the ssm_setup.sh script to:
| ■ |
Note: If you perform any of the above operations, you must run the SSM setup script, select “Print CG-NMS configuration for SSM,” and copy and paste all details into the cgms.properties file.
Monitoring SSM Log Files
You can monitor SSM logs in /opt/cgms-ssm/log/ssm.log
The default metrics report interval is 900 secs (15 min.), which is the minimum valid value. Only servicing metrics are logged. If there are no metrics to report, no messages are in the log.
You can change the metrics report interval by setting the ssm-metrics-report-interval field (in secs) in the /opt/cgms-ssm/conf/ssm.properties file.
Note: Your SSM server must be up and running before starting the IoT FND server.
Uninstalling the SSM Server
This section presents steps to completely uninstall the SSM server, including the steps for a fresh installation.
Note: Do not use this procedure for upgrades. Use the procedure in Installing or Upgrading the SSM Server.
2.![]() Copy and move the /opt/cgms-ssm/conf directory and contents to a directory outside of /opt/cgms-ssm.
Copy and move the /opt/cgms-ssm/conf directory and contents to a directory outside of /opt/cgms-ssm.
3.![]() Uninstall the cgms-ssm rpm:
Uninstall the cgms-ssm rpm:
5.![]() Copy and overwrite the /opt/cgms-ssm/conf directory with the contents moved in Copy and move the /opt/cgms-ssm/conf directory and contents to a directory outside of /opt/cgms-ssm..
Copy and overwrite the /opt/cgms-ssm/conf directory with the contents moved in Copy and move the /opt/cgms-ssm/conf directory and contents to a directory outside of /opt/cgms-ssm..
Integrating SSM and IoT FND
Note: You must install and start the SSM server before switching to SSM.
To switch from using the Hardware Security Module (HSM) for CSMP-based messaging and use the SSM:
2.![]() Run the ssm_setup.sh script on the SSM server.
Run the ssm_setup.sh script on the SSM server.
3.![]() Select option 3 to print IoT FND SSM configuration.
Select option 3 to print IoT FND SSM configuration.
4.![]() Copy and paste the details into the cgms.properties to connect to that SSM server.
Copy and paste the details into the cgms.properties to connect to that SSM server.
5.![]() To set up the HSM, specify the following properties in the cgms.properties file (see also, Setting Up an HSM Client):
To set up the HSM, specify the following properties in the cgms.properties file (see also, Setting Up an HSM Client):
6.![]() Ensure that the SSM up and running and you can connect to it.
Ensure that the SSM up and running and you can connect to it.
Installing and Setting Up IoT FND
Complete the following procedures to finish your IoT FND installation:
■![]() Installation and Setup Overview
Installation and Setup Overview
■![]() Running the IoT FND Database Migration Script
Running the IoT FND Database Migration Script
■![]() Accessing the IoT FND Web GUI
Accessing the IoT FND Web GUI
To install IoT FND, first obtain the IoT FND installation RPM:
Note: Ensure that /etc/hosts and /etc/resolv.conf files are correctly configured on the IoT FND server.
Installation and Setup Overview
These topics provide an overview of the two types of IoT FND installations:
Single-Server Deployment
To install and set up IoT FND for a single-server deployment:
1.![]() Log in to the RHEL server that will host IoT FND.
Log in to the RHEL server that will host IoT FND.
Cluster Deployment (HA)
To install and set up IoT FND for HA deployments, repeat the steps in Single-Server Deployment, but only run the IoT FND database migration script once.
Installing IoT FND
To install the IoT FND application:
1.![]() Run the IoT FND installation RPM:
Run the IoT FND installation RPM:
2.![]() Verify installation and check the RPM version:
Verify installation and check the RPM version:
Setting Up IoT FND
To set up IoT FND, run the setupCgms.sh script.
Note: If deploying a IoT FND server cluster, the setupCgms.sh script must be run on every node in the cluster.
Caution: The IoT FND certificate encrypts data in the database. The setupCgms.sh script runs database migration, which requires access to the IoT FND certificate in the keystore. You must set up certificates before running setupCgms.sh. The script results in an error if it migrates the database and cannot access the certificate (see Generating and Installing Certificates).
Caution: Ensure that the database password entered while running the setupCgms.sh script is valid. If you enter an invalid password multiple times, Oracle might lock your user account. You can unlock your account on the database server. For more information about unlocking your password, see “Unlocking the IoT FND Database Password” in the Troubleshooting chapter of the IoT Field Network Director User Guide, Release 4.1.x.
This example uses the setupCgms.sh script to set up a single-server IoT FND system that uses one database.
The setupCgms.sh script lets you configure these settings:
■![]() Configuring Database Settings
Configuring Database Settings
■![]() Configuring CGMS_S Standby Database
Configuring CGMS_S Standby Database
■![]() Configuring the IoT FND Database Password
Configuring the IoT FND Database Password
■![]() Configuring the Keystore Password
Configuring the Keystore Password
Configuring Database Settings
To configure the database settings, the setupCgms.sh script prompts you for this information:
■![]() IP address of the primary IoT FND database server
IP address of the primary IoT FND database server
■![]() Port number of the IoT FND database server
Port number of the IoT FND database server
Press Enter to accept the default port number (1522).
■![]() Database System ID (SID), which is cgms for the primary database server
Database System ID (SID), which is cgms for the primary database server
Press Enter to accept the default SID (cgms). This SID identifies the server as the primary database server.
Configuring CGMS_S Standby Database
1.![]() Log into the server with the standby database.
Log into the server with the standby database.
2.![]() Enter the following commands:
Enter the following commands:
b.![]() cd $ORACLE_HOME/cgms/scripts/ha
cd $ORACLE_HOME/cgms/scripts/ha
c.![]() ./manageObserver <------ Enter this command to stop Observer
./manageObserver <------ Enter this command to stop Observer
Note: Step c command above starts with a (.) period and is followed by a forward slash (/) as are steps d, e, g and i below.
f.![]() cd $ORACLE_HOME/cgms/scripts
cd $ORACLE_HOME/cgms/scripts
h.![]() cd $ORACLE_HOME/cgms/scripts/ha
cd $ORACLE_HOME/cgms/scripts/ha
i.![]() ./manageObserver <------ Enter this command to start Observer
./manageObserver <------ Enter this command to start Observer
Configuring Database HA
To configure the standby database settings, the setupCgms.sh script prompts you for the following information:
■![]() IP address of the standby IoT FND database server
IP address of the standby IoT FND database server
■![]() Port number of the standby IoT FND database server
Port number of the standby IoT FND database server
■![]() Database System ID (SID), which is cgms for the primary database server
Database System ID (SID), which is cgms for the primary database server
Enter cgms_s. This SID identifies the server as the standby database server.
For information about setting up database HA, see Setting Up IoT FND Database for HA.
Configuring the IoT FND Database Password
When prompted to change the IoT FND database password, enter the password of the cgms_dba user account on the database server. If using the default password, do not change the database password now.
Configuring the Keystore Password
To configure the keystore password:
Configuring the Web root User Password
To change the password of the root user account that lets you access the IoT FND browser-based interface, enter y and provide the password:
Configuring FTPS Settings
If deploying a cluster, provide the FTPS settings required for downloading logs. FTPS securely transfers files between cluster nodes. If the FTPS settings are not configured, you can only download logs from the IoT FND node where you are currently logged in.
Checking IoT FND Status
Before you can start IoT FND, check its connection to the IoT FND database by running this command:
This command provides the IP address or hostname and status of the IoT FND database, and also verifies the connection to the IoT FND database. If the connection is not verified, you cannot start IoT FND.
Running the IoT FND Database Migration Script
IoT FND uses a special database migration system that lets you quickly migrate your IoT FND database without having to perform a database dump and restore. Each database migration creates or modifies some of the tables in the IoT FND database so that IoT FND can keep a record of migrations already performed.
Before launching IoT FND the first time, run the database migration script to set up the IoT FND tables in the database:
# ./db-migrate
Note: This script runs for a few minutes before launching IoT FND for the first time. Running this script after upgrading to a new version of IoT FND takes longer depending on the amount of data in the IoT FND database.
Note: If deploying a IoT FND server cluster, run the db-migrate script on only one cluster node.
The db-migrate command prompts you for the database password. The default password is cgms123.
Caution: Ensure that the password entered while running the db-migrate script is the correct password. If you enter an incorrect password multiple times, Oracle might lock your user account. If so, you have to unlock your account on the database server. Follow the steps below to unlock your password:
■![]() If you enter an incorrect IoT FND Database password multiple times, Oracle locks your user account. Unlock your password using the Oracle software, as shown in this example:
If you enter an incorrect IoT FND Database password multiple times, Oracle locks your user account. Unlock your password using the Oracle software, as shown in this example:
Accessing the IoT FND Web GUI
IoT FND has a self-signed certificate for its Web GUI. You must add a security exception in your browser to access the IoT FND GUI. Once you start IoT FND, you can access its web GUI at:
https://nms_machine_IP_address/
The initial default username is root; the password is root123.
IoT FND uses the default password of root123 unless the password was changed when the setup script ran.
For more information on the setup script, see Setting Up IoT FND.
Note: If the IoT FND includes the Hardware Security Module (HSM), the Firefox browser will not connect to IoT FND. To work around this issue, open Firefox Preferences, navigate to Advanced![]() , and click the Encryption tab. Under Protocols, clear the Use TLS 1.0 check box. Reconnect to IoT FND and ensure that the page loaded properly.
, and click the Encryption tab. Under Protocols, clear the Use TLS 1.0 check box. Reconnect to IoT FND and ensure that the page loaded properly.
IoT FND only accepts TLSv1.2 based HTTPS connections. To access the IoT FND GUI, you must enable the TLSv1.2 protocol to establish an HTTPS connection with the IoT FND.
Note: IoT FND Release 2.1.1-54 and later do not support TLSv1.0 or TLSv1.1 based connections.
First-Time Log In Actions
Changing the Password
When you log in to IoT FND for the first time, a popup window prompts you to change the password.
Note: IoT FND supports a maximum 32-character password length.
Configuring the Time Zone
To configure the time zone, follow these steps:
1.![]() From the username drop-down menu (top right), choose Time Zone.
From the username drop-down menu (top right), choose Time Zone.
Changing the Sorting Order of Columns
For pages that display lists under a column heading (such as a list of routers) you can change the sort order (ascending or descending) by toggling the triangle icon in the column heading,
Filtering Lists
IoT FND lets you define filters on the DEVICES and OPERATIONS pages.
■![]() To define a filter, click Show Filters to the right of the search field to open a filter definition panel (shown below). After you define the search parameters in the field, click the magnifying glass icon to start search. Results display beneath the filter field.
To define a filter, click Show Filters to the right of the search field to open a filter definition panel (shown below). After you define the search parameters in the field, click the magnifying glass icon to start search. Results display beneath the filter field.

■![]() Click Hide Filters to close the search field.
Click Hide Filters to close the search field.
In the following example, typing the search string deviceType:cgmesh status:up in the Search Devices field lists the mesh endpoint devices with an Up status.
Setting User Preferences for User Interface
You can define what items display in the user interface by selecting the Preferences option under the < user name> drop-down menu (top right).
In the User Preferences panel that displays, you can select those items (listed below) that you want to display by checking the box next to that option. Click Apply to save.
User Preference options include:
■![]() Show summary counts on events/issues page
Show summary counts on events/issues page
■![]() Show device type and function on device pages: Routers, Endpoints, Head End Routers, Servers
Show device type and function on device pages: Routers, Endpoints, Head End Routers, Servers
Logging Out
Click Log Out in the <user name> drop-down menu (top right).
IoT FND CLIs
This section addresses key command-line interface (CLI) commands used to manage IoT FND:
Starting IoT FND
To start IoT FND, run this command:
To configure IoT FND so that it runs automatically at boot time, run this command:
Checking IoT FND Status
To check IoT FND status, run this command:
Stopping IoT FND
To stop IoT FND, run this command:
Note: The application typically takes approximately 10 seconds to stop. Run ps | grep java to verify that no Java processes are running.
Restarting IoT FND
To restart IoT FND, run this command:
IoT FND Log File Location
The IoT FND log file (server.log) is located in the /opt/cgms/server/cgms/log directory.
IoT FND Helper Scripts
IoT FND Helper Scripts describes the helper IoT FND scripts in the /opt/cgms/bin/ directory.
|
|
|
|---|---|
Upgrading IoT FND
Note: It is not necessary to stop the database during normal upgrades. All upgrades are in-place.
Note: For virtual IoT FND installations using custom security certificates, see Managing Custom Certificates before performing this upgrade.
Caution: Run the following steps sequentially.
To upgrade the IoT FND application:
1.![]() Obtain the new IoT FND RPM.
Obtain the new IoT FND RPM.
Note: The application typically takes approximately 10 seconds to stop. Run ps | grep java![]() to verify that no Java processes are running.
to verify that no Java processes are running.
3.![]() Make sure the cgms service has stopped:
Make sure the cgms service has stopped:
Note: These files overwrite the files in /opt/cgms.
5.![]() Run the database migrations to upgrade the database from the /opt/cgms directory:
Run the database migrations to upgrade the database from the /opt/cgms directory:
Note: You must run the db-migrate script after each upgrade.
6.![]() When prompted, enter the database password. The default password is cgms123.
When prompted, enter the database password. The default password is cgms123.
You can also use the RHEL (Red Hat Enterprise Linux) GUI to start the IoT FND service (ADMIN > System Management > Server Settings > Services). For information, see the RHEL documentation.
Uninstalling IoT FND
Note: This deletes all IoT FND local installation configuration settings and installation files (for example, the keystore with your certificates).
Tip: If you plan to reinstall IoT FND, copy your current keystore and certificate files to use to overwrite the keystore and certificate files included with the install package.
To remove the IoT FND application, run these commands:
Cleaning up the IoT FND Database
To clean up the IoT FND database:
1.![]() (HA database configurations) Stop the Observer server.
(HA database configurations) Stop the Observer server.
2.![]() (HA database configurations) Run the $ORACLE_BASE/cgms/scripts/ha/deleteStandbyDb.sh script to delete the standby database.
(HA database configurations) Run the $ORACLE_BASE/cgms/scripts/ha/deleteStandbyDb.sh script to delete the standby database.
3.![]() (HA database configurations) Run the $ORACLE_BASE/cgms/scripts/ha/deletePrimaryDbHa.sh script to delete the HA configuration from primary database.
(HA database configurations) Run the $ORACLE_BASE/cgms/scripts/ha/deletePrimaryDbHa.sh script to delete the HA configuration from primary database.
4.![]() Run the $ORACLE_BASE/cgms/scripts/deleteCgmsDb.sh script to delete primary database.
Run the $ORACLE_BASE/cgms/scripts/deleteCgmsDb.sh script to delete primary database.
Installing and Configuring the IoT FND TPS Proxy
The first use of the optional TPS proxy is typically when a CGR sends an inbound request to initialize the portion of Zero Touch Deployment (ZTD) handled by IoT FND. IoT FND operates behind a firewall and does not have a publicly reachable IP address. When field area routers (CGRs) contact IoT FND for the first time, IoT FND requires that they use the TPS proxy. This server lets these routers contact the IoT FND application server to request tunnel provisioning (see Managing Tunnel Provisioning).
The TPS proxy does not have its own GUI. You must edit the properties in the cgnms.properties and tpsproxy.properties-template files for HTTPS outbound tunnel provisioning requests so that IoT FND recognizes them as requests from the TPS proxy.
After provisioning the tunnel(s), the field area routers can contact IoT FND directly without using the TPS proxy. IoT FND is notified of the exact certificate subject from the proxy certificate, and then authenticates that the HTTPS inbound requests are coming from the TPS proxy.
Setting Up the TPS Proxy
Install the cgms-tpsproxy RPM package Java application on a separate (TPS proxy) server to act as a stateless extension of IoT FND outside the firewall. The TPS proxy can be a Red Hat Enterprise Linux (RHEL) server (see TPS proxy system requirements in the IoT FND Release Notes). The cgnms-tpsproxy application runs as a daemon on the server and requires the following configuration parameters:
■![]() URL of the IoT FND server (to forward inbound requests).
URL of the IoT FND server (to forward inbound requests).
■![]() IP address of the IoT FND server, as part of a whitelist (approved list) for forwarding outbound requests.
IP address of the IoT FND server, as part of a whitelist (approved list) for forwarding outbound requests.
Before you install the TPS proxy, obtain the TPS proxy installation package:
To configure the proxy-server settings:
1.![]() Configure a RHEL server to use as the TPS proxy.
Configure a RHEL server to use as the TPS proxy.
2.![]() Connect this RHEL server so that it can be reached while outside the firewall.
Connect this RHEL server so that it can be reached while outside the firewall.
3.![]() Configure the TPS proxy using the template file:
Configure the TPS proxy using the template file:
Note: Edit the cgnms.properties and tpsproxy.properties files after running the encryption_util.sh script during IoT FND TPS Proxy Enrollment.
4.![]() Edit the tpsproxy.properties file to add the following lines defining the inbound and outbound addresses for the IoT FND application server:
Edit the tpsproxy.properties file to add the following lines defining the inbound and outbound addresses for the IoT FND application server:
Note: You must edit the properties in the cgnms.properties and tpsproxy.properties-template files for HTTPS outbound tunnel provisioning requests so that IoT FND recognizes them as requests from the TPS proxy.
Configuring the TPS Proxy Firewall
To configure the TPS proxy firewall:
■![]() Set up a firewall rule to allow HTTPS connections from the TPS proxy to the IoT FND server on port 9120 (for HTTPS inbound requests).
Set up a firewall rule to allow HTTPS connections from the TPS proxy to the IoT FND server on port 9120 (for HTTPS inbound requests).
■![]() Set up a firewall rule to allow HTTPS connections from the IoT FND server to the TPS proxy on port 9122 (for HTTPS outbound requests).
Set up a firewall rule to allow HTTPS connections from the IoT FND server to the TPS proxy on port 9122 (for HTTPS outbound requests).
IoT FND TPS Proxy Enrollment
The enrollment process for the TPS proxy is the same as the IoT FND enrollment process. The certification authority (CA) that signs the certificate of the IoT FND application server must also sign the certificate of the TPS proxy. The certificate of the TPS proxy is stored in a Java keystore and is similar to the IoT FND certificate.
For the enrollment process, consider these scenarios:
–![]() If the keystore password is the same as the default password, change the default password.
If the keystore password is the same as the default password, change the default password.
Note: We strongly recommend that you change all default passwords. Do not use special characters such as, @, #, !, or + as the encryption_util.sh script cannot encrypt special characters.
–![]() If the keystore password is different from default password, run the encryption_util.sh script and copy the encrypted password to the properties file.
If the keystore password is different from default password, run the encryption_util.sh script and copy the encrypted password to the properties file.
Note: Edit the cgnms.properties and tpsproxy.properties files after running the encryption_util.sh script.
Regardless of whether you are using the default password or a custom one, the upgrade process encrypts the password in the /opt/cgms-tpsproxy/conf/tpsproxy.properties file.
For information on IoT FND enrollment, refer to Generating and Exporting Certificates in the Generating and Installing Certificates chapter of this guide.
To enroll the terminal TPS proxy:
1.![]() Create a cgms_keystore file.
Create a cgms_keystore file.
Configuring IoT FND to Use the TPS Proxy
You must edit the properties in the cgnms.properties and tpsproxy.properties-template files for HTTPS outbound tunnel provisioning requests so that IoT FND recognizes them as requests from the TPS proxy. The TPS proxy logs all inbound and outbound requests.
Note: If the properties in the cgnms.properties and tpsproxy.properties-template files are not set, IoT FND does not recognize the TPS proxy, drops the forwarded request, and considers it from an unknown device.
Note: The following examples employ variable not mandatory values, and are provided as examples only.
To configure IoT FND to use the TPS proxy:
1.![]() Open an SSH connection to the IoT FND server:
Open an SSH connection to the IoT FND server:
Note: Edit the cgnms.properties and tpsproxy.properties files after running the encryption_util.sh script during IoT FND TPS Proxy Enrollment.
2.![]() Edit the cgms.properties file to add lines identifying the TPS proxy IP address, domain name, and user subjects in the cgdm-tpsproxy-subject property:
Edit the cgms.properties file to add lines identifying the TPS proxy IP address, domain name, and user subjects in the cgdm-tpsproxy-subject property:
Note: The cgdm-tpsproxy-subject property must match the installed TPS proxy certificate.
Starting the IoT FND TPS Proxy
Start the TPS proxy after it is installed, configured, and enrolled.
To start the TPS proxy, run the start script:
The TPS proxy log file is located at:
Note: For information, see TPS Proxy Validation.
TPS Proxy Validation
The TPS proxy logs all HTTPS inbound and outbound requests in the TPS proxy log file located at /opt/cgms-tpsproxy/log/tpsproxy.log
The following entry in the TPS proxy tpsproxy.log file defines inbound requests for a CGR:
This message entry in the TPS proxy tpsproxy.log file indicates that the TPS successfully forwarded the message to IoT FND:
The following entry in the IoT FND server log file identifies the TPS proxy:
The following entry in the TPS proxy tpsproxy.log file defines outbound requests:
The following entry in the IoT FND server log file identifies the HTTPS connection:
Backing Up and Restoring the IoT FND Database
The following topics demonstrate how IoT FND supports both full and incremental database backups:
■![]() Creating a Full Backup of the IoT FND Database
Creating a Full Backup of the IoT FND Database
■![]() Scheduling a Full IoT FND Backup
Scheduling a Full IoT FND Backup
Before You Begin
Before backing up your IoT FND database:
1.![]() Download and install the latest cgms-oracle- version_number.x86_64.rpm package.
Download and install the latest cgms-oracle- version_number.x86_64.rpm package.
2.![]() Copy the scripts, templates, and tools folders from the /opt/cgms-oracle folder to the $ORACLE_BASE/cgms folder.
Copy the scripts, templates, and tools folders from the /opt/cgms-oracle folder to the $ORACLE_BASE/cgms folder.
3.![]() Set the ownership of the files and folders you copied to oracle:dba.
Set the ownership of the files and folders you copied to oracle:dba.
Creating a Full Backup of the IoT FND Database
Full backups back up all the blocks from the data file. Full backups are time consuming and consume more disk space and system resources than partial backups.
IoT FND lets you perform full hot backups of IoT FND database. In a hot backup, IoT FND and the IoT FND database are running during the backup.
Note: The destination backup directory must be writable by the oracle user and have enough space for the IoT FND data.
To create a backup file of the IoT FND software:
1.![]() On the IoT FND database server, open a CLI window.
On the IoT FND database server, open a CLI window.
3.![]() Change directory to the location of the IoT FND backup script (backupCgmsDb.sh):
Change directory to the location of the IoT FND backup script (backupCgmsDb.sh):
4.![]() Run the backup script and specify the destination folder. For example, to store the backup data in the /home/oracle/bkp folder, enter this command:
Run the backup script and specify the destination folder. For example, to store the backup data in the /home/oracle/bkp folder, enter this command:
Scheduling a Full IoT FND Backup
To schedule a full IoT FND backup to run daily at 1:00 AM (default setting):
Note: The destination backup directory must be writable by the oracle user and have enough space for the IoT FND data.
1.![]() On the IoT FND database server, open a CLI window.
On the IoT FND database server, open a CLI window.
2.![]() Switch to the user oracle :
Switch to the user oracle :
3.![]() Change directory to the location of the IoT FND backup script (backupCgmsDb.sh):
Change directory to the location of the IoT FND backup script (backupCgmsDb.sh):
4.![]() Run the backup script and specify the destination folder.
Run the backup script and specify the destination folder.
To change the backup scheduling interval, edit the installCgmsBackupJob.sh script before running it.
For example, to store the backup data in /home/oracle/bkp, enter this command:
To delete the backup job, enter these commands:
Backing Up the IoT FND Database Incrementally
Incremental backups only back up data file blocks that changed since the previous specified backup. IoT FND supports two incremental backup levels, and an hourly log backup:
■![]() incr0–Base backup for subsequent incremental backups. This is similar to a full backup. For large deployments (millions of mesh endpoints and several thousand routers such as CGR1000 and IR800), run incr0 backups twice a week.
incr0–Base backup for subsequent incremental backups. This is similar to a full backup. For large deployments (millions of mesh endpoints and several thousand routers such as CGR1000 and IR800), run incr0 backups twice a week.
■![]() incr1–Differential backup of all blocks changed since the last incremental backup. For large deployments (millions of mesh endpoints and several thousand routers), run incr1 backups once a day.
incr1–Differential backup of all blocks changed since the last incremental backup. For large deployments (millions of mesh endpoints and several thousand routers), run incr1 backups once a day.
Note: An incr0 backup must run before an incr1 backup to establish a base for the incr1 differential backup.
■![]() Hourly archivelog backup–The Oracle Database uses archived logs to record all changes made to the database. These files grow over time and can consume a large amount of disk space. Schedule the backup_archive_log.sh script to run every hour. This script backs up the database archive (.arc) log files, stores them on a different server, and deletes the source archivelog files to free space on the database server.
Hourly archivelog backup–The Oracle Database uses archived logs to record all changes made to the database. These files grow over time and can consume a large amount of disk space. Schedule the backup_archive_log.sh script to run every hour. This script backs up the database archive (.arc) log files, stores them on a different server, and deletes the source archivelog files to free space on the database server.
Tip: Before performing any significant operation that causes many changes in the IoT FND database (for example, importing a million mesh endpoints or uploading firmware images to mesh endpoints), perform am incr0 backup. After the operation completes, perform another incr0 backup, and then resume the scheduled incremental backups.
Performing an Incremental Backup
Note: The destination backup directory must be writable by the oracle user and have enough space for the IoT FND data.
To perform an incremental backup:
1.![]() On the IoT FND database server, open a CLI window.
On the IoT FND database server, open a CLI window.
2.![]() Switch to the user oracle and change directory to the location of the IoT FND backup script:
Switch to the user oracle and change directory to the location of the IoT FND backup script:
3.![]() Run the backup script and specify the incremental backup level and the destination folder where the backup data is stored (for example, /home/oracle/bkp). For example, to perform an incr0 backup to/home/oracle/bkp, enter the command:
Run the backup script and specify the incremental backup level and the destination folder where the backup data is stored (for example, /home/oracle/bkp). For example, to perform an incr0 backup to/home/oracle/bkp, enter the command:
To perform an incr1 backup, enter the command:
Restoring a IoT FND Backup
Perform database backups and restores using the scripts provided in the cgms-oracle.rpm package. If using the supplied scripts, backups and restores only work if performed on the same Oracle database version.
Note: Backups from Oracle version 11.2.0.1 can only be restored on v11.2.0.1 if using the supplied scripts. Backups do not work across different versions of Oracle, for example, a backup taken on 11.2.0.1 cannot be restored on 11.2.0.3 using the supplied scripts. If a database upgrade from 11.2.0.1 to 11.2.0.3 is required, follow the Oracle upgrade procedure. Refer to the Oracle upgrade document and Web site.
IoT FND supports restoring IoT FND backups on the same host or different host. If you choose to restore IoT FND backups on a different host, ensure that the host runs the same or a higher version of the Oracle database software and that IoT FND database on the destination host was created using the setupCgmsDb.sh script.
Note: IoT FND does not support cross-platform backups.
2.![]() Switch to the user oracle, change directories to the script location, and stop Oracle:
Switch to the user oracle, change directories to the script location, and stop Oracle:
3.![]() To restore the IoT FND database, run the command:
To restore the IoT FND database, run the command:
Tip: Performing a restore from a full backup can be time consuming. For large deployments, we recommend restoring the database from incremental backups.
To restore IoT FND database from an incremental backup, run these commands and specify the path to last incremental backup file:
The restore script might display these errors:
To avoid these errors, increase the size of the shared memory file system:
5.![]() Change directories to /opt/cgms and run the db-migrate script:
Change directories to /opt/cgms and run the db-migrate script:
When you restore a IoT FND database, the restore script restores the database to the IoT FND version the database was using. An error returns if you restore an old database to a newer version of IoT FND. Run the migrate script to ensure that the database runs with the current version of IoT FND.
For disaster recovery, perform a clean restore. The script starts by deleting the current IoT FND database:
If a clean restore is not required, use the Oracle tool to restore the database.
Deploying IoT FND/Oracle/TPS Virtual Machines on ESX 5.x
You use the VMware vSphere client to import OVA files into ESXi 5.x.
■![]() Install the VMware vSphere Client for the ESXi 5.x server.
Install the VMware vSphere Client for the ESXi 5.x server.
■![]() Locate the VMware ESXi 5. x credentials to create virtual machines in ESXi 5.x.
Locate the VMware ESXi 5. x credentials to create virtual machines in ESXi 5.x.
■![]() Ensure that you meet the VMware server machine requirements.
Ensure that you meet the VMware server machine requirements.
Listed below are the VM CPU and memory requirements for a small scale deployment:
–![]() 2 virtual sockets with 2 cores per socket
2 virtual sockets with 2 cores per socket
To import the IoT FND, Oracle, and TPS virtual appliances into ESXi 5.x or ESXi6.x using VMware vSphere Client version 5.0.0 or 6.0.0, respectively:
1.![]() Select the Network Adapter > NAT setting for the server.
Select the Network Adapter > NAT setting for the server.
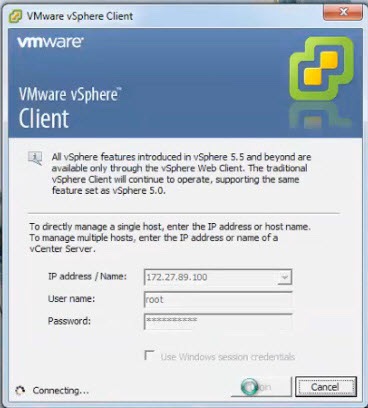
2.![]() At the VMware vSphere Client window enter the IP address, username and password of the server where VMware resides. Click Login.
At the VMware vSphere Client window enter the IP address, username and password of the server where VMware resides. Click Login.
3.![]() Select File > Deploy OVF Template...
Select File > Deploy OVF Template...
4.![]() Browse to the FND-OVA\oracle-415.ovf file.
Browse to the FND-OVA\oracle-415.ovf file.
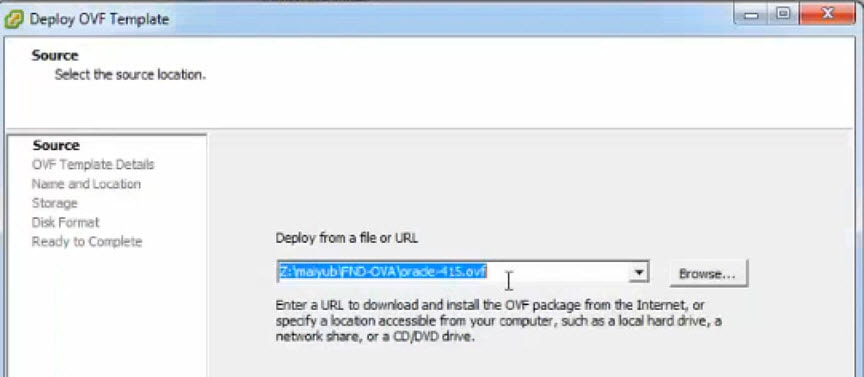
5.![]() Ensure that the correct OVA file displays in the Source location window, and then click Next. ( Note: The Next button, not shown, is found in the bottom, right-hand portion of the window.)
Ensure that the correct OVA file displays in the Source location window, and then click Next. ( Note: The Next button, not shown, is found in the bottom, right-hand portion of the window.)
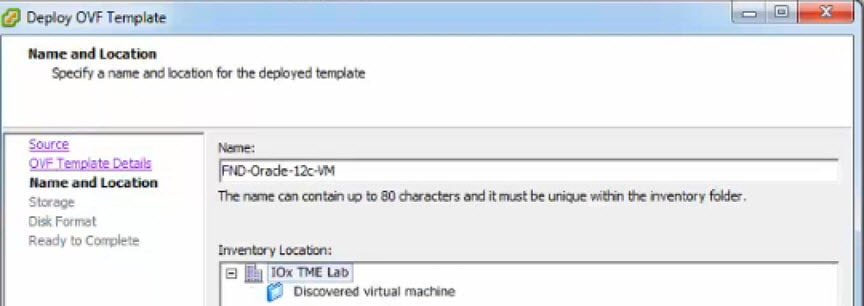
6.![]() In the OVF Template Details window, enter the Name and Inventory Location of the deployed template (for example, FND-Oracle-12c-VM) Click Next.
In the OVF Template Details window, enter the Name and Inventory Location of the deployed template (for example, FND-Oracle-12c-VM) Click Next.
7.![]() In the next window that appears, verify the OVA file name matches what you entered in the previous window. If no issues, click Next. If the OVA file name does not match, click Back and reenter the information.
In the next window that appears, verify the OVA file name matches what you entered in the previous window. If no issues, click Next. If the OVA file name does not match, click Back and reenter the information.
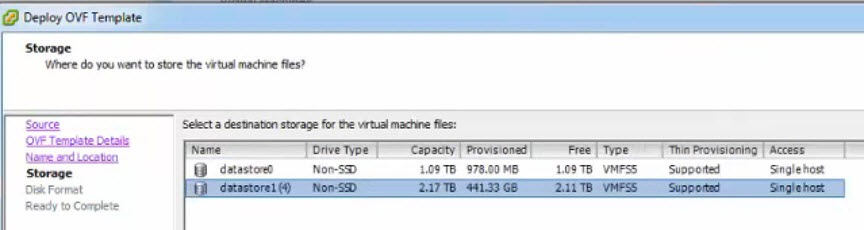
8.![]() Select a Storage destination for the VM deployed template.
Select a Storage destination for the VM deployed template.
9.![]() In the Disk Format window (not shown), select the Thin Provision option, and then click Next.
In the Disk Format window (not shown), select the Thin Provision option, and then click Next.
Note: Thin Provision allows the VM disk to grow as needed.
10.![]() In the Ready to Complete window, confirm your deployment settings, and then click Finish. Deployment of the FND-Oracle-12C-VM templates begins.
In the Ready to Complete window, confirm your deployment settings, and then click Finish. Deployment of the FND-Oracle-12C-VM templates begins.
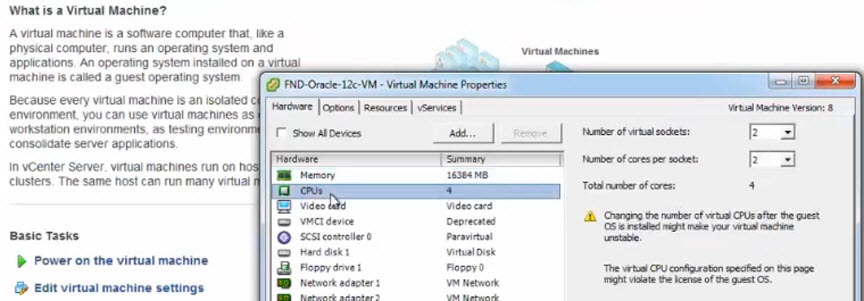
11.![]() After completion of the FND-Oracle-12c-VM install, a window displays.
After completion of the FND-Oracle-12c-VM install, a window displays.
–![]() In the left panel, select the FND-Oracle-12c-VM server.
In the left panel, select the FND-Oracle-12c-VM server.
–![]() In the right panel, Under Basic Task, select Edit virtual machine settings to confirm CPU and MEM settings.
In the right panel, Under Basic Task, select Edit virtual machine settings to confirm CPU and MEM settings.
–![]() Click OK to close the window.
Click OK to close the window.
12.![]() Click Power on the virtual machines and select Console tab in the window that opens. The console opens showing possible RHEL server versions to select.
Click Power on the virtual machines and select Console tab in the window that opens. The console opens showing possible RHEL server versions to select.
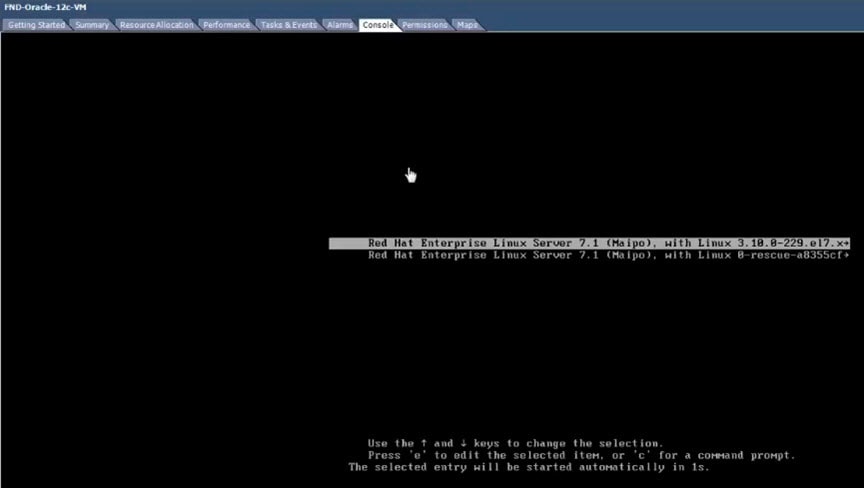
13.![]() After you select a RHEL option, you will be prompted for your username and password.
After you select a RHEL option, you will be prompted for your username and password.
14.![]() Click Sign In and select the GNOME Classic option.
Click Sign In and select the GNOME Classic option.

16.![]() At the Welcome screen, select the default language (such as English-United States) for the interface, Click Next.
At the Welcome screen, select the default language (such as English-United States) for the interface, Click Next.
17.![]() Continue through the install script until you reach the final screen that indicates that “Your computer is ready to use.” Click Start using Red Hat Enterprise Linus Server button.
Continue through the install script until you reach the final screen that indicates that “Your computer is ready to use.” Click Start using Red Hat Enterprise Linus Server button.
18.![]() Close Getting Started window, right-click to open.
Close Getting Started window, right-click to open.
19.![]() At the Application Places window, right-click in the window to display a menu panel. Select Open in Terminal.
At the Application Places window, right-click in the window to display a menu panel. Select Open in Terminal.
 Feedback