Installing the Device

Unpacking the Device

The device, accessory kit, publications, and any optional units may be shipped in more than one container. When you unpack the containers, check the packing list to ensure that you have received all the items on the list.

Only unpack the product when you are ready to install it. This will help prevent accidental damage.

Installing the Cisco Catalyst 8200 Series Edge uCPE

If not already installed, the DIMMs must be installed before rack-mounting the chassis.


Warning

Only trained and qualified personnel should be allowed to install, replace, or service this equipment. Statement 1030


You can place the router on a desktop, bench top, or shelf.

Desktop-Mounting the Chassis

The Catalyst 8200 uCPE has circular markings on the bottom of the chassis for rubber feet. Apply the rubber feet when installing the router on horizontal surface (desk or shelf).

Rack-Mounting the Chassis

The Catalyst 8200 uCPE can be installed in 19-inch (48.26-cm) racks. You can order the standard brackets for mounting the chassis in a 19-inch EIA rack.

The mounting ears for the device are designed for #12-24 UNC screws for rack mounting.


Warning

To prevent airflow restriction, allow clearance around the ventilation openings to be at least: 1-inch (25.4-mm) Statement 1076


You can rack-mount the device in the following ways:

  • Front mounting—Brackets attached at the front of the chassis with the front panel facing forward

  • Back mounting—Brackets attached at the back of the chassis with the back panel facing forward

Attaching Brackets to the Chassis

Attach one mounting bracket to each side of the device as shown in following figures. You need four screws to attach each bracket to the device. Total eight screws are required to attach both brackets to the device. Use the screws provided with the mounting kit to attach the screws to the device.

Figure 1. Bracket Installation for Front Mounting
Figure 2. Bracket Installation for Back Mounting

Mounting the device in a Rack

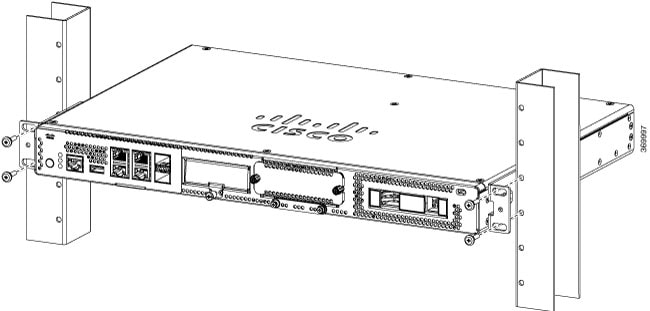
After you attach the brackets to the device, install the chassis on the rack as shown in following figures. You need two screws to attach each bracket to the rack. Total four screws are required to attach the device to the rack. The screws for attaching the device to the rack are not provided with the kit.

Figure 3. Mounting the Chassis on the Rack - Front and Back

Tip

The screw slots in the brackets are spaced to line up with every second pair of screw holes in the rack. When the correct screw holes are used, the small threaded holes in the brackets line up with unused screw holes in the rack. If the small holes do not line up with the rack holes, you must raise or lower the brackets to the next rack hole.


Wall-Mounting the Chassis

These are the steps to wall mount the chassis:

  1. Attach the brackets to the device using the screws provided with the mounting kit. You can order the wall mounting kit to mount the chassis on a wall.


    Note

    The wall-mounting kit is different from the rack-mounting kit.


    Two screws should be used to attach each bracket to the chassis as shown in the following figure.

    1

    Bracket slot spacer for screw. Orient spacer in slot as shown.

  2. Fix the chassis to the wall using the brackets that you attached to thedevice.

    The screws or anchors for attaching the device to the wall are not provided with the kit. Depending on the type of wall (wood, brick, stone etc), use appropriate screws or anchors to fix the device to the wall.


    Note

    Route the cables so that they do not put a strain on the connectors or mounting hardware. For safety reasons, the chassis may only be mounted with ports going out in left or right direction. Do not mount the chassis with ports facing upward or downward direction.


Grounding the Chassis


Warning

This equipment must be grounded. Never defeat the ground conductor or operate the equipment in the absence of a suitably installed ground conductor. Contact the appropriate electrical inspection authority or an electrician if you are uncertain that suitable grounding is available. Statement 1024


Warning

To reduce risk of electric shock, when installing or replacing the unit, the ground connection must always be made first and disconnected last. Statement 1046


These are the steps to install the ground connection for the device. The ground lug kit is provided with the chassis:

Before you begin

  • Connect the chassis to the earth ground; the ground wire must be installed in accordance with local electrical safety standards.

  • For grounding, use size 6 AWG copper wire and the ground lug provided in the accessory kit.

  1. Strip one end of the ground wire to the length required for the groundlug.

  2. Crimp the ground wire to the ground lug using a crimp tool of the appropriatesize (7/8" strip length).

  3. Attach the ground lug to the chassis as shown in the figure. Use the screws provided along with the ground lug to attach the lug to the device.

Powering On the Server

An external POE supply may be ordered if required. The POE supply can be of different sizes. The table below shows the physical parameters depending on the supplier.

PSU

Delta PSU

FSP PSU

Main Part Dimensions

L-200 * W-100 * H-43 mm

L-177 * W-86 * H-32.2 mm

Weight

1.015 KG

0.575 KG

Initial Server Setup

Local Connection Procedure

  • Ensure that the device is powered on.

  • Connect serial console port on the front panel of the device.

  • When you see the prompt, you can press F2 to get into the setup (BIOS) to change some settings.

  • After you have performed the required configuration, save the setup and continue to boot.

Remote Connection Procedure

  • Plug in your terminal server to the Serial port (Refer to Front panel ofChassis).

  • Telnet into the console and perform the necessary configuration using corresponding commands.