Configuration

Configuring Devices using vManage

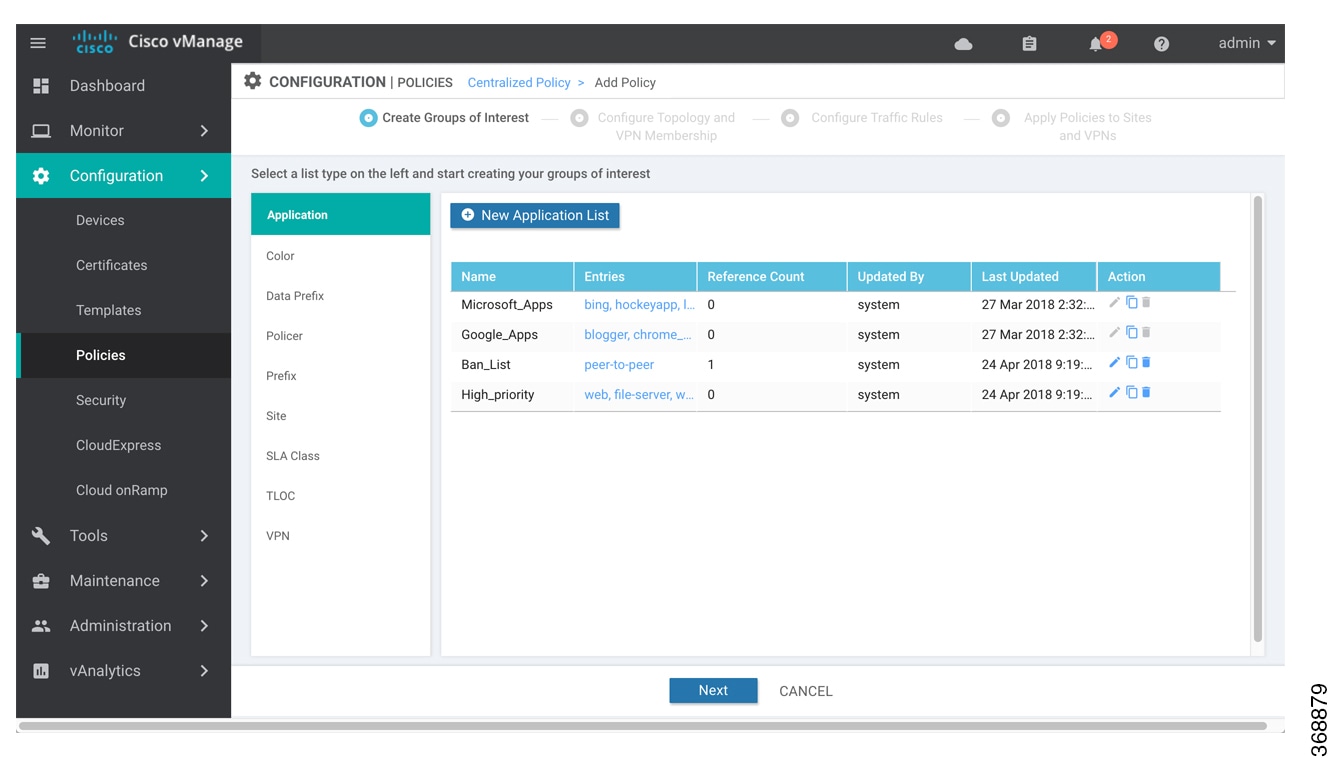
Use the Devices screen to add and delete devices, toggle the mode of a device between CLI and vManage, upload the WAN Edge Serial number file, export bootstrap configuration and, and perform other device-related tasks.

1

Menu

2

CloudExpress

3

Tasks

4

Alarms

5

Help

6

User Profile

Change Configuration Modes

A device can be in either of these configuration modes:

  • vManage mode–A template is attached to the device and you cannot change the configuration on the device by using the CLI.

  • CLI mode – No template is attached to the device and the device can be configured locally by using the CLI.

When you attach a template to a device from vManage, it puts the device in vManage mode. You can change the device back to CLI mode if needed to make local changes to its configuration.

To toggle a router from vManage mode to CLI mode:
  1. In WAN Edge List tab, select a device.

  2. Click the Change Mode drop-down and select CLI mode.

An SSH window opens. To log in to the device, enter a username and password. You can then issue CLI commands to configure or monitor the device.

To toggle a controller device from vManage mode to CLI mode:

  1. In the Controllers tab, select a device.

  2. Click the Change Mode drop-down.

  3. Select CLI mode and then select the device type. The Change Mode CLI window opens.

  4. From the vManage mode pane, select the device and click the right arrow to move the device to the CLI mode pane.

  5. Click Update to CLI Mode.

An SSH window opens. To log in to the device, enter a username and password. You can then issue CLI commands to configure or monitor the device.

Upload WAN Edge Router Authorized Serial Number File

The WAN Edge router authorized serial number file contains the chassis and serial numbers of all valid Cisco vEdge deviceCisco IOS XE SD-WAN devices in the overlay network. You retrieve a serial number file from the Cisco Plug-and-Play (PnP) portal and upload it to the vManage NMS. Then, from the vManage NMS, you send it to the controllers in the network. This file is required to allow the Cisco SD-WAN overlay network components to validate and authenticate each other and thus to allow the overlay network to become operational.

To upload the WAN edge router authorized serial number file to the vManage NMS and then download it to all the controllers in the overlay network:

  1. In the WAN Edge List tab, click Upload WAN Edge List.

  2. In the Upload WAN Edge List window:

    1. Click Choose File and select the WAN edge router authorized serial number file you received from Cisco SD-WAN.

    2. To automatically validate the routers and send their chassis and serial numbers to the controllers, ensure that the checkbox Validate the Uploaded WAN Edge List and Send to Controllers is selected. (It is selected by default.) If you do not select this option, you must individually validate each router in Configuration ► Certificates ► WAN Edge List.

    3. Click Upload.

A list of routers in the network is displayed in the router table, with details about each router.

Upload WAN Edge Router Serial Numbers from Cisco Smart Account

Chassis and serial numbers of all valid Cisco vEdge deviceCisco IOS XE SD-WAN devices in the overlay network are required to allow the Cisco SD-WAN overlay network components to validate and authenticate each other and thus to allow the overlay network to become operational.

To upload the WAN edge router authorized serial numbers from a Cisco Smart account to the vManage NMS and then download it to all the controllers in the overlay network:

  1. In the WAN Edge List tab, click Sync Smart Account.

  2. In the Sync Smart Account window:

    1. Enter the username and password for your Smart account..

    2. To automatically validate the routers and send their chassis and serial numbers to the controllers, ensure that the checkbox Validate the Uploaded WAN Edge List and Send to Controllers is selected. (It is selected by default.) If you do not select this option, you must individually validate each router in Configuration ► Certificates ► WAN Edge List.

    3. Click Sync.

A list of routers in the network is displayed in the router table, with details about each router.

Generate Bootstrap Configuration for a vEdge Cloud Router

For vEdge Cloud routers, you need to generate a bootstrap configuration file that you use when you create vEdge cloud VM instances.

To generate and download a bootstrap configuration for one or more vEdge Cloud routers:

  1. In the WAN Edge List tab, click the Export Bootstrap Configuration button.

  2. In the Export Bootstrap Configuration window, in the Bootstrap Configuration field, click Cloud-Init or Encoded String, depending the Hypervisor you are using to bring up the vEdge Cloud router.

  3. Select the devices to configure from the Available Devices pane, or click Select All to select all devices.

  4. Click the right arrow to move the devices to the Selected Devices pane.

  5. Click Generate Configuration. The configurations are downloaded to the vManage NMS.

  6. Provision the vEdge Cloud router instance in AWS, KVM, or ESXi with the boostrap configuration. By default, ge0/0 is the device's tunnel interface and is a DHCP client. To use an interface other than ge0/0 as the tunnel interface or to use a static IP as the IP address, reconfigure the device through the CLI. For more information about configuring interfaces, see Configure Network Interfaces.

After you provision the vEdge Cloud router instance, vManage NMS installs a certificate on the device and the device's token changes to a serial number. After the device's control connections to vManage NMS come up, any templates attached to the device are automatically pushed to the device.

Export Device Data in CSV Format

In an overlay network, you might have multiple devices of the same type that have identical or effectively identical configurations. For example, in a network with redundant Cisco vSmart Controllers, each controller must be configured with identical policies. Another example is a network with Cisco vEdge deviceCisco IOS XE SD-WAN devices at multiple sites, where each Cisco vEdge deviceCisco IOS XE SD-WAN device is providing identical services at each site.

Because the configurations for these devices are essentially identical, you can create one set of feature templates, which you then consolidate into one device template that you use to configure all the devices. You can create an Excel file in CSV format that lists the variables and defines each device specific variable value for each device. Then you can load the file when you attach a device template to a device.

To export data for all devices to a file in CSV format, click the Export icon. This icon, which is a downward-pointing arrow, is located to the right of the filter criteria both in the WAN Edge List and in the Controllers tab.

vManage NMS downloads all data from the device table to an Excel file in CSV format.

View and Copy Device Configuration

View a Device's Running Configuration

Running configuration is configuration information that vManage obtains from the memory of a device. This information can be useful for troubleshooting.

To view a device's running configuration:

  1. In the WAN Edge List or Controllers tab, select the device.

  2. Click the More Actions icon to the right of the row and click Running Configuration.

View a Device's Local Configuration

Local configuration is configuration that vManage has stored for a device. This information can be useful for troubleshooting or for determining how to access a device if, for example, a device is not reachable from vManage.

To view a device's local configuration created using Configuration ► Templates:

  1. In the WAN Edge List or Controllers tab, select the device.

  2. Click the More Actions icon to the right of the row and click Local Configuration.

Copy Router Configuration

When you are replacing one router at a site with another router, you copy the old router's configuration to the new router. Then you remove the old router from the network and add the new one.

To copy the configuration from the old router to the new router:

  1. In the Configuration ► Certificates screen, mark the new Cisco vEdge deviceCisco IOS XE SD-WAN device as invalid.

  2. In the Configuration ► Devices screen, in the WAN Edge List tab, select the old router.

  3. Click the More Actions icon to the right of the row and click Copy Configuration.

  4. In the Copy Configuration window, select the new router.

  5. Click Update to confirm the copy of the configuration.

After you have copied the configuration to the new router, you can add the new router to the network. First, delete the old router from the network, as described below. Then add the new router to the network:

  1. In the Configuration ► Certificates screen, mark the new router as valid.

  2. Click Send to Controller.

Delete a WAN Edge Router

Deleting a router removes its serial and chassis numbers from the WAN edge router serial number list and permanently removes the router's configuration from the vManage NMS. Delete a router if you need to remove it from your deployment.

  1. In the Configuration ► Certificates screen, mark the WAN Edge router as invalid.

  2. In the Configuration ► Devices screen, in the WAN Edge List tab, select the router.

  3. Click the More Actions icon to the right of the row and click Delete WAN Edge.

  4. Click OK to confirm deletion of the device.

  5. In the Configuration ► Certificates screen, click Send to Controller.

Decommission a vEdge Cloud router

Decommissioning a vEdge Cloud router removes the device's serial number from vManage NMS and generates a new token for the device. To do so:

  1. In the WAN Edge List tab, select a vEdge Cloud router.

  2. Click the More Actions icon to the right of the row and click Decommission WAN Edge.

  3. Click OK to confirm the decommissioning of the router.

View Template Log and Device Bringup

View Log of Template Activities

A log of template activities contains information that relates to creating, editing, and deleting configuration templates, and the status of attaching configuration templates to devices. This information can be useful for troubleshooting.

To view a log of template activities:

  1. In the WAN Edge List or Controllers tab, select the device.

  2. Click the More Actions icon to the right of the row and click Template Log.

View Status of Device Bringup

You can view the status of the operations involved in bringing a router or controller up in the overlay network. This information can help you monitor these operations.

To view the status of a device bringup:

  1. In the WAN Edge List or Controllers tab, select the device.

  2. Click the More Actions icon to the right of the row and click Device Bring Up.

Add a Cisco vBond Orchestrator

A Cisco vBond Orchestrator automatically orchestrates connectivity between Cisco vEdge deviceCisco IOS XE SD-WAN devices and vManage controllers. If any Cisco vEdge deviceCisco IOS XE SD-WAN device or Cisco vSmart Controller is behind a NAT, the Cisco vBond Orchestrator also serves as an initial NAT-traversal orchestrator. To add a Cisco vBond Orchestrator:

  1. In the Controllers tab, click the Add Controller drop-down and select vBond.

  2. In the Add vBond window:

    1. Enter the management IP address of the vBond controller.

    2. Enter the username and password to access the vBond orchestrator.

    3. Select the Generate CSR checkbox to allow the certificate-generation process to occur automatically.

    4. Click Add.

  3. Repeat Steps 1 and 2 to add additional Cisco vBond Orchestrators.

The new Cisco vBond Orchestrator is added to the list of controllers in the Controllers screen.

Configure Cisco vSmart Controllers

Add a vSmart Controller

After the Cisco vBond Orchestrator authenticates Cisco vEdge deviceCisco IOS XE SD-WAN devices, the Cisco vBond Orchestrator provides Cisco vEdge deviceCisco IOS XE SD-WAN devices information that they need to connect to the Cisco vSmart Controller. A Cisco vSmart Controller controls the flow of data traffic throughout the network via data and app-route policies. To configure Cisco vSmart Controllers:

  1. In the Controllers tab, click the Add Controller drop-down and select vSmart.

  2. In the Add vSmart window:

    1. Enter the system IP address of the Cisco vSmart Controller.

    2. Enter the username and password to access the Cisco vSmart Controller.

    3. Select the protocol to use for control-plane connections. The default is DTLS. The DTLS (Datagram Transport Layer Security) protocol is designed to provide security for UDP communications.

    4. If you select TLS, enter the port number to use for TLS connections. The default is 23456.

      The TLS (Transport Socket Layer) protocol that provides communications security over a network.
    5. Select the Generate CSR checkbox to allow the certificate-generation process to occur automatically.

    6. Click Add.

  3. Repeat Steps 1 and 2 to add additional Cisco vSmart Controllers. The vManage NMS can support up to 20 Cisco vSmart Controllers in the network.

The new Cisco vSmart Controller is added to the list of controllers in the Controllers screen.

Edit Controller Details

Editing controller details lets you update the IP address and login credentials of a controller device. To edit controller details:

  1. In the Controllers tab, select the controller.

  2. Click the More Actions icon to the right of the row and click Edit.

  3. In the Edit window, edit the IP address and the login credentials.

  4. Click Save.

Delete a Controller

Deleting a controller removes it from the overlay. Delete a controller it if you are replacing it or if you no longer need it in your network.

To delete a controller:

  1. In the Controllers tab, select the controller.

  2. Click the More Actions icon to the right of the row and click Invalidate.

  3. Click OK to confirm the removal of the device and all its control connections.

Configure Reverse Proxy on Controllers

To configure reverse proxy on an individual vManage NMS and Cisco vSmart Controller:

  1. In the Controllers tab, select the device.

  2. Click the More Actions icon to the right of the row, and click Add Reverse Proxy. The Add Reverse Proxy popup is displayed.

  3. Click Add Reverse Proxy.

  4. Configure the private IP address and port number for the device. The private IP address is the IP address of the transport interface in VPN 0. The default port number is 12346. This is the port used to establish the connections that handle control and traffic in the overlay network.

  5. Configure the proxy IP address and port number for the device, to create the mapping between the private and public IP addresses and port numbers.

  6. If the vManage NMS or Cisco vSmart Controller has multiple cores, repeat Steps 4 and 5 for each core.

  7. Click Add.

To enable reverse proxy in the overlay network, in vManage NMS select Administration ► Settings. Then click Edit to the right of the Reverse Proxy bar, click Enabled, and click Save.

Configure Cisco IOS XE SD-WAN Devices as TLS Proxy

High-level Steps for Configuring a Device as TLS Proxy

  1. Configure certificate authority (CA) for the TLS proxy: Enterprise CA, vManage as CA, or vManage as Intermediate CA.

  2. The next step differs based on the CA option you configure. See the task flows in the following section for Enterprise CA, and vManage as CA and vManage as Intermediate CA.

  3. Create and attach SSL decryption security policy to the device.

Task Flow: Set up TLS Proxy with Enterprise CA

If you configure Enterprise CA to enable TLS proxy on your devices, go through the following steps to complete the TLS proxy setup.

Figure 1. Use Enterprise CA to Configure TLS Proxy on a Device

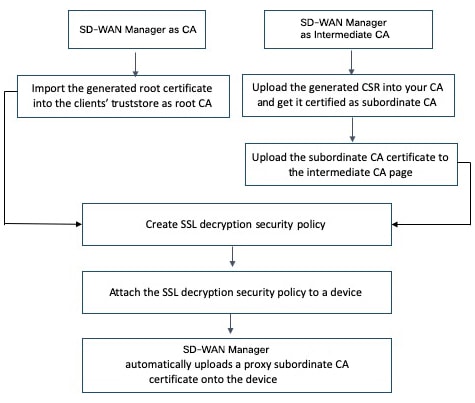
Task Flow: of Set Up TLS Proxy with vManage as CA or vManage as Intermediate CA

If you configure up vManage as CA or vManage as Intermediate CA to enable TLS proxy on your devices, go through the following steps to complete the TLS proxy setup.

Figure 2. Use vManage as CA or vManage as Intermediate CA to Configure TLS Proxy on a Device

The subsequent topics provide a step-by-step procedure to complete the configuration of a Cisco IOS XE SD-WAN device as SSL/TLS Proxy.

Configure Enterprise CA

Configure Enterprise CA to issue subordinate CA certificates to the proxy device at the edge of the network.

Prerequisites to Set up CA for SSL/TLS Proxy

To be able to configure CA certificates, the CA server and the device seeking the certificate must have their time synchronized. See Configure NTP to learn how to coordinate and synchronize time across all devices in the Cisco SD-WAN overlay network.

Configure Enterprise CA

  1. Download a CA certificate from your CA server in PEM or Base 64 format.

  2. In Cisco vManage, go to Configuration > TLS/SSL Proxy.

  3. Select Enterprise CA.

  4. [Optional, but recommended] Select the Simple Certificate Enrollment Protocol (SCEP) check-box.

    1. Enter the SCEP server URL in the URL Base field.

    2. [Optional] Enter the Challenge Password/Phrase if you have one configured.


    Note

    If Enterprise CA is configured with SCEP, the Enterprise SCEP CA server should be reachable from transport VPN (VPN 0).


  5. Upload your PEM-encoded CA certificate by clicking the Select a file option next to Root Certificates.

    OR

    Paste the CA certificate in the Root Certificates Box.

  6. Verify that the fingerprint, which auto-populates after you upload the certificate, matches your CA.

  7. Click Save Certificate Authority.


    Note

    This step concludes configuring enterprise CA. However, you must complete steps 8, 9, and 10 to complete setting up the device as TLS proxy.


  8. Configure a security policy with SSL decryption enabled

  9. Attach the policy to the device that you want to set as SSL proxy.

  10. Upload a Subordinate CA Certificate to TLS Proxy

Configure Cisco vManage as CA

Configure vManage as CA to issue subordinate CA certificates to the proxy device at the edge of the network.

Use the vManage as CA option if your enterprise doesn’t have an internal CA. With this option, Cisco vManage is used as a root CA and is authorized to issue subordinate CAs to the proxy devices at the edge of the network. The certificates issued by vManage as CA can be managed through Cisco vManage.

Prerequisites to Set up CA for SSL/TLS Proxy

To be able to configure CA certificates, the CA server and the device seeking the certificate must have their time synchronized. See Configure NTP to learn how to coordinate and synchronize time across all devices in the Cisco SD-WAN overlay network.

  1. In Cisco vManage, go to Configuration > TLS/SSL Proxy.

  2. Select vManage as CA.


    Note

    Leave the Set vManage as Intermediate CA check-box unselected if you want to set vManage as CA.


  3. Enter the requested details: Common Name, Organization, Organizational Unit, Locality, State/Province, Country Code, and Email.

  4. Select the certificate validity period from the drop-down list.

  5. Click Save Certificate Authority.

  6. Click the Download option on the vManage as CA page to download the root certificate generated.

  7. Import the downloaded certificate into your client's trustStore as a trusted root CA.


    Note

    This step concludes configuring Cisco vManage as CA. However, you must complete steps 8, 9, and 10 to complete setting up a device as TLS proxy.


  8. Configure TLS/SSL Decryption security policy.

  9. Configure a security policy with SSL decryption enabled

  10. Attach the policy to the device that you want to set as SSL proxy.

    When TLS/SSL decryption is applied to a Cisco IOS XE SD-WAN device, Cisco vManage automatically issues a subordinate CA for the proxy and imports it to the device.

Configure vManage as Intermediate CA

Configure vManage as Intermediate CA to enable a TLS proxy device to use subordinate CA certificates issued by Cisco vManage.

When Cisco vManage is set as intermediate CA, your enterprise CA acts as the root CA and Cisco vManage is designated as the preferred intermediate CA to issue and manage subordinate CA certificates for a proxy device. This option is suitable for enterprises that have their own internal CA but would like to use Cisco vManage to automate and manage certificate issuance and renewal.

  1. In Cisco vManage, go to Configuration > TLS/SSL Proxy.

  2. Select vManage as CA.

  3. Select the Set vManage as Intermediate CA check-box.

  4. Upload the CA certificate using the Select a file option.

    OR

    Paste the content of the PEM-encoded CA certificate file in the Root Certificate text box.

  5. Click Next.

  6. Under the Generate CSR area, enter the requested details, and click Generate CSR.

    The CSR field on the screen populates with the Certificate Signing Request (CSR).

  7. Copy or download the CSR and upload it to the enterprise CA server to get it signed by the CA server as the subordinate CA certificate.


    Note

    The process to get a CSR signed by a CA server may differ from one CA to another. Follow your standard procedure to get a CSR signed by your CA.


  8. Click Next.

  9. In the Intermediate Certificate text box, paste the content of the signed Cisco vManage certificate, and click Upload.

    OR

    Click the Select a file option and upload the CSR generated in the previous step, and click Upload.

  10. Verify that the finger print, which auto-populates after you upload the CSR, matches your CA certificate.

  11. Click Save Certificate Authority.


    Note

    This step concludes configuring Cisco vManage as intermediate CA. However, you must complete steps 12 and 13 to complete the configuration for setting up a device as TLS proxy.


  12. Configure a security policy with SSL decryption enabled

  13. Attach the policy to the device that you want to set as SSL proxy.

    When the SSL/TLS decryption security policy is attached to the device, Cisco vManage automatically issues a subordinate, proxy CA certificate and imports it on the device.

Configure SSL Decryption

The SSL decryption policy provides the following ways to divert traffic for decryption:

  • Network-based rules: Diverts traffic on the basis of the source or destination IP address, port, VPNs, and application.

  • URL-based rules: Decide whether to decrypt based on the URL category or reputation of the URL.The decision is made based on the Client Hello packet.

For URL-based rules, note the following:

  • You can set blacklisted URLs to always be decrypted

  • You can set whitelisted URLs to never be decrypted.

  • If a URL lookup to the cloud takes too long, the user can set one of the following:

    • Decrypt the traffic

    • Skip decryption for this traffic temporarily

To configure SSL decryption through a security policy, use the vManage security configuration wizard:

  1. In Cisco vManage, select the Configuration > Security tab in the left side panel.

  2. Click Add Security Policy. The Add Security Policy wizard opens, and various use-case scenarios are displayed.

  3. In Add Security Policy, select a scenario that supports the TLS/SSL Decryption feature (Compliance, Guest Access, Direct Cloud Access, Direct Internet Access, or Custom).

  4. Click Proceed to add an SSL decryption policy in the wizard.

    • If this is the first time you're creating a TLS/SSL decryption policy, then you must create and apply a policy to the device before creating security policies that can use a security policy (such as Intrusion Prevention, URL Filtering, or Advanced Malware Protection). In the Add Security Policy wizard, click Next until the TLS/SSL Decryption screen is displayed.

    • If you want to use TLS/SSL decryption along with other security features such as Intrusion Prevention, URL Filtering, or Advanced Malware Protection, add those features as described in this book. Once you've configured those features, click Next until the TLS/SSL Decryption screen is displayed.

  5. Click the Add TLS/SSL Decryption Policy drop-down and choose Create New to create a new SSL decryption policy. The TLS/SSL Decryption Policy Configuration wizard appears.

  6. Ensure that SSL Decryption is Enabled.

  7. In the Policy Name field, enter the name of the policy.

  8. Click on Add Rule to create a rule.

    The New Decryption Rule window is displayed.


    Note

    For branch-to-branch and branch-to-data center traffic scenarios that support service nodes, the SSL decryption security policy must be applied in a way that prevents the SSL flow from being inspected on both the devices.


  9. Select the order for the rule that you want to create.

  10. In the Name field, enter the name of the rule.

  11. You can choose to decrypt traffic based on source / destination which is similar to the firewall rules or applications which is similar to URL-Filtering rules.

    • If you select Source / Destination, enter any of the following conditions:

      • Source VPNs

      • Source Networks

      • Source Ports

      • Destination VPNs

      • Destination Networks

      • Destination Port

      • Application/Application Family List

    • If you select URLs, enter the following:

      • VPNs

      • TLS/SSL profile.

        1. Enter a name for the profile.

        2. Select Decrypt, No Decrypt or Pass Through. Alternatively, you can select multiple categories and set the action for all of them using the actions drop-down.

  12. (Optional) To configure advanced settings such as server certificate checks, minimum TLS version, and so on, expand Advanced Settings


    Note

    By default, vManage configures the default values for each advanced setting. If you change any of these settings, it may affect the behaviour of the decryption security policies.


    • Under the Server Certificate Checks section, you can configure the following:

      Field Name

      Description

      Options

      Expired Certificate

      Defines what the policy should do if the server certificate is expired

      • Drop the traffic

      • Decrypt the traffic

      Untrusted Certificate

      Defines what the policy should do if the server certificate is not trusted

      • Drop the traffic

      • Decrypt the traffic

      Certificate Revocation Status

      Defines whether Online Certificate Status Protocol (OCSP) should be used to check the revocation status of the server certificate

      Enabled or Disabled

      Unknown Revocation Status

      Defines what the policy should do, if the OCSP revocation status is unknown

      • Drop the traffic

      • Decrypt the traffic

    • Under the Proxy Certificate Attributes section, you can configure the following:

      Field Name

      Description

      Options

      RSA Keypair Modules

      Defines the Proxy Certificate RSA Key modulus

      • 1024 bit RSA

      • 2048 bit RSA

      • 4096 bit RSA

      Certificate Lifetime (in Days)

      Sets the lifetime of the proxy certificate in days.

      Minimum TLS Version Revocation Status

      Sets the minimum version of TLS that the proxy should support.

      • TLS 1.0

      • TLS 1.1

      • TLS 1.2

    • Under the Unsupported Mode Checks section, you can configure the following:

      Field Name

      Description

      Options

      Unsupported Protocol Versions

      Defines what the policy should do if an unsupported protocol version is detected.

      • Drop the traffic

      • No Decrypt: The proxy does not decrypt this traffic.

      Unsupported Cipher Suites

      Defines what the policy should do if unsupported cipher suites are detected.

      • Drop the traffic

      • No Decrypt: The proxy does not decrypt this traffic.

      Failure Mode

      Defines what the policy should do in the case of a failure.

      • Close: Sets the mode as fail-close

      • Open: Sets the mode as fail-open.

      Certificate Bundle

      Defines whether the policy should use the default CA certificate bundle or not

      You can select or deselect this option. If you deselect this option, the Custom Certificate Bundle option appears and you must upload a certificate by clicking Select a file.

  13. Click Save TLS/SSL Decryption Policy.

  14. Click Next.

  15. Enter Security Policy Name and Security Policy Description in the respective fields.

  16. Click Save Policy to configure the Security policy.

  17. You can edit the existing SSL decryption policy by clicking on Custom Options in the right-side panel of the vManage > Configuration > Security wizard.

Apply a Security Policy to an XE SD-WAN Router

  1. In vManage NMS, select the Configuration > Templates screen.

  2. If you are creating a new device template:

    1. In the Device tab, click Create Template.

    2. From the Create Template drop-down, select From Feature Template.

    3. From the Device Model drop-down, select one of the XE SD-WAN Routers.

    4. In the Template Name field, enter a name for the device template. This field is mandatory and can contain only uppercase and lowercase letters, the digits 0 through 9, hyphens (–), and underscores (_). It cannot contain spaces or any other characters.

    5. In the Description field, enter a description for the device template. This field is mandatory, and it can contain any characters and spaces.

    6. Continue with Step 4.

  3. If you are editing an existing device template:

    1. In the Device tab, click the More Actions icon to the right of the desired template, and click the pencil icon.

    2. Click the Additional Templates tab. The screen scrolls to the Additional Templates section.

    3. From the Policy drop-down, select the name of a policy that you have configured.

  4. Click the Additional Templates tab located directly beneath the Description field. The screen scrolls to the Additional Templates section.

  5. From the Security Policy drop-down, select the name of the security policy you configured in the above procedure.

  6. Click Create (for a new template) or Update (for an existing template).

Upload a Subordinate CA Certificate to TLS Proxy


Note

This procedure is applicable only if you configure the Enterprise CA for TLS proxy.

Prerequisites to Generate a CSR from the TLS Proxy Device

  1. Configure Enterprise CA

  2. Configure SSL decryption

  3. Apply the security policy to an XE SD-WAN device

Generate CSR and Upload Subordinate CA Certificate to TLS Proxy

  1. In Cisco vManage, navigate to Configuration > Certificates.

  2. Select TLS Proxy. The page shows a list of devices on which a CA certificate has been installed and the status of the certificates.

  3. Select the device for which you want to generate CSR and click Download CSR at the top of the page.

    A pop-up window opens. You can copy or download the CSR. Ensure that the certificate that you request is downloaded in PEM format.

  4. On your CA server, request a certificate and upload or paste the CSR file you generated in the previous step.

  5. Download the certificate issued by your CA in PEM format.


    Important

    Ensure that the certificate you generate is a subordinate or an intermediate CA certificate. The procedure to generate a subordinate CA certificate may differ from one enterprise CA to another. The certificate generated in this step must have its constraint set as CA: TRUE.

    Cisco IOS CA can’t be used for the TLS proxy feature as it doesn’t support generating a certificate with the constraint set as CA: TRUE.


  6. Repeat steps 1 and 2.

  7. Select the device and click Upload Certificate at the top of the page.

  8. In the pop-up window that opens, upload or paste the PEM-encoded certificate that you generated from your CA server in step 5.

  9. Click Upload and Save.

  10. Verify that the certificate is installed on the device by running the command show crypto pki trustpoint PROXY-SIGNING-CA status on your device CLI.

    Device#show crypto pki trustpoint PROXY-SIGNING-CA status
    Trustpoint PROXY-SIGNING-CA:
      Issuing CA certificate configured:
        Subject Name:
         e=appqoe@cisco.com,cn=server-name,ou=AppQoE,o=CISCO,l=Blr,st=KA,c=IN
        Fingerprint MD5: 755C9485 DDACC0BD B5ED93E6 4E8A7DEB 
        Fingerprint SHA1: 4D4380EA 07392044 6A5BF891 938AC610 C0C0AA6D 
      Router General Purpose certificate configured:
        Subject Name:
         cn=sign
        Fingerprint MD5: 1956194E FEC057A3 8FE5BFA5 DD84662B 
        Fingerprint SHA1: 864A8126 EBC780E2 D958AD86 93CB8923 3EF3B7FF 
      State:
        Keys generated ............. Yes (General Purpose, non-exportable)
        Issuing CA authenticated ....... Yes
        Certificate request(s) ..... Yes
    

Enterprise Certificates

In the Cisco IOS XE SD-WAN Release 16.11.1 and Cisco SD-WAN Release 19.1, enterprise certificates were introduced. Enterprise certificates replace the controller certificates authorization that were used previously.


Note

When using enterprise certificates for Cisco SD-WAN devices and controllers, make sure to use root certificates with a RSA key that is at least 2048 bit.

Note

For purposes of certificate management, the term controller is used to collectively refer to the vManage NMS, the vSmart controller, and the vBond orchestrator.

Use the Certificates screen to manage certificates and authenticate WAN edge and controller devices in the overlay network.

Two components of the Cisco SD-WAN solution provide device authentication:

  • Signed certificates are used to authenticate devices in the overlay network. Once authenticated, devices can establish secure sessions between each other. It is from the vManage NMS that you generate these certificates and install them on the controller devices—vManage NMSs, vBond orchestrators, and vSmart controllers.

  • WAN edge authorized serial number file contains the serial numbers of all valid vEdge and WAN routers in your network. You receive this file from Cisco SD-WAN, mark each router as valid or invalid, and then from the vManage NMS, send the file to the controller devices in the network.

You must install the certificates and the WAN edge authorized serial number file on the controller devices to allow the Cisco SD-WAN overlay network components to validate and authenticate each other and thus to allow the overlay network to become operational.

Screen Elements

  • Top bar—On the left are the menu icon, for expanding and collapsing the vManage menu, and the vManage product name. On the right are a number of icons and the user profile drop-down.

  • Title bar—Includes the title of the screen, Certificates.

  • WAN Edge List tab—Install the router authorized serial number file on the controllers in the overlay network and manage the serial numbers in the file. When you first open the Certificates screen, the WAN Edge List tab is selected.

    • Send to Controllers—Send the WAN edge router chassis and serial numbers to the controllers in the network.

    • Table of WAN edge routers in the overlay network—To re-arrange the columns, drag the column title to the desired position.

  • Controllers tab—Install certificates and download the device serial numbers to the vBond orchestrator.

    • Send to vBond—Send the controller serial numbers to the vBond orchestrator.

    • Install Certificate—Install the signed certificates on the controller devices. This button is available only if you select Manual in Administration > Settings > Certificate Signing by Symantec.

    • Export Root Certificate—Display a copy of the root certificate for the controller devices that you can download to a file.

    • Table of controller devices in the overlay network—To re-arrange the columns, drag the column title to the desired position.

    • Certificate status bar—Located at the bottom of the screen, this bar is available only if you select Server Automated in Administration > Settings > Certificate Authorization. It displays the states of the certificate installation process:

      • Device Added

      • Generate CSR

      • Waiting for Certificate

      • Send to Controllers

    A green check mark indicates that the step has been completed. A grey check mark indicates that the step has not yet been performed.
  • Search box—Includes the Search Options drop-down, for a Contains or Match string.

  • Refresh icon—Click to refresh data in the device table with the most current data.

  • Export icon—Click to download all data to a file, in CSV format.

  • Show Table Fields icon—Click the icon to display or hide columns from the device table. By default, all columns are displayed.

​​​​​​​

Check the WAN Edge Router Certificate Status

In the WAN Edge List tab, check the Validate column. The status can be one of the following:

  • Valid (shown in green)—The router's certificate is valid.

  • Staging (shown in yellow)—The router is in the staging state.

  • Invalid (shown in red)—The router's certificate is not valid.

Validate a WAN Edge Router

Before you begin, ensure that you have uploaded the vEdge serial number file to the vManage NMS.

When you add vEdge and WAN routers to the network using the Configuration > Devices screen, you can automatically validate the routers and send their chassis and serial numbers to the controller devices by clicking the checkbox Validate the uploaded WAN Edge List and send to controllers. If you do not select this option, you must individually validate each router and send their chassis and serial numbers to the controller devices. To do so:

  1. In the WAN Edge List tab, select the router to validate.

  2. In the Validate column, click Valid.

  3. Click OK to confirm the move to the valid state.

  4. Repeat Steps 1-3 for each router you wish to validate.

  5. Click the Send to Controllers button in the upper left corner of the screen to send the chassis and serial numbers of the validated routers to the controller devices in the network. vManage NMS displays the Push WAN Edge List screen showing the status of the push operation.

Stage a WAN Edge Router

When you initially bring up and configure a WAN Edge router, you can place it in staging state using the vManage NMS. When the router is in this state, you can configure the router, and you can test that the router is able to establish operational connections with the vSmart controller and the vManage NMS.

After you physically place the router at its production site, you change the router's state from staging to valid. It is only at this point that the router joins the actual production network. To stage a router:

  1. In the WAN Edge List tab, select the router to stage.

  2. In the Validate column, click Staging.

  3. Click OK to confirm the move to the staging state.

  4. Click Send to Controllers in the upper left corner of the screen to sync the WAN edge authorized serial number file with the controllers. vManage NMS displays the Push WAN Edge List screen showing the status of the push operation.

  5. To unstage, validate the WAN Edge Router.

Invalidate a WAN Edge Router

  1. In the WAN Edge List tab, select the router to invalidate.

  2. In the Validate column, click Invalid.

  3. Click OK to confirm the move to the invalid state.

  4. Repeat Steps 1-3 for each router you wish to invalidate.

  5. Click the Send to Controllers button in the upper left corner of the screen to send the chassis and serial numbers of the validated routers to the controller devices in the network. vManage NMS displays the Push WAN Edge List screen showing the status of the push operation.

Send the Controller Serial Numbers to vBond Orchestrator

To determine which controllers in the overlay network are valid, the vBond orchestrator keeps a list of the controller serial numbers. The vManage NMS learns these serial numbers during the certificate-generation process.

To send the controller serial numbers to the vBond orchestrator:

  1. In the Controllers tab, check the certificate status bar at the bottom of the screen. If the Send to Controllers check mark is green, all serial numbers have already been sent to the vBond orchestrator. If it is grey, you can send one or more serial numbers to the vBond orchestrator.

  2. Click the Send to vBond button in the Controllers tab. A controller's serial number is sent only once to the vBond orchestrator. If all serial numbers have been sent, when you click the Send to vBond button, an error message is displayed. To resend a controller's serial number, you must first select the device and then select Invalid in the Validity column.

After the serial numbers have been sent, click the Tasks icon in the vManage toolbar to display a log of the file download and other recent activities.

Install Signed Certificate

If in Administration > Settings > Certificate Signing by Symantec, you selected the Manual option for the certificate-generation process, use the Install Certificate button to manually install certificates on the controller devices.

After Symantec or your enterprise root CA has signed the certificates, they return the files containing the individual signed certificates. Place them on a server in your local network. Then install them on each controller:

  1. In the Controllers tab, click the Install Certificate button.

  2. In the Install Certificate window, select a file, or copy and paste the certificate text.

  3. Click Install to install the certificate on the device. The certificate contains information that identifies the controller, so you do not need to select the device on which to install the certificate.

  4. Repeat Steps 1-3 to install additional certificates.

Export Root Certificate

  1. In the Controllers tab, click the Export Root Certificate button.

  2. In the Export Root Certificate window, click Download to export the root certificate to a file.

  3. Click Close.

View CSR

  1. In the WAN Edge List or Controllers tab, select a device.

  2. Click the More Actions icon to the right of the row, and click View CSR to view the certificate signing request (CSR).

View Device CSR

  1. In the WAN Edge List or Controllers tab, select a Cisco IOS XE SD-WAN device.

  2. Click the More Actions icon to the right of the row, and click View Device CSR to view the certificate signing request (CSR).

    For a Cisco IOS XE SD-WAN device where trustpoint has been configured, clicking the More Actions icon allows you to view three options:

    • View Device CSR

    • Generate Feature CSR

    • View Feature CSR

View the Certificate

  1. In the Controllers tab, select a device.

  2. Click the More Actions icon to the right of the row and click View Certificate.

Generate the CSR

  1. In the Controllers tab, select a device.

  2. Click the More Actions icon to the right of the row and click Generate CSR.

  3. In the Generate CSR window, click Download to download the file to your local PC (that is, to the PC you are using to connect to the vManage NMS).

  4. Repeat Steps 1-4 for each controller for which you are generating a CSR.

Generate Feature CSR

  1. In the WAN Edge List tab, choose a Cisco IOS XE SD-WAN device.

  2. Click the More Actions icon to the right of the row and click Generate Feature CSR.

  3. In the Generate Feature CSR window, click OK to continue with the generation of feature CSR. This step authenticates the device trustpoint that has been set and extracts the CSR from the device.

  4. Repeat steps 1-3 for each device for which you are generating a CSR.

Reset the RSA Key Pair

  1. In the Controllers tab, select a device.

  2. Click the More Actions icon to the right of the row and click Reset RSA.

  3. Click OK to confirm resetting of the device's RSA key and to generate a new CSR with new public or private keys.

Invalidate a Device

  1. In the Controllers tab, select a device.

  2. Click the More Actions icon to the right of the row and click Invalidate.

  3. Click OK to confirm invalidation of the device.

View Log of Certificate Activities

To view the status of certificate-related activities:

  1. Click the Tasks icon located in the vManage toolbar. vManage NMS displays a list of all running tasks along with the total number of successes and failures.

  2. Click a row to see details of a task. vManage NMS opens a status window displaying the status of the task and details of the device on which the task was performed.

Configuring WAN Edge Certificates for Hardware

Feature Name

Release Information

Description

Support for Secondary Organizational Unit

Cisco IOS XE Release Amsterdam 17.2.1r

Cisco SD-WAN Release 20.1.1

This optional feature allows you to configure a secondary organizational unit when configuring the certificates. If specified, this setting is applied to all controllers and edge devices.

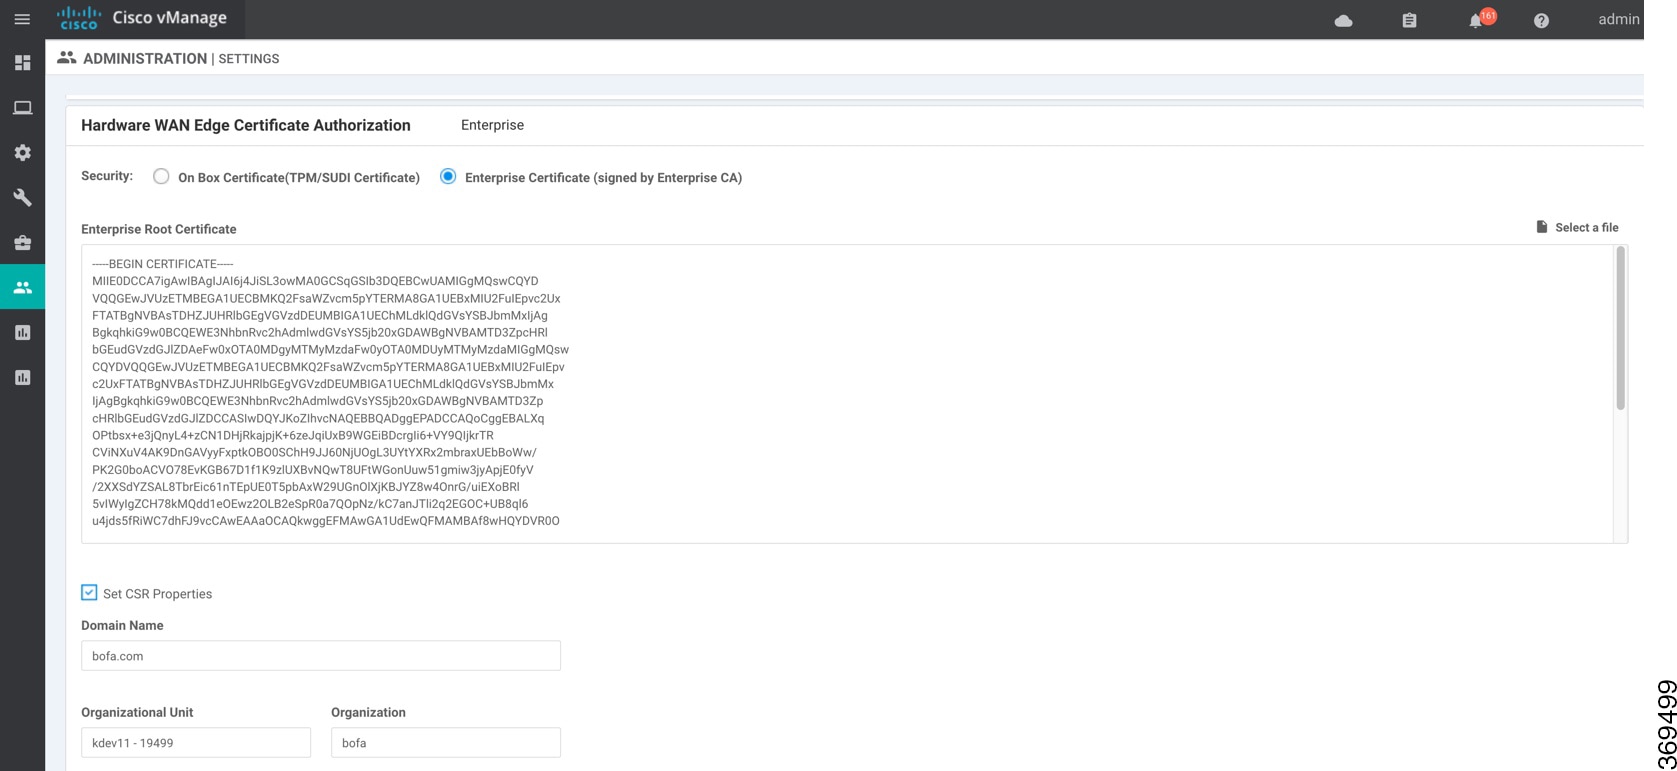
Enterprise certificates allow organizations to use their own private certificate signing authority rather than having to rely on public certificate signing authorities. You can also apply custom certificate properties using the Set CSR Properties field.


Note

In the 16.11/19.1 release, enterprise certificates were introduced. Enterprise certificates replace the controller certificates authorization that were used previously. An independent organization handles the signing of enterprise certificates.


Use the Configuration > Certificates screen to manage certificates and authenticate WAN edge and controller devices in the overlay network.

Two components of the Cisco SD-WAN solution provide device authentication:

  • Signed certificates are used to authenticate devices in the overlay network. Once authenticated, devices can establish secure sessions between each other. It is from the vManage NMS that you generate these certificates and install them on the controller devices—vManage NMSs, vBond orchestrators, and vSmart controllers.

  • WAN edge authorized serial number file contains the serial numbers of all valid vEdge and WAN routers in your network. You receive this file from Cisco Plug and Play (PnP), mark each router as valid or invalid, and then from the vManage NMS, send the file to the controller devices in the network.

You must install the certificates and the WAN edge authorized serial number file on the controller devices to allow the Cisco SD-WAN overlay network components to validate and authenticate each other and thus to allow the overlay network to become operational.


Note

For purposes of certificate management, the term controller is used to collectively refer to the vManage NMS, the vSmart controller, and the vBond orchestrator.

Once you reset a WAN edge device, you have to install the enterprise root certificate manually on the device. If you perform an upgrade, your certificate is retained.


Note

vManage supports only Base 64 encoded certificates. Other formats such as DER encoded are not supported.

For example, the PEM extension is used for different types of X.509v3 files that contain ASCII (Base64) armored data prefixed with a --BEGIN ... line.


Enterprise Certificate Supported Devices

The following are the supported enterprise supported devices.

Device

Supported

vManage

Yes

vBond

Yes

vSmarts

Yes

Edges

All hardware WAN edges

vEdge/IOS-XE-SD-WAN except ASR1002-X, ISRv, CSR1000v

Configuring Enterprise Certificates

  1. Navigate to Administration > Settings Hardware WAN Edge Certificate Authority and select Edit.

  2. Click Enterprise Certification (signed by Enterprise CA).

    Security: On Box Certificate(TPM/SUDI Certificate) is the default option.

  3. Click Set CSR Properties if you want to specify custom certificate properties. The following properties are listed under the CSR Properties checkbox.

    • Domain Name

    • Organizational Unit


      Note

      Organizational Unit is a noneditable field. Organization Unit needs to be the same as Organization Name on vManage.


    • Secondary Organization Unit: This optional field is only available in Cisco IOS XE Release 17.2 or Cisco SD-WAN Release 20.1.x and onwards. Note that if this optional field is specified, it will be applied to all controllers and edge devices.

    • Organization

    • City

    • State

    • Email

    • 2-Letter Country Code

  4. Chose Select a file to upload a root certificate authority file.

    The uploaded root certificate authority displays in the text box.

  5. Select Save.

  6. Navigate to Configuration > Devices.

  7. Select the Upload WAN Edge List tab.

  8. Browse to the location of the Cisco IOS XE SD-WAN devices and Cisco vEdge devices list and click Upload.

  9. At the Configuration > Certificates page, using the More options, select the appropriate action, View Enterprise CSR, View Enterprise Certificate, Renew Enterprise CSR, or Revoke Enterprise Certificate.

    • View Enterprise CSR (certificate signing request): Copy the CSR and sign it using the enterprise root certificate, and upload the signed certificate on vManage using the Install Certificate operation. vManage automatically discovers on which hardware edge the certificate needs to be installed on.

    • View Enterprise Certificate: Once the certificate is installed, you can see the installed certificate and download it.

    • Renew Enterprise CSR: In case you need to install a new certificate on the hardware device, you can use the Renew Enterprise CSR option. The Renew Enterprise CSR option generates the CSR. You can then view the certificate (View Enterprise CSR option) and install the certificate (Install Certificate option). This step flaps the control connections as a new serial number. You can see the new serial number and expiry data on the Configuration > Certificates page.

    • Revoke Enterprise Certificate: This option removes the enterprise certificate from the device and moves it back to prestaging. The device has only vBond and vManage controls up.

    For a Cisco IOS XE SD-WAN device, using the More options, select the appropriate action, View Feature CSR, View Feature Certificate, or Revoke Feature Certificate.

    • View Feature CSR:

      • Copy the CSR available from the Cisco IOS XE SD-WAN device.

      • Sign the certificate using the enterprise root certificate from a certifying authority.

      • Upload the signed certificate on Cisco vManage using the Install Feature Certificate operation.

        Cisco vManage automatically discovers on which hardware edge the certificate needs to be installed. After you install feature certificate, the option View Feature Certificate is available.

    • View Feature Certificate: After you install the feature certificate, you can view the feature certificate and download it.

    • Revoke Feature Certificate: This option removes the feature certificate or trustpoint information from the Cisco IOS XE SD-WAN device. After revoking a certificate, all actions against devices are not available. To view all actions for a device, ensure that you configure logging information of the device to a Transport Layer Security (TLS) profile with authentication type as server, and then configure back to mutual. Alternatively, to view the actions, reset Cisco IOS XE SD-WAN device to factory default configuration.

      To reset a device to factory default:

      • Click Configuration > Templates.

      • Create a device template with the factory-default template.

        The factory-default template is, Factory_Default_feature-name_Template. See Create a Device Template from Feature Templates for information about creating a device template with feature template.

  10. Select Install Certificate or Install Feature Certificate to upload the signed certificate.

    The certificate has to be a signed certificate. Initially, the state is CSR Generated.

    The state changes to Certificate Installed when successfully installed.

  11. At the Configuration > Certificates page, you can see enterprise certificate columns, including the device type, chassis-id, enterprise serial number, and enterprise certificate date.

Generating a Bootstrap Configuration

The on-site bootstrap process involves generating a bootstrap configuration file that loads from a bootable USB drive or from internal boot flash to a device that supports SD-WAN. When the device boots, it uses the information in the configuration file to come up on the network.

  1. If you need to generate a bootstrap configuration, use the Configuration > Devices page, and select Generate Bootstrap Configuration under More options.

Deleting a WAN Edge Device

Before deleting a WAN edge device, invalidate the device on the Configuration > Certificates page.

Using Controller Certificates with Cisco PKI

From software release 19.x and onwards, there is an option to use Cisco as the certificate authority (CA) instead of Symantec/Digicert for the controller certificates.

This section goes through the different deployment types, scanarios to administer, install, and troubleshoot controller certificates using Cisco public key infrastructure (PKI). Cisco PKI provides certificate management to support security protocols such IP Security (IPSec), secure shell (SSH), and secure socket layer (SSL).

The major difference between Symantec/Digicert and Cisco PKI certificates is that Cisco PKI certificates are linked to a customer's Smart Account (SA) and Virtual Account (VA) in Plug and Play (PnP) and do not require manual approval using a portal like Digicert. Each VA has a limit of 100 certificates; that is, each overlay has a limit of 100 certificates and once the certificate signing request (CSR) is generated, the approval and installation happens automatically if the vManage Settings are set correctly.

Devices are added and certificates are installed automatically from the Cisco PKI servers. There is no human intervention required to approve the certificate.

Supported Devices for Cisco PKI Certificates

The following are the supported devices for using Cisco PKI certificates.

Device

Support

vManage

Yes

vBond

Yes

vSmart

Yes

vEdges

No

Use Cases for Cisco PKI Controller Certificates

Use Case 1

Cisco-Hosted Cloud Overlays with Software Version 19.x and Above

Prerequisites

vManage and the controllers should all be running the same 19.x software version.

You can verify the software version for the new or expired overlays without having control connections using SSH.

  1. SSH to each of the controllers and the version should show during the SSH process.

  2. You do not need to actually have the credentials work, therefore you can run this on a controller where the credentials do not work.

    Repeat this process for all the controllers in the overlay to make sure.

  3. Customer Smart Account credentials need to be ready using either of the following methods:

    1. Email and request the customer contact from PnP trigger notifications to individually email you and provide the Smart Account credentials.

      or

    2. Email and request the customer contact to log on to vManage and add them. Also ensure that you ask the customer for their IPs to whitelist.

      Ensure that if asking the customer to provide their customer contact to log on, this step is done after asking the customer for their IPs to whitelist, so that they can reach the vManage GUI, be able to log on, and input their Smart Account credentials.

      You can find your Smart Account credentials in the vManage GUI in Administration ► Settings ► Smart Account Credentials at the very bottom of the page.

      Enter the user name and password and select Save.

Runbook to Request and Install Cisco PKI Certificates

  1. Verify that you have satisfied the prerequisites and that you have added the Smart Account credentials.

  2. Navigate to Administration ► Settings ► Controller Certificate Authorization and press Edit.

  3. Select the radio button Cisco Automated (Recommended).


    Note

    You get an error if the Smart Account credentials are not added. Check the prerequisites.


  4. Set the validity period to 1 year for POCs, 2 years for production overlays in the drop-down.

  5. Set Certificate Retrieve Interval to 1 minute and press Save.


    Note

    Currently there is no customer email field to notify customers about approval because the certificates are auto-approved as soon as the CSR request is done.


  6. From this step onwards, the process is the same as for the Symantec/Digicert controllers in the vManage GUI.

    Navigate to the Configuration ► Certificates ► Controllers tab. Click on the More (dot) menu on the right ► Generate CSR.

    The operation status shows the CSR sent for signing, the certificate signed and installed automatically without needing human intervention.

  7. The certificates get installed automatically and shows the expiration date and status of a successful install. The operation status shows Installed for vBonds and vBond Updated for vSmarts and vManage along with the certificate serial number.

  8. Ensure that the control connections have come up to the controllers on the vManage dashboard.

Use Case 2

Migration of an Active Existing Overlay from Digicert to Cisco PKI Controller Certificates During Certificate Renewal

Prerequisites

vManage, controllers, and vEdges should all have their control connections up.

  1. Verify that the control connections to controllers and vEdges are up in the vManage GUI dashboard.

    If the control connections are not up, let the customer know that migrating from Digicert to Cisco PKI cannot proceed until the control is up.

    If the control connections are only partially up, that is some vEdges are control down, then let the customer know that those vEdges will not be able to automatically reconnect to the controllers if their control comes up once the certificates have been moved to Cisco PKI.

    If it is a case of expired certificates and control connections are down, then certificates need to be renewed on Digicert first and control connections need to be brought up before migrating them to the Cisco PKI controller certificates.

  2. Verify that the software version of the controllers is 19.x.

    How to Verify the Software Version for the Active Existing Overlays (with Valid Control Connections to Controllers) Using the vManage GUI

    1. Navigate to the Maintenance ► Software Upgrade in the vManage GUI menu.

    2. Select the vManage tab and look for the column Current Version. Verify that it is 19.x or above.

      If the control connections are up and vManage and controller versions are not 19.x, then let the customer know to upgrade them to 19.x first (vEdges need not be upgraded) before migration to Cisco PKI can be done.


      Note

      It is mandatory that controllers upgraded to 19.x should immediately have their certificates renewed with Cisco PKI as part of the upgrade; they cannot be allowed to run with the existing Symantec certificates even if those certificates are going to remain valid.


    3. Once the prerequisites are verified, check that the Cisco PKI root-CA has been propagated to all the controllers and the vEdges.

      This requires SSH access to the controllers.

      1. SSH into the vManage and controllers and run the following command: show certificate root-ca-cert | include Cisco.

        If the output is blank or does not show the result, escalate to the cloud infrastructure team.

    4. Customer Smart Account credentials need to be ready by either of the following methods:

      1. Email and request the customer contact from a PnP trigger notification to individually email you and provide the Smart Account credentials.

        or

      2. Email and request your customer contact to log on to the vManage themselves and add them. Also ensure that you ask for the customer IPs to whitelist.

        Ensure that if asking the customer to provide, this step is done after asking the customer for their IPs to whitelist, so that they can reach the vManage GUI, be able to log on, and input the Smart Account Credentials.

        You can find the Smart Account credentials in the vManage GUI at Administration ► Settings ► Smart Account Credentials (at the very bottom).

      3. Enter the username and password and press Save.

        Once all the prerequisites have been satisfied, follow the Runbook to Request and Install Cisco PKI Certificates to request CSRs and get the Cisco certificates installed. Verify that all the control connections to the controllers and the vEdges have come back up. If not, then escalate to the cloud infrastructure team.

Use Case 3:

Submitting CSRs and Downloading Certificates on On-Premises Controllers

The following steps require access to PnP and to the SA/VA in question. Customers have access to their own SA/VA.

Prerequisites

The prerequisites are the same in the above cases, except that you use the manual method for installing the certificates.

Runbook

  1. Verify in the vManage GUI Administration ► Settings ► Controller Certificate Authorizaton is set to Manual.

  2. Generate the CSRs for the controllers.

    Navigate to the Configuration ► Certificates ► Controllers tab. Click on the More (dot) menu on the right and then select Generate CSR.

    Download each CSR to a file with a filename .csr and keep it ready to submit to the PnP portal for getting the signed certificates.

  3. Log on to the PnP portal to the required SA/VA and select the Certificates tab.

  4. Click on Generate Certificate and follow the steps to give a name for the certificate file, paste the CSR, and download the signed certificate.

    The finished certificate is ready for download. Repeat this process for each CSR and download all the required certificates.

  5. You can install the downloaded certificates in the vManage GUI by navigating to Configuration ► Certificates ► Controllers ► Install Certificate button (top right).

    Once installed, verify that the control connections are up.

Debugging and Log Information

  1. Check the vBond profile under the VA in PnP to verify that the correct organization name exists.

  2. Check the output at /var/log/nms/vmanage-server.log on the vManage for logs of the entire certificate process.

  3. vManage should have internet connectivity to reach the Cisco PKI servers.

Revoke and Renew Certificates

This section describes how to revoke and renew certificates issued by Enterprise CA, vManage as CA, and vManage as Subordinate CA.

Revoke Enterprise CA Certificate

Follow these steps to revoke, renew, or revoke and renew a certificate for a device configured as TLS proxy using Enterprise CA.

Revoke and Renew Certificate
  1. In Cisco vManage, go to Configuration > Certificates.

  2. Click the TLS Proxy tab at the top of the page.

    You will see a list of devices configured as CA.

  3. Select the device (configured as Enterprise CA) for which you want to revoke or revoke and renew the certificate.

  4. Click Revoke Certificate at the top of the page. A pop-up window opens.

  5. From the drop-down menu, choose a reason for revoking the certificate. Select the check-box.

  6. Revoke: To revoke the certificate, click the Revoke button. Beware that the revocation is permanent and cannot be rolled back. If you choose to revoke the certificate, no additional steps are required after this step.


    Note

    Revoking the certificate through Cisco vManage only removes the certificate from the device and invalidates the private key. You also need to revoke this certificate from your Enterprise CA.


    Revoke and Renew: To revoke the existing certificate and upload a new one to replace it, click the Revoke and Renew button. To renew a certificate after revoking it, see steps 6-11 in the Renew Certificate section of this topic.

Renew Certificate
  1. In Cisco vManage, go to Configuration > Certificates.

  2. Click the TLS Proxy tab at the top of the page.

    You will see a list of devices configured as CA.

  3. Select the device (configured as Enterprise CA) for which you want to revoke or revoke and renew the certificate.

  4. Click Renew Certificate at the top of the page. A pop-up window opens.

  5. Click Yes to continue with the renewal.

    In the status column, the status of the certificate changes to CSR_Generated.

  6. Click Download CSR at the top of the page.

    A pop-up window opens. You can copy or download the CSR. Ensure that the certificate that you request is downloaded in PEM format.

  7. On your CA server, request a certificate and upload or paste the CSR file you generated in the previous step.

  8. Download the certificate issued by your CA in PEM format.


    Important

    Ensure that the certificate you generate is a subordinate or an intermediate CA certificate. The procedure to generate a subordinate CA certificate may differ from one enterprise CA to another. The certificate generated in this step must have its constraint set as CA: TRUE.

    Cisco IOS CA can’t be used for the TLS proxy feature as it doesn’t support generating a certificate with the constraint set as CA: TRUE.


  9. Click Upload Certificate at the top of the page.

  10. In the pop-up window that opens, upload or paste the PEM-encoded certificate that you generated from your CA server in step 9.

  11. Click Upload and Save.

vManage as CA or vManage as Intermediate CA

If you have configured vManage as CA or vManage as Intermediate CA, follow the steps below to revoke or renew a certificate.

  1. In Cisco vManage, go to Configuration > Certificates.

  2. Click the TLS Proxy tab at the top of the page.

    You will see a list of devices configured as CA.

  3. Select the device.

  4. At the top of the page, click Revoke Certificate or Renew Certificate to revoke or renew the certificate respectively.

Design Overlay Network Using vManage

Use the Network Design screen to create and manage an overlay network topology. From this screen, you can add circuits, data centers, and branch sites to a network topology, configure LAN, WAN, and management options for elements in the topology, review the topology, and perform related tasks. The network design operations are particularly useful for smaller-scale deployments that include data centers and branch sites.

Network design consists of these major workflows:

  • Create network topology—Create circuits, data centers, and branch sites, in this order. A network topology must include at least one circuit and one data center.

  • Configure device profiles—Configure global parameters and options for LAN, WAN, and management settings.

  • Attach devices profiles—Attach device profiles to devices.

  • Ongoing management—Add elements to the network topology and modify the configuration settings for elements as needed.

Access Network Design Options

To access options for creating or updating a network design, select ConfigurationNetwork Design.

The Network Design screen displays. This screen includes the following items:

  • Create Network Design button—Displays if you have not yet created a network topology. Click to create elements for the network. For more information, see Configure Network Design Elements .

  • Manage Network Design button—Displays if you have created a network topology. Click to modify configuration setting for elements in the network. For more information, see Configure Network Design Elements .

  • Attach Devices button—Click to access options for attaching a device profile to a device, detach a device profile from a device, export device profile configuration values to a CSV file, or modify values in a device profile. For more information, see Attach, Detach, Export, Update Device Profiles .

  • Last modified information—Date and time that the network design was last modified.

  • Device Attached Task option—Displays if the system is in the process of attaching a device profile to devices or updating device profile configuration information. For more information, see Attach Device Profile or Change Device Profile Values .

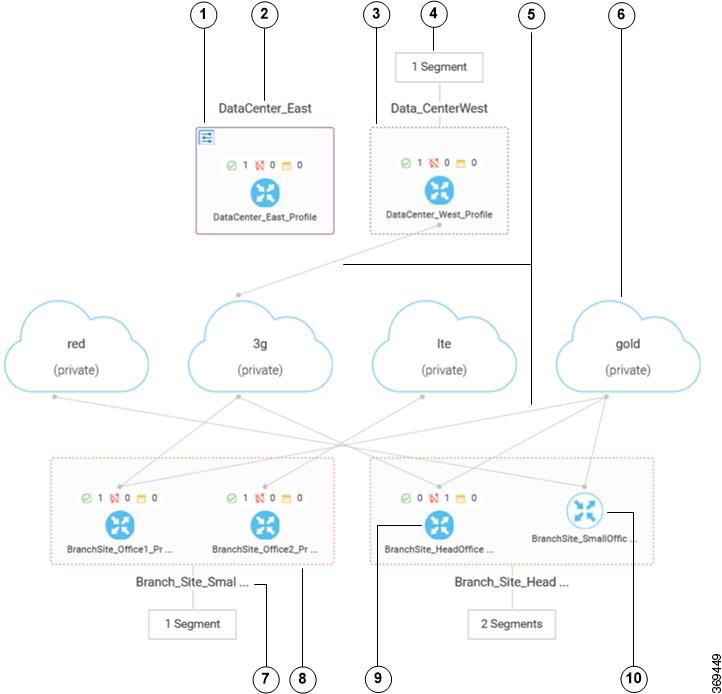
  • Network design topology diagram—Displays if you have created a network topology. Figure 1 shows an example diagram.

Figure 1. Network Design Topology Display

Table 1.

1

Custom device profile for a device in a data center. Custom profiles are indicated by a solid border and the  
icon at the top left corner. If the partial name of a device profile displays, hover your mouse pointer over the name to see the full name. If a device profile is attached to 1 or more devices, the following icons and information display:
  • — Indicates the number of devices that the profile is successfully attached to.
  • — Indicates the number of devices that the profile failed to attach to. If there are failed attachments, the device is out of sync.
  • — Indicates the number of devices that the profile is in the process of attaching to.

2

Name of a data center. If the partial name of a data center displays, hover your mouse pointer over the name to see the full name.

3

Standard device profile for a device in a data center. Standard profiles are indicated by a dashed border. If the partial name of a device profile displays, hover your mouse pointer over the name to see the full name. If a device profile is attached to 1 or more devices, icons and information display as described in Row 1 of this table.

4

Number of segments that are assigned to a data center or branch site. Hover your mouse pointer over the segment display to see the name of each segment.

5

TLOC connections between elements in the topology. A custom device profile does not display TLOC connections to other elements because its settings, such as LAN, WAN, and circuit configurations, have been converted to feature templates.

6

Circuit.

7

Name of a branch site. If the partial name of a branch site displays, hover your mouse pointer over the name to see the full name.

8

Standard device profiles for a device in a branch site. Standard profiles are indicated by a dashed border. If the partial name of a device profile displays, hover your mouse pointer over the name to see the full name. If a device profile is attached to 1 or more devices, icons and information display as described in Row 1 of this table.

9

A blue shaded icon with white arrows indicates that the device profile has been attached to 1 or more devices. Shaded circle with white arrows

10

An unshaded icon with blue arrows indicates that the device profile has not been attached to any devices.

Configure Network Design Elements

With the network design feature, you can create a new overlay network topology and modify existing elements in a topology. You perform these activities from the Network Design screen.

Creating a new network topology involves performing the following procedures in the order shown:

Table 2.

Procedure

Description

Reference

1

Add circuits.

See Configure Circuits .

2

Add data centers.

See Configure Data Centers .

3

Add branch sites.

See Configure Branch Sites .

4

Configure global parameters.

See Configure Global Parameters .

5

Configure device profiles.

See Configure Device Profiles .

6

Attach device profiles.

See Attach Device Profile .

A network topology must include at least one circuit and one data center. After a network topology is created, you can modify its elements directly.

Configure Circuits

Each network topology must have at least 1 circuit and can have up to 18 circuits.

To configure circuits for a network topology, follow these steps:

  1. Select ConfigurationNetwork Design and then click Create Network Design (which displays if you have not yet created a network topology) or Manage Network Design (which displays if you have created a network topology).

  2. Click Circuits near the top of the Network Design screen.

A screen for configuring circuits displays. If any circuits have been created, this screen lists them. You can remove a circuit by clicking its corresponding delete icon
.
  1. Click Add New Circuit.

  2. Select the Private or the Public radio button to indicate whether the circuit is private or public.

  3. From the Circuit Color drop-down list, choose a predefined color to uniquely identify the transport location (TLOC) in a circuit.

The color can be default, 3g, biz-internet, blue, bronze, custom1, custom2, custom3, gold, green, lte, metro-ethernet, mpls, private1, private2, public-internet, red, or silver. The color you choose cannot be used for a TLOC in any other circuit in the topology.

  1. Repeat Steps 2 through 5 as needed to add more circuits.

To remove a circuit that you added, click its corresponding Delete icon
.
  1. Click Finish.

  2. Click Save on the Network Design screen.

Or, if you do not want to save the updates that you made, click Cancel.

Configure Data Centers

Configuring a data center involves assigning a name and adding device profiles and segments to the data center. Each network topology must have at least one data center.

To configure data centers for a network topology, follow these steps:

  1. Select ConfigurationNetwork Design and then click Create Network Design (which displays if you have not yet created a network topology) or Manage Network Design (which displays if you have created a network topology).

  2. Click Data Center near the top of the Network Design screen.

This option appears dimmed if you have not added at least one circuit as described in Configure Circuits .

A screen for configuring data centers displays. If any data centers have been created, this screen lists them. If you are creating a network topology for the first time, skip to Step 4 .

  1. If any data centers are listed on the screen that displays, you can take any of these actions:

  • To add another data center, click Add Data Center and then continue to Step 4 .

  • To view information about device profiles that have been added to a data center, click the Devices button to the right of the data center name.

  • To view information about segments that have been added to a data center, click the Segments button to the right of the data center name.

  • To update configuration items for a data center, including its name, device profiles, and segments, click the pencil icon to the right of the data center name and then continue to Step 4 .

  • To remove a data center from the network topology, click the trash can icon to the right of the data center name and then skip to Step 8 . You cannot delete a data center that includes any device profiles that are attached to one or more devices. To delete a data center in this situation, first detach the device profiles from devices. For instructions, see Detach Device Profile .

  1. In the Data Center Name field, enter a unique name for the data center.

This name cannot be used for any other data center, branch site, or device profile in the topology. The name can include letters, numbers, underscores, and hyphens, but no spaces or special characters.

  1. Take the following actions to add device profiles to the data center or to update device profile configuration settings:

Each data center must have at least one device profile. A device profile is associated with a specific device type in the data center and provides configuration settings that are pushed to those device types.

  1. If you are adding a new device profile, click Add a Device Profile.

  2. In the Name field, enter a name for the device profile. This name cannot be used for any other device profile, data center, or branch site in the topology. The name can include letters, numbers, underscores, and hyphens, but no spaces or special characters.

  3. From the Device Model drop-down list, choose the device type with which to associate the device profile.

  4. Click the Circuits field to display a list of circuits that you created as described in Configure Circuits and then check the box next to each circuit that the device profile should be associated with. The circuit names that you check appear in the Circuits field. You can remove a circuit from this field by unchecking its check box or by clicking the X next to its name. You can use the same circuit in multiple data centers and branch sites.

  5. Repeat Steps 5a through 5d as needed to add more device profiles.

  6. Click Next.

  1. Take the following actions to add one or more segments.

Each data center must have at least one segment. A segment is a service side VPN that is associated with all device profiles in the data center. You can use the same segment in multiple data centers and branch sites.

  1. Click Add Segment and choose one of these options:

  • New Segment—Creates a new segment with a new name and VPN ID

  • Existing Segment—Lets you choose a segment that you already created

  1. In the Segment Name field, take one of these actions:

  • If you chose New Segment, enter a name for the segment. The name can include letters, numbers, underscores, and hyphens, but no spaces or special characters.

  • If you chose Existing Segment, choose a segment from the drop-down list. The VPN Number field populates automatically with the VPN ID that was configured for the segment.

  1. If you chose New Segment, in the VPN Number field, enter a LAN side VPN ID to associate with the segment. This value cannot be used for any other VPN number in the topology. Valid values are 1 through 65535, except 512.

  2. Repeat Steps 6a through 6c as needed to add more segments. To remove a segment that you added, click its corresponding Delete icon
    .
  3. Click Add.

The system displays a list of data centers.

  1. Repeat Steps 2 through 6 as needed to add more data centers.

  2. Click Finish.

  3. Click Save on the Network Design screen.

Or, if you do not want to save the updates that you made, click Cancel.

Configure Branch Sites

Configuring a branch site involves assigning a name and adding device profiles and segments to the branch site. A network topology does not require branch sites.

To configure branch sites for a network topology, follow these steps:

  1. Select ConfigurationNetwork Design and then click Create Network Design (which displays if you have not yet created a network topology) or Manage Network Design (which displays if you have created a network topology).

  2. Click Branch Sites near the top of the Network Design screen.

This option appears dimmed if you have not added at least one circuit when you added a data center as described in Configure Data Center .

A screen for configuring branch sites displays. If any circuits have been created, this screen lists them. If you are creating a network design for the first time, skip to Step 4 .

  1. If any branch sites are listed on the screen that displays, you can take any of these actions:

  • To add another branch site, click Add Branch and then continue to Step 4 .

  • To view information about device profiles that have been added to a branch site, click the Devices button to the right of the branch site name.

  • To view information about segments that have been added to a branch site, click the Segments button to the right of the branch site name.

  • To update configuration items for a branch site, including its name, device profiles, circuits, and segments, click the pencil item to the right of the branch site name and then continue to Step 4 .

  • To remove a branch site from the network topology, click the trash can icon to the right of the branch site name and then skip to Step 8 . You cannot delete a branch site that includes any device profiles that are attached to one or more devices. To delete a branch site in this situation, first detach device profiles from devices. For instructions, see Detach Device Profile .

  1. In the Branch Name field, enter a name for the branch site.

This name cannot be used for any other branch site, data center, or device profile in the topology. The name can include letters, numbers, underscores, and hyphens, but no spaces or special characters.

  1. Take the following actions to add or update device profiles.

Each branch site must have at least one device profile. A device profile is associated with a specific device type in the branch site and provides configuration settings that are pushed to those device types.

  1. If you are adding a new device profile, click Add a Device Profile.

  2. In the Name field, enter a name for the device profile. This name cannot be used for any other device profile, data center, or branch site in the topology. The name can include letters, numbers, underscores, and hyphens, but no spaces or special characters.

  3. From the Device Model drop-down list, choose the device type with which to associate the device profile.

  4. Click the Circuits field to display a list of circuits that you created as described in Configure Circuits and then check the box next to each circuit that the device profile should be associated with. The circuit names that you check appear in the Circuits field. You can remove a circuit from this field by unchecking its check box or by clicking the X next to its name. You can use the same circuit in multiple data centers and branch sites.

  5. Repeat Steps 5a through 5d as needed to add more device profiles.

  6. Click Next.

  1. Take the following actions to add one or more segments.

Each branch site must have at least one segment. A segment is a service side VPN that is associated with all device profiles in the branch site. You can use the same segment in multiple branch sites and data centers.

  1. Click Add Segment and choose one of these options:

  • New Segment—Creates a new segment with a new name and VPN ID

  • Existing Segment—Lets you choose a segment that you already created

  1. In the Segment Name field, take one of these actions:

  • If you chose New Segment, enter a name for the segment. The name can include letters, numbers, underscores, and hyphens, but no spaces or special characters.

  • If you chose Existing Segment, choose a segment from the drop-down list. The VPN Number field populates automatically with the VPN ID that was configured for the segment.

  1. If you chose New Segment, in the VPN Number field, enter a LAN side VPN ID to associate with the segment. This value cannot be used for any other VPN number in the topology. Valid values are 1 through 65535, except 512.

  2. Repeat Steps 6a through 6c as needed to add more segments. To remove a segment that you added, click its corresponding Delete icon
    .
  3. Click Add.

The system displays a list of branch sites.

  1. Repeat Steps 2 through 6 as needed to add more branch sites.

  2. Click Finish.

  3. Click Save on the Network Design screen.

Or, if you do not want to save the updates that you made, click Cancel.

Configure Global Parameters

Global parameters are configuration settings that are used in all device profiles in a network topology. If you do not configure global parameters, factory default configuration settings are used for device profiles.

To configure global parameters, follow these steps:

  1. Select ConfigurationNetwork Design and then click Create Network Design (which displays if you have not yet created a network topology) or Manage Network Design (which displays if you have created a network topology).

  2. Click Global Parameters near the top of the Network Design screen and choose the desired template from the drop-down list that displays.

A screen for configuring the selected template displays.

  1. Configure the template as described in the “Create a Device Template” section in Templates .

The template name and description are filled in automatically and cannot be changed. There is no option for selecting a device type because the template is used for all devices throughout your network.

  1. Click Update.

  2. Click Save on the Network Design screen.

Or, if you do not want to save the updates that you made, click Cancel.

Configure Device Profiles

You must configure a device profile for each router in a data center or branch site before the device profile can be attached to the router. Configuring a profile involves configuring its TLOC, LAN side, and management interfaces, and configuring related settings.

There are two types of device profiles:

  • Standard device profile—Contains basic LAN, WAN, and management interface configuration options

  • Custom device profile—Contains more advanced configuration options for a variety of items such as routing and other services for the interfaces

Each new device profile that you create is saved as a standard type. After you create a standard device profile and attach it to a device, you can convert it to a custom device profile as described in the following instructions.

To configure a device profile for a router in a network topology, follow these steps:

1. Select ConfigurationNetwork Design and then click Create Network Design (which displays if you have not yet created a network topology) or Manage Network Design (which displays if you have created a network topology).

  1. In the network diagram that displays on the Network Design screen, click the image that represents the device for which you want to build or modify a device profile.

The image of the device displays in one of these ways:

  • Blue shaded icon—Indicates that the device has a profile. When you hover your mouse pointer over this image, “Manage profile” displays.

If you choose this option for a standard device profile, the Manage Profile screen displays. From this screen, you can modify configuration settings for the device profile or convert it to a custom device profile. Continue to Step 3 .

If you choose this option for a custom device profile, a template screen displays. Skip to Step 4 .

  • Unshaded icon—Indicates that the device does not yet have a profile. When you hover your mouse pointer over this image, “Build profile” displays.

If you choose this option, the Build Profile screen displays. From this screen, you can create a standard device profile. Skip to Step 5 .

  1. If you chose to manage a device profile for a standard device profile, take one of these actions:

  • To update existing options for the standard device profile, click the pencil icon that appears near the top right of the screen for managing a profile. The Build Profile screen displays. Skip to Step 5 .

  • To convert the standard device profile to a custom device profile, click Custom Profile and then click Proceed in the dialog box that pops up. A template screen displays with some options pre-populated based on options that you have already configured for this device profile. Configure the options as desired. (For information about configuring a template, see the “Create a Device Template” section in Templates .) When you are finished, click Update and then skip to Step 17 .

  1. If you chose to manage a custom device profile, configure the options as desired. (For information about configuring a template, see the “Create a Device Template” section in Templates .) When you are finished, click Done and then skip to Step 17 .

  2. If you chose to build a device profile or to manage a standard device profile, In the Interface Name field, enter the name of a TLOC interface to associate with the circuit that is associated with this router.

  3. Click one of these radio buttons:

  • DHCP—Selects a dynamic IP address  for the interface

  • Static— Indicates that you will assign a static IP address to the interface and a prefix and next hop to the VPN later, as described in Attach Device Profile

  1. (Optional) In the DNS server field, enter the IP address of the primary DNS server in the network.

  2. Click Next.

  3. In the Interface Name field, enter the name of a LAN side interface to associate with the segment.

  4. (Optional) In the VLAN field, enter a sub-interface, if needed for your deployment.

  5. Click one of these radio buttons:

  • None—Indicates that you will assign a static IP address to this interface later, as described in Attach Device Profile

  • DHCP—Indicates that you will assign a DHCP address pool to this interface late, as described in Attach Device Profile

  • DHCP Relay—Indicates that you will assign a DHCP helper address to this interface later, as described in Attach Device Profile

  1. Click Next.

  2. In the Interface Name field, enter the name for the management interface to associate with the device.

  3. Click one of these radio buttons:

  • DHCP—Selects a dynamic IP address for the interface

  • Static—Indicates that you will assign a static IP address to the interface and a prefix and next hop to the VPN later, as described in Attach Device Profile

  1. (Optional) In the DNS server field, enter the IP address of the primary DNS server in the network.

  2. Click Done.

  3. Click Save on the Network Design screen.

Or, if you do not want to save the updates that you made, click Cancel.

Attach, Detach, Export, Update Device Profiles

From the Network Design screen, you can perform the following tasks for existing device profiles.

Table 3.

Task

Description

Reference

Attach a device profile to devices.

Makes the devices available to be controlled and configured through the SD-WAN.

See Attach Device Profile .

Detach a device profile from devices.

Puts the devices into CLI mode.

See Detach Device Profile .

Export device profile settings

Creates a CSV file that contains configuration information of a selected device profile. This tasks is useful for backing up of device profile configuration information.

See Export Device Profile Settings .

Change configuration information for a device profile.

Updates device profile configuration information on the devices to which the profile is attached.

See Change Device Profile Values .

 For information about creating a device profile, see Configure Device Profiles .

Attach Device Profile

Attaching a device profile to devices makes the devices available to be controlled and configured through the SD-WAN. A device to which a device profile is not attached is in CLI mode.

A device can have only one device profile. The same device profile can be attached to multiple devices.

To attach a device profile to devices, follow these steps:

  1. Select ConfigurationNetwork Design and then click Attach Device.

  2. In the network diagram that displays, click the device profile that you want to attach to devices and then choose Attach Devices from the pop-up list.

The Attach Devices window displays.

Configure options on this window as described in the “Attach Devices to a Device Template” section in Templates .

If, when you configured a device profile, if you configured static for a TLOC interface, or DHCP or DCHP relay for a VLAN subinterface, make sure to configure the static IP address, DHCP IP address, prefix information, and next hop information, as applicable.

After you configure devices, the Network Design screen displays and the configuration updates are pushed to the selected devices.

You can click the Device Attached Task option near the top right of the screen to view the progress of the configuration push operation.

Detach Device Profile

Detaching a device profile puts the devices to which it was attached into CLI mode.

To detach a device, follow these steps:

  1. Select ConfigurationNetwork Design and then click Detach Device.

  2. In the network diagram that displays, click the device profile that you want to detach from devices and then choose Detach Devices from the pop-up list.

The Detach Device window displays.

  1. In the Available Devices column on the left, either select a group and search for one or more devices, select a device from the list, or click Select All.

  2. Click the arrow pointing right to move the device to the Selected Devices column on the right.

  3. Click Detach.

The device profile is detached from the devices that you selected.

Export Device Profile Settings

Exporting device profile settings creates a CSV file that contains the configuration information of a selected device profile. You can save this CSV file in the location of your choice. This export feature is useful for creating a backup of device profile configuration information.

A device profile must be attached to at least one device before you can export its configuration information.

To export a CSV file, follow these steps:

  1. Select ConfigurationNetwork Design and then click Export.

  2. In the network diagram that displays, click the device profile whose configuration information you want to export and then choose Export CSV from the pop-up list.

  3. Follow the on-screen prompts to create the CSV file and save it to the location of your choice.

Change Device Profile Values

Changing device profile values updates device profile configuration information on the devices to which the profile is attached.

A device profile must be attached to at least one device before you can update its configuration information.

To change device values, follow these steps:

  1. Select ConfigurationNetwork Design and then click Profile.

  2. In the network diagram that displays, click the device profile whose configuration values you want to update and then choose Change Device Values from the pop-up list.

  3. In the window that displays, use the Search field and options to locate a device to which the profile is attached.

  4. Click the More Actions icon to the right of the row for the applicable device and select Edit Device Template.

  5. In the Update Device Template window that pops-up, modify values as desired, and then click Update.

  6. Click Next.

  7. Select a device from the list of devices that displays at the left of the window.

  8. Click Configure Devices to push the configuration to all devices that the device profile is attached to.

The Network Design screen displays and the configuration updates are pushed to the selected devices. You can click the Device Attached Task option near the top right of the screen to view the progress of the configuration push operation.

Create a Device Template from Feature Templates

Device templates define a device's complete operational configuration. A device template consists of a number of feature templates. Each feature template defines the configuration for a particular Cisco SD-WAN software feature. Some feature templates are mandatory, indicated with an asterisk (*), and some are optional. Each mandatory feature template, and some of the optional ones, have a factory-default template. For software features that have a factory-default template, you can use either the factory-default template (named Factory_Default_feature-name_Template) or you can create a custom feature template.

Create a Device Template from Feature Templates

To create a device template:

Figure 3. Create a Device Template in Cisco vManage
Figure 4. Create a Device Template Using Cisco vManage

1

Menu

2

CloudExpress

3

Tasks

4

Alarms

5

Help

6

User Profile

  1. In the Device tab, click the Create Template drop-down and select From Feature Template.

  2. From the Device Model drop-down, select the type of device for which you are creating the template. vManage NMS displays all the feature templates for that device type. The required feature templates are indicated with an asterisk (*), and the remaining templates are optional. The factory-default template for each feature is selected by default.

  3. In the Template Name field, enter a name for the device template. This field is mandatory and can contain only uppercase and lowercase letters, the digits 0 through 9, hyphens (-), and underscores (_). It cannot contain spaces or any other characters.

  4. In the Description field, enter a description for the device template. This field is mandatory, and it can contain any characters and spaces.

  5. To view the factory-default configuration for a feature template, select the desired feature template and click View Template. Click Cancel to return to the Configuration Template screen.

  6. To create a custom template for a feature, select the desired factory-default feature template and click Create Template. The template form is displayed. The top of the form contains fields for naming the template, and the bottom contains fields for defining feature parameters.

  7. In the Template Name field, enter a name for the feature template. This field is mandatory and can contain only uppercase and lowercase letters, the digits 0 through 9, hyphens (-), and underscores (_). It cannot contain spaces or any other characters.

  8. In the Description field, enter a description for the feature template. This field is mandatory, and it can contain any characters and spaces.

  9. For each field, enter the desired value. You may need to click a tab or the plus sign (+) to display additional fields.

  10. When you first open a feature template, for each parameter that has a default value, the scope is set to Default (indicated by a check mark), and the default setting or value is shown. To change the default or to enter a value, click the scope drop-down to the left of the parameter field and select one of the following:

Table 4.

Parameter Scope

Scope Description

Device Specific (indicated by a host icon)

Use a device-specific value for the parameter. For device-specific parameters, you cannot enter a value in the feature template. You enter the value when you attach a device to a device template .

When you click Device Specific, the Enter Key box opens. This box displays a key, which is a unique string that identifies the parameter in a CSV file that you create. This file is an Excel spreadsheet that contains one column for each key. The header row contains the key names (one key per column), and each row after that corresponds to a device and defines the values of the keys for that device. You upload the CSV file when you attach a device to a device template. For more information, see Use Variable Values in Configuration Templates .

To change the default key, type a new string and move the cursor out of the Enter Key box.

Examples of device-specific parameters are system IP address, hostname, GPS location, and site ID.

Global (indicated by a globe icon)

Enter a value for the parameter, and apply that value to all devices.

Examples of parameters that you might apply globally to a group of devices are DNS server, syslog server, and interface MTUs.

  1. For some groups of parameters, you can mark the entire group as device-specific. To do this, click the Mark as Optional Row box. These parameters are then grayed out so that you cannot enter a value for them in the feature template. You enter the value or values when you attach a device to a device template.

  2. Click Save.

  3. Repeat Steps 7 through 13 to create a custom template for each additional software feature. For details on creating specific feature templates, see the templates listed in Available Feature Templates.

  4. Click Create. The new configuration template is displayed in the Device Template table. The Feature Templates column shows the number of feature templates that are included in the device template, and the Type column shows "Feature" to indicate that the device template was created from a collection of feature templates.

Another way to create device templates from feature templates is to first create one or more custom feature templates and then create device templates. You can create multiple feature templates for the same feature. For a list of feature templates, see Available Feature Templates .

  1. From the Templates title bar, select Feature.

  2. Click the Add Template button.

  3. In the left pane, from Select Devices, select the type of device for which you are creating a template. You can create a single feature template for features that are available on multiple device types. You must, however, create separate feature templates for software features that are available only on the device type you are configuring.

  4. In the right pane, select the feature template. The template form is displayed. The top of the form contains fields for naming the template, and the bottom contains fields for defining required parameters. If the feature has optional parameters, the bottom of the template form shows a plus sign (+) after the required parameters.

  5. In the Template Name field, enter a name for the feature template. This field is mandatory and can contain only uppercase and lowercase letters, the digits 0 through 9, hyphens (-), and underscores (_). It cannot contain spaces or any other characters.

  6. In the Description field, enter a description for the feature template. This field is mandatory, and it can contain any characters and spaces.

  7. For each required parameter, choose the desired value, and if applicable, select the scope of the parameter. Select the scope from the drop-down menu to the left of each parameter's value box

  8. Click the plus sign (+) below the required parameters to set the values of optional parameters.

  9. Click Save.

  10. Repeat Steps 2 to 9 for each additional feature template you wish to create.

  11. From the Templates title bar, select Device.

  12. Click the Create Template drop-down and select From Feature Template.

  13. From the Device Model drop-down, select the type of device for which you are creating the device template. vManage NMS displays the feature templates for the device type you selected. The required feature templates are indicated with an asterisk (*). The remaining templates are optional.

  14. In the Template Name field, enter a name for the device template. This field is mandatory and can contain only uppercase and lowercase letters, the digits 0 through 9, hyphens (-), and underscores (_). It cannot contain spaces or any other characters.

  15. In the Description field, enter a description for the device template. This field is mandatory, and it can contain any characters and spaces.

  16. To view the factory-default configuration for a feature template, select the desired feature template and click View Template. Click Cancel to return to the Configuration Template screen.

  17. To use the factory-default configuration, click Create to create the device template. The new device template is displayed in the Device Template table. The Feature Templates column shows the number of feature templates that are included in the device template, and the Type column shows "Feature" to indicate that the device template was created from a collection of feature templates.

  18. To modify the factory-default configuration, select the feature template for which you do not wish to use the factory-default template. From the drop-down list of available feature templates, select a feature template that you created.

  19. Repeat Step 18 for each factory-default feature template you wish to modify.

  20. Click Create. The new configuration template is displayed in the Device Template table. The Feature Templates column shows the number of feature templates that are included in the device template, and the Type column shows "Feature" to indicate that the device template was created from a collection of feature templates.

Create a Device CLI Template

To create a device template by entering a CLI text-style configuration directly on the Cisco vManage:

  1. In the Device tab, click the Create Template drop-down and select CLI Template.

  2. From the Device Type drop-down, select the type of device for which you are creating the template.

  3. In the Template Name field, enter a name for the device template. This field is mandatory and can contain only uppercase and lowercase letters, the digits 0 through 9, hyphens (–), and underscores (_). It cannot contain spaces or any other characters.

  4. In the Description field, enter a description for the device template. This field is mandatory, and it can contain any characters and spaces.

  5. In the CLI Configuration box, enter the configuration either by typing it, cutting and pasting it, or uploading a file.

  6. To convert an actual configuration value to a variable, select the value and click Create Variable. Enter the variable name, and click Create Variable. You can also type the variable name directly, in the format {{variable-name}}; for example, {{hostname}}.

  7. Click Add. The new device template is displayed in the Device Template table. The Feature Templates column shows the number of feature templates that are included in the device template, and the Type column shows "CLI" to indicate that the device template was created from CLI text.

Manage Device Templates

Edit a Device Template

  1. In the Device or Feature tab, select a template.

  2. Click the More Actions icon to the right of the row and click Edit.

You cannot change the name of a device or feature template when that template is attached to a device.

Note that you can edit templates simultaneously from one or more vManage servers. For simultaneous template edit operations, the following rules apply:

  • You cannot edit the same device or feature template simultaneously.

  • When you are editing a device template, all other feature templates attached to that device template are locked and you cannot perform any edit operations on them.

  • When you are editing a feature template that is attached to a device template, that device template as well as all other feature templates attached to it are locked and you cannot perform any edit operations on them.

Delete a Template

Deleting a template does not remove the associated configuration from devices.

  1. In the Device or Feature tab, select a template.

  2. Click the More Actions icon to the right of the row and click Delete.

  3. Click OK to confirm deletion of the template.

Copy a Template

  1. In the Device or Feature tab, select a template.

  2. Click the More Actions icon to the right of the row and click Copy.

  3. Enter a new template name and description.

  4. Click Copy.

Edit a CLI Device Template

  1. In the Device tab, select a template.

  2. Click the More Actions icon to the right of the row and click Edit.

  3. In the Device CLI Template window, edit the template.

  4. Click Update.

View Device Templates

View a Template

  1. In the Device or Feature tab, select a template.

  2. Click the More Actions icon to the right of the row and click View.

View Device Templates Attached to a Feature Template

  1. In the Feature tab, select a template.

  2. Click the More Actions icon to the right of the row and click Show Attached Device Templates. The View Attached Device Templates popup window opens, displaying the names of the device templates to which the feature template is attached.

View Devices Attached to a Device Template

For a device template that you created from feature templates:

  1. In the Device tab, select a template.

  2. Click the More Actions icon to the right of the row and click Attach Devices.

  3. In the Attach Devices window, click the Attached Devices tab.

For a device template that you created from a CLI template:

  1. In the Device tab, select a template.

  2. Click the More Actions icon to the right of the row and click Show Attached Devices.

Attach and Detach a Device Template

To configure a device on the network, you attach a device template to the device. You can attach only one device template to a device, so the template—whether you created it by consolidating individual feature templates or by entering a CLI text-style configuration—must contain the complete configuration for the device. You cannot mix and match feature templates and CLI-style configurations.

On Cisco Cisco vEdge deviceCisco IOS XE SD-WAN devices in the overlay network, you can perform the same operations, in parallel, from one or more vManage servers. You can perform the following template operations in parallel:

  • Attach a device template to devices

  • Detach a device template from a device

  • Change the variable values for a device template that has devices attached to it

For template operations, the following rules apply:

  • When a device template is already attached to a device, you can modify one of its feature templates. Then when you click Update ► Configure Devices, all other template operations—including attach devices, detach devices, and edit device values—are locked on all vManage servers until the update operation completes. This means that a user on another vManage server cannot perform any template operations until the update completes.

  • You can perform the attach and detach device template operations on different devices, from one or more vManage servers, at the same time. However, if any one of these operations is in progress on one vManage server, you cannot edit any feature templates on any of the servers until the attach or detach operation completes.

If the device being configured is present and operational on the network, the configuration is sent to the device immediately and takes effect immediately. If the device has not yet joined the network, the pushing of the configuration to the device is scheduled. When the device joins the network, Cisco vManage pushes the configuration immediately after it learns that the device is present in the network.

Attach a Device Template to Devices

You can attach the same templates to multiple devices, and you can do so simultaneously, in a single operation.

To attach a device template to one or more devices:

  1. In the Device tab, select a template.

  2. Click the More Actions icon to the right of the row and click Attach Devices. The Attach Devices dialog box opens with the Select Devices tab selected

  3. In the Available Devices column on the left, select a group and search for one or more devices, select a device from the list, or click Select All.

  4. Click the arrow pointing right to move the device to the Selected Devices column on the right.

  5. Click Attach.

  6. If the template contains variables, enter the missing variable values for each device you selected in one of the following ways:

  • Enter the values manually for each device either in the table column or by clicking the More Actions icon to the right of the row and clicking Edit Device Template. When you are using optional rows, if you do not want to include the parameter for the specific device, do not specify a value.

  • Click Import File in the upper right corner of the screen to upload a CSV file that lists all the variables and defines each variable's value for each device.

  1. Click Update

  2. Click Next. If any devices have the same system IP address, a pop-up or an error message is displayed when you click Next. Modify the system IP addresses so that there are no duplicates, and click Save. Then click Next again.

  3. In the left pane, select the device, to preview the configuration that is ready to be pushed to the device. The right pane displays the device's configuration and the Config Preview tab in the upper right corner is selected. Click the Config Diff tab to view the differences between this configuration and the configuration currently running on the device, if applicable. Click the Back button to edit the variable values entered in the previous screen.

  4. If you are attaching a Cisco vEdge deviceCisco IOS XE SD-WAN device, click Configure Device Rollback Timer located at the bottom of the left pane, to configure the time interval at which the device rolls back to its previous configuration if the router loses its control connection to the overlay network. The Configure Device Rollback Time dialog box is displayed.
    1. From the Devices drop-down, select a device.

    2. To enable the rollback timer, in the Set Rollback slider beneath the Devices drop-down, drag the slider to the left to enable the rollback timer. When you do this, the slider changes in color from gray to green.

    3. To disable the rollback timer, click the Enable Rollback slider. When you disable the timer, the Password field pops up. Enter the password that you used to log in to the vManage NMS.

    4. In the Device Rollback Time slider, drag the slider to the desired value. The default time is 5 minutes. You can configure a time from 6 to 15 minutes.

    5. To exclude a device from the rollback timer setting, click Add Exception and select the devices to exclude.

    6. The table at the bottom of the Configure Device Rollback Time dialog box lists all the devices to which you are attaching the template and their rollback time. To delete a configured rollback time, click the Trash icon to the right of the device name.

    7. Click Save.

  5. Click Configure Devices to push the configuration to the devices. The Status column displays whether the configuration was successfully pushed. Click the right angle bracket to the left of the row to display details of the push operation.

Export a Variables Spreadsheet in CSV Format for a Template

  1. In the Device tab, select a device template.

  2. Click the More Actions icon to the right of the row and click Export CSV.

Change the Device Rollback Timer

By default, when you attach a Cisco vEdge deviceCisco IOS XE SD-WAN device to a configuration template, if the router is unable to successfully start after 5 minutes, it returns to, or rolls back to, the previous configuration. For a configuration that you have created from the CLI, you can change the device's rollback timer:

  1. In the Device tab, select a device template.

  2. Click the More Actions icon to the right of the row and click Change Device Values. The right pane displays the device's configuration, and the Config Preview tab in the upper right corner is selected.

  3. In the left pane, click the name of a device.

  4. Click Configure Device Rollback Timer located at the bottom of the left pane. The Configure Device Rollback Time dialog box is displayed.

  5. From the Devices drop-down, select a device.

  6. To enable the rollback timer, in the Set Rollback slider beneath the Devices drop-down, drag the slider to the left to enable the rollback timer. When you do this, the slider changes in color from gray to green.

  7. To disable the rollback timer, click the Enable Rollback slider. When you disable the timer, the Password field pops up. Enter the password that you used to log in to the vManage NMS.

  8. In the Device Rollback Time slider, drag the slider to the desired value. The default time is 5 minutes. You can configure a time from 6 to 15 minutes.

  9. To exclude a device from the rollback timer setting, click Add Exception and select the devices to exclude.

  10. The table at the bottom of the Configure Device Rollback Time dialog box lists all the devices to which you are attaching the template and their rollback time. To delete a configured rollback time, click the Trash icon to right right of the device name.

  11. Click Save.

  12. Click Configure Devices to push the configuration to the devices. The Status column displays whether the configuration was successfully pushed. Click the right angle bracket to the left of the row to display details of the push operation.

Preview Device Configuration and View Configuration Differences

For a configuration that you have created from the CLI:

  1. In the Device tab, select a device template.

  2. Click the More Actions icon to the right of the row and click Change Device Values. The right pane displays the device's configuration, and the Config Preview tab in the upper right corner is selected.

  3. In the left pane, click the name of a device.

  4. Click the Config Diff tab to view the differences between this configuration and the configuration currently running on the device, if applicable. Click the Back button to edit the variable values entered in the previous screen.

  5. Click Configure Devices to push the configuration to the devices. The Status column displays whether the configuration was successfully pushed. Click the right angle bracket to the left of the row to display details of the push operation.

Change Variable Values for a Device

For a configuration that you have created from device configuration templates, if the templates contain variables, the vManage NMS can automatically populate the variables with actual values when you attach the templates to the devices. To do this, you create an Excel file that lists the variable values for each device and save the file in CSV format. You can also enter values for these variables manually.

After you have pushed the configuration to a device, you can change the value assigned to any variable:

  1. In the Device tab, select the device template.

  2. Click the More Actions icon to the right of the row, and click Change Device Values. The screen displays a table of all the devices that are attached to that device template.

  3. For the desired device, click the More Actions icon to the right of the row, and click Edit Device Template.

  4. In the Update Device Template pop-up, enter values for the items in the variable list.

  5. Click Update.

  6. Click Next.

  7. Click Configure Devices to push the configuration to the device. The Status column displays if the configuration was successfully pushed or not. Click the right angle bracket to the left of the row to display details of the push operation.

Default Device Templates

Table 5. Feature History

Feature Name

Release Information

Description

Default Device Templates

Cisco IOS XE Release Amsterdam 17.2.1r

Cisco SD-WAN Release 20.1.1

A default device template provides basic information that you can use to bring up devices in a deployment quickly.

This feature is supported on the Cisco Cloud Services Router 1000V Series, Cisco C1111-8PLTELA Integrated Services Routers, and Cisco 4331 Integrated Services Routers.

A default device template provides basic information that you can use to bring up devices in a deployment. It provides a way for you to quickly provision devices with the minimum information that they need to operate in your network.

You cannot directly edit or update information in a device default template, but you can copy the template and then edit the copy.

To use a default device template:

  1. Choose Configuration > Templates.

  2. In the Device tab, select Default form the Template Type drop-down list.

    A list of default device templates displays.

  3. Perform any of these actions:

    • To attach a default device template to devices, choose Attach Devices from the More Actions menu for the template. In the Attach Devices dialog box, select the devices that you want attach, and then click Attach.

    • To view the configuration settings for a default device template, choose View from the More Actions menu for the template.

    • To copy a default device template, choose View from the More Actions menu for the template. In the Template Copy dialog box, enter a unique name and a description for the copy that you are creating, and then click Copy. The copied version becomes a feature template that you can edit.

    • To create an Excel file in CSV format that contains device-specific settings from a device template, choose Export CSV from the More Actions menu for the template. Use dialog box that displays to open or save the CSV file. You can use this CSV file as a reference for device-specific settings when you create other device templates.

Routing

Configure BGP Using vManage Templates

The Border Gateway Protocl (BGP) can be used for service-side routing to provide reachability to networks at the local site, and it can be used for transport-side routing to enable communication between Cisco SD-WAN devices when a device is not directly connected to the WAN cloud. Create separate BGP templates for the two BGP routing types.


Note

Cisco IOS XE SD-WAN devices use VRFs in place of VPNs. However, the following steps still apply to configure Cisco IOS XE SD-WAN devices through Cisco vManage. When you complete the configuration, the system automatically maps the VPN configurations to VRF configurations.


To configure the BGP routing protocol using Cisco vManage templates:

  1. Create a BGP feature template to configure BGP parameters.

  2. Create a VPN feature template to configure VPN parameters for either service-side BGP routing (in any VPN other than VPN 0 or VPN 512) or transport-side BGP routing (in VPN 0).

Create a BGP Template
  1. In vManage, go to Configuration > Templates.

  2. In the Device tab, click Create Template.

  3. From the Create Template drop-down, select From Feature Template.

  4. From the Device Model drop-down, select the type of device for which you are creating the template.

  5. To create a template for VPN 0 or VPN 512:

    1. Click the Transport & Management VPN tab located directly beneath the Description field, or scroll to the Transport & Management VPN section.

    2. Under Additional VPN 0 Templates, located to the right of the screen, click BGP.

    3. From the BGP drop-down, click Create Template. The BGP template form displays. The top of the form contains fields for naming the template, and the bottom contains fields for defining BGP parameters.

  6. To create a template for VPNs 1 through 511, and 513 through 65530:

    1. Click the Service VPN tab located directly beneath the Description field, or scroll to the Service VPN section.

    2. Click the Service VPN drop-down.

    3. Under Additional VPN Templates, located to the right of the screen, click BGP.

    4. From the BGP drop-down, click Create Template. The BGP template form displays. The top of the form contains fields for naming the template, and the bottom contains fields for defining BGP parameters.

  7. In the Template Name field, enter a name for the template. The name can be up to 128 characters and can contain only alphanumeric characters.

  8. In the Template Description field, enter a description of the template. The description can be up to 2048 characters and can contain only alphanumeric characters.

Configure Basic BGP Parameters

To configure Border Gateway Protocol (BGP), select the Basic Configuration tab and configure the following parameters. Parameters marked with an asterisk are required to configure BGP.

Parameter Name Description
Shutdown* Click No to enable BGP on the interface.
AS number* Enter the local AS number.
Router ID Enter the BGP router ID in decimal four-part dotted notation.
Propagate AS Path Click On to carry BGP AS path information into OMP.
Internal Routes Distance

Enter a value to apply as the BGP route administrative distance for routes coming from one AS into another.

Range: 0 through 255

Default: 0

Local Routes Distance Specify the BGP route administrative distance for routes within the local AS. By default, a route received locally from BGP is preferred over a route received from OMP.

Range: 0 through 255

Default: 0

External Routes Distance Specify the BGP route administrative distance for routes learned from other sites in the overlay network.

Range: 0 through 255

Default: 0

For service-side BGP, you might want to configure Overlay Management Protocol (OMP) to advertise to the Cisco vSmart Controller any BGP routes that the device learns. By default, Cisco SD-WAN devices advertise to OMP both the connected routes on the device and the static routes that are configured on the device, but it does not advertise BGP external routes learned by the device. You configure this route advertisement in the OMP template for devices or Cisco SD-WAN software.

For transport-side BGP, you must also configure a physical interface and a loopback interface in VPN 0. In addition, you should create a policy for BGP to advertise the loopback interface address to its neighbors, and apply the policy in the BGP instance or to a specific neighbor.

To save the feature template, click Save.

Configure Unicast Address Family

To configure global BGP address family information, select the IPv4 Unicast Address Family tab and configure the following parameters:

Tab/Parameter Option Sub-Option Description
IPv4 / IPv6 Click IPv4 to configure an IPv4 VPN interface. Click IPv6 to configure an IPv6 interface.
Maximum Paths

Specify the maximum number of parallel IBGP paths that can be installed into a route table to enable IBGP multipath load sharing.

Range: 0 to 32

Mark as Optional Row Check Mark as Optional Row to mark this configuration as device-specific. To include this configuration for a device, enter the requested variable values when you attach a device template to a device, or create a template variables spreadsheet to apply the variables.
Redistribute Click Redistribute > New Redistribute.
Mark as Optional Row Check Mark as Optional Row to mark this configuration as device-specific. To include this configuration for a device, enter the requested variable values when you attach a device template to a device, or create a template variables spreadsheet to apply the variables.
Protocol Select the protocols from which to redistribute routes into BGP, for all BGP sessions. Options are:
static Redistribute static routes into BGP.
connected Redistribute connected routes into BGP.
ospf Redistribute Open Shortest Path First routes into BGP.
omp Redistribute Overlay Management Protocol routes into BGP.
nat Redistribute Network Address Translation routes into BGP.
natpool-outside Redistribute outside NAT routes into BGP.
At a minimum, select the following:
  • For service-side BGP routing, select OMP. By default, OMP routes are not redistributed into BGP.

  • For transport-side BGP routing, select Connected, and then under Route Policy, specify a route policy that has BGP advertise the loopback interface address to its neighbors.

Route Policy Enter the name of the route policy to apply to redistributed routes.
Click Add to save the redistribution information.
Network Click Network > New Network.
Mark as Optional Row Check Mark as Optional Row to mark this configuration as device-specific. To include this configuration for a device, enter the requested variable values when you attach a device template to a device, or create a template variables spreadsheet to apply the variables.
Network Prefix Enter a network prefix, in the format prefix/length to be advertised by BGP.
Click Add to save the network prefix.
Aggregate Address Click Aggregate Address > New Aggregate Address.
Mark as Optional Row Check Mark as Optional Row to mark this configuration as device-specific. To include this configuration for a device, enter the variable values when you attach a device template to a device, or create a template variables spreadsheet to apply the variables.

Aggregate Prefix

IPv6 Aggregate Prefix

Enter the prefix of the addresses to aggregate for all BGP sessions in the format prefix/length.
AS Set Path Click On to generate the set path information for aggregated prefixes.
Summary Only Click On to filter out specific routes from the BGP updates.
Click Add to save the aggregate address.

To save the feature template, click Save.

Configure BGP Neighbors

To configure a neighbor, click Neighbor > New Neighbor, and configure the following parameters:


Note

For BGP to function, you must configure at least one neighbor.


Parameter Name Options Sub-Options Description
IPv4 / IPv6 Click IPv4 to configure IPv4 neighbors. Click IPv6 to configure IPv6 neighbors.
Address/IPv6 Address Specify the IP address of the BGP neighbor.
Description Enter a description of the BGP neighbor.
Remote AS Enter the AS number of the remote BGP peer.
Address Family Click On and select the address family. Enter the address family information. The software supports only the BGP IPv4 unicast address family.
Address Family Select the address family. The software supports only the BGP IPv4 unicast address family.
Maximum Number of Prefixes

Specify the maximum number of prefixes that can be received from the neighbor.

Range: 1 through 4294967295

Default: 0

Threshold Specify the threshold at which to generate a warning message or restart the BGP connection. The threshold is a percentage of the maximum number of prefixes. You can specify either a restart interval or a warning only.
Restart Interval Specify the duration to wait for restarting the BGP connection.Range: 1 through 65535 minutes
Warning Only Click On to display a warning message without restarting the BGP connection.
Route Policy In Click On and specify the name of a route policy that will have the prefixes from the neighbour.
Route Policy Out Click On and specify the name of a route policy that will have the prefixes sent to the neighbour.
Shutdown Click On to enable the connection to the BGP neighbor.
Configure MPLS Interface
Table 6. Feature History
Feature Name

Release

Information

Description

MPLS-BGP Support on the Service Side

Cisco IOS XE Release Amsterdam 17.2.1r

This features allows you to enable support on Multiprotocol Label Switching (MPLS). Multiple Service VPNs use inter autonomous system (AS) BGP labelled path to forward the traffic, which in turn helps scaling the service side VPNs with less control plane signaling.

Label distribution for a given VPN routing and forwarding (VRF) instance on a given device can be handled by Border Gateway Protocol (BGP).

Cisco IOS XE SD-WAN devices support Multiprotocol Label Switching (MPLS) to enable multiple protocol environment. MPLS offers extremely scalable, protocol agnostic, data-carrying mechanism that transfers data packets with assigned labels across the network through virtual links. Extensions of the BGP protocol can be used to manage an MPLS path. The Cisco IOS XE SD-WAN devices also have the capability of BGP MPLS VPN Option B.

The multiple service VPNs use inter autonomous system (AS) BGP labelled path to forward the traffic, that in turn helps scale the service side VPNs with less control plane signaling. MPLS interface is supported only in global VRF.

To configure MPLS interface,

  • Click MPLS Interface.

  • Enter the interface name in the Interface Name field.

  • You can click on + to add more interfaces and save the configuration.

Configure Label Range

The Cisco vManage automatically programs the label space for BGP MPLS. The labels are allocated per VPN. To view the configuration, use the command, show sdwan running-config.

Sample configuration:

Device# show sdwan running-config
Device# mpls label range 100000 1048575 static 16 999
Device# mpls label mode all-vrfs protocol bgp-vpnv4 per-vrf
Device# mpls label mode all-vrfs protocol bgp-vpnv6 per-vrf

Configure Route Targets

You can configure route targets on the Cisco IOS XE SD-WAN devices. Route targets configuration is supported only on eBGP and IPv4 peer devices. All the supported protocols can be redistributed to BGP.

To configure route targets, click Route Targets tab and configure the following parameters:

Tab/Parameter Option Sub-Option Description
IPv4 / IPv6 Click IPv4 to configure route target for IPv4 interfaces. Click IPv6 to configure route target for IPv6 interfaces.
Add VPN Click Add VPN to add VPNs.
VPN ID for IPv4

Specify the VPN ID for IPv4 interface.

Import

Imports routing information from the target VPN extended community.

Export

Exports routing information to the target VPN extended community.

To save the feature template, click Save.

Initially, the devices have default route targets, then you can add additional entries as required.

Configure Advanced Neighbor Parameter

To configure advanced parameters for the neighbor, click Neighbor > Advanced Options.

Parameter Name Description
Next-Hop Self Click On to configure the router to be the next hop for routes advertised to the BGP neighbor.
Send Community Click On to send the local router's BGP community attribute to the BGP neighbor.
Send Extended Community Click On to send the local router's BGP extended community attribute to the BGP neighbor.
Negotiate Capability Click On to allow the BGP session to learn about the BGP extensions that are supported by the neighbor.
Source Interface Address Enter the IP address of a specific interface of the neighbor that BGP is to use for the TCP connection to the neighbor.
Source Interface Name Enter the name of a specific interface of the neighbor that BGP is to use for the TCP connection to the neighbor, in the format ge port/slot.
EBGP Multihop Set the time to live (TTL) for BGP connections to external peers.

Range: 0 to 255

Default: 1

Password Enter a password to use to generate an MD5 message digest. Configuring the password enables MD5 authentication on the TCP connection with the BGP peer. The password is case-sensitive and can be up to 25 characters long. It can contain any alphanumeric characters, including spaces. The first character cannot be a number.
Keepalive Time Specify the frequency at which keepalive messages are advertised to a BGP peer. These messages indicate to the peer that the local router is still active and should be considered available. Specify the keepalive time for the neighbor to override the global keepalive time.

Range: 0 through 65535 seconds

Default: 60 seconds (one-third the hold-time value)

Hold Time Specify the interval after not receiving a keepalive message that the local BGP session considers its peer to be unavailable. The local router then terminates the BGP session to that peer. Specify the hold time for the neighbor to override the global hold time.

Range: 0 through 65535 seconds

Default: 180 seconds (three times the keepalive timer)

Connection Retry Time Specify the number of seconds between retries to establish a connection to a configured BGP neighbor peer that has gone down.

Range: 0 through 65535 seconds

Default: 30 seconds

Advertisement Interval For the BGP neighbor, set the minimum route advertisement interval (MRAI) between when BGP routing update packets are sent to that neighbor.

Range: 0 through 600 seconds

Default: 5 seconds for IBGP route advertisements; 30 seconds for EBGP route advertisements

To save the feature template, click Save.

Change the Scope of a Parameter Value

When you first open a feature template, for each parameter that has a default value, the scope is set to Default (a ), and the default setting or value is shown). To change the default or to enter a value, click the scope drop-down to the left of the parameter field and select one of the following:

Parameter Name

Description

Device Specific

Use a device-specific value for the parameter. For device-specific parameters, you cannot enter a value in the feature template. You enter the value when you attach a device to a device template.

When you click Device Specific, the Enter Key box opens. This box displays a key which is a unique string that identifies the parameter in a CSV file that you create. This file is an Excel spreadsheet that contains one column for each key. The header row contains the key names (one key per column), and each row after that corresponds to a device and defines the values of the keys for that device. You upload the CSV file when you attach a device to a device template.

To change the default key, type a new string and move the cursor out of the Enter Key box.

Examples of device-specific parameters are system IP address, hostname, GPS location, and site ID.

Global

Enter a value for the parameter, and apply that value to all devices.

Examples of parameters that you might apply globally to a group of devices are DNS server, syslog server, and interface MTUs.

Configure Advanced BGP Parameters

To configure advanced parameters for BGP, click the Advanced tab and configure the following parameters:

Parameter Name Description
Hold Time Specify the interval after not receiving a keepalive message that the local BGP session considers its peer to be unavailable. The local device then terminates the BGP session to that peer. This hold time is the global hold time.

Range: 0 through 65535 seconds

Default: 180 seconds (three times the keepalive timer)

Keepalive Specify the frequency at which keepalive messages are advertised to a BGP peer. These messages indicate to the peer that the local device is still active and should be considered available. This keepalive time is the global keepalive time.

Range: 0 through 65535 seconds

Default: 60 seconds (one-third the hold-time value)

Compare MED Click On to compare the device IDs among BGP paths to determine the active path.
Deterministic MED Click On to compare multiple exit discriminators (MEDs) from all routes received from the same AS, regardless of when the route was received.
Missing MED as Worst Click On to consider a path as the worst path if the path is missing a MED attribute.
Compare Router ID Click On to always compare MEDs regardless of whether the peer ASs of the compared routes are the same.
Multipath Relax Click On to have the BGP best-path process select from routes in different in ASs. By default, when you are using BGP multipath, the BGP best path process selects from routes in the same AS to load-balance across multiple paths.

To save the feature, click Save.

Configure OSPF Using vManage Templates

Use the OSPF template for all Cisco SD-WAN devices.


Note

Cisco XE SD-WAN devices use VRFs in place of VPNs. However, the following steps still apply to configure Cisco IOS XE SD-WAN devices through Cisco vManage. When you complete the configuration, the system automatically maps the VPN configurations to VRF configurations.


To configure OSPF on a device using Cisco vManage templates:

  1. Create an OSPF feature template to configure OSPF parameters. OSPF can be used for service-side routing to provide reachability to networks at the local site, and it can be used for transport-side routing to enable communication between the Cisco SD-WAN devices when the router is not directly connected to the WAN cloud. Create separate OSPF templates for the two OSPF routing types.

  2. Create a VPN feature template to configure VPN parameters for either service-side OSPF routing (in any VPN other than VPN 0 or VPN 512) or transport-side OSPF routing (in VPN 0). See the VPN help topic for more information.

Create an OSPF Template
  1. In vManage NMS, select Configuration > Templates.

  2. In the Device tab, click Create Template.

  3. From the Create Template drop-down, select From Feature Template.

  4. From the Device Model drop-down, select the type of device for which you are creating the template. To create a template for VPN 0 or VPN 512:

    1. Click the Transport & Management VPN tab located directly beneath the Description field, or scroll to the Transport & Management VPN section.

    2. Under Additional VPN 0 Templates, located to the right of the screen, click OSPF.

    3. From the OSPF drop-down, click Create Template. The OSPF template form is displayed. The top of the form contains fields for naming the template, and the bottom contains fields for defining OSPF parameters.

  5. To create a template for VPNs 1 through 511, and 513 through 65530:

    1. Click the Service VPN tab located directly beneath the Description field, or scroll to the Service VPN section.

    2. Click the Service VPN drop-down.

    3. Under Additional VPN Templates, located to the right of the screen, click OSPF.

    4. From the OSPF drop-down, click Create Template. The OSPF template form is displayed. The top of the form contains fields for naming the template, and the bottom contains fields for defining OSPF parameters.
  6. In the Template Name field, enter a name for the template. The name can be up to 128 characters and can contain only alphanumeric characters.

  7. In the Template Description field, enter a description of the template. The description can be up to 2048 characters and can contain only alphanumeric characters.

When you first open a feature template, for each parameter that has a default value, the scope is set to Default (indicated by a check mark), and the default setting or value is shown. To change the default or to enter a value, click the scope drop-down to the left of the parameter field and select one of the following:

Table 7.

Parameter Scope

Scope Description

Device Specific (indicated by a host icon)

Use a device-specific value for the parameter. For device-specific parameters, you cannot enter a value in the feature template. You enter the value when you attach a Cisco SD-WAN device to a device template .

When you click Device Specific, the Enter Key box opens. This box displays a key,which is a unique string that identifies the parameter in a CSV file that you create. This file is an Excel spreadsheet that contains one column for each key. The header row contains the key names (one key per column), and each row after that corresponds to a device and defines the values of the keys for that device. You upload the CSV file when you attach a Cisco SD-WAN device to a device template. For more information, see Create a Template Variables Spreadsheet .

To change the default key, type a new string and move the cursor out of the Enter Key box.

Examples of device-specific parameters are system IP address, hostname, GPS location, and site ID.

Global (indicated by a globe icon)

Enter a value for the parameter, and apply that value to all devices.

Examples of parameters that you might apply globally to a group of devices are DNS server, syslog server, and interface MTUs.

Configure Basic OSPF

To configure basic OSPF, select the Basic Configuration tab and then configure the following parameters. All these parameters are optional. For OSPF to function, you must configure area 0, as described below.

Table 8.

Parameter Name

Description

Router ID

Enter the OSPF router ID in decimal four-part dotted notation. This is the IP address associated with the router for OSPF adjacencies.

Distance for External Routes

Specify the OSPF route administration distance for routes learned from other domains.

Range: 0 through 255Default: 110

Distance for Inter-Area Routes

Specify the OSPF route administration distance for routes coming from one area into another.

Range: 0 through 255Default: 110

Distance for intra-Area routes

Specify the OSPF route administration distance for routes within an area.

Range: 0 through 255Default: 110

To save the feature template, click Save.

Redistribute Routes into OSPF

To redistribute routes learned from other protocols into OSPF on Cisco SD-WAN devices, select Redistribute > Add New Redistribute and configure the following parameters:

Table 9.

Parameter Name

Description

Protocol

Select the protocol from which to redistribute routes into OSPF. Select from BGP, Connected, NAT, OMP, and Static.

Route Policy

Enter the name of a localized control policy to apply to routes before they are redistributed into OSPF.

To add another OSPF route redistribution policy, click the plus sign (+).

To remove an OSPF route redistribution policy from the template configuration, click the trash icon to the right of the entry.

To save the feature template, click Save.

Configure OSPF To Advertise a Maximum Metric

To configure OSPF to advertise a maximum metric so that other devices do not prefer the Cisco vEdge deviceCisco IOS XE SD-WAN device as an intermediate hop in their Shortest Path First (SPF) calculation, select Maximum Metric (Router LSA) > Add New Router LSA and configure the following parameters:

Table 10.

Parameter Name

Description

Type

Select a type:

  • Administrative—Force the maximum metric to take effect immediately through operator intervention.

  • On-Startup—Advertise the maximum metric for the specified time.

Advertisement Time

If you selected On-Startup, specify the number of seconds to advertise the maximum metric after the router starts up.

Range: 0, 5 through 86400 secondsDefault: 0 seconds (the maximum metric is advertised immediately when the router starts up)

To save the feature template, click Save.

Configure OSPF Areas

To configure an OSPF area within a VPN on a Cisco SD-WAN device, select Area > Add New Area. For OSPF to function, you must configure area 0.

Table 11.

Parameter Name

Description

Area Number

Enter the number of the OSPF area.

Range: 32-bit number

Set the Area Type

Select the type of OSPF area, Stub or NSSA.

No Summary

Select On to not inject OSPF summary routes into the area.

Translate

If you configured the area type as NSSA, select when to allow Cisco SD-WAN devices that are ABRs (area border routers) to translate Type 7 LSAs to Type 5 LSAs:

  • Always—Router always acts as the translator for Type 7 LSAs. That is no other router, even if it is an ABR, can be the translator. If two ABRs are configured to always be the translator, only one of them actually ends up doing the translation.

  • Candidate—Router offers translation services, but does not insist on being the translator.

  • Never—Translate no Type 7 LSAs.

To save the new area, click Add.

To save the feature template, click Save.

Configure Interfaces in an OSPF Area

To configure the properties of an interface in an OSPF area, select Area > Add New Area > Add Interface. In the Add Interface popup, configure the following parameters:

Table 12.

Parameter Name

Description

Interface Name

Enter the name of the interface, in the format ge slot/port or loopback number.

Hello Interval

Specify how often the router sends OSPF hello packets.

Range: 1 through 65535 secondsDefault: 10 seconds

Dead Interval

Specify how often the Cisco vEdge deviceCisco IOS XE SD-WAN device must receive an OSPF hello packet from its neighbor. If no packet is received, the Cisco vEdge deviceCisco IOS XE SD-WAN deviceassumes that the neighbor is down.

Range: 1 through 65535 secondsDefault: 40 seconds (4 times the default hello interval)

LSA Retransmission Interval

Specify how often the OSPF protocol retransmits LSAs to its neighbors.

Range: 1 through 65535 secondsDefault: 5 seconds

Interface Cost

Specify the cost of the OSPF interface.

Range: 1 through 65535

To configure advanced options for an interface in an OSPF area, in the Add Interface popup, click Advanced Options and configure the following parameters:

Table 13.

Parameter Name

Description

Designated Router Priority

Set the priority of the router to be elected as the designated router (DR). The router with the highest priority becomes the DR. If the priorities are equal, the node with the highest router ID becomes the DR or the backup DR.Range: 0 through 255Default: 1

OSPF Network Type

Select the OSPF network type to which the interface is to connect:

  • Broadcast network—WAN or similar network.

  • Point-to-point network—Interface connects to a single remote OSPF router.

Default: Broadcast

Passive Interface

Select On or Off to specify whether to set the OSPF interface to be passive. A passive interface advertises its address, but does not actively run the OSPF protocol.Default: Off

Authentication

Specify the authentication and authentication key on the interface to allow OSPF to exchange routing update information securely.

• Authentication Type

Select the authentication type:

  • Simple authentication—Password is sent in clear text.

  • Message-digest authentication—MD5 algorithm generates the password.

• Authentication Key

Enter the authentication key. Plain text authentication is used when devices within an area cannot support the more secure MD5 authentication. The key can be 1 to 32 characters.

Message Digest

Specify the key ID and authentication key if you are using message digest (MD5).

• Message Digest Key ID

Enter the key ID for message digest (MD5 authentication). It can be 1 to 32 characters.

• Message Digest Key

Enter the MD5 authentication key in clear text or as an AES-encrypted key. It can be from 1 to 255 characters.

To save the interface configuration, click Save.

To save the new area, click Add.

To save the feature template, click Save.

Configure an Interface Range for Summary LSAs

To configure the properties of an interface in an OSPF area, select Area > Add New Area > Add Range. In the Area Range popup, click Add Area Range, and configure the following parameters:

Table 14.

Parameter Name

Description

Address

Enter the IP address and subnet mask, in the format prefix/length for the IP addresses to be consolidated and advertised.

Cost

Specify a number for the Type 3 summary LSA. OSPF uses this metric during its SPF calculation to determine the shortest path to a destination.Range: 0 through 16777215

No Advertise

Select On to not advertise the Type 3 summary LSAs or Off to advertise them.

To save the area range, click Save.

To save the new area, click Add.

To save the feature template, click Save.

Configure Other OSPF Properties

To configure other OSPF properties, select the Advanced tab and configure the following properties:

Table 15.

Parameter Name

Description

Reference Bandwidth

Specify the reference bandwidth for the OSPF auto-cost calculation for the interface.

Range: 1 through 4294967 MbpsDefault: 100 Mbps

RFC 1538 Compatible

By default, the OSPF calculation is done per RFC 1583. Select Off to calculate the cost of summary routes based on RFC 2328.

Originate

Click On to generate a default external route into an OSPF routing domain:

  • Always—Select On to always advertise the default route in an OSPF routing domain.

  • Default metric—Set the metric used to generate the default route.Range: 0 through 16777214Default: 10

  • Metric type—Select to advertise the default route as an OSPF Type 1 external route or an OSPF Type 2 external route.

SPF Calculation Delay

Specify the amount of time between when the first change to a topology is received until performing the SPF calculation.

Range: 0 through 600000 milliseconds (60 seconds)Default: 200 milliseconds

Initial Hold Time

Specify the amount of time between consecutive SPF calculations.

Range: 0 through 600000 milliseconds (60 seconds)Default: 1000 milliseconds

Maximum Hold Time

Specify the longest time between consecutive SPF calculations.

Range: 0 through 600000Default: 10000 milliseconds (60 seconds)

Policy Name

Enter the name of a localized control policy to apply to routes coming from OSPF neighbors.

To save the feature template, click Save.

Configure OMP Using vManage Templates

Use the OMP template to configure OMP parameters for all Cisco vEdge devicesCisco IOS XE SD-WAN devices, and for Cisco vSmart Controllers.

OMP is enabled by default on all Cisco vEdge devicesCisco IOS XE SD-WAN devices, Cisco vManage NMSs, and Cisco vSmart Controllers, so there is no need to explicitly enable OMP. OMP must be operational for the Cisco SD-WAN overlay network to function. If you disable it, you disable the overlay network.


Note

Cisco XE SD-WAN devices use VRFs in place of VPNs. However, the following steps still apply to configure Cisco IOS XE SD-WAN devicesthrough Cisco vManage. When you complete the configuration, the system automatically maps the VPN configurations to VRF configurations.


Create OMP Template
  1. In vManage NMS, select Configuration > Templates.

  2. In the Device tab, click Create Template.

  3. From the Create Template drop-down, select From Feature Template.

  4. From the Device Model drop-down, select the type of device for which you are creating the template.

  5. To create a custom template for OMP, select the Factory_Default_OMP_Template and click Create Template. The OMP template form is displayed. The top of the form contains fields for naming the template, and the bottom contains fields for defining OMP parameters. You may need to click a tab or the plus sign (+) to display additional fields.

  6. In the Template Name field, enter a name for the template. The name can be up to 128 characters and can contain only alphanumeric characters.
  7. In the Template Description field, enter a description of the template. The description can be up to 2048 characters and can contain only alphanumeric characters.

When you first open a feature template, for each parameter that has a default value, the scope is set to Default (indicated by a check mark), and the default setting or value is shown. To change the default or to enter a value, click the scope drop-down to the left of the parameter field and select one of the following:
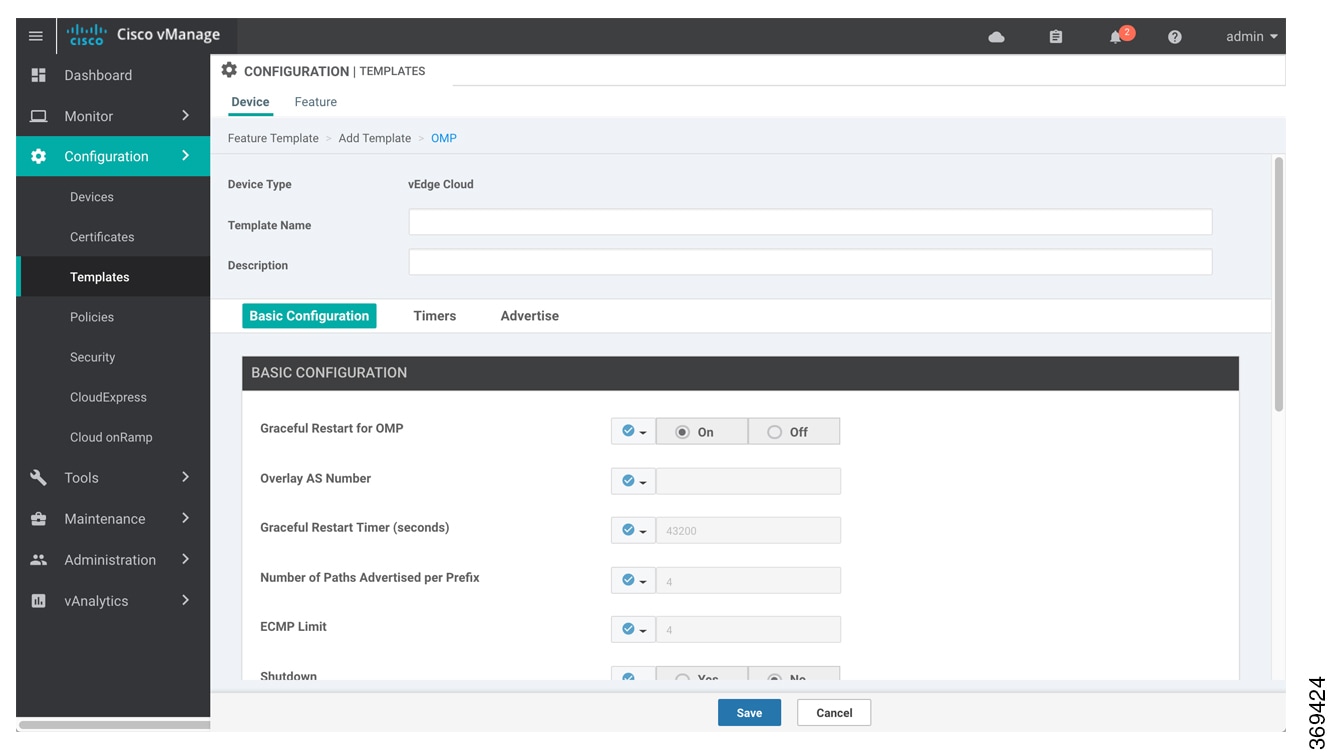
Table 16.

Parameter Scope

Scope Description

Device Specific (indicated by a host icon)

Use a device-specific value for the parameter. For device-specific parameters, you cannot enter a value in the feature template. You enter the value when you attach a Cisco SD-WAN device to a device template .

When you click Device Specific, the Enter Key box opens. This box displays a key, which is a unique string that identifies the parameter in a CSV file that you create. This file is an Excel spreadsheet that contains one column for each key. The header row contains the key names (one key per column), and each row after that corresponds to a device and defines the values of the keys for that device. You upload the CSV file when you attach a Cisco SD-WAN device to a device template. For more information, see Create a Template Variables Spreadsheet .

To change the default key, type a new string and move the cursor out of the Enter Key box.

Examples of device-specific parameters are system IP address, hostname, GPS location, and site ID.

Global (indicated by a globe icon)

Enter a value for the parameter, and apply that value to all devices.

Examples of parameters that you might apply globally to a group of devices are DNS server, syslog server, and interface MTUs.

Configure Basic OMP Options

To configure basic OMP options, select the Basic Configuration tab and configure the following parameters. All parameters are optional.

Table 17.

Parameter Name

Description

Graceful Restart for OMP

Ensure that Yes is selected to enable graceful restart. By default, graceful restart for OMP is enabled.

Overlay AS Number (on vEdge routers only)

Specify a BGP AS number that OMOP advertises to the router's BGP neighbors.

Graceful Restart Timer

Specify how often the OMP information cache is flushed and refreshed. A timer value of 0 disables OMP graceful restart.Range: 0 through 604800 seconds (168 hours, or 7 days)Default: 43200 seconds (12 hours)

Number of Paths Advertised per Prefix

Specify the maximum number of equal-cost routes to advertise per prefix. Cisco vEdge devices advertise routes to Cisco vSmart Controllers, and the controllers redistributes the learned routes, advertising each route-TLOC tuple. A Cisco vEdge deviceCisco IOS XE SD-WAN device can have up to four TLOCs, and by default advertises each route-TLOC tuple to the Cisco vSmart Controller. If a local site has two Cisco vEdge devicesCisco IOS XE SD-WAN device, a Cisco vSmart Controller could potentially learn eight route-TLOC tuples for the same route. If the configured limit is lower than the number of route-TLOC tuples, the best route or routes are advertised.Range: 1 through 16Default: 4

ECMP Limit (on vEdge routers only)

Specify the maximum number of OMP paths received from the Cisco vSmart Controller that can be installed in the Cisco vEdge device'sCisco IOS XE SD-WAN device'slocal route table. By default, a Cisco vEdge deviceCisco IOS XE SD-WAN device installs a maximum of four unique OMP paths into its route table.Range: 1 through 32Default: 4

Send Backup Paths (on vSmart Controllers only)

Click On to have OMP advertise backup routes to Cisco vEdge devicesCisco IOS XE SD-WAN devices. By default, OMP advertises only the best route or routes. If you configure to send backup paths, OMP also advertises the first non-best route in addition to the best route or routes.

Shutdown

Ensure that No is selected to enable to Cisco SD-WAN overlay network. Click Yes to disable OMP and disable the Cisco SD-WAN overlay network. OMP is enabled by default.

Discard rejected (on vSmart controllers only)

Click Yes to have OMP discard routes that have been rejected on the basis of policy. By default, rejected routes are not discarded.

To save the feature template, click Save.

Configure OMP Timers

To configure OMP timers, select the Timers tab and configure the following parameters:

Table 18.

Parameter Name

Description

Advertisement Interval

Specify the time between OMP Update packets.

Range: 0 through 65535 secondsDefault: 1 second

Hold Time

Specify how long to wait before closing the OMP connection to a peer. If the peer does not receive three consecutive keepalive messages within the hold time, the OMP connection to the peer is closed.Range: 0 through 65535 secondsDefault: 60 seconds

EOR Timer

Specify how long to wait after an OMP session has gone down and then come back up to send an end-of-RIB (EOR) marker. After this marker is sent, any routes that were not refreshed after the OMP session came back up are considered to be stale and are deleted from the route table.Range: 1 through 3600 seconds (1 hour)Default: 300 seconds (5 minutes)

To save the feature template, click Save.

Configure OMP Advertisements

To advertise routes learned locally by the Cisco vEdge deviceCisco IOS XE SD-WAN device to OMP, select the Advertise tab and configure the following parameters:

Table 19.

Parameter Name

Description

Advertise

Click On or Off to enable or disable the Cisco vEdge deviceCisco IOS XE SD-WAN device advertising to OMP the routes that it learns locally:

  • BGP—Click On to advertise BGP routes to OMP. By default, BGP routes are not advertised to OMP.

  • Connected—Click Off to disable advertising connected routes to OMP. By default, connected routes are advertised to OMP.

  • OSPF—​Click On and click On again in the External field that appears to advertise external OSPF routes to OMP. OSPF inter-area and intra-area routes are always advertised to OMP. By default, external OSPF routes are not advertised to OMP.

  • Static—Click Off to disable advertising static routes to OMP. By default static routes are advertised to OMP.

To configure per-VPN route advertisements to OMP, use the VPN feature template .

To save the feature template, click Save.

Configure EIGRP Using Cisco vManage

To configure EIGRP routing protocol using Cisco vManage templates follow these steps:

  1. Create an EIGRP feature template to configure EIGRP parameters.

  2. Create a VPN feature template to configure VPN parameters for service-side routing (any VPN other than VPN 0 or VPN 512).

  3. Create a device template and apply the templates to the correct devices.

Create an EIGRP Template
  1. From the Cisco vManage, navigate to Configuration > Templates.

  2. Click Feature.

  3. Click Add Template and select a device from the list.

  4. From the Other Templates section, choose EIGRP and enter a name and a description for the template.

Basic Configuration

Click the Basic Configuration tab to configure the local autonomous system (AS) number for the template.

Parameter Name

Description

Autonomous System ID *

Enter the local AS number.

  • Range: 1-65,535

  • Default: None

Configure IP4 Unicast Address Family

To redistribute routes from one protocol (routing domain) into a EIGRP routing domain, click New Redistribute and enter the following parameter values:

Table 20. Redistribution Parameters

Parameter Name

Value

Description

Mark as Optional Row

Click Optional to mark this configuration as device-specific. To include this configuration for a device, enter the requested variable values when you attach a device template to a device, or create a template variables spreadsheet to apply the variables.

Protocol *

Select the protocols from which to redistribute routes into EIGRP, for all EIGRP sessions.

bgp

Redistribute Border Gateway Protocol (BGP) routes into EIGRP.

connected

Redistribute connected routes into EIGRP.

nat-route

Redistribute network address translation (NAT) routes into EIGRP.

omp

Redistribute Overlay Management Protocol (OMP) routes into EIGRP.

ospf

Redistribute Open Shortest Path First (OSPF) routes into EIGRP.

static

Redistribute static routes into EIGRP.

Route Policy *

Enter the name of the route policy to apply to redistributed routes.

Click Add to save the redistribution information.

To advertise a prefix into the EIGRP routing domain, click the Network tab, and then click New Network and enter the following parameter values:

Table 21. Configure Network

Parameter Name

Description

Mark as Optional Row

Click Optional to mark this configuration as device-specific. To include this configuration for a device, enter the requested variable values when you attach a device template to a device, or create a template variables spreadsheet to apply the variables. See Create a Template Variables Spreadsheet.

Network Prefix *

Enter the network prefix you want EIGRP to advertise in the format of prefix/mask.

Click Add to save the network prefix.

Configure Advanced Parameters

To configure advanced parameters for EIGRP, click the Advanced tab and configure the following parameter values:

Table 22. Advanced Parameters

Parameter Name

Description

Hold Time (seconds)

Set the interval after which EIGRP considers a neighbor to be down. The local router then terminates the EIGRP session to that peer. This acts as the global hold time.

  • Range: 0 through 65,535

  • Default: 15 seconds

Hello Interval (seconds)

Set the interval at which the router sends EIGRP hello packets.

  • Range: 0 through 65,535

  • Default: 5 seconds

Route Policy Name

Enter the name of an EIGRP route policy.

Configure Route Authentication Parameters

The IP Enhanced IGRP Route Authentication feature supports MD5 or HMAC-sha-256 authentication of routing updates from the EIGRP routing protocol. To configure authentication for EIGRP routes:

  1. Click the Authentication tab.

  2. Click Authentication to open the Authentication Type field.

  3. Select global parameter scope.

  4. From the drop-down list, select md5 or hmac-sha-256.

    Parameter

    Option

    Description

    MD5

    MD5 Key ID

    Enter an MD5 key ID to compute an MD5 hash over the contents of the EIGRP packet using that value.

    MD5 Authentication Key

    Enter an MD5 authentication key to use an encoded MD5 checksum in the transmitted packet.

    Authentication Key

    A 256-byte unique piece of information that is used to compute the HMAC and is known both by the sender and the receiver of the message.

    Click Add to save the authentication parameters.


    Note

    To use a preferred route map, specify both an MD5 key (ID or auth key) and a route map.
Configure Interface Parameters

To configure interface parameters for EIGRP routes, click Interface, and enter the following parameter values:

Table 23. Interface Parameters
Parameter Name Description
Mark as Optional Row Click Optional to mark this configuration as device-specific. To include this configuration for a device, enter the requested variable values when you attach a device template to a device, or create a template variables spreadsheet to apply the variables.
Interface name Enter the interface name(s) on which EIGRP should run.
Shutdown

No (the default) enables the interface to run EIGRP.

Yes disables the interface.

Click Add to save the interfaces.

Configure PIM Using vManage Templates

Use the PIM template for all Cisco SD-WANCisco IOS XE SD-WAN devices.

Configure the PIM Sparse Mode (PIM-SM) protocol using vManage templates so that a router can participate in the Cisco SD-WANCisco IOS XE SD-WAN multicast overlay network:

  1. Create a PIM feature template to configure PIM parameters.

  2. Optionally, create an IGMP feature template to allow individual hosts on the service side to join multicast groups within a particular VPN. See Configure IGMP Using vManage Templaes.

  3. Optionally, create a Multicast feature template to configure a Cisco SD-WANCisco IOS XE SD-WAN to be a multicast replicator.

  4. Create a VPN feature template to configure parameters for the VPN that is running PIM.

Create a PIM Feature Template
  1. In vManage NMS, select Configuration > Templates.

  2. In the Device tab, click Create Template.

  3. From the Create Template drop-down, select From Feature Template.

  4. From the Device Model drop-down, select the type of device for which you are creating the template.

  5. Click the Service VPN tab located directly beneath the Description field, or scroll to the Service VPN section.

  6. Click the Service VPN drop-down.
    Figure 5. PIM Template
  7. Under Additional VPN Templates, located to the right of the screen, click PIM.

  8. From the PIM drop-down, click Create Template. The PIM template form is displayed. The top of the form contains fields for naming the template, and the bottom contains fields for defining PIM parameters.

  9. In the Template Name field, enter a name for the template. The name can be up to 128 characters and can contain only alphanumeric characters.

  10. In the Template Description field, enter a description of the template. The description can be up to 2048 characters and can contain only alphanumeric characters.

  11. In the Basic Configuration tab, configure SSM – on/off.

  12. Configure access list (if already defined).

  13. To configure RP option – Auto-RP or static RP.

  14. Configure RP Announce settings.

  15. Configure the interface name on the service side.

  16. Save feature template and attach feature template to device template.

When you first open a feature template, for each parameter that has a default value, the scope is set to Default (indicated by a check mark), and the default setting or value is shown. To change the default or to enter a value, click the scope drop-down to the left of the parameter field and select the value.

Table 24.

Parameter Scope

Scope Description

Device Specific (indicated by a host icon)

Use a device-specific value for the parameter. For device-specific parameters, you cannot enter a value in the feature template. You enter the value when you attach a Cisco SD-WANCisco IOS XE SD-WAN device to a device template .

When you click Device Specific, the Enter Key box opens. This box displays a key, which is a unique string that identifies the parameter in a CSV file that you create. This file is an Excel spreadsheet that contains one column for each key. You upload the CSV file when you attach a Cisco SD-WANCisco IOS XE SD-WAN device to a device template.

To change the default key, type a new string and move the cursor out of the Enter Key box.

Examples of device-specific parameters are system IP address, hostname, GPS location, and site ID.

Global

Enter a value for the parameter, and apply that value to all devices.

Examples of parameters that you might apply globally to a group of devices are DNS server, syslog server, and interface MTUs.

Configure Basic PIM

To configure PIM, select the Basic Configuration tab and configure the following parameters. Parameters marked with an asterisk are required to configure PIM.

Table 25.

Parameter Name

Description

Shutdown*

Ensure that No is selected, to enable PIM.

Auto-RP

Click On to enable auto-RP to enable automatic discovery of rendezvous points (RPs) in the PIM network so that the router receivea group-to-RP mapping updates. By default, auto-RP is disabled.

SPT Threshold

Specify the traffic rate, in kbps, at which to switch from the shared tree to the shortest-path tree (SPT). Configuring this value forces traffic to remain on the shared tree and travel via the RP instead of via the SPT.

Replicator

For a topology that includes multicast replicators, determine how the replicator for a multicast group is chosen:

  • Random—Choose the replicator at random.

  • Sticky—Always use the same replicator. This is the default.

Table 26.

Parameter Name

Description

Auto-RP

Click On to enable Auto-RP to enable reception of PIM group-to-RP mapping updates. This will enable reception on the Auto-RP multicast groupe, 224.0.1.39 and 224.0.1.40. By default, Auto-RP is disabled.

Auto-RP RP Announce

Click On to enable transmission of Auto-RP multicast messages. By default, RP Announce is disabled.

Auto-RP RP Discovery

Click On to enable Auto-RP automatic discovery of rendezvous points (RPs) in the PIM network so that the router can serve as an Auto-RP mapping agent. An Auto-RP mapping will receive all the RPs and their respective multicast groups and advertise consistent group-to-RP mapping updates. By default, RP Discovery is disabled.

Static-RP

Specify the IP address of a rendezvous point (RP).

SPT Threshold

Specify the traffic rate, in kbps, at which to switch from the shared tree to the shortest-path tree (SPT). Configuring this value forces traffic to remain on the shared tree and travel via the RP instead of via the SPT.

Interface

Specify the source interface for Auto-RP RP Announcements or RP Discovery messages.

Scope

Specify the IP header Time-to-Live (TTL) for Auto-RP RP Announcements or RP Discovery messages.

To save the feature template, click Save.

Configure PIM Interfaces

If the router is just a multicast replicator and is not part of a local network that contains either multicast sources or receivers, you do not need to configure any PIM interfaces. The replicator learns the locations of multicast sources and receivers from the OMP messages it exchanges with the vSmart controller. These control plane messages are exchanged in the transport VPN (VPN 0). Similarly, other Cisco SD-WANCisco IOS XE SD-WAN devices discover replicators dynamically, through OMP messages from the vSmart controller.

To configure PIM interfaces, select the Interface tab. Then click Add New Interface and configure the following parameters:

Table 27.

Parameter Name

Description

Name

Enter the name of an interface that participates in the PIM domain, in the format ge slot /port.

Hello Interval

Specify how often the interface sends PIM hello messages. Hello messages advertise that PIM is enabled on the router.

Range: 1 through 3600 seconds

Default: 30 seconds

Join/Prune Interval

Specify how often PIM multicast traffic can join or be removed from a rendezvous point tree (RPT) or shortest-path tree (SPT). Cisco SD-WANCisco IOS XE SD-WAN send join and prune messages to their upstream RPF neighbor.

Range: 0 through 600 seconds

Default: 60 seconds

To edit an interface, click the pencil icon to the right of the entry.

To delete an interface, click the trash icon to the right of the entry.

To save the feature template, click Save.

Configure IGMP Using vManage Templates

Use the IGMP template for all Cisco SD-WANCisco IOS XE SD-WAN devices. Internet Group Management Protocol (IGMP) allows routers to join multicast groups within a particular VPN.

To configure IGMP using vManage templates:

  1. Create an IGMP feature template to configure IGMP parameters.

  2. Create the interface in the VPN to use for IGMP. See the VPN-Interface-Ethernet help topic.

  3. Create a VPN feature template to configure VPN parameters. See the VPN help topic.

Navigate to the Template Screen and Name the Template
  1. In vManage NMS, select Configuration > Templates.

  2. In the Device tab, click Create Template.

  3. From the Create Template drop-down, select From Feature Template.

  4. From the Device Model drop-down, select the type of device for which you are creating the template.

  5. Click the Service VPN tab located directly beneath the Description field, or scroll to the Service VPN section.

  6. Click the Service VPN drop-down.
  7. Under Additional VPN Templates, located to the right of the screen, click IGMP.

  8. From the IGMP drop-down, click Create Template. The IGMP template form is displayed. The top of the form contains fields for naming the template, and the bottom contains fields for defining IGMP parameters.

  9. Add interface name on service side to enable IGMP.

  10. (Optional) In the Join Group And Source Address field, click on Add Join Group and Source Address. Join Group and Source Address window displays.

    Figure 6. IGMP Template

    This image is not available in preview/cisco.com

  11. (Optional) Enter group address to join and source address.

  12. In the Template Name field, enter a name for the template. The name can be up to 128 characters and can contain only alphanumeric characters.

  13. In the Template Description field, enter a description of the template. The description can be up to 2048 characters and can contain only alphanumeric characters.

When you first open a feature template, for each parameter that has a default value, the scope is set to Default (indicated by a check mark), and the default setting or value is shown. To change the default or to enter a value, click the scope drop-down to the left of the parameter field and select the value.

Table 28.

Parameter Scope

Scope Description

Device Specific (indicated by a host icon)

Use a device-specific value for the parameter. For device-specific parameters, you cannot enter a value in the feature template. You enter the value when you attach a Cisco SD-WANCisco IOS XE SD-WAN device to a device template .

When you click Device Specific, the Enter Key box opens. This box displays a key, which is a unique string that identifies the parameter in a CSV file that you create. This file is an Excel spreadsheet that contains one column for each key. You upload the CSV file when you attach a Cisco SD-WANCisco IOS XE SD-WAN device to a device template.

To change the default key, type a new string and move the cursor out of the Enter Key box.

Examples of device-specific parameters are system IP address, hostname, GPS location, and site ID.

Global

Enter a value for the parameter, and apply that value to all devices.

Examples of parameters that you might apply globally to a group of devices are DNS server, syslog server, and interface MTUs.

Configure Basic IGMP Parameters

To configure IGMP, select the Basic Configuration tab to enable IGMP. Then, select the Interface tab and click Add New Interface to configure IGMP interfaces. All parameters listed below are required to configure IGMP.

Table 29.

Parameter Name

Description

Shutdown

Ensure that No is selected to enable IGMP.

Interface Name

Enter the name of the interface to use for IGMP.

To add another interface, click the plus sign (+).

Join Group Address

Optionally, click Add Join Group Address to enter a multicast group.

Click Add to add the IGMP for the group.

To save the feature template, click Save.

Bridging

Configure Switchports

  1. In Cisco vManage, choose Configuration > Templates.

  2. In the Device tab, click Create Template.

  3. From the Create Template drop-down, choose From Feature Template.

  4. From the Device Model drop-down, choose the type of device for which you are creating the template.

  5. Click the Additional Templates tab located directly beneath the Description field, or scroll to the Additional Templates section.

  6. Click the plus sign (+) next to Switch Port.

  7. In the Switch Port drop-down, choose the port number.

  8. If the switch port you want to choose does not exist, from the lower Switch Port drop-down, click Create Template. The Switch Port template form is displayed. The top of the form contains fields for naming the template, and the bottom contains fields for defining switch port parameters.
  9. In the Template Name field, enter a name for the template. The name can be up to 128 characters and can contain only alphanumeric characters.

  10. In the Template Description field, enter a description of the template. The description can be up to 2048 characters and can contain only alphanumeric characters.

When you first open a feature template, for each parameter that has a default value, the scope is set to Default (indicated by a check mark), and the default setting or value is shown. To change the default or to enter a value, click the scope drop-down to the left of the parameter field and select one of the following:

Table 30.

Parameter Scope

Scope Description

Device Specific (indicated by a host icon)

Use a device-specific value for the parameter. For device-specific parameters, you cannot enter a value in the feature template. You enter the value when you attach a Viptela device to a device template .

When you click Device Specific, the Enter Key box opens. This box displays a key, which is a unique string that identifies the parameter in a CSV file that you create. This file is an Excel spreadsheet that contains one column for each key. The header row contains the key names (one key per column), and each row after that corresponds to a device and defines the values of the keys for that device. You upload the CSV file when you attach a Cisco SD-WAN device to a device template.

To change the default key, type a new string and move the cursor out of the Enter Key box.

Examples of device-specific parameters are system IP address, hostname, GPS location, and site ID.

Global (indicated by a globe icon)

Enter a value for the parameter, and apply that value to all devices.

Examples of parameters that you might apply globally to a group of devices are DNS server, syslog server, and interface MTUs.

Configure Basic Switch Port Parameters

To configure basic switch port parameters, select the Basic Configuration tab and configure the following parameters:

Table 31.

Parameter Name

Description

Slot

Enter the number of the slot in which the Layer 2 switch port module is installed.

Sub-Slot

Enter the number of the sub-slot.

Module

Select the switch port module type. You can choose from 4, 8, or 22 ports.

To save the feature template, click Save.

Associate Interfaces with the Switch Port

To associate an interface with the switch port, click the Interface tab and click Add New Interface.

The Wlan-GigabitEthernet0/1/8 interface applies only to C1111-8PW and C1111-8PLTExxW routers. When you configure this interface, select either C1111-8PW or C1111-8PLTExxW when you create a switch port, and select 8 port from the Module drop-down list. In addition, from the New Interface drop-down menu, make sure to choose Wlan-GigabitEthernet0/1/8.

Table 32.

Parameter Name

Description

Interface Name

Enter the name of the interface to associate with the bridging domain, in the format Gi slot/sub-slot/port.

Shutdown

Click No to enable the interface. By default, an interface is disabled.

Switch Port

Select the switch port mode:

  • Access—Configure the interface as an access port. You can configure only one VLAN on an access port, and the port can carry traffic for only one VLAN.

    • VLAN Name—Enter a description for the VLAN.

    • VLAN ID—Enter the VLAN number, which can be a value from 1 through 4094.

  • Trunk—Configure the interface as a trunk port. You can configure one or more VLANs on a trunk port, and the port can carry traffic for multiple VLANs.

    • Allowed VLANs—Enter the numbers of the VLANs for which the trunk can carry traffic.a description for the VLAN.

    • Native VLAN ID—Enter the number of the VLAN allowed to carry untagged traffic.

Click Save.

To use the switch port for routing, associate it with an SVI.

Configure Other Interface Properties

To configure other interface properties, choose the Advanced tab and configure the following properties:


Note

For Cisco IOS XE SD-WAN devices, you cannot configure MAC age-out time and static MAC address per interface. You can only configure them globally.


Table 33.

Parameter Name

Description

Age-Out Time

Enter how long an entry is in the MAC table before it ages out. Set the value to 0 to prevent entries from timing out.Range: 0, 10 through 1000000 secondsDefault: 300 seconds

Static MAC Address

Click Add Static MAC Address to map a MAC address to a switch port. In the MAC Static Address field that appears, enter the following:

  • MAC Address—Enter the static MAC address to map to the switch port interface.

  • Switch Port Interface Name—Enter the name of the switch port interface.

  • VLAN ID—Enter the number of the VLAN for the switch port.

Click Add to save the static MAC address mapping.

Click Save.

Configure VPN Interface SVI using vManage

Use the VPN Interface SVI template to configure SVI for Cisco IOS XE SD-WAN devices. You configure a switch virtual interface (SVI) to configure a VLAN interface.

To configure DSL interfaces on Cisco routers using Cisco vManage templates, create a VPN Interface SVI feature template to configure VLAN interface parameters.

Create VPN Interface SVI Template
  1. In Cisco vManage, choose Configuration > Templates.

  2. In the Device tab, click Create Template.

  3. From the Create Template drop-down, select From Feature Template.

  4. From the Device Model drop-down, select the type of device for which you are creating the template.

  5. If you are configuring the SVI in the transport VPN (VPN 0):

    1. Click the Transport & Management VPN tab located directly beneath the Description field, or scroll to the Transport & Management VPN section.

    2. Under Additional VPN 0 Templates located to the right of the screen, click VPN Interface SVI.

  6. If you are configuring the SVI in a service VPN (VPNs other than VPN 0):

    1. Click the Service VPN tab located directly beneath the Description field, or scroll to the Service VPN section.

    2. In the Service VPN drop-down list, enter the number of the service VPN.

    3. Under Additional VPN Templates located to the right of the screen, click VPN Interface SVI.

  7. From the VPN Interface SVI drop-down, click Create Template. The VPN Interface SVI template form is displayed.

    The top of the form contains fields for naming the template, and the bottom contains fields for defining VLAN Interface parameters.
  8. In the Template Name field, enter a name for the template. The name can be up to 128 characters and can contain only alphanumeric characters.

  9. In the Template Description field, enter a description of the template. The description can be up to 2048 characters and can contain only alphanumeric characters.

When you open a feature template initially, for each parameter that has a default value, the scope is set to Default (indicated by a check mark), and the default setting or value is shown. To change the default or to enter a value, click the scope drop-down to the left of the parameter field.

Configure Basic Interface Functionality
Table 34. Feature History

Feature Name

Release Information

Description

Support for Configuring Secondary IP Address

Cisco IOS XE Release Amsterdam 17.2.1r

You can configure up to four secondary IPv4 or IPv6 addresses, and up to four DHCP helpers. Secondary IP addresses can be useful for forcing unequal load sharing between different interfaces, for increasing the number of IP addresses in a LAN when no more IPs are available from the subnet, and for resolving issues with discontinuous subnets and classful routing protocol.

To configure basic VLAN interface functionality in a VPN, select the Basic Configuration tab and configure the following parameters. Parameters marked with an asterisk are required to configure an interface.

Table 35.

Parameter Name

Description

Shutdown*

Click No to enable the VLAN interface.

VLAN Interface Name*

Enter the VLAN identifier of the interface.Range: 1 through 1094.

Description

Enter a description for the interface.

IP MTU

Specify the maximum MTU size of packets on the interface.Range: 576 through 1500. Default: 2000 bytes

IPv4* or IPv6

Click to configure one or more IPv4 of IPv6 addresses for the interface. (Beginning with Cisco IOS XE SD-WAN Release 17.2.)

IPv4 Address*

IPv6 Address

Enter the IPv4 address for the interface.

Secondary IP Address

Click Add to enter up to four secondary IP addresses. (Beginning with Cisco IOS XE SD-WAN Release 17.2.)

DHCP Helper*

Enter up to eight IP addresses for DHCP servers in the network to have the interface be a DHCP helper. Separate each address with a comma. A DHCP helper interface forwards BOOTP (Broadcast) DHCP requests that it receives from the specified DHCP servers.

Click Add to configure up to four DHCP helpers. (Beginning with Cisco IOS XE SD-WAN Release 17.2, for IPv6.)

To save the feature template, click Save.

Apply Access Lists

To apply a rewrite rule, access lists, and policers to a router interface, select the ACL tab and configure the following parameters:

Table 36.

Parameter Name

Description

Ingress ACL – IPv4

Click On and specify the name of the access list to apply to IPv4 packets being received on the interface.

Egress ACL – IPv4

Click On and specify the name of the access list to apply to IPv4 packets being transmitted on the interface.

Ingress Policer

Click On and specify the name of the policer to apply to packets being received on the interface.

Egress Policer

Click On and specify the name of the policer to apply to packets being transmitted on the interface.

To save the feature template, click Save.

Configure VRRP

To have an interface run the Virtual Router Redundancy Protocol (VRRP), which allows multiple routers to share a common virtual IP address for default gateway redundancy, select the VRRP tab. Then click Add New VRRP and configure the following parameters:

Table 37.

Parameter Name

Description

Group ID

Enter the virtual router ID, which is a numeric identifier of the virtual router. You can configure a maximum of 24 groups.Range: 1 through 255

Priority

Enter the priority level of the router. There router with the highest priority is elected as master. If two Cisco IOS XE SD-WAN devices have the same priority, the one with the higher IP address is elected as master.Range: 1 through 254Default: 100

Timer

Specify how often the VRRP master sends VRRP advertisement messages. If slave routers miss three consecutive VRRP advertisements, they elect a new master.Range: 1 through 3600 secondsDefault: 1 second

Track OMP ​Track Prefix List

By default, VRRP uses of the state of the service (LAN) interface on which it is running to determine which Cisco IOS XE SD-WAN device is the master virtual router. if a Cisco IOS XE SD-WAN device loses all its WAN control connections, the LAN interface still indicates that it is up even though the router is functionally unable to participate in VRRP. To take WAN side connectivity into account for VRRP, configure one of the following:

Track OMP—Click On for VRRP to track the Overlay Management Protocol (OMP) session running on the WAN connection. If the master VRRP router loses all its OMP sessions, VRRP elects a new default gateway from those that have at least one active OMP session.

Track Prefix List—Track both the OMP session and a list of remote prefixes, which is defined in a prefix list configured on the local router. If the master VRRP router loses all its OMP sessions, VRRP failover occurs as described for the Track OMP option. In addition, if reachability to one of the prefixes in the list is lost, VRRP failover occurs immediately, without waiting for the OMP hold timer to expire, thus minimizing the amount of overlay traffic is dropped while the Cisco IOS XE SD-WAN device determine the VRRP master.

IP Address

Enter the IP address of the virtual router. This address must be different from the configured interface IP addresses of both the local Cisco IOS XE SD-WAN device and the peer running VRRP.

Add ARP Table Entries

To configure static Address Resolution Protocol (ARP) table entries on the interface, select the ARP tab. Then click Add New ARP and configure the following parameters:

Table 38.

Parameter Name

Description

IP Address

Enter the IP address for the ARP entry in dotted decimal notation or as a fully qualified host name.

MAC Address

Enter the MAC address in colon-separated hexadecimal notation.

To save the ARP configuration, click Add.

To save the feature template, click Save.

Configure Other Interface Properties​

To configure other interface properties, select the Advanced tab and configure the following properties:

Table 39.

Parameter Name

Description

TCP MSS

Specify the maximum segment size (MSS) of TPC SYN packets passing through the Cisco IOS XE SD-WAN device. By default, the MSS is dynamically adjusted based on the interface or tunnel MTU such that TCP SYN packets are never fragmented.Range: 552 to 1460 bytesDefault: None

ARP Timeout

Specify how long it takes for a dynamically learned ARP entry to time out.Range: 0 through 2678400 seconds (744 hours)Default: 1200 (20 minutes)

To save the feature template, click Save.

Segmentation

Create a VPN Template


Note

Cisco IOS XE SD-WAN devices use VRFs for segmentation and network isolation. However, the following steps still apply if you are configuring segmentation for Cisco IOS XE SD-WAN devices through Cisco vManage. When you complete the configuration, the system automatically converts the VPNs to VRFs for Cisco IOS XE SD-WAN devices.


Procedure

Step 1

In Cisco vManage, choose Configuration > Templates.

Step 2

In the Device tab, click Create Template.

Step 3

From the Create Template drop-down, select From Feature Template.

Step 4

From the Device Model drop-down, select the type of device for which you are creating the template.

Step 5

To create a template for VPN 0 or VPN 512:

  1. Click the Transport & Management VPN tab located directly beneath the Description field, or scroll to the Transport & Management VPN section.

  2. From the VPN 0 or VPN 512 drop-down, click Create Template. The VPN template form displays. The top of the form contains fields for naming the template, and the bottom contains fields for defining VPN parameters.

Step 6

To create a template for VPNs 1 through 511, and 513 through 65530: To create a template for VPNs 1 through 511, and 513 through 65527:

  1. Click the Service VPN tab located directly beneath the Description field, or scroll to the Service VPN section.

  2. Click the Service VPN drop-down.

  3. From the VPN drop-down, click Create Template. The VPN template form displays. The top of the form contains fields for naming the template, and the bottom contains fields for defining VPN parameters.

Step 7

In the Template Name field, enter a name for the template. The name can be up to 128 characters and can contain only alphanumeric characters.

Step 8

In the Template Description field, enter a description of the template. The description can be up to 2048 characters and can contain only alphanumeric characters.


Configure Basic VPN Parameters

To configure basic VPN parameters, choose the Basic Configuration tab and then configure the following parameters. Parameters marked with an asterisk are required to configure a VPN.

Parameter Name Description
VPN

Enter the numeric identifier of the VPN.

Range for Cisco vEdge devices: 0 through 65530

Range for Cisco IOS XE SD-WAN devices: 0 through 65527

Values for Cisco vSmart Controller and Cisco vManage devices: 0, 512

Name Enter a name for the VPN.
Note 

For Cisco IOS XE SD-WAN devices, you cannot enter a device-specific name for the VPN.

Enhance ECMP keying

(Cisco vEdge devices only)

Click On to enable the use in the ECMP hash key of Layer 4 source and destination ports, in addition to the combination of the source IP address, destination IP address, protocol, and DSCP field​, as the ECMP hash key. ECMP keying is Off by default.

Enable TCP Optimization

Cisco vEdge devices only

Click On to enable TCP optimization for a service-side VPN (a VPN other than VPN 0 and VPN 512). TCP optimization fine-tunes TCP to decrease round-trip latency and improve throughput for TCP traffic.

Note

To complete the configuration of the transport VPN on a router, you must configure at least one interface in VPN 0.


To save the feature template, click Save.

Configure Basic Interface Functionality

To configure basic interface functionality in a VPN, choose the Basic Configuration tab and configure the following parameters:


Note

Parameters marked with an asterisk are required to configure an interface.


Parameter Name IPv4 or IPv6 Options Description
Shutdown* Click No to enable the interface.
Interface name*

Enter a name for the interface.

For Cisco IOS XE SD-WAN devices, you must:

  • Spell out the interface names completely (for example, GigabitEthernet0/0/0).

  • Configure all the router's interfaces, even if you are not using them, so that they are configured in the shutdown state and so that all default values for them are configured.

Description Enter a description for the interface.
IPv4 / IPv6 Click IPv4 to configure an IPv4 VPN interface. Click IPv6 to configure an IPv6 interface.
Dynamic Click Dynamic to set the interface as a Dynamic Host Configuration Protocol (DHCP) client, so that the interface receives its IP address from a DHCP server.
Both DHCP Distance Optionally, enter an administrative distance value for routes learned from a DHCP server. Default is 1.
IPv6 DHCP Rapid Commit

Optionally, configure the DHCP IPv6 local server to support DHCP Rapid Commit, to enable faster client configuration and confirmation in busy environments.

Click On to enable DHCP rapid commit

Click Off to continue using the regular commit process.

Static Click Static to enter an IP address that doesn't change.
IPv4 IPv4 Address Enter a static IPv4 address.
IPv6 IPv6 Address Enter a static IPv6 address.
Secondary IP Address IPv4 Click Add to enter up to four secondary IPv4 addresses for a service-side interface.
IPv6 Address IPv6 Click Add to enter up to two secondary IPv6 addresses for a service-side interface.
DHCP Helper Both To designate the interface as a DHCP helper on a router, enter up to eight IP addresses, separated by commas, for DHCP servers in the network. A DHCP helper interface forwards BootP (broadcast) DHCP requests that it receives from the specified DHCP servers.
Block Non-Source IP Yes / No Click Yes to have the interface forward traffic only if the source IP address of the traffic matches the interface's IP prefix range. Click No to allow other traffic.
Bandwidth Upstream

For Cisco vEdge devices and vManage:

For transmitted traffic, set the bandwidth above which to generate notifications.

Range: 1 through (232 / 2) – 1 kbps

Bandwidth Downstream

For Cisco vEdge devices and vManage:

For received traffic, set the bandwidth above which to generate notifications.

Range: 1 through (232 / 2) – 1 kbps

To save the feature template, click Save.

CLI Equivalent

vpn vpn-id 
  interface interface-name
    bandwidth-downstream kbps
    bandwidth-upstream kbps
    block-non-source-ip
    description text   
    dhcp-helper ip-address 
    (ip address ipv4-prefix/length| ip dhcp-client [dhcp-distance number])
    (ipv6 address ipv6-prefix/length | ipv6 dhcp-client [dhcp-distance number] [dhcp-rapid-commit])
    secondary-address ipv4-address
    [no] shutdown

Create a Tunnel Interface

On Cisco vEdge device Cisco IOS XE SD-WAN devices, you can configure up to four tunnel interfaces. This means that each Cisco vEdge device Cisco IOS XE SD-WAN device router can have up to four TLOCs. On Cisco vSmart Controllers and Cisco vManage, you can configure one tunnel interface.

For the control plane to establish itself so that the overlay network can function, you must configure WAN transport interfaces in VPN 0. The WAN interface will enable the flow of tunnel traffic to the overlay. You can add other parameters shown in the table below only after you configure the WAN interface as a tunnel interface.

To configure a tunnel interface, select the Interface Tunnel tab and configure the following parameters:

Parameter Name

Cisco vEdge Devices Only

Description
Tunnel Interface

No

Click On to create a tunnel interface.
Color

No

Select a color for the TLOC.
Control Connection

Yes

If the Cisco vEdge device has multiple TLOCs, click No to have the tunnel not establish a TLOC. The default is On, which establishes a control connection for the TLOC.
Maximum Control Connections

Yes

Specify the maximum number of Cisco vSmart Controllers that the WAN tunnel interface can connect to. To have the tunnel establish no control connections, set the number to 0.

Range: 0 through 8

Default: 2

Cisco vBond Orchestrator As Stun Server

Yes

Click On to enable Session Traversal Utilities for NAT (STUN) to allow the tunnel interface to discover its public IP address and port number when theCisco vEdge device router is located behind a NAT.
Exclude Controller Group List

Yes

Set the Cisco vSmart Controllers that the tunnel interface is not allowed to connect to.

Range: 0 through 100

vManage Connection Preference

Yes

Set the preference for using a tunnel interface to exchange control traffic with the vManage NMS.

Range: 0 through 8

Default: 5

Port Hop

No

Click On to enable port hopping, or click Off to disable it. If port hopping is enabled globally, you can disable it on an individual TLOC (tunnel interface). To control port hopping on a global level, use the System configuration template.

Default: Enabled

vManage NMS and Cisco vSmart Controller default: Disabled

Low-Bandwidth Link

Yes

Select to characterize the tunnel interface as a low-bandwidth link.
Allow Service

No

Select On or Off for each service to allow or disallow the service on the interface.
Parameter Name Description
Tunnel Interface Click On to create a tunnel interface.
Color Select a color for the TLOC.
Port Hop Click On to enable port hopping, or click Off to disable it. If port hopping is enabled globally, you can disable it on an individual TLOC (tunnel interface). To control port hopping on a global level, use the System configuration template.

Default: Enabled

vManage NMS and Cisco vSmart Controller default: Disabled

Allow Service Select On or Off for each service to allow or disallow the service on the interface.

To configure additional tunnel interface parameters, click Advanced Options:

Parameter Name Cisco vEdge devices Only Description
GRE Yes

Use GRE encapsulation on the tunnel interface. By default, GRE is disabled.

If you select both IPsec and GRE encapsulations, two TLOCs are created for the tunnel interface that have the same IP addresses and colors, but that differ by their encapsulation.

IPsec Yes

Use IPsec encapsulation on the tunnel interface. By default, IPsec is enabled.

If you select both IPsec and GRE encapsulations, two TLOCs are created for the tunnel interface that have the same IP addresses and colors, but that differ by their encapsulation.

IPsec Preference Yes

Specify a preference value for directing traffic to the tunnel. A higher value is preferred over a lower value.

Range: 0 through 4294967295

Default: 0

IPsec Weight Yes

Enter a weight to use to balance traffic across multiple TLOCs. A higher value sends more traffic to the tunnel.

Range: 1 through 255

Default: 1

Carrier No

Select the carrier name or private network identifier to associate with the tunnel.

Values: carrier1, carrier2, carrier3, carrier4, carrier5, carrier6, carrier7, carrier8, default

Default: default

Bind Loopback Tunnel Yes Enter the name of a physical interface to bind to a loopback interface.
Last-Resort Circuit Yes Select to use the tunnel interface as the circuit of last resort.
NAT Refresh Interval No Enter the interval between NAT refresh packets sent on a DTLS or TLS WAN transport connection.

Range: 1 through 60 seconds

Default: 5 seconds

Hello Interval No

Enter the interval between Hello packets sent on a DTLS or TLS WAN transport connection.

Range: 100 through 10000 milliseconds

Default: 1000 milliseconds (1 second)
Hello Tolerance No

Enter the time to wait for a Hello packet on a DTLS or TLS WAN transport connection before declaring that transport tunnel to be down.

Range: 12 through 60 seconds

Default: 12 seconds

Parameter Name Description
Carrier

Select the carrier name or private network identifier to associate with the tunnel.

Values: carrier1, carrier2, carrier3, carrier4, carrier5, carrier6, carrier7, carrier8, default

Default: default

NAT Refresh Interval Enter the interval between NAT refresh packets sent on a DTLS or TLS WAN transport connection.

Range: 1 through 60 seconds

Default: 5 seconds

Hello Interval

Enter the interval between Hello packets sent on a DTLS or TLS WAN transport connection.

Range: 100 through 10000 milliseconds

Default: 1000 milliseconds (1 second)
Hello Tolerance

Enter the time to wait for a Hello packet on a DTLS or TLS WAN transport connection before declaring that transport tunnel to be down.

Range: 12 through 60 seconds

Default: 12 seconds

To save the feature template, click Save.

Configure DNS and Static Hostname Mapping

To configure DNS addresses and static hostname mapping, click the DNS tab and configure the following parameters:

Parameter Name Options Description
Primary DNS Address Select either IPv4 or IPv6, and enter the IP address of the primary DNS server in this VPN.
New DNS Address Click New DNS Address and enter the IP address of a secondary DNS server in this VPN. This field appears only if you have specified a primary DNS address.
Mark as Optional Row Check Mark as Optional Row to mark this configuration as device-specific. To include this configuration for a device, enter the requested variable values when you attach a device template to a device, or create a template variables spreadsheet to apply the variables.
Hostname Enter the hostname of the DNS server. The name can be up to 128 characters.
List of IP Addresses Enter up to eight IP addresses to associate with the hostname. Separate the entries with commas.
To save the DNS server configuration, click Add.

To save the feature template, click Save.

CLI Equivalent

vpn vpn-id
  dns ip-address (primary | secondary)
  ​host hostname ip ip-address
Mapping Host Names to IP Addresses

! IP DNS-based host name-to-address translation is enabled
  ip domain lookup
! Specifies hosts 192.168.1.111 and 192.168.1.2 as name servers
  ip name-server 192.168.1.111 192.168.1.2
! Defines cisco.com as the default domain name the device uses to complete
! Set the name for unqualified host names  
  ip domain name cisco.com

Forwarding and QoS

Configure Per Tunnel QoS Using Cisco vManage

To configure per-tunnel QoS, perform the following tasks in the order specified.

Step 1: Configure QoS Map

A QoS map can be added to a localized data policy. For more details on the various QoS parameters, see QoS parameters section in the Policies Guide. To configure QoS map:

  1. In Cisco vManage, navigate to Configuration > Policies.

  2. Click the Localized Policy tab and then click Add Policy.

  3. From the list type shown in the left pane, choose Class Map. A list displays existing class maps. Choose a class map from the list and click Next.

    OR

    To create a new class map:

    1. Click Add New Class Map.

    2. Enter a name for the class map.

    3. From the Queuedrop-down menu, choose a number (from 0-7).

    4. Click Save and then click Next.

  4. Click the Add QoS Map drop-down menu and choose Create New.

  5. Provide a name and description for the map.

  6. Click Add Queue and enter the requested details and click Save Queue.

  7. Click Save Policy to save the localized policy with QoS configured.

Step 2: Select the QoS Map to be Added to the Feature Template

Per-tunnel QoS can only be configured through the Cisco VPN Interface Ethernet template. To enable per-tunnel QoS on other WAN interface types, use the global CLI add-on template.

  1. In Cisco vManage, navigate to Configuration > Templates.

  2. Click the Feature tab and then click Add Template.

  3. Choose a device from the list on the left. Feature templates applicable to the device are shown in the right pane.

  4. Choose the Cisco VPN Interface Ethernet template.

  5. Enter a name and description for the feature template.

  6. Choose the ACL/QoS option.

  7. Enter the requested details.

    • Shaping Rate: Select Global from the drop-down list and enter a shaping rate in kbps.

    • QoS Map: Select Global from the drop-down list and enter the name of the QoS map that you want to include in the feature template.

  8. Click Save.

Step 3: Attach the Localized QoS Policy and the Feature Template to the Device Template
  1. Attach the localized policy created in Step 1 to the device template.

  2. Attach the feature template created in Step 2 to the device template. See Create Device Templates from Feature Templates for more details.


Note

Ensure that you attach the localized policy and the feature template to the same device template.


Step 4 Configure Hub Role for Per-Tunnel QoS
  1. In Cisco vManage, navigate to Configuration > Templates.

  2. Click the Feature tab. All the features templates are listed.

  3. Choose the Cisco VPN Interface template that you want to add per-tunnel QoS policy to. Click the Options icon () in the same row as the template and choose Edit.

    Alternatively, you can create a new Cisco VPN Interface Ethernet template following the instructions in the previous sections and then proceed with the steps below.

  4. When the template opens, click the Tunnel option at the top of the page.

  5. From the Tunnel Interface drop-down list, choose Global and select the On radio button.

    A new set of fields display below the Tunnel Interface option. These new fields are specific to per-tunnel QoS and display only when you select the On radio button.

  6. From the QoS drop-down list, choose Global and select the On radio button.

    The Per-tunnel Aggregator field displays after you set Per-Tunnel QoS to On. If this field is set to Off, which is the default behavior, it means that the device selected in the template is assigned the spoke role. If the field is set to On, it means that the device is assigned the hub role.

  7. Select Global from the Per-tunnel Aggregator drop-down list and select the On radio button. The device has now been assigned the role of a hub.

    When you select the On option, the Tunnel Bandwidth Percent field displays.

  8. You can either leave the Tunnel Bandwidth Percent value at default (50) or select Global from the drop-down to enter a value based on your network requirement.

    The remaining fields under the Tunnel section are not specific to per-tunnel QoS. You can either leave the values at default or enter values specific to your network.

  9. Click Update. The feature template updates with per-tunnel QoS configuration.

Step 5: Configure Spoke Role for Per-Tunnel QoS
  1. In Cisco vManage, navigate to Configuration > Templates.

  2. Click the Feature tab. All the features templates are listed.

  3. Choose the Cisco VPN Interface Template that you want to add the per-tunnel QoS policy to. Click the Options icon () in the same row as the template and from the drop-down menu, choose Edit.

    OR

    Create a new Cisco VPN Interface Ethernet template following the instructions in the previous sections and then proceed with the steps below.

  4. When the template opens, click Tunnel at the top of the page.

  5. From the Tunnel Interface drop-down list, choose Global and select the On radio button.

    A new set of fields display below the Tunnel Interface option. These new fields are specific to per-tunnel QoS and display only when you select the On radio button.

  6. From the Per-tunnel QoS drop-down list, choose Global and select the On radio button.

    The Per-tunnel Aggregator field displays after you set Per-Tunnel QoS to On. This field is set to off by default. If this field is set to Off, it means that the device selected in the template is assigned the spoke role.

  7. The downstream bandwidth needs to be configured for the device to effectively take the spoke role. To configure the downstream bandwidth, click the Basic Configuration tab at the top of the page.

  8. Scroll down to the Bandwidth Downstream Field and choose Global from the drop-down list.

  9. Enter a value for the downstream bandwidth and click Update at the bottom of the page.

Configuration by vManage

To apply a QoS policy to a subinterface using vManage, the procedure is similar to that used for configuring policies on a main interface. Add a subinterface feature template to the device template for the target device. This enables loading the QoS policy onto the subinterface.

Preparation
  • Configure a QoS Policy

    Configuration > Policies > Localized Policy > Custom Options > Forwarding Class/QoS

  • Apply a QoS Policy to a Subinterface

    Apply a QoS policy and define shaping.

    1. Configuration > Feature > feature-name > ACL/QoS

    2. Configure the following fields:

      • Shaping Rate (Kbps)

      • QoS Map

Procedure

This procedure applies a QoS policy to a subinterface.

Prerequisite: One or more class maps have been defined. These assign classes of traffic (for example, VoIP traffic) to specific queues.

Figure 7. Overview of Workflow for Applying a QoS Policy
  1. Create a QoS policy map.

    1. Configuration > Policies

    2. Click Localized Policy at the top.

    3. Click the Add Policy button to create a new policy map.

    4. Click Next.

    5. Click the Add QoS Map button and select Create New from the dropdown menu.

    6. (This step relies on class maps that have been defined. The class maps assign classes of traffic to specific queues. The queues then represent those classes of traffic. This step uses the queues to control how the traffic will be handled.)

      In the Add Queue dialog box, select queues that represent the types of traffic relevant to the QoS objectives. Configure parameters such as Bandwidth% and Buffer% for the queues. For example, to configure bandwidth for audio traffic, select a queue that represents audio traffic and configure the bandwidth parameter. Click the Save Queue button.

    7. Click the Save Policy button.

  2. Create a QoS policy that uses the QoS policy map defined above.

    See the documentation for creating a QoS policy.

  3. Use a device template to push the QoS policy to the target device.

    (Note: The device policy defines other parts of the device configuration also. This procedure only affects the QoS policy portion.)

    1. Configuration > Templates

    2. In the list of templates, locate the device template for the target device.

    3. In table row for that template, click the ... button at the right, and select Edit.

    4. In the Additional Templates area, in the Policy field, click the dropdown menu and select the policy name.

    5. Click Update.

    6. Click Next.

    7. In the left pane, select the target device. The configuration appears in the right pane.

    8. Click the Configure Devices button to push the policy to the device. SD-WAN displays the Task View, showing the status of the update tasks.

  4. Load the QoS policy onto the subinterface.

    Prerequisite: The subinterface feature template must already have been added to the device template.

    1. Configuration > Templates

    2. Click Feature at the top.

    3. In the list of templates, locate the feature template for the subinterface. (This is the subinterface to which you are assigning the QoS policy.)

    4. In the Device Templates column, confirm that the feature template is assigned to a device template.

    5. In the Devices Attached column, confirm that the feature template is assigned to a device.

    6. In table row for the template, click the ... button at the right, and select Edit.

    7. Click ACL/QoS to jump to the ACL/QoS section.

    8. In the Shaping Rate field, use the dropdown menu to select Global or Device Specific, and enter a shaping rate value.

    9. In the QoS Map field, use the dropdown menu to select Global and enter the QoS policy map name.

    10. Click Update.

    11. In the left pane, select the device to display the configuration in the right pane.

    12. Click the Configure Devices button to push the policy map to the subinterface. SD-WAN displays the Task View, showing the status of the update tasks.

Unified Communication

Add a Voice Card Feature Template

A voice card feature template configures analog interfaces, which provide configuration settings for ports on voice cards in routers.

When you add a voice card feature template, you configure the type of voice card you are configuring, port information for the card, and parameters for the service that you receive from your service provider.

To add a voice card feature template:

  1. Choose Configuration > Templates.

  2. In the Feature tab, click Add Template.

  3. Select the supported device to which you want to add voice services.

  4. In the right pane, select Voice Card from the Unified Communications templates.

  5. In the Template Name field, enter a name for the template.

    This field may contain uppercase and lowercase letters, digits 0 through 9, hyphens (-), and underscores (_).

  6. In the Description field, enter a description for the template.

    This field can contain any characters and spaces.

  7. Click New Analog Interface and configure interface options as described in the following table.

    You can add as many analog interfaces as needed.

    Click Add after you configure each analog interface.

    If any analog interfaces are already configured, they appear in the interfaces table on this page. To edit an interface, click its pencil icon in the Action column, edit the options in the window that pops up as described in the following table, and then click Save Changes. To delete an interface, click its trash can icon in the Action column.

    Option

    Description

    Cisco IOS CLI Equivalent

    Module

    Select the type of voice module that is installed in the router.

    Module Slot/Sub-slot

    Enter the slot and sub-slot of the voice module.

    voice-card slot/subslot

    Use DSP

    Enable this option if you want to use the built-in DSPs on the network interface module for TDM hairpin calls.

    no local-bypass

    Port Type

    Select the type of ports on the voice module that you are configuring for this interface (FXS or FXO). You can select All to define the port type for all ports of the selected type, or Port Range to define the port type for a specified range of ports.

    Using Port Range, you can create analog interfaces as described later in this procedure to configure different ranges of ports.

    Description

    Enter a description of the selected port or ports. For example, fax machine or paging system.

    description string

    Secondary Dialtone

    Available if you select FXO from the Port Type drop-down list.

    Set to On if you want the selected ports to generate a secondary dial tone when callers access an outside line.

    secondary dialtone

    Connection PLAR

    Enter the Private Line Automatic Ringdown extension to which the selected ports forward inbound calls.

    connection plar digits

    OPX

    Available if you select FXO from the Port Type drop-down list.

    Check this option if you want to enable Off-Premises Extension for the PLAR extension.

    connection plar opx digits

    Signal Type

    Select the Signal Type that indicates an on-hook or off-hook condition for calls that the ports receive. Options are Loopstart, Groundstart, or DID. The DID option is available if you select FXS from the Port Type drop-down list.

    signal {groundstart | loopstart}

    signal did {delay-dial | immediate | wink-start}

    Caller-ID Enable

    Available if you select a signal type of Loopstart or Groundstart.

    Set to ON if you want to enable caller ID information for inbound calls.

    caller-id enable

    DID Signal Mode

    Available if you select a signal type of DID.

    Choose the mode for the DID signal type (Delay Dial, Immediate, or Wink Start).

    Default: Wink Start.

    signal did {delay-dial | immediate | wink-start}

    Shutdown

    Set to ON if you want to shut down ports that are not being used.

    Default: Off.

    shutdown

  8. Click Save.

  9. (Optional) If you want to configure more analog interfaces for this template, select Configuration > Templates, select the Feature tab, select Edit for the template from the More Actions menu, and then repeat Steps 7 and 8.

    You can configure as many analog interfaces as needed.

Add a Call Routing Feature Template

A call routing feature template configures parameters for TDM-SIP trunking, including trusted IP addresses for preventing toll fraud, and a dial plan. A dial plan, made up of dial peers, defines how a router routes traffic to and from voice ports to the PSTN or to another branch.

To add a call routing feature template:

  1. Choose Configuration > Templates.

  2. In the Feature tab, click Add Template.

  3. Select the supported device to which you want to add call routing features.

  4. In the right pane, select Call Routing from the Unified Communications templates.

  5. In the Template Name field, enter a name for the template.

    This field can contain uppercase and lowercase letters, digits 0 through 9, hyphens (-), and underscores (_).

  6. In the Description field, enter a description for the template.

    This field can contain any characters and spaces.

  7. In the Global tab, configure options as described in the following table:

    Option

    Description

    Cisco IOS CLI Equivalent

    Trusted IPv4 Prefix List

    Enter the IPv4 addresses with which the router can communicate through SIP.

    Enter each IPv4 address in CIDR format. For example, 10.1.2.3/32. Separate each address with a comma (,).

    The router does not communicate with other IPv4 addresses, which prevents fraudulent calls being placed through the router.

    A Trusted IPv4 Prefix is required for TDM to IP calls.

    voice service voip

    ip address trusted list

    ipv4 ipv4-address/ipv4-network-mask

    Trusted IPv6 Prefix List

    Enter the IPv6 addresses with which the router can communicate through SIP.

    Separate each IPv6 address with a comma (,).

    The router does not communicate with other IPv6 addresses, which prevents fraudulent calls being placed through the router.

    A Trusted IPv6 Prefix is required for TDM to IP calls.

    voice service voip

    ip address trusted list

    ipv6 ipv6-prefix//prefix-length

    Source Interface

    Enter the name of the source interface from which the router initiates SIP control and media traffic.

    This information defines how the return/response to this traffic should be sent.

    voice service voip

    sip

    bind control source-interface interface-id

    bind media source-interface interface-id

  8. In the Dial Plan tab, click New Dial Peer and perform the following actions as needed to configure dial peers by manually updating options or by importing a dial peer comma separated value (CSV) file that you have created:

    • To configure a dial peer directly, configure options as described in the following table.

    • To create or edit a dial peer CSV file, click Download Dial Peer List to download the system provided file named Dial-Peers.csv. The first time you download this file, it contains field names but no records. Update this file as needed by using an application such as Microsoft Excel. For detailed information about this file, see Dial Peer CSV File.

    • To import configuration information from a dial peer CSV file, click Upload Dial Peer List.

    You can add as many dial peers as needed. Click Add after you configure each dial peer.

    If any dial peers already are configured, they appear in the dial peers table on this page. To edit a dial peer, click its pencil icon in the Action column, edit the options in the window that pops up as described in the following table, and then click Save Changes.To delete a dial peer, click its trash can icon in the Action column.

    Option

    Description

    Cisco IOS CLI Equivalent

    Voice Dial Peer Tag

    Enter a number to be used to reference the dial peer.

    dial-peer voice number {pots | voip}

    Dial Peer Type

    Select the type of dial peer that you are creating (POTS or SIP).

    dial-peer voice number {pots | voip}

    Direction

    Select the direction for traffic on this dial peer (Incoming or Outgoing).

    Incoming:

    dial-peer voice number {pots | voip}

    incoming called-number string

    Outgoing:

    dial-peer voice number {pots | voip}

    destination-pattern string

    Description

    Enter a description of this dial peer.

    description

    Numbering Pattern

    Enter a string that the router uses to match incoming calls to the dial peer.

    Enter the string as an E.164 format regular expression in the form [0-9,A-F#*.?+%()-]*T?.

    Incoming:

    dial-peer voice number {pots | voip}

    incoming called-numberstring

    Outgoing:

    dial-peer voice number {pots | voip}

    destination-pattern string

    Forward Digits Type

    Available if you select the POTS dial peer type and the Outgoing direction.

    Select how the dial peer transmits digits in outgoing numbers:

    • All—The dial peer transmits all digits

    • None—The dial peer does not transmit digits that do not match the destination pattern

    • Some—The dial peer transmits the specified number of right-most digits

    Default: None.

    All:

    dial-peer voice number pots

    forward-digits all

    None:

    dial-peer voice number pots

    forward-digits 0

    Some:

    dial-peer voice number pots

    forward-digits number

    Forward Digits

    Available if you select Some for Forward Digits Type.

    Enter the number of right-most digits in the outgoing number to transmit.

    For example, if you set this value to 7 and the outgoing number is 1112223333, the dial peer transmits 2223333.

    dial-peer voice number pots

    forward-digits number

    Prefix

    Available if you select the POTS dial peer type and the Outgoing direction.

    Enter digits to be prepended to the dial string for outgoing calls.

    dial-peer voice number pots

    prefix string

    Transport Protocol

    Available if you select SIP for the Dial Peer Type.

    Choose the transport protocol (TCP or UDP) for SIP control signaling.

    dial-peer voice number voip

    session transport {tcp | udp}

    Preference

    Available if you select POTS or SIP for the Dial Peer Type.

    Select an integer from 0 to 10, where the lower the number, the higher the preference.

    If dial peers have the same match criteria, the system uses the one with the highest preference value.

    Default: 0 (highest preference).

    dial-peer voice number voip

    preference value

    dial-peer voice number pots

    preference value

    Voice Port

    Available if you select the POTS dial peer type.

    Enter the voice port that the router uses to match calls to the dial peer.

    For an outgoing dial peer, the router sends calls that match the dial peer to this port.

    For an incoming dial peer, this port serves as an additional match criterion. The dial peers are matched only if a call comes in on this port.

    dial-peer voice number pots

    port slot/subslot/port

    Destination Address

    Available if you select the SIP dial peer type and the Outgoing direction.

    Enter the network address of the remote voice gateway to which calls are sent after a local outgoing SIP dial peer is matched.

    Enter the address in one of these formats:

    • dns:hostname.domain

    • sip-server

      ipv4:destination-addres

      ipv6:destination-address

    session target {ipv4:destination-address | ipv6:destination-address| sip-server | dns:hostname.domain }

  9. Click Save.

Add an SRST Feature Template

An SRST feature template configures parameters for Survivable Remote Site Telephony (SRST) for SIP. With SRST, if the WAN goes down or is degraded, SIP IP phones in a branch site can register to the local gateway so that they continue to function for emergency services without requiring WAN resources that are no longer available.

To add an SRST feature template:

  1. Choose Configuration > Templates.

  2. In the Feature tab, click Add Template.

  3. Select the supported device to which you want to add SRST features.

  4. In the right pane, select SRST from the Unified Communications templates.

  5. In the Template Name field, enter a name for the template.

    This field can contain uppercase and lowercase letters, digits 0 through 9, hyphens (-), and underscores (_).

  6. In the Description field, enter a description for the template.

    This field can contain any characters and spaces.

  7. In the Global Settings tab, configure options as described in the following table:

    Option

    Description

    Cisco IOS CLI Equivalent

    System Message

    Enter a message that displays on endpoints when SRST mode is in effect.

    voice register global

    system message string

    Max Phones

    Enter the number of phones that the system can register to the local gateway when in SRST mode.

    The maximum value that you can enter in this field depends on the device that you are configuring. Hover your mouse pointer over the Information icon next to this field to see maximum values for supported devices.

    voice register global

    max-pool max-voice-register-pools

    Max Directory Numbers

    Enter the number of DNs that the gateway supports when in SRST mode.

    The maximum value that you can enter in this field depends on the device that you are configuring. Hover your mouse pointer over the Information icon next to the Max phones to support field to see maximum values for supported devices.

    voice register global

    max-dn max-directory-numbers

    Music on Hold

    Select Yes to play music on hold on endpoints when a caller is on hold when in SRST mode. Otherwise, select No.

    Music on Hold file

    Enter the path and file name of the audio file for music on hold.

    The file must be in the system flash and must be in .au or .wav format. In addition, the file format must contain 8-bit 8-kHz data, for example, CCITT a-law or u-law data format.

    call-manager-fallback

    moh filename

  8. In the Phone Profile tab, click New Phone Profile to create a phone profile, and configure options as described in the following table.

    A phone profile provides pool tag and device network information for a SIP phone.

    You can add as many phone profiles as needed. Click Add after you configure each phone profile.

    If any phone profiles already are configured, they appear in the phone profiles table on this page. To edit a phone profile, click its pencil icon in the Action column, edit the options in the window that pops up as described in the following table, and then click Save Changes. To delete a phone profile, click its trash can icon in the Action column.

    Option

    Description

    Cisco IOS CLI Equivalent

    Voice Register Pool Tag

    Enter the unique sequence number of the IP phone to be configured.

    The maximum value is defined by the Max phones to support option in the Global tab of the SRST feature template.

    voice register pool pool-tag

    Device Network IPv6 Prefix

    Enter the IPv6 prefix of the network that contains the IP phone to support.

    For example, a.b.c.d/24.

    voice register pool pool-tag

    id [network address mask mask]

    Device Network IPv4 Prefix

    Enter the IPv4 prefix of the network that contains the IP phone to support.

    voice register pool pool-tag

    id [network address mask mask]

  9. Click Save.

Provision a Device Template for Unified Communications

When you provision a device template for Unified Communications, you select UC-specific feature templates and set up the voice policy to include with the device template.

  1. Choose Configuration > Templates.

  2. In the Device tab, click Add Template.

  3. From the Create Template drop-down list, select From Feature Template.

  4. From the Device Model drop-down list, select the type of supported device to which you want to attach the UC-specific feature templates and map the voice policy.

  5. Select the Unified Communications tab.

  6. To select UC-specific feature templates to include with the device template, perform these actions:

    1. From the Voice Card drop-down list, select the voice card feature template that you want to attach to the device.

    2. From the Call Routing drop-down list, select the call routing feature template that you want to attach to the device.

    3. From the SRST drop-down list, select the SRST feature template that you want to attach to the device.

  7. To set up the voice policy to include with the device template, peform these actions:

    1. From the Voice Policy drop-down list, select the voice policy that you want to map to endpoints.

    2. Click Mapping.

    3. From the list of endpoint types in the left pane of the screen that displays, select the type of endpoint that contains the subpolicies that you want to map to specific endpoints.

    4. From the list of subpolicies that displays, click Mapping in the Action column for the subpolicy that you want to map to specific endpoints.

    5. In the list of endpoints that displays, select each endpoint to which you want to map the subpolicy.

    6. Click Map.

    7. Click Save.

  8. To create the device template, click Create.

    When you map subpolicies to endpoints, the system generates the CLI commands that the following table shows.

Table 40. Generated CLI Commands for Subpolicies to Endpoints Mapping

Endpoint

Subpolicy

Cisco IOS CLI Application Mapping

Remarks

Voice Port FXO

Voice Port FXS

Voice Port FXS DID

POTS Dial Peer

SIP Dial Peer

Translation profile

translation-profile incoming profile-name

translation-profile outgoing profile-name

A translation profile policy is applied to a dial peer or a voice profile.

SRST Phone

SIP Dial Peer

Media profile

voice register pool number

voice-class codec number

dtmf-relay {[[sip-notify] [sip-kpml] [rtp-nte]]}

A media profile policy includes voice class codec and DTMF relay configurations. This policy is applied to an incoming SIP dial peer, an outgoing SIP dial peer, or an SRST phone profile.

Voice Port FXO

Supervisory disconnect

voice port number

supervisory custom-cptone cptone-name

supervisory dualtone-detect=params tag

A supervisory disconnect policiy such as custom-cptone or dualtone-detect-params is applied to FXO voice interfaces.

Dial Peer CSV File

A dial peer CSV file includes information for one or more incoming and outgoing SIP and POTS dial peers. The file must be comma delimited, and each record in the file must include each field that the following table describes, in the order shown.

Table 41. Dial Peer CSV Files Fields

Field

Description

Dial Peer Tag

Number that is used to reference the dial peer.

Dial Peer Type

Type of dial peer that you are creating (pots or voip).

Direction

Direction of traffic on the dial peer (Incoming or Outgoing).

Description

Description of the dial peer.

Forward Digits

How the dial peer transmits digits in outgoing numbers:

  • All—The dial peer transmits all digits in the number.

  • None—The dial peer does not transmit digits in the number that do not match the destination pattern.

  • n—The dial peer transmits the number of right-most digits in the number that the integer n represents. For example, if n is 7 and the outgoing number is 1112223333, the dial peer transmits 2223333.

Preference

For POTS dial peers, a unique numeric value for the dial peer. If dial peers have the same match criteria, the system uses the one with the highest preference value.

Prefix

Digits to be prepended to outgoing POTS dial peer calls.

Numbering Pattern

String that the router uses to match incoming calls to the dial peer.

Dest. Address

Network address of the remote voice gateway to which calls are sent after a local outgoing SIP dial peer is matched.

Voice Port

Voice port that the router uses to match calls to the dial peer.

For an outgoing dial peer, the router sends the calls that match the dial peer to this port.

For an incoming dial peer, this port serves as an additional match criterion. The dial peer is matched only if a call comes in on this port.

Transport Protocol

For SIP dial peers, transport protocol (TCP or UDP) for SIP control signaling.

Example dial peer CSV file:

Tag,type,Direction,Description,Forward Digits,Preference,Prefix,Pattern,Dest. Address,Voice Port,Transport
6545,voip,Outgoing,description To Voice Gateway,,1,,23456,ipv4:166.2.121.17,,udp
6756,voip,Outgoing,description ***Fax Number 6362-6362***,,0,,34567,ipv4:166.2.121.16,,tcp
768,voip,Outgoing, description Fire Alarm Dialer,,8,,5678,ipv4:166.2.121.19,,udp
10,pots,Incoming,,,5,,0115T,,1/0/1,
54,pots,Outgoing,,,6,,.T,,1/0/3,
23,pots,Incoming,,all,0,,76..,,1/0/4,
26,pots,Incoming,,5,1,55,9800.......,,1/0/5,

Translation Rules CSV File

When you configure translation rules for a translation profile, POTS dial peer, or SIP dial peer you can either create new translation rules or import existing translation rule information from a CSV file.

The file must be comma delimited, and each record in the file must include each field that the following table describes, in the order shown:

Table 42. Translation Rules CSV Files Fields

Field

Description

Match

String that you want the translation rule to affect. The string must be in regular expression format beginning and ending with a slash (/). For example, /^9/.

Action

Action that the system performs for calls that match the string in the Match field. Valid values are:

  • reject—Causes the system to reject the call

  • replace—Causes the system to replace the match string with the value in the Replace field

Replace

If the Action field contains replace, this field contains the string to which to translate the matched string. Enter the number in regular expression format beginning and ending with a slash (/). For example, //, which indicates a replacement of no string.

As an example, if you specify a match string of /^9/ and a replace string of //, the system removes the leading 9 from calls with a number that begins with 9. In this case, the system translates 914085551212 to 14085551212.

Example translation rules CSV file:

Match,Action,Replace
/34/,replace,/34/
/23/,reject,
/56/,replace,/100/
/16083652563/,replace,/6083652563/

Policies in Cisco vManage

Use the Policies screen to create and activate centralized and localized control and data policies for Cisco vSmart Controllers and Cisco vEdge deviceCisco IOS XE SD-WAN devices.

Figure 8. Policy Configuration

This screen allows you to perform several tasks related to Policies in Cisco vManage:

  • View centralized or localized policies

  • Copy, edit, or delete policies

  • Create and edit policy components

  • Activate and deactivate a centralized policy on Cisco vSmart controllers

Create and Manage Policies via Cisco vManage

View centralized or localized policies

To view centralized or localized policies, do the following:

  1. From the Centralized Policy or Localized Policy tab, select a policy.

  2. For a policy created using the UI policy builder or via CLI, click More Actions and click View. The policy created using the UI policy builder is displayed in graphical format while the policy created using the CLI method is displayed in text format.

  3. For a policy created using the vManage policy configuration wizard, click More Actionsand click Preview. This policy is displayed in text format.

Copy, edit and delete policies

  1. To copy a policy:

    1. From the Centralized Policy or Localized Policy tab, select a policy.

    2. Click More Actions and click Copy.

    3. In the Policy Copy popup window, enter the policy name and a description of the policy.


      Note

      If you are upgrading to 18.4.4 version, Data Policy names need to be under 26 characters.


    4. Click Copy.

  2. To edit policies created using the vManage policy configuration wizard:

    1. Click More Actions and click Edit.

    2. Edit the policy as needed.

    3. Click Save Policy Changes.

  3. To edit polices created using the CLI method:

    1. In the Custom Options drop-down, click CLI Policy.

    2. Click More Actions and click Edit.

    3. Edit the policy as needed.

    4. Click Update.

  4. To delete policies:

    1. From the Centralized Policy or Localized Policy tab, select a policy.

    2. Click More Actions and click Delete.

    3. Click OK to confirm deletion of the policy.

Edit or Create a Policy Component

You can create individual policy components directly and then use them or import them when you are using the policy configuration wizard:

  1. In the Title bar, click the Custom Options drop-down.

  2. For centralized policies, select the Centralized Policy tab and then select a policy component:

    • CLI policy—Create the policy using the command-line interface rather than the policy configuration wizard.

    • Lists—Create groups of interest to import in the Group of Interest screen in the policy configuration wizard.

    • Topology—Create a hub-and-spoke, mesh, or custom topology or a VPN membership to import in the Topology screen in the policy configuration wizard.

    • Traffic Policy—Create an application-aware routing, traffic data, or cflowd policy to import in the Traffic Rules screen in the policy configuration wizard.

  3. For localized policies, select the Localized Policy and then select a policy component:

    • CLI policy—Create the policy using the command-line interface rather than the policy configuration wizard.

    • Lists—Create groups of interest to import in the Group of Interest screen in the policy configuration wizard.

    • Forwarding Class/QoS—Create QoS mappings and rewrite rules to import in the Forwarding Classes/QoS screen in the policy configuration wizard.

    • Access Control Lists—Create ACLs of interest to import in the Configure Access Lists screen in the policy configuration wizard.

    • Route Policy—Create route policies to import in the Configure Route Policies screen in the policy configuration wizard.

Activate a Centralized Policy on Cisco vSmart Controllers

  1. In the Title bar, click the Custom Options drop-down.

  2. In the Centralized Policy tab, and then select a policy.

  3. Click More Actions and click Activate.

  4. In the Activate Policy popup, click Activate to push the policy to all reachable Cisco vSmart Controllers in the network.

  5. Click OK to confirm activation of the policy on all Cisco vSmart Controllers.

  6. To deactivate the centralized policy, select the = tab, and then select a policy.

  7. 6. Click More Actions and click Deactivate.

  8. In the Deactivate Policy popup, click Deactivate to confirm that you want to remove the policy from all reachable Cisco vSmart Controllers.

Configure Centralized Policy Using Cisco vManage

To configure centralized policies, use the Cisco vManage policy configuration wizard. The wizard consists of four sequential screens that guide you through the process of creating and editing policy components:

  • Create Groups of Interest—Create lists that group together related items and that you call in the match or action components of a policy.

  • Configure Topology—Create the network structure to which the policy applies.

  • Configure Traffic Rules—Create the match and action conditions of a policy.

  • Apply Policies to Sites and VPNs—Associate policy with sites and VPNs in the overlay network.

In the first three policy configuration wizard screens, you are creating policy components or blocks. In the last screen, you are applying policy blocks to sites and VPNs in the overlay network.

For a centralized policy to take effect, you must activate the policy.

Step 1: Start the Policy Configuration Wizard

  1. In the Cisco vManage NMS, select the Configure > Policies screen.

  2. Select the Centralized Policy tab.

  3. Click Add Policy.

The policy configuration wizard appears, and the Create Applications or Groups of Interest screen is displayed.

Step 2: Configure Groups of Interest

In Create Groups of Interest, create lists of groups to use in a centralized policy:

  1. Create new lists, as described in the following table:

    Table 43.

    List Type

    Procedure

    Color

    1. In the left bar, click Color.

    2. Click New Color List.

    3. Enter a name for the list.

    4. From the Select Color drop-down, select the desired colors.

    5. Click Add.

    Prefix

    1. In the left bar, click Prefix.

    2. Click New Prefix List.

    3. Enter a name for the list.

    4. In the Add Prefix field, enter one or more data prefixes separated by commas.

    5. Click Add.

    Site

    1. In the left bar, click Site.

    2. Click New Site List.

    3. Enter a name for the list.

    4. In the Add Site field, enter one or more site IDs separated by commas.

    5. Click Add.

    TLOC

    1. In the left bar, click TLOC.

    2. Click New TLOC List. The TLOC List popup displays.

    3. Enter a name for the list.

    4. In the TLOC IP field, enter the system IP address for the TLOC.

    5. In the Color field, select the TLOC's color.

    6. In the Encap field, select the encapsulation type.

    7. In the Preference field, optionally select a preference to associate with the TLOC.

    8. Click Add TLOC to add another TLOC to the list.

    9. Click Save.

    VPN

    1. In the left bar, click VPN.

    2. Click New VPN List.

    3. Enter a name for the list.

    4. In the Add VPN field, enter one or more VPN IDs separated by commas.

    5. Click Add.

  2. Click Next to move to Configure Topology and VPN Membership in the wizard.

Step 3: Configure Topology and VPN Membership

When you first open the Configure Topology and VPN Membership screen, the Topology tab is selected by default:

To configure topology and VPN membership:

In the Topology tab, create a network topology:

Custom Control (Route & TLOC) - Centralized route control policy (for matching OMP routes)

  1. In the Add Topology drop-down, select Custom Control (Route & TLOC).

  2. Enter a name for the control policy.

  3. Enter a description for the policy.

  4. In the left pane, click Add Sequence Type. The Add Control Policy popup displays.

  5. Select Route. A policy component containing the text string Route is added in the left pane.

  6. Double-click the Route text string, and enter a name for the policy component.

  7. In the right pane, click Add Sequence Rule. The Match/Actions box opens, and Match is selected by default.

  8. From the boxes under the Match box, select the desired policy match type. Then select or enter the value for that match condition. Configure additional match conditions for the sequence rule, as desired. For an explanation of the match conditions, see the OMP Route Match Attributes section in the Configuring Centralized Control Policy topic for your software release.

  9. Click Actions. The Reject radio button is selected by default. To configure actions to perform on accepted packets, click the Accept radio button. Then select the action or enter a value for the action. For an explanation of the actions, see the Action Parameters section in the Configuring Centralized Control Policy topic for your software release.

  10. Click Save Match and Actions.

  11. Click Add Sequence Rules to configure more sequence rules, as desired. Drag and drop to re-order them.

  12. Click Add Sequence Type to configure more sequences, as desired. Drag and drop to re-order them.

  13. Click Save Control Policy.

Custom Control (Route & TLOC) - Centralized TLOC control policy (for matching TLOC routes)

  1. In the Add Topology drop-down, select Custom Control (Route & TLOC).

  2. Enter a name for the control policy.

  3. Enter a description for the policy.

  4. In the left pane, click Add Sequence Type. The Add Control Policy popup displays.

  5. Select TLOC. A policy component containing the text string TLOC is added in the left pane.

  6. Double-click the TLOC text string, and enter a name for the policy component.

  7. In the right pane, click Add Sequence Rule. The Match/Actions box opens, and Match is selected by default.

  8. From the boxes under the Match box, select the desired policy match type. Then select or enter the value for that match condition. Configure additional match conditions for the sequence rule, as desired. For an explanation of the match conditions, see the OMP TLOC Match Attributes section in the Configuring Centralized Control Policy topic for your software release.

  9. Click Actions. The Reject radio button is selected by default. To configure actions to perform on accepted packets, click the Accept radio button. Then select the action or enter a value for the action. For an explanation of the actions, see the Action Parameters section in the Configuring Centralized Control Policy topic for your software release.

  10. Click Save Match and Actions.

  11. Click Add Sequence Rules to configure more sequence rules, as desired. Drag and drop to re-order them.

  12. Click Add Sequence Type to configure more sequences, as desired. Drag and drop to re-order them.

  13. Click Save Control Policy.

To use an existing topology:

  1. In the Add Topology drop-down, click Import Existing Topology. The Import Existing Topology popup appears.

  2. Select the type of topology.

  3. In the Policy drop-down, choose the name of the topology.

  4. Click Import.

Click Next to move to Configure Traffic Rules in the wizard.

Click Next to move to Apply Policies to Sites and VPNs in the wizard.

Step 4: Apply Policies to Sites and VPNs

In Apply Policies to Sites and VPNs screen, apply a policy to sites and VPNs:

  1. In the Policy Name field, enter a name for the policy. This field is mandatory and can contain only uppercase and lowercase letters, the digits 0 through 9, hyphens (–), and underscores (_). It cannot contain spaces or any other characters.

  2. In the Policy Description field, enter a description of the policy. It can contain up to 2048 characters. This field is mandatory, and it can contain any characters and spaces.

  3. From the Topology bar, choose the type of policy block. The table then lists policies that you have created for that type of policy block.

  4. Associate the policy with VPNs and sites. The choice of VPNs and sites depends on the type of policy block:

    1. For a Topology policy block, click Add New Site List and VPN List or Add New Site. Some topology blocks might have no Add buttons. Choose one or more site lists, and choose one or more VPN lists. Click Add.

    2. For an Application-Aware Routing policy block, click Add New Site List and VPN list. Choose one or more site lists, and choose one or more VPN lists. Click Add.

    3. For a Traffic Data policy block, click Add New Site List and VPN List. Choose the direction for applying the policy (From Tunnel, From Service, or All), choose one or more site lists, and choose one or more VPN lists. Click Add.

    4. For a cflowd policy block, click Add New Site List. Choose one or more site lists, Click Add.

  5. Click Preview to view the configured policy. The policy appears in CLI format.

  6. Click Save Policy. The Configuration > Policies screen appears, and the policies table includes the newly created policy.

Step 5: Activate a Centralized Policy

Activating a centralized policy sends that policy to all connected Cisco vSmart controllers. To activate a centralized policy:

  1. In the Cisco vManage NMS, select the Configure > Policies screen. When you first open this screen, the Centralized Policy tab is selected by default.

  2. Choose a policy.

  3. Click the More Actions icon to the right of the row, and click Activate. The Activate Policy popup appears. It lists the IP addresses of the reachable Cisco vSmart Controllers to which the policy must be applied.

  4. Click Activate.

Configure Localized Control Policy Using Cisco vManage

To configure localized policies, use the Cisco vManage policy configuration wizard. The wizard is a UI policy builder that consists of five screens to configure and modify the following localized policy components:

  • Groups of interest, also called lists

  • Forwarding classes to use for QoS

  • Access control lists (ACLs)

  • Route policies

  • Policy settings

You configure some or all these components depending on the specific policy you are creating. To skip a component, click the Next button at the bottom of the screen. To return to a component, click the Back button at the bottom of the screen.

Step 1: Start the Policy Configuration Wizard

To start the policy configuration wizard:

  1. In the Cisco vManage NMS, select the Configure > Policies screen.

  2. Select the Localized Policy tab.

  3. Click Add Policy.

The policy configuration wizard opens, and the Create Groups of Interest screen is displayed.

Step 2: Configure Groups of Interest

In Create Groups of Interest, create lists of groups to use in localized policy:

  1. Create new lists, as described in the following table:

Table 44.

List Type

Procedure

AS Path

  1. In the left bar, click AS Path.

  2. Click New AS Path List.

  3. Enter a name for the list.

  4. Enter the AS path, separating AS numbers with a comma.

  5. Click Add.

Community

  1. In the left bar, click Community.

  2. Click New Community List.

  3. Enter a name for the list.

  4. Enter the BGP community in the format aa:nn or as the string internet, local-as, no-advertise, or no-export, separating multiple items with a comma. For aa, enter a 2-byte AS number, and for nn, enter a 2-byte network number.

  5. Click Add.

Extended Community

  1. In the left bar, click Extended Community.

  2. Click New Extended Community List.

  3. Enter a name for the list.

  4. Enter the BGP extended community as rt (aa:nn | ip-address)​, for a route target community, or soo (aa:nn | ip-address), for a route origin community, separating multiple items with a comma. For aa, enter a 2-byte AS number, and for nn enter a 2-byte network number.

  5. Click Add.

Mirror

  1. In the left bar, click TLOC.

  2. Click New TLOC List. The TLOC List popup displays.

  3. Enter a name for the list.

  4. In the TLOC IP field, enter the system IP address for the TLOC.

  5. In the Color field, select the TLOC's color.

  6. In the Encap field, select the encapsulation type.

  7. In the Preference field, optionally select a preference to associate with the TLOC.

  8. Click Add TLOC to add another TLOC to the list.

  9. Click Save.

Policer

  1. In the left bar, click VPN.

  2. Click New VPN List.

  3. Enter a name for the list.

  4. In the Add VPN field, enter one or more VPN IDs separated by commas.

  5. Click Add.

Prefix

  1. In the left bar, click Prefix.

  2. Click New Prefix List.

  3. Enter a name for the list.

  4. Enter the IP prefix in one of the following formats:

    • prefix/length—Exactly match a single prefix–length pair.

    • 0.0.0.0/0—Match any prefix–length pair.

    • 0.0.0.0/0 le length—Match any IP prefix whose length is less than or equal to length. For example, ip-prefix 0.0.0.0/0 le 16 matches all IP prefixes with lengths from /1 through /16.

    • 0.0.0.0/0 ge length—Match any IP prefix whose length is greater than or equal to length. For example, ip-prefix 0.0.0.0 ge 25 matches all IP prefixes with lengths from /25 through /32.

    • 0.0.0.0/0 ge length1 le length2, or 0.0.0.0 le length2 ge length1—Match any IP prefix whose length is greater than or equal to length1 and less than or equal to length2. For example, ip-prefix 0.0.0.0/0 ge 20 le 24 matches all /20, /21, /22, /23, and /24 prefixes. Also, ip-prefix 0.0.0.0/0 le 24 ge 20 matches the same prefixes. If length1 and length2​ are the same, a single IP prefix length is matched. For example, ip-prefix 0.0.0.0/0 ge 24 le 24 matches only /24 prefixes.

  5. Click Add.

  1. Click Next to move to Configure Forwarding Classes/QoS in the wizard.

  2. Click Next to move to Configure Access Control Lists in the wizard.

  3. Click Next to move to Configure Route Policies in the wizard. 

Step 3: Configure Route Policies

In Configure Route Policies, configure the routing policies:

  1. In the Add Route Policy tab, select Create New.

  2. Enter a name and description for the route policy.

  3. In the left pane, click Add Sequence Type. A Route box is displayed in the left pane.

  4. Double-click the Route box, and type a name for the route policy.

  5. In the right pane, click Add Sequence Rule to create a single sequence in the policy. The Match tab is selected by default.

  6. Click a match condition.

  7. On the left, enter the values for the match condition.

  8. On the right enter the action or actions to take if the policy matches.

  9. Repeat Steps 6 through 8 to add match–action pairs to the route policy.

  10. To rearrange match–action pairs in the route policy, in the right pane drag them to the desired position.

  11. To remove a match–action pair from the route policy, click the X in the upper right of the condition.

  12. Click Save Match and Actions to save a sequence rule.

  13. To rearrange sequence rules in an route policy, in the left pane drag the rules to the desired position.

  14. To copy, delete, or rename an route policy sequence rule, in the left pane, click More Options next to the rule's name and select the desired option.

  15. If no packets match any of the route policy sequence rules, the default action is to drop the packets. To change the default action:

    1. Click Default Action in the left pane.

    2. Click the Pencil icon.

    3. Change the default action to Accept.

    4. Click Save Match and Actions.

  16. Click Next to move to Policy Overview in the wizard.

  17. Click Preview to view the full policy in CLI format.

  18. Click Save Policy.

Step 4: Apply a Route Policy in a Device Template

  1. In the Cisco vManage NMS, select the Configuration > Templates screen.

  2. If you are creating a new device template:

    1. In the Device tab, click Create Template.

    2. From the Create Template drop-down, select From Feature Template.

    3. From the Device Model drop-down, select one of the devices.

    4. In the Template Name field, enter a name for the device template. This field is mandatory and can contain only uppercase and lowercase letters, the digits 0 through 9, hyphens (–), and underscores (_). It cannot contain spaces or any other characters.

    5. In the Description field, enter a description for the device template. This field is mandatory, and it can contain any characters and spaces.

    6. Continue with Step 4.

  3. If you are editing an existing device template:

    1. In the Device tab, click the More Actions icon to the right of the desired template, and click the pencil icon.

    2. Click the Additional Templates tab. The screen scrolls to the Additional Templates section.

    3. From the Policy drop-down, select the name of a policy that you have configured.

  4. Click the Additional Templates tab located directly beneath the Description field. The screen scrolls to the Additional Templates section.

  5. From the Policy drop-down, select the name of the policy you configured in the above procedure.

  6. To apply a route policy to BGP:

    1. Scroll to the Service VPN section.

    2. In the Service VPN drop-down, type the service VPN number (a VPN number other than 0 or 512).

    3. From Additional VPN Templates, select BGP.

    4. From the BGP drop-down, click Create Template or View Template.

    5. Select the Neighbor tab, click the plus sign (+), and click More.

    6. In Address Family, change the scope to Device Specific. Then, Click On to enable Address Family, Click On to enable Route Policy In, and specify the name of a route policy to apply to prefixes received from the neighbor, or Click On to enable Route Policy Out, and specify the name of a route policy to apply to prefixes sent to the neighbor. This name is one that you configured with a policy route-policy command.

    7. Click Save to save the neighbor configuration, and then click Save to save the BGP configuration.

  7. To apply a route policy to routes coming from all OSPF neighbors:

    1. Scroll to the Service VPN section.

    2. In the Service VPN drop-down, type the service VPN number (a VPN number other than 0 or 512).

    3. From Additional VPN Templates, select OSPF.

    4. Click Create Template or View Template.

    5. Select the Advanced tab.

    6. In Policy Name, specify the name of a route policy to apply to incoming routes. This name is one that you configured with a policy route-policy command.

    7. Click Save.

  8. To apply a route policy before redistributing routes into OSPF:

    1. Scroll to the Service VPN section.

    2. In the Service VPN drop-down, type the service VPN number (a VPN number other than 0 or 512).

    3. From Additional VPN Templates, select OSPF.

    4. Click Create Template or View Template.

    5. Select the Redistribute tab, click the plus sign (+), and select the protocol from which to redistribute routes into OSPF.

    6. Specify the name of a route policy to apply to the routes being redistributed. This name is one that you configured with a policy route-policy command.

    7. Click Save.

  9. Click Save (for a new template) or Update (for an existing template).

Configure Device Access Policy Using vManage

Cisco vEdge deviceCisco IOS XE SD-WAN devices supports device access policy configuration to handle SNMP and SSH traffic directed towards Control Plane. Use Cisco vManage to configure destination port based on device access policy.


Note

In order to allow connection to device from vManage Tools > SSH Terminal tab, create a rule to accept Device Access Protocol as SSH and Source Data Prefix as 192.168.1.5/32.


To configure localized device access control policies, use the Cisco vManage policy configuration wizard.

Configure specific or all components depending on the specific policy you are creating. To skip a component, click the Next button. To return to a component, click the Back button at the bottom of the screen.

To configure Device Access Policy:

  1. In the Cisco vManage, select the Configure > Policies screen.

  2. Select the Localized Policy tab.

  3. From Custom Options > Localized Policy pane, select Access Control Lists.

  4. Click Add Device Access Policy drop down list to add a device. The options are Add IPv4 Device Access Policy and Add IPv6 Device Access Policy.

  5. Select Add IPv4 Device Access Policy from the drop-down list to add IPv4 ACL Policy. The Edit Device IPv4 ACL Policy page displays.

  6. Enter the name and the description for the new policy.

  7. Click Add ACL Sequence to add a sequence. The Device Acces Control List page displays.

  8. Click Sequence Rule. Match and Actions options display.

  9. From the Match pane, select and configure the following conditions for your ACL policy:

    Match Condition

    Description

    Device Access Protocol (required)

    Select a carrier from the drop-down list. For example SNMP, SSH.

    Source Data Prefix

    Enter the source IP address. For example, 10.0.0.0/12.

    Source Port

    Enter the list of source ports. The range is 0-65535.

    Destination Data Prefix

    Enter the destination IP address. For example, 10.0.0.0/12.

    Destination VPN

    Enter a VPN ID.

  10. From the Actions tab, configure the following conditions for your ACL policy:

    Action Condition

    Description

    Accept

    Counter Name

    Enter the counter name to be accepted. The maximum length can be 20 characters.

    Drop

    Counter Name

    Enter the counter name to drop. The maximum length can be 20 characters.

  11. Click Save Match And Actions to save all the conditions for ACL policy.

  12. Click Save Device Access Control List Policy to apply the selected match conditions to an action.

  13. If no packets match any of the route policy sequence rules, the Default Action in the left pane is to drop the packets.


Note

IPv6 Prefix match is not supported on Cisco vEdge deviceCisco IOS XE SD-WAN devices. When you try to configure IPv6 prefix match on these devices, Cisco vManage fails to generate device configuration.

Configure Centralized Data Policy Based on Prefixes and IP Headers

A centralized data policy based on source and destination prefixes and on headers in IP packets consists of a series of numbered (ordered) sequences of match-action pair that are evaluated in order, from lowest sequence number to highest sequence number. When a packet matches one of the match conditions, the associated action is taken and policy evaluation on that packets stops. Keep this in mind as you design your policies to ensure that the desired actions are taken on the items subject to policy.

If a packet matches no parameters in any of the sequences in the policy configuration, it is dropped and discarded by default.

Configuration Components

The following figure illustrates the configuration components for centralized data policy:

To configure centralized data policies, use the Cisco vManage policy configuration wizard. The wizard consists of four sequential screens that guide you through the process of creating and editing policy components:

  • Create Groups of Interest—Create lists that group together related items and that you call in the match or action components of a policy.

  • Configure Traffic Rules—Create the match and action conditions of a policy.

  • Apply Policies to Sites and VPNs—Associate policy with sites and VPNs in the overlay network.

In the first three policy configuration wizard screens, you are creating policy components or blocks. In the last screen, you are applying policy blocks to sites and VPNs in the overlay network.

For a centralized data policy to take effect, you must activate the policy.

This section provides general procedures for configuring centralized data policy on Cisco vSmart Controllers. Centralized data policy can be used for different purposes, which are described in the sections that follow.

Start the Policy Configuration Wizard

To start the policy configuration wizard:

Procedure

Step 1

In the Cisco vManage NMS, select the Configure > Policies screen.

Step 2

Select the Centralized Policy tab.

Step 3

Click Add Policy. The policy configuration wizard opens, and the Create Groups of Interest screen displays.


Step 1: Create Policy Lists

You can create lists of groups to use in centralized policy.

Procedure

Step 1

Create new lists, as described in the following table:

List Type

Procedure

Application
  1. In the left bar, click Application.

  2. Click New Application List.

  3. Enter a name for the list.

  4. Click either the Application or Application Family button.

  5. From the Select drop-down, select the desired applications or application families.

  6. Click Add.

Two application lists are preconfigured. You cannot edit or delete these lists.

  • Google_Apps—Includes Google applications, such as gmail, Google maps, and YouTube. To display a full list of Google applications, click the list in the Entries column.

  • Microsoft_Apps—Includes Microsoft applications, such as Excel, Skype, and Xbox. To display a full list of Microsoft applications, click the list in the Entries column.

Color

  1. In the left bar, click Color.

  2. Click New Color List.

    The Color List popup displays.

  3. Enter a name for the list

  4. From the Select Color drop-down, select the desired colors.

  5. Click Add.

Data Prefix
  1. In the left bar, click Data Prefix.

  2. Click New Data Prefix List.

  3. Enter a name for the list.

  4. Select either IPv4 or IPv6.

  5. In the Add Data Prefix field, enter one or more data prefixes separated by commas.

  6. Click Add.

Policer
  1. In the left bar, click Policer.

  2. Click New Policer List.

  3. Enter a name for the list.

  4. Define the policing parameters:

    1. In the Burst field, enter the maximum traffic burst size, a value from 15,000 to 10,000,000 bytes.

    2. In the Exceed field, select the action to take when the burst size or traffic rate is exceeded. It can be drop, which sets the packet loss priority (PLP) to low.

      You can use the remark action to set the packet loss priority (PLP) to high.

    3. In the Rate field, enter the maximum traffic rate, a value from 0 through 264 – 1 bits per second (bps).

  5. Click Add.

Prefix
  1. In the left bar, click Prefix.

  2. Click New Prefix List.

  3. Enter a name for the list.

  4. In the Add Prefix field, enter one or more data prefixes separated by commas.

  5. Click Add.

Site
  1. In the left bar, click Site.

  2. Click New Site List.

  3. Enter a name for the list.

  4. In the Add Site field, enter one or more site IDs separated by commas.

  5. Click Add.

SLA Class

  1. In the left bar, click SLA Class.

  2. Click New SLA Class List.

  3. Enter a name for the list.

  4. Define the SLA class parameters:

    1. In the Loss field, enter the maximum packet loss on the connection, a value from 0 through 100 percent.

    2. In the Latency field, enter the maximum packet latency on the connection, a value from 0 through 1,000 milliseconds.

    3. In the Jitter field, enter the maximum jitter on the connection, a value from 1 through 1,000 milliseconds.

  5. Click Add.

TLOC
  1. In the left bar, click TLOC.

  2. Click New TLOC List. The TLOC List popup displays.

  3. Enter a name for the list.

  4. In the TLOC IP field, enter the system IP address for the TLOC.

  5. In the Color field, select the TLOC's color.

  6. In the Encap field, select the encapsulation type.

  7. In the Preference field, optionally select a preference to associate with the TLOC.

  8. Click Add TLOC to add another TLOC to the list.

  9. Click Save.

VPN

  1. In the left bar, click VPN.

  2. Click New VPN List.

  3. Enter a name for the list.

  4. In the Add VPN field, enter one or more VPN IDs separated by commas.

  5. Click Add.

Step 2

Click Next to move to Configure Topology and VPN Membership in the wizard.


Step 2: Configure Traffic Rules

When you first open the Traffic Rules screen, the Application-Aware Routing tab is selected by default. To configure traffic rules for deep packet inspection, see Deep Packet Inspection.

To configure traffic rules for centralized data policy:

Procedure

Step 1

Click the Traffic Data tab.

Step 2

Click the Add Policy drop-down.

Step 3

Click Create New. The Add Data Policy screen displays.

Step 4

Enter a name and description for the data policy.

Step 5

In the right pane, click Sequence Type. The Add Data Policy popup opens.

Step 6

Select the type of data policy you want to create. Choices are: Application Firewall, QoS, Service Chaining, Traffic Engineering, and Custom.

Step 7

A policy sequence containing the text string Application Firewall, QoS, Service Chaining, Traffic Engineering, or Custom is added in the left pane

Step 8

Double-click the text string, and enter a name for the policy sequence. The name you type is displayed both in the Sequence Type list in the left pane and in the right pane.

Step 9

In the right pane, click Sequence Rule. The Match/Action box opens, and Match is selected by default. The available policy match conditions are listed below the box.

Step 10

For QoS and Traffic Engineering data policies: From the Protocol drop-down list, select IPv4 to apply the policy only to IPv4 address families, IPv6 to apply the policy only to IPv6 address families, or Both to apply the policy IPv4 and IPv6 address families.

Step 11

To select one or more Match conditions, click its box and set the values as described in the following table. Note that not all match conditions are available for all policy sequence types.

Match Condition Procedure IPv4 Fields IPv6 Fields
None (match all packets) Do not specify any match conditions.
Applications /Application Family List
  1. In the Match conditions, click Applications/Application Family List.

  2. In the drop-down, select the application family.

  3. To create an application list:

    1. Click New Application List.

    2. Enter a name for the list.

    3. Click Application to create a list of individual applications. Click Application Family to create a list of related applications.

    4. In the Select Application drop-down, select the desired applications or application families.

    5. Click Save.

app-list

Destination Data Prefix
  1. In the Match conditions, click Destination Data Prefix.

  2. To match a list of destination prefixes, select the list from the drop-down.

  3. To match an individual destination prefix, enter the prefix in the Destination: IP Prefix field.

source/ destination-data-prefix-list

source/ destination-data-prefix-list

Destination Port
  1. In the Match conditions, click Destination Port.

  2. In the Destination: Port field, enter the port number. Specify a single port number, a list of port numbers (with numbers separated by a space), or a range of port numbers (with the two numbers separated with a hyphen [-]).

src/dst ip

src/dst ip

DNS Application List

Add an application list to enable split DNS.

  1. In the Match conditions, click DNS Application List.

  2. In the drop-down, select the application family.

dns-app-list

DNS

Add an application list to process split DNS.

  1. In the Match conditions, click DNS.

  2. In the drop-down, select Request to process DNS requests for the DNS applications, and select Response to process DNS responses for the applications.

dns-request

dns-response

DSCP
  1. In the Match conditions, click DSCP.

  2. In the DSCP field, type the DSCP value, a number from 0 through 63.

dscp

dscp

Packet Length
  1. In the Match conditions, click Packet Length.

  2. In the Packet Length field, type the length, a value from 0 through 65535.

packet-len

packet-len

PLP
  1. In the Match conditions, click PLP to set the Packet Loss Priority.

  2. In the PLP drop-down, select Low or High. To set the PLP to high, apply a policer that includes the exceed remark option.

Protocol
  1. In the Match conditions, click Protocol.

  2. In the Protocol field, type the Internet Protocol number, a number from 0 through 255.

protocol

protocol/next header

Source Data Prefix
  1. In the Match conditions, click Source Data Prefix.

  2. To match a list of source prefixes, select the list from the drop-down.

  3. To match an individual source prefix, enter the prefix in the Source field.

source/ destination-data-prefix-list

source /destination-data-prefix-list

Source Port
  1. In the Match conditions, click Source Port.

  2. In the Source field, enter the port number. Specify a single port number, a list of port numbers (with numbers separated by a space), or a range of port numbers (with the two numbers separated with a hyphen [-]).

ports

ports

TCP
  1. In the Match conditions, click TCP.

  2. In the TCP field, syn is the only option available.

tcp flag

Step 12

To select actions to take on matching data traffic, click the Actions box.

Step 13

To drop matching traffic, click Drop. The available policy actions are listed to the right of the button.

Step 14

To accept matching traffic, click Accept. The available policy actions are listed to the right of the button.

Step 15

Set the policy action as described in the following table. Note that not all actions are available for all match conditions

Match Condition Description Procedure
Counter Count matching data packets.
  1. In the Action conditions, click Counter.

  2. In the Counter Name field, enter the name of the file in which to store packet counters.

DSCP Assign a DSCP value to matching data packets.
  1. In the Action conditions, click DSCP.

  2. In the DSCP field, type the DSCP value, a number from 0 through 63.

Forwarding Class Assign a forwarding class to matching data packets.
  1. In the Match conditions, click Forwarding Class.

  2. In the Forwarding Class field, type the class value, which can be up to 32 characters long.

Log Place a sampled set of packets that match the SLA class rule into system logging (syslog) files. In addition to logging the packet headers, a syslog message is generated the first time a packet header is logged and then every 5 minutes thereafter, as long as the flow is active.
  1. In the Action conditions, click Log to enable logging.

Policer Apply a policer to matching data packets.
  1. In the Match conditions, click Policer.

  2. In the Policer drop-down field, select the name of a policer.

Loss Correction

Apply loss correction to matching data packets.

Forward Error Correction (FEC) recovers lost packets on a link by sending redundant data, enabling the receiver to correct errors without the need to request retransmission of data.

FEC is supported only for IPSEC tunnels, it is not supported for GRE tunnels.

  • FEC Adaptive – Corresponding packets are subjected to FEC only if the tunnels that they go through have been deemed unreliable based on measured loss. Adaptive FEC starts to work at 2% packet loss; this value is hard-coded and is not configurable.

  • FEC Always – Corresponding packets are always subjected to FEC.

  • Packet Duplication – Sends duplicate packets over a single tunnel. If more than one tunnel is available, duplicated packets will be sent over the tunnel with the best parameters.

  1. In the Match conditions, click Loss Correction.

  2. In the Loss Correction field, select FEC Adaptive, FEC Always, or Packet Duplication.

Click Save Match and Actions.
Step 16

Create additional sequence rules as desired. Drag and drop to re-arrange them.

Step 17

Click Save Data Policy.

Step 18

Click Next to move to Apply Policies to Sites and VPNs in the wizard.


Step 3: Apply Policies to Sites and VPNs

In Apply Policies to Sites and VPNs, apply a policy to overlay network sites and VPNs.

Procedure

Step 1

In the Policy Name field, enter a name for the policy. This field is mandatory and can contain only uppercase and lowercase letters, the digits 0 through 9, hyphens (–), and underscores (_). It cannot contain spaces or any other characters.

Step 2

In the Policy Description field, enter a description of the policy. It can contain up to 2048 characters. This field is mandatory, and it can contain any characters and spaces.

Step 3

From the Topology bar, select the tab that corresponds to the type of policy block—Topology, Application-Aware Routing, Traffic Data, or Cflowd. The table then lists policies that you have created for that type of policy block.

Step 4

Associate the policy with VPNs and sites. The choice of VPNs and sites depends on the type of policy block:

  1. For a Topology policy block, click Add New Site List and VPN List or Add New Site. Some topology blocks might have no Add buttons. Select one or more site lists, and select one or more VPN lists. Click Add.

  2. For an Application-Aware Routing policy block, click Add New Site List and VPN list. Select one or more site lists, and select one or more VPN lists. Click Add

  3. For a Traffic Data policy block, click Add New Site List and VPN List. Select the direction for applying the policy (From Tunnel, From Service, or All), select one or more site lists, and select one or more VPN lists. Click Add.

  4. For a cflowd policy block, click Add New Site List. Select one or more site lists, Click Add.

Step 5

Click Preview to view the configured policy. The policy is displayed in CLI format.

Step 6

Click Save Policy. The Configuration > Policies screen appears, and the policies table includes the newly created policy.


Step 4: Activate a Centralized Data Policy

Activating a centralized data policy sends that policy to all connected Cisco vSmart Controllers. To activate a centralized policy:

Procedure

Step 1

In the Cisco vManage NMS, select the Configure > Policies screen.

Step 2

Select a policy from the policy table.

Step 3

Click the More Actions icon to the right of the row, and click Activate. The Activate Policy popup opens. It lists the IP addresses of the reachable Cisco vSmart Controllers to which the policy is to be applied.

Step 4

Click Activate.


Deep Packet Inspection

You configure deep packet inspection using a standard centralized data policy. You define the applications of interest in a vManage policy list or with policy lists app-list CLI command, and you call these lists in the match portion of the data policy. You can control the path of the application traffic through the network by defining, in the action portion of the data policy, the local TLOC or the remote TLOC, or for strict control, you can define both.

Configure Deep Packet Inspection Using vManage

To configure a centralized data policy for deep packet inspection, use the vManage policy configuration wizard. Use the wizard to create and edit deep packet inspection policy components:

  • Configure groups of interest (lists) to group related items to be called in the centralized data policy.

  • Configure traffic rules.

  • Apply the policy.

Step 1: Start the Policy Configuration Wizard

To start the policy configuration wizard:

  1. In vManage NMS, select the Configure > Policies screen.

  2. Select the Centralized Policy tab.

  3. Click Add Policy.

The policy configuration wizard opens, and the Create Groups of Interest screen is displayed.

Step 2: Create Groups of Interest

In Create Groups of Interest, create lists of groups to use in centralized policy:

To configure groups of interest for deep packet inspection:

  1. In the left pane, select the type of list. For centralized data policy for deep packet inspection, you can use Application, Site, and VPN lists.

  2. To create a new list, click New List.

    To modify an existing list, click the More Actions icon to the right of the desired list, and click the pencil icon.

  3. In the List Name field, enter a name for the list. This field is mandatory and can contain only uppercase and lowercase letters, the digits 0 through 9, hyphens (–), and underscores (_). It cannot contain spaces or any other characters.

  4. In the field below the List Name field, enter the desired values for the list. For some lists you type the desired values, and for others you select from a drop-down.

  5. Click Add (for a new list) or Save (for an existing list).

  6. Click Next to move to the Configure Topology and VPN Membership screen.

  7. Click Next to move the Configure Traffic Rules in the wizard.

Step 3: Configure Traffic Rules

When you first open the Traffic Rules screen, the Application-Aware Routing tab is selected by default:

To configure traffic rules for deep packet inspection policy:

  1. In the Application-Aware Routing bar, click Traffic Data.

  2. To create a new centralized data policy, click Add Policy.

    To modify an existing policy, click the More Actions icon to the right of the desired policy, and click the pencil icon.

  3. If data traffic does not match any of the conditions in one of the sequences, it is dropped by default. If you want nonmatching routes to be accepted, click the pencil icon in the Default Action, click Accept, and click Save Match And Actions.

  4. To create a match–action sequence for data traffic:

    1. Click Sequence Type.

    2. To create a match–action rule, click Sequence Rule. The Match button is selected by default.

    3. Click the desired Match button, and enter the desired values in Match Conditions. For some conditions, you type the desired values, and for others you select from a drop-down.

    4. Click the Actions button. The default action is Reject. To accept matching packets, click the Accept radio button. Then click the desired action, and enter the desired values for Actions.

    5. Click Save Match and Actions.

    6. Create additional Sequence Rules or Sequence Types, as needed.

  5. To rename a Sequence Type, double-click its name in the right pane, and type the new name. The name also changes in the right pane.

  6. To re-order sequence rules and types, drag and drop them them.

  7. Click Save.

  8. Click Next to move to the Apply Policies to Sites and VPNs in the wizard.

Step 4: Apply Policies to Sites and VPNs
  1. In Apply Policies to Sites and VPNs, apply a policy to overlay network sties and VPNs:

  2. In the Policy Name field, enter a name for the policy. This field is mandatory and can contain only uppercase and lowercase letters, the digits 0 through 9, hyphens (–), and underscores (_). It cannot contain spaces or any other characters.

  3. In the Policy Description field, enter a description of the policy. It can contain up to 2048 characters. This field is mandatory, and it can contain any characters and spaces.

  4. From the Topology bar, select the Application-Aware Routing tab. The table then lists policies that you have created for that type of policy block.

  5. Click Add New Site List and VPN List or Add New Site. Some topology blocks might have no Add buttons. Select one or more site lists, and select one or more VPN lists. Click Add.

  6. Click Preview to view the configured policy. The policy is displayed in CLI format.

  7. Click Save Policy. The Configuration > Policies screen opens, and the policies table includes the newly created policy.

Step 5: Activate a Centralized Data Policy

Activating a centralized data policy sends that policy to all connected vSmart controllers. To activate a centralized policy:

  1. In vManage NMS, select the Configure > Policies screen.

  2. Select a policy from the policy table.

  3. Click the More Actions icon to the right of the row, and click Activate. The Activate Policy popup opens. It lists the IP addresses of the reachable vSmart controllers to which the policy is to be applied.

  4. Click Activate.

Configure Deep Packet Inspection Using CLI

Following are the high-level steps for configuring a centralized data policy to use for deep packet inspection:

  1. Create a list of overlay network sites to which the data policy is to be applied in the apply-policy command:

    vSmart(config)# policy
    vSmart(config-policy)# lists site-list list-name
    vSmart(config-lists-list-name)# site-id site-id

    The list can contain as many site IDs as necessary. Include one site-id command for each site ID. For contiguous site IDs, you can specify a range of numbers separated with a dash (–).

    Create additional site lists, as needed.

  2. Create lists of applications and application families that are to be subject to the data policy, Each list can contain one or more application names, or one or more application families. A single list cannot contain both applications and application families.

    vSmart(config)# policy lists
    vSmart(config-lists)# app-list list-name
    vSmart(config-app-list)# app application-name
    
    vSmart(config)# policy lists
    vSmart(config-lists)# app-list list-name
    vSmart(config-applist)# app-family family-name
  3. Create lists of IP prefixes and VPNs, as needed:

    vSmart(config)# policy lists
    vSmart(config-lists)# data-prefix-list list-name
    vSmart(config-lists-list-name)# ip-prefix prefix/length
    
    vSmart(config)# policy lists
    vSmart(config-lists)# vpn-list list-name
    vSmart(config-lists-list-name)# vpn vpn-id
  4. Create lists of TLOCs, as needed:

    vSmart(config)# policy​
    vSmart(config-policy)# lists tloc-list list-name
    vSmart(config-lists-list-name)# tloc ip-address color color encap encapsulation [preference number]
  5. Define policing parameters, as needed:

    vSmart(config-policy)# policer policer-name
    vSmart(config-policer)# rate bandwidth
    vSmart(config-policer)# burst bytes
    vSmart(config-policer)# exceed action
  6. Create a data policy instance and associate it with a list of VPNs:

    vSmart(config)# policy data-policy policy-name
    vSmart(config-data-policy-policy-name)# vpn-list list-name
  7. Create a series of match–pair sequences:

    vSmart(config-vpn-list)# sequence number
    vSmart(config-sequence-number)#

    The match–action pairs are evaluated in order, by sequence number, starting with the lowest numbered pair and ending when the route matches the conditions in one of the pairs. Or if no match occurs, the default action is taken (either rejecting the route or accepting it as is).

  8. Define match parameters based on applications:

    vSmart(config-sequence-number)# match app-list list-name
  9. Define additional match parameters for data packets:

    vSmart(config-sequence-number)# match parameters
  10. Define actions to take when a match occurs:

    vSmart(config-sequence-number)# action (accept | drop) [count]
  11. For packets that are accepted, define the actions to take. To control the tunnel over which the packets travels, define the remote or local TLOC, or for strict control over the tunnel path, set both:

    vSmart(config-action)# set tloc ip-address color color encap encapsulation
    vSmart(config-action)# set tloc-list list-name
    vSmart(config-action)# set local-tloc color color encap encapsulation
    vSmart(config-action)# set local-tloc-list color color encap encapsulation [restrict]
  12. Define additional actions to take.
  13. Create additional numbered sequences of match–action pairs within the data policy, as needed.
  14. If a route does not match any of the conditions in one of the sequences, it is rejected by default. If you want nonmatching prefixes to be accepted, configure the default action for the policy:

    vSmart(config-policy-name)# default-action accept
  15. Apply the policy to one or more sites in the overlay network:

    vSmart(config)# apply-policy site-list list-name data-policy policy-name (all | from-service | from-tunnel)

To enable the infrastructure for deep packet inspection on the vEdge routers, include the following command in the configuration on the routers:

vEdge(config)# policy app-visibility
Structural Components of Policy Configuration for Deep Packet Inspection

Following are the structural components required to configure centralized data policy for deep packet inspection. Each one is explained in more detail in the sections below.

On the vSmart controller:
policy
  lists
    app-list list-name
      (app applications | app-family application-families)
    data-prefix-list list-name 
      ip-prefix prefix 
    site-list list-name 
      site-id site-id 
    tloc-list list-name
      tloc ip-address color color encap encapsulation [preference value]
    vpn-list list-name 
      vpn vpn-id 
  policer policer-name
    burst bytes
    exceed action
    rate bps
  data-policy policy-name 
    vpn-list list-name 
      sequence number 
        match
          app-list list-name
          destination-data-prefix-list list-name
          destination-ip ip-addresses
          destination-port port-numbers
          dscp number
          packet-length number
          protocol protocol
          source-data-prefix-list list-name
          source-ip ip-addresses
          source-port port-numbers
          tcp flag
        action
          drop
          count counter-name
          log
          accept
            nat [pool number] [use-vpn 0]
            set 
              dscp number
              forwarding-class class
              local-tloc color color [encap encapsulation] [restrict]
              next-hop ip-address
              policer policer-name
              service service-name local [restrict] [vpn vpn-id]
              service service-name (tloc ip-address | tloc-list list-name) [vpn vpn-id]
              tloc ip-address color color encap encapsulation
              tloc-list list-name
              vpn vpn-id
      default-action
        (accept | drop)
apply-policy site-list list-name 
  data-policy policy-name (all | from-service | from-tunnel) 
  
On the vEdge router:
policy
  app-visibility
Action Parameters for Configuring Deep Packet Inspection

When data traffic matches the conditions in the match portion of a centralized data policy, the packet can be accepted or dropped, and it can be counted. Then, you can associate parameters with accepted packets.

In vManage NMS, you configure match parameters from:

  • Configuration > Policies > Centralized Policy > Add Policy > Configure Traffic Rules > (Application-Aware Routing | Traffic Data | Cflowd) > Sequence Type > Sequence Rule > Action

  • Configuration > Policies > Custom Options > Centralized Policy > Traffic Policy > (Application-Aware Routing | Traffic Data | Cflowd) > Sequence Type > Sequence Rule > Action.

In the CLI, you configure the action parameters under the policy data-policy vpn-list sequence action command.

Each sequence in a centralized data policy can contain one action condition.

In the action, you first specify whether to accept or drop a matching data packet, and whether to count it:

Description vManage Configuration/CLI Configuration Parameter Value or Range
Accept the packet. An accepted packet is eligible to be modified by the additional parameters configured in the action portion of the policy configuration.

Click Accept.

accept

Count the accepted or dropped packets.

Action Counter

Click Accept, then action Counter

count counter-name

Name of a counter. Use the show policy access-lists counters command on the Cisco device.
Discard the packet. This is the default action.

Click Drop

drop

Log the packet. Packets are placed into the messages and vsyslog system logging (syslog) files.

Action Log

Click Accept, then action Log

log

To view the packet logs, use the show app log flows and show log commands.

To view the packet logs, use the show app log flows and show log commands.

Then, for a packet that is accepted, the following parameters can be configured. Note that you cannot use DPI with either cflowd or NAT.

Description vManage CLI Configuration Parameter Value or Range
DSCP value.

Click Accept, then action DSCP.

set dscp value

0 through 63
Forwarding class.

Click Accept, then action Forwarding Class.

set forwarding-class value

Name of forwarding class

Direct matching packets to a TLOC that mathces the color and encapsulation

By default, if the TLOC is not available, traffic is forwarded using an alternate TLOC.

Click Accept, then action Local TLOC.

set local-tloc color color [encap encapsulation]

color​ can be:

3g, biz-internet, blue,

bronze, custom1, custom2,

custom3, default, gold,

green lte, metro-ethernet,

mpls, private1 through private6,

public-internet, red, and silver.

By default, encapsulation is ipsec. It can also be gre.

Direct matching packets to one of the TLOCs in the list if the TLOC matches the color and encapsulation

By default, if the TLOC is not available, traffic is forwarded using an alternate TLOC. To drop traffic if a TLOC is unavailable, include the restrict option.

Click Accept, then action Local TLOC

set local-tloc-list color color encap encapsulation [restrict]

Set the next hop to which the packet should be forwarded.

Click Accept, then action Next Hop.

set next-hop ip-address

IP address
Apply a policer.

Click Accept, then action Policer.

set policer policer-name

Name of policer configured with a policy policer command.

Direct matching packets to the name service, before delivering the traffic to its ultimate destination.

The TLOC address or list of TLOCs identifies the remote TLOCs to which the traffic should be redirected to reach the service. In the case of multiple TLOCs, the traffic is load-balanced among them.

The VPN identifier is where the service is located.

Configure the services themselves on the vEdge routers that are collocated with the service devices, using the vpn service configuration command.

Click Accept, then action Service.

set service service-name [tloc ip-address​ | tloc-list list-name] [vpn vpn-id]

Standard services: FW, IDS, IDP

Custom services: netsvc1, netsvc2,netsvc3, netsvc4

TLOC list is configured with a policy lists tloc-list list.

Direct matching packets to the named service that is reachable via a GRE tunnel whose source is in the transport VPN (VPN 0). If the GRE tunnel used to reach the service is down, packet routing falls back to using standard routing. To drop packets when a GRE tunnel to the service is unreachable, include the restrict option. In the service VPN, you must also advertise the service using the service command. You configure the GRE interface or interfaces in the transport VPN (VPN 0).

Click Accept, then action Service.

set service service-name [tloc ip-address​ | tloc-list list-name] [vpn vpn-id]

Standard services: FW, IDS, IDP

Custom services: netsvc1, netsvc2,netsvc3, netsvc4

Direct traffic to a remote TLOC. The TLOC is defined by its IP address, color, and encapsulation.

Click Accept, then action TLOC.

set local-tloc color color [encap encapsulation]

TLOC address, color, and encapsulation

Direct traffic to one of the remote TLOCs in the TLOC list.

Click Accept, then action TLOC.

set tloc-list list-name

Name of a policy lists tloc-list list
Set the VPN that the packet is part of.

Click Accept, then action VPN.

set vpn vpn-id

0 through 65530
Default Action

If a data packet being evaluated does not match any of the match conditions in a data policy, a default action is applied to the packet. By default, the data packet is dropped.

In vManage NMS, you modify the default action from Configuration > Policies > Centralized Policy > Add Policy > Configure Traffic Rules > Application-Aware Routing > Sequence Type > Sequence Rule > Default Action.

In the CLI, you modify the default action with the policy data-policy vpn-list default-action accept command.

Apply Centralized Data Policy for Deep Packet Inspection

For a deep packet inspection centralized data policy to take effect, you apply it to a list of sites in the overlay network.

To apply a centralized policy in vManage NMS:

  1. In vManage NMS, select the Configure > Policies screen.

  2. Select a policy from the policy table.

  3. Click the More Actions icon to the right of the row, and click Activate. The Activate Policy popup opens. It lists the IP addresses of the reachable vSmart controllers to which the policy is to be applied.

  4. Click Activate.

To apply a centralized policy in the CLI:

vSmart(config)# apply-policy site-list list-name data-policy policy-name (all | from-service | from-tunnel)

By default, data policy applies to all data traffic passing through the vEdge router: the policy evaluates all data traffic going from the local site (that is, from the service side of the router) into the tunnel interface, and it evaluates all traffic entering to the local site through the tunnel interface. You can explicitly configure this behavior by including the all option. To have the data policy apply only to policy exiting from the local site, include the from-service option. To have the policy apply only to incoming traffic, include the from-tunnel option.

You cannot apply the same type of policy to site lists that contain overlapping site IDs. That is, all data policies cannot have overlapping site lists among themselves. If you accidentally misconfigure overlapping site lists, the attempt to commit the configuration on the vSmart controller fails.

As soon as you successfully activate the configuration by issuing a commit command, the vSmart controller pushes the data policy to the vEdge routers located in the specified sites. To view the policy as configured on the vSmart controller, use the show running-config command on the vSmart controller:

vSmart# show running-config policy
vSmart# ;show running-config apply-policy

To view the policy that has been pushed to the vEdge router, use the show policy from-vsmart command on the vEdge router.

vEdge# show policy from-vsmart
Monitor Running Applications

To enable the deep packet inspection infrastructure on the vEdge routers, you must enable application visibility on the routers:

vEdge(config)# policy app-visibility

To display information about the running applications, use the show app dpi supported-applications, show app dpi applications, and show app dpi flows commands on the router.

View DPI Applications Using vManage

You can view the list of all the application-aware applications supported by the SD-WAN software on the router using the following steps:

  1. In the Cisco vManage, select the Monitor > Network screen.

  2. From the WAN-Edge pane, select the Device that supports DPI. The vManage Control Connections page displays.

  3. In the left pane, select Real Time to view the device details.

  4. From the Device Options drop-down, choose DPI Applications to view the list of applications running on the device.

  5. From the Device Options drop-down, choose DPI Supported Applications to view the list of applications that are supported on the device.

Configure Localized Data Policy for IPv4 Using Cisco vManage

Table 45. Feature History

Feature Name

Release Information

Description

Control Traffic Flow Using Class of Service Values

Cisco SD-WAN Release 19.2.1

Cisco IOS XE SD-WAN Release 16.12.1b

This feature lets you control the flow of traffic into and out of a Cisco SD-WANCisco IOS XE SD-WAN device interface based on the conditions defined in the quality of service (QoS) map. A priority field and a layer 2 class of service (CoS) were added for configuring the re-write rule.

To configure IPv4 localized policy, use the Cisco vManage policy configuration wizard. The wizard is a UI policy builder that consists of five screens to configure IPv4 localized policy components:

  • Groups of Interest, also called lists—Create data prefix lists and mirroring and policer parameters that group together related items and that you call in the match or action components of a policy.

  • Forwarding Classes—Define forwarding classes and rewrite rules to use for QoS.

  • Access Control Lists—Define the match and action conditions of ACLs.

  • Route Policies—Define the match and action conditions of route policies.

  • Policy Settings—Define additional policy settings, including Cloud QoS settings and the frequency for logging policy-related packet headers.

You configure some or all these components depending on the specific policy you are creating. To skip a component, click the Next button at the bottom of the screen. To return to a component, click the Back button at the bottom of the screen.

Step 1: Start the Policy Configuration Wizard

To start the policy configuration wizard:

  1. In Cisco vManage NMS, select the Configure > Policies screen.

  2. Select the Localized Policy tab.

  3. Click Add Policy.

The policy configuration wizard opens, and the Create Groups of Interest screen is displayed.

Step 2: Create Groups of Interest

In the Create Groups of interest screen create lists to use in the localized data policy:

  1. Create news lists of groups, as described in the following table:

Table 46.

List Type

Procedure

Data Prefix

  1. In the left bar, click Data Prefix.

  2. Click New Data Prefix List.

  3. Enter a name for the list.

  4. Enter one or more IP prefixes.

  5. Click Add.

Mirror

  1. In the left bar, click Mirror.

  2. Click New Mirror List. The Mirror List popup displays.

  3. Enter a name for the list.

  4. In the Remote Destination IP field, enter the IP address of the destination to which to mirror the packets.

  5. In the Source IP field, enter the IP address of the source of the packets to mirror.

  6. Click Save.

Policer

  1. In the left bar, click Policer.

  2. Click New Policer List.

  3. Enter a name for the list.

  4. In the Burst field, enter maximum traffic burst size. It can be a value from 15000 to 10000000 bytes.

  5. In the Exceed field, select the action to take when the burst size or traffic rate is exceeded. Select Drop (the default) to set the packet loss priority (PLP) to low. Select Remark to set the PLP to high.

  6. In the Rate field, enter the maximum traffic rate. It can be value from 0 through 264 – 1 bps

  7. Click Add.

  1. Click Next to move to Configure Forwarding Classes/QoS in the wizard.

Step 3: Configure Forwarding Classes for QoS

When you first open the Forwarding Classes/QoS screen, the QoS tab is selected by default:

To configure forwarding classes for use by QoS:

  1. To create a new QoS mapping:

    1. In the QoS tab, click the Add QoS drop-down.

    2. Select Create New.

    3. Enter a name and description for the QoS mapping.

    4. Click Add Queue. The Add Queue popup displays.

    5. Select the queue number from the Queue drop-down.

    6. Select the maximum bandwidth and buffer percentages, and the scheduling and drop types. Enter the forwarding class.

    7. Click Save.

  2. To import an existing QoS mapping:

    1. In the QoS tab, click the Add QoS drop-down.

    2. Select Import Existing.

    3. Select a QoS mapping.

    4. Click Import.

  3. To view or copy a QoS mapping or to remove the mapping from the localized policy, click the More Actions icon to the right of the row, and select the desired action.

  4. To configure policy rewrite rules for the QoS mapping:

    1. In the QoS tab, click the Add Rewrite Policy drop-down..

    2. Select Create New.

    3. Enter a name and description for the rewrite rule.

    4. Click Add Rewrite Rule. The Add Rule popup displays.

    5. Select a class from the Class drop-down.

    6. Select the priority (Low or High) from the Priority drop-down.

      Low priority is supported only for Cisco IOS XE SD-WAN devices.

    7. Enter the DSCP value (0 through 63) in the DSCP field.

    8. Enter the class of service (CoS) value (0 through 7) in the Layer 2 Class of Service field.

    9. Click Save.

  5. To import an existing rewrite rule:

    1. In the QoS tab, click the Add Rewrite Policy drop-down..

    2. Select Import Existing.

    3. Select a rewrite rule.

    4. Click Import.

  6. Click Next to move to Configure Access Lists in the wizard.

Step 4: Configure ACLs

  1. In the Configure Access Control Lists screen, configure ACLs.

  2. To create a new IPv4 ACL, click the Add Access Control List Policy drop-down. Then select Add IPv4 ACL Policy:

  3. Enter a name and description for the ACL.

  4. In the left pane, click Add ACL Sequence. An Access Control List box is displayed in the left pane.

  5. Double-click the Access Control List box, and type a name for the ACL.

  6. In the right pane, click Add Sequence Rule to create a single sequence in the ACL. The Match tab is selected by default.

  7. Click a match condition.

  8. On the left, enter the values for the match condition.

  9. On the right enter the action or actions to take if the policy matches.

  10. Repeat Steps 6 through 8 to add match–action pairs to the ACL.

  11. To rearrange match–action pairs in the ACL, in the right pane drag them to the desired position.

  12. To remove a match–action pair from the ACL, click the X in the upper right of the condition.

  13. Click Save Match and Actions to save a sequence rule.

  14. To rearrange sequence rules in an ACL, in the left pane drag the rules to the desired position.

  15. To copy, delete, or rename an ACL sequence rule, in the left pane, click More Options next to the rule's name and select the desired option.

  16. If no packets match any of the ACL sequence rules, the default action is to drop the packets. To change the default action:

    1. Click Default Action in the left pane.

    2. Click the Pencil icon.

    3. Change the default action to Accept.

    4. Click Save Match and Actions.

  17. Click Next to move to Configure Route Policy in the wizard.

  18. Click Next to move to the Policy Overview screen.

Step 5: Configure Policy Settings

In Policy Overview, configure policy settings:

  1. Enter a name and description for the ACL.

  2. To enable cflowd visibility so that a Cisco vEdge deviceCisco IOS XE SD-WAN device can perform traffic flow monitoring on traffic coming to the router from the LAN, click Netflow.

  3. To enable application visibility so that a Cisco vEdge device Cisco IOS XE SD-WAN device can monitor and track the applications running on the LAN, click Application.

  4. To enable QoS scheduling and shaping for traffic that a Cisco vEdge deviceCisco IOS XE SD-WAN device receives from transport-side interfaces, click Cloud QoS.

  5. To enable QoS scheduling and shaping for traffic that a Cisco vEdge deviceCisco IOS XE SD-WAN device receives from service-side interfaces, click Cloud QoS Service Side.

  6. To log the headers of all packets that are dropped because they do not match a service configured by an Allow Service parameter on a tunnel interface, click Implicit ACL Logging.

  7. To configure how often packets flows are logged, click Log Frequency. Packet flows are those that match an access list (ACL), a cflowd flow, or an application-aware routing flow.

  8. Click Preview to view the full policy in CLI format.

  9. Click Save Policy.

Step 6: Apply a Localized Data Policy in a Device Template

  1. In Cisco vManage NMS, select the Configuration > Templates screen.

  2. If you are creating a new device template:

    1. In the Device tab, click Create Template.

    2. From the Create Template drop-down, select From Feature Template.

    3. From the Device Model drop-down, select one of the Cisco vEdge deviceCisco IOS XE SD-WAN devices.

    4. In the Template Name field, enter a name for the device template. This field is mandatory and can contain only uppercase and lowercase letters, the digits 0 through 9, hyphens (–), and underscores (_). It cannot contain spaces or any other characters.

    5. In the Description field, enter a description for the device template. This field is mandatory, and it can contain any characters and spaces.

    6. Continue with Step 4.

  3. If you are editing an existing device template:

    1. In the Device tab, click the More Actions icon to the right of the desired template, and click the Pencil icon.

    2. Click the Additional Templates tab. The screen scrolls to the Additional Templates section.

    3. From the Policy drop-down, select the name of a policy that you have configured.

  4. Click the Additional Templates tab located directly beneath the Description field. The screen scrolls to the Additional Templates section.

  5. From the Policy drop-down, select the name of the policy you configured in the above procedure.

  6. Click Create (for a new template) or Update (for an existing template).

Configure Localized Data Policy for IPv6 Using vManage

To configure IPv6 localized data policy, use the Cisco vManage policy configuration wizard. The wizard is a UI policy builder that consists of five screens, and you use four of them to configure IPv6 localized policy components:

  • Groups of Interest, also called lists—Create data prefix lists and mirroring and policer parameters that group together related items and that you call in the match or action components of a policy.

  • Access Control Lists—Define the match and action conditions of ACLs.

  • Route Policies—Define the match and action conditions of route policies.

  • Policy Settings—Define additional policy settings. Specify the frequency for logging policy-related packet headers.

You configure some or all these components depending on the specific policy you are creating. To skip a component, click the Next button at the bottom of the screen. To return to a component, click the Back button at the bottom of the screen.

Step 1: Start the Policy Configuration Wizard

To start the policy configuration wizard:

  1. In Cisco vManage NMS, select the Configure > Policies screen. When you first open this screen, the Centralized Policy tab is selected by default.

  2. Select the Localized Policy tab.

  3. Click Add Policy. The policy configuration wizard opens, and the Create Groups of Interest screen is displayed.

Step 2: Create Groups of Interest

In the Create Groups of interest screen create lists to use in the localized data policy:

  1. Create news lists of groups, as described in the following table:

    List Type

    Procedure

    AS Path

    Permit or deny prefixes from certain autonomous systems.

    1. In the left bar, click AS Path.

    2. Enter a name for the list.

      For Cisco vEdge devices: Enter an alphanumeric value.

      For Cisco IOS XE SD-WAN devices: Enter a number from 1 to 500.

    3. Set the preference value for the list in the Add AS Path field.

    Community
    1. In the left bar, click Community.

    2. Click New Community List.

    3. Enter a name for the list.

    4. In the Add Community field, enter one or more data prefixes separated by commas.

    5. Click Add.

    Data Prefix
    1. In the left bar, click Data Prefix.

    2. Click New Data Prefix List.

    3. Enter a name for the list.

    4. In the Internet Protocol field, click IPv4 or IPv6.

    5. In the Add Data prefix field, enter one or more data prefixes separated by commas.

    6. Click Add.

    Extended Community
    1. In the left bar, click Extended Community.

    2. Click New Extended Community List.

    3. Enter a name for the list.

    4. In the Add Extended Community field, enter one or more data prefixes separated by commas.

    5. Click Add.

    Class Map

    Map a class name to an interface queue number.

    1. In the left bar, click Class Map.

    2. Click New Class List. The Class List popup displays.

    3. Enter a name for the list. The class name can be a text string from 1 to 32 characters long.

    4. Select a queue number between 0 and 7 from the Queue drop-down menu.

    5. Click Save.

    Mirror

    Define the remote destination for mirrored packets, and define the source of the packets.

    1. In the left bar, click Mirror.

    2. Click New Mirror List.

    3. Enter a name for the list.

    4. Enter the Remote Destination IP address in the left field, where the mirrored traffic should be routed.

    5. Enter the Source IP address of the mirrored traffic in the right field.

    6. Click Add.

    Policer

    1. In the left bar, click Policer.

    2. Click New Policer List.

    3. Enter a name for the list.

    4. Define the policing parameters:

      1. In the Burst field, enter the maximum traffic burst size, a value from 15,000 to 10,000,000 bytes.

      2. In the Exceed field, select the action to take when the burst size or traffic rate is exceeded. It can be drop, which sets the packet loss priority (PLP) to low, or remark, which sets the PLP to high.

      3. In the Rate field, enter the maximum traffic rate, a value from 0 through 264 – 1 bits per second (bps).

    5. Click Add.

    Prefix

    1. In the left bar, click Prefix.

    2. Click New Prefix List.

    3. Enter a name for the list.

    4. Click either IPv4 or IPv6.

    5. Under Add Prefix, enter the prefix for the list. (An example is displayed.) Optionally, click the green Import link on the right-hand side to import a prefix list.

    6. Click Add.

  2. Click Next to move to Configure Forwarding Classes/QoS in the wizard. For IPv6 localized data policy, you cannot configure QoS.

  3. Click Next to move to Configure Access Lists in the wizard.

Step 3: Configure ACLs

  1. In the Configure Access Control Lists screen, click Add Access Control List Policy, and choose Add IPv6 ACL Policy from the drop-down.

  2. Enter a name and description for the ACL.

  3. From the left column, click Add ACL Sequence.

  4. Click Sequence Rule to open the ACL match/action sequence menu.

  5. Click a match condition. See Match Parameters for a full description of these options.

  6. On the left side, enter the values for the match condition.

  7. On the right side, enter the action or actions to take if the policy matches. See Action Parameters for a full description of these options.

  8. Repeat Steps 3 through 7 to add match–action pairs to the ACL.

  9. To rearrange match–action pairs in the ACL, drag them to the desired position in the right pane.

  10. To remove a match–action pair from the ACL, click the X in the upper right of the condition.

  11. Click Save Match and Actions to save a sequence rule.

  12. To copy, delete, or rename an ACL sequence rule, in the left pane, click the More Options menu (three dots) next to the rule's name and select the desired option.

  13. If no packets match any of the ACL sequence rules, the default action is to drop the packets. To change the default action:

    1. Click Default Action in the left pane.

    2. Click the Pencil icon.

    3. Change the default action to Accept.

    4. Click Save Match and Actions.

  14. Click Next to move to Configure Route Policy in the wizard.

  15. Click Next to move to the Policy Overview screen.

Step 4: Configure Policy Settings

In Policy Overview, configure policy settings:

  1. Enter a name and description for the ACL.

  2. Under Policy Settings, select one of the following policy options:

    Policy Settings Options

    Description

    Netflow

    Application

    Cloud QoS

    Cloud QoS Service side

    Implicit ACL Logging

    Log the headers of all packets that are dropped because they do not match a service configured by an Allow Service parameter on a tunnel interface.

    Log Frequency

    Configure how often packet flows are logged. Packet flows are those that match an access list (ACL), a cflowd flow, or an application-aware routing flow.

  3. Click Preview to view the full policy in CLI format.

  4. Click Save Policy.

Step 5: Apply a Localized Data Policy in a Device Template

  1. In Cisco vManage NMS, select the Configuration > Templates screen.

  2. If you are creating a new device template:

    1. In the Device tab, click Create Template.

    2. From the Create Template drop-down, select From Feature Template.

    3. From the Device Model drop-down, select a Cisco vEdge deviceCisco IOS XE SD-WAN device.

    4. In the Template Name field, enter a name for the device template. This field is mandatory and can contain only uppercase and lowercase letters, the digits 0 through 9, hyphens (–), and underscores (_). It cannot contain spaces or any other characters.

    5. In the Description field, enter a description for the device template. This field is mandatory, and it can contain any characters and spaces.

    6. Continue with Step 4.

  3. If you are editing an existing device template:

    1. In the Device tab, click the More Actions icon to the right of the desired template, and click the pencil icon.

    2. Click the Additional Templates tab. The screen scrolls to the Additional Templates section.

    3. From the Policy drop-down, select the name of a policy that you have configured.

  4. Click the Additional Templates tab located directly beneath the Description field. The screen scrolls to the Additional Templates section.

  5. From the Policy drop-down, select the name of the policy you configured in the above procedure.

  6. Click Create (for a new template) or Update (for an existing template).

Configure Forward Error Correction for a Policy

Procedure


Step 1

Select Configuration > Policies.

Step 2

Select Centralized Policy at the top of the page and then click Add Policy.

Step 3

Click Next to select Configure Traffic Rules

Step 4

Select Traffic Data, and from the Add Policy drop-down menu select click Create New.

Step 5

Click Sequence Type in the left panel.

Step 6

From the Add Data Policy pop-up menu, select QoS.

Step 7

Click Sequence Rule.

Step 8

In the Applications/Application Family List/Data Prefix, Select one or more applications or lists..

Step 9

Click Actions and select Loss Correction.

Step 10

In the Actions area, select one of the following:

  • FEC Adaptive—Only send FEC information only when the system detects a packet loss.

    Note 

    The FEC Adaptive option is supported only for Cisco SD-WAN devices.

    Note 

    The FEC Adaptive option is not supported on Cisco IOS XE SD-WAN devices.

    Note 

    FEC adaptive only works when the app-route interval is set at least twice that of the BFD Hello packet interval.

  • FEC Always—Always send FEC information with every transmission

  • Packet Duplication check box—Duplicates packets through secondary links to reduce packet loss if one link goes down

Step 11

Click Save Match and Actions.

Step 12

Click Save Data Policy.

Step 13

Click Next and take these actions to create a Centralized Policy:

  1. Enter a Name and Description.

  2. Select Traffic Data Policy.

  3. Choose VPNs/site list for the policy.

  4. Save the policy.


Configure Packet Duplication

Procedure


Step 1

Select Configuration > Policies.

Step 2

Select Centralized Policy at the top of the page and then click Add Policy.

Step 3

Click Next twice to select Configure Traffic Rules.

Step 4

Select Traffic Data, and from the Add Policy drop-down menu, select click Create New.

Step 5

Click Sequence Type in the left panel.

Step 6

From the Add Data Policy pop-up menu, select QoS.

Step 7

Click Sequence Rule.

Step 8

In the Applications/Application Family List/Data Prefix, Select one or more applications or lists..

Step 9

Click Actions and select Loss Correction.

Step 10

In the Actions area, select the Pack Duplication option to enable the packet duplication feature.

  • FEC Adaptive—Only send Forward Error Correction (FEC) information when the system detects a packet loss.

  • FEC Always—Always send FEC information with every transmission.

  • None—Use when no loss protection is needed.

  • Packet Duplication—Enable when packets need to be duplicated and sent on the next available links to reduce packet loss.

Step 11

Click Save Match and Actions.

Step 12

Click Save Data Policy.

Step 13

Click Next and take these actions to create a Centralized Policy:

  • Enter a Name and a Description.

  • Select Traffic Data Policy.

  • Choose VPNs/site list for the policy.

  • Save the policy.


Create an App-Route-Policy

After Cisco ACI maps a data prefix and a VPN to an SLA class list, you can create an app-rout-policy to define sequence rules for the Cisco ACI integration.

To create an app-route-policy, follow these steps:

Procedure


Step 1

In Cisco vManage, select Configuration > Policies.

Step 2

Click the More Actions icon at the right of a row that contains a centralized policy, and then click Edit.

Step 3

Select the Traffic Rules tab.

Step 4

Select Add Policy > Create New.

Step 5

Click ACI Sequence Rules.

Step 6

From the VPN drop-down, choose a VPN ID. Cisco vManage displays a list of data prefixes and SLA classes that are mapped to this VPN. (These mappings were sent by Cisco ACI.)

Step 7

Check the box to the left of the data prefix and SLA class that you want to include with the policy, and then click Import.

Step 8

Enter a name for the policy in the Name field and a description of the policy in the Description field, and then click Save Application Aware Routing Policy. Cisco vManage creates the policy.

Step 9

To apply a site list and a VPN list to the policy, select the Policy Application tab, then select Application-Aware Routing, and then click New Site Lists and VPN List.

Step 10

Select a site list and a VPN list for the policy.

Step 11

Add sequence rules to the policy as needed.

Step 12

Click Save Policy Changes.


Configure Application-Aware Routing

This topic provides general procedures for configuring application-aware routing. Application-aware routing policy affects only traffic that is flowing from the service side (the local/WAN side) to the tunnel (WAN) side of the Cisco SD-WANCisco IOS XE SD-WAN device.

An application-aware routing policy matches applications with an SLA, that is, with the data plane tunnel performance characteristics that are necessary to transmit the applications' data traffic. The primary purpose of application-aware routing policy is to optimize the path for data traffic being transmitted by Cisco SD-WANCisco IOS XE SD-WAN devices.

An application-aware routing policy is a type of centralized data policy: you configure it on the vSmart controller, and the controller automatically pushes it to the affected Cisco SD-WANCisco IOS XE SD-WAN devices. As with any policy, an application-aware routing policy consists of a series of numbered (ordered) sequences of match-action pairs that are evaluated in order, from lowest sequence number to highest sequence number. When a data packet matches one of the match conditions, an SLA action is applied to the packet to determine the data plane tunnel to use to transmit the packet. If a packet matches no parameters in any of the policy sequences, and if no default SLA class is configured, the packet is accepted and forwarded with no consideration of SLA. Because application-aware routing policy accepts nonmatching traffic by default, it is considered to be a positive policy. Other types of policies in the Cisco SD-WANCisco IOS XE SD-WAN software are negative policies, because by default they drop nonmatching traffic.

General Cisco vManage Configuration Procedure

To configure application-aware routing policy, use the Cisco vManage policy configuration wizard. The wizard consists of four sequential screens that guide you through the process of creating and editing policy components:

  • Create Applications or Groups of Interest—Create lists that group together related items and that you call in the match or action components of a policy.

  • Configure Topology—Create the network structure to which the policy applies.

  • Configure Traffic Rules—Create the match and action conditions of a policy.

  • Apply Policies to Sites and VPNs—Associate policy with sites and VPNs in the overlay network.

In the first three policy configuration wizard screens, you are creating policy components or blocks. In the last screen, you are applying policy blocks to sites and VPNs in the overlay network.

For a application-aware routing policy to take effect, you must activate the policy.

Step 1: Start the Policy Configuration Wizard

To start the policy configuration wizard:

  1. In Cisco vManage NMS, select the Configure > Policies screen. When you first open this screen, the Centralized Policy tab is selected by default.

  2. Click Add Policy.

The policy configuration wizard opens, and the Create Applications or Groups of Interest screen is displayed.

Step 2: Create Applications or Groups of Interest

To create lists of applications or groups to use in centralized policy:

  1. Create new lists of groups, as described:

    • Application

      1. In the left bar, click Application.

      2. Click New Application List.

      3. Enter a name for the list.

      4. Click either the Application or Application Family button.

      5. From the Select drop-down, select the desired applications or application families.

      6. Click Add.

    • Prefix

      1. In the left bar, click Prefix.

      2. Click New Prefix List.

      3. Enter a name for the list.

      4. In the Add Prefix field, enter one or more data prefixes separated by commas.

      5. Click Add.

    • Site

      1. In the left bar, click Site.

      2. Click New Site List.

      3. Enter a name for the list.

      4. In the Add Site field, enter one or more site IDs separated by commas.

      5. Click Add.

    • SLA Class

      1. In the left bar, click SLA Class.

      2. Click New SLA Class List.

      3. Enter a name for the list.

      4. Define the SLA class parameters:

        1. In the Loss field, enter the maximum packet loss on the connection, a value from 0 through 100 percent.

        2. In the Latency field, enter the maximum packet latency on the connection, a value from 0 through 1,000 milliseconds.

        3. In the Jitter field, enter the maximum jitter on the connection, a value from 1 through 1,000 milliseconds.

      5. Click Add.

    • VPN

      1. In the left bar, click VPN.

      2. Click New VPN List.

      3. Enter a name for the list.

      4. In the Add VPN field, enter one or more VPN IDs separated by commas.

      5. Click Add.

  2. Click Next to move to Configure Topology in the wizard. When you first open this screen, the Topology tab is selected by default.

Step 3: Configure the Network Topology

To configure the network topology:

  1. In the Topology tab, create a network topology

    Hub and Spoke - Policy for a topology with one or more central hub sites and with spokes connected to a hub.

    1. In the Add Topology drop-down, select Hub and Spoke.

    2. Enter a name for the hub-and-spoke policy.

    3. Enter a description for the policy.

    4. In the VPN List field, select the VPN list for the policy.

    5. In the left pane, click Add Hub and Spoke. A hub-and-spoke policy component containing the text string My Hub-and-Spoke is added in the left pane.

    6. Double-click the My Hub-and-Spoke text string, and enter a name for the policy component.

    7. In the right pane, add hub sites to the network topology:

      1. Click Add Hub Sites.

      2. In the Site List Field, select a site list for the policy component.

      3. Click Add.

      4. Repeat Steps 7a, 7b, and 7c to add more hub sites to the policy component.

    8. In the right pane, add spoke sites to the network topology:

      1. Click Add Spoke Sites.

      2. In the Site List Field, select a site list for the policy component.

      3. Click Add.

      4. Repeat Steps 8a, 8b, and 8c to add more spoke sites to the policy component.

    9. Repeat Steps 5 through 8 to add more components to the hub-and-spoke policy.

    10. Click Save Hub and Spoke Policy.

    Mesh - Partial-mesh or full-mesh region

    1. In the Add Topology drop-down, select Mesh.

    2. Enter a name for the mesh region policy component.

    3. Enter a description for the mesh region policy component.

    4. In the VPN List field, select the VPN list for the policy.

    5. Click New Mesh Region.

    6. In the Mesh Region Name field, enter a name for the individual mesh region.

    7. In the Site List field, select one or more sites to include in the mesh region.

    8. Repeat Steps 5 through 7 to add more mesh regions to the policy.

    9. Click Save Mesh Region.

  2. To use an existing topology:

    1. In the Add Topology drop-down, click Import Existing Topology. The Import Existing Topology popup displays.

    2. Select the type of topology.

    3. In the Policy drop-down, select the name of the topology.

    4. Click Import.

  3. Click Next to move to Configure Traffic Rules in the wizard. When you first open this screen, the Application-Aware Routing tab is selected by default.

Step 4: Configure Traffic Rules

To configure traffic rules for application-aware routing policy:

  1. In the Application-Aware Routing bar, select the Application-Aware Routing tab.

  2. Click the Add Policy drop-down.

  3. Select Create New, and in the left pane, click Sequence Type. A policy sequence containing the text string App Route is added in the left pane.

  4. Double-click the App Route text string, and enter a name for the policy sequence. The name you type is displayed both in the Sequence Type list in the left pane and in the right pane.

  5. In the right pane, click Sequence Rule. The Match/Action box opens, and Match is selected by default. The available policy match conditions are listed below the box.

  6. To select one or more Match conditions, click its box and set the values as described in the following table:

    Table 47.

    Match Condition

    Procedure

    None (match all packets)

    Do not specify any match conditions.

    Applications/Application Family List

    1. In the Match conditions, click Applications/Application Family List.

    2. In the drop-down, select the application family.

    3. To create an application list:

      1. Click New Application List.

      2. Enter a name for the list.

      3. Click the Application button to create a list of individual applications. Click the Application Family button to create a list of related applications.

      4. In the Select Application drop-down, select the desired applications or application families.

      5. Click Save.

    Destination Data Prefix

    1. In the Match conditions, click Destination Data Prefix.

    2. To match a list of destination prefixes, select the list from the drop-down.

    3. To match an individual destination prefix, type the prefix in the Destination box.

    Destination Port

    1. In the Match conditions, click Destination Port.

    2. In the Destination field, enter the port number. Specify a single port number, a list of port numbers (with numbers separated by a space), or a range of port numbers (with the two numbers separated with a hyphen [-]).

    DNS Application List (to enable split DNS)

    1. In the Match conditions, click DNS Application List.

    2. In the drop-down, select the application family.

    DNS (to enable split DNS)

    1. In the Match conditions, click DNS.

    2. In the drop-down, select Request to process DNS requests for the DNS applications, and select Response to process DNS responses for the applications.

    DSCP

    1. In the Match conditions, click DSCP.

    2. In the DSCP field, type the DSCP value, a number from 0 through 63.

    PLP

    1. In the Match conditions, click PLP.

    2. In the PLP drop-down, select Low or High. To set the PLP to high, apply a policer that includes the exceed remark option.

    Protocol

    1. In the Match conditions, click Protocol.

    2. In the Protocol field, type the Internet Protocol number, a number from 0 through 255.

    Source Data Prefix

    1. In the Match conditions, click Source Data Prefix.

    2. To match a list of source prefixes, select the list from the drop-down.

    3. To match an individual source prefix, type the prefix in the Source box.

    Source Port

    1. In the Match conditions, click Source Port.

    2. In the Source field, enter the port number. Specify a single port number, a list of port numbers (with numbers separated by a space), or a range of port numbers (with the two numbers separated with a hyphen [-]).

  7. To select actions to take on matching data traffic, click the Actions box. The available policy actions are listed below the box.

  8. Set the policy action for a Backup SLA Preferred Color match condition. When no tunnel matches the SLA, direct the data traffic to a specific tunnel. Data traffic is sent out the configured tunnel if that tunnel interface is available. If that tunnel interface is not available, traffic is sent out another available tunnel. You can specify one or more colors. The backup SLA preferred color is a loose matching, not a strict matching.

    1. In the Action conditions, click Backup SLA Preferred Color.

    2. In the drop-down, select one or more colors.

  9. Set the policy action for a Counter match condition. Count matching data packets.

    1. In the Action conditions, click Counter.

    2. In the Counter Name field, enter the name of the file in which to store packet counters.

  10. Set the policy action for a Log match condition. Place a sampled set of packets that match the SLA class rule into system logging (syslog) files. In addition to logging the packet headers, a syslog message is generated the first time a packet header is logged and then every 5 minutes thereafter, as long as the flow is active.

    1. In the Action conditions, click Log to enable logging.

  11. Set the policy action for a SLA Class List match condition. For the SLA class, all matching data traffic is directed to a tunnel whose performance matches the SLA parameters defined in the class. The software first tries to send the traffic through a tunnel that matches the SLA. If a single tunnel matches the SLA, data traffic is sent through that tunnel. If two or more tunnels match, traffic is distributed among them. If no tunnel matches the SLA, data traffic is sent through one of the available tunnels.

    1. In the Action conditions, click SLA Class List.

    2. In the SLA Class drop-down, select one or more SLA classes.

    3. Optionally, in the Preferred Color drop-down, select the color of the data plane tunnel or tunnels to prefer. Traffic is load-balanced across all tunnels. If no tunnels match the SLA, data traffic is sent through any available tunnel. That is, color preference is a loose matching, not a strict matching.

    4. Click Strict to perform strict matching of the SLA class. If no data plane tunnel is available that satisfies the SLA criteria, traffic is dropped.

  12. Click Save Match and Actions.

  13. Create additional sequence rules as desired. Drag and drop to re-arrange them.

  14. Create additional sequence types as desired. Drag and drop to re-arrange them.

  15. Click Save Application-Aware Routing Policy.

  16. Click Next to move to Apply Policies to Sites and VPNs in the wizard.

Step 5: Apply Policies to Sites and VPNs

In the last screen of the policy configuration wizard, you associate the policy blocks that you created on the previous three screens with VPNs and with sites in the overlay network.

To apply a policy block to sites and VPNs in the overlay network:

  1. If you are already in the policy configuration wizard, skip to Step 6. Otherwise, in Cisco vManage NMS, select the Configure > Policies screen. When you first open this screen, the Centralized Policy tab is selected by default.

  2. Click Add Policy. The policy configuration wizard opens, and the Create Applications or Groups of Interest screen is displayed

  3. Click Next. The Network Topology screen opens, and in the Topology bar, the Topology tab is selected by default.

  4. Click Next. The Configure Traffic Rules screen opens, and in the Application-Aware Routing bar, the Application-Aware Routing tab is selected by default.

  5. Click Next. The Apply Policies to Sites and VPNs screen opens.

  6. In the Policy Name field, enter a name for the policy. This field is mandatory and can contain only uppercase and lowercase letters, the digits 0 through 9, hyphens (–), and underscores (_). It cannot contain spaces or any other characters.

  7. In the Policy Description field, enter a description of the policy. It can contain up to 2048 characters. This field is mandatory, and it can contain any characters and spaces.

  8. From the Topology bar, select the type of policy block. The table then lists policies that you have created for that type of policy block.

  9. Click Add New Site List and VPN list. Select one or more site lists, and select one or more VPN lists. Click Add.

  10. Click Preview to view the configured policy. The policy is displayed in CLI format.

  11. Click Save Policy. The Configuration > Policies screen opens, and the policies table includes the newly created policy.

Step 6: Activate an Application-Aware Routing Policy

Activating an application-aware routing policy sends that policy to all connected Cisco vSmart Controllers. To activate a policy:

  1. In Cisco vManage NMS, select the Configure > Policies screen. When you first open this screen, the Centralized Policy tab is selected by default.

  2. Select a policy.

  3. Click the More Actions icon to the right of the row, and click Activate. The Activate Policy popup opens. It lists the IP addresses of the reachable Cisco vSmart Controllers to which the policy is to be applied.

  4. Click Activate.

Configure Traffic Flow Monitoring on Cisco XE SD-WAN Devices

This topic provides the procedure for configuring cflowd traffic flow monitoring on Cisco IOS XE SD-WAN devices. Cflowd traffic flow monitoring uses Flexible Netflow (FNF) to export traffic data. To configure cflowd monitoring, follow these steps:

  1. Configure global flow visibility.

  2. Configure cflowd monitoring policy.

Configure Global Flow Visibility

To enable cflowd visibility globally on all Cisco IOS XE SD-WAN devices so that you can perform traffic flowing monitoring on traffic coming to the router from all VPNs in the LAN.

In Cisco vManage NMS
  1. Select the Configuration > Policies screen.

  2. Select the Localized Policy tab.

  3. Click Add Policy.

  4. Click Next to display the Configure Policy Setting screen.

  5. Click Netflow.

From the CLI
Device# config-transaction
Device(config)# policy flow-visibility
Device(config-policy)# commit
Commit complete.
Device(config-policy)# end
Device#

Note

The policy app-visibility command also enables global flow visibility by enabling nbar to get the application name.


Configure Global Application Visibility

To enable cflowd visibility globally on all Cisco IOS XE SD-WAN devices so that you can perform traffic flowing monitoring on traffic coming to the router from all VPNs in the LAN.

The difference between flow-visibility and app-visibility is that app-visibility enables nbar to see each application of the flows coming to the router from all VPNs in the LAN.

In Cisco vManage NMS
  1. Select the Configuration > Policies screen.

  2. Select the Localized Policy tab.

  3. Click Add Policy.

  4. Click Next to display the Configure Policy Setting screen.

  5. Click Application.

From the CLI
Device# config-transaction
Device(config)# policy app-visibility
Device(config-policy)# commit
Commit complete.
Device(config-policy)# end
Device#

Configure Cflowd Monitoring Policy

To configure policy for cflowd traffic flow monitoring, use the Cisco vManage policy configuration wizard. The wizard consists of four sequential screens that guide you through the process of creating and editing policy components:

  1. Create Applications or Groups of Interest—Create lists that group together related items and that you call in the match or action components of a policy.

  2. Configure Topology—Create the network structure to which the policy applies.

  3. Configure Traffic Rules—Create the match and action conditions of a policy.

  4. Apply Policies to Sites and VPNs—Associate policy with sites and VPNs in the overlay network.

In the first three policy configuration wizard screens, you are creating policy components or blocks. In the last screen, you are applying policy blocks to sites and VPNs in the overlay network. For the cflowd policy to take effect, you must activate the policy.

For details of the Cisco vManage configuration procedure, see Configuring Cflowd Traffic Flow Monitoring.

From the CLI on the Cisco vSmart Controller that is controlling the Cisco IOS XE SD-WAN device:

  1. Configure a cflowd template to specify flow visibility and flow sampling parameters:

    vSmart(config)# policy cflowd-template template-name
    vSmart(config-cflowd-template)#  flow-active-timeout seconds
    vSmart(config-cflowd-template)#  flow-inactive-timeout seconds
    vSmart(config-cflowd-template)#  flow-sampling-interval number
    vSmart(config-cflowd-template)#  template-refresh seconds
    
  2. Configure a flow collector:

    vSmart(config-cflowd-template)# collector vpn vpn-id address 
    ip-address port port-number transport transport-type 
    source-interface interface-name
    

    Note

    Cisco IOS XE SD-WAN devices only support UDP collector. Irrespective of which transport protocol is configured, the collector functionality on Cisco IOS XE SD-WAN device is always UDP.

    Cisco vEdge devices support both UDP and TCP collectors.


  3. Configure a data policy that defines traffic match parameters and that includes the action cflowd:

    vSmart(config)# policy data-policy policy-name
    vSmart(config-data-policy)# sequence number
    vSmart(config-sequence)# match match-parameters
    vSmart(config-sequence)# action cflowd
    vSmart(config-data-policy)# default-action accept
    
  4. Create lists of sites in the overlay network that contain the Cisco IOS XE SD-WAN devices to which you want to apply the traffic flow monitoring policy. To include multiple site in the list, configure multiple vpn vpn-id commands.

    vSmart(config)# policy lists
    vSmart(config-lists)# vpn-list list-name
    vSmart(config-vpn-list)# vpn
    vpn-id
    
  5. Apply the data policy to the sites in the overlay network that contain the Cisco IOS XE SD-WAN devices:

    vSmart(config)# apply-policy site-list list-name
    vSmart(config-site-list)# data-policy policy-name
    vSmart(config-site-list)# cflowd-template template-name
    

Display Cflowd Information

To display cflowd information, use the following commands on the Cisco IOS XE SD-WAN device.

  • show sdwan app-fwd cflowd collector

  • show sdwan app-fwd cflowd flow-count

  • show sdwan app-fwd cflowd flows [vpn vpn-id] format table

  • show sdwan app-fwd cflowd statistics

  • show sdwan app-fwd cflowd template [name template-name]

  • show sdwan app-fwd cflowd flows format table

Use the Policy Configuration Wizard

Table 48. Feature History

Feature Name

Release Information

Description

Firewall FQDN Support

Cisco IOS XE Release Amsterdam 17.2.1r

This enhancement adds support to define a firewall policy using fully qualified domain names (FQDN), rather than only IP addresses. One advantage of using FQDNs is that they account for changes in the IP addresses assigned to the FQDN if that changes in the future.

This article provides procedures for configuring firewall policies on XE SD-WAN Routers. Provision firewall policies to direct traffic between two zones, which are referred to as a source zone and a destination zone. Each zone consists of one or more VPNs in the overlay network.

In vManage NMS, you configure firewall policies from the Configuration > Security screen, using a policy configuration wizard. In the CLI, you configure these firewalls on the XE SD-WAN Router.

Start the Policy Configuration Wizard

To start the policy configuration wizard:

  1. In vManage NMS, select the Configure > Security screen.

  2. Click Add Security Policy.

The Add Security Policy configuration wizard opens, and various use-case scenarios display.

Select a Use-Case Scenario

In Add Security Policy, select a policy based on use-case scenarios, or build your own custom policy.

  1. Select a security policy use-case scenario. The following table describes the use-case scenarios.

    • Compliance – Applies application firewall and intrusion prevention.

    • Guest Access – Applies application firewall and URL filtering.

    • Direct Cloud Access – Applies application firewall, URL filtering, and DNS Umbrella security.

    • Direct Internet Access – Applies application firewall, intrusion prevention, URL filtering, and DNS Umbrella security.

    • Custom – Build your own security policy by combining various security policy blocks.

  2. Click Proceed to add a firewall policy in the wizard.

Configure Firewall Policy

Notes

  • In the Cisco IOS XE Amsterdam 17.2 release, this procedure was updated to accommodate new functionality.

  • The FQDN intended use is for matching standalone servers in data centers or a private cloud. When matching public URLs, the recommended match action is 'drop'. If you use 'inspect' for public URLs, you must define all related sub-urls/redirect-urls under the FQDN pattern.

Limitations

  • Maximum number of fully qualified domain name (FQDN) patterns supported for a rule under firewall policy: 64

  • Maximum number of entries for FQDN to IP mapping supported in the database: 5000

  • If a firewall policy uses an FQDN in a rule, the policy must explicitly allow DNS packets, or resolution will fail.

  • Firewall policy does not support mapping multiple FQDN's to a single IP.

  • Only two forms of FQDN are supported: full name or a name beginning with an asterisk (*) wildcard.

    Example: *.cisco.com

  1. Select Configuration > Security.

  2. Click Add Policy. The zone-based firewall configuration wizard opens.

  3. Click the Add Firewall Policy drop-down.

  4. To create a new firewall policy

    1. Select Create New.

    2. Enter a name and description for the policy.

    3. Go to Step 4.

  5. To import an existing zone-based firewall policy:

    1. Select Copy from Existing. The Copy from Existing Firewall Policy dialog box appears.

    2. From the Policy drop-down, select the policy to copy.

    3. In the Policy Name field, accept the default name (policy_name_copy) or enter a new name.

    4. In the Policy Description field, enter a description.

    5. Click Copy.

    6. To modify the policy, click the More Actions icon to at the far right of the policy and select Edit. Go to Step 4.

  6. Click Add Rule. In the New Firewall Rule window, enter a rule name and configure one or more of the following.


    Note

    For some options, it is possible to enter a defined list as a value, or to define a list from within the window.


    Section

    Description

    Source Data Prefix

    IPv4 prefixes and/or domain names (FQDN)

    Source Port

    Source ports

    Destination Data Prefix

    IPv4 prefixes and/or domain names (FQDN)

    Destination Ports

    Destination port

    Protocol

    Protocol: select from a list, or enter a protocol.

    Application List

    Applications

    Note 

    If you selected an Application or Application Family List, you must select at least one other match condition.

  7. Set the Action for the rule as Inspect, Pass, or Drop.

  8. Click Save to save the rule.

  9. (Optional) Add additional rules.

  10. Click Save Firewall Policy.

Apply Policy to a Zone Pair

Table 49. Feature History

Feature Name

Release Number

Feature Description

Self zone policy for Zone-Based Firewalls

Cisco IOS XE SD-WAN Release 16.12.1b

This feature can help define policies to impose rules on incoming and outgoing traffic.

  1. At the top of the page, click Apply Zone-Pairs.

  2. In the Source Zone field, select the zone that is the source of the data packets.

  3. In the Destination Zone field, select the zone that is the destination of the data packets.


    Note

    You can select the same zone for both source and destination. However, if the packet's source and destination use the same physical interface (resulting in U-turn traffic), a firewall session is not created and traffic passes.


  4. Click the plus (+) icon to add zone pairs.

  5. Click Save.

  6. At the bottom of the page, click Save Firewall Policy to save the policy.

  7. To edit or delete a firewall policy, in the right pane, click the More Actions icon to the far right of the policy and select the desired option.

  8. Click Next to configure the next security block in the wizard.

    • Intrusion Prevention

    • URL Filtering

    • DNS Security

Policy Summary

  1. Enter a name for the security policy. This field is mandatory and can contain only uppercase and lowercase letters, the digits 0 through 9, hyphens (–), and underscores (_). It cannot contain spaces or any other characters.

  2. Enter a description for the security policy. This field is mandatory.

  3. (Optional) For Cisco IOS XE SD-WAN Release 16.12.x and onwards, to configure high-speed logging (HSL), enter the following details of the Netflow server that will listen for the Netflow event logs:


    Note

    For more information on HSL, see Firewall High-Speed Logging Overview.


    1. In the VPN field, enter the VPN that the server is in.

    2. In the Server IP field, enter the IP address of the server.

    3. In the Port field, enter the port on which the server is listening.

  4. If you configured an application firewall policy, uncheck the “Bypass firewall policy and allow all Internet traffic to/from VPN 0” check box in the Additional Security Policy Settings area.

  5. (Optional) To prevent TCP SYN-flooding attacks that are a type of denial-of-service (DoS) attack, do the following:

    1. Enable the TCP SYN Flood Limit option.

    2. Specify a limit of the number of half-opened TCP sessions.

  6. (Optional) To configure an audit trail, enable the Audit Trail option. This option is only applicable for rules with an Inspect action.

  7. Click Save Policy to save the security policy.

Configure Firewall Policies

In vManage NMS, you configure firewall policies from the Configuration > Security screen, using a policy configuration wizard. In the CLI, you configure these firewalls on the XE SD-WAN Router.

Configuration Components

For firewall policies, you configure zones and a policy to apply to those zones.

Each zone consists of one of more VPNs in the overlay network. You define a source zone, which identifies the VPNs from which data traffic originates, and a destination zone, which identifies the VPNs to which the traffic is being sent.

The firewall policy consists of a series of numbered (ordered) sequences of match–action pairs that are evaluated in order, from lowest sequence number to highest sequence number. When a data packet matches the match conditions, the associated action or actions are taken and policy evaluation on that packet stops. Keep this process in mind as you design your policies to ensure that the desired actions are taken on the items subject to policy.

If a packet matches no parameters in any of the policy sequences, you define a default action to be taken on the packet.

The following figure illustrates the configuration components for firewall policies:

To create an application firewall policy, you include the following components in the configuration for a XE SD-WAN Router:

Component

Description

vManage Configuration

CLI Configuration Command

Lists

Groupings of related items that you reference in the match portion of the firewall policy configuration.

Configuration ► Security ► Custom Options ► Lists ► Application

Configuration ► Security ► Custom Options ► Lists ► Zones 

policy lists

Firewall policy

Container for a firewall policy.

Configuration ► Security ► Add Security Policy ► <Scenario> ► Add Firewall Policy

policy zone-based-policy

Numbered sequences of match–action pairs

Sequences establish the order in which the policy components are applied.

Configuration ► Security ► Add Security Policy ► <Scenario> ► Add Firewall Policy ► Sequence Rule

policy zone-based-policy sequence

Application Match parameters

Conditions that packets must match to be considered for a security policy.

Configuration ► Security ► Add Security Policy ► <Scenario> ► Add Firewall Policy ► Sequence Rule ► Match ► Application/Application Family List

policy zone-based-policy sequence match app-list

Actions

For a sequence that contains an application or application family list, packets can be inspected. Matching applications are blocked/denied.

Configuration ► Security ► Add Security Policy ► <Scenario> ► Add Firewall Policy ► Sequence Rule ► Actions ►Inspect

policy zone-based-policy sequence action inspect

Default action

Action to take if a packet matches none of the match parameters in any of the sequences. By default, non matching packets are dropped.

Configuration ► Security ► Add Security Policy ► <Scenario> ► Add Firewall Policy ► Sequence Rule ► Actions

policy zone-based-policy default-action drop

Apply firewall policy to a zone pair

For a firewall policy to take effect, you include it in the definition of a zone pair.

Configuration ► Security ► Add Security Policy ►<Scenario> ►Apply Policy

policy zone-pair

General vManage Configuration Procedure

To configure firewall policies, use the vManage policy configuration wizard. The wizard is a UI policy builder that lets you configure policy components:

  • Create Lists—Create lists that group together related items and that you call in the match condition of a firewall policy.

  • Firewall Policy—Define the match and action conditions of the firewall policy.

  • Apply Configuration—Define zone pairs.

You must configure all these components to create a firewall policy. If you are modifying an existing firewall, you can skip a component by clicking the Next button at the bottom of the screen. To return to a component, click the Back button at the bottom of the screen.

Configuration Components

UTD security policy components consist of the following:

  • Intrusion prevention policy—Protects against malicious attacks on data traffic by using signature sets and inspection mode. Intrusion detection passes all packets flowing between service-side and transport-side (WAN or internet) interfaces, and between VLANs, through an intrusion detection engine, generating alerts for traffic that is identified as malicious, and logging these alerts via syslog. Intrusion prevention blocks traffic that is identified as malicious.

  • URL filtering policy—Allows and disallows access to specific URLs and webpage categories. URL filtering allows you to control access to Internet websites by permitting or denying access to specific websites based on whitelists, blacklists, categories, and reputations. For example, when a client sends a HTTP or HTTPS request, the router inspects the traffic. If, for example, the request matches the blacklist, either it is blocked by a blocked page response or it is redirected to a different URL. If, for example, the HTTP or HTTPS request matches the whitelist, the traffic is allowed without further URL filtering inspection.

Create or Modify Lists

To create an application firewall policy, you include the following components in the configuration for a XE SD-WAN Router:

Component

Description

vManage Configuration

CLI Configuration Command

Lists

Groupings of related items that you reference in the match portion of the firewall policy configuration.

Configuration ► Security ► Custom Options ► Lists ► Application

Configuration ► Security ► Custom Options ► Lists ► Zones 

policy lists

Firewall policy

Container for a firewall policy.

Configuration ► Security ► Add Security Policy ► <Scenario> ► Add Firewall Policy

policy zone-based-policy

Numbered sequences of match–action pairs

Sequences establish the order in which the policy components are applied.

Configuration ► Security ► Add Security Policy ► <Scenario> ► Add Firewall Policy ► Sequence Rule

policy zone-based-policy sequence

Application Match parameters

Conditions that packets must match to be considered for a security policy.

Configuration ► Security ► Add Security Policy ► <Scenario> ► Add Firewall Policy ► Sequence Rule ► Match ► Application/Application Family List

policy zone-based-policy sequence match app-list

Actions

For a sequence that contains an application or application family list, packets can be inspected. Matching applications are blocked/denied.

Configuration ► Security ► Add Security Policy ► <Scenario> ► Add Firewall Policy ► Sequence Rule ► Actions ►Inspect

policy zone-based-policy sequence action inspect

Default action

Action to take if a packet matches none of the match parameters in any of the sequences. By default, non matching packets are dropped.

Configuration ► Security ► Add Security Policy ► <Scenario> ► Add Firewall Policy ► Sequence Rule ► Actions

policy zone-based-policy default-action drop

Apply firewall policy to a zone pair

For a firewall policy to take effect, you include it in the definition of a zone pair.

Configuration ► Security ► Add Security Policy ►<Scenario> ►Apply Policy

policy zone-pair

Create Lists

You create lists that group together related items and that you call in the match condition of a firewall policy.

To create lists:

  1. In vManage NMS, select the Configure > Security screen.

  2. In the Title bar, click the Custom Options drop-down.

  3. Select Lists. The Define Lists screen displays.

  4. Select the list type to create. The following table describes the lists you can create for firewall policies.

List Type

Procedure

Application

  1. In the left pane, click Application.

  2. Click New Application List.

  3. Enter a name for the list.

  4. Select individual applications or application families.

  5. Click Add.

Data Prefix

  1. In the left pane, click Data Prefix.

  2. Click New Data Prefix List.

  3. Enter a name for the list.

  4. Enter one or more IP prefixes.

  5. Click Add.

Zones

  1. In the left pane, click Zones.

  2. Click New Zone List.

  3. Enter a name for the zone list.

  4. In the Add VPN field, enter the number or numbers of the VPN in the zone. Separate numbers with commas.

  5. Click Add.

You can edit, copy, or delete an existing list, click the Edit, Copy, or Trash Bin icon in the Action column.

Firewall High-Speed Logging Overview

Zone-based firewalls support high-speed logging (HSL). When HSL is configured, a firewall provides a log of packets that flow through routing devices (similar to the NetFlow Version 9 records) to an external collector. Records are sent when sessions are created and destroyed. Session records contain the full 5-tuple information (the source IP address, destination IP address, source port, destination port, and protocol). A tuple is an ordered list of elements.

HSL allows a firewall to log records with minimum impact to packet processing. The firewall uses buffered mode for HSL. In buffered mode, a firewall logs records directly to the high-speed logger buffer, and exports of packets separately.

A firewall logs the following types of events:

  • Audit—Session creation and removal notifications.

  • Alert—Half-open and maximum-open TCP session notifications.

  • Drop—Packet-drop notifications.

  • Pass—Packet-pass (based on the configured rate limit) notifications.

  • Summary—Policy-drop and pass-summary notifications.

The NetFlow collector issues the show platform software interface F0 brief command to map the FW_SRC_INTF_ID and FW_DST_INTF_ID interface IDs to the interface name.

The following sample output from the show platform software interface F0 brief command shows that the ID column maps the interface ID to the interface name (Name column):

Device# show platform software interface F0 brief

Name                          ID      QFP ID   
GigabitEthernet0/2/0          16         9     
GigabitEthernet0/2/1          17        10     
GigabitEthernet0/2/2          18        11     
GigabitEthernet0/2/3          19        12     
Restrictions
  • HSL is supported only on NetFlow Version 9 template.

  • HSL is supported only on IPv4 destination and source IP addresses. IPv6 addresses are not supported.

  • HSL supports only one HSL destination.

Enabling Firewall High-Speed Logging Using vManage

To enable Firewall High-Speed Logging using vManage, follow the standard firewall vManage flow. In the Policy Summary screen, you will see an option to enable Firewall High-Speed Logging. For more information, see Use the Policy Configuration Wizard.

Configure and Apply URL Filtering

To configure and apply URL Filtering to a Cisco IOS XE SD-WAN device, do the following:

Configure URL Filtering

To configure URL Filtering through a security policy, use the vManage security configuration wizard:

  1. In Cisco vManage, select the Configuration > Security tab in the left side panel.

  2. Click Add Security Policy. The Add Security Policy wizard opens, and various use-case scenarios are displayed.

  3. In Add Security Policy, select a scenario that supports URL filtering (Guest Access, Direct Internet Access, or Custom).

  4. Click Proceed to add a URL filtering policy in the wizard.

  5. In the Add Security Policy wizard, click Next until the URL Filtering screen is displayed.

  6. Click the Add URL Filtering Policy drop-down and choose Create New to create a new URL filtering policy. The URL filtering - Policy Rule Configuration wizard appears.
  7. Click on Target VPNs to add the required number of VPNs in the Add Target VPNs wizard.

  8. Enter a policy name in the Policy Name field.

  9. Choose one of the following options from the Web Categories drop-down:

    • Block—Block websites that match the categories that you select.

    • Allow—Allow websites that match the categories that you select.

  10. Select one or more categories to block or allow from the Web Categories list.

  11. Select the Web Reputation from the drop-down. The options are:

    • High Risk: Reputation score of 0 to 20.

    • Suspicious: Reputation score of 0 to 40.

    • Moderate Risk: Reputation score of 0 to 60.

    • Low Risk: Reputation score of 0 to 80.

    • Trustworthy: Reputation score of 0 to 100.

  12. (Optional) From the Advanced tab, choose one or more existing Whitelist or Blacklist URL lists or create new ones as needed from the Whitelist URL List or Blacklist URL List drop-down.


    Note

    Items on the whitelist are not subject to category-based filtering. However, items on the blacklist are subject to category-based filtering. If the same item is configured under both the whitelist and the blacklist, the traffic is whitelisted.


    To create a new list, do the following:

    1. Click New Whitelist URL List or New Blacklist URL Listat the bottom of the drop-down.

    2. In the Whitelist/Blacklist URL List Name field, enter a list name consisting of up to 32 characters (letters, numbers, hyphens and underscores only)

    3. In the Add Whitelist/Blacklist URL field, enter URLs to include in the list, separated with commas. You also can use the Import button to add lists from an accessible storage location.

    4. Click Save when you are finished.

    You also can create or manage URL lists by selecting the Configuration > Security tab in the left side panel, choosing Lists from the Custom Options drop-down at the top right of the page, and then selecting Whitelist URLs or Blacklist URLsin the left panel.

    To remove a URL list from the Whitelist/Blacklist URL List field, click the X next to the list name in the field.

  13. (Optional) In the Block Page Server pane, choose an option to designate what happens when a user visits a URL that is blocked. Choose Block Page Content to display a message that access to the page has been denied, or choose Redirect URL to display another page.

    If you choose Block Page Content, users see the content header “Access to the requested page has been denied.” in the Content Body field, enter text to display under this content header. The default content body text is “Please contact your Network Administrator.” If you choose Redirect URL, enter a URL to which users are redirected.

  14. (Optional) In the Alerts and Logs pane, select the alert types from the following options:

    • Blacklist—Exports an alert as a Syslog message if a user tries to access a URL that is configured in the Blacklist URL List

    • Whitelist—Exports an alert as a Syslog message if a user tries to access a URL that is configured in the Whitelist URL List

    • Reputation/Category—Exports an alert as a Syslog message if a user tries to access a URL that has a reputation that is configured as blocked in the Web Reputation field or that matches a blocked web category.

      Alerts for allowed reputations or allowed categories are not exported as Syslog messages.

  15. You must configure the address of the external log server in the Policy Summary page.

  16. Click Save URL filtering Policyto add an URL filtering policy.

  17. Click Next until the Policy Summary page is displayed.

  18. Enter Security Policy Name and Security Policy Description in the respective fields.

  19. If you enabled Alerts and Logs, in the Additional Policy Settings section you must specify the following:

    • External Syslog Server VPN: The syslog server should be reachable from this VPN.

    • Server IP: IP address of the server.

    • Failure Mode: Open or Close

  20. Click Save Policy to save the Security policy.

  21. You can edit the existing URL filtering policy by clicking on Custom Options in the right-side panel of the vManage > Configuration > Security wizard.

Apply a Security Policy to a Device

To apply a security policy to a device:

  1. In vManage, select the Configuration > Templates screen.

  2. In the Device tab, from the Create Template drop-down, select From Feature Template.

  3. From the Device Model drop-down, select one of the IOS XE SD-WAN devices.

  4. Click the Additional Templates tab located directly beneath the Description field. The screen scrolls to the Additional Templates section.

  5. From the Security Policy drop-down, select the name of the policy you configured in the previous procedure.

  6. Click Create to apply the security policy to a device.

Modify URL Flitering

To modify a URL Filtering policy, do the following:

  1. In Cisco vManage, select the Configuration > Security tab in the left side panel.

  2. In the Security screen, click the Custom Options drop-down and select URL Filtering.

  3. For the policy that you want to modify, click the More Actions icon to the far right of the policy and select Edit.

  4. Modify the policy as required and click Save URL Filtering Policy.

Delete URL Filtering

To delete a URL filtering policy, you must first detach the policy from the security policy:

  1. In Cisco vManage, select the Configuration > Security tab in the left side panel.

  2. Detach the URL filtering policy from the security policy as follows:

    1. For the security policy that contains the URL filtering policy, click the More Actions icon to the far right of the policy and select Edit.

      The Policy Summary page is displayed.

    2. Click the URL Filtering tab.

    3. For the policy that you want to delete, click the More Actions icon to the far right of the policy and select Detach.

    4. Click Save Policy Changes.

  3. Delete the URL filtering policy as follows:

    1. In the Security screen, click the Custom Options drop-down and select URL Filtering.

    2. For the policy that you want to delete, click the More Actions icon to the far right of the policy and select Delete.

      A dialog box is displayed.

    3. Click OK.

Configure and Apply IPS or IDS

To configure and apply IPS or IDS to a Cisco IOS XE SD-WAN device, do the following:

Configure Intrusion Prevention or Detection

To configure Intrusion Prevention or Detection through a security policy, use the vManage security configuration wizard:

  1. In Cisco vManage, select the Configuration > Security tab in the left side panel.

  2. Click Add Security Policy. The Add Security Policy wizard opens, and various use-case scenarios are displayed.

  3. In Add Security Policy, select a scenario that supports intrusion prevention (Compliance, Direct Cloud Access, Direct Internet Access, or Custom).

  4. Click Proceed to add an Intrusion Prevention policy in the wizard.

  5. In the Add Security Policy wizard, click Next until the Intrusion Prevention screen is displayed.

  6. Click the Add Intrusion Prevention Policy drop-down and choose Create New to create a new Intrusion Prevention policy. The Intrusion Prevention - Policy Rule Configuration wizard appears.
  7. Click on Target VPNs to add the required number of VPNs in the Add Target VPNs wizard.

  8. Enter a policy name in the Policy Name field.

  9. Choose a signature set that defines rules for evaluating traffic from the Signature Set drop-down. The following options are available. Connectivity provides the least restrictions and the highest performance. Security provides the most restrictions but can affect system performance.

    • Balanced: Designed to provide protection without a significant effect on system performance.

      This signature set blocks vulnerabilities with a CVSS score that is greater than or equal to 9. It also blocks CVEs published in the last two years and that have the following rule categories: Malware CNC, Exploit Kits, SQL Injection or Blacklist.

    • Connectivity: Designed to be less restrictive and provide better performance by imposing fewer rules.

      This signature set blocks vulnerabilities with a CVSS score of 10 and CVEs published in the last two years.

    • Security: Designed to provide more protection than Balanced but with an impact on performance.

      This signature set blocks vulnerabilities with a CVSS score that is greater than or equal to 8. It also blocks CVEs published in the last three years and that have the following rule categories: Malware CNC, Exploit Kits, SQL Injection, Blacklist, and App Detect Rules.

  10. Choose mode of operation from the Inspection Mode drop-down. The following options are available:

    • Detection: Select this option for intrusion detection mode

    • Protection: Select this option for intrusion protection mode

  11. (Optional) From the Advanced tab, choose one or more existing IPS signature whitelist profile lists or create new ones as needed from the Signature Whitelist drop-down.

    A whitelist allows the designated IPS signatures to pass through.

    To create a new signature list, click New Signature List at the bottom of the drop-down. In the IPS Signature List Name field, enter a list name consisting of up to 32 characters (letters, numbers, hyphens and underscores only). In the IPS Signature field, enter signatures in the format Generator ID:Signature ID, separated with commas. You also can use the Import button to add a whitelist from an accessible storage location. Click Save when you are finished.

    You also can create or manage IPS Signature Whitelist lists by selecting the Configuration > Security tab in the left side panel, choosing Lists from the Custom Options drop-down at the top right of the page, and then selecting Signatures in the left panel.

    To remove an IPS Signature Whitelist from the Signature Whitelist field, click the X next to the list name in the field.

  12. (Optional) Choose an alert level for syslogs from the Alert Log Level drop-down. The options are:

    • Emergency

    • Alert

    • Critical

    • Error

    • Warning

    • Notice

    • Info

    • Debug

    You must configure the address of the external log server in the Policy Summary page.

  13. Click Save Intrusion Prevention Policyto add an Intrusion Prevention policy.

  14. Click Next until the Policy Summary page is displayed

  15. Enter Security Policy Name and Security Policy Description in the respective fields.

  16. If you set an alert level when configuring the Intrusion Prevention policy, in the Additional Policy Settings section, you must specify the following:

    • External Syslog Server VPN: The syslog server should be reachable from this VPN.

    • Server IP: IP address of the server.

    • Failure Mode: Open or Close

  17. Click Save Policy to configure the Security policy.

  18. You can edit the existing Intrusion Prevention policy by clicking on Custom Options in the right-side panel of the vManage > Configuration > Security wizard.

Apply a Security Policy to a Device

To apply a security policy to a device:

  1. In vManage, select the Configuration > Templates screen.

  2. In the Device tab, from the Create Template drop-down, select From Feature Template.

  3. From the Device Model drop-down, select one of the IOS XE SD-WAN devices.

  4. Click the Additional Templates tab located directly beneath the Description field. The screen scrolls to the Additional Templates section.

  5. From the Security Policy drop-down, select the name of the policy you configured in the previous procedure.

  6. Click Create to apply the security policy to a device.

Modify an Intrusion Prevention or Detection Policy

To modify a intrusion prevention or detection policy, do the following:

  1. In Cisco vManage, select the Configuration > Security tab in the left side panel.

  2. In the Security screen, click the Custom Options drop-down and select Intrusion Prevention.

  3. For the policy that you want to modify, click the More Actions icon to the far right of the policy and select Edit.

  4. Modify the policy as required and click Save Intrusion Prevention Policy.

Delete an Intrusion Prevention or Detection Policy

To delete an intrusion prevention or detection policy, you must first detach the policy from the security policy:

  1. In Cisco vManage, select the Configuration > Security tab in the left side panel.

  2. Detach the IPS or IDS policy from the security policy as follows:

    1. For the security policy that contains the IPS or IDS policy, click the More Actions icon to the far right of the policy and select Edit.

      The Policy Summary page is displayed.

    2. Click the Intrusion Prevention tab.

    3. For the policy that you want to delete, click the More Actions icon to the far right of the policy and select Detach.

    4. Click Save Policy Changes.

  3. Delete the IPS or IDS policy as follows:

    1. In the Security screen, click the Custom Options drop-down and select Intrusion Prevention.

    2. For the policy that you want to delete, click the More Actions icon to the far right of the policy and select Delete.

      A dialog box is displayed.

    3. Click OK.

Configure and Apply an Advanced Malware Policy

To configure and apply an Advanced Malware Policy to a Cisco IOS XE SD-WAN device, do the following:

Before you Begin

Configure Threat Grid API Key

To perform file analysis, you must configure your Threat Grid API key:

Procedure

Step 1

Log into your Cisco AMP Threat Grid dashboard, and select your account details.

Step 2

Under your Account Details, an API key may already be visible if you've created one already. If you haven't, click Generate New API Key.

Your API key should then be visible under User Details > API Key.

Step 3

In Cisco vManage, select the Configuration > Security tab in the left side panel.

Step 4

In the Security screen, click the Custom Options drop-down and select Threat Grid API Key.

Step 5

In the Manage Threat Grid API key pop-up box, take these actions:

  1. Choose a region from the Region drop-down.

  2. Enter the API key in the Key field.

  3. Click Add.

  4. Click Save Changes.


Configuring an Advanced Malware Protection Policy

To configure an Advanced Malware Protection policy:

Procedure

Step 1

In Cisco vManage, select the Configuration > Security tab in the left side panel.

Step 2

Click Add Security Policy. The Add Security Policy wizard opens and various use-case scenarios display.

Step 3

In Add Security Policy, select Direct Internet Access and then click Proceed.

Step 4

In the Add Security Policy wizard, click Next as needed to select the Advanced Malware Protection tab.

Step 5

In the Advanced Malware Protection tab, click the Add Advanced Malware Protection Policy drop-down.

Step 6

Select Create New. The Add Advanced Malware Protection screen displays.

Step 7

In the Policy Name field, enter a name for the malware policy. The name can be up to 128 characters and can contain only alphanumeric characters.

Step 8

Make sure that the Match All VPN button is selected. Select Match All VPN if you want to apply the policy to all the VPNs, or select Custom VPN Configuration to input the specific VPNs.

Step 9

From the AMP Cloud Region dropdown, select a global region.

Step 10

From the Alerts Log Level dropdown, select a severity level (Critical, Warning, or Info).

Note: Because the Info severity level generates multiple notifications and can affect system performance, this level should be configured only for testing or debugging and not for real-time traffic.

Step 11

Click File Analysis to enable Threat Grid (TG) file analysis.

Note 

Before you can perform this step, configure a threat grid API key as described in Configure Threat Grid API Key.

Note 

File Analysis requires a separate Threat Grid license.

Step 12

From the TG Cloud Region dropdown, select a global region.

Note 

Configure the Threat Grid API Key by clicking on Manage API Key or as described in Configure Threat Grid API Key

Step 13

From the File Types List dropdown, select the file types that you want to be analyzed.

Step 14

From the Alerts Log Level dropdown, select a severity level (Critical, Warning, or Info).

Step 15

Click Target VPNs to select the target VPNs or all VPNs, and then click Add VPN.

Step 16

Click Save Changes. The Policy Summary screen displays.

Step 17

Click Next.


Apply a Security Policy to a Device

To apply a security policy to a device:

  1. In vManage, select the Configuration > Templates screen.

  2. In the Device tab, from the Create Template drop-down, select From Feature Template.

  3. From the Device Model drop-down, select one of the IOS XE SD-WAN devices.

  4. Click the Additional Templates tab located directly beneath the Description field. The screen scrolls to the Additional Templates section.

  5. From the Security Policy drop-down, select the name of the policy you configured in the previous procedure.

  6. Click Create to apply the security policy to a device.

Modify an Advanced Malware Protection Policy

To modify an Advanced Malware Protection policy, do the following:

  1. In Cisco vManage, select the Configuration > Security tab in the left side panel.

  2. In the Security screen, click the Custom Options drop-down and select Advanced Malware Protection.

  3. For the policy that you want to modify, click the More Actions icon to the far right of the policy and select Edit.

  4. Modify the policy as required and click Save Advanced Malware Protection Policy.

Delete an Advanced Malware Protection Policy

To delete an Advanced Malware Protection policy, you must first detach the policy from the security policy:

  1. In Cisco vManage, select the Configuration > Security tab in the left side panel.

  2. Detach the AMP policy from the security policy as follows:

    1. For the security policy that contains the AMP policy, click the More Actions icon to the far right of the policy and select Edit.

      The Policy Summary page is displayed.

    2. Click the Advanced Malware Protection tab.

    3. For the policy that you want to delete, click the More Actions icon to the far right of the policy and select Detach.

    4. Click Save Policy Changes.

  3. Delete the AMP policy as follows:

    1. In the Security screen, click the Custom Options drop-down and select Advanced Malware Protection.

    2. For the policy that you want to delete, click the More Actions icon to the far right of the policy and select Delete.

      A dialog box is displayed.

    3. Click OK.

Configure Cisco IOS XE SD-WAN Devices as TLS Proxy

High-level Steps for Configuring a Device as TLS Proxy

  1. Configure certificate authority (CA) for the TLS proxy: Enterprise CA, vManage as CA, or vManage as Intermediate CA.

  2. The next step differs based on the CA option you configure. See the task flows in the following section for Enterprise CA, and vManage as CA and vManage as Intermediate CA.

  3. Create and attach SSL decryption security policy to the device.

Task Flow: Set up TLS Proxy with Enterprise CA

If you configure Enterprise CA to enable TLS proxy on your devices, go through the following steps to complete the TLS proxy setup.

Figure 9. Use Enterprise CA to Configure TLS Proxy on a Device

Task Flow: of Set Up TLS Proxy with vManage as CA or vManage as Intermediate CA

If you configure up vManage as CA or vManage as Intermediate CA to enable TLS proxy on your devices, go through the following steps to complete the TLS proxy setup.

Figure 10. Use vManage as CA or vManage as Intermediate CA to Configure TLS Proxy on a Device

The subsequent topics provide a step-by-step procedure to complete the configuration of a Cisco IOS XE SD-WAN device as SSL/TLS Proxy.

Configure SSL Decryption

The SSL decryption policy provides the following ways to divert traffic for decryption:

  • Network-based rules: Diverts traffic on the basis of the source or destination IP address, port, VPNs, and application.

  • URL-based rules: Decide whether to decrypt based on the URL category or reputation of the URL.The decision is made based on the Client Hello packet.

For URL-based rules, note the following:

  • You can set blacklisted URLs to always be decrypted

  • You can set whitelisted URLs to never be decrypted.

  • If a URL lookup to the cloud takes too long, the user can set one of the following:
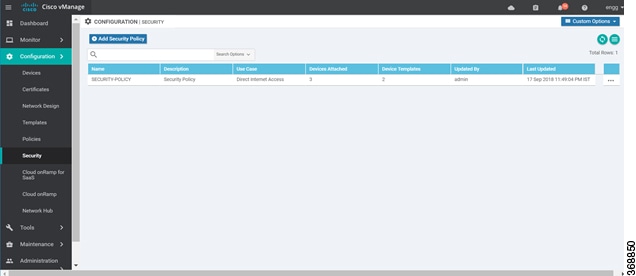
    • Decrypt the traffic

    • Skip decryption for this traffic temporarily

To configure SSL decryption through a security policy, use the vManage security configuration wizard:

  1. In Cisco vManage, select the Configuration > Security tab in the left side panel.

  2. Click Add Security Policy. The Add Security Policy wizard opens, and various use-case scenarios are displayed.

  3. In Add Security Policy, select a scenario that supports the TLS/SSL Decryption feature (Compliance, Guest Access, Direct Cloud Access, Direct Internet Access, or Custom).

  4. Click Proceed to add an SSL decryption policy in the wizard.

    • If this is the first time you're creating a TLS/SSL decryption policy, then you must create and apply a policy to the device before creating security policies that can use a security policy (such as Intrusion Prevention, URL Filtering, or Advanced Malware Protection). In the Add Security Policy wizard, click Next until the TLS/SSL Decryption screen is displayed.

    • If you want to use TLS/SSL decryption along with other security features such as Intrusion Prevention, URL Filtering, or Advanced Malware Protection, add those features as described in this book. Once you've configured those features, click Next until the TLS/SSL Decryption screen is displayed.

  5. Click the Add TLS/SSL Decryption Policy drop-down and choose Create New to create a new SSL decryption policy. The TLS/SSL Decryption Policy Configuration wizard appears.

  6. Ensure that SSL Decryption is Enabled.

  7. In the Policy Name field, enter the name of the policy.

  8. Click on Add Rule to create a rule.

    The New Decryption Rule window is displayed.


    Note

    For branch-to-branch and branch-to-data center traffic scenarios that support service nodes, the SSL decryption security policy must be applied in a way that prevents the SSL flow from being inspected on both the devices.


  9. Select the order for the rule that you want to create.

  10. In the Name field, enter the name of the rule.

  11. You can choose to decrypt traffic based on source / destination which is similar to the firewall rules or applications which is similar to URL-Filtering rules.

    • If you select Source / Destination, enter any of the following conditions:

      • Source VPNs

      • Source Networks

      • Source Ports

      • Destination VPNs

      • Destination Networks

      • Destination Port

      • Application/Application Family List

    • If you select URLs, enter the following:

      • VPNs

      • TLS/SSL profile.

        1. Enter a name for the profile.

        2. Select Decrypt, No Decrypt or Pass Through. Alternatively, you can select multiple categories and set the action for all of them using the actions drop-down.

  12. (Optional) To configure advanced settings such as server certificate checks, minimum TLS version, and so on, expand Advanced Settings


    Note

    By default, vManage configures the default values for each advanced setting. If you change any of these settings, it may affect the behaviour of the decryption security policies.


    • Under the Server Certificate Checks section, you can configure the following:

      Field Name

      Description

      Options

      Expired Certificate

      Defines what the policy should do if the server certificate is expired

      • Drop the traffic

      • Decrypt the traffic

      Untrusted Certificate

      Defines what the policy should do if the server certificate is not trusted

      • Drop the traffic

      • Decrypt the traffic

      Certificate Revocation Status

      Defines whether Online Certificate Status Protocol (OCSP) should be used to check the revocation status of the server certificate

      Enabled or Disabled

      Unknown Revocation Status

      Defines what the policy should do, if the OCSP revocation status is unknown

      • Drop the traffic

      • Decrypt the traffic

    • Under the Proxy Certificate Attributes section, you can configure the following:

      Field Name

      Description

      Options

      RSA Keypair Modules

      Defines the Proxy Certificate RSA Key modulus

      • 1024 bit RSA

      • 2048 bit RSA

      • 4096 bit RSA

      Certificate Lifetime (in Days)

      Sets the lifetime of the proxy certificate in days.

      Minimum TLS Version Revocation Status

      Sets the minimum version of TLS that the proxy should support.

      • TLS 1.0

      • TLS 1.1

      • TLS 1.2

    • Under the Unsupported Mode Checks section, you can configure the following:

      Field Name

      Description

      Options

      Unsupported Protocol Versions

      Defines what the policy should do if an unsupported protocol version is detected.

      • Drop the traffic

      • No Decrypt: The proxy does not decrypt this traffic.

      Unsupported Cipher Suites

      Defines what the policy should do if unsupported cipher suites are detected.

      • Drop the traffic

      • No Decrypt: The proxy does not decrypt this traffic.

      Failure Mode

      Defines what the policy should do in the case of a failure.

      • Close: Sets the mode as fail-close

      • Open: Sets the mode as fail-open.

      Certificate Bundle

      Defines whether the policy should use the default CA certificate bundle or not

      You can select or deselect this option. If you deselect this option, the Custom Certificate Bundle option appears and you must upload a certificate by clicking Select a file.

  13. Click Save TLS/SSL Decryption Policy.

  14. Click Next.

  15. Enter Security Policy Name and Security Policy Description in the respective fields.

  16. Click Save Policy to configure the Security policy.

  17. You can edit the existing SSL decryption policy by clicking on Custom Options in the right-side panel of the vManage > Configuration > Security wizard.

Umbrella Integration on SD-WAN

Configure Umbrella API Token

To configure Umbrella API token:

  1. In Cisco vManage NMS, select the Configuration > Security tab > Custom Options on the right side to configure the Umbrella API.

  2. Select Umbrella API Token.

  3. Enter token number in the Umbrella Token field.


    Note

    Must be exactly 40 hexadecimal.


  4. Click Save Changesto configure the Umbrella API Token. 

Configure Cisco Umbrella Registration

Table 50. Feature History

Feature Name

Release Information

Description

Auto-registration for Cisco Umbrella Cloud Services

Cisco IOS XE Release Amsterdam 17.2.1r

This feature adds the ability to register devices to Cisco Umbrella using the Smart Account credentials to automatically retrieve Umbrella credentials (organization ID, registration key, and secret). This offers a more automatic alternative to manually copying a registration token from Umbrella.

Use this procedure to configure Cisco Umbrella registration globally for all devices. The procedure retrieves the Umbrella registration parameters automatically.

When configuring individual policies, it is also possible to configure Umbrella registration, but it can be managed more flexibly using the following procedure:

  1. In vManage, select Configuration > Security.

  2. Click Custom Options and select Umbrella Registration.

  3. In the Manage Umbrella Registration dialog box, use one of the following methods to register devices to Umbrella. The registration details are used globally.

    • Cisco Umbrella Registration Key and Secret

      1. Click the Get Keys button to retrieve Umbrella registration parameters automatically: Organization ID, Registration Key, and Secret.


        Note

        To automatically retrieve registration parameters, vManage uses the Smart Account credentials to connect to the Umbrella portal. The Smart Account credentials are configured in vManage in Administration > Settings > Smart Account Credentials.


      2. (Optional) If the Umbrella keys have been rotated and the automatically retrieved details are incorrect, enter the details manually.

      3. Click Save Changes.

    • Cisco Umbrella Registration Token

      (For legacy devices only) Enter a registration token (40 hexadecimal digits) provided by Umbrella.

Define Domain Lists

To define Domain-List, use the vManage security configuration wizard:

  1. In Cisco vManage NMS, select the Configuration > Security tab > Custom Options in the right side.

  2. Click on Lists in the Custom Options drop-down.

  3. Select Domain from the left pane.

  4. Click on New Domain List to create a new domain list or select the domain name and click on pencil icon on the right side for the existing list.

  5. Enter the Domain List Name,  Add Domain and click Add to create the list.

Configure Umbrella DNS Policy Using vManage

To configure umbrella through DNS Security:

  1. In Cisco vManage NMS, select the Configuration > Security tab in the left side panel.

  2. Click Add Security Policy. The Add Security Policy wizard appears.

  3. The Add Security Policy configuration wizard opens, and various use-case scenarios display.

  4. In Add Security Policy, select Direct Internet Access.

  5. Click Proceed to add an Umbrella DNS Security policy in the wizard.

  6. In the Add Security Policy wizard, select DNS Security tab to create a new DNS Security policy.

  7. Click the Add DNS Security Policy drop-down and select from the following options:

    • Create New - A DNS Security - Policy Rule Configuration wizard appears and continue with Step 8.

    • Copy from Existing - A Copy from Existing DNS Security Policy wizard appears. Select a Policy from the drop-down and enter Policy Name and copy the policy to a device.

  8. If you are creating a new policy using Create New, a DNS Security - Policy Rule Configuration wizard appears.

  9. Enter a policy name in the Policy Name field.

  10. The Umbrella Registration Status displays the status about the API Token configuration.

  11. Click on Manage Umbrella Registration to add a token.

  12. Select Match All VPN option if you need to keep the same configuration for all the available VPNs and continue with Step 13.

    Or select Custom VPN Configuration if you need to add target VPNs to your policy. A Target VPNs wizard appears.

  13. To add target VPNs, click Target VPNs in the Add DNS Security Policy wizard.

  14. Click Save Changes to add the VPN.

  15. Select the domain bypass from the Local Domain Bypass List drop-down as shown.

  16. Configure the DNS Server IP from the following options:

    • Umbrella Default

    • Custom DNS

  17. Click on the Advanced tab to enable or disable the DNSCrypt. By default, the DNSCrypt is enabled.

  18. Click Save DNS Security Policy to configure DNS Security policy. The Configuration > Security screen is then displayed, and the DNS Policy list table includes the newly created DNS Security Policy.

Configure IPSec Pairwise Keys Using vManage

  1. In vManage NMS, select the ConfigurationTemplates screen.

  2. In the Feature tab, click Create Template.

  3. From the Device Model check box, select the type of device for which you are creating the template.

  4. From the Basic Information tab, choose Security template.

  5. From theBasic Configuration tab, select On or Off from the IPsec Pairwise-Keying field..
    Figure 11. IPSec Pairwise Keying
  6. Alternatively, enter the pairwise key specific to the device in the EnterKey field.

  7. Click Save.

Apply a Security Policy to an XE SD-WAN Router

  1. In vManage NMS, select the Configuration > Templates screen.

  2. If you are creating a new device template:

    1. In the Device tab, click Create Template.

    2. From the Create Template drop-down, select From Feature Template.

    3. From the Device Model drop-down, select one of the XE SD-WAN Routers.

    4. In the Template Name field, enter a name for the device template. This field is mandatory and can contain only uppercase and lowercase letters, the digits 0 through 9, hyphens (–), and underscores (_). It cannot contain spaces or any other characters.

    5. In the Description field, enter a description for the device template. This field is mandatory, and it can contain any characters and spaces.

    6. Continue with Step 4.

  3. If you are editing an existing device template:

    1. In the Device tab, click the More Actions icon to the right of the desired template, and click the pencil icon.

    2. Click the Additional Templates tab. The screen scrolls to the Additional Templates section.

    3. From the Policy drop-down, select the name of a policy that you have configured.

  4. Click the Additional Templates tab located directly beneath the Description field. The screen scrolls to the Additional Templates section.

  5. From the Security Policy drop-down, select the name of the security policy you configured in the above procedure.

  6. Click Create (for a new template) or Update (for an existing template).

Add a Voice Policy

A voice policy defines how the system augments and manipulates calls for various endpoint types. Endpoints include voice ports, POTS dial peers, SIP dial peers, and SRST phone profiles. A voice policy includes subpolicies for each endpoint that you want to configure.

To add a voice policy:

  1. Choose Configuration > Unified Communications.

  2. Click Add Voice Policy.

  3. In the Voice Policy Name field, enter a name for the policy.

  4. Configure options in the following tabs in the left pane as needed:

  5. Click Save Policy.

Configure Voice Ports for a Voice Policy

When you configure voice ports for a voice policy, you configure options that define how the system augments and manipulates calls for the voice port endpoint type.

  1. When adding a voice policy from the Configuration > Unified Communications page, select Voice Ports in the left pane.

  2. From the Add Voice Ports Policy Profile drop-down list, select Create New.

    Alternatively, you can select Copy from Existing to copy an existing voice policy to a new voice policy. In the box that appears, select the name of the policy profile to copy, enter a new name for the profile if desired, and then click Copy.

  3. Select FXO, FXS, or FXS DID to specify the type of voice port that the policy is for.

  4. Select the types of call functionality policy options that you want to configure from the list of options that displays, and then click Next. These option types include the following:

    • Translation Profile—Available for FXO, FXS, and FXS DID cards

    • Station ID—Available for FXO, FXS, and FXS DID cards

    • Line Params—Available for FXO, FXS, and FXS DID cards

    • Tuning Params—Available for FXO and FXS cards

    • Supervisory Disconnect—Available for FXO cards

    • DID Timers—Available for FXS DID cards

  5. In the page that displays, configure as needed the options on the tabs that the following tables describe.

    The tabs that are available depend on the voice port and call functionality policy option types that you selected.

    • Translation Profile options—Available for FXO, FXS, and FXS DID cards. Use these options to configure translation rules for calling and called numbers.

      Option

      Description

      Cisco IOS CLI Equivalent

      Add New Translation Profile

      Click to add a translation profile for the selected card.

      You can create up to two translation profiles for this endpoint.

      voice translation-profile name

      Copy from Existing

      Click to copy an existing translation profile to a new translation profile. In the box that appears, change the name if desired, select a called translation rule and a calling translation rule, and click Copy.

      Calling

      Click to configure translation rules for the number that is calling in.

      The Translation Rules pane displays.

      translate calling translation-rule-number

      Called

      Click to configure translation rules for the number that is being called.

      The Translation Rules pane displays.

      translate called translation-rule-number

      Translation Rules pane

      1. Click Add New to create a translation rule.

        Alternatively, you can click Copy From Existing to copy an existing translation rule to a new translation rule. In the box that appears, change the name if desired, select a called translation rule and a calling translation rule, and click Copy.

      2. In the Translation Rule Number field, enter a unique number that designates the precedence for this rule. Valid range: integers 1 through 100.

      3. (Optional) To copy existing translation rules from a CSV file, click Import. Continue to add rules or click Finish. For detailed information about this file, see Translation Rules CSV File.

      4. Click Add Rule.

      5. In the Match field, enter the string that you want the translation rule to affect. Enter the string in regular expression format beginning and ending with a slash (/). For example, /^9/.

      6. From the Action drop-down list, select the action that the system performs for calls that match the string in the Match field. The Reject option causes the system to reject the call. The Replace option causes the system to replace the match number with a value that you specify.

      7. If you select the Replace action, in the Replace field that displays, enter the string to which to translate the matched string. Enter the number in regular expression format beginning and ending with a slash (/). For example, //, which indicates a replacement of no string.

        As an example, if you specify a match string of /^9/ and a replace string of //, the system removes the leading 9 from calls with a number that begins with 9. In this case, the system translates 914085551212 to 14085551212.

      8. Click Save.

      9. Add more translation rules as needed.

      10. (Optional) Click Export to save the translation rules that you created in a CSV file.

      11. Click Finish at the bottom of the pane.

      voice translation-rule number

      Match and Replace Rule:

      rule precedence /match-pattern/ / replace-pattern/

      Reject Rule:

      rule precedence reject /match-pattern/

      After you click Finish, perform these actions:

      1. Add another translation profile if needed. You can create up to two translation profiles for this endpoint.

      2. Click Save Translation Profile.

      3. For each translation profile that you create, double-click the dash (-) that displays in Direction column in the table of translation rules and select Incoming or Outgoing from the drop-down list that displays. The Incoming selection applies the corresponding translation rule to traffic that is incoming to this endpoint. The Outgoing selection applies the corresponding translation rule to traffic that is outgoing from this endpoint.

    • Station ID options—Available for FXO, FXS, and FXS DID cards. Use these options to configure the name and number for caller ID display.

      Option

      Description

      Cisco IOS CLI Equivalent

      Station Name

      Enter the name of the station.

      The station name can contain up to 50 letters, numbers, and spaces, dashes (-), and underscores (_).

      station-id name name

      Station Number

      Enter the phone number of the station in E.164 format.

      The station number can contain up to 15 numeric characters.

      station-id number number

    • Line Params options—Available for FXO, FXS, and FXS DID cards. Use these options to configure line parameters on the card for voice quality.

      Option

      Description

      Cisco IOS CLI Equivalent

      Gain

      Enter the gain, in dB, for voice input.

      Valid range: –6 through 14. Default: 0

      input gain decibels

      Attenuation

      Enter the amount of attenuation, in dB, for transmitted voice output.

      Valid range: –6 through 14. Default: 3.

      output attenuation decibels

      Echo Canceller

      Select Enable to apply echo cancellation to voice traffic.

      This option is enabled by default.

      echo-cancel enable

      Voice Activity Detection (VAD)

      Select Enable to apply VAD to voice traffic.

      This option is enabled by default.

      vad

      Compand Type

      Select the companding standard to be used to convert between analog and digital signals in PCM systems (U-law or A-law).

      Default: U-Law.

      compand-type {u-law | a-law}

      Impedance

      Select the terminating impedance for calls.

      Default: 600r.

      impedance {600c | 600r 900c | 900r | complex1 | complex2 | complex3 | complex4 | complex5 | complex6}

      Call Progress Tone

      Select the locale for call progress tones.

      cptone locale

    • Tuning Params options—Available for FXO and FXS cards. Use these options to configure parameters for signaling between voice ports and another instrument.

      Option

      Description

      Cisco IOS CLI Equivalent

      Tuning Params Options for FXO Cards

      Pre Dial Delay

      Enter the delay, in seconds, of the delay on the FXO interface between the beginning of the off-hook state and the initiation of DTMF signaling.

      Valid range: 0 through 10. Default: 1.

      pre-dial-delay seconds

      Supervisory Disconnect

      Select the type of tone that indicates that a call has been released and that a connection should be disconnected:

      • Anytone—Any tone indicates a supervisory disconnect

      • Signal—A disconnect signal indicates a supervisory disconnect

      • Dualtone—A dual-tone indicates a supervisory disconnect

      Default: Signal.

      Anytone:

      supervisory disconnect anytone

      Signal:

      supervisory disconnect

      Dualtone:

      supervisory disconnect dualtone {mid-call | pre-connect}

      Dial Type

      Select the dialing method for outgoing calls:

      • pulse—Pulse dialer

      • dtmf—Dual-tone multifrequency dialer

      • mf—Multifrequency dialer

      Default: dtmf.

      dial-type {dtmf | pulse | mf}

      Timing Sup-Disconnect

      Enter the minimum time, in milliseconds, that is required to ensure that an on-hook indication is intentional and not an electrical transient on the line before a supervisory disconnect occurs (based on power denial signaled by the PSTN or PBX).

      Valid range: 50 through 1500. Default: 350.

      timing sup-disconnect milliseconds

      Battery Reversal

      Battery reversal reverses the battery polarity on a PBX when a call connects, then changes the battery polarity back to normal when the far-end disconnects.

      Select Answer to configure the port to support answer supervision by detection of battery reversal.

      Select Detection Delay to configure the delay time after which the card acknowledges a battery-reversal signal, then enter the delay time in milliseconds. Valid range: 0 through 800. Default: 0 (no delay).

      If an FXO port or its peer FXS port does not support battery reversal, do not configure battery reversal options to avoid unpredictable behavior.

      battery-reversal [answer]

      battery-reversal-detection-delay milliseconds

      Timing Hookflash out

      Enter the duration, in milliseconds, of hookflash indications that the gateway generates on the FXO interface.

      Valid range: 50 through 1550. Default: 400.

      timing hookflash-out milliseconds

      Timing Guard out

      Enter the number of milliseconds after a call disconnects before another outgoing call is allowed.

      Valid range: 300 through 3000. Default: 2000.

      timing guard-out milliseconds

      Tuning Params Options for FXS Cards

      Timing Hookflash In

      Enter the minimum and maximum duration, in milliseconds, of an on-hook condition to be interpreted as a hookflash by the FXS card.

      Valid range for minimum duration: 0 through 400. Default minimum value: 50.

      Valid range for maximum duration: 50 through 1500. Default maximum value: 1000.

      timing hookflash-in maximum-milliseconds minimum-milliseconds

      Pulse Digit Detection

      To enable pulse digit detection at the beginning of a call, select Yes.

      Default: Yes.

      pulse-digit-detection

      Loop Length

      Select the length for signaling on FXS ports (Long or Short).

      Default: Short.

      loop-length [long | short]

      Ring

      • Frequency—Select the frequency, in Hz, of the alternating current that, when applied, rings a connected device. Default: 25.

      • DC Offset—Applies only if Loop Length is set to Long. Select the voltage threshold below which a ring does not sound on devices. Valid values: 10-volts, 20-volts, 24-volts, 30-volts, and 35-volts.

      ring frequency number

      ring dc-offset number

      Ringer Equivalence Number (REN)

      Select the REN for calls that this card processes. This number specifies the loading effect of a telephone ringer on a line.

      Valid range: 1 through 5. Default: 1.

      ren number

    • Supervisory Disconnect options—Available for FXO cards. Use these options to configure parameters for supervisory disconnect events. These events provide an indication that a call has disconnected. You can configure as many supervisory disconnect events as needed.

      Option

      Description

      Cisco IOS CLI Equivalent

      Add New Supervisory Disconnect

      Click to add a supervisory disconnect event.

      Mode

      Choose the mode for the supervisory disconnect event:

      • Custom CPTone—Provides options for configuring cptone detection parameters for a supervisory disconnect event

      • Dual Tone Detection Params— Provides options for configuring dual-tone detection parameters for a supervisory disconnect event

      voice class custom-cptone cptone-name

      voice class dualtone-detect-params tag

      Supervisory Name

      Applies to Custom CPTone mode. Enter a name for the supervisory disconnect event.

      The name can contain up to 32 characters. Valid characters are letters, numbers, dashes (-), and underscores (_).

      voice class custom-cptone cptone-name

      Dualtone

      Applies to Custom CPTone mode. Select the type of dual-tone that causes a disconnect. Options are:

      • Busy

      • Disconnect

      • Number Unobtainable

      • Out of Service

      • Reorder

      • Ringback

      dualtone {ringback |busy | reorder | out-of-service | number-unobtainable | disconnect}

      Cadence

      Applies to Custom CPTone mode. Enter the cadence interval, in milliseconds, of the dual-tones that causes a disconnect. Enter the cadence as an on/off value pair, separated with a space. You can enter up to 4 on/off value pairs, separated with a space.

      cadence cycle-1-on-time cycle-1-off-time [cycle-2-on-time cycle-2-off-time [cycle-3-on-time cycle-3-off-time [ cycle-4-on-time cycle-4-off-time ]]]

      Dualtone Frequency

      Applies to Custom CPTone mode. Enter the frequency, in Hz, of each tone in the dual-tone.

      Valid range for each tone are 300 through 3600.

      frequency frequency-1 [frequency-2]

      Supervisory Number

      Applies to Custom Dual Tone Detection Params mode.

      Enter a unique number to identify dual-tone detection parameters.

      Valid range: 1 through 10000.

      voice class dualtone-detect-params tag-number

      Cadence-Variation

      Applies to Custom Dual Tone Detection Params mode. Enter the maximum time, in milliseconds, by which the tone onset can vary from the onset time and still be detected. The system multiplies the value that you enter by 10.

      Valid range: 0 through 200 in units of 10. Default: 10.

      cadence-variation time

      Frequency

      Applies to Custom Dual Tone Detection Params mode.

      • Max Delay—Enter the maximum delay, in milliseconds, before a supervisory disconnect is performed after the dual-tone is detected. The system multiplies the value that you enter by 10. Valid range: 0 through 100 in units of 10. Default: 10.

      • Max Deviation—Enter the maximum deviation, in Hz, by which each tone can deviate from configured frequencies and be detected. Valid range: 10 through 125. Default: 10.

      • Max Power—Enter the power of the dual-tone, in dBm0, above which a supervisory disconnect is no detected. Valid range: 0 through 20. Default: 10.

      • Min Power— Enter the power of the dual-tone, in dBm0, below which a supervisory disconnect is not detected. Valid range: 10 through 35. Default: 30.

      • Power Twist—Enter difference, in dBm0, between the minimum power and the maximum power of the dual-tone above which a supervisory disconnect is not detected. Valid range: 0 through 15. Default: 6.

      freq-max-delay time

      freq-max-deviation hertz

      freq-max-power dBm0

      freq-min-power dBm0

      freq-power-twist dBm0

      Save

      Click to save the supervisory disconnect information that you configured.

    • DID Timers options—Available FXS DID cards. Use these options to configure timers for DID calls.

      Option

      Description

      Cisco IOS CLI Equivalent

      Wait Before Wink

      Enter the amount of time, in milliseconds, that the card waits after receiving a call before sending a wink signal to notify the remote side that it can send DNIS information.

      Valid range: 100 through 6500. Default: 550.

      timing wait-wink milliseconds

      Wink Duration

      Enter the maximum amount of time, in milliseconds, of the wink signal for the card.

      Valid range: 50 through 3000. Default: 200.

      timing wait-duration milliseconds

      Clear Wait

      Enter the minimum amount of time, in milliseconds, between an inactive seizure signal and the call being cleared for the card.

      Valid range: 200 through 2000. Default: 400.

      timing clear-wait milliseconds

      Dial Pulse Min Delay

      Enter the amount of time, in milliseconds, between wink-like pulses for the card.

      Valid range: 0 or 140 through 5000. Default: 140.

      timing dial-pulse min-delay milliseconds

      Answer Winkwidth

      Enter the minimum delay time, in milliseconds, between the start of an incoming seizure and the wink signal.

      Valid range: 110 through 290. Default: 210.

      timing answer-winkwidth milliseconds

  6. Click Next

  7. In the Policy Profile Name field, enter a name for this child policy.

  8. In the Policy Profile Description field, enter a description for this child policy.

  9. Click Save.

Configure POTS Dial Peers for a Voice Policy

When you configure POTS Dial Peers for a voice policy, you configure options that define how the system augments and manipulates calls for the POTS dial peer endpoint type.

  1. When adding a voice policy from the Configuration > Unified Communications page, select POTS Dial Peer in the left pane.

  2. From the Add POTS Dial Peer Policy Profile drop-down list, select Create New.

    Alternatively, you can select Copy from Existingto copy an existing POTS dial peer policy to a new one. In the box that appears, select the name of the policy profile to copy, enter a new name for the profile if desired, and then click Copy.

  3. Select Translation Profile and then click Next.

  4. In the page that displays, configure options as described in the following table:

    Option

    Description

    Cisco IOS CLI Equivalent

    Add New Translation Profile

    Click to add a translation profile for the selected POTS dial peer.

    You can create up to two translation profiles for this endpoint.

    voice translation-profile name

    Copy from Existing

    Click to copy an existing translation profile to a new translation profile. In the box that appears, change the name if desired, select a called translation rule and a calling translation rule, and click Copy.

    Calling

    Click to configure translation rules for the number that is calling in.

    The Translation Rules pane displays.

    translate calling translation-rule-number

    Called

    Click to configure translation rules for the number that is being called.

    The Translation Rules pane displays.

    translate called translation-rule-number

    Translation Rules pane

    1. Click Add New to create a translation rule.

      Alternatively, you can click Copy From Existing to copy an existing translation rule to a new translation rule. In the box that appears, change the name if desired, select a called translation rule and a calling translation rule, and click Copy.

    2. In the Translation Rule Number field, enter a unique number that designates the precedence for this rule. Valid range: integers 1 through 100.

    3. (Optional) To copy existing translation rules from a CSV file, click Import. Continue to add rules or click Finish. For detailed information about this file, see Translation Rules CSV File.

    4. Click Add Rule.

    5. In the Match field, enter the string that you want the translation rule to affect. Enter the string in regular expression format beginning and ending with a slash (/). For example, /^9/.

    6. From the Action drop-down list, select the action that the system performs for calls that match the string in the Match field. The Reject option causes the system to reject the call. The Replace option causes the system to replace the match number with a value that you specify.

    7. If you select the Replace action, in the Replace field that displays, enter the string to which to translate the matched string. Enter the number in regular expression format beginning and ending with a slash (/). For example, //, which indicates a replacement of no string.

      As an example, if you specify a match string of /^9/ and a replace string of //, the system removes the leading 9 from calls with a number that begins with 9. In this case, the system translates 914085551212 to 14085551212.

    8. Click Save.

    9. Add more translation rules as needed.

    10. (Optional) Click Export to save the translation rules that you created in a CSV file.

    11. Click Finish at the bottom of the pane.

    voice translation-rule number

    Match and Replace Rule:

    rule precedence /match-pattern/ / replace-pattern/

    Reject Rule:

    rule precedence reject /match-pattern/

  5. Add another translation profile if needed.

    You can create up to two translation profiles for this endpoint.

  6. Click Save Translation Profile.

  7. For each translation profile that you create, double-click the dash (-) that displays in Direction column in the table of translation rules and select Incoming or Outgoing from the drop-down list that displays.

    The Incoming selection applies the corresponding translation rule to traffic that is incoming to this endpoint. The Outgoing selection applies the corresponding translation rule to traffic that is outgoing from this endpoint.

  8. Click Next.

  9. In the Policy Profile Name field, enter a name for this child policy.

  10. In the Policy Profile Description field, enter a description for this child policy.

  11. Click Save.

Configure SIP Dial Peers for a Voice Policy

When you configure SIP Dial Peers for a voice policy, you configure options that define how the system augments and manipulates calls for the SIP dial peer endpoint type.

  1. When adding a voice policy from the Configuration > Unified Communications page, select SIP Dial Peer in the left pane.

  2. From the Add SIP Dial Peer Policy Profile drop-down list, select Create New.

    Alternatively, you can select Copy from Existingto copy an existing SIP dial peer policy to a new one. In the box that appears, select the name of the policy profile to copy, enter a new name for the profile if desired, and then click Copy.

  3. Select the policy types that you want to create and then click Next.

    • Translation Profile lets you configure translation rules for calling and called numbers.

    • Media Profile lets you configure the codecs and the DTMF type that the SIP trunk uses when communicating with the remote dial peer.

  4. In the page that displays, configure options in the tabs that the following tables describe as needed.

    The tabs that are available depend on the policy types that you selected.

    • Translation Profile options—Use these options to configure translation rules for called and calling numbers on SIP dial peers.

    • Option

      Description

      Cisco IOS CLI Equivalent

      Add New Translation Profile

      Click to add a translation profile for the selected SIP dial peer.

      You can create up to two translation profiles for this endpoint.

      voice translation-profile name

      Copy from Existing

      Click to copy an existing translation profile to a new translation profile. In the box that appears, change the name if desired, select a called translation rule and a calling translation rule, and click Copy.

      Calling

      Click to configure translation rules for the number that is calling in.

      The Translation Rules pane displays.

      translate calling translation-rule-number

      Called

      Click to configure translation rules for the number that is being called.

      The Translation Rules pane displays.

      translate called translation-rule-number

      Translation Rules pane

      1. Click Add New to create a translation rule.

        Alternatively, you can click Copy From Existing to copy an existing translation rule to a new translation rule. In the box that appears, change the name if desired, select a called translation rule and a calling translation rule, and click Copy.

      2. In the Translation Rule Number field, enter a unique number that designates the precedence for this rule. Valid range: integers 1 through 100.

      3. (Optional) To copy existing translation rules from a CSV file, click Import. Continue to add rules or click Finish. For detailed information about this file, see Translation Rules CSV File.

      4. Click Add Rule.

      5. In the Match field, enter the string that you want the translation rule to affect. Enter the string in regular expression format beginning and ending with a slash (/). For example, /^9/.

      6. From the Action drop-down list, select the action that the system performs for calls that match the string in the Match field. The Reject option causes the system to reject the call. The Replace option causes the system to replace the match number with a value that you specify.

      7. If you select the Replace action, in the Replace field that displays, enter the string to which to translate the matched string. Enter the number in regular expression format beginning and ending with a slash (/). For example, //, which indicates a replacement of no string.

        As an example, if you specify a match string of /^9/ and a replace string of //, the system removes the leading 9 from calls with a number that begins with 9. In this case, the system translates 914085551212 to 14085551212.

      8. Click Save.

      9. Add more translation rules as needed.

      10. (Optional) Click Export to save the translation rules that you created in a CSV file.

      11. Click Finish at the bottom of the pane.

      voice translation-rule number

      Match and Replace Rule:

      rule precedence /match-pattern/ / replace-pattern/

      Reject Rule:

      rule precedence reject /match-pattern/

      After you click Finish, perform these actions:

      1. Add another translation profile if needed. You can create up to two translation profiles for this endpoint.

      2. After you click Save Translation Profile.

      3. For each translation profile that you create, double-click the dash (-) that displays in Direction column in the table of translation rules and select Incoming or Outgoing from the drop-down list that displays. The Incoming selection applies the corresponding translation rule to traffic that is incoming to this endpoint. The Outgoing selection applies the corresponding translation rule to traffic that is outgoing from this endpoint.

    • Media Profile options—Use these options to configure codecs to be available for the SIP trunk communication with remote dial peers and DTMF relay options to use for SIP calls.

      Option

      Description

      Cisco IOS CLI Equivalent

      Add New Media Profile

      Click to add a translation profile for the dial peer.

      Media Profile Number

      Enter a number for this SIP media profile.

      Valid range: Integers 1 through 10000.

      voice class codec tag-number

      Codec

      Move from the Source list to the Target list the codecs that you want to be made available for the SIP trunk to use when communicating with the remote dial peer.

      Codecs in the target list are in descending order of priority, with the highest priority at the top of the list. Drag and drop items in this list to rearrange them.

      voice class codec tag-number

      codec preference value codec-type

      DTMF

      Move from the Source list to the Target list the DTMF relay options that you want the system to use for SIP calls.

      Items in the Target list are in descending order of priority, with the highest priority at the top of the list. Drag and drop items in this list to rearrange them.

      If you want to include the Inband option in the Target list, it can be the only option in that list. If you want to include other options in the Target list, move the Inband option to the Source list before saving the media profile.

      dtmf-relay {[[sip-notify] [sip-kpml] [rtp-nte]]}

      Save

      Click to save the configuration settings that you made.

  5. Click Next.

  6. In the Policy Profile Name field, enter a name for this child policy.

  7. In the Policy Profile Description field, enter a description for this child policy.

  8. Click Save.

Configure SRST Phones for a Voice Policy

When you configure SRST Phones for a voice policy, you configure options that define how the system augments and manipulates calls for the SRST phone endpoint type.

  1. When adding a voice policy from the Configuration > Unified Communications page, select SRST Phone in the left pane.

  2. From the Add SRST Phone Policy Profile drop-down list, select Create New.

    Alternatively, you can select Copy from Existing to copy an existing POTS dial peer policy to a new one. In the box that appears, select the name of the policy profile to copy, enter a new name for the profile if desired, and then click Copy.

  3. Select Media Profile and then click Next.

  4. Click Add New Media Profile.

  5. In the page that displays, configure options as described in the following table:

    Option

    Description

    Cisco IOS CLI Equivalent

    Medial Profile Number

    Enter a number for this SRST media profile.

    Valid range: Integers 1 through 10000.

    voice class codec tag-number

    Codec

    Move from the Source list to the Target list the codecs that you want to be available for phones when they are in SRST mode and communicating with other phones that are in the same site and registered to the same gateway.

    Codecs in the target list are in descending order of priority, with the highest priority at the top of the list. Drag and drop items in this list to rearrange them.

    voice class codec tag-number

    codec preference value codec-type

    DTMF field

    Move from the source list to the target list the DTMF relay options that you want the system to use when in SRST mode.

    Items in the target list are in descending order of priority, with the highest priority at the top of the list. Drag and drop items in this list to rearrange them.

    If you want to include the Inband option in the Target list, it can be the only option in that list. If you want to include other options in the Target list, move the Inband option to the Source list before saving the media profile.

    dtmf-relay {[[sip-notify] [sip-kpml] [rtp-nte]]}

    Save

    Click to save the configuration settings that you made.

  6. Click Next.

  7. In the Policy Profile Name field, enter a name for this child policy.

  8. In the Policy Profile Description field, enter a description for this child policy.

  9. Click Save.

Configure Cloud OnRamp for SaaS

Add Applications

  1. In vManage NMS, select the Configuration > Cloud onRamp for SaaS screen. The Cloud OnRamp for SaaS Dashboard screen appears.

    To edit the VPN configured for an application, click the Edit icon for that application, then enter the new VPN. You can enter any VPN other than 0, which is the transport VPN, or 512, which is the management VPN.

  2. To add applications, from the Manage Cloud OnRamp for SaaS drop-down, located to the right of the title bar, select Applications to add applications to the cloud onRamp configuration.

  3. Click the Add Applications and VPN button. The Add Applications & VPN pop-up window appears.

  4. In the Applications field, select an application.

  5. In the VPN field, enter the service VPN in which that application runs. You can enter any VPN other than 0 and 512.

  6. Click Add.

  7. Repeat Steps 3 through 6 for each application you want to add.

  8. Click Save Changes.

Configure Client Sites

To configure Cloud OnRamp for SaaS on client sites that access the internet through gateways, you must configure Cloud OnRamp for SaaS both on the client sites and on the gateway sites.

Client sites in Cloud onRamp service choose the best gateway site for each application to use for accessing the internet.

  1. In vManage NMS, select the Configuration > Cloud onRamp for SaaS screen. The Cloud OnRamp for SaaS Dashboard screen opens.

  2. From the Manage Cloud OnRamp for SaaS drop-down, located to the right of the title bar, select Client Sites. The screen changes and displays the following elements:

    • Attach Sites—Add client sites to Cloud onRamp for SaaS service.

    • Detach Sites—Remove client sites from Cloud onRamp for SaaS service.

    • Client sites table—Display client sites configured for Cloud onRamp for SaaS service.

  3. In the Manage Sites screen, click the Attach Sites button. The Attach Sites screen displays all sites in the overlay network with available sites highlighted. For a site to be available, all devices at that site must be running in vManage mode.

  4. In the Available Sites pane, select a client site to attach and click the right arrow. To remove a site, select it in the Selected Sites pane and click the left arrow.

  5. Click Attach. vManage NMS pushes the feature template configuration to the devices. The Task View window displays a Validation Success message.

  6. Select Configuration > Cloud onRamp for SaaS to return to the Cloud OnRamp for SaaS Dashboard screen.

  7. From the Manage Cloud OnRamp for SaaS drop-down, located to the right of the title bar, choose Gateways. The screen changes and displays the following elements:

    • Attach Gateways—Attach gateway sites.

    • Detach Sites—Remove gateway sites from Cloud onRamp service.

    • Edit Sites—Edit interfaces on gateway sites.

    • Gateways table—Display gateway sites configured for Cloud onRamp service.

  8. In the Manage Gateways screen, click the Attach Gateways button. The Attach Gateways popup window displays all sites in your overlay network with available sites highlighted. For a site to be available, all devices at that site must be running in vManage mode.

  9. In the Available Gateways pane, select a gateway site to attach and click the right arrow. To remove a site, select it in the Selected Sites pane and click the left arrow.

  10. If you do not specify interfaces for Cloud OnRamp for SaaS to use, the system selects a NAT-enabled physical interface from VPN 0. To specify GRE interfaces for Cloud OnRamp for SaaS to use:

    1. Click the link Add interfaces to selected sites (optional), located in the bottom right corner of the window.

    2. In the Select Interfaces drop-down, select GRE interfaces to add.

    3. Click Save Changes.

  11. Click Attach. vManage NMS pushes the feature template configuration to the devices. The Task View window displays a Validation Success message.

  12. To return to the Cloud OnRamp for SaaS Dashboard, select Configuration > Cloud onRamp for SaaS.

To edit Cloud OnRamp for SaaS interfaces on gateway sites:

  1. Select the sites you want to edit and click Edit Gateways.

  2. In the Edit Interfaces of Selected Sites screen, select a site to edit.

    • To add interfaces, click the Interfaces field to select available interfaces.

    • To remove an interface, click the X beside its name.

  3. Click Save Changes to push the new template to the vEdge routers.

    Click Save Changes to push the new template to the Cisco CSR 1000V routers.

Configure DIA Sites

  1. In vManage NMS, select the Configuration > Cloud onRamp for SaaS screen. The Cloud OnRamp for SaaS Dashboard screen opens.

    In the title bar, choose Manage Cloud OnRamp for SaaS > DIA. The screen changes and displays the following elements:

    • Attach DIA Sites—Attach DIA sites.

    • Detach DIA Sites—Remove DIA sites.

    • Edit DIA Sites—Edit interfaces on DIA sites.

    • Sites table—Display sites configured for Cloud onRamp service.

  2. From the Manage Cloud OnRamp for SaaS drop-down, located to the right of the title bar, choose Direct Internet Access (DIA) Sites.

  3. In the Manage DIA screen, click Attach DIA Sites. The Attach DIA Sites popup window displays all sites in your overlay network with available sites highlighted. For a site to be available, all devices at that site must be running in vManage mode.

  4. In the Available Sites pane, select a site to attach and click the right arrow. To remove a site, select it in the Selected Sites pane and click the left arrow.

  5. If you do not specify interfaces for Cloud OnRamp for SaaS to use, the system will select a NAT-enabled physical interface from VPN 0. If you would like to specify GRE interfaces for Cloud OnRamp for SaaS to use:

    1. Click the link, Add interfaces to selected sites (optional), located in the bottom right corner of the window.

    2. In the Select Interfaces drop-down, choose GRE interfaces to add.

    3. Click Save Changes.

  6. Click Attach. vManage NMS pushes the feature template configuration to the devices. The Task View window displays a Validation Success message.

  7. To return to the Cloud OnRamp for SaaS Dashboard, choose Configuration > Cloud onRamp for SaaS.

To edit Cloud onRamp interfaces on DIA sites:

  1. Select the sites you want to edit and click Edit DIA Sites.

  2. In the Edit Interfaces of Selected Sites screen, select a site to edit.

    • To add interfaces, click the Interfaces field to select available interfaces.

    • To remove an interface, click the X beside its name.

  3. Click Save Changes to push the new template to the Cisco IOS XE SD-WAN device Cisco vEdge devices.

You have now completed configuring the Cloud OnRamp for SaaS. To return to the Cloud OnRamp for SaaS Dashboard, choose the Configuration > Cloud onRamp for SaaS screen.

Monitor Performance of Cloud OnRamp for SaaS

View Application Performance

In vManage NMS, select the Configuration > Cloud OnRamp for SaaS screen. The Cloud OnRamp for SaaS Dashboard displays the performance of each cloud application in a separate pane.

Each application pane displays the number of Cisco IOS XE SD-WAN deviceCisco vEdge devices accessing the application and the quality of the connection:

  • The bottom status bar displays green for devices experiencing good quality.

  • The middle status bar displays yellow for devices experiencing average quality.

  • The top status bar displays red for devices experiencing bad quality.

The number to the right of each status bar indicates how many devices are experiencing that quality of connection.

View Application Details

  1. In vManage NMS, choose the Configuration > Cloud OnRamp for SaaS screen. The Cloud OnRamp for SaaS Dashboard displays each cloud application in a separate pane.

  2. Click in an application's pane. vManage NMS displays a list of sites accessing the application.

  3. Click a graph icon in the vQoE Score column to display vQoE history for that site:

    • Click a predefined or custom time period for which to display data.

    • Hover over a point on the chart to display vQoE details for that point in time.

Cloud OnRamp for IaaS

Configure Cloud OnRamp for IaaS for AWS

Configure Cloud OnRamp for IaaS for AWS

To configure Cloud OnRamp for IaaS for AWS, you create AWS transit VPCs, each of which consists of up to four pairs of Cisco vEdge deviceCisco IOS XE SD-WAN devices. You then map the transit virtual private clouds (VPC)s to host VPCs that already exist in the AWS cloud.

  • Transit VPCs provide the connection between the Cisco overlay network and the cloud-based applications running on host VPCs. Each transit VPC consists of up to four pairs of cloud routers that reside in their own VPC. Multiple routers are used to provide redundancy for the connection between the overlay network and cloud-based applications. On each of these two cloud routers, the transport VPN (VPN 0) connects to a branch router, and the service-side VPNs (any VPN except for VPN 0 and VPN 512) connect to applications and application providers in the public cloud.

  • Cloud OnRamp supports auto-scale for AWS. To use auto-scale, ensure that you associate two to four pairs of cloud routers to a transit VPC. Each of the devices that are associated with the transit VPC for auto-scale should have a device template attached to it.

  • Host VPCs are virtual private clouds in which your cloud-based applications reside. When a transit VPC connects to an application or application provider, it is simply connecting to a host VPC.

  • All host VPCs can belong to the same account, or each host VPC can belong to a different account. A host that belongs one account can be mapped to a transit VPC that belongs to a completely different account. You configure cloud instances by using a configuration wizard.

  1. In vManage NMS, select the Configuration > Cloud onRamp for IaaS screen.

  2. Click Add New Cloud Instance.

  3. In the Add Cloud Instance – log in to a Cloud Server popup:

    1. In the Cloud drop-down, select the Amazon Web Services radio button.

    2. Click IAM Role or Key to log in to the cloud server. It is recommended that you use IAM Role.

    3. If you select IAM Role:

      1. In the Role ARN field, enter the role ARN of the IAM role.

      2. In the External ID field, enter external ID created for the role ARN. It is recommended that the external ID include 10 to 20 characters in random order. To authenticate to the vManage NMS using an IAM role, vManage NMS must be hosted by Cisco on AWS and have the following attributes:

        • Trusts the AWS account, 200235630647, that hosts the vManage NMS.

        • Have all permissions for EC2 and VPC resources.

        • A default timeout of at least one hour.

        If vManage NMS is not hosted by Cisco on AWS, assign an IAM role with permissions to AssumeRole to the vManage server running the Cloud OnRamp process. Refer to the AWS documentation for details.

    4. If you select Key:

      1. In the API Key field, enter your Amazon API key.

      2. In the Secret Key field, enter the password associated with the API key.

  4. Click Login to log in to the cloud server.

    The cloud instance configuration wizard opens. This wizard consists of three screens that you use to select a region and discover host VPCs, add transit VPC, and map host VPCs to transit VPCs. A graphic on the right side of each wizard screen illustrates the steps in the cloud instance configuration process. The steps that are not yet completed are shown in light gray. The current step is highlighted within a blue box. Completed steps are indicated with a green checkmark and are shown in light orange.

  5. Select a region:

    1. In the Choose Region drop-down, choose a geographical region.

    2. Click Save and Finish to create a transit VPC or optionally click Proceed to Discovery and Mapping to continue with the wizard.

  6. Add a transit VPC:

    1. In the Transit VPC Name field, type a name for the transit VPC.

      The name can be up to 128 characters and can contain only uppercase and lowercase letters, the digits 0 through 9, hyphens (–), and underscores (_). It cannot contain spaces or any other characters.

    2. Under Device Information, enter information about the transit VPC:

      1. In the WAN Edge Version drop-down, select the software version of the cloud router to run on the transit VPC.

      2. In the Size of Transit WAN Edge drop-down, choose how much memory and how many CPUs to use for each of the cloud routers that run on the transit VPC.

      3. In the Max. Host VPCs per Device Pair field, select the maximum number of host VPCs that can be mapped to each device pair for the transit VPC. Valid values are 1 through 32.

      4. In the Device Pair 1# fields, select the serial numbers of each device in the pair. To remove a device serial number, click the X that appears in a field.

        The devices that appear in this field have been associated with a configuration template and support the WAN Edge Version that you selected.

      5. To add additional device pairs, click .

        To remove a device pair, click .

        A transit VPC can be associated with one to four device pairs. To enable the Cloud onRamp auto-scale feature for AWS, you must associate at least two device pairs with the transit VPC.

      6. Click Save and Finish to complete the transit VPC configuration or optionally click Proceed to Discovery and Mapping to continue with the wizard.

      7. Click Advanced if you wish to enter more specific configuration options:

        1. In the Transit VPC CIDR field, enter a custom CIDR that has a network mask in the range of 16 to 25. If you choose to leave this field empty, the Transit VPC is created with a default CIDR of 10.0.0.0/16.

        2. In the SSH PEM Key drop-down, select a PEM key pair to log in to an instance. Note that the key pairs are region-specific. Refer to the AWS documentation for instructions on creating key pairs.

      8. Click Save and Finish to complete the transit VPC configuration, or optionally click Proceed to Discovery and Mapping to continue with the wizard.

      9. Select hosts to discover:

        1. In the Select an account to discover field, select a host to map to this transit VPC.

        2. Click Discover Host VPCs.

        3. In the table that displays, choose one or more hosts to map to this transit VPC.

          You can use the search field and options to display only host VPCs that mention specific search criteria.

          You can click the Refresh icon to update the table with current information.

          You can click the Show Table Columns icon to specify which columns display in the table.

        4. Click Next.

  7. Map the host VPCs to transit VPCs:

    1. In the table of host VPCs, select the desired host VPCs.

    2. Click Map VPCs. The Map Host VPCs popup opens.

    3. In the Transit VPC drop-down, select the transit VPC to map to the host VPCs.

    4. In the VPN drop-down, select the VPN in the overlay network in which to place the mapping.

    5. Enable the Route Propagation option if you want vManage to automatically propagate routes to the host VPC routes table.

    6. Click Map VPCs.

    7. Click Save and Complete.

In the VPN feature configuration template for VPN 0, when configuring the two cloud routers that form the transit VPC, ensure that the color you assign to the tunnel interface is a public color, not a private color. Public colors are 3g, biz-internet, blue, bronze, custom1, custom2, custom3, default, gold, green, lte, metro-ethernet, mpls, public-internet, red, and silver.

Display Host VPCs

  1. In the Cloud OnRamp Dashboard, click the pane for the desired VPC. The Host VPCs/Transit VPCs screen opens, and Host VPCs is selected by default. In the bar below this, Mapped Host VPCs is selected by default, and the table on the screen lists the mapping between host and transit VPCs, the state of the transit VPC, and the VPN ID.

  2. To list unmapped host VPCs, click Unmapped Host VPCs. Then click Discover Host VPCs.

  3. To display the transit VPCs, click Transit VPCs.

Map Host VPCs to a Transit VPC

  1. In the Cloud OnRamp Dashboard, click the pane for the desired VPC. The Host VPCs/Transit VPCs screen opens.

  2. Click Un-Mapped Host VPCs.

  3. Click Discover Host VPCs.

  4. From the list of discovered host VPCs, select the desired host VPCs

  5. Click Map VPCs. The Map Host VPCs popup opens.

  6. In the Transit VPC drop-down, choose the desired transit VPC.

  7. In the VPN drop-down, choose the VPN in the overlay network in which to place the mapping.

  8. Click Map VPCs.

Unmap Host VPCs

  1. In the Cloud OnRamp Dashboard, click the pane for the desired VPC. The Host VPCs/Transit VPCs screen opens.

  2. Click Mapped Host VPCs.

  3. From the list of VPCs, select the desired host VPCs.

  4. Click Unmap VPCs.

  5. Click OK to confirm the unmapping.

Unmapping host VPCs deletes all VPN connections to the VPN gateway in the host VPC, and then deletes the VPN gateway. When you make additional VPN connections to a mapped host VPC, they will be terminated as part of the unmapping process.

Display Transit VPCs

  1. In the Cloud OnRamp Dashboard, click the pane for the desired VPC. The Host VPCs/Transit VPCs screen opens, and Host VPCs is selected by default.

  2. Click Transit VPCs.

The table at the bottom of the screen lists the transit VPCs.

Add Transit VPC

  1. In the Cloud OnRamp Dashboard, click the pane for the desired VPC. The Host VPCs/Transit VPCs screen opens, and Host VPCs is selected by default.

  2. Click Transit VPCs.

  3. Click Add Transit VPC.

    To add a transit VPC, perform operations from step 6 of Configure Cloud OnRamp for IaaS for AWS.

Delete Device Pair

The device pair must be offline.

  1. In the Cloud OnRamp Dashboard,

  2. Click a device pair ID.

  3. Verify that the status of the device pair is offline.

  4. To descale the device pairs, click the trash can icon in the Action column or click the Trigger Autoscale option.

Delete Transit VPC

Prerequisite: Delete the device pairs that are associated with the transit VPC.


Note

To delete the last pair of online device pairs, you must delete a transit VPC.


  1. In the Cloud OnRamp Dashboard, click the pane for the desired VPC. The Host VPCs/Transit VPCs screen opens, and Host VPCs is selected by default.

  2. Click Host VPCs.

  3. Select all host VPCs, and click Unmap VPCs.

    Ensure that all host mappings with transit VPCs are unmapped.

  4. Click OK to confirm the unmapping.

  5. Click Transit VPCs.

  6. Click the trash icon to the left of the row for the transit VPC.


    Note

    The trash icon is not available for the last device pair of transit VPC. Hence, to delete the last device pair, click Delete Transit drop-down list at the right corner. The trash icon is only available from the second device pair onwards.


  7. Click OK to confirm.

Add Device Pairs

  1. Click Add Device Pair.

    Ensure that the devices you are adding are already associated with a device template.

  2. In the box, select a device pair.

  3. Click the Add icon to add more device pairs.

    You can add up to a total of four device pairs to the transit VPC.

  4. Click Save.

History of Device Pairs for Transit VPCs

To display the Transit VPC Connection History page with all its corresponding events, click History for a device pair.

In this view, by default, a histogram of events that have occurred in the previous one hour is displayed and a table of all events for the selected transit VPC. The table lists all the events generated in the transit VPC. The events can be one of the following:

  • Device Pair Added

  • Device Pair Spun Up

  • Device Pair Spun Down

  • Device Pair Removed

  • Host Vpc Mapped

  • Host Vpc Unmapped

  • Host Vpc Moved

  • Transit Vpc Created

  • Transit Vpc Removed

Edit Transit VPC

You can change the maximum number of host VPCs that can be mapped to a device pair.

  1. Click Edit Transit Details. Provide a value for the maximum number of host VPCs per device pair to which the transit VPC can be mapped.

  2. Click OK.

This operation can trigger auto-scale.

Configure Cloud onRamp for IaaS for Azure

To configure Cloud onRamp for IaaS for Azure, you create Azure transit VNets, each of which consist of a pair of routers. You then map the host vNets to transit VNets that already exist in the Azure cloud. All VNets reside in the same resource group.

  • Transit VNets provide the connection between the overlay network and the cloud-based applications running on host VNet. Each transit VNet consists of two routers that reside in their own VNet. Two routers are used to provide redundancy for the connection between the overlay network and cloud-based applications. On each of these two cloud routers, the transport VPN (VPN 0) connects to a branch router, and the service-side VPNs (any VPN except for VPN 0 and VPN 512) connect to applications and application providers in the public cloud.

  • Host VNets are virtual private clouds in which your cloud-based applications reside. When a transit VNet connects to an application or application provider, it is simply connecting to a host VNet.

In the Cloud onRamp configuration process, you map one or more host VPCs or host VNets to a single transit VPC or transit VNet. In doing this, you are configuring the cloud-based applications that branch users are able to access.

The mapping process establishes IPsec and BGP connections between the transit VPC or transit VNet and each host VPC or host VNet. The IPsec tunnel that connects the transit and host VPC or VNet runs IKE to provide security for the connection. For AWS, the IPsec tunnel runs IKE Version 1. For Azure, the IPsec tunnel runs IKE version 2. The BGP connection that is established over the secure IPsec tunnel allows the transit and host VPC or VNet to exchange routes so that the transit VPC or VNet can direct traffic from the branch to the proper host VPC or VNet, and hence to the proper cloud-based application.

During the mapping process, the IPsec tunnels and BGP peering sessions are configured and established automatically. After you establish the mappings, you can view the IPsec and BGP configurations, in the VPN Interface IPsec and BGP feature configuration templates, respectively, and you can modify them as necessary. You can configure Cloud OnRamp for IaaS for Azure by using the configuration wizard:

Create a Cloud Instance

  1. In vManage NMS, select the Configuration > Cloud onRamp for IaaS screen.

  2. Click Add New Cloud Instance:
  3. In the Add Cloud Instance–Log In to a Cloud Server popup:

    1. In the Cloud drop-down, select Azure as the cloud type.

    2. To give vManage programmatic access to your Azure Subscription, log in to the cloud server:

      1. In the Subscription ID field, enter the ID of the Azure subscription you want to use as part of the Cloud OnRamp workflow.

      2. In the Client ID field, enter the ID of an existing application or create a new application in Azure. To create a new application, go to your Azure Active Directory > App Registrations > New Application Registration.

      3. In the Tenant ID field, enter the ID of your Azure account. To find the tenant ID, go to your Azure Active Directory and click Properties.

      4. In the Secret Key field, enter the password associated with the client ID.

  4. Click Log In. The cloud instance configuration wizard opens.

    This wizard consists of three screens that you use to select a location and discover host VNets, add transit VNet, and map host VNets to transit VNets. A graphic on the right side of each wizard screen illustrates the steps in the cloud instance configuration process. Steps not yet completed are shown in light gray. The current step is highlighted within a blue box. Completed steps are indicated with a green checkmark and are shown in light orange.

  5. Select a location and discover host VNets:

    1. In the Choose Location drop-down, select a geographical location.

    2. Click Save and Finish to create a transit VNet or optionally click Proceed to Discovery and Mapping to continue with the wizard.

  6. Add a transit VNet:

    1. In the Transit VNet Name field, type a name for the transit VNet.

      The name can be up to 32 characters and can contain only uppercase and lowercase letters, the digits 0 through 9, hyphens (–), and underscores (_). It cannot contain spaces or any other characters.

    2. Under Device Information, enter information about the transit VNet:

      1. In the WAN Edge Version drop-down, select the software version to run on the VNet transit. The drop-down lists the published versions of the Viptela software in the Azure marketplace.

      2. In the Size of Transit VNet drop-down, select how much memory and how many CPUs to create on the VNet transit.

      3. In the Device 1 drop-down, select the serial number to use.

      4. In the Device 2 drop-down, select the serial number to use.

      5. To add additional device pairs, click .

        To remove a device pair, click .

      6. Click Save and Finish to complete the transit VNet configuration or optionally click Proceed to Discovery and Mapping to continue with the wizard.

      7. Click Advanced if you wish to enter more specific configuration options.

      8. In the Transit VNet CIDR field, enter a custom CIDR that has a network mask in the range of 16 to 25. If you choose to leave this field empty, the Transit VPC is created with a default CIDR of 10.0.0.0/16.

    3. Click Save and Finish to complete the transit VPC configuration, or optionally click Proceed to Discovery and Mapping to continue with the wizard.

  7. Map the host VNets to transit VNets:

    1. In the table of host VNets, select the desired host VNet.

    2. Click Map VNets. The Map Host VNets popup opens.

    3. In the Transit VNet drop-down, choose the transit VNet to map to the host VNets.

    4. In the VPN drop-down, choose the VPN in the overlay network in which to place the mapping.

    5. In the IPSec Tunnel CIDR section, enter two pairs of interface IP addresses for each Cisco vEdge device and a pair of loopback IP adresses to configure IPSec tunnels to reach the Azure virtual network transit. The IP addresses must be network addresses in the /30 subnet, be unique across the overlay network, and not be a part of the host VNet CIDR. If they are part of the host VNet CIDR, Azure will return an error while attempting to create VPN connections to the transit VNet.

      In the IPSec Tunnel CIDR section, enter two pairs of interface IP addresses for each Cisco CSR 1000V to configure IPSec tunnels to reach the Azure virtual network transit. The IP addresses must be network addresses in the /30 subnet, be unique across the overlay network, and not be a part of the host VNet CIDR. If they are part of the host VNet CIDR, Azure will return an error while attempting to create VPN connections to the transit VNet.

      As Azure supports single Virtual Private Gateway (VGW) configuration over IPSec tunnels with redundancy provided over a single tunnel, Cloud OnRamp for IaaS supports two VGWs for redundancy. During a planned maintenance or an unplanned event of a VGW, the IPSec tunnel from the VGW to the cloud routers get disconnected. This loss of connectivity causes the cloud routers lose BGP peering with vManage over IPSec tunnel. To enable BGP peering with cloud routers rather than IP address of the IPSec tunnel, provide the loopback addresses for each cloud router.


      Note

      The loopback option for BGP peering supports single and multiple Virtual Gateway or Customer Gateway configuration or both on Azure cloud. This option applies only to the new host VNets mapped to transit VNets and not on the existing VNets.


    6. In the Azure Information section:

      1. In the BGP ASN field, enter the ASN that will be configured on the Azure Virtual Network Gateway that is spun up within the host VNet. Use an ASN that is not part of an existing configuration on Azure. For acceptable ASN values, refer to Azure documentation.

      2. In the Host VNet Gateway Subnet field, enter a host VNet subnet in which the Virtual Network Gateway can reside. It is recommended you use a /28 subnet or higher. You must not provide a subnet that is already created in the VNet.

    7. Click Map VNets.

    8. Click Save and Complete.

In the VPN feature configuration template for VPN 0, when configuring the two cloud routers that form the transit VNet, ensure that the color you assign to the tunnel interface is a public color, not a private color. Public colors are 3g, biz-internet, blue, bronze, custom1, custom2, custom3, default, gold, green, lte, metro-ethernet, mpls, public-internet, red, and silver.

Display Host VNets

  1. In the Cloud onRamp Dashboard, click the pane for the desired VNet. The Host VNets/Transit VNets screen opens, and Host VNets is selected by default. In the bar below this, Mapped Host VNets is selected by default, and the table on the screen lists the mapping between host and transit VNets, the state of the transit VNet, and the VPN ID.

  2. To list unmapped host VNets, click Unmapped Host VNets.

  3. To display the transit  VNets, click Transit VNets.

Map Host VNets to an Existing Transit VNet

  1. In the Cloud onRamp Dashboard, click the pane for the desired location of the required account. The Host VNets/Transit VNets screen opens.

  2. Click Unmapped Host VNets.

  3. Click Discover Host VNets.

  4. From the list of discovered host VNets, select the desired host VNet.

  5. Click Map VNets. The Map Host VNets popup opens.

  6. In the Transit VNet drop-down, select the desired transit VNet.

  7. In the VPN drop-down, choose the VPN in the overlay network in which to place the mapping.

  8. Click Map VNets.

Unmap Host VNets

  1. In the Cloud onRamp Dashboard, click the pane for the desired VNet. The Host VNets/Transit VNets screen opens.

  2. Click Mapped Host VNets.

  3. From the list of VNets, select the desired host VNets. It is recommended that you unmap one vNet at a time. If you want to unmap multiple vNets, do not select more than three in a single unmapping operation.

  4. Click Unmap VNets.

  5. Click OK to confirm the unmapping.

Display Transit VNets

  1. In the Cloud onRamp Dashboard, click the pane for the desired VNets. The Host VNets/Transit VNets screen opens, and Host VNets is selected by default.

  2. Click Transit VNets.

The table at the bottom of the screen lists the transit VNets.

Add a Transit VNet

  1. In the Cloud onRamp Dashboard, click the pane for the desired VNet. The Host VNets/Transit VNets screen opens, and Host VNets is selected by default.

  2. Click Transit VNets.

  3. Click Add Transit VNet.

Delete a Transit VNet

  1. In the Cloud onRamp Dashboard, click the pane for the desired VNet. The Host VNets/Transit VNets screen opens, and Host VNets is selected by default.

  2. Click Mapped Host VNets.

  3. Select the desired host VNet, and click Unmap VNets.

  4. Click OK to confirm the unmapping.

  5. Click Transit VNets.

  6. Click the trash icon to the left of the row for the transit VNet.

  7. Click OK to confirm.

Troubleshoot Cloud onRamp for IaaS

This section describes how to troubleshoot common problems with Cloud onRamp for IaaS.

Two vEdge Routers are Not Available

In vManage NMS, when you select the Configuration > Cloud onRamp for IaaS screen, and click Add New Cloud instance, you see an error message indicating that two vEdge routers are not available.

Resolve the Problem

The vManage NMS does not have two vEdge Cloud routers that are running licensed Cisco SD-WAN software. Contact your operations team so that they can create the necessary vEdge Cloud routers.

If the vEdge routers are present and the error message persists, the two vEdge Cloud routers are not attached to configuration templates. Attach these templates in the vManage Configuration > Templates Device screen. Select the vEdge Cloud router, and then select Attach Devices from the More Actions icon to the right of the row.

Two Cisco CSR 1000V Routers are Not Available

Problem Statement

In vManage NMS, when you select the Configuration > Cloud OnRamp screen and click Add New Cloud instance, you see an error message indicating that two Cisco CSR 1000V routers are not available.

Resolve the Problem

The vManage NMS does not have two Cisco CSR 1000V routers that are running licensed Cisco SD-WAN software. Contact your operations team so that they can create the necessary Cisco CSR 1000V routers.

If the Cisco CSR 1000V routers are present and the error message persists, the two Cisco CSR 1000V routers are not attached to configuration templates. Attach these templates in the vManage Configuration > Templates Device screen. Select the Cisco CSR 1000V router, and then select Attach Devices from the More Actions icon to the right of the row.

Required Permissions for API

Problem Statement

When you enter your API keys, you get an error message indicating that this user does not have the required permissions.

Resolve the Problem

Ensure that the vManage server can reach the internet and has a DNS server configured so that it can reach AWS or Azure. To configure a DNS server, in the vManage VPN feature configuration template, enter the IP address of a DNS server, and then reattach the configuration template to the vManage server.

For AWS, check the API keys belonging to your AWS account. If you think you have the wrong keys, generate another pair of keys.

For AWS, if you are entering the correct keys and the error message persists, the keys do not have the required permissions. Check the user permissions associated with the key. Give the user the necessary permissions to create and edit VPCs and EC2 instances.

If the error message persists, check the time of the vManage server to ensure that it is set to the current time. If it is not, configure the vManage server’s time to point to the Google NTP server. In the vManage NTP feature configuration template, enter a hostname of time.google.com, time2.google.com, time3.google.com, or time4.google.com. Then reattach the configuration template to the vManage server.

No vEdge Software Versions Appear in the Drop-Down

Problem Statement

When you are trying to configure transit VPC parameters for the transit VPC, no vEdge Cloud software versions are listed in the drop-down.

Resolve the Problem

Ensure that your customer account has subscribed to the Cisco SD-WAN vEdge Cloud routers.

Ensure that the vEdge cloud router is running software Release 17.2.0 or later.

No Cisco CSR 1000V Software Versions Appear in the Drop-Down

Problem Statement

When you are trying to configure transit VPC parameters for the transit VPC, no Cisco CSR 1000V software versions are listed in the drop-down.

Resolve the Problem

Ensure that your customer account has subscribed to the Cisco SD-WAN Cisco CSR 1000V routers.

Ensure that the Cisco CSR 1000V router is running software Release 19.2.0 or later.

No VPNs Appear in Drop-Down

Problem Statement

When you select the host VPCs or VNets to map, no VPNs are listed in the drop-down.

Resolve the Problem

This problem occurs when the device configuration template attached to the cloud router includes no service-side VPNs. Service-side VPNs (VPNs other than VPN 0 and VPN 512) are required to configure the IPsec connection between the two cloud routers selected for the transit and host VPCs or VNets.

This problem can also occur if the two cloud routers selected for the transit VPC or VNet have no overlapping service-side VPNs. Because the two vEdge routers form and active–active pair, the same service-side VPNs must be configured on both of them.

This problem can also occur if the two cloud routers selected for the transit VPC or VNet have no overlapping service-side VPNs. Because the two Cisco CSR 1000V routers form and active–active pair, the same service-side VPNs must be configured on both of them.

To configure service-side VPNs, in the vManage VPN feature configuration template, configure at least one service-side VPN. Ensure that at least one of the service-side VPNs is the same on both routers. Then reattach the configuration template to the routers.

Cloud onRamp Task Fails

Problem Statement

After you have completed mapping the host VPCs to the transit VPCs, or host VNets to transit VNets, the Cloud OnRamp tasks fails.

Resolve the Problem

Review the displayed task information that is displayed on the screen to determine why the task failed. If the errors are related to AWS or Azure resources, ensure that all required resources are in place.

Cloud onRamp Task Succeeds, But Routers Are Down

Problem Statement

The Cloud OnRamp task was successful, but the cloud routers are still in the Down state.

Resolve the Problem

Check the configuration templates:

  • Check that all portions of the cloud router configuration, including policies, are valid and correct. If the configuration are invalid, they are not applied to the router, so the router never comes up.

  • Check that the configuration for the vBond orchestrator is correct. If the DNS name or IP address configured of the vBond orchestrator is wrong, the vEdge router is unable to reach it and hence is unable to join the overlay network.

    Check that the configuration for the vBond orchestrator is correct. If the DNS name or IP address configured of the vBond orchestrator is wrong, the Cisco CSR 1000V router is unable to reach it and hence is unable to join the overlay network.

After you have determined what the configuration issues are:

  1. Delete the Cloud OnRamp components:

    1. Unmap the host VPNs and the transit VPCs or VNets.

    2. Delete the transit vEdge routers.

      Delete the transit Cisco CSR 1000V routers.

  2. Edit the configuration templates and reattach them to the cloud routers.

  3. Repeat the Cloud OnRamp configuration process.

Desired Routes Not Exchanged

Problem Statement

The Cloud OnRamp configuration workflow is successful, the Cloud vEdge routers are up and running, but the desired routes are not getting exchanged.

The Cloud OnRamp configuration workflow is successful, the Cisco CSR 1000V routers are up and running, but the desired routes are not getting exchanged.

Resolve the Problem

In vManage NMS, check the BGP configuration on the transit cloud routers. During the mapping process when you configure Cloud OnRamp service, BGP is configured to advertise the network 0.0.0.0/0. Make sure that the service-side VPN contains an IP route that points to 0.0.0.0/0. If necessary, add a static route in the VPN feature configuration template, and then reattach the configuration to the two cloud routers that you selected for the transit VPC or VNet.

On AWS, go to the host VPC and check its route table. In the route table, click the option Enable route propagation to ensure that the VPC receives the routes.

End-to-End Ping Is Unsuccessful

Problem Statement

Routing is working properly, but an end-to-end ping is not working.

Resolve the Problem

On AWS, check the security group rules of the host VPC. The security group rules must allow the source IP address range subnets of the on-premises or branch-side devices, to allow traffic from the branch to reach AWS.

Manage Clusters

Use the Cloud OnRamp for Colocation screen to configure a Cloud OnRamp for Colocation cluster and service groups that can be used with the cluster.

The three steps to configure Cloud OnRamp for Colocation devices are:

A Cloud OnRamp for Colocation cluster is a collection of two to eight CSP devices and two switches. The supported cluster templates are:

  • Small cluster—2 Catalyst 9500+2 CSP

  • Medium Cluster—2 Catalyst 9500+4 CSP

  • Large Cluster—2 Catalyst 9500+6 CSP

  • X-Large Cluster—2 Catalyst 9500+8 CSP


Note

Ensure that you add a minimum of two CSP devices one-by-one to a cluster. You can keep adding three, four, and so on, up to a maximum of eight CSP devices. You can edit a Day-N configuration of any cluster, and add pairs of CSP devices to each site up to a maximum of eight CSP devices.


Ensure that all devices that you bring into a cluster have the same software version.

Following are the cluster states:

  • Incomplete—When a cluster is created from the vManage interface without providing the minimum requirement of two CSP devices and two switches. Also, cluster activation is not yet triggered.

  • Inactive—When a cluster is created from the vManage interface after providing the minimum requirement of two CSP devices and two Switches, and cluster activation is not yet triggered.

  • Init—When the cluster activation is triggered from the vManage interface and Day-0 configuration push to the end devices is pending.

  • Inprogress—When one of the CSP devices within a cluster comes up with control connections, the cluster moves to this state.

  • Pending—When the Day-0 configuration push is pending or VNF install is pending.

  • Active—When a cluster is activated successfully and NCS has pushed the configuration to the end device.

  • Failure—If Cisco Colo Manager has not been brought up or if any of the CSP devices that failed to receive an UP event.

A cluster transitioning to an active state or failure state is as follows:

  • Inactive > Init > Inprogress > Pending > Active—Success

  • Inactive > Init > Inprogress > Pending > Failure—Failure

Provision and Configure Cluster

This topic describes about activating a cluster that enable deployment of service chains.

To provision and configure a cluster, perform the following:

  1. Create a cluster by adding two to eight CSP devices and two switches.

    CSP devices can be added to a cluster and configured through vManage before bringing them up. You can configure CSP devices and Catalyst 9K switches with the global features such as, AAA, default user (admin) password, NTP, syslog, and more.

  2. Configure cluster parameters including IP address pool input such as, service chain VLAN pool, VNF management IP address pool, management gateway, VNF data plane IP pool, and system IP address pool.

  3. Configure a service group.

    A service group consists of one or more service chains.


    Note

    You can add a service chain by selecting one of the predefined or validated service chain template, or create a custom one. For each service chain, configure input and output VLAN handoff and service chain throughput or bandwidth, as mentioned.


  4. Configure each service chain by selecting each VNF from the service template. Choose a VNF image that is already uploaded to the VNF repository to bring up the VM along with required resources (CPU, memory, and disk). Provide the following information for each VNF in a service chain:

    • The specific VM instance behavior such as, HA, shared VM can be shared across service chains.

    • Day-0 configuration values for tokenized keys and not part of the VLAN pool, management IP address, or data HA IP address. The first and last VMs handoff-related information such as peering IP and autonomous system values must be provided. The internal parameters of a service chain are automatically filled by the orchestrator from the VLAN or Management or Data Plane IP address pool provided.

  5. Add the required number of service chains for each service group and create the required number of service groups for a cluster.

  6. To attach a cluster to a site or location, activate the cluster after all configuration has been completed.

    You can watch the cluster status change from in progress to active or error.

To edit a cluster, perform the following:
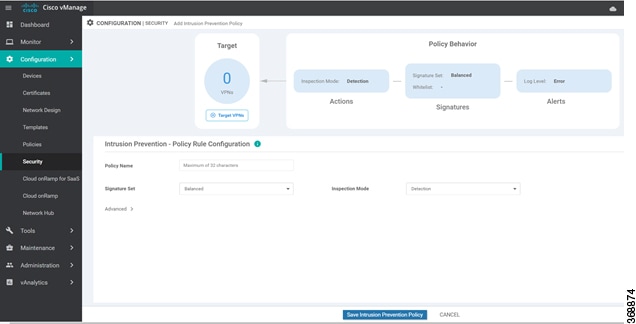
  1. Modify the activated cluster by adding or deleting service groups or service chains.

  2. Modify the global features configuration such as, AAA, system setting, and more.

You can predesign a service group and service chain before creating a cluster. They can be attached with a cluster after the cluster is active.

Create and Activate Clusters

This topic provides the steps on how you can form a cluster with CSP devices, Catalyst 9500-40X switches as single unit, and provision the cluster with cluster-specific configuration.

Before you begin

Procedure


Step 1

In Cisco vManage, choose Configuration > Cloud OnRamp for Colocation. In the screen that is displayed, perform the following tasks:

  1. In the Cluster tab, click the Configure & Provision Cluster button.

  2. Provide the following information:

    Table 51. Cluster Information

    Field

    Description

    Cluster Name

    The cluster name can contain 128 alphanumeric characters.

    Description

    The description can contain 2048 alphanumeric characters.

    Site ID

    Specifies overlay network site identifier. Ensure that value you provide for Site ID is in line with the organizations Site ID structure for other overlay elements.

    Location

    The location can contain 128 alphanumeric characters.

  3. To configure a Catalyst 9500-40X switch, click a switch icon in the Switches box. The Edit Switch dialog box is displayed. Provide a name and choose the switch serial number. Click Save.

    The Catalyst 9500-40X switch name can contain128 alphanumeric characters.

    The switch serial numbers that you view are obtained and integrated with Cisco vManage through PNP. These serial numbers are assigned to switches when you order Cisco SD-WAN Cloud onRamp for CoLocation solution PID on CCW and buy the Catalyst 9500-40X switches.

    Note 

    You can keep the serial number field blank for switches and CSP devices, design your cluster, and then edit the cluster later to include the serial number after you buy the devices. However, you cannot activate a cluster, where the serial number of CSP devices are not available.

  4. To configure another Catalyst 9500-40X switch, repeat step c.

  5. To configure a CSP devices, click a CSP icon in the Appliances box. The Edit CSP dialog box is displayed. Provide a hostname and choose the CSP serial number. Click Save.

    The hostname can contain 128 alphanumeric characters.

  6. Configure OTP for the CSP devices to bring up the devices. See Bring Up Cloud Services Platform in Cisco SD-WAN Cloud OnRamp for Colocation Solution Guide.

  7. To add remaining CSP devices, repeat step e.

    After you design a cluster, on the configuration page, an ellipsis enclosed in a yellow circle appears next to the device where serial number has not been assigned for a device.
  8. To edit a CSP device configuration, click a CSP icon, and follow the process that is mentioned in substep e.

  9. For mandatory and optional global parameters to be set for a cluster, on the Configuration page, click and choose from Cluster Settings drop-down. Enter values for the cluster settings parameters and click Save. See Cluster Settings.

  10. Click Save Cluster.

    You can view the created cluster in a table.
Step 2

To activate a cluster, on the Cluster tab,

  1. Click a cluster.

  2. Click the More Actions icon to the right of the row.

  3. Click Activate against the cluster.


When you activate the cluster, vManage establishes a DTLS tunnel with CSP devices in the cluster where it connects with the switches through Cisco Colo Manager. After the DTLS connection is running, a CSP device in the cluster is chosen to host the Cisco Colo Manager. Cisco Colo Manager is brought up and vManage sends global parameter configurations to the CSP devices and Catalyst 9500-40X switches. For information about cluster activation progress, see Progress of Cluster Activation.

Progress of Cluster Activation

Table 52. Feature History

Feature Name

Release Information

Description

Monitor Cluster Activation Progress

Cisco IOS XE Release Amsterdam 17.2.1r

Cisco SD-WAN Release 20.1.1

This feature displays the cluster activation progress at each step and shows any failures that may occur during the process. The process of activating a cluster takes approximately 30 minutes or longer, and you can monitor the progress using the vManage task view window and events from the Monitoring page.

To check cluster activation status after activating a cluster, view the progress on the task view window:

Figure 12. Cluster Activation

Perform the following verification steps:

  1. To view cluster state and change the state:

    1. On the Cluster tab of Cloud OnRamp for Colocation screen, if a cluster goes into a "PENDING" state, click the More Actions icon, and click Sync. This action moves a cluster back to an "ACTIVE" state.

    2. To view if a cluster moves back to an "ACTIVE" state, you can view the successful activation on the Cluster tab.
      Figure 13. Cluster Tab
  2. To view the service groups present on CSP devices, click Monitor > Network > Colocation Cluster.

    Choose a cluster and then choose a CSP device as shown in the following image. You can choose and view other CSP devices.

  3. To check if cluster has been activated from a CSP device:

    1. In Cisco vManage, click Configuration > Devices.

    2. View device status of all the CSP devices and ensure that they are in sync with Cisco vManage.

    3. View the state of CSP devices and verify that the certificates are installed for CSP devices.


    Note

    If the state of CSP devices does not show "cert installed" for more than five minutes after CSP activation through OTP, see .


    After cluster has been activated from CSP device, the Cisco Colo Manager (CCM) performs the cluster activation tasks on the Cisco NFVIS host.

  4. To view if CCM is enabled for a CSP device,

    1. In Cisco vManage, click Monitor > Network.

    2. Click Colocation Clusters.

      In the detail part, view if CCM is enabled for specific CSP devices.

  5. To monitor CCM health,

    1. In Cisco vManage, click Monitor > Network.

    2. To view CCM health, from the left pane, click Colo Manager.

    If the Cisco Colo Manager status does not go to "HEALTHY" after "STARTING", see the "Troubleshoot Cisco Colo Manager Issues" topic in the Cisco SD-WAN Cloud OnRamp for Colocation Solution Guide .

    If the status of Cisco Colo Manager goes to "HEALTHY" after "STARTING" but the status of Cisco Colo Manager shows IN-PROGRESS for more than 20 minutes after the switch configurations are already complete, see the "Switch devices are not calling home to PNP or Cisco Colo Manager" topic in the Cisco SD-WAN Cloud OnRamp for Colocation Solution Guide.

Cluster Settings

The cluster settings parameters are:

  • Configure login credentials for the cluster:

    1. In the Cluster Settings drop-down, click Credentials. The Credentials dialog box is displayed. Enter the values for the following fields:

      (Mandatory) Template Name: The template name can be up to 128 characters and can contain only alphanumeric characters.

      (Optional) Description: The description can be up to 2048 characters and can contain only alphanumeric characters.

    2. Click New User.

      Provide name, password, and role of a user.

  • Configure the Resource pool for the cluster:

    In the Cluster Settings drop-down, click Resource Pool. The Resource Pool dialog box is displayed. Enter the values for the following fields:

    (Mandatory) Name: Name of the IP address pool. The name can be up to 128 characters and can contain only alphanumeric characters.

    (Optional) Description: IP address pool description. The description can be up to 2048 characters and can contain only alphanumeric characters.

    (Mandatory) DTLS Tunnel IP: IP addresses to be used for the DTLS tunnel. To enter multiple IP addresses, separate them by commas. To enter a range, separate the IP addresses with a hyphen (for example, 172.16.0.180-172.16.255.190).

    (Mandatory) Service Chain VLAN Pool: Numbers of the VLAN to be used for service chains. To enter multiple numbers, separate them by commas. To enter a numeric range, separate the numbers with a hyphen (for example, 1021-2021).


    Note

    A VLAN range brings up VNFs, so that each circuit has VLAN configured when it comes up. The VLAN pool can only start from 1021 as switch reserves the VLANs until 1021. We recommend you to enter VLAN pools between 1021-2021.


    (Mandatory) VNF Data Plane IP Pool: IP addresses to be used for auto configuring data plane on a VNF interface. To enter multiple IP addresses, separate them by commas. To enter a range, separate the IP addresses with a hyphen (for example, 10.0.0.1-10.0.0.100).

    (Mandatory) VNF Management IP Pool: IP addresses to be used for theVNF. To enter multiple IP addresses, separate them by commas. To enter a range, separate the IP addresses with a hyphen (for example, 192.168.30.99-192.168.30.150).


    Note

    These addresses are IP addresses for secure interfaces.


    (Mandatory) Management Subnet Gateway: IP address of the gateway to the management network. It enables DNS to exit the cluster.

    (Mandatory) Management Mask: Mask value for the failover cluster. For example, /24 and not 255.255.255.0

    (Mandatory) Switch PNP Server IP: IP address of the switch device.


    Note

    The IP address of the switch is automatically picked from the management pool, which is the first IP address. You can change it if a different IP is configured in the DHCP server for the switch.


  • Optionally, configure NTP servers for the cluster:

    1. In the Cluster Settings drop-down, select NTP. The NTP configuration box is displayed. Enter the values for the following fields:

      Template Name: Name of the NTP template. The name can be up to 128 characters and can contain only alphanumeric characters.

      Description: The description can be up to 2048 characters and can contain only alphanumeric characters.

      Preferred server: IP address of the primary NTP server.

      Backup server: IP address of the secondary NTP server.

  • Optionally, configure syslog parameters for the cluster:

    1. In the Cluster Settings drop-down, select Syslog. The System Log configuration box is displayed. Enter the values for the following fields:

      Template Name: Name of the System Log template. The name can be up to 128 characters and can contain only alphanumeric characters.

      Description: The description can be up to 2048 characters and can contain only alphanumeric characters.

      Severity drop-down: Select the severity of syslog messages to be logged.

    2. To configure a syslog server, click New Server.

    3. Type the IP address of a syslog server.

If all global parameters are set through cluster settings, you can verify if the cluster has been activated successfully, as shown.

View Cluster

To view a cluster configuration, perform the following steps:

Procedure


Step 1

In vManage, choose Configuration > Cloud OnRamp for Colocation. The CLOUD ONRAMP FOR COLOCATION Cluster screen appears, and the Configure & Provision Cluster button is highlighted.

Step 2

In the Cluster tab, click a cluster, click the More Actions icon to the right of its row, and click View against the cluster.

The Cluster window opens, displaying the switches and CSP devices in the cluster and showing which cluster settings have been configured.

Step 3

You can only view the global parameters being set, configuration of switches and CSP devices.

Step 4

Click the Cancel button to return to the CLOUD ONRAMP FOR COLOCATION Cluster screen.


Edit Cluster

To modify any existing cluster configuration such as global parameters, perform the following steps:

Procedure


Step 1

In vManage, select Configuration > Cloud OnRamp for Colocation. The CLOUD ONRAMP FOR COLOCATION Cluster screen appears, and the Configure & Provision Cluster button is highlighted.

Step 2

In the Cluster tab, click a cluster, click the More Actions icon to the right of its row, and click Edit against the cluster.

The Cluster window opens, displaying the switches and CSP devices in the cluster and showing which cluster settings have been configured.

Step 3

In the cluster design window, you can modify some of the global parameters. Based on whether a cluster is in active or inactive state, following are the restrictions for editing a cluster:

  1. Inactive state.

    • Edit all global parameters, and the Resource pool parameter.

    • Add more CSP devices (up to eight).

    • Cannot edit the name or serial number of a switch or CSP device. Instead, delete the CSP or switch and add another switch or CSP with a different name and serial number.

    • Delete an entire cluster configuration.

  2. Activate state.

    • Edit all global parameters, except the Resource pool parameter.

      Note 

      The Resource pool parameter cannot be changed when the cluster is activated. However, the only way to change the Resource pool parameter is to delete the cluster and recreate it again with the correct Resource pool parameter.

    • Cannot edit the name or serial number of a switch or CSP device. Instead, delete the CSP or switch and add another switch or CSP with a different name and serial number.

    • Cannot delete a cluster in active state.

Step 4

Click the Save Cluster button.


Remove Cluster

To decommission an entire cluster , perform the following steps:

Procedure


Step 1

In Cisco vManage, in the Configuration > Certificates screen, locate and verify status of devices to be deleted, and click Invalid against the devices.

Step 2

In the Configuration|Ceritificates screen, click Send to Controllers.

Step 3

In vManage, click Configuration > Cloud OnRamp for Colocation. The CLOUD ONRAMP FOR COLOCATION Cluster screen appears, and the Configure & Provision Cluster button is highlighted.

Step 4

In the Cluster tab, locate the cluster that has invalid devices, click the More Actions icon to the right of its row, and click Deactivate against the cluster.

If the cluster is attached to one or more service groups, you are prompted with a message that service chains hosting the VMs are running on this device and whether you can continue with the cluster deletion. However, although you confirm deletion of a cluster, you are not allowed to remove the cluster without detaching the service groups that are hosted on this device. If the cluster is not attached to any service group, you are prompted with a message to confirm the cluster deletion.

Note 

You can delete the cluster, if necessary, or can keep it in deactivated state.

Step 5

To delete the cluster, select Delete.

Step 6

Click the Cancel button to return to the CLOUD ONRAMP FOR COLOCATION Cluster screen without deleting the cluster.

Step 7

To decommission invalid devices, in vManage, click Configuration > Devices.

Step 8

Locate the devices that are in the deactivated cluster, click the More Actions icon to the right of the device row, and click Decommission WAN Edge.

This action provides new tokens to your devices.

Step 9

Reset the devices to the factory default by using the command:

factory-default-reset all

Step 10

Log into NFVIS by using admin as the login name and Admin123# as the default password.

Step 11

Reset switch configuration and reboot switches. See the troubleshooting chapter in Cisco SD-WAN Cloud OnRamp for Colocation Solution Guide.


Reactivate Cluster

To add new CSP devices or when CSP devices are considered for RMA process, perform the following steps:

Procedure


Step 1

In Cisco vManage, in the Configuration > Devices screen, locate the devices that are in the deactivated cluster.

Step 2

Get new token from vManage for the devices.

Step 3

Log into NFVIS by using admin as the login name and Admin123# as the default password.

Step 4

Use the request activate chassis-number chassis-serial-number token token-number command.

Step 5

From vManage, configure the system configuration and then activate the cluster. See Create and Activate Clusters.

If the cluster has been deleted, recreate and then activate it.

Step 6

In Cisco vManage, in the Configuration > Certificates screen, locate, and verify status of devices.

Step 7

To validate the devices, click Valid if it is invalid.

Step 8

In the Configuration|Ceritificates screen, click Send to Controllers.


Create Service Chain in a Service Group

A service group consists of one or more service chains.
Table 53. Feature History

Feature Name

Release Information

Feature Description

Monitor Service Chain Health

Cisco SD-WAN Release 19.2.1

Cisco IOS XE SD-WAN Release 16.12.1b

This feature lets you configure periodic checks on the service chain data path and reports the overall status. To enable service chain health monitoring, NFVIS version 3.12.1 or later should be installed on all CSP devices in a cluster.

Procedure


In vManage, click Configuration > Cloud OnRamp for Colocation. The CLOUD ONRAMP FOR COLOCATION Cluster screen appears, and the Configure & Provision Cluster button is highlighted. In the CLOUD ONRAMP FOR COLCATION Cluster screen, perform the following tasks:

  1. Click the Service Group tab, and then click the Create Service Group button. Provide the service group name and description.

    The service group name can be up to 128 characters and can contain only alphanumeric characters.

    The service group description can be up to 2048 characters and can contain only alphanumeric characters.

  2. Click Add Service Chain.

  3. In the Add Service Chain dialog box, provide the following information:

    Table 54. Add Service Chain Information

    Field

    Description

    Name

    The service chain name can be up to 128 characters and can contain only alphanumeric characters.

    Description

    The service chain description can be up to 2048 characters and can contain only alphanumeric characters.

    Bandwidth

    The service chain bandwidth is in MBPS. The default bandwidth is 10 MB and you can configure a maximum bandwidth of 5G.

    To limit the bandwidth per service chain, the QoS policy is applied on both ingress and egress ports. For more information about QoS policy, see QoS on Service Chains.

    Input Handoff VLANS and Output Handoff VLANS

    The Input VLAN handoff and output VLAN handoff can be comma separated values (10, 20) or a range from 10 through 20.

    The QoS policy is based on the input and output VLAN values and is applied on bidirectional traffic on both ingress and egress ports. For related information, see QoS on Service Chains.

    Monitoring

    A toggle button that allows you to enable or disable service chain health monitoring. The service chain health monitoring is a periodic monitoring service that checks health of a service chain data path and reports the overall service chain health status. By default, the monitoring service is disabled.

    A service chain with subinterfaces such as, SCHM (Service Chain Health Monitoring Service) can only monitor the service chain including the first VLAN from subinterface VLAN list.

    The service chain monitoring reports status based on end-to-end connectivity. Hence, ensure that you take care of the routing and return traffic path, especially with SD-WAN chains for better results.

    Note 
    • Ensure that you provide input and output monitoring IP addresses from input and output handoff subnets respectively. However, if the first and last VNF devices are VPN terminated, you do not need to provide an input and output monitoring IP addresses.

      For example, if the network function isn’t VPN terminated, the input monitoring IP can be 192.0.2.1/24 from the inbound subnet, 192.0.2.0/24. The inbound subnet connects to the first network function and the output monitoring IP can be 203.0.113.11/24 that comes from outbound subnet, 203.0.113.0/24 of the last network function of a service chain.

    • If the first or last VNF firewall in a service chain is in transparent mode, those service chains can’t be monitored.

    Service Chain

    Choose a topology from the service chain drop-down. For a service chain topology, you can choose any of the four validated service chains such as, Router - Firewall - Router, Firewall, Firewall - Router. See the topic "Validated Service Chains" in Cisco SD-WAN Cloud OnRamp Colocation Solution Guide.You can also create a customized service chain. See Create Custom Service Chain.

  4. In the Add Service Chain definition box, click Add.

    Based on the service chain configuration information, a graphical representation of the service group with all the service chains and its VNFs automatically appear in the design view window. A VNF appears with a "V" or "P" around its circumference specifying that it is a virtual network function. It shows all the configured service chains within each service group. A check against the service chain indicates that all configuration information for the service chain has been completed.

    After a cluster is activated, attached with the service group, and monitoring service is enabled for the service chain, when the CSP device is brought up where CCM is running, vManage chooses the same CSP device to start the monitoring service. The monitoring service monitors all service chains periodically in a round robin fashion by setting the monitoring interval to 30 minutes. See Monitor Cloud OnRamp Colocation Clusters.

  5. In the design view window, to configure a VNF, click a VNF in the service chain.

    The Configure VNF dialog box appears.
  6. Configure the VNF with the following information and perform the actions, as appropriate:

    Table 55. VNF Properties of Router and Firewall

    Field

    Mandatory or Optional

    Description

    Image Package

    Mandatory

    Choose a router or firewall package.

    Click Fetch VNF Properties. The available information for the image package is displayed in the Configure VNF dialog box.

    Name

    Mandatory

    VNF image name

    CPU

    Optional

    If you do not enter, the default value is considered, which is 1 vCpu.

    Specifies the number of virtual CPUs that are required for a VNF.

    Memory

    Optional

    If you do not enter, the default value is considered, which is 1024 MB.

    Specifies the maximum primary memory in MB that the VNF can use.

    Disk

    Optional

    If you do not enter, the default value is considered, which is 8 GB.

    Specifies disk in GB required for the VM.

    You are prompted with any custom tokenized variables from Day-0 that requires your input. Provide the values.

    In the following image, all IP addresses, VLAN, and autonomous system within the green box are system that is generated (from the VLAN, IP pools provided for the cluster) and automatically populated into Day-0 configurations of VMs.

    The Day-0 configurations of VMs are automatically populated for the Cloud Edge Service Chain.

    The following images provide an example of the configuration for VNF IP addresses and autonomous system numbers in vManage.

    For edge VMs such as first and last VM in a service chain, user must provide the following addresses as they peer with a branch and provider.

    Table 56. VNF Options for First VM in Service Chain

    Field

    Mandatory or Optional

    Description

    Firewall Mode

    Mandatory

    Choose Routed or Transparent mode.

    Note 

    Firewall mode is applicable only for firewall VMs and not other VMs.

    Enable HA

    Optional

    HA enabled or not for VNF.

    Termination mode

    Mandatory

    Specifies the following modes:

    • L3 mode selection with subinterfaces that are trunked.

      <type>selection</type> <val help="L3 Mode With Sub-interfaces(Trunked)" display="VNF-Tagged">vlan</val>

    • L3 mode with IPSEC termination from a consumer and routed to a provider gateway.

      <val help="L3 Mode With IPSEC Termination From Consumer and Routed to Provider GW" display="Tunneled">vpn</val>

    • L3 mode with access mode (nontrunked)

      <val help="L3 Mode In Access Mode (Non-Trunked)" display="Hypervisor-Tagged">routed</val>

  7. Click Configure. The service chain is configured with the VNF configuration.

  8. To add another service chain, repeat from step b.

  9. Click Save.


The new service group is listed in a table on the Service Group tab. To view the status of the service chains that are monitored, use the task view page that displays a list of all running tasks along with the total number of successes and failures. To determine if the service chain health monitoring is enabled SSH into CSP hosting CCM/Service chain Health monitor, use the show cluster-master command. If the return value is "True," service chain health monitoring is enabled on the CSP. On the CSP where service chain health monotioring is enabled, to determine the service chain health status, use the show system:system status command.

QoS on Service Chains

Table 57. Feature History

Feature Name

Release Information

Description

QoS on Service Chains

Cisco IOS XE Release Amsterdam 17.2.1r

Cisco SD-WAN Release 20.1.1

This feature classifies the network traffic based on the Layer 2 virtual local-area network (VLAN) identification number. The QoS policy allows you to limit the bandwidth available for each service chain by applying traffic policing on bidirectional traffic. The bidirectional traffic is the ingress side that connects Catalyst 9500-40X switches to the consumer and egress side that connects to the provider.

Prerequisites

  • Ensure that you use the Quality of Service (QoS) traffic policing on service chains that do not have shared VNF and PNF devices.


    Note

    You cannot apply QoS policy on service chains with shared VNF devices where input and output VLANs are same for multiple service chains.


  • Ensure that you use the following versions of software for QoS traffic policing:

    Software

    Version

    Cisco NFVIS Cloud OnRamp for Colocation

    4.1.1

    Catalyst 9500-40X

    16.12.1

The QoS policing policy is applied on the network traffic based on the following workflow:

  1. Cisco vManage saves the bandwidth, input, or output VLAN information to VNF and PNF devices. To provide bandwidth and VLAN information, see Create Service Chain in a Service Group.

  2. CCM saves the bandwidth, input, or output VLAN values information to Catalyst 9500-40X switches.

  3. CCM creates corresponding class-maps and policy-maps in Catalyst 9500-40X switches based on VLAN match criteria.

  4. CCM applies input service-policy on the ingress (1/0/36, 2/0/36) and egress (1/0/37, 2/0/37) ports. For ingress and egress port information, see Device Port Connectivity Details and Service Chaining.

Create Custom Service Chain

You can customize service chains,
  • By including extra VNFs or add other VNF types.

  • By creating new VNF sequence that is not part of the predefined service chains.

Procedure


Step 1

Create a service group and service chains within the service group. See Create Service Chain in a Service Group.

Step 2

In the Add Service Chain dialog box, provide the service chain name, description, bandwidth, input VLAN handoff, output VLAN handoff, monitoring health information of a service chain, and service chain configuration. Click Add.

For the service chain configuration, choose Create Custom from the drop-down. An empty service chain in the design view window is available.

Step 3

To add a VNF such as a router, load balancer, firewall, and others, click a VNF icon on the left panel, and drag the icon to its proper location within the service group box. After adding all required VNFs and forming the VNF service chain, configure each of the VNFs. Click a VNF in the service group box. The Configure VNF dialog box appears. Enter the following parameters:

  1. Choose the software image to load from the Image Package drop-down.

  2. Click Fetch VNF Properties.

  3. Enter a name of the VNF in the Name field.

  4. Enter the number of virtual CPUs required for the VNF in the CPU field.

  5. Enter the amount of memory in megabytes to be allocated for the VNF in the Memory field.

  6. Enter the amount of memory for storage in gigabytes to be allocated for the VNF in the Disk field.

  7. Enter VNF-specific parameters, as required.

    Note 

    These VNF details are the custom variables that are required for Day-0 operations of the VNF.

  8. Click Configure.

  9. To delete the VNF or cancel the VNF configuration, click Delete or Cancel respectively.


The customized service chains are added to a service group.

Note

You can customize a VNF sequence with only up to four VNFs in a service chain.


Custom Service Chain with Shared PNF Devices

You can customize service chains by including supported PNF devices.

Caution

Ensure that you do not share PNF devices across clusters. A PNF device can be shared across service chains, or across service groups. However, a PNF device can now be shared only across a single cluster.


Table 58. Feature History

Feature Name

Release Information

Feature Description

Manage PNF Devices in Service Chains

Cisco SD-WAN Release 19.2.1

Cisco IOS XE SD-WAN Release 16.12.1b

This feature lets you add Physical Network Function (PNF) devices to a network, in addition to the Virtual Network function (VNF) devices. These PNF devices can be added to service chains and shared across service chains, service groups, and a cluster. Inclusion of PNF devices in the service chain can overcome the performance and scaling issues caused by using only VNF devices in a service chain.

Before you begin

For more information on validated physical network functions, see the "Validated Physical Network Functions" topic in the Cisco SD-WAN Cloud OnRamp for Colocation Solution Guide, Release 19.2 book.

To create a customized service chain by adding a router or firewall to an existing service chain, perform the following steps:

  • If a PNF device needs to be managed by vManage, ensure that the serial number is already available in the vManage, which can then be available for selection during PNF configuration.

  • The FTD device can be in any position in a service chain.

  • An ASR 1000 Series Aggregation Services Routers can only be in the first and last position in a service chain.

  • You can add PNF devices across service chains and service groups.

  • You can share PNF devices across service groups. They can be shared across service groups by entering the same serial numbers.

  • You can share PNF devices across a single cluster and cannot share across multiple clusters.

Procedure


Step 1

Create a service group and service chains within the service group. See Create Service Chain in a Service Group.

Step 2

In the Add Service Chain dialog box, provide the service chain name, description, bandwidth, input VLAN handoff, output VLAN handoff, monitoring health information of a service chain, and service chain configuration. Click Add.

For the service chain configuration, choose Create Custom from the drop-down. An empty service chain in the design view window is available. In the left panel, the set of VNF devices and PNF devices that you can add into the service chain appears. The 'V' in the circumference of VNF devicess represents a VNF and 'P' in the circumference of PNF devices represent a PNF.

Note 

Ensure that you choose the Create Custom option for creating service chains by sharing PNF devices.

Step 3

To add a PNF such as physical routers, physical firewalls in a service chain, click the required PNF icon on the left panel, and drag the icon to its proper location within the service chain box.

After adding all required PNF devices, configure each of them.

  1. Click a PNF device in the service chain box.

    The Configure PNF dialog box appears. To configure a PNF, enter the following parameters:

  2. Check HA Enabled if HA is enabled for the PNF device.

  3. If the PNF is HA enabled, ensure that you include the HA serial number in HA Serial.

    If the PNF device is FTD, enter the following information.

    1. Enter a name of the PNF in the Name field.

    2. Choose Routed or Transparent mode as the Firewall Mode.

    3. Enter the serial number of the PNF device in the PNF Serial field.

    If the PNF device is ASR 1000 Series Aggregation Services Routers, enter the following information.

    1. Check vManaged if the device is managed by vManage.

    2. Click Fetch Properties.

    3. Enter a name of the PNF in the Name field.

    4. Enter the serial number of the PNF device in the PNF Serial field.

  4. Click Configure.

Step 4

To add service chains and share PNF devices, repeat from step 2.

Step 5

Edit an existing PNF configuration by clicking it.

Step 6

In Share NF To, choose the service chains with which the PNF should be shared.

After a PNF is shared, if you hover on a PNF, the respective shared PNF devices are highlighted in blue color. However, the PNFs from different service groups are not highlighted in blue color. After you choose a NF to be shared, a blue color rim appears on it. If the same PNF is shared across multiple service chains, it can be used in different positions by dragging and placing the PNF icons in a specific positon.

Figure 14. Single PNF in a Service Chain

Here a service chain consists of a single PNF, Ftd_Pnf (not shared with other service chains).

Figure 15. Two PNF Devices in Service Chains

Here service chains consist of two PNFs, FTdv_PNF shared across SC1 and SC2 and ASR_PNF (non shred).

Figure 16. Three PNF Devices in Service Chains

Here service chains consist of three PNF devices in two different positions along with the vManage configuration.

Step 7

To delete a NF or cancel the NF configuration, click Delete or Cancel respectively.


You must attach the service groups to a cluster. After attaching service groups containing PNF devices with a cluster, the PNF configuration is not automatically pushed to the device unlike VNF devices. Instead, you must manually configure the PNF device by noting configuration that is generated on the Monitor screen. The VLANs must be also configured on the Catalyst 9500 interfaces. See the ASR 1000 Series Aggregation Services Routers Configuration Guides and Cisco Firepower Threat Defense Configuration Guides for more information about the specific PNF configuration.

Configure PNF and Catalyst 9500

Procedure


Step 1

Identify ports from the switches where the PNF devices should be added, which are part of a service chain. To verify the availability of the ports, see "Service Chains and Port Connectivity Details" topic in Cisco SD-WAN Cloud OnRamp for Colocation Solution Guide.

Step 2

Connect with Catalyst 9500 by using either the terminal server of any of the Catalyst 9500 switches or use the vty session command with the IP address of the active switch.

Step 3

Configure VLANs from the generated configuration parameters on Catalyst 9500 with interfaces that are connected to the PNF. See the Monitor screen for the generated VLAN configuration.

Step 4

To configure a FTD or ASR 1000 Series device, note the configuration from the Monitor screen and then manually configure it on the device.


Custom Service Chain with Shared VNF Devices

You can customize service chains by including supported VNF devices.
Table 59. Feature History

Feature Name

Release Information

Feature Description

Share VNF Devices Across Service Chains

Cisco SD-WAN Release 19.2.1

Cisco IOS XE SD-WAN Release 16.12.1b

This feature lets you share Virtual Network Function (VNF) devices across service chains to improve resource utilisation and reduce resource fragmentation.

Before you begin

Ensure that you note the following points about sharing VNF devices:

  • You can share only the first, last, or both first and last VNF devices in a service chain.

  • You can share a VNF with a minimum of one more service chain and maximum up to five service chains.

  • Each service chain can have a maximum of up to four VNF devices in a service chain.

  • You can share VNF devices only in the same service group

Procedure


Step 1

Create a service group and service chains within the service group. See Create Service Chain in a Service Group.

Step 2

In the Add Service Chain dialog box, provide the service chain name, description, bandwidth, input VLAN handoff, output VLAN handoff, monitoring health information of a service chain, and service chain configuration. Click Add.

For the service chain configuration, choose Create Custom from the drop-down. An empty service chain in the design view window is available. In the left panel, the set of VNF devices and PNF devices that you can add into the service chain appears. The 'V' in the circumference of VNF devices represents a VNF and 'P' in the circumference of PNF devices represent a PNF.

Note 

Ensure that you choose the Create Custom option for creating a shared VNF package.

Step 3

To add a VNF such as a router, load balancer, firewall, and others, click a VNF icon on the left panel, and drag the icon to its proper location within the service chain box.

After adding all required VNF devices, configure each of them.

  1. Click a VNF in the service chain box.

    The Configure VNF dialog box appears. To configure VNF, enter the following parameters:

  2. Choose the software image to load from the Image Package drop-down.

    To create a customized VNF package from vManage, see Create Customized VNF Image.

  3. Click Fetch VNF Properties.

  4. Enter a name of the VNF in the Name field.

  5. Enter the number of virtual CPUs required for the VNF in the CPU field.

  6. Enter the amount of memory in megabytes to be allocated for the VNF in the Memory field.

  7. Enter the amount of memory for storage in gigabytes to be allocated for the VNF in the Disk field.

  8. Enter VNF-specific parameters, as required. See Create Service Chain in a Service Group for more information about VNF-specific properties.

    These VNF-specific parameters are the custom user variables that are required for Day-0 operations of the VNF.

    For a complete information about the list of user and system variables for different VNF types such as vEdge, ASAv, CSR1000v when located at various positions, see .

    Note 
    Ensure that you provide the values of the user variables if they are defined as mandatory, and for the system variables, vManage automatically sets the values for them.
  9. Click Configure.

Step 4

To share VNF devices, repeat from step 2.

Step 5

Edit an existing VNF configuration by clicking it.

Step 6

Scroll down the VNF configuration slider to find the Share NF To field. Select the service chains from the Share NF To drop-down list with which the VNF should be shared.

After a VNF is shared, if you hover on a VNF, the respective shared VNF devices are highlighted in blue color. After you choose a NF to be shared, a blue rim appears on it.

Step 7

To delete a VNF or cancel the VNF configuration, click Delete or Cancel respectively.


You must attach service groups to a cluster.

Shared VNF Use Cases

The following images depict some of the shared VNF use cases and their predefined variable list:

Figure 17. Shared First vEdge VNF

The vEdge VNF in the first position is shared with the second service chain in the first position. The input to the first VNF is in access mode (hypervisor-tagged) and the neighbor (ASAv firewall) is in HA mode. To view and use the variable list that is associated for this scenario and various other scenarios, see the "vEdge Variable List" topic in the Cisco SD-WAN Cloud OnRamp for Colocation Solution Guide.

Figure 18. Shared First vEdge VNF

The vEdge VNF in the first position is shared with the second service chain in the first position. The input to the first VNF is in access mode (hypervisor-tagged) and the neighbor is in StandAlone mode. To view and use the variable list that is associated for this scenario and various other scenarios, see the "vEdge Variable List" topic in the Cisco SD-WAN Cloud OnRamp for Colocation Solution Guide.

Figure 19. Shared First vEdge VNF

The vEdge VNF in the first position is shared with the second service chain in the first position. The input to the first VNF is in trunk mode (VNF-tagged) and the neighbor is in StandAlone mode. To view and use the variable list that is associated for this scenario and various other scenarios, see the "vEdge Variable List" topic in the Cisco SD-WAN Cloud OnRamp for Colocation Solution Guide.

Figure 20. Shared First vEdge VNF

The vEdge VNF in the first position is shared with the second service chain in the first position. The input to the first VNF is in trunk mode (VNF-tagged) and the neighbor is in HA mode. To view and use the variable list that is associated for this scenario and various other scenarios, see the "vEdge Variable List" topic in the Cisco SD-WAN Cloud OnRamp for Colocation Solution Guide.

Figure 21. Shared Last CSR VNF

The CSR VNF in the last position is shared with the second service chain in the second position. The output from the last VNF is in access mode (hypervisor-tagged) and the neighbor (ASAv firewall) is in StandAlone mode. To view and use the variable list that is associated for this scenario and various other scenarios, see the "CSR Variable List" topic in the Cisco SD-WAN Cloud OnRamp for Colocation Solution Guide.

Figure 22. Shared Last CSR VNF

The CSR VNF in the last position is shared with the second service chain in the second position. The output from the last VNF is in access mode (hypervisor-tagged) and the neighbor is in StandAlone mode. To view and use the variable list that is associated for this scenario and various other scenarios, see the "CSR Variable List" topic in the Cisco SD-WAN Cloud OnRamp for Colocation Solution Guide.

Figure 23. Shared Last CSR VNF

The CSR VNF in the last position is shared with the second service chain in the second position. The output from the last VNF is in access mode (hypervisor-tagged) and the neighbor (Firewall_Service) is in HA mode. To view and use the variable list that is associated for this scenario and various other scenarios, see the "CSR Variable List" topic in the Cisco SD-WAN Cloud OnRamp for Colocation Solution Guide.

Figure 24. Shared Last CSR VNF

The CSR VNF in the last position is shared with the second service chain in the second position. The output from the last VNF is in access mode (hypervisor-tagged) and the neighbor (Firewall_Service) is in HA mode. To view and use the variable list that is associated for this scenario and various other scenarios, see the "CSR Variable List" topic in the Cisco SD-WAN Cloud OnRamp for Colocation Solution Guide .

Figure 25. Shared First ASAv VNF

The ASAv VNF in the first position is shared with the second service chain in the first position. The input to the first VNF is in access mode (hypervisor-tagged) and the neighbor (CSR) is in redundant mode. To view and use the variable list that is associated for this scenario and various other scenarios, see the "ASAv Variable List" topic in the Cisco SD-WAN Cloud OnRamp for Colocation Solution Guide.

Figure 26. Shared First ASAv VNF

The ASAv (Firewall_Service) VNF in the first position is shared with the second service chain in the first position. The input to the first VNF is in access mode (hypervisor-tagged) and the neighbor is in StandAlone mode. To view and use the variable list that is associated for this scenario and various other scenarios, see the "ASAv Variable List" topic in the Cisco SD-WAN Cloud OnRamp for Colocation Solution Guide.

Figure 27. Shared First ASAv VNF

The ASAv (Firewall_Service) VNF in the first position is shared with the second service chain in the first position. The input to the first VNF is in access mode (hypervisor-tagged) and the neighbor, which is a router is in redundant mode. To view and use the variable list that is associated for this scenario and various other scenarios, see the "ASAv Variable List" topic in the Cisco SD-WAN Cloud OnRamp for Colocation Solution Guide.

Figure 28. Shared First ASAv VNF

The ASAv VNF in the first position in HA mode is shared with the second service chain in the first position. The input to the first VNF is in trunk mode (vnf-tagged) and the neighbor (CSR) is in redundant mode. To view and use the variable list that is associated for this scenario and various other scenarios, see the "ASAv Variable List" topic in the Cisco SD-WAN Cloud OnRamp for Colocation Solution Guide.

View Service Groups

To view service groups, perform the following steps:

Procedure


In vManage, click Configuration > Cloud OnRamp for Colocation. The CLOUD ONRAMP FOR COLOCATION Cluster screen appears, and the Configure & Provision Cluster button is highlighted. In the CLOUD ONRAMP FOR COLOCATION Cluster screen, perform the following tasks:

  1. Click the Service Group tab.

  2. To view the service chains in the design view window, click a service chain box.


Edit Service Group

Before attaching a service group with a cluster, you can edit all parameters. After attaching a service group with a cluster, you can only edit monitoring configuration parameters. Also, after attaching a service group, you can only add new service chains but not edit or attach a service chain. Hence, ensure that you detach a service group from a cluster before editing an existing service chain. To edit and delete a service group, perform the following steps:

Procedure


In vManage, click Configuration > Cloud OnRamp for Colocation. The CLOUD ONRAMP FOR COLOCATION Cluster screen appears, and the Configure & Provision Cluster button is highlighted. In the CLOUD ONRAMP FOR COLOCATION Cluster screen, perform the following tasks:

  1. Click the Service Group tab.

  2. To modify either service chain configuration or modify a VNF configuration, click a router or firewall VNF icon.

  3. To add new service chains, click a service chain button.


Attach and Detach Service Group with Cluster

To complete the Cloud OnRamp for Colocation configuration, you must attach service groups to a cluster. To attach or detach a service group from a cluster, perform the following steps:

Procedure


Step 1

In vManage, click Configuration > Cloud OnRamp for Colocation. The CLOUD ONRAMP FOR COLOCATION Cluster screen appears, and the Configure & Provision Cluster button is highlighted. To attach a service group with a cluster, perform the following steps:

  1. In the Cluster tab, click a cluster from the table, click the More Actions icon to the right of its row, and click Attach Service Groups.

Step 2

In the Attach Service Groups dialog box, select a service group from the available service groups.

Step 3

Click the right arrow to move the chosen service groups to the selected box.

Step 4

Click Attach.

Step 5

To detach a service group from a cluster, perform the following action:

  1. In the Cluster tab, click a cluster from the table, click the More Actions icon to the right of its row.

  2. Click Detach Service Groups.

You cannot attach or detach an individual service chain within a group.
Step 6

To verify if service groups have been attached and detached, you can view from the following vManage screen:

If the statuses of the tasks are "FAILURE" or in "PENDING" state for long duration, see the topic, "Troubleshoot Service Chain Issues" in the Cisco SD-WAN Cloud OnRamp for Colocation Solution Guide.

If a Cisco Colo Manager task fails, see the topic, "Troubleshoot Cisco Colo Manager Issues" in the Cisco SD-WAN Cloud OnRamp for Colocation Solution Guide.


Note

If a cluster goes into a "PENDING" state, click the More Actions icon to the right of its row and then click the Sync button. This action moves the cluster back to an "ACTIVE" state. The sync button keeps the vManage synched with the devices and is visible when a cluster is active.


Figure 29. Sync Button for a Cluster