- About this Guide
-
- Information About Cisco Unified Communications Features
- Using the Cisco Unified Communication Wizard
- Configuring the Cisco Phone Proxy
- Configuring the TLS Proxy for Encrypted Voice Inspection
- Configuring Cisco Mobility Advantage
- Configuring Cisco Unified Presence
- Configuring Cisco Unified Communications Intercompany Media Engine
- Index
- AAA Performance
- Licensing Requirements for AAA Rules
- Guidelines and Limitations
- Configuring Authentication for Network Access
Configuring AAA Rules for Network Access
This chapter describes how to enable AAA (pronounced “triple A”) for network access.
For information about AAA for management access, see the general operations configuration guide.
This chapter includes the following sections:
- AAA Performance
- Licensing Requirements for AAA Rules
- Guidelines and Limitations
- Configuring Authentication for Network Access
- Configuring Authorization for Network Access
- Configuring Accounting for Network Access
- Using MAC Addresses to Exempt Traffic from Authentication and Authorization
- Feature History for AAA Rules
AAA Performance
The ASA uses “cut-through proxy” to significantly improve performance compared to a traditional proxy server. The performance of a traditional proxy server suffers because it analyzes every packet at the application layer of the OSI model. The ASA cut-through proxy challenges a user initially at the application layer and then authenticates with standard AAA servers or the local database. After the ASA authenticates the user, it shifts the session flow, and all traffic flows directly and quickly between the source and destination while maintaining session state information.
Licensing Requirements for AAA Rules
The following table shows the licensing requirements for this feature:
|
|
|
|---|---|
Guidelines and Limitations
This section includes the guidelines and limitations for this feature.
Supported in single and multiple context mode.
Supported in routed and transparent firewall mode.
In clustering, this feature is only supported on the master unit.
Configuring Authentication for Network Access
This section includes the following topics:
- Information About Authentication
- Configuring Network Access Authentication
- Enabling Secure Authentication of Web Clients
- Authenticating Directly with the ASA
Information About Authentication
The ASA lets you configure network access authentication using AAA servers. This section includes the following topics:
One-Time Authentication
A user at a given IP address only needs to authenticate one time for all rules and types, until the authentication session expires. (See the timeout uauth command in the command reference for timeout values.) For example, if you configure the ASA to authenticate Telnet and FTP, and a user first successfully authenticates for Telnet, then as long as the authentication session exists, the user does not also have to authenticate for FTP.
Applications Required to Receive an Authentication Challenge
Although you can configure the ASA to require authentication for network access to any protocol or service, users can authenticate directly with HTTP, HTTPS, Telnet, or FTP only. A user must first authenticate with one of these services before the ASA allows other traffic requiring authentication.
The authentication ports that the ASA supports for AAA are fixed as follows:
ASA Authentication Prompts
For Telnet and FTP, the ASA generates an authentication prompt.
For HTTP, the ASA uses basic HTTP authentication by default, and provides an authentication prompt. You can optionally configure the ASA to redirect users to an internal web page where they can enter their username and password (configured with the aaa authentication listener command).
For HTTPS, the ASA generates a custom login screen. You can optionally configure the ASA to redirect users to an internal web page where they can enter their username and password (configured with the aaa authentication listener command).
Redirection is an improvement over the basic method because it provides an improved user experience during authentication, and an identical user experience for HTTP and HTTPS in both Easy VPN and firewall modes. It also supports authentication directly with the ASA.
You might want to continue to use basic HTTP authentication for the following reasons:
- You do not want the ASA to open listening ports.
- You use NAT on a router and you do not want to create a translation rule for the web page served by the ASA.
- Basic HTTP authentication might work better with your network.
For example non-browser applications, as when a URL is embedded in e-mail, might be more compatible with basic authentication.
After you authenticate correctly, the ASA redirects you to your original destination. If the destination server also has its own authentication, the user enters another username and password. If you use basic HTTP authentication and need to enter another username and password for the destination server, then you need to configure the virtual http command.

Note![]() If you use HTTP authentication, by default the username and password are sent from the client to the ASA in clear text; in addition, the username and password are sent on to the destination web server as well. See the “Enabling Secure Authentication of Web Clients” section for information to secure your credentials.
If you use HTTP authentication, by default the username and password are sent from the client to the ASA in clear text; in addition, the username and password are sent on to the destination web server as well. See the “Enabling Secure Authentication of Web Clients” section for information to secure your credentials.
For FTP, a user has the option of entering the ASA username followed by an at sign (@) and then the FTP username (name1@name2). For the password, the user enters the ASA password followed by an at sign (@) and then the FTP password (password1@password2). For example, enter the following text:
This feature is useful when you have cascaded firewalls that require multiple logins. You can separate several names and passwords by multiple at signs (@).
AAA Prompts and Identity Firewall
In an enterprise, some users log into the network by using other authentication mechanisms, such as authenticating with a web portal (cut-through proxy). For example, users with a Mac and Linux client might log into a web portal (cut-through proxy). Therefore, you must configure the identity firewall to allow these types of authentication in connection with identity-based access policies.
Figure 7-1 shows a deployment to support a cut-through proxy authentication captive portal. Active Directory servers and the AD Agent are installed on the main site LAN. However, the identity firewall is configured to support authentication of clients that are not part of the Active Directory domain.
Figure 7-1 Deployment Supporting Cut-through Proxy Authentication
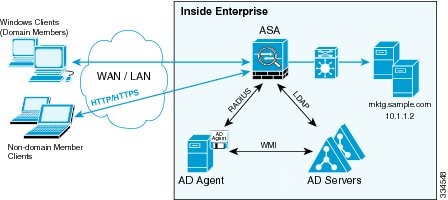
The ASA designates users logging in through a web portal (cut-through proxy) as belonging to the Active Directory domain with which they authenticated.
The ASA reports users logging in through a web portal (cut-through proxy) to the AD Agent, which distributes the user information to all registered ASA devices. In this case, the identity firewall can associate the users with their Active Directory domain. Specifically, the user identity-IP address mappings of authenticated users are forwarded to all ASA contexts that contain the input interface where packets are received and authenticated.
Users can log in by using HTTP/HTTPS, FTP, Telnet, or SSH. When users log in with these authentication methods, the following guidelines apply:
- For HTTP/HTTPS traffic, an authentication window appears for unauthenticated users.
- For Telnet and FTP traffic, users must log in through the cut-through proxy server and again to the Telnet and FTP servers.
- A user can specify an Active Directory domain while providing login credentials (in the format, domain\username). The ASA automatically selects the associated AAA server group for the specified domain.
- If a user specifies an Active Directory domain while providing login credentials (in the format, domain\username), the ASA parses the domain and uses it to select an authentication server from the AAA servers that have been configured for the identity firewall. Only the username is passed to the AAA server.
- If the backslash (\) delimiter is not found in the login credentials, the ASA does not parse the domain and authentication is conducted with the AAA server that corresponds to the default domain configured for the identity firewall.
- If a default domain or a server group is not configured for that default domain, the ASA rejects the authentication.
- If the domain is not specified, the ASA selects the AAA server group for the default domain that is configured for the identity firewall.
AAA Rules as a Backup Authentication Method
An authentication rule (also known as “cut-through proxy”) controls network access based on the user. Because this function is very similar to an access rule plus an identity firewall, AAA rules can now be used as a backup method of authentication if a user AD login expires or a valid user has not yet logged into AD. For example, for any user without a valid login, you can trigger a AAA rule. To ensure that the AAA rule is only triggered for users that do not have valid logins, you can specify special usernames in the extended ACL that are used for the access rule and for the AAA rule: None (users without a valid login) and Any (users with a valid login). In the access rule, configure your policy as usual for users and groups, but then include a rule that permits all None users before deny any any; you must permit these users so they can later trigger a AAA rule. Then, configure a AAA rule that does not match Any users (these users are not subject to the AAA rule, and were handled already by the access rule), but matches all None users only to trigger AAA authentication for these users. After the user has successfully logged in via cut-through proxy, the traffic will flow normally again.
Static PAT and HTTP
For HTTP authentication, the ASA checks real ports when static PAT is configured. If it detects traffic destined for real port 80, regardless of the mapped port, the ASA intercepts the HTTP connection and enforces authentication.
For example, assume that outside TCP port 889 is translated to port 80 and that any relevant ACLs permit the traffic:
Then when users try to access 10.48.66.155 on port 889, the ASA intercepts the traffic and enforces HTTP authentication. Users see the HTTP authentication page in their web browsers before the ASA allows HTTP connection to complete.
If the local port is different than port 80, as in the following example:
Then users do not see the authentication page. Instead, the ASA sends an error message to the web browser, indicating that the user must be authenticated before using the requested service.
When a mapped address is used for static PAT, it is automatically placed into the dynamic PAT pool.
For instance, this configuration,
The second line ensures that all PAT bindings are accounted for.This accounting is necessary to avoid connection failure from port collision.
As the the mapped address is placed under dynamic PAT, any additional service that is to be accessed through the mapped address, must also be explicitly configured.
For example, the following is the correct configuration for three services through address 192.150.49.10. Additionally, the SMTP and HTTP services also reside at a host with the same address as the mapped address, 192.150.49.10.
Configuring Network Access Authentication
To configure network access authentication, perform the following steps:
|
|
|
|
|---|---|---|
|
|
Identifies your AAA servers. If you have already identified them, continue to the next step. |
|
|
ciscoasa(config)# access-list MAIL_AUTH extended permit tcp any any eq smtp |
Creates an ACL that identifies the source addresses and destination addresses of traffic that you want to authenticate. The syntax shown here is just an example. For details, see the general operations configuration guide. If you specify identity firewall arguments in the ACL, then the following keywords in the ACL are specifically relevant to AAA rules. The keywords user - group any and user - group none can be specified to support cut-through proxy authentication. |
|
|
ciscoasa(config)# aaa authentication match MAIL_AUTH inside AuthOutbound |
The acl_name argument is the name of the ACL that you created in Step 2. The interface_name argument is the name of the interface specified with the nameif command. The server_group argument is the AAA server group that you created in Step 1. Note You can alternatively use the aaa authentication include command (which identifies traffic within the command). However, you cannot use both methods in the same configuration. See the command reference for more information. The user-identity keyword matches authentication to the identity firewall. |
|
|
ciscoasa(config)# aaa authentication listener http inside redirect |
(Optional) Enables the redirection method of authentication for HTTP or HTTPS connections. The interface_name argument is the interface on which you want to enable listening ports. The port portnum argument specifies the port number on which the ASA listens; the defaults are 80 (HTTP) and 443 (HTTPS). You can use any port number and retain the same functionality, but be sure your direct authentication users know the port number; redirected traffic is sent to the correct port number automatically, but direct authenticators must specify the port number manually. |
|
|
|
(Optional) Uses the local database for network access authentication and limits the number of consecutive failed login attempts that the ASA allows any given user account (with the exception of users with a privilege level of 15. This feature does not affect level 15 users). The number argument value is between 1 and 16. |
Examples
The following example authenticates all inside HTTP traffic and SMTP traffic:
The following example authenticates Telnet traffic from the outside interface to a particular server (209.165.201.5):
The following example shows a typical cut-through proxy configuration to allow a user to log in through the ASA. In this example, the following conditions apply:
- The ASA IP address is 192.168.123.10.
- The Active Directory domain controller has the IP address 10.1.2.10.
- The end user client has the IP address 192.168.123.10 and uses HTTPS to log in through a web portal.
- The user is authenticated by the Active Directory domain controller via LDAP.
- The ASA uses the inside interface to connect to the Active Directory domain controller on the corporate network.
In this example, the following guidelines apply:
- In access - list commands, you should configure permit user NONE rules before entering the access-list 100 ex deny any any command to allow unauthenticated incoming users to trigger AAA cut-through proxy.
- In access-list AUTH commands, permit user NONE rules specify that only unauthenticated users can trigger AAA cut-through proxy.
The following example shows how you can use AAA rules plus identity firewall (cut-through proxy) to authenticate successfully:
For more information about authentication, see the “Information About Authentication” section.
Enabling Secure Authentication of Web Clients
If you use HTTP authentication, by default the username and password are sent from the client to the ASA in clear text; in addition, the username and password are sent to the destination web server as well.
The ASA provides the following methods for securing HTTP authentication:
- Enable the redirection method of authentication for HTTP—Use the aaa authentication listener command with the redirect keyword. This method prevents the authentication credentials from continuing to the destination server. See the “ASA Authentication Prompts” section for more information about the redirection method compared to the basic method.
- Enable virtual HTTP—Use the virtual http command to authenticateseparately with the ASA and with the HTTP server. Even if the HTTP server does not need a second authentication, this command achieves the effect of stripping the basic authentication credentials from the HTTP GET request. See the “Authenticating HTTP(S) Connections with a Virtual Server” section for more information.
Enable the exchange of usernames and passwords between a web client and the ASA with HTTPS—Use the aaa authentication secure-http-client command to enable the exchange of usernames and passwords between a web client and the ASA with HTTPS. This is the only method that protects credentials between the client and the ASA, as well as between the ASA and the destination server. You can use this method alone, or in conjunction with either of the other methods so you can maximize your security.
After enabling this feature, when a user requires authentication when using HTTP, the ASA redirects the HTTP user to an HTTPS prompt. After you authenticate correctly, the ASA redirects you to the original HTTP URL.
Secured, web-client authentication has the following limitations:
–![]() A maximum of 64 concurrent HTTPS authentication sessions are allowed. If all 64 HTTPS authentication processes are running, a new connection requiring authentication will not succeed.
A maximum of 64 concurrent HTTPS authentication sessions are allowed. If all 64 HTTPS authentication processes are running, a new connection requiring authentication will not succeed.
–![]() When uauth timeout 0 is configured (the uauth timeout is set to 0),HTTPS authentication might not work. If a browser initiates multiple TCP connections to load a web page after HTTPS authentication, the first connection is let through, but the subsequent connections trigger authentication. As a result, users are continuously presented with an authentication page, even if the correct username and password are entered each time. To work around this, set the uauth timeout to 1 second with the timeout uauth 0:0:1 command. However, this workaround opens a 1-second window of opportunity that might allow unauthenticated users to go through the firewall if they are coming from the same source IP address.
When uauth timeout 0 is configured (the uauth timeout is set to 0),HTTPS authentication might not work. If a browser initiates multiple TCP connections to load a web page after HTTPS authentication, the first connection is let through, but the subsequent connections trigger authentication. As a result, users are continuously presented with an authentication page, even if the correct username and password are entered each time. To work around this, set the uauth timeout to 1 second with the timeout uauth 0:0:1 command. However, this workaround opens a 1-second window of opportunity that might allow unauthenticated users to go through the firewall if they are coming from the same source IP address.
Because HTTPS authentication occurs on the SSL port 443, users must not configure an access-list command statement to block traffic from the HTTP client to the HTTP server on port 443. Furthermore, if static PAT is configured for web traffic on port 80, it must also be configured for the SSL port.
–![]() In the following example, the first set of commands configures static PAT for web traffic, and the second set of commands must be added to support the HTTPS authentication configuration:
In the following example, the first set of commands configures static PAT for web traffic, and the second set of commands must be added to support the HTTPS authentication configuration:
Authenticating Directly with the ASA
If you do not want to allow HTTP, HTTPS, Telnet, or FTP through the ASA but want to authenticate other types of traffic, you can authenticate with the ASA directly using HTTP, HTTPS, or Telnet.
Authenticating HTTP(S) Connections with a Virtual Server
If you enabled the redirection method of HTTP and HTTPS authentication in the “Configuring Network Access Authentication” section, then you have also automatically enabled direct authentication.
When you use HTTP authentication on the ASA (see the“Configuring Network Access Authentication” section), the ASA uses basic HTTP authentication by default.
To continue to use basic HTTP authentication, and to enable direct authentication for HTTP and HTTPS, enter the following command:
If the destination HTTP server requires authentication in addition to the ASA, then to authenticate separately with the ASA (via a AAA server) and with the HTTP server, enter the following command:
Authenticating Telnet Connections with a Virtual Server
Although you can configure network access authentication for any protocol or service (see the aaa authentication match or aaa authentication include command), you can authenticate directly with HTTP, Telnet, or FTP only. A user must first authenticate with one of these services before other traffic that requires authentication is allowed through. If you do not want to allow HTTP, Telnet, or FTP traffic through the ASA, but want to authenticate other types of traffic, you can configure virtual Telnet; the user Telnets to a given IP address configured on the ASA, and the ASA issues a Telnet prompt.
To configure a virtual Telnet server, enter the following command:
Examples
The following example shows how to enable virtual Telnet together with AAA authentication for other services:
Configuring Authorization for Network Access
After a user authenticates for a given connection, the ASA can use authorization to further control traffic from the user.
This section includes the following topics:
Configuring TACACS+ Authorization
You can configure the ASA to perform network access authorization with TACACS+. You identify the traffic to be authorized by specifying ACLs that authorization rules must match. Alternatively, you can identify the traffic directly in authorization rules themselves.

Tip![]() Using ACLs to identify traffic to be authorized can greatly reduced the number of authorization commands that you must enter. This is because each authorization rule that you enter can specify only one source and destination subnet and service, whereas an ACL can include many entries.
Using ACLs to identify traffic to be authorized can greatly reduced the number of authorization commands that you must enter. This is because each authorization rule that you enter can specify only one source and destination subnet and service, whereas an ACL can include many entries.
Authentication and authorization statements are independent; however, any unauthenticated traffic matched by an authorization rule will be denied. For authorization to succeed:
1.![]() A user must first authenticate with the ASA.
A user must first authenticate with the ASA.
Because a user at a given IP address only needs to authenticate one time for all rules and types, if the authentication session has not expired, authorization can occur even if the traffic is not matched by an authentication rule.
2.![]() After a user authenticates, the ASA checks the authorization rules for matching traffic.
After a user authenticates, the ASA checks the authorization rules for matching traffic.
3.![]() If the traffic matches the authorization rule, the ASA sends the username to the TACACS+ server.
If the traffic matches the authorization rule, the ASA sends the username to the TACACS+ server.
4.![]() The TACACS+ server responds to the ASA with a permit or a deny for that traffic, based on the user profile.
The TACACS+ server responds to the ASA with a permit or a deny for that traffic, based on the user profile.
5.![]() The ASA enforces the authorization rule in the response.
The ASA enforces the authorization rule in the response.
See the documentation for your TACACS+ server for information about configuring network access authorizations for a user.
To configure TACACS+ authorization, perform the following steps:
Examples
The following example authenticates and authorizes inside Telnet traffic. Telnet traffic to servers other than 209.165.201.5 can be authenticated alone, but traffic to 209.165.201.5 requires authorization.
Configuring RADIUS Authorization
When authentication succeeds, the RADIUS protocol returns user authorizations in the access-accept message sent by a RADIUS server. For more information about configuring authentication, see the “Configuring Network Access Authentication” section.
When you configure the ASA to authenticate users for network access, you are also implicitly enabling RADIUS authorizations; therefore, this section contains no information about configuring RADIUS authorization on the ASA. It does provide information about how the ASA handles ACL information received from RADIUS servers.
You can configure a RADIUS server to download an ACL to the ASA or an ACL name at the time of authentication. The user is authorized to do only what is permitted in the user-specific ACL.
Note If you have used the access-group command to apply ACLs to interfaces, be aware of the following effects of the per-user-override keyword on authorization by user-specific ACLs:
- Without the per-user-override keyword, traffic for a user session must be permitted by both the interface ACL and the user-specific ACL.
- With the per-user-override keyword, the user-specific ACL determines what is permitted.
For more information, see the access-group command entry in the command reference.
Configuring a RADIUS Server to Send Downloadable Access Control Lists
This section describes how to configure Cisco Secure ACS or a third-party RADIUS server and includes the following topics:
About the Downloadable ACL Feature and Cisco Secure ACS
Downloadable ACLs is the most scalable means of using Cisco Secure ACS to provide the appropriate ACLs for each user. It provides the following capabilities:
- Unlimited ACL size—Downloadable ACLs are sent using as many RADIUS packets as required to transport the full ACL from Cisco Secure ACS to the ASA.
- Simplified and centralized management of ACLs—Downloadable ACLs enable you to write a set of ACLs once and apply it to many user or group profiles and distribute it to many ASAs.
This approach is most useful when you have very large ACL sets that you want to apply to more than one Cisco Secure ACS user or group; however, its ability to simplify Cisco Secure ACS user and group management makes it useful for ACLs of any size.
The ASA receives downloadable ACLs from Cisco Secure ACS using the following process:
1.![]() The ASA sends a RADIUS authentication request packet for the user session.
The ASA sends a RADIUS authentication request packet for the user session.
2.![]() If Cisco Secure ACS successfully authenticates the user, Cisco Secure ACS returns a RADIUS access-accept message that includes the internal name of the applicable downloadable ACL. The Cisco IOS cisco-av-pair RADIUS VSA (vendor 9, attribute 1) includes the following attribute-value pair to identify the downloadable ACL set:
If Cisco Secure ACS successfully authenticates the user, Cisco Secure ACS returns a RADIUS access-accept message that includes the internal name of the applicable downloadable ACL. The Cisco IOS cisco-av-pair RADIUS VSA (vendor 9, attribute 1) includes the following attribute-value pair to identify the downloadable ACL set:
where acl-set-name is the internal name of the downloadable ACL, which is a combination of the name assigned to the ACL by the Cisco Secure ACS administrator and the date and time that the ACL was last modified.
3.![]() The ASA examines the name of the downloadable ACL and determines if it has previously received the named downloadable ACL.
The ASA examines the name of the downloadable ACL and determines if it has previously received the named downloadable ACL.
–![]() If the ASA has previously received the named downloadable ACL, communication with Cisco Secure ACS is complete and the ASA applies the ACL to the user session. Because the name of the downloadable ACL includes the date and time that it was last modified, matching the name sent by Cisco Secure ACS to the name of an ACL previously downloaded means that the ASA has the most recent version of the downloadable ACL.
If the ASA has previously received the named downloadable ACL, communication with Cisco Secure ACS is complete and the ASA applies the ACL to the user session. Because the name of the downloadable ACL includes the date and time that it was last modified, matching the name sent by Cisco Secure ACS to the name of an ACL previously downloaded means that the ASA has the most recent version of the downloadable ACL.
–![]() If the ASA has not previously received the named downloadable ACL, it may have an out-of-date version of the ACL or it may not have downloaded any version of the ACL. In either case, the ASA issues a RADIUS authentication request using the downloadable ACL name as the username in the RADIUS request and a null password attribute. In a cisco-av-pair RADIUS VSA, the request also includes the following attribute-value pairs:
If the ASA has not previously received the named downloadable ACL, it may have an out-of-date version of the ACL or it may not have downloaded any version of the ACL. In either case, the ASA issues a RADIUS authentication request using the downloadable ACL name as the username in the RADIUS request and a null password attribute. In a cisco-av-pair RADIUS VSA, the request also includes the following attribute-value pairs:
In addition, the ASA signs the request with the Message-Authenticator attribute (IETF RADIUS attribute 80).
4.![]() After receipt of a RADIUS authentication request that has a username attribute that includes the name of a downloadable ACL, Cisco Secure ACS authenticates the request by checking the Message-Authenticator attribute. If the Message-Authenticator attribute is missing or incorrect, Cisco Secure ACS ignores the request. The presence of the Message-Authenticator attribute prevents malicious use of a downloadable ACL name to gain unauthorized network access. The Message-Authenticator attribute and its use are defined in RFC 2869, RADIUS Extensions, available at http://www.ietf.org.
After receipt of a RADIUS authentication request that has a username attribute that includes the name of a downloadable ACL, Cisco Secure ACS authenticates the request by checking the Message-Authenticator attribute. If the Message-Authenticator attribute is missing or incorrect, Cisco Secure ACS ignores the request. The presence of the Message-Authenticator attribute prevents malicious use of a downloadable ACL name to gain unauthorized network access. The Message-Authenticator attribute and its use are defined in RFC 2869, RADIUS Extensions, available at http://www.ietf.org.
5.![]() If the ACL required is less than approximately 4 KB in length, Cisco Secure ACS responds with an access-accept message that includes the ACL. The largest ACL that can fit in a single access-accept message is slightly less than 4 KB, because part of the message must be other required attributes.
If the ACL required is less than approximately 4 KB in length, Cisco Secure ACS responds with an access-accept message that includes the ACL. The largest ACL that can fit in a single access-accept message is slightly less than 4 KB, because part of the message must be other required attributes.
Cisco Secure ACS sends the downloadable ACL in a cisco-av-pair RADIUS VSA. The ACL is formatted as a series of attribute-value pairs that each include an ACE and are numbered serially:
6.![]() If the ACL required is more than approximately 4 KB in length, Cisco Secure ACS responds with an access-challenge message that includes a portion of the ACL, formatted as described previously, and a State attribute (IETF RADIUS attribute 24), which includes control data used by Cisco Secure ACS to track the progress of the download. Cisco Secure ACS fits as many complete attribute-value pairs into the cisco-av-pair RADIUS VSA as it can without exceeding the maximum RADIUS message size.
If the ACL required is more than approximately 4 KB in length, Cisco Secure ACS responds with an access-challenge message that includes a portion of the ACL, formatted as described previously, and a State attribute (IETF RADIUS attribute 24), which includes control data used by Cisco Secure ACS to track the progress of the download. Cisco Secure ACS fits as many complete attribute-value pairs into the cisco-av-pair RADIUS VSA as it can without exceeding the maximum RADIUS message size.
The ASA stores the portion of the ACL received and responds with another access-request message that includes the same attributes as the first request for the downloadable ACL, plus a copy of the State attribute received in the access-challenge message.
This process repeats until Cisco Secure ACS sends the last of the ACL in an access-accept message.
Configuring Cisco Secure ACS for Downloadable ACLs
You can configure downloadable ACLs on Cisco Secure ACS as a shared profile component and then assign the ACL to a group or to an individual user.
The ACL definition consists of one or more ASA commands that are similar to the extended access-list command (see command reference), except without the following prefix:
The following example is a downloadable ACL definition on Cisco Secure ACS version 3.3:
For more information about creating downloadable ACLs and associating them with users, see the user guide for your version of Cisco Secure ACS.
On the ASA, the downloaded ACL has the following name:
The acl_name argument is the name that is defined on Cisco Secure ACS ( acs_ten_acl in the preceding example), and number is a unique version ID generated by Cisco Secure ACS.
The downloaded ACL on the ASA consists of the following lines:
Configuring Any RADIUS Server for Downloadable ACLs
You can configure any RADIUS server that supports Cisco IOS RADIUS VSAs to send user-specific ACLs to the ASA in a Cisco IOS RADIUS cisco-av-pair VSA (vendor 9, attribute 1).
In the cisco-av-pair VSA, configure one or more ACEs that are similar to the access-list extended command (see command reference), except that you replace the following command prefix:
nnn=
The nnn argument is a number in the range from 0 to 999999999 that identifies the order of the command statement to be configured on the ASA. If this parameter is omitted, the sequence value is 0, and the order of the ACEs inside the cisco-av-pair RADIUS VSA is used.
The following example is an ACL definition as it should be configured for a cisco-av-pair VSA on a RADIUS server:
For information about making unique per user the ACLs that are sent in the cisco-av-pair attribute, see the documentation for your RADIUS server.
On the ASA, the downloaded ACL name has the following format:
The username argument is the name of the user that is being authenticated.
The downloaded ACL on the ASA consists of the following lines. Notice the order based on the numbers identified on the RADIUS server.
Downloaded ACLs have two spaces between the word “access-list” and the name. These spaces serve to differentiate a downloaded ACL from a local ACL. In this example, “79AD4A08” is a hash value generated by the ASA to help determine when ACL definitions have changed on the RADIUS server.
Converting Wildcard Netmask Expressions in Downloadable ACLs
If a RADIUS server provides downloadable ACLs to Cisco VPN 3000 series concentrators as well as to the ASA, you may need the ASA to convert wildcard netmask expressions to standard netmask expressions. This is because Cisco VPN 3000 series concentrators support wildcard netmask expressions, but the ASA only supports standard netmask expressions. Configuring the ASA to convert wildcard netmask expressions helps minimize the effects of these differences on how you configure downloadable ACLs on your RADIUS servers. Translation of wildcard netmask expressions means that downloadable ACLs written for Cisco VPN 3000 series concentrators can be used by the ASA without altering the configuration of the downloadable ACLs on the RADIUS server.
You configure ACL netmask conversion on a per-server basis using the acl-netmask-convert command, available in the aaa-server configuration mode. For more information about configuring a RADIUS server, see the general operations configuration guide. For more information about the acl-netmask-convert command, see the command reference
Configuring a RADIUS Server to Download Per-User Access Control List Names
To download a name for an ACL that you already created on the ASA from the RADIUS server when a user authenticates, configure the IETF RADIUS filter-id attribute (attribute number 11) as follows:
Note![]() In Cisco Secure ACS, the values for filter-id attributes are specified in boxes in the HTML interface, omitting filter-id= and entering only acl_name.
In Cisco Secure ACS, the values for filter-id attributes are specified in boxes in the HTML interface, omitting filter-id= and entering only acl_name.
For information about making the filter-id attribute value unique per user, see the documentation for your RADIUS server.
To create an ACL on the ASA, see the general operations configuration guide.
Configuring Accounting for Network Access
The ASA can send accounting information to a RADIUS or TACACS+ server about any TCP or UDP traffic that passes through the ASA. If that traffic is also authenticated, then the AAA server can maintain accounting information by username. If the traffic is not authenticated, the AAA server can maintain accounting information by IP address. Accounting information includes session start and stop times, username, the number of bytes that pass through the ASA for the session, the service used, and the duration of each session.
To configure accounting, perform the following steps:
|
|
|
|
|---|---|---|
|
ciscoasa(config)# access-list TELNET_AUTH extended permit tcp any any eq telnet |
If you want the ASA to provide accounting data per user, you must enable authentication. For more information, see the “Configuring Network Access Authentication” section. If you want the ASA to provide accounting data per IP address, enabling authentication is not necessary. Creates an ACL that identifies the source addresses and destination addresses of traffic for which you want accounting data. For instructions, see the general operations configuration guide. The permit ACEs mark matching traffic for accounting, while deny entries exclude matching traffic from accounting. Note If you have configured authentication and want accounting data for all the traffic being authenticated, you can use the same ACL that you created for use with the aaa authentication match command. |
|
|
|
The acl_name argument is the ACL name set in the access-list command. The interface_name argument is the interface name set in the nameif command. The server_group argument is the server group name set in the aaa-server command. Note Alternatively, you can use the aaa accounting include command (which identifies traffic within the command), but you cannot use both methods in the same configuration. See the command reference for more information. |
Examples
The following example authenticates, authorizes, and accounts for inside Telnet traffic. Telnet traffic to servers other than 209.165.201.5 can be authenticated alone, but traffic to 209.165.201.5 requires authorization and accounting.
AAA provides an extra level of protection and control for user access than using ACLs alone. For example, you can create an ACL allowing all outside users to access Telnet on a server on the DMZ network. If you want only some users to access the server and you might not always know IP addresses of these users, you can enable AAA to allow only authenticated and/or authorized users to connect through the ASA. (The Telnet server enforces authentication, too; the ASA prevents unauthorized users from attempting to access the server.)
Using MAC Addresses to Exempt Traffic from Authentication and Authorization
The ASA can exempt from authentication and authorization any traffic from specific MAC addresses. For example, if the ASA authenticates TCP traffic originating on a particular network, but you want to allow unauthenticated TCP connections from a specific server, you would use a MAC exempt rule to exempt from authentication and authorization any traffic from the server specified by the rule.
This feature is particularly useful to exempt devices such as IP phones that cannot respond to authentication prompts.
To use MAC addresses to exempt traffic from authentication and authorization, perform the following steps:
Examples
The following example bypasses authentication for a single MAC address:
The following example bypasses authentication for all Cisco IP Phones, which have the hardware ID 0003.E3:
The following example bypasses authentication for a a group of MAC addresses except for 00a0.c95d.02b2. Enter the deny statement before the permit statement, because 00a0.c95d.02b2 matches the permit statement as well, and if it is first, the deny statement will never be matched.
Feature History for AAA Rules
Table 7-1 lists each feature change and the platform release in which it was implemented.
 Feedback