Supported Gateway Use Cases
Secure Firewall Firewall Threat Defense Virtual
Overview
Deploying Secure Firewall Firewall Threat Defense virtual (FTDv) gateway can offer several advantages, especially in network security and management. Utilizing this functionality with FTDv lets you take advantage of advanced security features that may not be present in standard ISP gateways. By deploying an FTDv gateway you can take advantage of these security features to protect your network.
Because this is a multi-product task you must navigate between both Multicloud Defense and Cloud-delivered Firewall Management Center to complete the steps. Multicloud Defense deploys and registers the FTDv device including interfaces, gateway configuration, NAT rules, platform settings, whereas you edit your access policy, rules, and objects in your Cloud-delivered Firewall Management Center account.
Guidelines
Here are some of the guidelines to follow when you create an FTDv that is managed by Cloud-delivered Firewall Management Center:
-
When you create and apply a gateway to your FTDv environment, note that Multicloud Defense automatically creates a subnet and a corresponding security group for the secondary interface, which is required.
-
Avoid deploying the maximum number of FTDv gateways allowed by the Cloud-delivered Firewall Management Center tier within a tenant. During upgrades, additional capacity is temporarily required to bring up new instances before the older instances can be decommissioned.
-
In Azure, for debugging, if you want to log in to an FTDv instance via SSH, use the username "centos" along with the SSH key provisioned during the gateway deployment.
Alternatively you can use Azure CLI to log in to FTDv using "admin" username and the password provided during gateway deployment.
-
In AWS, for East-West traffic inspection, the security zone to be used in Access Policy is "VNI" zone. This is U-turn traffic, hence the source and the destination security zone will be the same.
In AWS, for egress traffic source, the source security zone to be used is "VNI" zone and destination to be used is "Outside" security zone.
-
In Azure, for East-West traffic inspection, the security zone to be used in Access Policy is "Inside" zone. This is U-turn traffic, hence the source and the destination security zone will be the same.
In Azure, for egress traffic, the source security zone will be "Inside" zone and the destination will be "Outside" security zone.
Follow this set of procedures to successfully create and deploy the FTDv gateway:
Limitations
Read through the following general limitations that apply when you create an FTDv gateway that is managed by Cloud-delivered Firewall Management Center:
-
You must confirm you have an active Cloud-delivered Firewall Management Center account.
-
You cannot create a gateway if your FTDv device is clustered.
-
You cannot use the FTDv gateway as an endpoint in site-to-site VPN or RA VPN.
-
Only East-West/Egress gateway types are supported.
-
You must create a new Service VPC. VPCs created before this feature was introduced do not support this functionality; note that when you create a new VPC it can still be used for both Multicloud Defense gateways or FTDv gateways.
-
If you intend to use a smart license then you must purchase a license through your Cisco seller or partner.
-
Gateway software updates must be done through the Multicloud Defense dashboard.
-
FTDv version updates and configuration changes made to the FTDv gateway must be done through the Multicloud Defense dashboard. This includes moving the FTDv device to or out of a device group, changing the policy attached to the FTDv device or device group, and other tasks that directly impact the status of the FTDv.
-
Access control policy modifications must be done through the Cloud-delivered Firewall Management Center dashboard. This implies changes to the policy itself and not how the policy is affiliated with the FTDv.
-
At this time, Jumbo frames are not supported.
-
At this time, only AWS and Azure cloud service providers support gateways affiliated with FTDv gateways.

Important
If you have an existing AWS or Azure cloud service provider, or a new AWS cloud service provider account, you must manually accept the Marketplace Terms or Terms of Use.
Licensing
The Multicloud Defense Gateway supports both Multicloud Defense licensing and Smart Licensing.
Multicloud Defense licensing is subscription-based access to software delivered via the cloud, emphasizing ease of access, scalability, and regular updates. Multicloud Defense licensing is typically subscription-based with a recurring fee that often includes maintenance, updates, and support as part of the package. Most Multicloud Defense licensing models offer scalability, enabling your organization to easily adjust the number of users or features based on current needs. Because this licensing model is based in the cloud you can expect immediate access to the latest features and updates. See Cisco Security Analytics and Logging Ordering Guide for more information.
Smart Licensing is more suited for utilizing existing licenses for cost savings in specific deployment scenarios. Opting for a smart license allows your organization to use pre-purchased licenses with their cloud or hybrid deployments, leveraging licenses that are already owned by the organization to be more cost effective. There is an added bonus that smart license is often used for specific deployment types, such as cloud or hybrid scenarios, where organizations migrate existing workloads without acquiring new licenses.
When creating your gateway for your FTDv you have the opportunity to select one of these two options, depending on your resources.
Important |
Once you deploy a gateway with an FTDv device, you cannot cannot change the licensing model. You can change the performance tier of the licensing model you selected. |
There are different tiers of licensing, as follows:
-
Base licensing - This is the standard foundational license that enables basic firewall and networking functionality, such as stateful firewalling, routing and NAT features.
-
Threat Licensing (Threat Protection) - Provides access to Intrusion Prevention System (IPS) features, enabling threat detection and prevention. It also includes signature-based detection for known vulnerabilities and threats.
-
Malware Licensing (Malware Defense) - Enables advanced malware protection through Cisco Advanced Malware Protection (AMP) and includes file trajectory, sandboxing, and retrospective malware detection capabilities.
-
URL Filtering Licensing - Allows URL filtering to control and monitor web traffic and provides access to Cisco’s global threat intelligence for web categorization.
To accompany these license types there is capacity-based licensing intended to align performance and throughput that can potentially assist in cost optimization and scalability:
-
FTDv5: Up to 100 Mbps. This is only supported in Azure.
-
FTDv10: Up to 1 Gbps. This is only supported in Azure.
-
FTDv20: Up to 3 Gbps
-
FTDv30: Up to 5 Gbps
-
FTDv50: Up to 10 Gbps
-
FTDv100: Up to 16 Gbps
Auto-Scaling
Auto-scaling helps ensure that applications have the necessary resources to maintain performance while optimizing cost efficiency. While Multicloud Defense does this automatically, know that the benefits of auto-scaling your gateway instances can include cost efficiency, optimized performance, and flexibility within your environment.
Note that auto-scaling in FTDv gateways is not the same as auto-scaling in Multicloud Defense Gateway. See Gateway Auto-scaling for more information on native auto-scaling abilities. For how auto-scaling impacts FTDv gateways and how it can elevate your experience, read the following:
-
Monitored Metrics - To ensure auto-scaling is performed appropriately and timely for your specific environment, the metrics of system memory, Snort CPU and data plane are monitored.
-
Scale Out - If any of the metrics register above the allowed thresholds, the environment scales up or out to accommodate the load or resources associated with the instances to handle traffic spikes. This triggered event is per availability zone, not the designated region.
Note
Scaling out your environment adds additional time to the deployment action.
-
Scale In - If any of the metrics register below the allowed thresholds, the environment scales down or in to accommodate the load or resources associated with the instances to handle traffic drops. This triggered event is per availability zone, not the designated region.
Multicloud Defense Egress Gateways
Egress/East-West
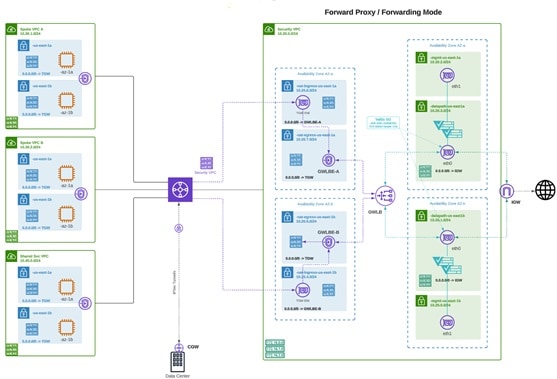
Deploying an Egress/East-West gateway to protect traffic leaving their public cloud networks. The egress gateway functions as a transparent forward proxy, performing full decryption and embedding advanced security features like intrusion prevention, antimalware, data loss prevention, and full-path URL filtering. Optionally, it can also operate in a forwarding mode, where it doesn't proxy or decrypt traffic but still applies security functionalities like malicious IP blocking and FQDN filtering.
The diagram is an example of an AWS account with an egress gateway in a centralized mode:

NAT Gateways in Egress
Note |
At this time, Multicloud Defense supports native gateways in an egress deployment for AWS and Azure ony. |
Network Address Translation (NAT) gateways are gateways designed to originate from within your cloud service provider. Egress traffic appears from a single IP address, or at least one per availability zone. By building a gateway and hosting it from within your cloud environment you can potentially increase efficiency and reduce costs. Note that if the association between the VPC or VNet in Multicloud Defense and the gateway in your cloud service provider fails, Multicloud Defense system logs capture the instance for troubleshooting.
These are the configurations that are supported:
-
Azure supports one subnet.
-
You must have at least one public IP address configured in your NAT gateway.
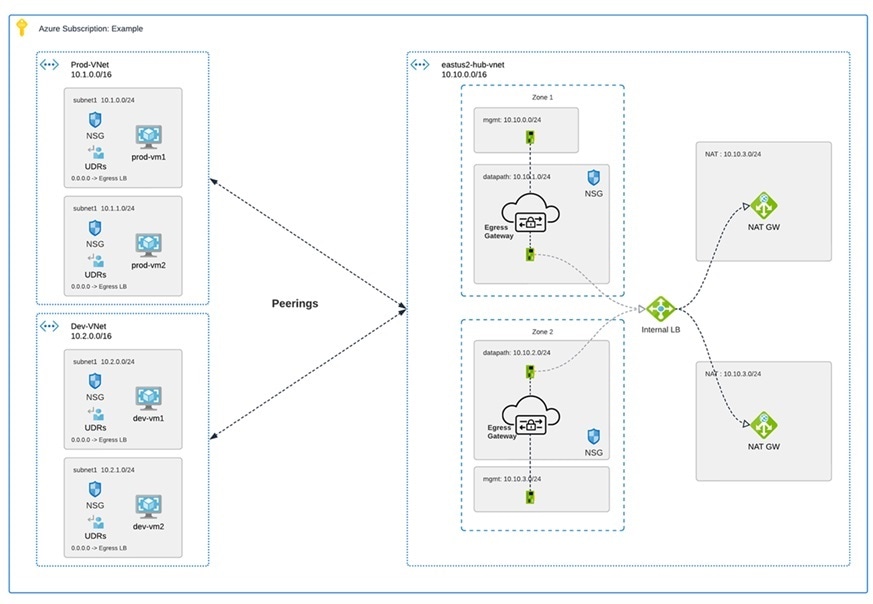
The diagram is an example of an Azure account with an egress gateway in a centralized mode:
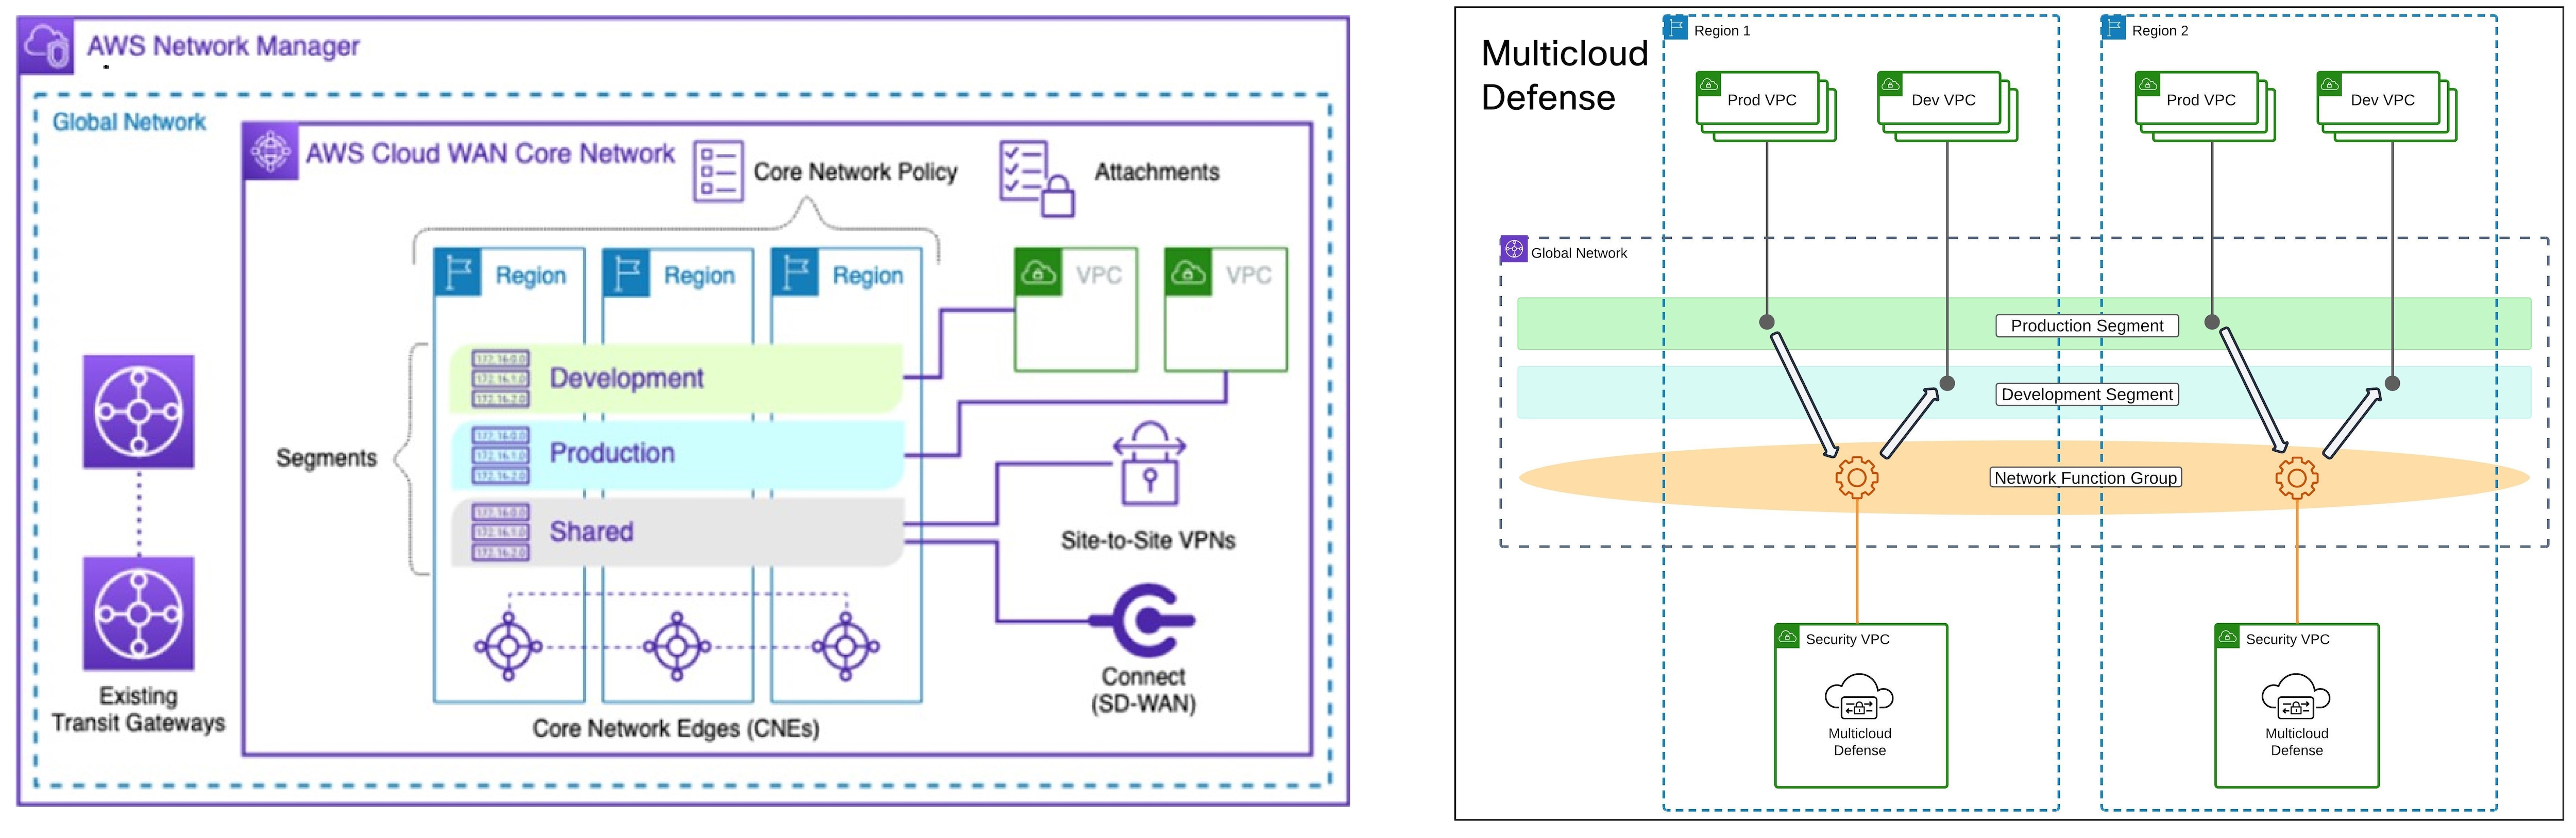
AWS CloudWAN
At this time, Multicloud Defense supports the inclusion of AWS' CloudWAN in egress gateways. CloudWAN is an intent-driven managed wide area network (WAN) service that unifies your data center, branch, and AWS networks. While it is possible to create a global network by interconnecting multiple Transit Gateways across regions, CloudWAN offers built-in automation, segmentation, and configuration management features specifically designed for building and operating global networks based on your core network policy.
This option provides enhanced features such as automated VPC attachments, integrated performance monitoring, and centralized configuration, all managed within AWS Network Manager. This enables you to centrally manage and visualize your CloudWAN core network and Transit Gateway networks across AWS accounts, regions, and on-premises locations.
Key Benefits:
-
Simplified Network Management: AWS CloudWAN provides a centralized dashboard through AWS Network Manager for managing network configurations, policies, and monitoring traffic. This greatly reduces the complexity of dealing with multiple, disparate networking solutions and offers a unified view of the network.
-
Scalability: It enables customers to easily scale their network as their business grows. As organizations expand their cloud presence and global footprint, CloudWAN can accommodate the increased demand without requiring significant manual reconfiguration
-
Optimized Performance: By leveraging AWS’s global infrastructure, CloudWAN ensures high performance and low latency connectivity across various geographic locations, improving application performance and user experience.
CloudWAN Simplification:
-
Centralized Policy Management: The core network policy, written in a declarative language, defines segments, AWS region routing, and how attachments should map to segments. With a single network policy, customers can manage their entire network’s routing and security policies, reducing the need for manual configurations and minimizing errors.
-
Automated Operations: CloudWAN automates many network management tasks, such as route propagation and policy enforcement, freeing up IT teams to focus on more strategic initiatives.
-
Seamless Integration: It integrates with other AWS services and third-party solutions, enabling customers to build a cohesive and comprehensive network infrastructure with minimal friction.
-
Enhanced Visualization: AWS Network Manager provides several dashboard visualizations, including world maps pinpointing network resources, monitoring with CloudWatch events, real-time event tracking, and topological diagrams of your network. This makes it easier to manage and monitor all aspects of your global network.
Security service insertion refers to the practice of integrating security services directly into the network path. Here are the benefits of implementing this with Multicloud Defense:
-
Enhanced Security Posture: By inserting security services into the network, traffic can be inspected, monitored, and filtered in real-time, ensuring that threats are detected and mitigated before they can impact critical resources.
-
Consistent Security Policies: Security service insertion ensures that consistent security policies are applied across the entire network, regardless of the underlying infrastructure or geographic location. This uniformity simplifies compliance and governance.
-
Improved Visibility and Control: Integrating security services provides enhanced visibility into network traffic and potential threats. Administrators can leverage advanced analytics and monitoring tools to gain deeper insights and more effectively manage security risks.
-
Reduced Latency and Complexity: By embedding security functions into the network path rather than routing traffic through separate security appliances, latency is minimized, and network complexity is reduced, leading to better performance and simpler network architecture.
-
Flexibility and Scalability: Security service insertion with Multicloud Defense enables organizations to dynamically scale their security measures in response to changing network conditions and emerging threats, ensuring robust protection at all times.
-
Centralized Security: Consolidates security resources, reducing management burden and saving on infrastructure costs.
-
Simplified Routing: Easily steer network traffic to security appliances without complex routing configurations or third-party automation tools.
-
Multi-Region Security Inspection: Simplifies multi-region deployments, allowing intra-region and inter-region traffic to pass through security infrastructure without complex configurations.
By leveraging AWS CloudWAN and Multicloud Defense for security service insertion, customers can achieve a high-performing, secure, and easily manageable network infrastructure that supports their business growth and operational resilience. Multicloud Defense allows users to create a security services VPC, attach it to an existing CloudWAN, create a Network Functions Group (NFG), and secure spoke segments by updating routing—all in an automated manner.
How to Create a Service VPC with AWS CloudWAN
To successfully create a service VPC with AWS CloudWAN, follow these steps:
-
Create Service VPCs: Establish service VPCs in multiple CNEs with required gateways.
-
Create Network Function Groups (NFGs).
-
Attach Service VPCs as NFGs: Use attachment policy rules to attach service VPCs.
-
Attach Workload VPCs: Attach VPCs to respective segments using attachment policy rules.
-
Update Routing: Modify policies and Workload VPCs to update the routing.
-
Update Core Network Policies: Apply and execute the required changes in the Core Network policies.
Consider the following limitations before you create a service VPC with AWS CloudWAN:
-
NAT gateways are mandatory for service VPCs.
-
Dual-Hop and Edge Selection is currently not supported.
-
Due to a limitation in AWS CloudWAN limitation that does not support SNAT-enabled traffic for forwarding, traffic drops for policy rulesets configured with SNAT. We strongly recommend you disable SNAT in your Multicloud Defense policy ruleset.
-
To add an additional service VPCs in different regions (CNE) use one of the two options:
-
Manual execution and application of policies are needed to update the routing for the new NFG attachment.
-
Manually update the routing tables of new service VPC datapath subnets with workload VPC routes through the Core Network.
-
Multicloud Defense Ingress Gateways
Deploying an Ingress gateway protects our public-facing applications. The Ingress gateway acts as a reverse proxy that carries out full decryption and applies advanced security functionalities such as intrusion prevention, antimalware, web application firewall (WAF), and full-path URL filtering.
The diagram is an example of an AWS account with an ingress gateway in a centralized mode.

Multicloud Defense East-West Gateways
An Egress/East-West gateway deployment implements East-West L4 segmentation between subnets or VPCs/VNets within their public cloud environments. The gateway functions in a forwarding mode with L4 firewall rules, allowing or denying traffic based on set parameters, with optional logging enabled.
The diagram shows an example of an AWS account with an east-west gateway in a centralized mode:
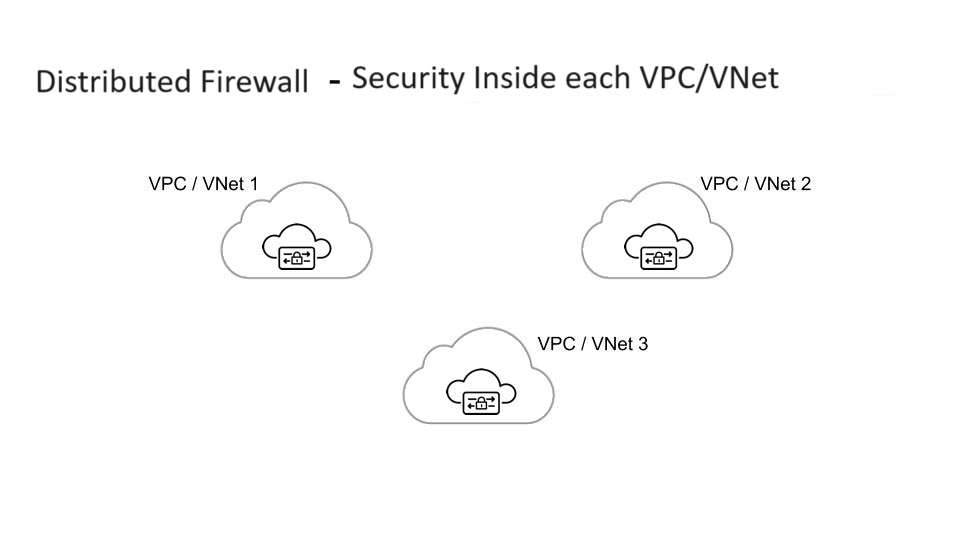
Multicloud Defense Distributed Gateways
You have applications running in multiple VPC/VNets. Deploy a Multicloud Defense Gateway in each of the VPCs/VNets.
Gateways Deployed in Centralized / Hub Mode
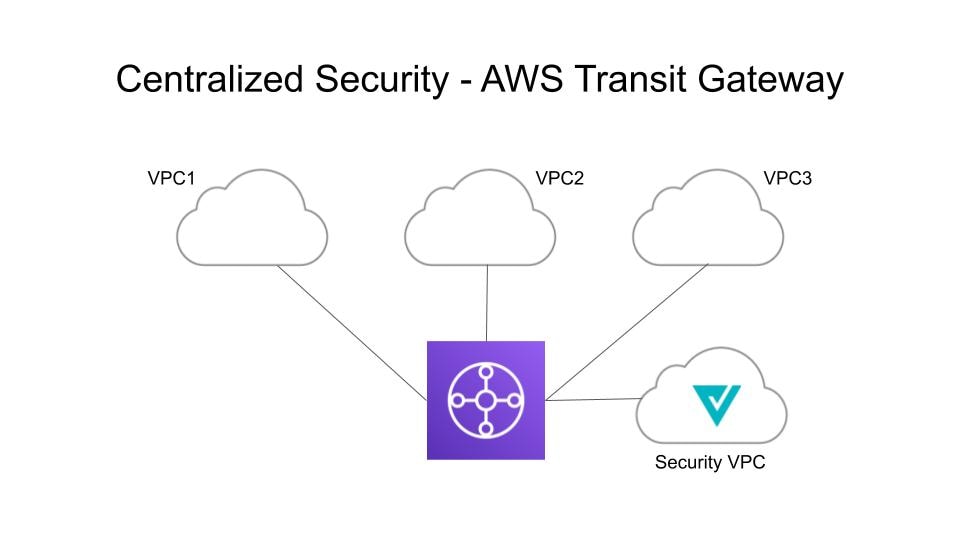
You have applications running in multiple VPCs/VNet. You would like to secure all the applications through a centralized security service VPCs or VNets. This model deploys the Multicloud Defense Gateway in a service VPC. You attach all the application VPCs (Spoke VPCs) and the Service VPC to the AWS Transit Gateway or VNet and VPC peering in Azure and GCP. Multicloud Defense provides an option to orchestrate the AWS Transit Gateway, Service VPC and the Spoke VPC Attachments. This is the recommended solution for ease of deployment, removing the complexity of multiple route tables and Transit Gateway attachments.


Advanced Gateway Configuration: Use Your Own Load Balancer
You can use a load balancer that is native to either AWS or Azure when creating a Multicloud Defense Gateway. Because AWS and Azure are different platforms, they do not use the same word for "load balancer" but the functionality mentioned below is identical in performance. Continue reading the appropriate information for the cloud service provider you currently have.
To configure your Multicloud Defense Gateway to use your own load balancer, see Add a Gateway.
Note |
Note that both of these configurations support ingress gateway deployments only. |
AWS Global Accelerator
Multicloud Defense can integrate with a set of one or more AWS global accelerators to use as an ingress point to load balance traffic across the Multicloud Defense Gateway instances. This is similar to the AWS network load balancer that is created and managed by Multicloud Defense when an ingress gateway is deployed, but offers an alternative ingress point for the ingress gateway to protect applications and workloads.
Accelerator manages the global accelerators' listener endpoint group to ensure the endpoint group has the active set of gateway instances. Client IP addresses are preserved as they pass through the global accelerator to the Multicloud Defense ingress gateway.
In order to integrate Multicloud Defense with a global accelerator, you must first create the global accelerator within AWS, defined a desired listener and created an empty endpoint group (or an endpoint group that contains the existing Multicloud Defense ingress gateway instances). Once the AWS resources exist, then configure the Multicloud Defense ingress gateway to integrate with the global accelerator.
For any additional configuration information, see the Amazon AWS documentation.
Azure Load Balancer
If you have an Azure cloud service provider, you can now use your own load balancer from Azure as part of your Multicloud Defense Gateway. The Azure load balancer funnels and processes traffic from multiple proxy servers to a system-provided backendpool that contains at least one cluster of Multicloud Defense Gateway instances. This scenario is ideal if you want to create a security policy for multiple proxy servers that handle non-HTTP traffic.
You must create a Multicloud Defense Gateway that defers to the Azure load balancer to be able to use this capability. Consider the following prerequisites and limitations:
-
You must have your Azure load balancer already configured.
-
For the load balancer to work, you must enable the floating IP for your load balancer rules.
-
We strongly recommend creating and configuring a backend pool in Azure for your custom load balancer. The backend pool does not have to contain any resources at this time and can be modified later.
-
If you opt to configure your Azure load balancer with a resource group, the Azure resource group and the Multicloud Defense Gateway's resource group must be configured for the same region.
-
If you choose to configure your Azure load balancer with a resource group, note that the load balancer resource group and the Multicloud Defense Gateway resource group do not have to be the same.
-
You can configure a health probe for your Azure load balancer but is not required.
-
The Multicloud Defense Gateway's virtual network and the Azure load balancer's virtual network should be the same.
-
The Multicloud Defense Gateway's datapth subnet and the Azure load balancer's subnet should be the same.
-
You must attach your gateway to a VPC that has at least one availaibilty zone.
For any information on how to create, modify, or complete an Azure load balancer, see Microsoft Azure documentation.
Azure UDP Fragmentation
While it is recommended to avoid fragmentation in general, there may be scenarios where fragmentation does occur and the Azure load balancer drops packets.
To enable support for fragmentation, contact Cisco Support.

 Feedback