Managing role-based access control

A Security Provisioning and Administration administrator manages users, groups, and roles within the enterprise. From a centralized location, the administrator can invite new users, disable accounts, organize user groups, and manage user access roles for all the products in the enterprise.

Role-based access control in an enterprise

Security Provisioning and Administration supports role-based access control (RBAC) to automate access management across the enterprise. A role defines the level of user access to functions within a product. With Security Provisioning and Administration, you can centralize the management of user roles within an enterprise, allowing enterprise users to switch seamlessly between products without the need to log in repeatedly.

As an enterprise administrator, you can define applicable user roles for a product and assign one or more roles to each user. You can organize user accounts into manageable units called groups, which lets you assign roles to multiple users simultaneously. Each group can be assigned one or more roles and the members of the group inherit those roles.

The Security Provisioning and Administration user interface offers separate pages to manage users, groups, and roles.

On the Users page, you can…

On the Groups page, you can…

On the Roles page, you can…

  • Create users

  • Assign roles to users

  • Add users to groups

  • Edit the name of a user

  • Disable a user account

  • Restore a user account

  • View the list of users

  • Search for a user based on the name, type, or status

User accounts are segregated based on their status:

  • Current Accounts – This tab displays all active users.

  • Pending Invitations – This tab displays all users that are invited and whose activations are pending.

  • Disabled Accounts – This tab displays all those users whose accounts are disabled.

  • Create a group and add users to the group

  • Edit a group name

  • Add or remove users from a group

  • Assign roles to a group

  • Delete a group

  • View the list of groups that are created for the enterprise

  • View the list of roles that are associated with a product

  • Assign roles to users and groups

  • Edit or remove roles that are assigned to users or groups

Managing users

  • To manually add new users to the enterprise, see Invite a user. This task allows you to add new users to groups and assign them roles, making it useful for onboarding new users. A maximum of 20 users can be invited at once using this task.

  • To create new users automatically by importing user details into the enterprise, see Import users. This task allows you to add users by uploading a .csv file with details of up to 20 users. After the file is uploaded, you can add those users to groups and assign them roles.

  • To edit the name of a user, see Edit a user name.

  • To disable users, see Disable user accounts.

  • To restore access to disabled users, see Restore user access.

  • To remove a user from the enterprise, see Remove users from an enterprise.

Managing groups

Groups let you organize user accounts into a unit to assign uniform roles and permissions.


Note


Creating a group is optional but it is beneficial when you need to manage a set of users who share common permissions.


  • To create a new group and add members to the group, see Create a new group.

  • To edit the name and description of the group, see Edit a group name.

  • To assign one or multiple roles to groups, see Assign roles to groups. All users in the group inherit the group role.

  • To view all the groups that are created for the enterprise, go to the Groups page. The Groups page displays a list of all the groups in the enterprise.

  • To remove users from a group and delete a group after all the users are removed, see Remove group users and Delete groups.

Managing roles

Security Provisioning and Administration enables role-based access control at a product instance level. This allows you to assign roles to users within each product instance, providing precise control over administrative access.

The following are the various ways in which you can assign and manage the roles of users and groups:


Important


All tasks that are listed in this document are performed only after logging in to the Security Provisioning and Administration application.


Invite a user

Enterprise administrators can invite a user to join an enterprise.

This task allows you to add new users to groups and assign them roles, making it useful for onboarding new users. A maximum of 20 users can be invited at once using this task.

Procedure


Step 1

Click Users in the left navigation pane.

Step 2

In the Users page, click the Invite users button.

Step 3

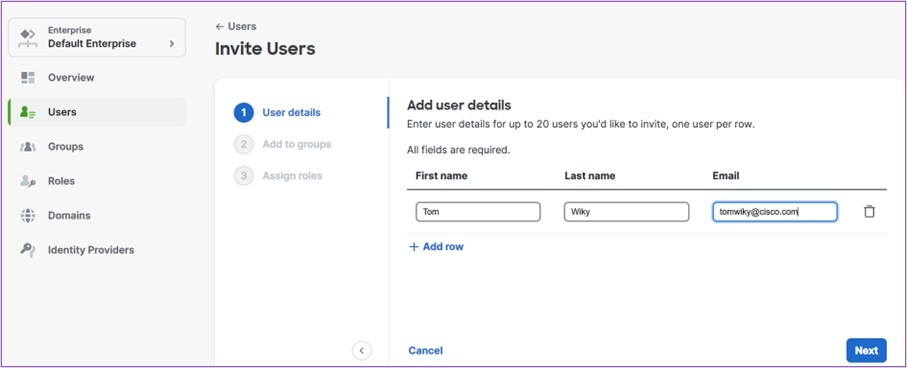
In the Add user details pane, provide the first name, last name, and email address of the user.

To proceed to the next step, ensure that you have entered the email address in the correct format and the email address doesn't already exist in the enterprise.

You can add up to 20 user accounts, using the Add row option.

Step 4

Click Next.

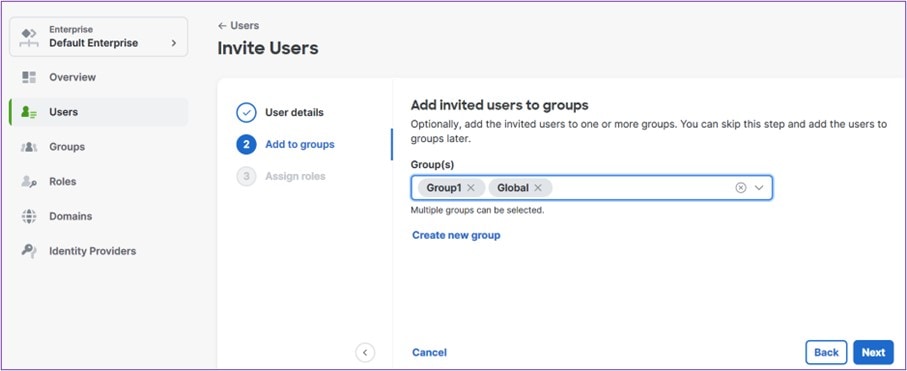
This step enables the Add to groups option.

Step 5

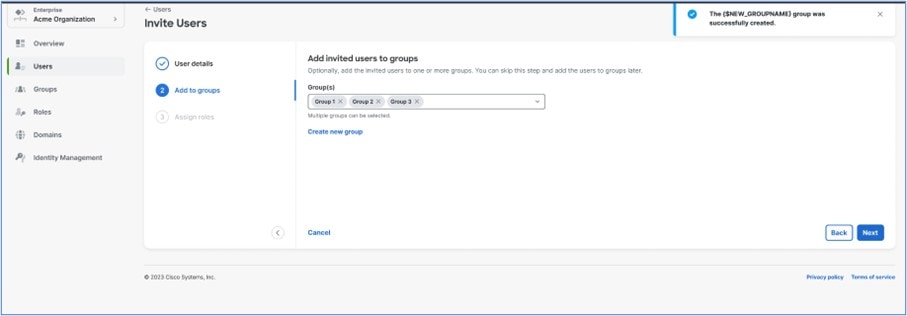
(Optional) In the Add invited users to groups pane, choose a group or groups from the Group(s) drop-down list. This lets you add the invited users to the selected groups.

You can create a new group and add the users to the new group:

  1. To create a new group, click Create new group.

  2. In the Create New Group slide-in pane, enter the group name and description.

  3. Click the Create group button.

    The new group is added to the list of groups to which the invited user will be added.

Step 6

Click Next.

This step enables the Assign roles option.

Step 7

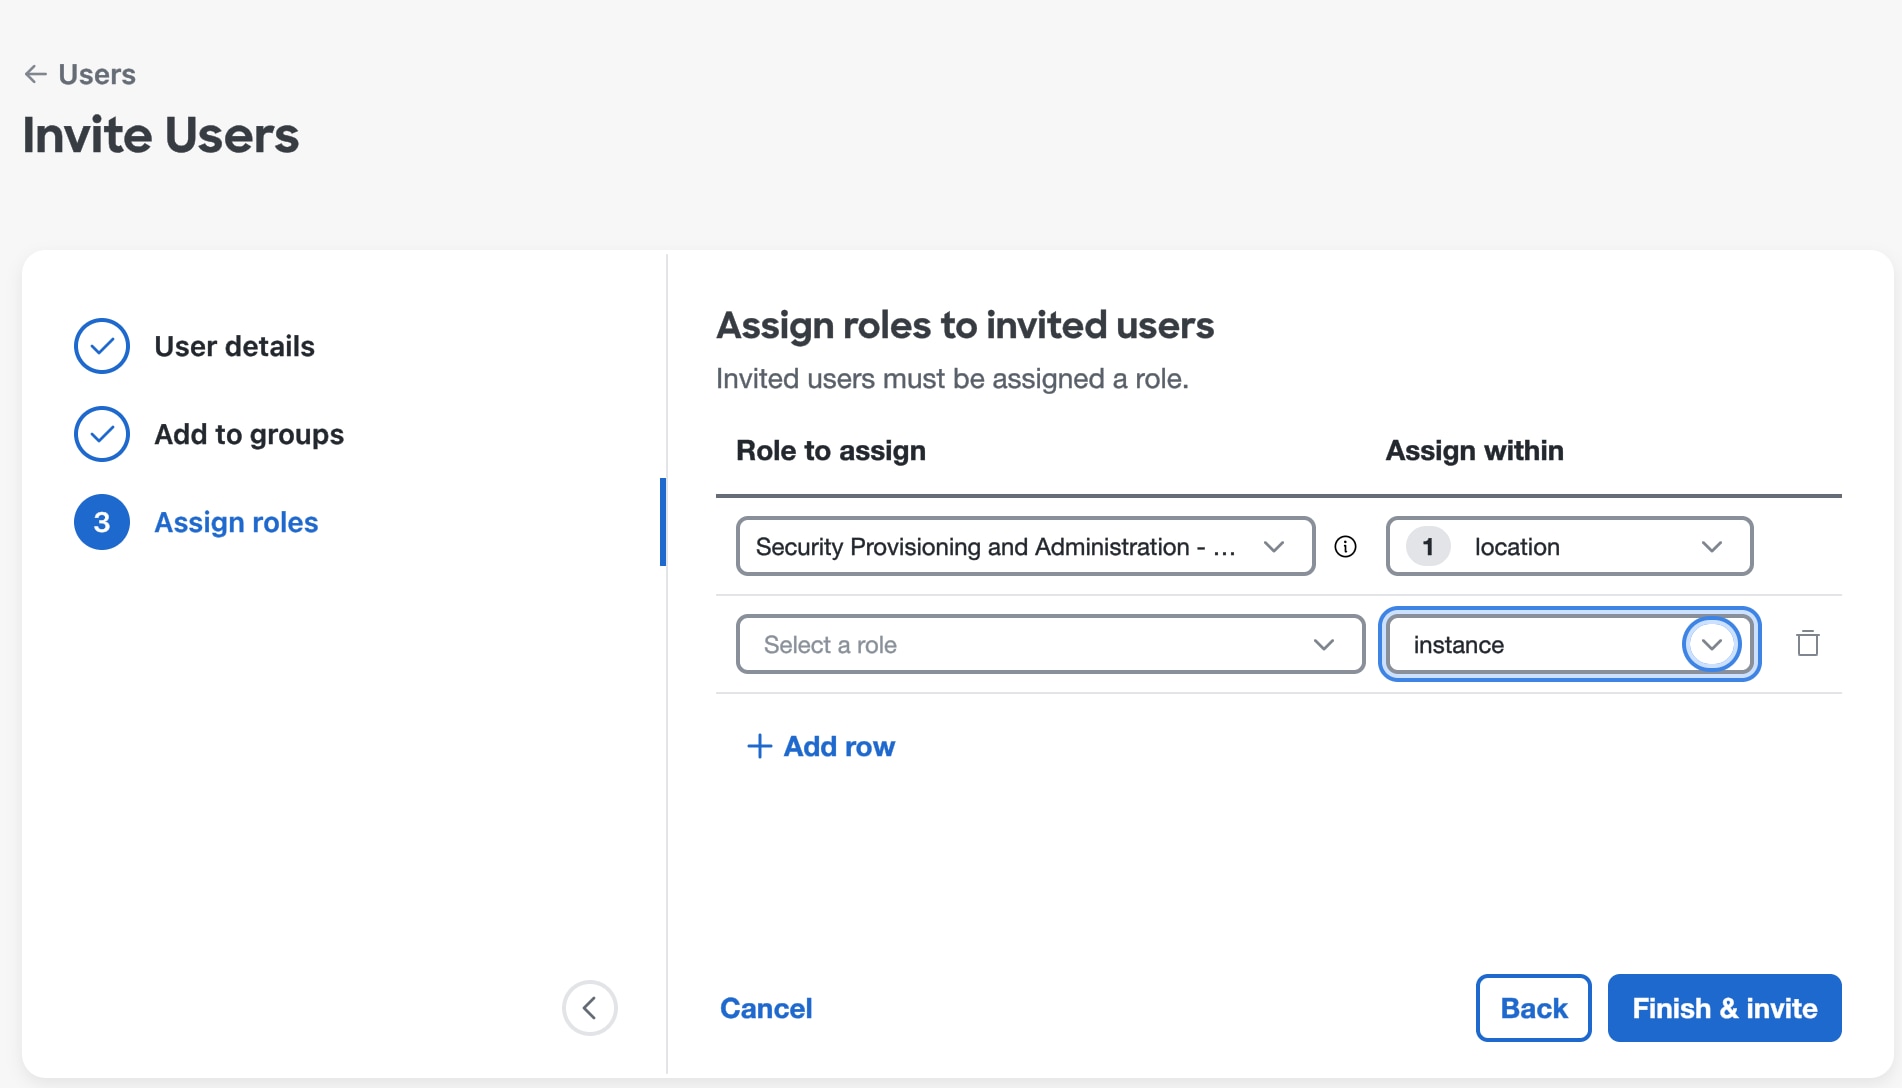
In the Assign roles to invited users pane:

  1. Choose a role from the Roles to assign drop-down list.

    This is a mandatory step for Security Provisioning and Administration to assign either a member or administrator role to the user.

  2. To associate the selected role to the enterprise, choose Enterprise from the Assign within drop-down list.

  3. To add more product roles to the user, click Add row.

    1. Choose a product role from the Roles to assign drop-down list.

    2. Choose the corresponding product instance from the Assign within drop-down list.

Step 8

Click Finish & invite.

Invited users are sent an email with an activation link that expires in one hour.

On the Users page, click the Pending invitations tab to view invitations that haven't been activated yet.

If you have invited a user who already exists in Security Provisioning and Administration, that user appears in the Current Accounts tab on the Users page.


Import users

Automate the process of inviting multiple users to an enterprise by importing a file that contains the details of users.

Procedure


Step 1

Click Users in the left navigation pane.

Step 2

In the Users page, click the Import users button.

Step 3

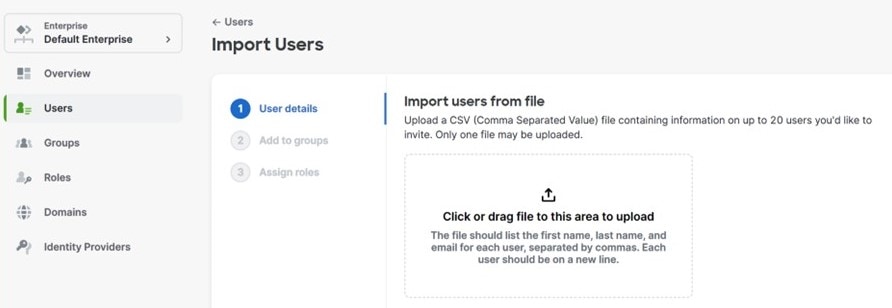
In the Import users from file pane, upload or drag and drop a .csv file.

Note


The file should list the first name, last name, and email address for each user, separated by commas. Each user must be listed on a separate line.

After the file is successfully imported, the Add to groups option is enabled.

Step 4

(Optional) From the Group(s) drop-down list, choose the group or groups to add the invited users.

Step 5

Click Next.

This step enables you to assign roles to the users.

Step 6

In the Assign roles to invited users pane:

  1. Choose a role from the Roles to assign drop-down list.

    This is a mandatory step for Security Provisioning and Administration to assign either a member or administrator role to the user.

  2. To associate the selected role to the enterprise, choose Enterprise from the Assign within drop-down list.

  3. To add more product roles to the user, click Add row.

    1. Choose a product role from the Roles to assign drop-down list.

    2. Choose the corresponding product instance from the Assign within drop-down list.

Step 7

Click Finish & invite.

Invited users are sent an email with an activation link that expires in one hour.

On the Users page, click the Pending invitations tab to view invitations that haven't been activated yet.

If you have invited a user who exists in Security Provisioning and Administration, that user appears in the Current Accounts tab.


View or find users

Users page displays the list of users in the enterprise.

Each tab on the Users page provides a search bar to find a user based on the type, status, or name of the user.

Procedure


Step 1

Click Users in the left navigation pane.

By default, the Current Accounts tab displays a list of all users in the enterprise. For each user, the name, type, and status are displayed.

Step 2

Click the Pending Invitations tab to view the list of users whose account activation is pending.

At this stage, a user could either be in Staged or Provisioned status.

Step 3

Click the Current Accounts tab to view the list of active users in your enterprise.

Step 4

Click the Disabled Accounts tab to see the list of users whose accounts have been locked out or suspended.

For a user in the Locked out or Enterprise disabled state, the administrator must restore access to the user. A user in the Suspended or Deprovisioned state can’t get access to the enterprise.


Edit a user

An administrator can edit a user’s first or last name. A user's email address can’t be changed.

Procedure


Step 1

Click Users in the left navigation, then click Current Users.

Step 2

Click the menu icon and select Edit.

Step 3

Edit the user's first name or last name.

Step 4

Click Update.


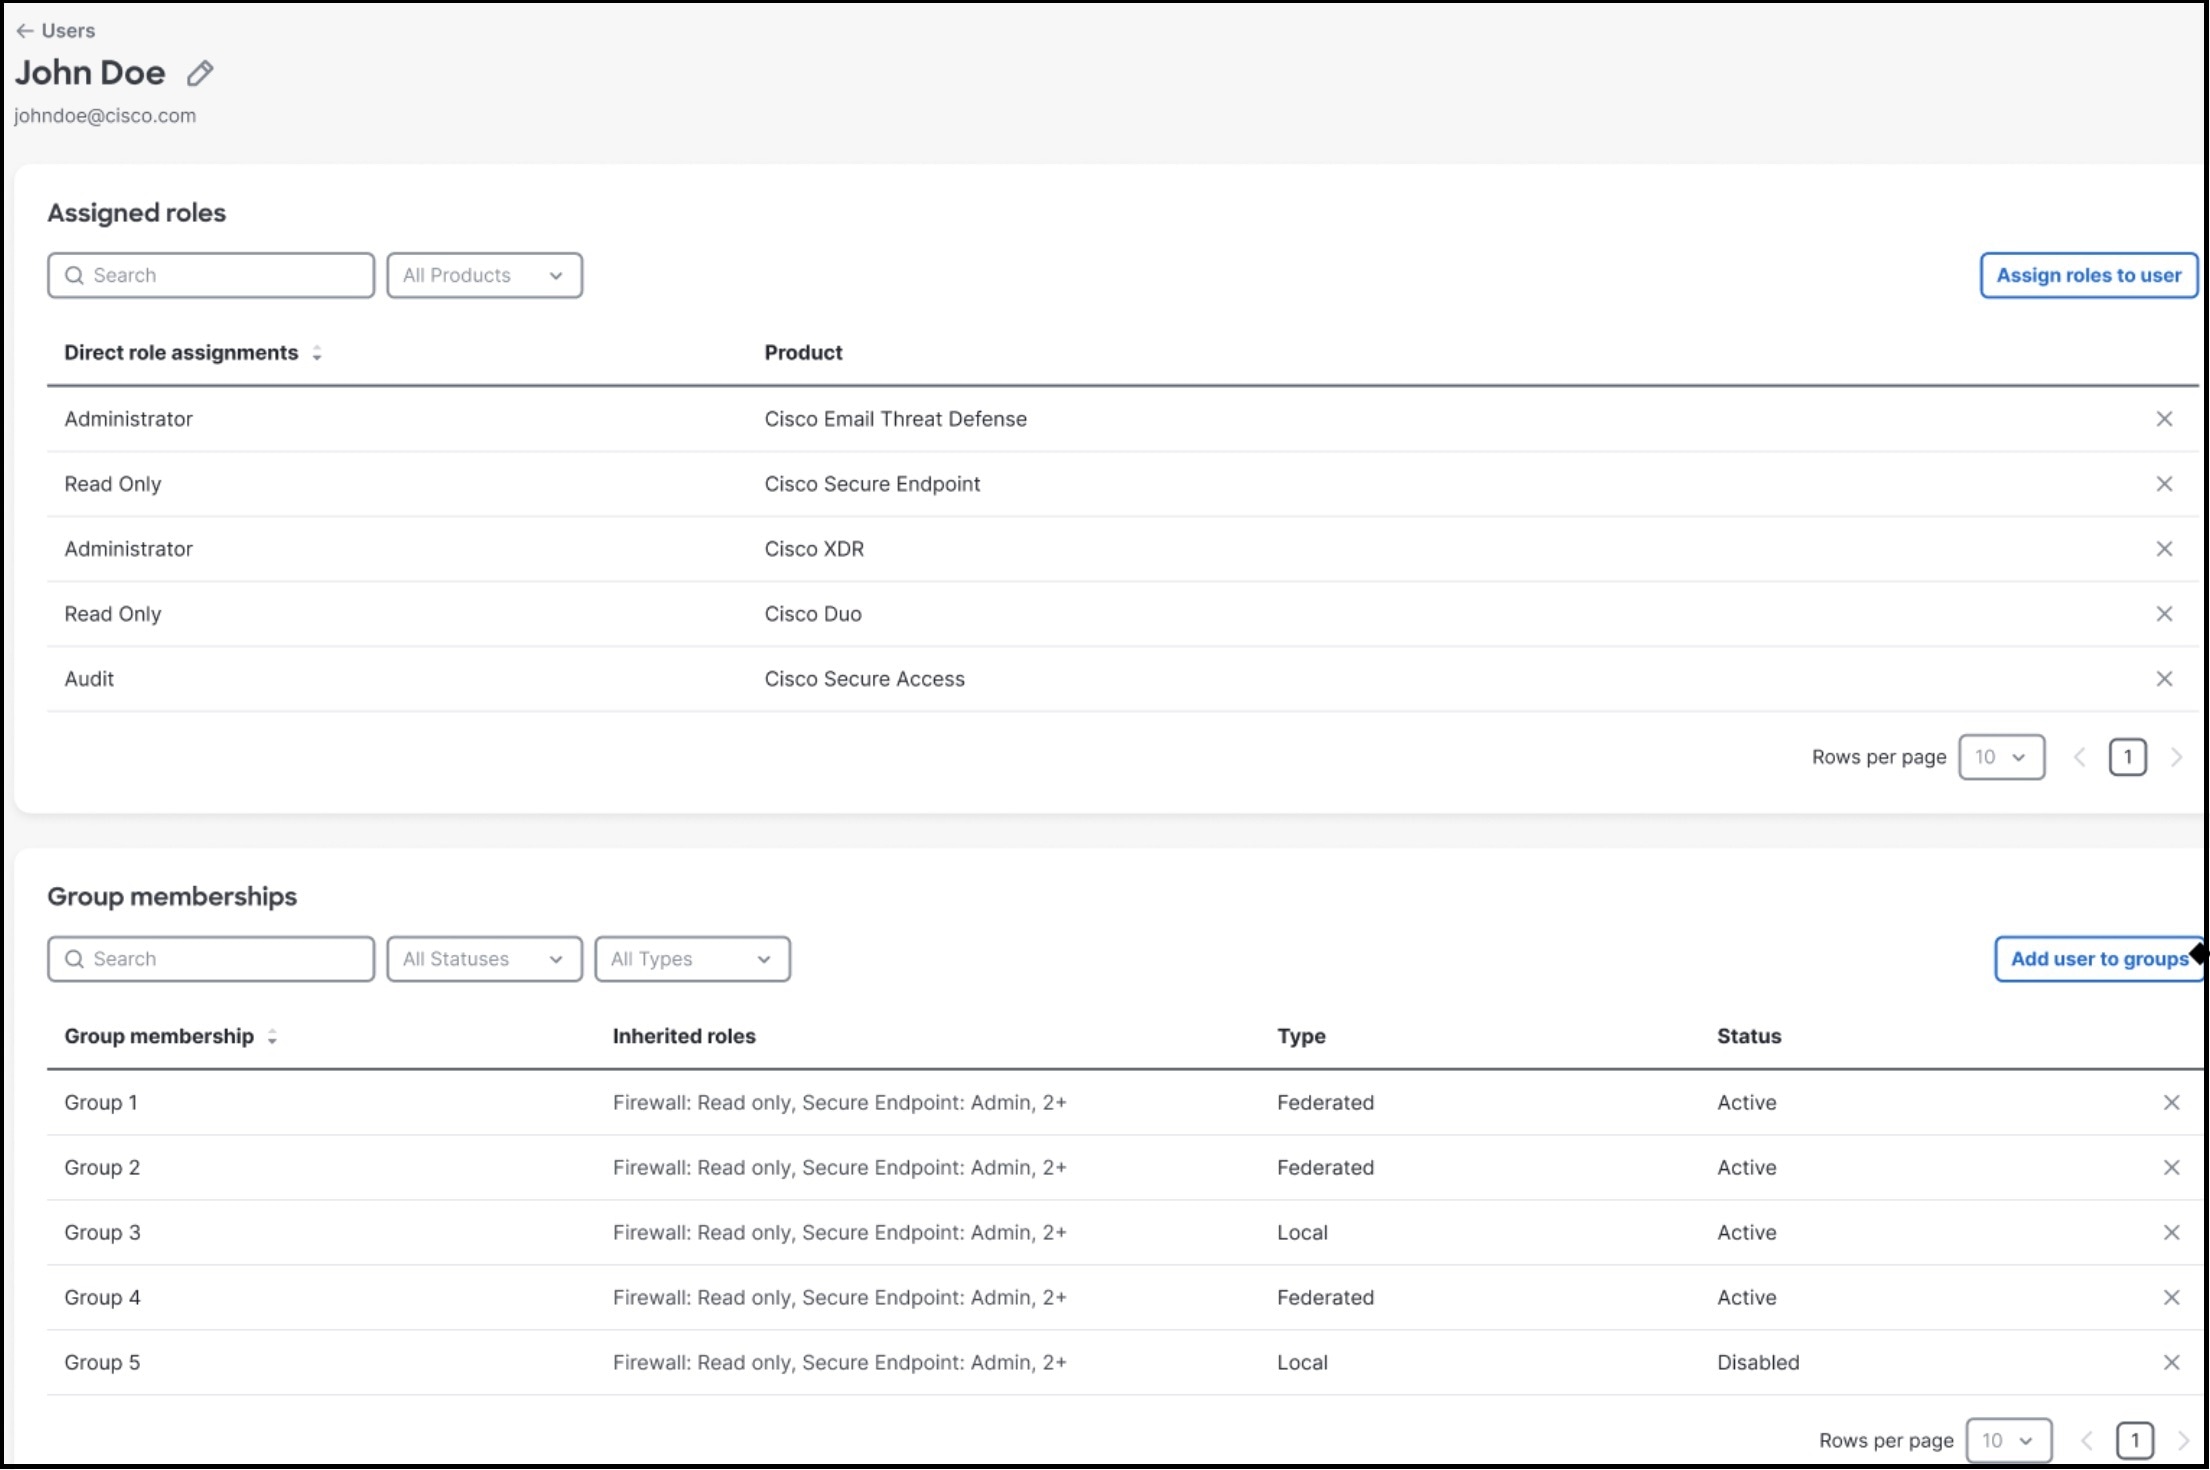
Assign roles to a user

An enterprise administrator can assign one or more roles to a user.

Procedure


Step 1

Click Users in the left navigation pane.

Step 2

In the Users page, click the Current Accounts tab.

Step 3

Click the three-dot menu icon that is next to the user that you want to edit and select Edit.

Step 4

Click the Assign roles to user button at the top-right corner of the page.

Step 5

In the Assign Roles slide-in pane:

  1. From the Product and role drop-down list, choose the role of the user for the product.

  2. From the Product Instances drop-down list, choose the product instances to assign the selected role.

    You can choose multiple product instances for the selected role.

    Note


    If you choose Select All from the Product instances drop-down list, the selected role applies to all the product instances. If a new instance of the product is added to enterprise later, the selected role does NOT automatically apply to the new product instance. You can have to repeat this task to assign roles in the new instance.

    Click Add row to add more user roles for each product instance.

Note


A user can be assigned multiple roles for a given product.

Step 6

Click Assign roles.


The selected product-roles are assigned to the corresponding users.

Add a user to groups

An enterprise administrator can add a user to groups. The user inherits the roles of the group.

Procedure


Step 1

Click Users in the left navigation pane.

Step 2

In the Users page, click the Current Accounts tab.

Step 3

Click the three-dot menu icon adjacent to the user whose details you want to add and select Edit.

Step 4

Under the Group memberships section, click the Add user to groups button.

Step 5

In the Add to Groups slide-in pane, choose the relevant groups from the Group(s) drop-down list.

Note


Multiple groups can be assigned to a user.

Step 6

Click Add to groups.


Assign roles to existing users

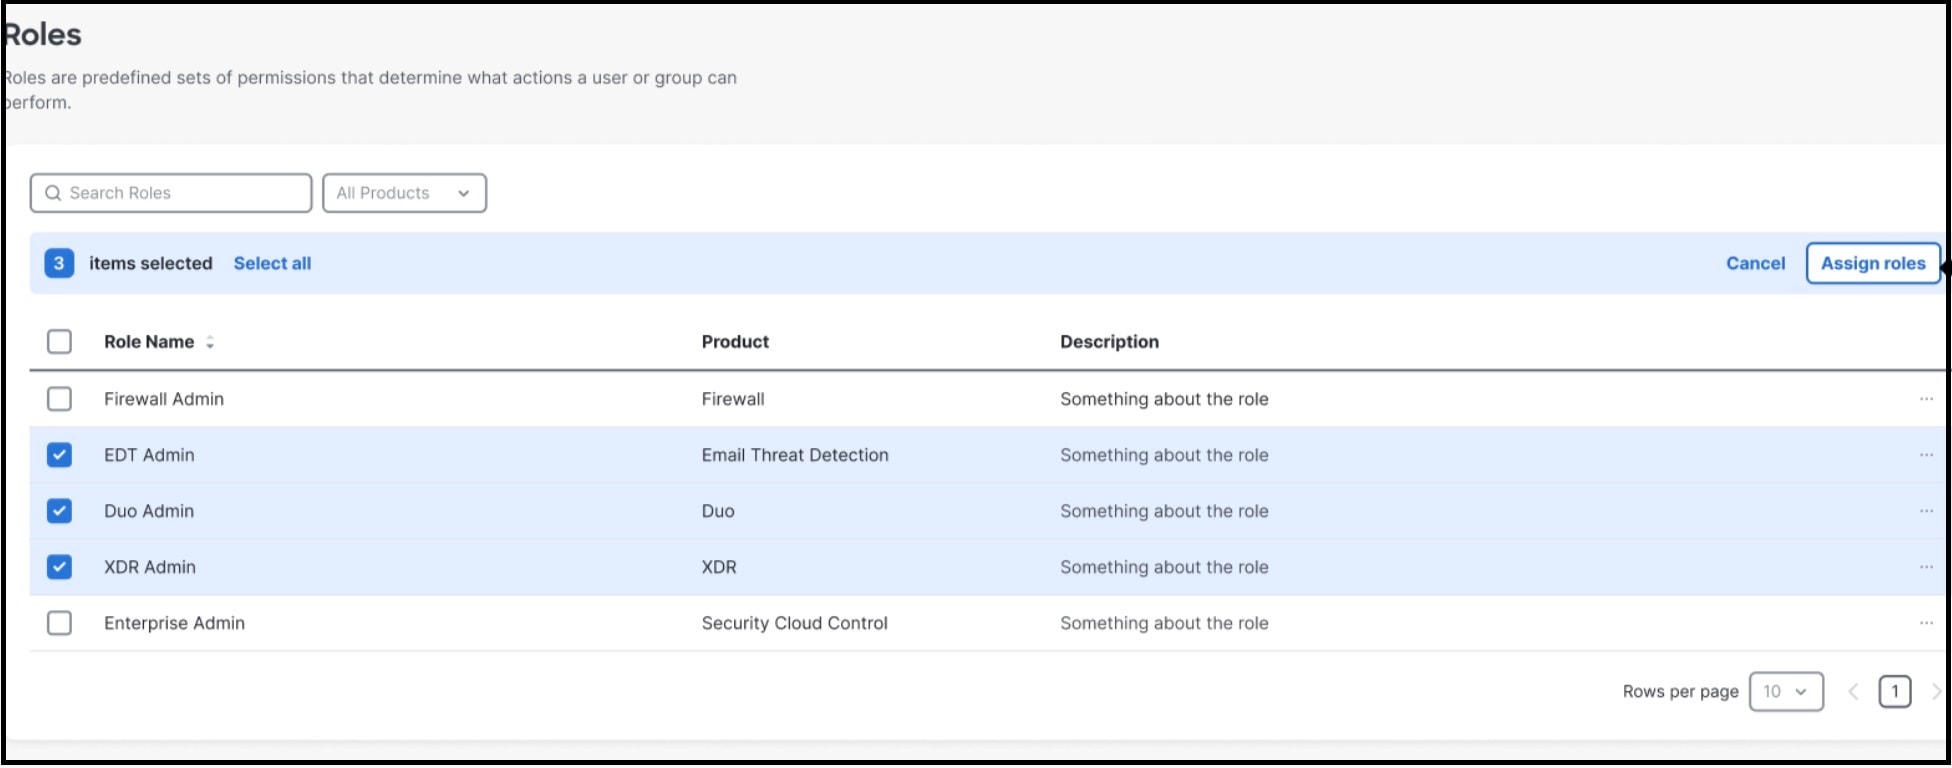
A role enables you to assign predefined permissions to a user or group. An administrator can assign multiple roles to one or more users or groups.

Procedure


Step 1

Click Roles in the left navigation pane.

The Roles page displays a list of roles mentioning the name, the product it belongs to, and a description of the role.

Step 2

In the Roles page, choose the roles that you want to assign, by checking the check boxes that are adjacent to the role names.

Note


Multiple roles can be assigned to users and groups.

Step 3

Click Assign roles.

Step 4

In the Assign Roles slide-in pane, choose the users and groups from the Users and Groups drop-down lists respectively.

Step 5

Click Assign roles.

The selected roles are assigned to the chosen users and groups.


Remove role assignments

An enterprise administrator can assign or unassign the roles that are assigned to users and groups.

Procedure


Step 1

Click Roles in the left navigation pane.

Step 2

In the Roles page, click the three-dot menu icon that is next to the role to be removed, and select Show Details.

The resulting page displays all the users and groups that are assigned the selected role.

Step 3

To disassociate the selected role from a user or a group, click the X icon that is adjacent to the user or group.

  1. Click Remove in the confirmation dialog box.


The user or the group do not have the permissions of the role that is removed.

Reset the multi-factor authentication settings

If your enterprise uses Duo Multi-Factor Authentication (MFA) to authenticate with Security Cloud Sign On, you can reset a user's Duo MFA settings. Resetting deletes the MFA credentials of the user and allows the user to set up new authentication factors and credentials.

Procedure


Step 1

Click Users in the left navigation pane and under the Current Users tab, locate the user.

Step 2

Click the three-dot menu icon for the user and select Reset MFA.

Step 3

Click Reset MFA in the confirmation dialog box.


On the next sign-in, that user is prompted to set up the Duo MFA credentials and authentication factors.

Reset user password

Enterprise administrators can reset the password for users that belong to a verified email domain.

Procedure


Step 1

Select the Users tab.

Step 2

Under Current Accounts, locate the user whose password you want to reset and click the three-dot menu icon .

Step 3

In the drop-down menu, click Reset password.

In the confirmation dialog box, click Reset password.


On the next sign-in, that user is prompted to reset the password.

Disable a user account

An enterprise admin can disable user accounts. A disabled user account loses all access privileges.

Procedure


Step 1

Click Users in the left navigation pane.

Step 2

In the Users page, click the Current accounts tab.

Step 3

Click the three-dot menu icon adjacent to the user and select Disable account.

Step 4

In the dialog box that displays, click Disable account.

The user account is displayed in the Disabled Accounts tab on the Users page.


Restore a user account

An enterprise admin can restore a disabled user account.

Procedure


Step 1

Click Users in the left navigation pane.

Step 2

In the Users page, click the Disabled Accounts tab.

Step 3

Click the three-dot menu icon adjacent to the user and select Restore access.

Step 4

In the dialog box that displays, click Restore access.

The user access, including all groups and roles the user was previously associated with, is restored. The user is displayed in the Current Accounts tab on the Users page.


Remove a user account

An enterprise administrator can remove a user account from the enterprise.

Procedure


Step 1

Click Users in the left navigation pane.

Step 2

In the Current Accounts tab, click the three-dot menu adjacent to the user entry that you want to delete, and select Remove user.

Step 3

In the Remove User dialog box, click Remove.

The user account is removed from the enterprise and the user will no longer have access to any of the products within the enterprise.


Create a new group

An enterprise administrator can create a group and add users to the group.

Procedure


Step 1

Click Groups in the left navigation pane.

Step 2

In the Groups page, click Add group.

Step 3

Enter details in the Name and Description fields.

Note


The group name should not exceed 50 characters.

Step 4

Click Next.

Step 5

(Optional) To add users to the group, select users from the Add users drop-down list.

Step 6

Click Finish.

The new group is listed in the Groups page.


Edit a group name

An enterprise administrator can change the name and description of a group.

Procedure


Step 1

Click Groups in the left navigation pane.

Step 2

In the Groups page, click the three-dot menu icon adjacent to the group that you want to edit and select the Edit option.

Step 3

In the Groups page, click the pencil icon to edit the group name.

Step 4

In the Edit Group Name slide-in pane, edit the name and description of the gorup.

Step 5

Click Update.

You can see the updates to the group name on the Groups page.


Assign roles to groups

An enterprise administrator can assign one or more roles to users and groups.

Procedure


Step 1

Click Groups in the left navigation pane.

Step 2

In the Groups page, click the three-dot menu icon that is next to the group and select the Edit option.

Step 3

In the Groups page, under the Assigned roles section, click the Assign roles button.

Step 4

In the Assign Roles slide-in pane:

Note


A group can be assigned multiple roles for a product.

  1. Choose a role from the Product and role drop-down list.

  2. From the Product Instance drop-down list, choose the product instance to assign the selected role.

    You can choose to assign the selected role to multiple product instances.

Step 5

Click Assign roles.


The newly assigned roles are listed in the Assigned Roles section of the Groups page.

Remove users from a group

An enterprise administrator can remove users from a group.

Procedure


Step 1

Click Groups in the left navigation pane.

Step 2

In the Groups page, click the three-dot menu icon adjacent to the group from which you want to remove users and select the Edit option.

Step 3

From the list of users in the selected group, select the users to be removed from the user list.

Step 4

Click the Remove users button.

In the confirmation dialog box that is displayed, click Remove users to confirm the remove action.

After a user is removed from the group, the user list on the Groups page doesn’t display the user.


Delete a group

You can delete a group only if it has no members.

Procedure


Step 1

Click Groups in the left navigation pane.

Step 2

Click the three-dot menu icon adjacent to the group that you want to delete and select Delete.

Step 3

In the confirmation Delete Group dialog box, click Delete.