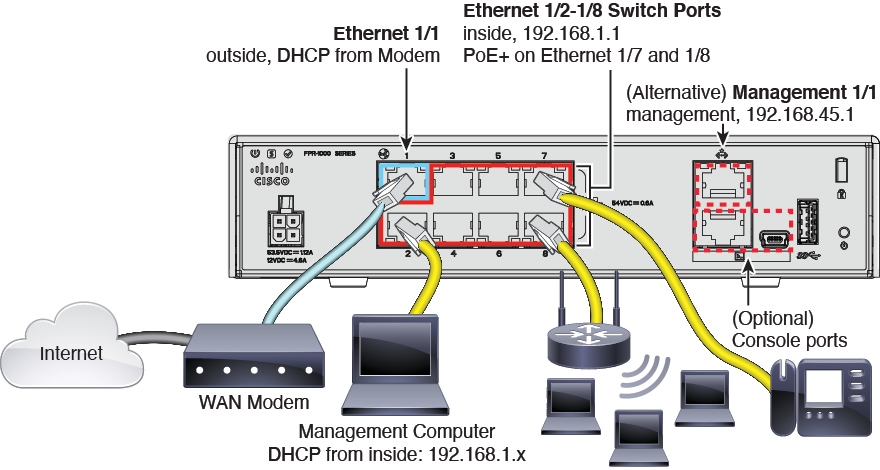
Cable the Firewall
See the hardware installation guide for more information.
The documentation set for this product strives to use bias-free language. For the purposes of this documentation set, bias-free is defined as language that does not imply discrimination based on age, disability, gender, racial identity, ethnic identity, sexual orientation, socioeconomic status, and intersectionality. Exceptions may be present in the documentation due to language that is hardcoded in the user interfaces of the product software, language used based on RFP documentation, or language that is used by a referenced third-party product. Learn more about how Cisco is using Inclusive Language.
Configure an ASA using ASDM.
See the hardware installation guide for more information.
System power is controlled by the power cord; there is no power button.
|
Step 1 |
Attach the power cord to the firewall, and connect it to an electrical outlet. The power turns on automatically when you plug in the power cord. |
|
Step 2 |
Check the Power LED on the back of the firewall; if it is solid green, the firewall is powered on. 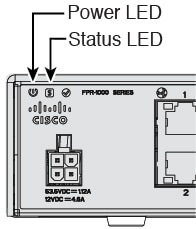
|
|
Step 3 |
Check the System LED on the back of the firewall; after it is solid green, the system has passed power-on diagnostics. |
Both applications, threat defense or ASA, are supported on the hardware. Connect to the console port and determine which application was installed at the factory.
|
Step 1 |
Connect to the console port using either port type. 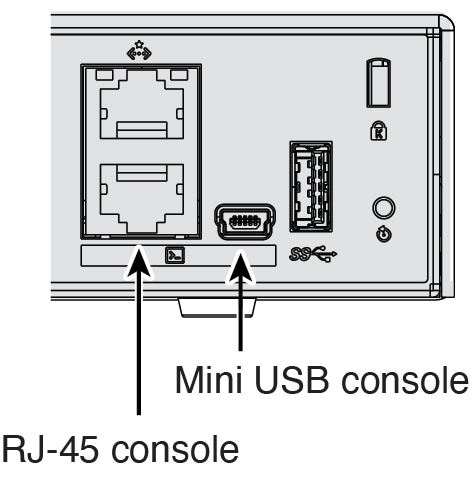
|
|
Step 2 |
See the CLI prompts to determine if your firewall is running threat defense or ASA. Threat Defense You see the firepower login (FXOS) prompt. You can disconnect without logging in and setting a new password. ASA You see the ASA prompt. |
|
Step 3 |
If you are running the wrong application, see Cisco Secure Firewall ASA and Secure Firewall Threat Defense Reimage Guide. |
You might need to access the CLI for configuration or troubleshooting.
|
Step 1 |
Connect to the console port using either port type.
|
|
Step 2 |
You connect to the ASA CLI in user EXEC mode. This mode lets you use many show commands. |
|
Step 3 |
Access privileged EXEC mode. This password-protected mode lets you perform many actions, including accessing configuration modes. enable You are prompted to change the password the first time you enter the enable command. Example: |
|
Step 4 |
Access global configuration mode. configure terminal Example: |
|
Step 5 |
Access the FXOS CLI. Use this CLI for troubleshooting at the hardware level. connect fxos [admin]
You are not prompted for user credentials. The current ASA username is passed through to FXOS, and no additional login is required. To return to the ASA CLI, enter exit or type Ctrl-Shift-6, x. Example: |
When you bought your device from Cisco or a reseller, your licenses should have been linked to your Smart Software License account. If you don't have an account on the Smart Software Manager, click the link to set up a new account.
Essentials—Required
Security Plus—For Active/Standby failover
Cisco Secure Client
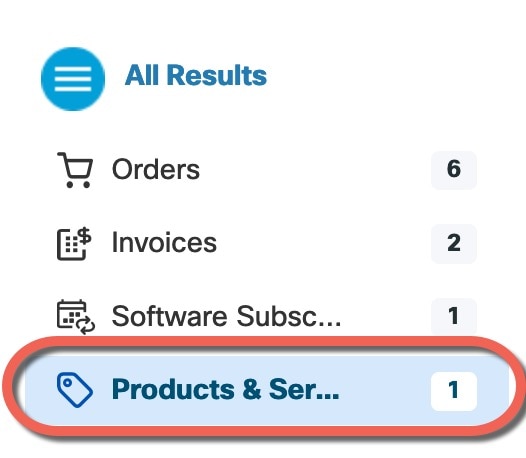
If you need to add licenses yourself, go to Cisco Commerce Workspace and use the Search All field.

Choose Products & Services from the results.
Search for the following license PIDs.
 Note |
If a PID is not found, you can add the PID manually to your order. |
Essentials—L-FPR1000-ASA=. Required.
Security Plus—L-FPR1010-SEC-PL=. The Security Plus license enables failover.
Cisco Secure Client—See the Cisco Secure Client Ordering Guide. You do not enable this license directly in the ASA.
 Feedback