Configure a Basic Policy

Configure licensing and add onto your default configuration using ASDM wizards.

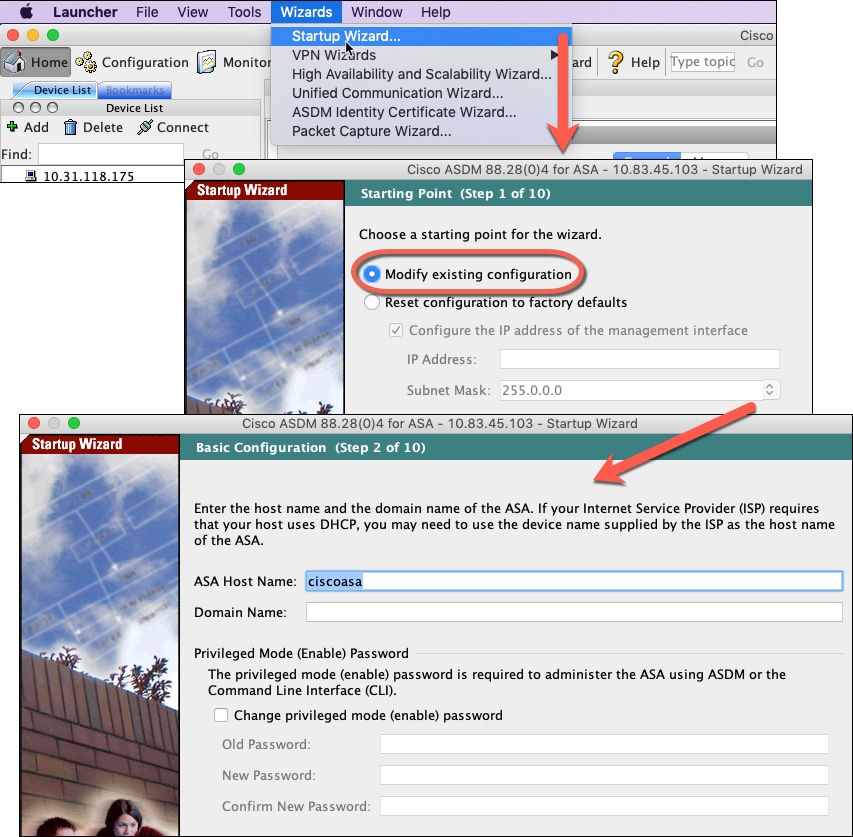
(Optional) Change the IP Address

By default, you can launch ASDM from the following interfaces:

  • Ethernet 1/2 through Ethernet 1/8—192.168.1.1

  • Management 1/1—192.168.45.1

If you cannot use the default IP address, you can set the IP address of the Management 1/1 interface at the ASA CLI.

Procedure


Step 1

Connect to the console port and access global configuration mode. See Access the ASA CLI.

Step 2

Restore the default configuration with your chosen IP address.

configure factory-default [ip_address [mask]]

Example:


ciscoasa(config)# configure factory-default 10.1.1.151 255.255.255.0
Based on the management IP address and mask, the DHCP address
pool size is reduced to 103 from the platform limit 256

WARNING: The boot system configuration will be cleared.
The first image found in disk0:/ will be used to boot the
system on the next reload.
Verify there is a valid image on disk0:/ or the system will
not boot.

Begin to apply factory-default configuration:
Clear all configuration
Executing command: interface management1/1
Executing command: nameif management
INFO: Security level for "management" set to 0 by default.
Executing command: ip address 10.1.1.151 255.255.255.0
Executing command: security-level 100
Executing command: no shutdown
Executing command: exit
Executing command: http server enable
Executing command: http 10.1.1.0 255.255.255.0 management
Executing command: dhcpd address 10.1.1.152-10.1.1.254 management
Executing command: dhcpd enable management
Executing command: logging asdm informational
Factory-default configuration is completed
ciscoasa(config)# 

Step 3

Save the default configuration to flash memory.

write memory


Log Into ASDM

Launch ASDM so you can configure the ASA.

Procedure


Step 1

Enter one of the following URLs in your browser.

  • https://192.168.1.1 —Inside interface IP address.You can connect to the inside address on any inside switch port (Ethernet1/2 through 1/8).

  • https://192.168.45.1 —Management 1/1 interface IP address.

Note


Be sure to specify https://.

The Cisco ASDM web page appears. You may see browser security warnings because the ASA does not have a certificate installed; you can safely ignore these warnings and visit the web page.

Step 2

Click Install ASDM Launcher.

Step 3

Follow the onscreen instructions to launch ASDM.

The Cisco ASDM-IDM Launcher appears.

Step 4

Leave the username and password fields empty, and click OK.

The main ASDM window appears.


Configure Licensing

Register the firewall with the Smart Software Manager.

Before you begin

Obtain licenses for your firewall according to Obtain Licenses.

Procedure


Step 1

In the Cisco Smart Software Manager, request and copy a registration token for the virtual account to which you want to add this device.

  1. Click Inventory.

  2. On the General tab, click New Token.

  3. On the Create Registration Token dialog box enter the following settings, and then click Create Token:

    • Description

    • Expire After—Cisco recommends 30 days.

    • Max. Number of Uses

    • Allow export-controlled functionaility on the products registered with this token—Enables the export-compliance flag.

    The token is added to your inventory.

  4. Click the arrow icon to the right of the token to open the Token dialog box so you can copy the token ID to your clipboard. Keep this token ready for later in the procedure when you need to register the ASA.

    Figure 1. View Token
    Figure 2. Copy Token

Step 2

In ASDM, choose Configuration > Device Management > Licensing > Smart Licensing.

Step 3

Set the licensing entitlements.

  1. Check Enable Smart license configuration.

  2. From the Feature Tier drop-down list, choose Essentials.

    Only the Essentials tier is available.

  3. (Optional) Check the Enable Security Plus check box.

    The Security Plus tier enables failover.

  4. Click Apply.

  5. Click the Save icon in the toolbar.

Step 4

Click Register.

Step 5

Enter the registration token from the Cisco Smart Software Manager in the ID Token field.

Step 6

Click Register.

ASDM refreshes the page when the license status is updated. You can also choose Monitoring > Properties > Smart License to check the license status, particularly if the registration fails.

Step 7

Quit ASDM and relaunch it.

When you change licenses, you need to relaunch ASDM to show updated screens.


Configure the ASA with the Startup Wizard

Using ASDM, you can use wizards to configure basic and advanced features. The Startup Wizard builds on the default configuration:

  • inside→outside traffic flow

  • Interface PAT for all traffic from inside to outside.

The Startup Wizard walks you through configuring:

  • The enable password

  • Interfaces, including setting the inside and outside interface IP addresses and enabling interfaces.

  • Static routes

  • The DHCP server

  • And more...

Procedure


Step 1

Choose Wizards > Startup Wizard, and click the Modify existing configuration radio button.

Step 2

Click Next on each page to conifgure the features you want.

Step 3

For other wizards, see the ASDM general operations configuration guide.