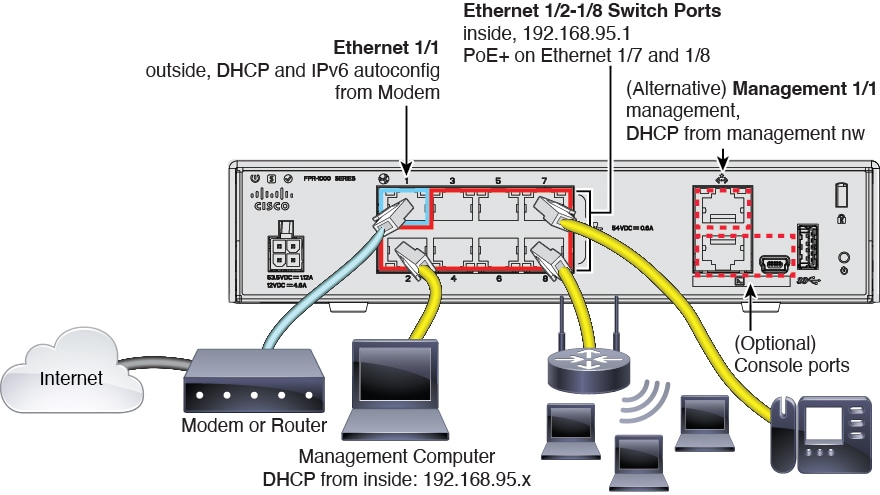
Cable the Firewall
See the hardware installation guide for more information.
The documentation set for this product strives to use bias-free language. For the purposes of this documentation set, bias-free is defined as language that does not imply discrimination based on age, disability, gender, racial identity, ethnic identity, sexual orientation, socioeconomic status, and intersectionality. Exceptions may be present in the documentation due to language that is hardcoded in the user interfaces of the product software, language used based on RFP documentation, or language that is used by a referenced third-party product. Learn more about how Cisco is using Inclusive Language.
Manage a firewall using the local Secure Firewall device manager.
See the hardware installation guide for more information.
System power is controlled by the power cord; there is no power button.
 Note |
The first time you boot up the firewall, threat defense initialization can take approximately 15 to 30 minutes. |
It's important that you provide reliable power for your firewall (for example, using an uninterruptable power supply (UPS)). Loss of power without first shutting down can cause serious file system damage. There are many processes running in the background all the time, and losing power does not allow the graceful shutdown of your system.
|
Step 1 |
Attach the power cord to the firewall, and connect it to an electrical outlet. The power turns on automatically when you plug in the power cord. |
|
Step 2 |
Check the Power LED on the back of the firewall; if it is solid green, the firewall is powered on. 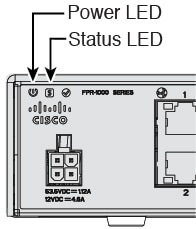
|
|
Step 3 |
Check the System LED on the back of the firewall; after it is solid green, the system has passed power-on diagnostics. |
Both applications, threat defense or ASA, are supported on the hardware. Connect to the console port and determine which application was installed at the factory.
|
Step 1 |
Connect to the console port using either port type. 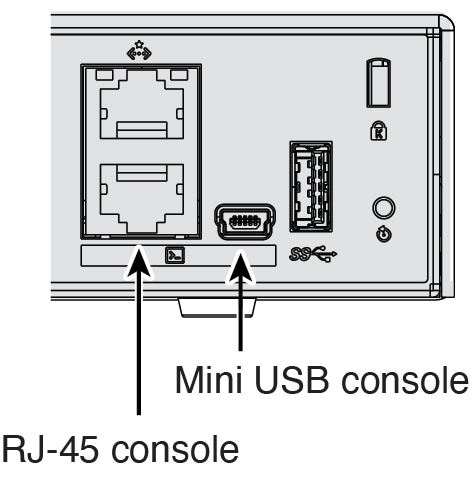
|
|
Step 2 |
See the CLI prompts to determine if your firewall is running threat defense or ASA. Threat Defense You see the firepower login (FXOS) prompt. You can disconnect without logging in and setting a new password. If you need to log in all the way, see Access the Threat Defense CLI. ASA You see the ASA prompt. |
|
Step 3 |
If you are running the wrong application, see Cisco Secure Firewall ASA and Secure Firewall Threat Defense Reimage Guide. |
You might need to access the CLI for configuration or troubleshooting.
|
Step 1 |
Connect to the console port using either port type.
|
||
|
Step 2 |
You connect to FXOS. Log in to the CLI using the admin username and the password (the default is Admin123). The first time you log in, you are prompted to change the password. |
||
|
Step 3 |
Change to the threat defense CLI.
connect ftd The first time you connect to the threat defense CLI, you are prompted to complete initial setup. Example:To exit the threat defense CLI, enter the exit or logout command. This command returns you to the FXOS prompt. Example: |
We recommend that you install your target version before you configure the firewall. Alternatively, you can perform an upgrade after you are up and running, but upgrading, which preserves your configuration, may take longer than using this procedure.
What Version Should I Run?
Cisco recommends running a Gold Star release indicated by a gold star next to the release number on the software download page. You can also refer to the release strategy described in https://www.cisco.com/c/en/us/products/collateral/security/firewalls/bulletin-c25-743178.html.
|
Step 1 |
Connect to the console port using either port type.
|
|
Step 2 |
At the FXOS CLI, show the running version. scope ssa show app-instance Example: |
|
Step 3 |
If you want to install a new version, perform these steps. |
By default, you can manage the firewall on either of the following interfaces:
Ethernet 1/2 through Ethernet 1/8—192.168.95.1/24
Management 1/1—IP address from DHCP
If you cannot use the default IP addresses, then you can connect to the console port and perform initial setup at the CLI to set the Management 1/1 IP address to a static address.
|
Step 1 |
Connect to the console port. See Which Application is Installed: Threat Defense or ASA?. |
|
Step 2 |
Connect to the threat defense CLI. connect ftd Example: |
|
Step 3 |
Complete the CLI setup script for the Management interface settings. Guidance: Enter y for at least one of these types of addresses. Guidance: Choose manual to set a static IP address. Guidance: Set an IP address for the gateway. Guidance: Enter yes to use the device manager. |
|
Step 4 |
Log into the device manager on the new Management IP address. |
When you bought your device from Cisco or a reseller, your licenses should have been linked to your Smart Software License account. If you don't have an account on the Smart Software Manager, click the link to set up a new account.
The threat defense has the following licenses:
Essentials—Required
IPS
Malware Defense
URL Filtering
Cisco Secure Client
If you need to add licenses yourself, go to Cisco Commerce Workspace and use the Search All field.

Choose Products & Services from the results.
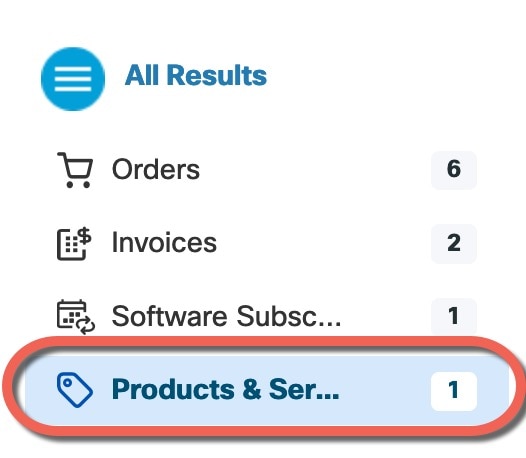
Search for the following license PIDs.
Note |
If a PID is not found, you can add the PID manually to your order. |
IPS, Malware Defense, and URL combination:
L-FPR1010T-TMC=
When you add one of the above PIDs to your order, you can then choose a term-based subscription corresponding with one of the following PIDs:
L-FPR1010T-TMC-1Y
L-FPR1010T-TMC-3Y
L-FPR1010T-TMC-5Y
Cisco Secure Client—See the Cisco Secure Client Ordering Guide.
It's important that you shut down your system properly. Simply unplugging the power can cause serious file system damage. There are many processes running in the background all the time, and unplugging or shutting off the power does not allow the graceful shutdown of your firewall system.
The Firepower 1010 chassis does not have an external power switch..
You can use the FXOS CLI to safely shut down the system and power off the firewall.
|
Step 1 |
Connect to the console port using either port type.
|
|
Step 2 |
In the FXOS CLI, connect to local-mgmt mode. firepower # connect local-mgmt |
|
Step 3 |
Shut down the system. firepower(local-mgmt) # shutdown Example: |
|
Step 4 |
Monitor the system prompts as the firewall shuts down. When the shutdown is complete, you will see the following prompt. |
|
Step 5 |
You can now unplug the power to physically remove power from the chassis if necessary. |
Shut down your system properly using the device manager.
|
Step 1 |
Shut down the firewall.
|
|
Step 2 |
If you have a console connection to the firewall, monitor the system prompts as the firewall shuts down. When shutdown is complete, you will see the following prompt. If you do not have a console connection, wait approximately 3 minutes to ensure the system has shut down. |
|
Step 3 |
You can now unplug the power to physically remove power from the chassis if necessary. |
 Feedback