Configure a Basic Policy

Complete the initial configuration and then configure additional interfaces and network settings as well as customizing your policy.

Log Into the Device Manager

Log into the device manager to configure your threat defense.

Procedure


Step 1

Enter the following URL in your browser, depending on which interface your computer is connected to.

  • Ethernet 1/2 through Ethernet 1/8https://192.168.95.1

  • Management 1/1—https://management_ip (from DHCP)

Step 2

Log in with the username admin, and the default password Admin123.


Complete the Initial Configuration

Use the setup wizard when you first log into the device manager to complete the initial configuration. After you complete the setup wizard, you should have a functioning device with a couple of basic policies in place:

  • inside→outside traffic flow

  • Interface PAT for all traffic to outside.

Procedure


Step 1

Accept the General Terms and change the admin password.

The Device Setup screen appears.

Figure 1. Device Setup
Device Setup

Note


The exact port configuration depends on your model.

Step 2

Configure network settings for the outside and management interfaces.

Figure 2. Connect firewall to internet
Connect firewall to internet
  1. Outside Interface—Ethernet 1/1. You cannot select an alternative outside interface during initial device setup.

    Configure IPv4—If you need PPPoE, you can configure it after you complete the wizard.

    Configure IPv6

  2. Management Interface—Sets parameters for the dedicated Management 1/1 interface. If you changed the IP address at the CLI, you will not see these settings because you already configured them.

    DNS Servers—The default is the OpenDNS public DNS servers.

    Firewall Hostname

  3. Click Next.

Step 3

Configure the system time settings.

Figure 3. Time Setting (NTP)
Connect firewall to internet
  1. Time Zone

  2. NTP Time Server

  3. Click Next.

Step 4

Configure Smart Licensing.

Connect firewall to internet
  1. Click Register device with Cisco Smart Software Manager.

  2. Click the Cisco Smart Software Manager link.

  3. Click Inventory.

  4. On the General tab, click New Token.

  5. On the Create Registration Token dialog box enter the following settings, and then click Create Token:

    • Description

    • Expire After—Cisco recommends 30 days.

    • Max. Number of Uses

    • Allow export-controlled functionality on the products registered with this token—Enables the export-compliance flag if you are in a country that allows for strong encryption. You must select this option now if you plan to use this functionality. If you enable this functionality later, you will need to re-register your device with a new product key and reload the device. If you do not see this option, your account does not support export-controlled functionality.

    The token is added to your inventory.

  6. Click the arrow icon to the right of the token to open the Token dialog box so you can copy the token ID to your clipboard. Keep this token ready for later in the procedure when you need to register the threat defense.

    Figure 4. View Token
    Figure 5. Copy Token
  7. In the device manager, paste the token into the token field.

  8. Set the other options, and then click Finish

Step 5

Finish the setup wizard.

Figure 6. What's Next
Connect firewall to internet
  1. Click Standalone Device to use the device manager.

  2. Click Configure Interfaces to go directly to the Interfaces page, Configure Policy to go to the Policies page, or Got It to go to the Device page.

    For interfaces or policy configuration, see Configure the Network Settings and Policy.

Step 6

Enable feature licenses.

  1. From the Device page, click Smart License > > View Configuration.

  2. Click the Enable/Disable control for each optional license.

  3. Choose Resync Connection from the gear drop-down list to synchronize license information with Cisco Smart Software Manager.


Configure the Network Settings and Policy

Configure additional interfaces, a DHCP server, and customize the security policy.

Procedure


Step 1

If you want to convert a switch port to a firewall interface, choose Device, and then click the link in the Interfaces summary.

  1. Click the edit icon (
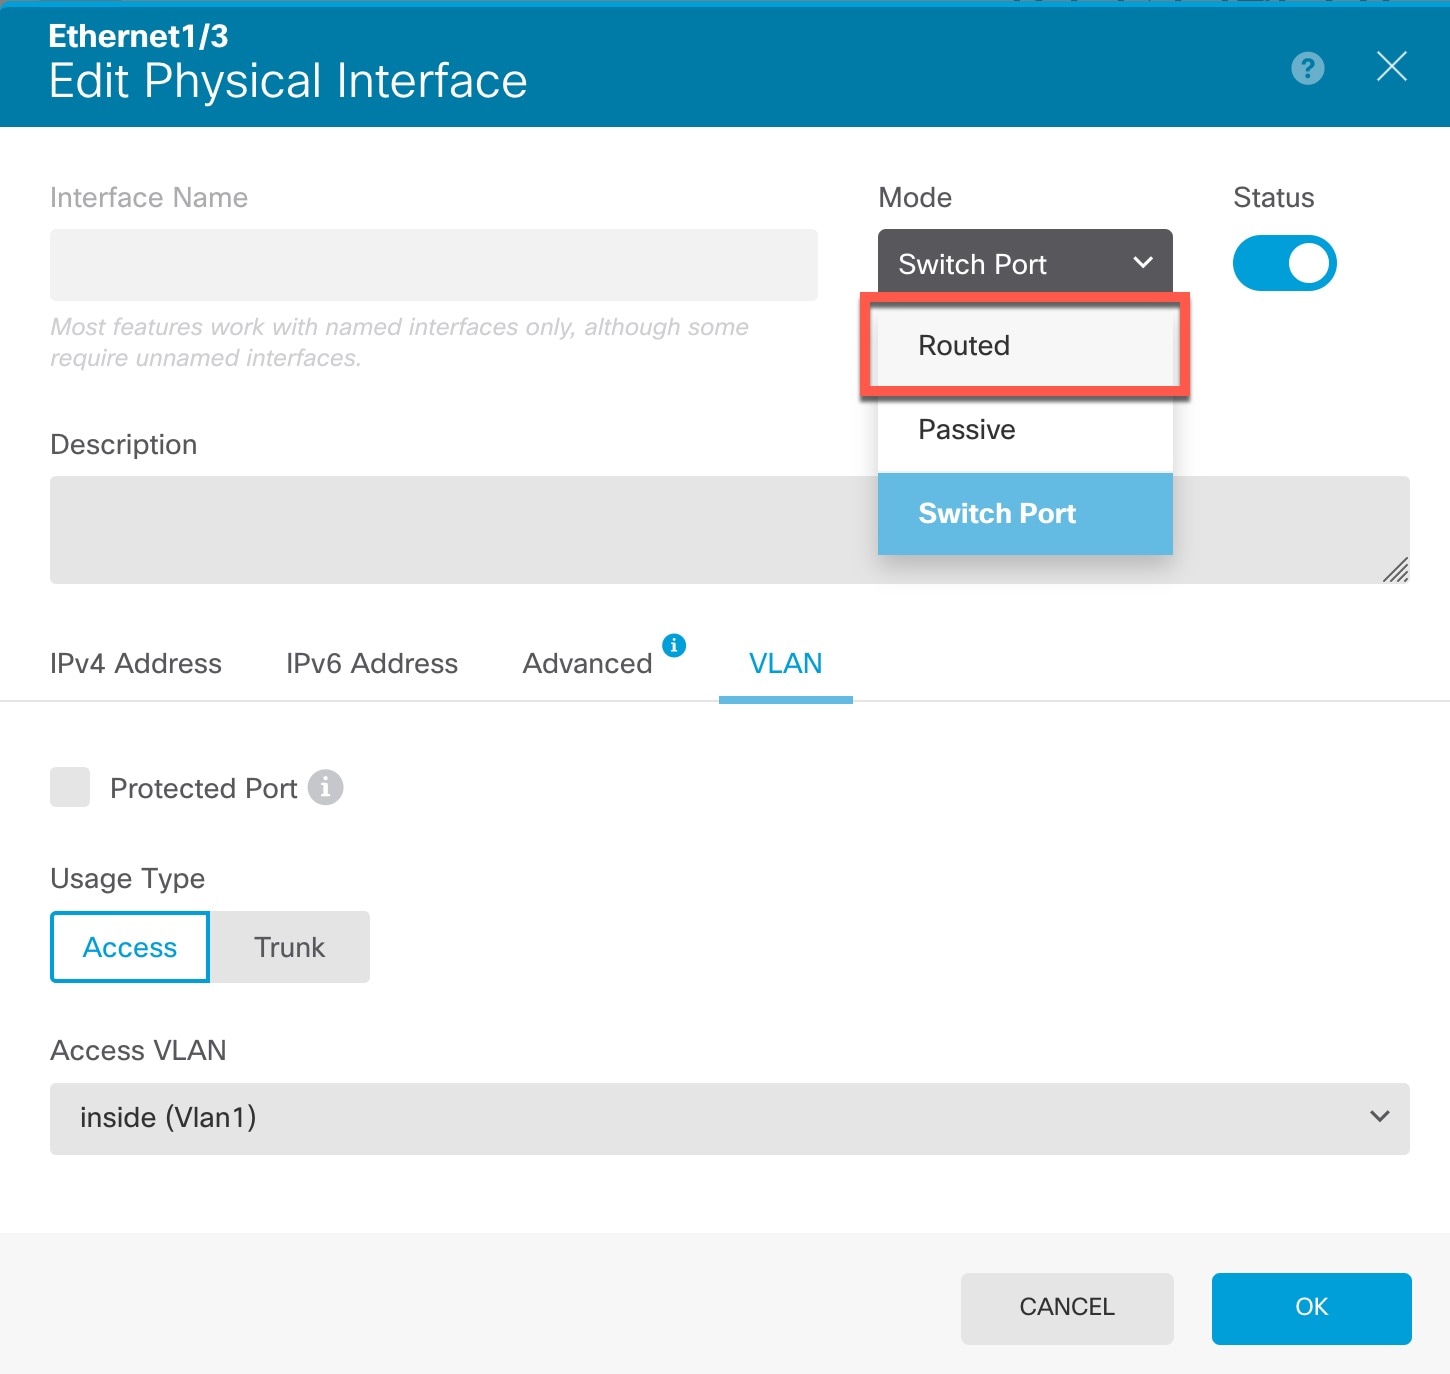
) for the switch port.

  2. Change the mode from Switch Port to Routed.

    Figure 7. Change the Mode
    Change the Mode
  3. Set the name and IP address.

    Figure 8. Edit Interface
  4. Click OK.

Step 2

If you configured new firewall interfaces, choose Objects, then select Security Zones.

Edit or create new zones as appropriate and assign the interface to the zone. Each interface must belong to a zone for which you configure policies.

The following example creates a new dmz_zone and then assigns the dmz interface to it.

Figure 9. Security Zone Object

Step 3

If you want internal clients to use DHCP to obtain an IP address from the device, choose Device > System Settings > DHCP Server, then select the DHCP Servers tab.

There is already a DHCP server configured for the inside interface.

Figure 10. DHCP Server

Step 4

Choose Policies and configure the security policies for the network.

The device setup wizard enables traffic flow between the inside_zone and outside_zone using a Trust rule. A Trust rule does not apply an intrusion policy. To use intrusion, specify the Allow action for the rule. The policy also includes interface PAT for all interfaces when going to the outside interface.

Figure 11. Default Security Policies

However, if you have interfaces in different zones, you need access control rules to allow traffic to and from those zones.

In addition, you can configure other policies to provide additional services and fine-tune NAT and access rules to get the results that your organization requires. You can configure the following policies by clicking the policy type in the toolbar:

  • SSL Decryption—If you want to inspect encrypted connections (such as HTTPS) for intrusions, malware, and so forth, you must decrypt the connections. Use the SSL decryption policy to determine which connections need to be decrypted. The system re-encrypts the connection after inspecting it.

  • Identity—If you want to correlate network activity to individual users, or control network access based on user or user group membership, use the identity policy to determine the user associated with a given source IP address.

  • Security Intelligence—(Requires the IPS license) Use the Security Intelligence policy to quickly drop connections from or to blacklisted IP addresses or URLs. By blacklisting known bad sites, you do not need to account for them in your access control policy. Cisco provides regularly updated feeds of known bad addresses and URLs so that the Security Intelligence blacklist updates dynamically. Using feeds, you do not need to edit the policy to add or remove items in the blacklist.

  • NAT (Network Address Translation)—Use the NAT policy to convert internal IP addresses to externally routeable addresses.

  • Access Control—Use the access control policy to determine which connections are allowed on the network. You can filter by security zone, IP address, protocol, port, application, URL, user or user group. You also apply intrusion and file (malware) policies using access control rules. Use this policy to implement URL filtering.

  • Intrusion—Use the intrusion policies to inspect for known threats. Although you apply intrusion policies using access control rules, you can edit the intrusion policies to selectively enable or disable specific intrusion rules.

The following example shows how to allow traffic between the inside_zone and dmz_zone in the access control policy. In this example, no options are set on any of the other tabs except for Logging, where At End of Connection is selected.

Figure 12. Access Control Policy

Step 5

Choose Device, then click View Configuration in the Updates group and configure the update schedules for the system databases.

If you are using intrusion policies, set up regular updates for the Rules and VDB databases. If you use Security Intelligence feeds, set an update schedule for them. If you use geolocation in any security policies as matching criteria, set an update schedule for that database.

Step 6

Click the Deploy button in the menu, then click the Deploy Now button () to deploy your changes to the device.

Changes are not active on the device until you deploy them.