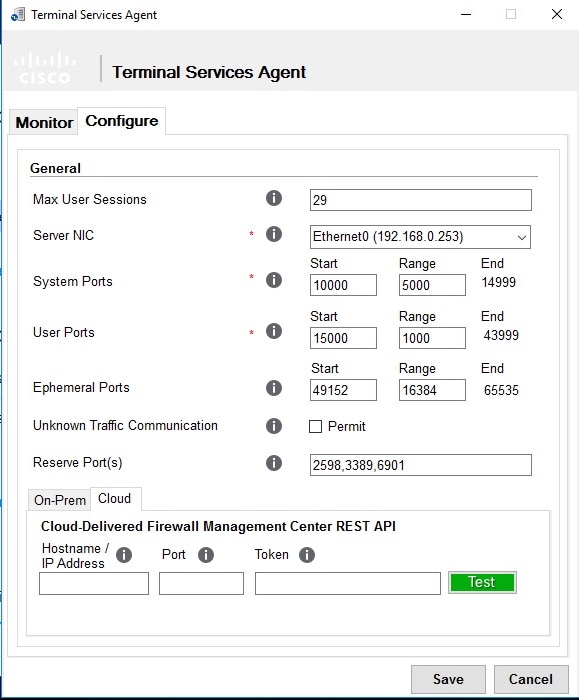
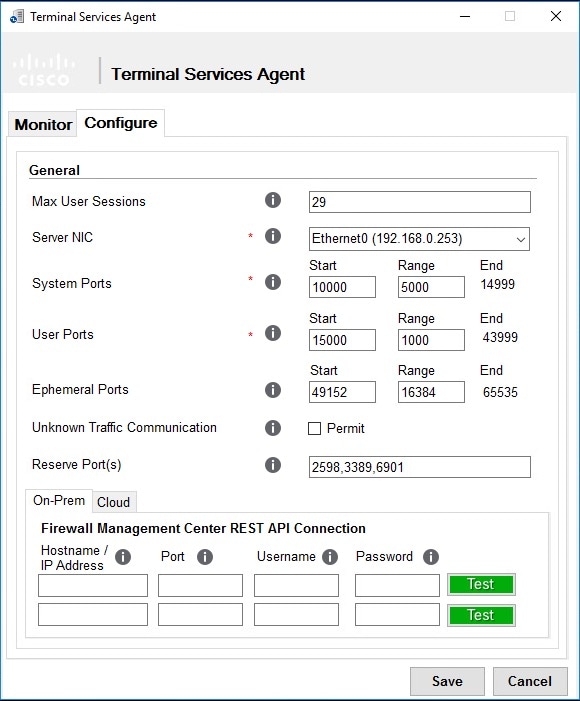
Install and Configure the TS Agent

Install or Upgrade the TS Agent

Before you begin

Procedure


Step 1

Log in to your server as a user with Administrator privileges.

Step 2

Download the TS Agent package from the Support site: TSAgent-1.4.1.exe.

Note


Download the update directly from the site. If you transfer the file by email, it might become corrupted.

Step 3

Right-click TSAgent-1.4.1.exe and choose Run as Administrator.

Step 4

Click Install and follow the prompts to install or upgrade the TS Agent.


What to do next


Note


If the TS Agent installer reports that the .NET Framework failed, run Windows Update and try installing the TS Agent again.


Start the TS Agent Configuration Interface

If there is a TS Agent shortcut on your desktop, double-click on the shortcut. Otherwise, use the following procedure to launch the TS Agent configuration interface.

Procedure


Step 1

Log in to your server as a user with Administrator privileges.

Step 2

Open C:\Program Files (x86)\Cisco\Terminal Services Agent.

Step 3

View the program files for the TS Agent.

Note


The program files are view-only. Do not delete, move, or modify these files.

Step 4

Double-click the TSAgentApp file to start the TS Agent.


Set up a Proxy

If your Cloud-Delivered Firewall Management Center cannot communicate with the machine on which TS Agent is installed, you must use a proxy with the HTTPS protocol enabled.

The way you do this is up to you; for example, you might have a commercial proxy and use a Windows system proxy with HTTPS enabled to communicate with it.


Note


This task is not required to use an On-Prem Firewall Management Center with the TS Agent or if you are not using CDO at all.


Set Up an Application Proxy

This task provides one suggested option to configure a proxy on the Windows Server on which the TS Agent is running. Cisco provides no assurance this procedure will work in your situation. For more information, consult your proxy provider and Windows documentation.

Before you begin

You must have already set up a proxy server; doing so is beyond the scope of this documentation.

Procedure


Step 1

Log in as Administrator to your Windows Server.

Step 2

As Administrator, open the following file in a text editor:

\Windows\Microsoft.NET\Framework64\v4.0.30319\Config\machine.config

Step 3

Paste the following in machine.config in the <system.net> section. Replace the sample IP address and port with your proxy server's IP address and port.

<! -- Configuration for TS Agent -->  
<system.net>
    <defaultProxy>
        <proxy autoDetect="false" bypassonlocal="false" proxyaddress="http://192.0.2.197:3128" usesystemdefault="false" />  
    </defaultProxy>
</system.net>
<! -- Configuration for TS Agent -->

Step 4

Save your changes to machine.config and exit the text editor.

Step 5

Restart the server for the changes to take effect.


What to do next

See Get an API Token.

Get an API Token

This task discusses how to get the API token, which is used by the TS Agent to authenticate with the Cisco Defense Orchestrator.

Required role:

  • Super Admin

  • Admin

  • Deploy Only (or better) with API Only enabled


Note


This task applies to Cloud-Delivered Firewall Management Center only.

If you are using On-Prem Firewall Management Center, see Creating the REST VDI Role instead.


Procedure


Step 1

Log in to CDO as a user with one of the following roles:

  • Super Admin: To either create an optional TS Agent user or to get the API token for yourself.

  • Admin or Deploy Only with API Only enabled: To get an API token for yourself.

Step 2

(Optional for the Super Admin user only.) Create a user for TS Agent with the Deploy Only or better role and check API Only.

Step 3

In the top right corner, click your login name, then click Settings.

Step 4

In the General Settings row, click Generate API Token.

Step 5

Copy the token to the clipboard; you can click to do that.


What to do next

Configure the TS Agent as discussed in Configure the TS Agent.

Configure the TS Agent

Use the TS Agent interface to configure the TS Agent. You must save your changes and reboot the server for your changes to take effect.

Before you begin

  • If you are connecting to the Cloud-delivered Firewall Management Center or On-Prem Firewall Management CenterFMC, configure and enable one or more Active Directory realms targeting the users your server is monitoring, as described in the Cisco Secure Firewall Management Center Device Configuration Guide.

  • If you are connecting to the Firepower System, configure a user account with REST VDI privileges.

    You must create the REST VDI role in the Firepower Management Center as discussed in Creating the REST VDI Role.

  • If you are already connected to the Cloud-delivered Firewall Management Center or On-Prem Firewall Management CenterFMC and you are updating your TS Agent configuration to connect to a different Cloud-delivered Firewall Management Center or On-Prem Firewall Management CenterFMC, you must end all current user sessions before saving the new configuration. For more information, see Ending a Current User Session .

  • Synchronize the time on your TS Agent server with the time on your Cloud-delivered Firewall Management Center or On-Prem Firewall Management CenterFMC.

    • Cloud-Delivered Firewall Management Center only:

  • Review and understand the configuration fields, as described in TS Agent Configuration Fields.

Procedure


Step 1

On the server where you installed the TS Agent, start the TS Agent as described in Start the TS Agent Configuration Interface.

Step 2

Click the Configure tab.

Step 3

Cloud-Delivered Firewall Management Center only: Click the Cloud tab at the bottom of the page.

Step 4

On-Prem Firewall Management Center only: Click the On-Prem tab tab at the bottom of the page.

Step 5

See TS Agent Configuration Fields.

Step 6

After you have configured the TS Agent, click Test to test the REST API connection between the TS Agent and the system.

Step 7

Click Save and confirm that you want to reboot the server.


TS Agent Configuration Fields

The following fields are used to configure the settings on a TS Agent.

General Settings

Table 1. General Settings Fields

Field

Description

Example

Max User Sessions

The maximum number of user sessions you want the TS Agent to monitor. A single user can run several user sessions at a time.

This version of the TS Agent supports 29 user sessions by default, up to a maximum of 199 user sessions.

29 (the maximum supported value in this version of the TS Agent)

Server NIC

The TS Agent supports using a single network interface controller (NIC) for port translation and server-system communications. If two or more valid NICs are present on your server, the TS Agent performs port translation only on the address you specify during configuration.

The TS Agent automatically populates this field with the IPv4 address and/or IPv6 address for each NIC on the server where the TS Agent is installed. A valid NIC must have a single IPv4 or IPv6 address, or one of each type; a valid NIC cannot have multiple addresses of the same type.

Note


If the server's IP address changes, you are prompted to save the configuration and reboot the server to make the change effective.

Note


You must disable router advertisement messages on any devices connected to your server. If router advertisements are enabled, the devices may assign multiple IPv6 addresses to NICs on your server and invalidate the NICs for use with the TS Agent.

Ethernet 2 (192.0.2.1) (a NIC on your server)

System Ports

The port range you use for system processes. The TS Agent ignores this activity. Configure a Start port to indicate where you want to begin the range. Configure a Range value to indicate the number of ports you want to designate for each individual system process.

Cisco recommends a Range value of 5000 or more. If you notice the TS Agent frequently runs out of ports for system processes, increase your Range value.

Note


If a system process requires a port that falls outside your designated System Ports, add the port to the Exclude Port(s) field. If you do not identify a port used by system processes in the System Ports range or exclude it, system processes might fail.

The TS Agent automatically populates the End value using the following formula:

( [Start value] + [Range value] ) - 1

If your entries cause the End value to exceed the Start value of User Ports, you must adjust your Start and Range values.

Start set to 10000 and Range set to 5000

User Ports

The port range you want to designate for users. Configure a Start port to indicate where you want to begin the range. Configure a Range value to indicate the number of ports you want to designate for TCP or UDP connections in each individual user session.

Note


ICMP traffic is passed without being port mapped.

Cisco recommends a Range value of 1000 or more. If you notice the TS Agent frequently runs out of ports for user traffic, increase your Range value.

Note


When the number of ports used exceeds the value of Range, user traffic is blocked.

The TS Agent automatically populates the End value using the following formula:

[Start value] + ( [Range value] * [Max User Sessions value] ) - 1

If your entries cause the End value to exceed 65535, you must adjust your Start and Range values.

Start set to 15000 and Range set to 1000

Ephemeral Ports

Enter a range of ephemeral ports (also referred to as dynamic ports) to allow the TS Agent to monitor.

Start set to 49152 and Range set to 16384

Unknown Traffic Communication

Check Permit to allow the TS Agent to permit traffic over System ports; however, the TS Agent does not track port usage. System ports are used by the Local System account or other local user accounts. (A local user account exists only on the TS Agent server; it has no corresponding Active Directory account.) You can choose this option to permit the following types of traffic:

  • Permit traffic run by the Local System account (such as Server Message Block (SMB)) instead of being blocked. The Cloud-delivered Firewall Management Center or On-Prem Firewall Management CenterFMC identifies this traffic as coming from the Unknown user because the user does not exist in Active Directory.

    Enabling this option also enables you to successfully test the connection with the Cloud-delivered Firewall Management Center or On-Prem Firewall Management CenterFMC if you log in to the TS Agent server using a local system account.

  • When a user or system session exhausts all available ports in its range, the TS Agent allows the traffic over ephemeral ports. This option enables the traffic; the Cloud-delivered Firewall Management Center or On-Prem Firewall Management CenterFMC identifies the traffic as coming from the Unknown user.

    This is especially useful when System ports are needed for keeping system healthy, such as domain controller updates, authentications, Windows Management Interface (WMI) queries, and so on.

Uncheck to block traffic on system ports.

n/a

Reserve Port(s)

The port(s) you want the TS Agent to ignore. Enter the ports you want to exclude as a comma-separated list.

The TS Agent automatically populates Reserve Port(s) with default port values for the Citrix MA Client (2598), Citrix Provisioning (6910), and Windows Terminal Server (3389). If you do not exclude the proper ports, applications requiring those ports might fail.

If you're using Citrix Provisioning and you're upgrading from an earlier TS Agent version, you must enter 6910 in this field.

The value you specify in the TS Agent Reserve Port(s) field must match one of the Citrix Provisioning First and Last UDP port numbers ports.

Caution


Failure to specify the correct port will cause clients to fail to boot.

Note


If a process on your server is using or listening in on a port that is not in your System Ports range, you must manually exclude that port using the Reserve Port(s) field.

Note


If there is a client application installed on your server and the application is configured to bind to a socket using a specific port number, you must use the Reserve Port(s) field to exclude that port from translation.

Typically one of the following:

  • 2598,3389 (the Citrix MA Client and Windows Terminal Server ports)

  • 2598,3389, 6910 (the Citrix MA Client, Windows Terminal Server, and Citrix Provisioning ports)

Cloud-delivered Firewall Management Center Settings

Sample Cloud tab page:

On the TS Agent's Cloud tab page, set general options and also the connection information to CDO. The CDO connection information includes the CDO host, port, and authentication token

Table 2. Cloud-delivered Firewall Management Center Settings Fields

Field

Description

Example

Hostname / IP Address

The hostname or IP address of the Cloud-Delivered Firewall Management Center instance (the URL that is displayed when you click Tools & Services > Firewall Management Center > Monitoring).

https://example-dev-app.eu.cdo.
cisco.com.cdo.cisco.com/

Port

The port the Cloud-Delivered Firewall Management Center uses for REST API communications. The TS Agent automatically populates this field to 443, the REST API port.

443

Token

The API token used to authenticate with the Cisco Defense Orchestrator. For more information, see Get an API Token.

n/a

On-Prem Firewall Management CenterFMCSettings

You can configure a connection primary and, optionally, standby (failover) system appliances:

  • If your system appliance is standalone, leave the second row of FMC/REST API Connection fields blank.

  • If your system appliance is deployed with a standby (failover) appliance, use the first row to configure a connection to the primary appliance and the second row to configure a connection to the standby (failover) appliance.

Sample On-Prem tab page:

The TS Agent's On-Prem tab page enables you to set general configuration options and Secure Firewall Manager connection information. Secure Firewall connection information includes the manager or cluster's IP address, port, user name, and password

Table 3. or On-Prem Firewall Management CenterFMC Settings Fields

Field

Description

Example

Hostname / IP Address

The hostname or IP address for the primary or On-Prem Firewall Management CenterFMC.

192.0.2.1

Port

The port the or On-Prem Firewall Management CenterFMC uses for REST API communications. The TS Agent automatically populates this field to 443, the REST API port on the or On-Prem Firewall Management CenterFMC.

443

Username and Password

The or On-Prem Firewall Management CenterFMC username and password for a user with REST VDI privileges on the or On-Prem Firewall Management CenterFMC. For more information about configuring this user, see Creating the REST VDI Role.

n/a

Creating the REST VDI Role

To connect the TS Agent to the Secure Management Center, your Secure Management Center user must have the REST VDI role. The REST VDI is not defined by default. You must create the role and assign it to any user that is used in the TS Agent configuration.

For more information about users and roles, see the Firepower Management Center Configuration Guide.


Note


This task applies to On-Prem Firewall Management Center only.

If you are using Cloud-Delivered Firewall Management Center, see Get an API Token instead.


Procedure


Step 1

Log in to the Secure Management Center as a user with permissions to create roles.

Step 2

Click System (system gear icon) > UsersSystem > Users.

Step 3

Click the User Roles tab.

Step 4

On the User Roles tab page, click Create User Role.

Step 5

In the Name field, enter REST VDI.

The role name is not case-sensitive.

Step 6

In the Menu-Based Permissions section, check REST VDI and make sure Modify REST VDI is also checked.

Step 7

Click Save.

Step 8

Assign the role to the user that is used in the TS Agent configuration.