Generate pxGrid Certificates for Subscribers
Before you begin
 Note |
From Cisco ISE Release 3.1, all pxGrid connections must be based on pxGrid 2.0. pxGrid 1.0-based (XMPP-based) integrations will cease to work on Cisco ISE from Release 3.1 onwards. pxGrid Version 2.0, which is based on WebSockets, was introduced in Cisco ISE Release 2.4. We recommend that you plan and upgrade your other systems to pxGrid 2.0-compliant versions in order to prevent potential disruptions, if any, to integrations. |
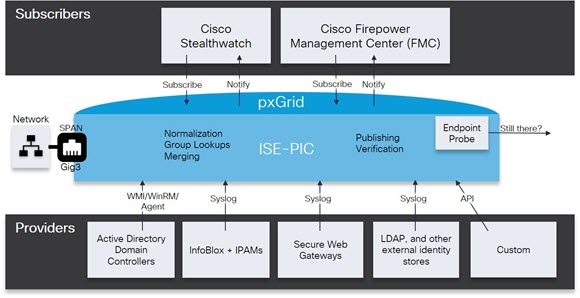
At installation, ISE-PIC automatically generates self-signed certificates for the pxGrid services that are digitally signed by the primary ISE-PIC node. Thereafter, you can generate certificates for pxGrid subscribers in order to guarantee mutual trust between pxGrid and the subscribers, thereby ultimately enabling user identities to be passed from ISE-PIC to the subscribers.
Procedure
|
Step 1 |
Choose Subscribers and go to the Certificates tab. |
||
|
Step 2 |
Select one of the following options from the I want to drop-down list:
|
||
|
Step 3 |
(optional) You can enter a description for this certificate. |
||
|
Step 4 |
View or edit the pxGrid Certificate template on which this certificate is based. Certificate templates contain properties that are common to all certificates issued by the Certificate Authority (CA) based on that template. The certificate template defines the Subject, Subject Alternative Name (SAN), key type, key size, SCEP RA profile that must be used, validity period of the certificate, and the extended key usage (EKU) that specifies whether the certificate has to be used for client or server authentication or both. The internal Cisco ISE CA (ISE CA) uses a certificate template to issue certificates based on that template. For pxGrid, only the pxGrid certificate template can be used when working with Passive Identity services and only the Subject information can be edited for this template. To edit this template, choose . |
||
|
Step 5 |
Specify the Subject Alternative Name (SAN). You can add multiple SANs. The following options are available:
|
||
|
Step 6 |
Select one of the following options from the Certificate Download Format drop-down list:
|
||
|
Step 7 |
Enter a certificate password. |
||
|
Step 8 |
Click Create. |
 Feedback