Before You Begin

Install the firewall at a branch office and manage it on the outside interface using the Cisco Defense Orchestrator.


Note


Outside management is not supported with clustering. In this case, use the Management interface for CDO access using manual registration. For high availability, you can use the outside interface with manual registration, but to use zero-touch provisioning, you must use the Management interface. This guide specifically covers outside management, but you can refer to Managing Firewall Threat Defense with Cloud-Delivered Firewall Management Center in Cisco Defense Orchestrator for management using the Management interface. See that guide for multi-instance deployment as well.


Power On the Firewall

System power is controlled by a rocker power switch located on the rear of the firewall. The rocker power switch provides a soft notification that supports graceful shutdown of the system to reduce the risk of system software and data corruption.


Note


The first time you boot up the firewall, threat defense initialization can take approximately 15 to 30 minutes.


Before you begin

It's important that you provide reliable power for your firewall (for example, using an uninterruptable power supply (UPS)). Loss of power without first shutting down can cause serious file system damage. There are many processes running in the background all the time, and losing power does not allow the graceful shutdown of your system.

Procedure


Step 1

Attach the power cord to the firewall, and connect it to an electrical outlet.

Step 2

Turn the power on using the rocker power switch located on the rear of the chassis, adjacent to the power cord.

Figure 1. Power Button
System and Power LEDs

Step 3

Check the Power LED on the back of the firewall; if it is solid green, the firewall is powered on.
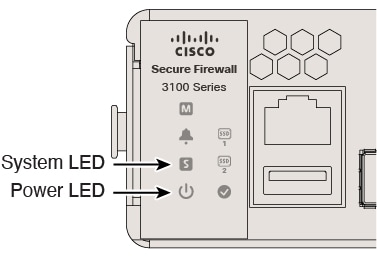
Figure 2. System and Power LEDs
System and Power LEDs

Step 4

Check the System LED on the back of the firewall; after it is solid green, the system has passed power-on diagnostics.


Which Application is Installed: Threat Defense or ASA?

Both applications, threat defense or ASA, are supported on the hardware. Connect to the console port and determine which application was installed at the factory.

Procedure


Step 1

Connect to the console port.

Figure 3. Console Port
Console Port

Step 2

See the CLI prompts to determine if your firewall is running threat defense or ASA.

Threat Defense

You see the firepower login (FXOS) prompt. You can disconnect without logging in and setting a new password. If you need to log in all the way, see Access the Threat Defense CLI.


firepower login:

ASA

You see the ASA prompt.


ciscoasa> 

Step 3

If you are running the wrong application, see Cisco Secure Firewall ASA and Secure Firewall Threat Defense Reimage Guide.


Access the Threat Defense CLI

You might need to access the CLI for configuration or troubleshooting.

Procedure


Step 1

Connect to the console port.

Figure 4. Console Port
Console Port

Step 2

You connect to FXOS. Log in to the CLI using the admin username and the password (the default is Admin123). The first time you log in, you are prompted to change the password.


firepower login: admin
Password: Admin123
Successful login attempts for user 'admin' : 1

[...]

Hello admin. You must change your password.
Enter new password: ********
Confirm new password: ********
Your password was updated successfully.

[...]

firepower# 

Step 3

Change to the threat defense CLI.

Note

 
If you want to use the device manager for initial setup or use zero-touch provisioning, do not access the threat defense CLI, which starts the CLI setup.

connect ftd

The first time you connect to the threat defense CLI, you are prompted to complete initial setup.

Example:


firepower# connect ftd
>

To exit the threat defense CLI, enter the exit or logout command. This command returns you to the FXOS prompt.

Example:


> exit
firepower#


Check the Version and Reimage

We recommend that you install your target version before you configure the firewall. Alternatively, you can perform an upgrade after you are up and running, but upgrading, which preserves your configuration, may take longer than using this procedure.

What Version Should I Run?

Cisco recommends running a Gold Star release indicated by a gold star next to the release number on the software download page. You can also refer to the release strategy described in https://www.cisco.com/c/en/us/products/collateral/security/firewalls/bulletin-c25-743178.html.

Procedure


Step 1

Connect to the console port.

Figure 5. Console Port
Console Port

Step 2

At the FXOS CLI, show the running version.

scope ssa

show app-instance

Example:


Firepower# scope ssa
Firepower /ssa # show app-instance

Application Name Slot ID Admin State Operational State Running Version Startup Version Cluster Oper State
---------------- ------- ----------- ----------------- --------------- --------------- ------------------
ftd              1       Enabled     Online            7.6.0.65        7.6.0.65        Not Applicable

Step 3

If you want to install a new version, perform these steps.

  1. By default, the Management interface uses DHCP. If you need to set a static IP address for the Management interface, enter the following commands.

    scope fabric-interconnect a

    set out-of-band static ip ip netmask netmask gw gateway

    commit-buffer

    Note


    If you encounter the following error, you must disable DHCP before committing the change. Follow the commands below to disable DHCP.

    firepower /fabric-interconnect* # commit-buffer
    Error: Update failed: [Management ipv4 address (IP <ip> / net mask <netmask> ) is not
    in the same network of current DHCP server IP range <ip - ip>.
    Either disable DHCP server first or config with a different ipv4 address.]
    firepower /fabric-interconnect* # exit
    firepower* # scope system
    firepower /system* # scope services
    firepower /system/services* # disable dhcp-server
    firepower /system/services* # commit-buffer
    
    
  2. Perform the reimage procedure in the FXOS troubleshooting guide.

    You will need to download the new image from a server accessible from the Management interface.

    After the firewall reboots, you connect to the FXOS CLI again.

  3. At the FXOS CLI, you are prompted to set the admin password again.

    For low-touch provisioning, when you onboard the device, for the Password Reset area, be sure to choose No because you already set the password.

  4. Shut down the firewall. See (If Needed) Power Off the Firewall.


Obtain Licenses

When you bought your device from Cisco or a reseller, your licenses should have been linked to your Smart Software License account. If you don't have an account on the Smart Software Manager, click the link to set up a new account.

If you have not already done so, register CDO with the Smart Software Manager. Registering requires you to generate a registration token in the Smart Software Manager. See the CDO documentation for detailed instructions.

The threat defense has the following licenses:

  • Essentials—Required

  • IPS

  • Malware Defense

  • URL Filtering

  • Cisco Secure Client

  • Carrier—Diameter, GTP/GPRS, M3UA, SCTP

  1. If you need to add licenses yourself, go to Cisco Commerce Workspace and use the Search All field.

    Figure 6. License Search
    License Search
  2. Choose Products & Services from the results.

    Figure 7. Results
    Results
  3. Search for the following license PIDs.


    Note


    If a PID is not found, you can add the PID manually to your order.


    • Essentials:

      • Included automatically

    • IPS, Malware Defense, and URL combination:

      • L-FPR3110T-TMC=

      • L-FPR3120T-TMC=

      • L-FPR3130T-TMC=

      • L-FPR3140T-TMC=

      When you add one of the above PIDs to your order, you can then choose a term-based subscription corresponding with one of the following PIDs:

      • L-FPR3110T-TMC-1Y

      • L-FPR3110T-TMC-3Y

      • L-FPR3110T-TMC-5Y

      • L-FPR3120T-TMC-1Y

      • L-FPR3120T-TMC-3Y

      • L-FPR3120T-TMC-5Y

      • L-FPR3130T-TMC-1Y

      • L-FPR3130T-TMC-3Y

      • L-FPR3130T-TMC-5Y

      • L-FPR3140T-TMC-1Y

      • L-FPR3140T-TMC-3Y

      • L-FPR3140T-TMC-5Y

    • Carrier:

      • L-FPR3K-FTD-CAR=

    • Cisco Secure Client—See the Cisco Secure Client Ordering Guide.

(If Needed) Power Off the Firewall

It's important that you shut down your system properly. Simply unplugging the power or pressing the power switch can cause serious file system damage. There are many processes running in the background all the time, and unplugging or shutting off the power does not allow the graceful shutdown of your firewall system.

Power Off the Firewall at the CLI

You can use the FXOS CLI to safely shut down the system and power off the firewall.

Procedure


Step 1

Connect to the console port.

Figure 8. Console Port
Console Port

Step 2

In the FXOS CLI, connect to local-mgmt mode.

firepower # connect local-mgmt

Step 3

Shut down the system.

firepower(local-mgmt) # shutdown

Example:

firepower(local-mgmt)# shutdown 
This command will shutdown the system.  Continue?
Please enter 'YES' or 'NO': yes
INIT: Stopping Cisco Threat Defense......ok

Step 4

Monitor the system prompts as the firewall shuts down. When the shutdown is complete, you will see the following prompt.


System is stopped.
It is safe to power off now.
Do you want to reboot instead? [y/N]

Step 5

You can now turn off the power switch and unplug the power to physically remove power from the chassis if necessary.


Power Off the Firewall Using the Management Center

Shut down your system properly using the management center.

Procedure


Step 1

Shut down the firewall.

  1. Choose Devices > Device Management.

  2. Next to the device that you want to restart, click Edit (edit icon).

  3. Click the Device tab.

  4. Click Shut Down Device (shut down device icon) in the System section.

  5. When prompted, confirm that you want to shut down the device.

Step 2

If you have a console connection to the firewall, monitor the system prompts as the firewall shuts down. When shutdown is complete, you will see the following prompt.


System is stopped.
It is safe to power off now.

Do you want to reboot instead? [y/N]

If you do not have a console connection, wait approximately 3 minutes to ensure the system has shut down.

Step 3

You can now turn off the power switch and unplug the power to physically remove power from the chassis if necessary.