Admin UI Configuration

This chapter provides instructions for configuring your appliance using the Admin UI. It includes the following topics:

Introduction

The Admin UI is the recommended tool for administrators to use to configure the Secure Malware Analytics Appliance. It is a Web user interface that can be used once an IP address has been configured on the Admin interface.

The configuration includes the following steps:

  • Change Admin UI Admin Password

  • Review End User License Agreement

  • Configure Network Settings

  • Install License

  • Configure NFS

  • Configure Clustering

  • Configure Email

  • Configure Notifications

  • Configure Date and Time

  • Configure System Log

  • Review and Install Configuration Settings


Note


Not all configuration steps are completed using the configuration wizard. See the Cisco Secure Malware Analytics Appliance Administration Guide for configuring settings not included in the wizard, such as SSL Certificates and Backups.


Important


The steps in the following sections should be completed in one session to reduce the chance of an interruption to the IP address during configuration.


Log In to the Admin UI

Perform the following steps to log in to the Secure Malware Analytics Admin UI.

Procedure


Step 1

In a browser, enter the URL for the Admin UI (https://<adminIP>/ or https://<adminHostname>/) to open the Secure Malware Analytics Admin UI login screen.

Note


The Hostname is the appliance serial number.

Figure 1. Admin UI Login Screen

Step 2

Enter the initial Admin Password that you copied from the Admin TUI and click Log In.


What to do next

Proceed to Change Admin Password.

Change Admin Password

The initial Admin password was generated randomly during the pre-ship Secure Malware Analytics installation and is visible as plain text in the Admin TUI. You must change the initial Admin password before continuing with the configuration.
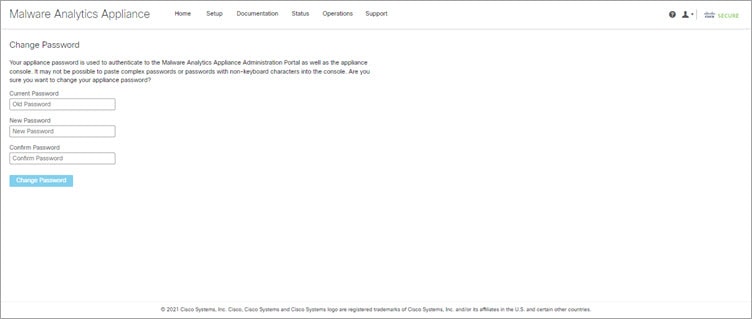
Figure 2. Change Admin Password

Procedure


Step 1

Enter the old password from the Admin TUI in the Current Password field. (You should have this password saved in a text file.)

Step 2

Enter a New Password and re-enter it in the Confirm New Password field.

The new password must contain the following: 8 characters minimum, one number, one special character, at least one uppercase and one lowercase character.

Step 3

Click Change Password. The password is updated.

Note


The new password will not be displayed in visible text in the Admin TUI so be sure to save it somewhere.


What to do next

Proceed to Review End User License Agreement.

Review End User License Agreement

Review the license agreement and confirm that you agree to it.

Procedure


Step 1

Review the End User License Agreement.

Step 2

Scroll to the end and click I HAVE READ AND AGREE.

Note


We recommend that you follow the configuration workflow and configure the networks before you install the license.


What to do next

Proceed to Configure Network Settings.

Configuration Wizard

The Configuration wizard takes you through configuring your Secure Malware Analytics Appliance.

If you need to make changes after you have completed the wizard configuration, you can access the settings from the Configuration tab in the Admin UI.

Home

Figure 3. Home

Configure Network Settings

If you configured static network settings in the Admin TUI, the IP addresses displayed on the Network Configuration page reflect the values you entered in the Admin TUI during the Secure Malware Analytics Appliance network configuration.

Figure 4. Network Configuration

Procedure


Step 1

Review the IP addresses and confirm they are accurate.

Step 2

If you used DHCP for your initial connection and now need to change the Clean and Dirty IP networks to static IP addresses, follow the steps in the Using DHCP section of the Cisco Secure Malware Analytics Appliance Administration Guide.


What to do next

Proceed to Configure NFS.

Configure NFS

The next step in the workflow is NFS configuration. This task is required for backups and for clustering. See the NFS Requirements section in the Cisco Secure Malware Analytics Appliance Administration Guide for more information.

The configuration process includes mounting the NFS store, mounting the encrypted data, and initializing the Secure Malware Analytics Appliance local datastores from the contents of the NFS store.

If you would like to skip this step or continue and return later, click Continue without NFS.

Procedure


Step 1

Click NFS in the navigation pane to open the NFS Configuration page.

Step 2

Enter the following information. Appliances in a cluster should share the same Host and Path as those set in the first cluster node.

  • Host - The NFSv4 host server. We recommend using the IP address.

  • Path - The absolute path to the location on the NFS host server under which files will be stored. This does not include the Key ID suffix, which will be added automatically.

  • Options - NFS mount options to be used, if this server requires any deviations from standard Linux defaults for NFSv4. The default is rw.

  • FS Encryption Key Hash - Click Generate Key to generate a new encryption key. You will need this key to restore backups later. (At that time, click Upload and upload the key required for the backup.)

The Status is Enabled_Pending Key.

Step 3

Click Save. The page refreshes and the Generate Key and Activate buttons become available.

Note


If the key correctly matches the one used to create a backup, the Key ID displayed in Admin UI after upload will match the name of a directory in the configured path. Backups cannot be restored without the encryption key. The configuration process includes the process of mounting the NFS store, mounting the encrypted data, and initializing the appliance's local datastores from the NFS store's contents.

Step 4

Click Generate Key to generate a new NFS encryption key.

Step 5

Click Activate. The State changes to Active. The Upload button changes to Download.

Step 6

Click Download to download a copy of the encryption key for safekeeping.

If this appliance is the first node in a cluster, you will need the key for joining additional nodes to the cluster. If the first node has already been configured, then click Upload and choose the NFS encryption key you downloaded from the first node when you started the new cluster.

Step 7

Click Save.

The page refreshes; the Key ID is displayed and the Activate button is enabled.

Step 8

ClickActivate.

The Status changes to Active after a few seconds (lower left corner).

Step 9

When activation has succeeded, click Continue.


What to do next

Proceed to Configure Clustering.

Configure Clustering

The next step in the wizard workflow is to configure clustering. If the appliance being configured is not going to be part of a cluster, then skip to the next configuration step, Install License.

The main goal of clustering is to increase the sample analysis capacity of a single system. Each appliance in a cluster saves data in the shared file system, and has the same data as the other nodes in the cluster. Clustering does not increase storage capacity, and it does not increase the speed of sample analysis. Instead, clustering makes it possible to analyze more samples in the same amount of time that you can achieve with a single appliance. Because the data is the same on all nodes, sample analysis can be passed from the submitting node to another cluster node that is not as busy. Clusters can include 2-7 appliances.

Clustering also helps support recovery from failure of one or more appliances in the cluster, depending on the cluster size.

You can create a cluster with new appliances, with appliances that have had their data removed (not Wiped), or a combination of new and existing appliances. When joining a Secure Malware Analytics Appliance to a cluster, it's convenient if the NFS and clustering are configured during the initial setup. You can start a cluster post-installation from the Cluster Configuration page, but you can't join an installed appliance into an existing cluster.

For more information about clustering, see the Secure Malware Analytics Appliance Administrator Guide v2.17.

If you have questions about installing or reconfiguring clusters, contact Support for assistance.


Note


If you are joining an existing appliance to a cluster, remove existing data with the destroy-datacommand, as documented in Reset Appliance as Backup Restore Target section in the Secure Malware Analytics Appliance Administrator Guide v2.17. Do not use the Wipe Appliance feature.


Configuring First Cluster Node

Begin a cluster by configuring the first node, and then configure each additional node and join them to the cluster using the NFS key that you downloaded when you configured the first node.

If you've already configured the first node, go to Joining Additional Cluster Nodes.

Clusters are configured and managed in the Admin UI on the Cluster Configuration page . This section describes the fields on this page to gain an understanding of an active and healthy cluster (the screenshot shows a cluster with three nodes).

Procedure

Step 1

Click Clustering in the navigation pane to open the Cluster Configuration page.

Step 2

Click Start Cluster and then click OK on the confirmation dialog.

The Clustering State changes to Clustered.

Step 3

Complete the remaining steps in the wizard and click Start Installation. This initiates a restore of the data in cluster mode.

Step 4

Check the health of the newcluster on the Clustering page.


What to do next

Proceed to Joining Additional Cluster Nodes

Joining Additional Cluster Nodes

This section describes how to join additional appliances to a cluster. It assumes that the first appliance in the cluster is configured as described in Configuring First Cluster Node. You can now start the configuration steps for the next node.

Procedure

Step 1

Click the Configuration tab and choose NFS to open the NFS Configuration page.

Step 2

Specify the Host and Path to match what was set in the first node in the cluster.

Step 3

Click Save. The page refreshes and the Upload button becomes available.

Step 4

In the Configuration menu, choose Clustering to open the Cluster Configuration page.

Step 5

Click Join Cluster and then click OK on the confirmation dialog.

The Cluster State changes to Clustered.

Step 6

Finish the installation. This will initiate a restore of the data in cluster mode.

Step 7

Repeat the procedure for each node you want to join to the cluster.


What to do next

Proceed to Install License.

Install License

After the clustering, you are ready to install the Secure Malware Analytics license.

Procedure


Step 1

Click Upload License and select the license file from your file manager.

Alternatively, you can retrieve the license from the server. If the appliance has network access when being installed, click Retrieve License From Server to get the license over the network.

Step 2

Enter your license password in the Passphrase field.

Figure 5. Upload New License

Step 3

Click Save to install the license. The page refreshes and your license information is displayed.

Figure 6. License Information After Successful Installation

Step 4

Click Continue.


What to do next

Proceed to Configure Email.

Configure Email

The next step in the workflow is to configure the email host in the SMTP Configuration page.

Procedure


Step 1

Enter the email From Address.

Figure 7. SMTP Configuration

Step 2

Enter the name of the Upstream Host (email host).

Step 3

Change the port from 587 to 25.

Step 4

Keep the defaults for the other settings.

Step 5

Click Save to save your settings.

Step 6

Click Continue to move to the next step in the workflow.


What to do next

Proceed to Configure Notifications.

Configure Notifications

The next step in the workflow is to configure notifications that can be delivered periodically to one or more email addresses. System notifications are displayed in the Secure Malware Analytics portal interface, but this page allows you to set up Notifications that are also sent via email.

Procedure


Step 1

Under Recipients, enter the Email Address for at least one notifications recipient. If you need to add multiple email addresses, click the + icon to add another field; repeat as needed.

Figure 8. Notifications

Step 2

Under Notification Frequency, choose the settings for Critical and Non-critical from the drop-down lists.

Step 3

Click Save.

Step 4

Click Continue to move to the next step in the workflow.


What to do next

Proceed to Configure Date and Time.

Configure Date and Time

The next step is to specify the Network Time Protocol (NTP) servers to configure the date and time.

Procedure


Step 1

Enter the NTP Server(s) IP or NTP name.

Figure 9. Date and Time

If there are multiple NTP servers, click the + icon to add another field; repeat as needed.

Step 2

Click Save.

Step 3

Click Continue to move to the next step in the workflow.


What to do next

Proceed to Configure System Log.

Configure System Log

The System Log Server Information page is used to configure a system log server to receive syslog messages and Thread Grid notifications.

Procedure


Step 1

Complete the Host URL, Host Port, and Protocol fields and click Save.

Figure 10. System Log Server Information

Step 2

Click Continue to move to the final step in the workflow.

See the Cisco Threat Grid Appliance Administration Guide for more information.


What to do next

Proceed to Review and Install Configuration Settings.

Review and Install Configuration Settings

The final step in the workflow is to review and install your network configuration settings.

Procedure


Step 1

Click Review and Install in the navigation pane and then click Begin Installation to begin installing the configuration scripts.

Figure 11. Begin Installation

Note


The screen displays configuration information as it is applied.

Figure 12. Activating Configuration

After successful installation, the State changes from Running to Successful, and the Reboot button becomes enabled (green). The configuration output is also displayed.

Figure 13. Successful Appliance Installation

Step 2

Click Reboot.

Note


Rebooting may take up to 5 minutes. Do not make any changes while the Threat Grid Appliance is rebooting.

Figure 14. Appliance is Rebooting

After reboot, the appliance opens to the Admin UI Home page. This completes the configuration process.


Install Secure Malware Analytics Appliance Updates

After you complete the initial Secure Malware Analytics Appliance setup, we recommend that you install any available updates before continuing. Secure Malware Analytics Appliance updates are applied through the Admin UI.

Users with air-gapped implementations may contact Secure Malware Analytics Support and request a downloadable update boot image.


Note


For more information about installing updates, see the Cisco Secure Malware Analytics Appliance Administration Guide.


Procedure


Step 1

Click the Operations tab and choose Update to open theAppliance Updates page.

Figure 15. Appliance Updates Page

The current release version is displayed in the upper portion of the page. It also informs you if there is an update available to install. For information about the release versions, see the Cisco Secure Malware Analytics Appliance Version Lookup Table.

Step 2

Click Check for Updates.

A check is run to see if there is a more recent update/version of the Secure Malware Analytics Appliance software, and if so, downloads it. This may take some time.

Step 3

Once the update has been downloaded, click Apply Update to install it.


Test the Appliance Setup

Once the Secure Malware Analytics Appliance is updated to the current version, you should test that it has been configured properly by submitting a malware sample to Secure Malware Analytics.

Procedure


Step 1

In a browser, open Secure Malware Analytics using the address you configured as the Clean interface.

The Secure Malware Analytics login page opens.

Figure 16. Secure Malware Analytics Login

Step 2

Enter the default credentials:

  • Login - admin

  • Password - Use the new password entered during the first step of the Admin UI configuation workflow. We encourage you to change it for the portal when you have a chance.

Step 3

Click Log In to open the main Secure Malware Analytics dashboard. There will be no sample data available yet.

Figure 17. Secure Malware Analytics Dashboard

Step 4

Click Submit a Sample to open the sample submission dialog.

Figure 18. Submit Sample

Note


There is help available at the bottom of this form, describing sample submission file types, size, and other information. You can also click the ? icon located in the upper-right corner to view the Secure Malware Analytics Release Notes and online help, including complete documentation on how to submit a sample and review the analysis results.

Step 5

Upload a file or enter a URL to submit for malware analysis. Leave the other options set at the defaults if you are not yet sure what they mean.

Step 6

Click Submit.

The Secure Malware Analytics sample analysis process is launched. You should see your sample going through several stages of analysis. During analysis, the sample is listed in the Samples page. Once analysis is completed, the results should be available in the Analysis Report.

Figure 19. Analysis Report

What to do next

Once the Secure Malware Analytics Appliance has been set up and initial configuration is completed, additional tasks can be performed by the appliance administrator, such as managing SSL certificates and adding users. See the Cisco Secure Malware Analytics Appliance Administration Guide for information about administrator tasks.