Identity provider integration guide

You can integrate an identity provider with Security Cloud Sign On using Security Assertion Markup Language (SAML) to provide SSO to your enterprise’s users. By default, Security Cloud Sign On enrolls all users in Duo Multi-Factor Authentication (MFA) at no additional cost. If your organization already has MFA integrated with your IdP, you can optionally disable Duo-based MFA during integration.

For instructions to integrate with specific identity service providers, see the following guides:


Note


Once your identity provider is integrated, users in your domain must authenticate through the integrated identity provider and not through Cisco or Microsoft social log-in, for example.


Prerequisites

Integrating your identity provider with Security Cloud Sign On requires the following:

  • A verified email domain

  • The ability to create and configure SAML applications in your identity provider's management portal

SAML response requirements

In response to a SAML authentication request from Security Cloud Sign On, your identity provider sends a SAML response. If the user authenticated successfully, the response includes a SAML assertion that contains the NameID attribute and other user attributes. The SAML response must meet specific criteria, as explained below.

SHA-256-signed responses

The SAML assertion in the response from your identity provider must contain the following attribute names. These names must be mapped to the corresponding attributes of the IdP’s user profile. IdP user profile attribute names vary by vendor.

SAML assertion attributes

The SAML assertion in the response from your identity provider must contain the following attribute names. These names must be mapped to the corresponding attributes of the IdP’s user profile. IdP user profile attribute names vary by vendor.

SAML assertion attribute name

Identity provider user attribute

firstName

User's first or given name.

lastName

User's lastname or surname.

email

User's email. This must match the value of the <NameID> element in the SAML response (see below).

<NameID> element format

The value of the <NameID> element in the SAML response must be a valid email address and match the value of the assertion’s email attribute. The <NameID> element's format attribute must be set to one of the following:

  • urn:oasis:names:tc:SAML:1.1:nameid-format:emailAddress

  • urn:oasis:names:tc:SAML:1.1:nameid-format:unspecified

Example SAML assertion

The following XML is an example of a SAML response from an identity provider to the Security Cloud Sign On ACL URL. Note that jsmith@example.com is the value of the <NameID> element and the email SAML response attribute.

<?xml version="1.0" encoding="UTF-8"?>
<saml2:Assertion ID="id9538389495975029849262425" IssueInstant="2023-08-02T01:13:04.861Z" Version="2.0"
    xmlns:saml2="urn:oasis:names:tc:SAML:2.0:assertion">
    <saml2:Issuer Format="urn:oasis:names:tc:SAML:2.0:nameid-format:entity"/>
    <saml2:Subject>
        <saml2:NameID Format="urn:oasis:names:tc:SAML:1.1:nameid-format:unspecified">jsmith@example.com</saml2:NameID>
        <saml2:SubjectConfirmation Method="urn:oasis:names:tc:SAML:2.0:cm:bearer">
            <saml2:SubjectConfirmationData NotOnOrAfter="2023-08-02T01:18:05.160Z" Recipient="https://sso.security.cisco.com/sso/saml2/0oa1rs8y79aeweVg80h8"/>
        </saml2:SubjectConfirmation>
    </saml2:Subject>
    <saml2:Conditions NotBefore="2023-08-02T01:08:05.160Z" NotOnOrAfter="2023-08-02T01:18:05.160Z">
        <saml2:AudienceRestriction>
            <saml2:Audience>https://www.okta.com/saml2/service-provider/12345678890</saml2:Audience>
        </saml2:AudienceRestriction>
    </saml2:Conditions>
    <saml2:AuthnStatement AuthnInstant="2023-08-02T01:13:04.861Z">
        <saml2:AuthnContext>
            <saml2:AuthnContextClassRef>urn:oasis:names:tc:SAML:2.0:ac:classes:PasswordProtectedTransport</saml2:AuthnContextClassRef>
        </saml2:AuthnContext>
    </saml2:AuthnStatement>
    <saml2:AttributeStatement>
        <saml2:Attribute Name="firstName" NameFormat="urn:oasis:names:tc:SAML:2.0:attrname-format:unspecified">
            <saml2:AttributeValue
                xmlns:xs="http://www.w3.org/2001/XMLSchema"
                xmlns:xsi="http://www.w3.org/2001/XMLSchema-instance" xsi:type="xs:string">Joe
            </saml2:AttributeValue>
        </saml2:Attribute>
        <saml2:Attribute Name="lastName" NameFormat="urn:oasis:names:tc:SAML:2.0:attrname-format:unspecified">
            <saml2:AttributeValue
                xmlns:xs="http://www.w3.org/2001/XMLSchema"
                xmlns:xsi="http://www.w3.org/2001/XMLSchema-instance" xsi:type="xs:string">Smith
            </saml2:AttributeValue>
        </saml2:Attribute>
        <saml2:Attribute Name="email" NameFormat="urn:oasis:names:tc:SAML:2.0:attrname-format:unspecified">
            <saml2:AttributeValue
                xmlns:xs="http://www.w3.org/2001/XMLSchema"
                xmlns:xsi="http://www.w3.org/2001/XMLSchema-instance" xsi:type="xs:string">jsmith@example.com
            </saml2:AttributeValue>
        </saml2:Attribute>
    </saml2:AttributeStatement>
</saml2:Assertion>

Step 1: Initial setup

Before you begin

To begin, you must provide a name for your Secure Cloud enterprise, and decide if you want to enroll your users in Duo Multi-Factor Authentication at no cost, or use your own MFA solution.

For all integrations, Cisco strongly recommends implementing MFA with a session timeout no greater than two hours, to help protect your sensitive data within Cisco Security products.

Procedure


Step 1

Sign in to Security Provisioning and Administration.

Step 2

Select Identity Providers from the left navigation pane.

Step 3

Click + Add Identity Provider.

Note


If you haven't claimed a domain yet you will instead see an + Add Domain button. Click that button to begin claiming your domain.

Step 4

On the Set up page, enter a name for your identity provider.

Step 5

If needed, opt-out of Duo MFA for users in your claimed domain.

Step 6

Click Next to advance to the Configure page.


Step 2: Provide Security Cloud SAML metadata to your identity provider

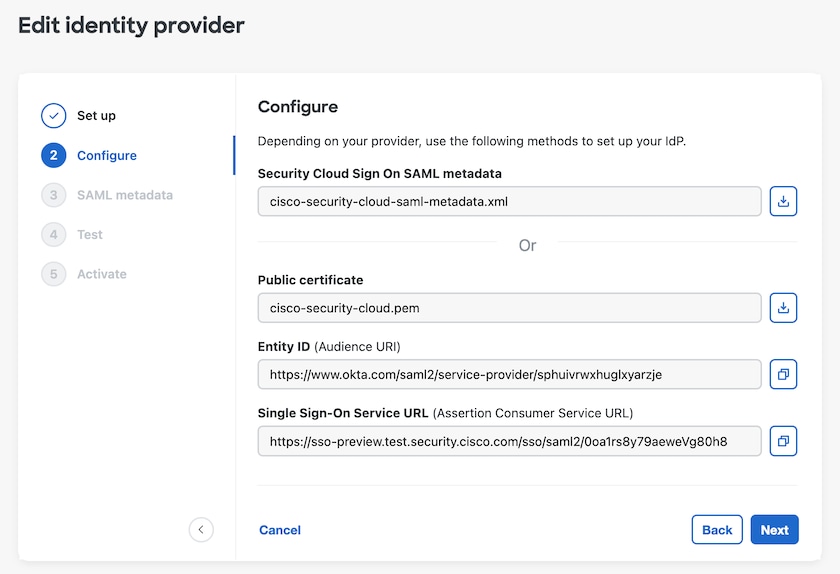
In this step you'll configure your identity provider's SAML application with the SAML metadata and signing certificate provided by Security Provisioning and Administration. This includes the following:

  • Single Sign-On Service URL – Also called the Assertion Consumer Service (ACS) URL, this is the where your identity provider sends its SAML response after authenticating a user.

  • Entity ID – Also called Audience URI, this uniquely identifies Security Cloud Sign On to your identity provider.

  • Signing certificate – The X.509 signing certificate your identity provider uses to verify the signature sent by Security Cloud Sign On in authentication requests.

Security Cloud provides this information in a single SAML metadata file that you can upload to your identity provider (if supported), and as individual values, you can copy and paste. See Identity service provider instructions for steps specific to several commercially available identity service providers.

Procedure


Step 1

From the Identity Providers > Edit identity provider > Configure page, download the SAML metadata file if your identity provider supports it; otherwise, copy the Single Sign-On Service and Entity ID values, and download the Public certificate.

Step 2

On your identity provider, open the SAML application that you want to integrate with Security Cloud Sign On.

Step 3

If supported by your provider, upload the SAML metadata file; otherwise, copy and paste the required Security Cloud Sign On SAML URIs into the corresponding configuration fields in your SAML application, and upload Security Cloud Sign On public signing certificate.

Step 4

Configure your SAML application with the Security Cloud Sign On SAML metadata that you obtained in the previous step, either by importing the XML metadata file or manually entering the SSO Service URL and Entity ID values, and uploading the public signing certificate.

Step 5

Return to Security Provisioning and Administration and click Next.


What to do next

Next you'll provide Security Provisioning and Administration with the corresponding metadata for your identity provider's SAML application.

Step 3: Provide SAML metadata from your IdP to Security Cloud

After you've configured your identity provider's SAML application with SAML metadata from Security Provisioning and Administration, the next step is to provide the corresponding metadata from your SAML application to Security Provisioning and Administration. See Identity service provider instructions for steps specific to several commercially available identity service providers.

Before you begin

To complete this step, you need the following metadata for the SAML application on your identity provider:

  • Single Sign-on Service URL

  • Entity ID (Audience URI)

  • Signing certificate in PEM format

Depending on how your identity provider provides data, you can either upload a metadata XML file that contains all this information, or manually enter (copy and paste) the individual SAML URIs and upload the signing certificate. See Identity service provider instructions for steps specific to several commercially available identity service providers.

Procedure


Step 1

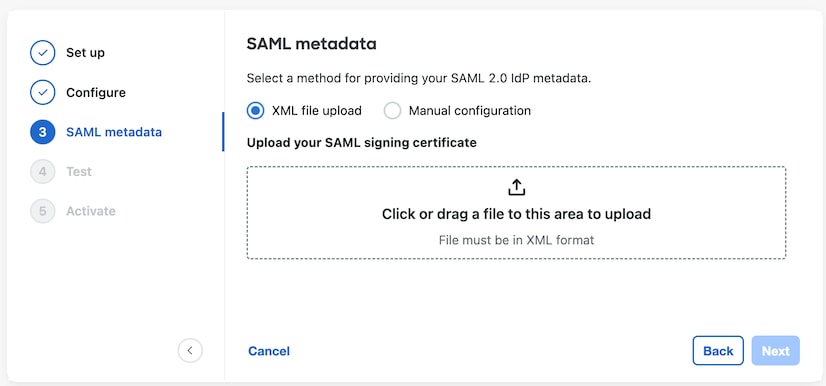
In Security Provisioning and Administration, on the Identity Providers > Edit identity provider > SAML metadata page, do one of the following:

  • If you have an XML metadata file from your identity provider, select XML file upload and upload the XML file.

  • Otherwise, click Manual configuration and enter the endpoints for the Single Sign-on Service URL, Entity ID, and upload the public signing certificate provided by your identity provider.

Step 2

Click Next.


What to do next

Next you'll test your integration by initiating an SSO from Security Provisioning and Administration to your identity provider.

Step 4: Test your SAML integration

After you’ve exchanged SAML metadata between your SAML application and Security Cloud Sign On, you can test the integration. Security Cloud Sign On sends a SAML request to your identity provider’s SSO URL. If your identity provider successfully authenticates the user, they are redirected and automatically signed in to the Application Portal.

Important: Be sure to test with an SSO user account other than the one you used to create the SAML integration in Security Provisioning and Administration. For instance, if you used admin@example.com to create the integration then test with another SSO user (jsmith@example.com, for instance).

Procedure


Step 1

In Security Provisioning and Administration, from the Identity Providers > Edit identity provider > Test page, copy the sign in URL to your clipboard and open it in a private (incognito) browser window.

Step 2

Sign in to your identity provider.

The test is successful if, after authenticating with your identity provider, you are signed in to the Application Portal. If you receive an error, see Troubleshooting SAML errors.

Click Next to advance to the Activate step.


Step 5: Activate the integration

After you've tested your SAML integration, you can activate it. Activating an integration has the following effects:

  • Users in the verified domain must authenticate using the integrated identity provider. If a user tries to sign in using the Cisco or Microsoft social sign-on options, a 400 error occurs.

  • Users that sign in to Security Cloud Sign On with an email domain that matches your claimed domain are redirected to your identity provider to authenticate.

  • If you opted in to Duo MFA, users in your claimed domain can no longer manage their MFA settings.


Caution


Be sure to test your integration before activating it.


You can activate an integration in the following way:

Procedure


Step 1

In Security Provisioning and Administration, on the Identity Providers > Edit identity provider > Activate page, click Activate my IdP.

Step 2

Click Activate in the dialog box to confirm the action.


Troubleshooting SAML errors

If you get an HTTP 400 error when testing your IdP integration, try the following troubleshooting steps.

Check that the user's sign-on email domain matches the claimed domain

Ensure the email domain of the user account you're using to test matches your claimed domain.

For instance, if you claimed a top-level domain, such as example.com, then users must sign in with <username>@example.com and not <username>@signon.example.com.

Check that the user is signing in through their identity provider

Users must authenticate through the integrated identity provider. An HTTP 400 error is returned if a user signs in using the Cisco or Microsoft social sign-in options or attempts to sign in directly through Okta.

Check that the <NameID> element in the SAML response is an email address

The value of the <NameId> element in the SAML response must be an email address. The email address must match the email specified in the user's SAML attributes. See SAML response requirements for details.

Check that the SAML response contains the correct attribute claims

The SAML response from your IdP to Security Cloud Sign On includes the required user attributes: firstName, lastName, and email. See SAML response requirements for details.

Check that the SAML response from your IdP is signed with SHA-256

SAML response from your identity provider must be signed with the SHA-256 signature algorithm. Security Cloud Sign On rejects assertions that are unsigned or signed with another algorithm.