- Preface
-
- Getting Started with Security Manager
- Preparing Devices for Management
- Managing the Device Inventory
- Managing Activities
- Managing Policies
- Managing Policy Objects
- Managing FlexConfigs
- Managing Deployment
- Troubleshooting Device Communication and Deployment
- Managing the Security Manager Server
- Configuring Security Manager Administrative Settings
-
- Introduction to Firewall Services
- Managing Identity-Aware Firewall Policies
- Managing TrustSec Firewall Policies
- Managing Firewall AAA Rules
- Managing Firewall Access Rules
- Managing Firewall Inspection Rules
- Managing Firewall Web Filter Rules
- Managing Firewall Botnet Traffic Filter Rules
- Working with ScanSafe Web Security
- Managing Zone-based Firewall Rules
- Managing Traffic Zones
- Managing Transparent Firewall Rules
- Configuring Network Address Translation
-
- Managing Site-to-Site VPNs: The Basics
- Configuring IKE and IPsec Policies
- GRE and DM VPNs
- Easy VPN
- Group Encrypted Transport (GET) VPNs
- Managing Remote Access VPNs: The Basics
- Managing Remote Access VPNs on ASA and PIX 7.0+ Devices
- Managing Dynamic Access Policies for Remote Access VPNs (ASA 8.0+ Devices)
- Managing Remote Access VPNs on IOS and PIX 6.3 Devices
- Configuring Policy Objects for Remote Access VPNs
- Using Map View
-
- Getting Started with IPS Configuration
- Managing IPS Device Interfaces
- Configuring Virtual Sensors
- Defining IPS Signatures
- Configuring Event Action Rules
- Managing IPS Anomaly Detection
- Configuring Global Correlation
- Configuring Attack Response Controller for Blocking and Rate Limiting
- Managing IPS Sensors
- Configuring IOS IPS Routers
-
- Managing Firewall Devices
- Configuring Bridging Policies on Firewall Devices
- Configuring Device Administration Policies on Firewall Devices
- Configuring Device Access Settings on Firewall Devices
- Configuring Failover
- Configuring Hostname, Resources, User Accounts, and SLAs
- Configuring Server Access Settings on Firewall Devices
- Configuring FXOS Server Access Settings on Firepower 2100 Series Devices
- Configuring Logging Policies on Firewall Devices
- Configuring Multicast Policies on Firewall Devices
- Configuring Routing Policies on Firewall Devices
- Configuring Security Policies on Firewall Devices
- Configuring Service Policy Rules on Firewall Devices
- Configuring Security Contexts on Firewall Devices
- User Preferences
- Index
- Overview of Remote Access VPN Policies for ASA and PIX 7.0+ Devices
- Understanding Cluster Load Balancing (ASA)
- Configuring Connection Profiles (ASA, PIX 7.0+)
- Understanding SSL VPN Access Policies (ASA)
- Configuring Other SSL VPN Settings (ASA)
- Configuring SSL VPN Performance Settings (ASA)
- Configuring SSL VPN Content Rewrite Rules (ASA)
- Configuring SSL VPN Encoding Rules (ASA)
- Configuring SSL VPN Proxies and Proxy Bypass (ASA)
- Configuring SSL VPN Browser Plug-ins (ASA)
- Understanding SSL VPN AnyConnect Client Settings
- Configuring SSL VPN AnyConnect Client Settings (ASA)
- Understanding Kerberos Constrained Delegation (KCD) for SSL VPN (ASA)
- Configuring Kerberos Constrained Delegation (KCD) for SSL VPN (ASA)
- Configuring AnyConnect Custom Attributes (ASA)
- Configuring SSL VPN Advanced Settings (ASA)
- Configuring SSL VPN Server Verification (ASA)
- Configuring SSL VPN Shared Licenses (ASA 8.2+)
- Configuring ASA Portal Appearance Using SSL VPN Customization Objects
- Localizing SSL VPN Web Pages for ASA Devices
- Creating Your Own SSL VPN Logon Page for ASA Devices
- Configuring SSL VPN Bookmark Lists for ASA and IOS Devices
- Using the Post URL Method and Macro Substitutions in SSL VPN Bookmarks
- Configuring SSL VPN Smart Tunnels for ASA Devices
- Configuring WINS/NetBIOS Name Service (NBNS) Servers To Enable File System Access in SSL VPNs
Managing Remote Access VPNs on ASA and PIX 7.0+ Devices

Note![]() From version 4.17, though Cisco Security Manager continues to support PIX features/functionality, it does not support any enhancements.
From version 4.17, though Cisco Security Manager continues to support PIX features/functionality, it does not support any enhancements.
You can configure and manage remote access IPsec on devices running Cisco ASA Software or PIX 7.0+, and SSL VPNs on ASA 8.0+ devices (but not on PIX devices). Additionally, you can use IKE version 2 (IKEv2) negotiations in remote access IPsec VPNs on ASA 8.4(x) devices.

Tip![]() No VPN configuration is supported on Cisco Catalyst 6500 Series ASA Service Modules and the ASA Software Release 8.5(x) used on the module.
No VPN configuration is supported on Cisco Catalyst 6500 Series ASA Service Modules and the ASA Software Release 8.5(x) used on the module.
The configuration of these remote access VPNs are the same for these device types. IOS and PIX 6.3+ devices use different configurations for remote access VPNs (as explained in Chapter 33, “Managing Remote Access VPNs on IOS and PIX 6.3 Devices”).
The topics in this chapter explain how to configure policies that are specific to ASA and PIX 7.0+ devices. Additionally, review the following topics for more information about remote access VPNs:
- Understanding Remote Access VPNs
- Understanding Devices Supported by Each Remote Access VPN Technology
- Discovering Remote Access VPN Policies
- Using the Remote Access VPN Configuration Wizard
–![]() Creating IPSec VPNs Using the Remote Access VPN Configuration Wizard (ASA and PIX 7.0+ Devices)
Creating IPSec VPNs Using the Remote Access VPN Configuration Wizard (ASA and PIX 7.0+ Devices)
–![]() Creating SSL VPNs Using the Remote Access VPN Configuration Wizard (ASA Devices)
Creating SSL VPNs Using the Remote Access VPN Configuration Wizard (ASA Devices)
This chapter contains the following topics:
- Overview of Remote Access VPN Policies for ASA and PIX 7.0+ Devices
- Understanding Cluster Load Balancing (ASA)
- Configuring Connection Profiles (ASA, PIX 7.0+)
- Configuring Group Policies for Remote Access VPNs
- Understanding SSL VPN Server Verification (ASA)
- Add/Edit Scripts Dialog Box
- Working with IPSec VPN Policies
- Working with SSL and IKEv2 IPSec VPN Policies
- Customizing Clientless SSL VPN Portals
Overview of Remote Access VPN Policies for ASA and PIX 7.0+ Devices
Note![]() From version 4.17, though Cisco Security Manager continues to support PIX features/functionality, it does not support any enhancements.
From version 4.17, though Cisco Security Manager continues to support PIX features/functionality, it does not support any enhancements.
When you configure remote access VPNs on ASA or PIX 7.0+ devices, you use the following policies based on the type of VPN you are configuring. Possible remote access VPN types are: IKE version 1 (IKEv1) IPsec, IKE version 2 (IKEv2) IPsec, and SSL. IKEv2 is supported on ASA devices running the software version 8.4(x) and higher. Table 31-1 explains the conditions under which these policies are required or optional.
Note![]() You cannot configure SSL VPNs on PIX devices; PIX devices support remote access IKEv1 IPsec VPNs only.
You cannot configure SSL VPNs on PIX devices; PIX devices support remote access IKEv1 IPsec VPNs only.
–![]() ASA Cluster Load Balancing —In a remote client configuration in which you are using two or more devices connected to the same network to handle remote sessions, you can configure these devices to share their session load. This feature is called load balancing. Load balancing directs session traffic to the least loaded device, thus distributing the load among all devices. Load balancing is effective only on remote sessions initiated with an ASA device. For more information, see Understanding Cluster Load Balancing (ASA).
ASA Cluster Load Balancing —In a remote client configuration in which you are using two or more devices connected to the same network to handle remote sessions, you can configure these devices to share their session load. This feature is called load balancing. Load balancing directs session traffic to the least loaded device, thus distributing the load among all devices. Load balancing is effective only on remote sessions initiated with an ASA device. For more information, see Understanding Cluster Load Balancing (ASA).
–![]() Connection Profiles —A connection profile is a set of records that contain VPN tunnel connection policies, including the attributes that pertain to creating the tunnel itself. Connection profiles identify the group policies for a specific connection, which includes user-oriented attributes. For more information, see Configuring Connection Profiles (ASA, PIX 7.0+).
Connection Profiles —A connection profile is a set of records that contain VPN tunnel connection policies, including the attributes that pertain to creating the tunnel itself. Connection profiles identify the group policies for a specific connection, which includes user-oriented attributes. For more information, see Configuring Connection Profiles (ASA, PIX 7.0+).
–![]() Dynamic Access —Multiple variables can affect each VPN connection, for example, intranet configurations that frequently change, the various roles that each user might inhabit within an organization, and logins from remote access sites with different configurations and levels of security. Dynamic access policies (DAP) let you configure authorization that addresses these many variables. You create a dynamic access policy by setting a collection of access control attributes that you associate with a specific user tunnel or session. For more information, see Chapter 32, “Managing Dynamic Access Policies for Remote Access VPNs (ASA 8.0+ Devices)”.
Dynamic Access —Multiple variables can affect each VPN connection, for example, intranet configurations that frequently change, the various roles that each user might inhabit within an organization, and logins from remote access sites with different configurations and levels of security. Dynamic access policies (DAP) let you configure authorization that addresses these many variables. You create a dynamic access policy by setting a collection of access control attributes that you associate with a specific user tunnel or session. For more information, see Chapter 32, “Managing Dynamic Access Policies for Remote Access VPNs (ASA 8.0+ Devices)”.
Note![]() For multi-context ASA devices, the Dynamic Access policy is supported by Security Manager version 4.12 and ASA version 9.6(2) onwards only.
For multi-context ASA devices, the Dynamic Access policy is supported by Security Manager version 4.12 and ASA version 9.6(2) onwards only.
–![]() Global Settings —You can define global settings that apply to all devices in your remote access VPNs. These settings include Internet Key Exchange (IKE), IKEv2, IPsec, NAT, and fragmentation definitions. The global settings typically have defaults that work in most situations, so configuring the Global Settings policy is optional in most cases; configure it only if you need non-default behavior or if you are supporting IKEv2 negotiations. For more information, see Configuring VPN Global Settings.
Global Settings —You can define global settings that apply to all devices in your remote access VPNs. These settings include Internet Key Exchange (IKE), IKEv2, IPsec, NAT, and fragmentation definitions. The global settings typically have defaults that work in most situations, so configuring the Global Settings policy is optional in most cases; configure it only if you need non-default behavior or if you are supporting IKEv2 negotiations. For more information, see Configuring VPN Global Settings.
–![]() Group Policies —You can view the user group policies defined for your remote access VPN connection profiles. From this page, you can specify new ASA user groups and edit existing ones. When you create a connection profile, if you specify a group policy that has not been used on the device, the group policy is automatically added to the Group Policies page; you do not need to add it to this policy before you create the connection profile. For more information, see Configuring Group Policies for Remote Access VPNs.
Group Policies —You can view the user group policies defined for your remote access VPN connection profiles. From this page, you can specify new ASA user groups and edit existing ones. When you create a connection profile, if you specify a group policy that has not been used on the device, the group policy is automatically added to the Group Policies page; you do not need to add it to this policy before you create the connection profile. For more information, see Configuring Group Policies for Remote Access VPNs.
–![]() Public Key Infrastructure —You can create a Public Key Infrastructure (PKI) policy to generate enrollment requests for CA certificates and RSA keys, and to manage keys and certificates. Certification Authority (CA) servers are used to manage these certificate requests and issue certificates to users who connect to your IPsec or SSL remote access VPN. For more information, see Understanding Public Key Infrastructure Policies and Configuring Public Key Infrastructure Policies for Remote Access VPNs.
Public Key Infrastructure —You can create a Public Key Infrastructure (PKI) policy to generate enrollment requests for CA certificates and RSA keys, and to manage keys and certificates. Certification Authority (CA) servers are used to manage these certificate requests and issue certificates to users who connect to your IPsec or SSL remote access VPN. For more information, see Understanding Public Key Infrastructure Policies and Configuring Public Key Infrastructure Policies for Remote Access VPNs.
Note![]() For multi-context ASA devices, the Public Key Infrastructure policy is supported by Security Manager version 4.12 and ASA version 9.6(2) onwards only.
For multi-context ASA devices, the Public Key Infrastructure policy is supported by Security Manager version 4.12 and ASA version 9.6(2) onwards only.
–![]() Username from Cert Scripts —You can use this policy to define a script to use in mapping the username from the certificate. For more information, see Add/Edit Scripts Dialog Box.
Username from Cert Scripts —You can use this policy to define a script to use in mapping the username from the certificate. For more information, see Add/Edit Scripts Dialog Box.
Note![]() For multi-context ASA devices, the Username from Cert Scripts policy is supported by Security Manager version 4.12 and ASA version 9.6(2) onwards only.
For multi-context ASA devices, the Username from Cert Scripts policy is supported by Security Manager version 4.12 and ASA version 9.6(2) onwards only.
–![]() Certificate To Connection Profile Maps, Policy and Rules (IKEv1 IPSec only.)—Certificate to connection profile map policies let you define rules to match a user’s certificate to a permission group based on specified fields. To establish authentication, you can use any field of the certificate, or you can have all certificate users share a permission group. You can match the group from the DN rules, the Organization Unit (OU) field, the IKE identity, or the peer IP address. You can use any or all of these methods. For more information, see Configuring Certificate to Connection Profile Map Policies (ASA).
Certificate To Connection Profile Maps, Policy and Rules (IKEv1 IPSec only.)—Certificate to connection profile map policies let you define rules to match a user’s certificate to a permission group based on specified fields. To establish authentication, you can use any field of the certificate, or you can have all certificate users share a permission group. You can match the group from the DN rules, the Organization Unit (OU) field, the IKE identity, or the peer IP address. You can use any or all of these methods. For more information, see Configuring Certificate to Connection Profile Map Policies (ASA).
–![]() IKE Proposal —Internet Key Exchange (IKE), also called ISAKMP, is the negotiation protocol that enables two hosts to agree on how to build an IPsec security association. IKE is used to authenticate IPsec peers, negotiate and distribute IPsec encryption keys, and to automatically establish IPsec security associations (SAs). Use the IKE Proposal policy to define the requirements for phase 1 of the IKE negotiation. For more information, see Configuring an IKE Proposal.
IKE Proposal —Internet Key Exchange (IKE), also called ISAKMP, is the negotiation protocol that enables two hosts to agree on how to build an IPsec security association. IKE is used to authenticate IPsec peers, negotiate and distribute IPsec encryption keys, and to automatically establish IPsec security associations (SAs). Use the IKE Proposal policy to define the requirements for phase 1 of the IKE negotiation. For more information, see Configuring an IKE Proposal.
–![]() IPsec Proposal (ASA/PIX 7.x) —An IPsec proposal is a collection of one or more crypto maps. A crypto map combines all the components required to set up IPsec security associations (SAs), including IPsec rules, transform sets, remote peers, and other parameters that might be necessary to define an IPsec SA. The policy is used for IKE phase 2 negotiations. For more information, see Configuring an IPsec Proposal on a Remote Access VPN Server (ASA, PIX 7.0+ Devices).
IPsec Proposal (ASA/PIX 7.x) —An IPsec proposal is a collection of one or more crypto maps. A crypto map combines all the components required to set up IPsec security associations (SAs), including IPsec rules, transform sets, remote peers, and other parameters that might be necessary to define an IPsec SA. The policy is used for IKE phase 2 negotiations. For more information, see Configuring an IPsec Proposal on a Remote Access VPN Server (ASA, PIX 7.0+ Devices).
–![]() Access —An Access policy specifies the security appliance interfaces on which a remote access SSL or IKEv2 IPsec VPN connection profile can be enabled, the port to be used for the connection profile, Datagram Transport Layer Security (DTLS) settings, the SSL VPN session timeout and maximum number of sessions. You can also specify whether to use the AnyConnect VPN Client or AnyConnect Essentials Client. For more information, see Understanding SSL VPN Access Policies (ASA).
Access —An Access policy specifies the security appliance interfaces on which a remote access SSL or IKEv2 IPsec VPN connection profile can be enabled, the port to be used for the connection profile, Datagram Transport Layer Security (DTLS) settings, the SSL VPN session timeout and maximum number of sessions. You can also specify whether to use the AnyConnect VPN Client or AnyConnect Essentials Client. For more information, see Understanding SSL VPN Access Policies (ASA).
–![]() Other Settings —The SSL VPN Other Settings policy defines settings that include caching, content rewriting, character encoding, proxy and proxy bypass definitions, browser plug-ins, AnyConnect client images and profiles, Kerberos Constrained Delegation, and some other advanced settings. For more information, see Configuring Other SSL VPN Settings (ASA).
Other Settings —The SSL VPN Other Settings policy defines settings that include caching, content rewriting, character encoding, proxy and proxy bypass definitions, browser plug-ins, AnyConnect client images and profiles, Kerberos Constrained Delegation, and some other advanced settings. For more information, see Configuring Other SSL VPN Settings (ASA).
–![]() Shared License —Use the SSL VPN Shared License page to configure your SSL VPN Shared License. For more information, see Configuring SSL VPN Shared Licenses (ASA 8.2+).
Shared License —Use the SSL VPN Shared License page to configure your SSL VPN Shared License. For more information, see Configuring SSL VPN Shared Licenses (ASA 8.2+).
The following table explains whether a policy is required or optional for a particular type of VPN.
|
|
|
|---|---|
| Also required if you configure any trustpoints for IKEv1 IPsec or SSL VPNs. Otherwise, it is optional. |
|
Understanding Cluster Load Balancing (ASA)
In a remote client configuration in which you are using two or more devices connected to the same network to handle remote sessions, you can configure these devices to share their session load. This feature is called load balancing. Load balancing directs session traffic to the least loaded device, thus distributing the load among all devices. Load balancing is effective only on remote sessions initiated with an ASA device.
To implement load balancing, you must group two or more devices on the same private LAN-to-LAN network into a virtual cluster. All devices in the virtual cluster carry session loads. One device in the virtual cluster, called the virtual director, directs incoming calls to the other devices, called secondary devices. The virtual director monitors all devices in the cluster, keeps track of how busy each is, and distributes the session load accordingly.
The virtual cluster appears to outside clients as a single virtual cluster IP address. This IP address is not tied to a specific physical device—it belongs to the current virtual director. A VPN client trying to establish a connection connects first to this virtual cluster IP address. The virtual director then sends back to the client the public IP address of the least-loaded available host in the cluster. In a second transaction (transparent to the user), the client connects directly to that host. In this way, the virtual director directs traffic evenly and efficiently across resources.
The role of virtual director is not tied to a physical device—it can shift among devices. If a machine in the cluster fails, the terminated sessions can immediately reconnect to the virtual cluster IP address. The virtual director then directs these connections to another active device in the cluster. Should the virtual director itself fail, a secondary device in the cluster immediately takes over as the new virtual session director. Even if several devices in the cluster fail, users can continue to connect to the cluster as long as any one device in the cluster is available.
Understanding Redirection Using a Fully Qualified Domain Name (FQDN)
By default, the ASA sends only IP addresses in load-balancing redirection to a client. If certificates are in use that are based on DNS names, the certificates will be invalid when redirected to a secondary device. As a VPN director, this security appliance can send a fully qualified domain name (FQDN) of a cluster device (another security appliance in the cluster) when redirecting VPN client connections to that cluster device. The security appliance uses reverse DNS lookup to resolve the FQDN of the device to its outside IP address to redirect connections and perform VPN load balancing. All outside and inside network interfaces on the load-balancing devices in a cluster must be on the same IP network.
After you enable load balancing using FQDNs, add an entry for each of your ASA outside interfaces into your DNS server, if such entries are not already present. Each ASA outside IP address should have a DNS entry associated with it for lookups. These DNS entries must also be enabled for Reverse Lookup. Enable DNS lookups on your ASA and define your DNS server IP address on the ASA.
For the procedure to configure cluster load balancing, see Configuring Cluster Load Balance Policies (ASA).
Configuring Cluster Load Balance Policies (ASA)
Use the ASA Cluster Load Balance page to enable load balancing for an ASA device in your remote access VPN. You must explicitly enable load balancing, as it is disabled by default. All devices that participate in a cluster must share the same cluster-specific values: IP address, encryption settings, encryption key, and port. For more information on cluster load balancing, see Understanding Cluster Load Balancing (ASA).
Note![]() Load balancing requires an active 3DES/AES license and an ASA Model 5510 with a Plus license or an ASA Model 5520 or higher. The ASA device checks for the existence of this crypto license before enabling load balancing. If it does not detect an active 3DES or AES license, the device prevents load balancing, and also prevents internal configuration of 3DES by the load balancing system unless the license permits this usage.
Load balancing requires an active 3DES/AES license and an ASA Model 5510 with a Plus license or an ASA Model 5520 or higher. The ASA device checks for the existence of this crypto license before enabling load balancing. If it does not detect an active 3DES or AES license, the device prevents load balancing, and also prevents internal configuration of 3DES by the load balancing system unless the license permits this usage.
Step 1![]() Do one of the following:
Do one of the following:
- (Device View) Select an ASA device; then select Remote Access VPN > ASA Cluster Load Balance from the Policy selector.
- (Policy View) Select Remote Access VPN > ASA Cluster Load Balance from the Policy Type selector. Select an existing policy or create a new one.
The ASA Cluster Load Balance page opens.
Step 2![]() Select Participate in Load Balancing Cluster to indicate that the device belongs to a load-balancing cluster.
Select Participate in Load Balancing Cluster to indicate that the device belongs to a load-balancing cluster.
Step 3![]() Configure the VPN Cluster Configuration options:
Configure the VPN Cluster Configuration options:
- Cluster IPv4/IPv6 Address —Specify the single IP address that represents the entire virtual cluster. Choose an IP address that is in the same subnet as the external interface. Beginning with version 4.12, Security Manager supports IPv6 address for IPv6 cluster in addition to the IPv4 address. This is for ASA devices running the version 9.0 or later.
- UDP Port —Specify the UDP destination port for the virtual cluster to which the device belongs. The port is typically 9023, but if that port is in use by another application, enter the UDP destination port number that you want to use for load balancing.
- Enable IPSec Encryption, IPSec Shared Secret —If required, select Enable IPsec Encryption to ensure that all load-balancing information communicated between the devices is encrypted. If you select this option, also enter (and confirm) the shared secret password. This can be a case-sensitive value between 4 and 16 characters, without spaces. The security appliances in the virtual cluster communicate through LAN-to-LAN tunnels using IPsec. This password must match the passwords passed on by the client.
Step 4![]() Configure the priority of the server in the cluster. Select one of the following options:
Configure the priority of the server in the cluster. Select one of the following options:
- Accept default device value —To accept the default priority value assigned to the device.
- Configure same priority on all devices in the cluster —To configure the same priority value to all the devices in the cluster. Then enter the priority number (1-10) to indicate the likelihood of the device becoming the virtual director, either at startup or when the existing director fails.
Step 5![]() Specify the public and private interfaces to be used on the server:
Specify the public and private interfaces to be used on the server:
- Public Interfaces —The public interfaces to be used on the server. Enter the name of an interface or interface role object, or click Select to select the interface or role or to create a new role.
- Private Interfaces —The private interfaces to be used on the server. Enter the name of an interface or interface role object, or click Select to select the interface or role or to create a new role.
Step 6![]() If required, select Send FQDN to client instead of an IP address when redirecting to enable redirection using fully-qualified domain names. This option is available only for ASA devices running 8.0(2) or later. For more information, see Understanding Cluster Load Balancing (ASA).
If required, select Send FQDN to client instead of an IP address when redirecting to enable redirection using fully-qualified domain names. This option is available only for ASA devices running 8.0(2) or later. For more information, see Understanding Cluster Load Balancing (ASA).
Configuring Connection Profiles (ASA, PIX 7.0+)
Note![]() From version 4.17, though Cisco Security Manager continues to support PIX features/functionality, it does not support any enhancements.
From version 4.17, though Cisco Security Manager continues to support PIX features/functionality, it does not support any enhancements.
A connection profile is a set of records that contain VPN tunnel connection policies, including the attributes that pertain to creating the tunnel itself. Connection profiles identify the group policies for a specific connection, which includes user-oriented attributes. If you do not assign a group policy to a user, the default connection profile for the connection applies. You can create one or more connection profiles specific to your environment. You can configure connection profiles on the local remote access VPN server or on external AAA servers.
When you discover remote access VPN policies on a device, Security Manager adds the default connection profiles to the policy. You can edit these profiles, and the associated DlftGrpPolicy (renamed in Security Manager as <device_display_name> DfltGrpPolicy), but you cannot delete them. The following default connection profiles are supported in Security Manager:
- DefaultRAGroup—The default connection profile for remote access IPsec VPNs.
- DefaultWEBVPNGroup—The default connection profile for SSL VPNs. This connection profile is discovered only for ASA 8.0+ devices.
If you are configuring a connection profile on an ASA device, you have the option of configuring double authentication. The double authentication feature implements two-factor authentication for remote access to the network, in accordance with the Payment Card Industry Standards Council Data Security Standard. This feature requires that the user enter two separate sets of login credentials at the login page. For example, the primary authentication might be a one-time password, and the secondary authentication might be a domain (Active Directory) credential. If the primary credential authentication fails, the security appliance does not attempt to validate the secondary credentials. If either authentication fails, the connection is denied. Both the AnyConnect VPN client (SSL VPN or IKEv2 IPSec VPN) and Clientless SSL VPN support double authentication. The AnyConnect client supports double authentication on Windows computers (including supported Windows Mobile devices and Start Before Login), Mac computers, and Linux computers.
This procedure describes how to create or edit connection profiles on your remote access VPN server using the Connection Profile policy.
Note![]() You can also create connection profiles from the Remote Access VPN Configuration wizard; see Using the Remote Access VPN Configuration Wizard. For information on connection profiles in Easy VPN site-to-site topologies, see Configuring a Connection Profile Policy for Easy VPN.
You can also create connection profiles from the Remote Access VPN Configuration wizard; see Using the Remote Access VPN Configuration Wizard. For information on connection profiles in Easy VPN site-to-site topologies, see Configuring a Connection Profile Policy for Easy VPN.
Step 1![]() Do one of the following:
Do one of the following:
- (Device view) With an ASA or PIX 7.0+ device selected, select Remote Access VPN > Connection Profiles from the Policy selector.
- (Policy view) Select Remote Access VPN > Connection Profiles (ASA) from the Policy Type selector. Select an existing policy or create a new one.
The Connection Profiles page opens. The policy lists all connection profiles and shows the group policy used in the profile. For more information, see Connection Profiles Page.
Step 2![]() Click Add Row (+) beneath the table, or select a profile and click Edit Row (pencil). The Connection Profiles dialog box opens.
Click Add Row (+) beneath the table, or select a profile and click Edit Row (pencil). The Connection Profiles dialog box opens.
Step 3![]() (All remote access VPN types.) On the General tab, specify the connection profile name and group policies and select which method (or methods) of address assignment to use. For a detailed explanation of the configuration, see General Tab (Connection Profiles).
(All remote access VPN types.) On the General tab, specify the connection profile name and group policies and select which method (or methods) of address assignment to use. For a detailed explanation of the configuration, see General Tab (Connection Profiles).
Step 4![]() (All remote access VPN types.) Click the AAA tab to specify the AAA authentication parameters for the connection profile. For a detailed explanation of the configuration, see AAA Tab (Connection Profiles).
(All remote access VPN types.) Click the AAA tab to specify the AAA authentication parameters for the connection profile. For a detailed explanation of the configuration, see AAA Tab (Connection Profiles).
Step 5![]() (Remote access IKEv2 IPsec and SSL VPN only.) If you are setting up a connection profile on an ASA device, you can configure secondary authentication. To do so, click the Secondary AAA tab. For a detailed explanation of the configuration, see Secondary AAA Tab (Connection Profiles).
(Remote access IKEv2 IPsec and SSL VPN only.) If you are setting up a connection profile on an ASA device, you can configure secondary authentication. To do so, click the Secondary AAA tab. For a detailed explanation of the configuration, see Secondary AAA Tab (Connection Profiles).
Step 6![]() (Remote access IPsec VPN only.) Click the IPsec tab to specify IPsec and IKE parameters for the connection profile. Some of these settings apply to IKEv1 but not to IKEv2 connections. For a detailed explanation of the configuration, see IPSec Tab (Connection Profiles).
(Remote access IPsec VPN only.) Click the IPsec tab to specify IPsec and IKE parameters for the connection profile. Some of these settings apply to IKEv1 but not to IKEv2 connections. For a detailed explanation of the configuration, see IPSec Tab (Connection Profiles).
Note![]() To configure IKEv2 settings, use the IKEv2 Settings tab of the Global Settings policy; see Configuring VPN Global IKEv2 Settings.
To configure IKEv2 settings, use the IKEv2 Settings tab of the Global Settings policy; see Configuring VPN Global IKEv2 Settings.
Step 7![]() (Remote access SSL VPN only.) Click the SSL tab to specify the WINS servers for the connection profile policy, select a customized look and feel for the SSL VPN end-user logon web page, specify DHCP servers to be used for client address assignment, and establish an association between an interface and client IP address pools. For a detailed explanation of the configuration, see SSL Tab (Connection Profiles).
(Remote access SSL VPN only.) Click the SSL tab to specify the WINS servers for the connection profile policy, select a customized look and feel for the SSL VPN end-user logon web page, specify DHCP servers to be used for client address assignment, and establish an association between an interface and client IP address pools. For a detailed explanation of the configuration, see SSL Tab (Connection Profiles).
Connection Profiles Page
Use the Connection Profiles page to manage connection profile policies for remote access VPN or Easy VPN topologies. The Connection Profiles page lists the connection profiles that are configured, shows the group policy associated with those connection profiles, and indicates whether a connection profile is the default connection profile to use for Citrix clients when no specific tunnel group is identified during tunnel negotiation.
Use of this policy differs depending on the type of VPN you are configuring:
- Remote access SSL VPN—The policy is used only for ASA devices. You can create multiple profiles, and configure settings on all tabs of the Connection Profiles dialog box.
- Remote access IPSec VPN—The policy is used for ASA devices and PIX Firewalls running PIX 7.0+ software. You can create multiple profiles, but only the General, AAA, and IPSec tabs on the Connection Profiles dialog box apply to this configuration (in some cases, you will see only these tabs).
- Easy VPN topologies—The policy is used for Easy VPN servers (hubs) that are ASA devices or PIX Firewalls running PIX 7.0+ software. You can create a single profile, so the policy page actually imbeds the Connection Profiles dialog box, so that you have direct access to the tabs that define the profile. Only the General, AAA, and IPSec tabs apply.
For remote access IPSec and SSL VPNs:
- To add a profile, click the Add Row button and fill in the Connection Profiles dialog box.
- To edit an existing profile, select it and click the Edit Row button.
- To delete a profile, select it and click the Delete Row button.
The connection profile consists of the following tabs. Configure them as appropriate for the type of VPN you are configuring.
- General Tab (Connection Profiles)
- AAA Tab (Connection Profiles)
- Secondary AAA Tab (Connection Profiles) (SSL VPN and IKEv2 IPsec VPN only.)
- IPSec Tab (Connection Profiles) (Some of these settings apply to IKEv1 but not to IKEv2 connections.)
- SSL Tab (Connection Profiles) (SSL VPN only)
- (Device View) Select an ASA or PIX 7+ device and select Remote Access VPN > Connection Profiles from the Policy selector.
- (Policy View) Select Remote Access VPN > Connection Profiles (ASA) from the Policy Type selector. Select an existing policy or create a new one.
- From the Site-to-Site VPN Manager Window, select the Easy VPN topology and then select Connection Profiles (PIX7.0/ASA).
- (Device view) Select a device that participates in the Easy VPN topology and select Site to Site VPN from the Policy selector. Select the Easy VPN topology and click Edit VPN Policies to open the Site-to-Site VPN Manager Window, where you can select the policy.
- (Policy view) Select Site-to-Site VPN > Connection Profiles (PIX7.0/ASA). Select an existing policy or create a new one.
Supported CLIs in Remote Access VPN Multi-Context Mode - Connection Profiles
The following CLIs are supported for ASA 9.5(2) for Connection Profiles for remote access VPN in multiple context mode. These CLIs are supported in Admin and User Context for Tunnel-Group.
DefaultWEBVPNGroup is the default Connection Profile. DefaultRAGroup is not supported in ASA 9.5(2) remote access VPN Multiple Context mode.
Note![]() For the configurations that are not supported, Security Manager displays a warning message that you can ignore. No delta will be generated.
For the configurations that are not supported, Security Manager displays a warning message that you can ignore. No delta will be generated.
–![]() Authenticated-session-username
Authenticated-session-username
–![]() Authentication-attr-from-server
Authentication-attr-from-server
General Tab (Connection Profiles)
Use the General tab of the Connection Profiles dialog box to configure the basic properties for a VPN Connection Profile policy. These properties are used in remote access IPsec and SSL VPNs and site-to-site Easy VPN topologies.
The General Tab is supported in ASA 9.5(2) Remote Access VPN in Multiple Context mode.
- Remote Access VPNs—From the Connection Profiles page (see Connection Profiles Page), click the Add Row (+) button, or select a profile and click the Edit Row (pencil) button, to open the Connection Profiles dialog box. Click the General tab if necessary.
- Easy VPN topologies—Select the site-to-site VPN Connection Profiles policy in either Policy view or in the Site-to-Site VPN Manager with an Easy VPN topology selected (see Connection Profiles Page). Click the General tab if necessary.
- Configuring Connection Profiles (ASA, PIX 7.0+)
- ASA Group Policies Dialog Box
- Understanding Networks/Hosts Objects
- Configuring a Connection Profile Policy for Easy VPN
- Understanding Easy VPN
|
|
|
|---|---|
If required, the name of the ASA group policy object that defines the default user group associated with the connection profile. A group policy is a collection of user-oriented attribute/value pairs stored either internally on the device or externally on a RADIUS/LDAP server. Click Select to select an existing object or to create a new one. |
|
|
|
|
The DHCP servers to be used for client address assignments. The servers are used in the order listed. Enter the IP addresses of the DHCP servers or the names of network/host policy objects that define the DHCP server addresses. Click Select to select existing network/host objects or to create new ones. Separate multiple entries with commas. |
|
The address pools from which IPv4 addresses will be assigned to clients if no pool is specified for the interface to which the client connects. Address pools are entered as a range of addresses, such as 10.100.12.2-10.100.12.254. The server uses these pools in the order listed. If all addresses in the first pool have been assigned, it uses the next pool, and so on. You can specify up to 6 pools. Enter the address pool ranges or the names of network/host objects that define these pools. Click Select to select existing network/host objects or to create new ones. Separate multiple entries with commas. |
|
The address pools from which IPv6 addresses will be assigned to clients if no pool is specified for the interface to which the client connects. Beginning with version 4.12, Security Manager supports IPv6 addresses for ASA devices running version 9.0 or later. Address pools are entered as a range of addresses, for example, fe80::60/5 4, where fe80::60/5 is the IPv6 address and prefix length, and 4 is the count (number of addresses). The server uses these pools in the order listed. If all addresses in the first pool have been assigned, it uses the next pool, and so on. You can specify up to 6 pools. Enter the address pool ranges or the names of network/host objects that define these pools. Click Select to select existing network/host objects or to create new ones. Separate multiple entries with commas. |
|
If you want to configure separate IP address pools for specific interfaces, so that clients connecting through that interface use a pool different from the global pool, add the interface to this table and configure the separate pool. Any interface not listed here uses the global pool. Beginning with version 4.12, Security Manager supports IPv6 addresses for ASA devices running version 9.0 or later. Therefore, you see an additional column for IPv6 address pool.
|
|
Add/Edit Interface Specific Client Address Pools Dialog Box
Use the Add/Edit Interface Specific Client Address Pools dialog box to configure interface-specific client address pools for your connection profile policy.
Open the General tab in the Connection Profiles dialog box (see General Tab (Connection Profiles)), then click Add Row below the Interface-Specific Address Pools table, or select a row in the table and click Edit Row.
AAA Tab (Connection Profiles)
Use the AAA tab of the Connection Profile dialog box to configure the AAA authentication parameters for a connection profile policy.
For AAA, the Distinguished Name Authorization Settings policy is not supported for ASA 9.5(2) Remote Access VPN in Multi-context mode.
However, beginning with Security Manager version 4.12, this policy is supported for ASA 9.6(2) Remote Access VPN in Multi-context mode. The supported CLIs for the Admin and User context are:
–![]() Secondary-username-from-certificate
Secondary-username-from-certificate
- Remote Access VPNs—From the Connection Profiles page (see Connection Profiles Page), click the Add Row (+) button, or select a profile and click the Edit Row (pencil) button, to open the Connection Profiles dialog box. Click the AAA tab.
- Easy VPN topologies—Select the site-to-site VPN Connection Profiles policy in either Policy view or in the Site-to-Site VPN Manager with an Easy VPN topology selected (see Connection Profiles Page). Click the AAA tab.
- Configuring Connection Profiles (ASA, PIX 7.0+)
- Understanding AAA Server and Server Group Objects
- Configuring a Connection Profile Policy for Easy VPN
- Understanding Easy VPN
|
|
|
|---|---|
Whether to authenticate connections using AAA, certificates, or both, Multiple Certificate, AAA and Multiple Certificate, and SAML. If you select Certificate, many of the options on the dialog box are disabled as the required details are obtained from the certificate. Beginning with version 4.10, Security Manager enables you to select SAML Identity Provider as an authentication method. This is to enable SAML Service Provider for the current tunnel group. SAML Identity Provider will not be used until they are applied in a tunnel group. The SAML authentication is a mutual exclusion authentication method. See Configuring SAML Identity Provider for more information. Beginning with version 4.13, Security Manager enables you to select Multiple Certificate, or AAA & Multiple Certificate as an authentication method. This method is enabled to support the Multiple certificate authentication feature of ASA 9.7.1 devices. If you select this method for a ASA device earlier to 9.7.1 release, validation error message appears. For more information, see Multiple Certificate Authentication Support. |
|
The name of the authentication server group (LOCAL if the tunnel group is configured on the local device). Enter the name of a AAA server group object or click Select to select it from a list or to create a new object. If you want to use different authentication server groups based on the interface to which the client connects, configure the server groups in the Interface-Specific Authentication Server Groups table at the bottom of this tab (described below). |
|
Whether to fall back to the local database for authentication if the selected authentication server group fails. |
|
The name of the authorization server group (LOCAL if the tunnel group is configured on the local device). Enter the name of a AAA server group object or click Select to select it from a list or to create a new object. |
|
Whether to require that the username of the client must exist in the authorization database to allow a successful connection. If the username does not exist in the authorization database, then the connection is denied. |
|
The name of the accounting server group. Enter the name of a AAA server group object or click Select to select it from a list or to create a new object. |
|
Whether to remove the realm or group name from the username before passing the username on to the AAA server. A realm is an administrative domain. Enabling these options allows the authentication to be based on the username alone. You can enable any combination of these options. However, you must select both check boxes if your server cannot parse delimiters. |
|
Whether to override the “account-disabled” indicator from a AAA server. This configuration is valid for servers, such as RADIUS with NT LDAP, and Kerberos, that return an “account-disabled” indication. If you are using an LDAP directory server for authentication, password management is supported with the Sun Microsystems JAVA System Directory Server (formerly named the Sun ONE Directory Server) and the Microsoft Active Directory.
|
|
Enable Notification Upon Password Expiration to Allow User to Change Password |
Whether to have the security appliance notify the remote user at login that the current password is about to expire or has expired, and to then offer the user the opportunity to change the password. If you want to give the user prior warning of an impending password expiration, select Enable Notification Prior to Expiration and specify the number of days prior to expiration that you want to start notifications (1 to 180 days). You can use this option with AAA servers that support such notification—RADIUS, RADIUS with an NT server, and LDAP servers. There is no prior notification for other types of servers. |
How you want to use the distinguished name for authorization. A distinguished name (DN) is a unique identification, made up of individual fields, that can be used as the identifier when matching users to a tunnel group. DN rules are used for enhanced certificate authentication. Select from the following options to determine how the DN is used during authorization:
|
|
If you want to configure separate authentication server groups for specific interfaces, so that clients connecting through that interface use a server group different from the global group, add the interface to this table and configure the separate group. Any interface not listed here uses the global authentication server group. The table shows the server group and whether you are falling back to local authentication if the server group is not available.
|
Add/Edit Interface Specific Authentication Server Groups Dialog Box
Use the Add/Edit Interface Specific Authentication Server Groups dialog boxes to configure interface-specific authentication for your connection profile policy. This setting overrides the global authentication server group settings if the client connects to the specified interface.
If you are configuring the secondary AAA server for an SSL VPN on an ASA device, the settings are specifically used for the secondary set of credentials that the user enters; this is reflected in the name of the dialog box.
Open the AAA or Secondary AAA tabs in the Connection Profiles dialog box (see AAA Tab (Connection Profiles) or Secondary AAA Tab (Connection Profiles)), then click Add Row below the Interface-Specific Address Pools table, or select a row in the table and click Edit Row.
Secondary AAA Tab (Connection Profiles)
Use the Secondary AAA tab to configure the secondary AAA authentication parameters for a remote access SSL VPN connection profile policy for use with ASA 8.2+ devices, or a remote access IKEv2 IPSec VPN connection profile policy for use with an ASA 8.4(1)+ device. These settings do not apply to remote access IKEv1 IPSec VPNs or Easy VPN topologies or to other device types.
Remote Access VPNs only—From the Connection Profiles page (see Connection Profiles Page), click the Add Row (+) button, or select a profile and click the Edit Row (pencil) button, to open the Connection Profiles dialog box. Click the Secondary AAA tab.
|
|
|
|---|---|
Whether to enable double authentication, which prompts the user for two sets of credentials (username and password) before completing the remote access VPN connection. |
|
The name of the authentication server group (LOCAL if the tunnel group is configured on the local device) to be used with the second set of credentials. Enter the name of a AAA server group object or click Select to select it from a list or to create a new object. If you want to use different authentication server groups based on the interface to which the client connects, configure the server groups in the Secondary Interface-Specific Authentication Server Groups table at the bottom of this tab (described below). |
|
Whether to fall back to the local database for authentication if the selected authentication server group fails. |
|
Whether to use the same username for the secondary credentials that was used for the primary credentials. If you select this option, after users authenticate with their primary credentials, they are prompted for the secondary password only. If you do not select this option, the secondary prompt requires both a username and password. |
|
The username that the software will use for the user session, either the primary or secondary name. If you prompt for the primary name only, select primary. Note By default, if there is more than one username, AnyConnect remembers both usernames between sessions. In addition, the head-end device might offer a feature to allow for administrative control over whether the client remembers both or neither usernames. |
|
The server to use for authorization, either the primary authentication server (defined on the AAA tab) or the secondary authentication server configured on this tab. |
|
How you want to use the distinguished name for authorization. A distinguished name (DN) is a unique identification, made up of individual fields, that can be used as the identifier when matching users to a tunnel group. DN rules are used for enhanced certificate authentication. Select from the following options to determine how the DN is used during authorization:
Note The Distinguished Name (DN) Secondary Authorization Settings policy is supported from Security Manager version 4.12 for ASA devices running version 9.6(2) in Multi-context mode. The supported CLIs for the Admin and User context are: |
|
Secondary Interface-Specific Authentication Server Groups table |
If you want to configure separate secondary authentication server groups for specific interfaces, so that clients connecting through that interface use a server group different from the global group, add the interface to this table and configure the separate group. Any interface not listed here uses the global authentication server group. The table shows the server group and whether you are falling back to local authentication if the server group is not available.
|
IPSec Tab (Connection Profiles)
Use the IPsec tab of the Connection Profiles page to specify IPsec and IKE parameters for the connection policy.
Beginning with version 4.8, Security Manager supports VPN connectivity via standards-based, third-party, IKEv2 remote-access clients (in addition to AnyConnect). Authentication support includes preshared keys, certificates, and user authentication via the Extensible Authentication Protocol (EAP).
IPSec is not supported for ASA 9.5(2) Remote Access VPN in Multi-context mode. Beginning with Cisco Security Manager version 4.17, IPSec is supported from ASA 9.9(2) or later multi-context devices. However, the following attributes under Connection Profile > IPSec tab is not supported for ASA 9.9(2) or later multi-context devices:
- Remote Access VPNs—From the Connection Profiles page (see Connection Profiles Page), click the Add Row (+) button, or select a profile and click the Edit Row (pencil) button, to open the Connection Profiles dialog box. Click the IPSec tab.
- Easy VPN topologies—Select the site-to-site VPN Connection Profiles policy in either Policy view or in the Site-to-Site VPN Manager with an Easy VPN topology selected (see Connection Profiles Page). Click the IPSec tab.
- Configuring Connection Profiles (ASA, PIX 7.0+)
- Configuring a Connection Profile Policy for Easy VPN
- Understanding Easy VPN
|
|
|
|---|---|
|
|
|
The preshared key for the connection profile. The maximum length of a preshared key is 127 characters. Enter the key again in the Confirm field. |
|
The name of the PKI enrollment policy object that defines the trustpoint name if any trustpoints are configured for IKEv1 connections. A trustpoint represents a Certificate Authority (CA)/identity pair and contains the identity of the CA, CA-specific configuration parameters, and an association with one enrolled identity certificate. Click Select to select the object from a list or to create a new object. If you specify a trustpoint, you must also select the same PKI enrollment object in the Public Key Infrastructure policy. For more information, see Configuring Public Key Infrastructure Policies for Remote Access VPNs. |
|
| You can configure one or more authentication options such as preshared key, certificate, and EAP for remote authentication. |
|
The preshared key for the connection profile. The maximum length of a preshared key is 127 characters. Enter the key again in the Confirm field. |
|
Allows you to use certificates for authentication if checked. |
|
Allows you to use EAP for authentication if checked. Note You must use certificates for local authentication if you check this check box since EAP authentication requires the server to authenticate via a certificate. |
|
Enables you to send an EAP request for authentication to the remote access VPN client. |
|
| You can configure either a preshared key or a trustpoint name for local authentication. |
|
The preshared key for the connection profile. The maximum length of a preshared key is 127 characters. Enter the key again in the Confirm field. |
|
The name of the PKI enrollment policy object that defines the trustpoint name if any trustpoints are configured for IKEv2 connections. A trustpoint represents a Certificate Authority (CA)/identity pair and contains the identity of the CA, CA-specific configuration parameters, and an association with one enrolled identity certificate. Click Select to select the object from a list or to create a new object. Note Local authentication must be using certificate if you select EAP for remote authentication. |
|
Select to enable Return Routability checking for dynamic IP address changes in IKE/IPSEC security associations on which mobike is enabled. By default, Mobike RRC is disabled. Note You can enable Return Routability Checking for dynamic IP address changes, only for ASA 9.8.1 and higher. Note This option is not supported for ASA 9.9(2) or later multi-context devices. |
|
Select whether IKE peer ID validation is ignored (Do not check), required, or checked only if supported by a certificate. During IKE negotiations, peers must identify themselves to one another. |
|
Whether to enable the sending of the certificate chain for authorization. A certificate chain includes the root CA certificate, identity certificate, and key pair. |
|
Whether to enable passwords to be updated with the RADIUS authentication protocol. For more information, see Supported AAA Server Types. |
|
Whether to monitor ISAKMP keepalive. If you select the Monitor Keepalive option, you can configure IKE keepalive as the default failover and routing mechanism. Enter the following parameters:
For more information, see Configuring VPN Global ISAKMP/IPsec Settings. |
|
The VPN client revision level and URLs for client platforms. You can configure different revision levels for All Windows Platforms, Windows 95/98/ME, Windows NT4.0/2000/XP, or the VPN3002 Hardware Client. To configure the client for a platform, select it, click the Edit Row button, and fill in the IPSec Client Software Update Dialog Box. Note This option is not supported for ASA 9.9(2) or later multi-context devices. |
|
IPSec Client Software Update Dialog Box
Use the IPsec Client Software Update dialog box to configure the specific revision level and image URL of a VPN client.
Open the IPSec tab in the Connection Profiles dialog box (see IPSec Tab (Connection Profiles)), select a client type from the Client Software Update table, then click Edit Row.
|
|
|
|---|---|
SSL Tab (Connection Profiles)
Use the SSL tab of the Connection Profile dialog box to configure the WINS servers for the connection profile policy, select a customized look and feel for the SSL VPN end-user logon web page, DHCP servers to be used for client address assignment, and to establish an association between an interface and client IP address pools. Some items, such as connection profile aliases, apply to remote access IKEv2 IPsec VPNs, but otherwise these settings do not apply to remote access IKEv1 IPSec VPNs or Easy VPN topologies.
The following profiles are supported for the SSL tab in ASA 9.5(2) Remote Access VPN in Multi-context mode.
Remote Access VPNs only—From the Connection Profiles page (see Connection Profiles Page), click the Add Row (+) button, or select a profile and click the Edit Row (pencil) button, to open the Connection Profiles dialog box. Click the SSL tab.
- Configuring Connection Profiles (ASA, PIX 7.0+)
- Configuring WINS/NetBIOS Name Service (NBNS) Servers To Enable File System Access in SSL VPNs
- Understanding Networks/Hosts Objects
- Configuring ASA Portal Appearance Using SSL VPN Customization Objects
|
|
|
|---|---|
The name of the WINS (Windows Internet Naming Server) servers list to use for CIFS name resolution. Click Select to select the WINS servers list policy object or to create a new object. SSL VPN uses the CIFS protocol to access or share files on remote systems. When you attempt a file-sharing connection to a Windows computer by using its computer name, the file server you specify corresponds to a specific WINS server name that identifies a resource on the network. A WINS servers list defines a list of WINS servers, which are used to translate Windows file server names to IP addresses. The security appliance queries the WINS servers to map WINS names to IP addresses. You must configure at least one, and up to three WINS servers for redundancy. The security appliance uses the first server on the list for WINS/CIFS name resolution. If the query fails, it uses the next server. |
|
The DNS group to use for the SSL VPN tunnel group. The DNS group resolves the hostname to the appropriate DNS server for the tunnel group. Select the desired group from the list; the DefaultDNS group is the default group that is always available on the device. |
|
The name of the SSL VPN Customization policy object that defines the default portal page for the VPN. This profile defines the appearance of the portal page that allows the remote user access to all resources available on the SSL VPN. Click Select to select the object or to create a new object. Note You can set up different login windows for different groups by using a combination of customization profiles and groups. For example, assuming that you had created a customization profile called salesgui, you can create an SSL VPN group called sales that uses that customization profile. You would then specify the SSL VPN customization object in the group policy object on the SSL VPN > Settings tab; see ASA Group Policies SSL VPN Settings. |
|
Select the SAML Identity Provider. SAML Identity Provider will not be used until it is applied in a tunnel group. See Configuring SAML Identity Provider for more information. |
|
Whether you want clientless users logging in under specific tunnel groups to not have to wait for the download prompt to expire before being presented with the clientless SSL VPN home page. Instead, these users are immediately presented with the clientless SSL VPN home page. |
|
Whether you want to display to remote users a RADIUS message about their authentication failure. |
|
A list of alternate names by which the tunnel group can be referred to. The status indicates whether the name is enabled for use or disabled (cannot be used). A group alias creates one or more alternate names by which a user can refer to a tunnel group. This feature is useful when the same group is known by several common names (such as “Devtest” and “QA”). If you want the actual name of the tunnel group to appear on this list, you must specify it as an alias. The group alias that you specify here appears on the login page. Each tunnel group can have multiple aliases or no alias.
|
|
A list of URLs associated with the tunnel group connection profile. The status indicates whether the URL is enabled for use. When enabled, the user can use the URL, which eliminates the need to select a group during login. You can configure multiple URLs (or no URLs) for a tunnel group. Each URL can be enabled or disabled individually. You must use a separate specification for each URL, specifying the entire URL using either the HTTP or HTTPS protocol.
|
|
Whether this connection profile should be the default connection profile to use for Citrix clients when no specific tunnel group is identified during tunnel negotiation. Note Only one connection profile can be configured as the Default Citrix Client Profile. If you try to configure a connection profile as the Default Citrix Client Profile when another profile is already configured as such, you will receive a warning message. If you continue with the operation, the selected connection profile will be made the Default Citrix Client Profile and the other connection profile will be deselected as the Default Citrix Client Profile. |
|
Whether to disable Cisco Secure Desktop (CSD) for this connection profile. Security Manager supports this feature on all devices that are running ASA software version 8.2(0) and higher. Note If you choose to disable CSD, by default Security Manager selects the option for both SSL Clientless VPN and AnyConnect. |
Add/Edit Connection Alias Dialog Box
Use the Add/Edit Connection Alias dialog box to create or edit a connection alias for an SSL or IKEv2 IPsec VPN connection profile. Specifying the connection alias creates one or more alternate names by which the user can refer to a tunnel group.
Open the SSL tab in the Connection Profiles dialog box (see SSL Tab (Connection Profiles)), and click Add Row beneath the Connection Alias table, or select an alias from the table and click Edit Row.
Add/Edit Connection URL Dialog Box
Use this dialog box to specify incoming URLs for the tunnel group. If a connection URL is enabled in a tunnel group, when the user connects using that URL, the security appliance selects the associated tunnel group and presents the user with only the username and password fields in the login window.
- You can configure multiple URLs or addresses (or none) for a group. Each URL or address can be enabled or disabled individually.
- You cannot associate the same URL or address with multiple groups. The security appliance verifies the uniqueness of the URL or address before accepting the URL or address for a tunnel group.
Open the SSL tab in the Connection Profiles dialog box (see SSL Tab (Connection Profiles)), and click Add Row beneath the Group URLs table, or select a URL from the table and click Edit Row.
Configuring Group Policies for Remote Access VPNs
In the Group Policies page, you can view the user group policies defined for your ASA remote access VPN connection profiles. From this page, you can specify new ASA user groups and edit existing ones. When you create a connection profile, if you specify a group policy that has not been used on the device, the group policy is automatically added to the Group Policies page; you do not need to add it to this policy before you create the connection profile. For information on creating connection profiles, see Configuring Connection Profiles (ASA, PIX 7.0+).
For more information about group policies, see Understanding Group Policies (ASA).
Tip![]() Dynamic Access policies take precedence over Group policies. If a setting is not specified in a Dynamic Access policy, an ASA device checks for Group policies that specify the setting.
Dynamic Access policies take precedence over Group policies. If a setting is not specified in a Dynamic Access policy, an ASA device checks for Group policies that specify the setting.
Each row in the table represents an ASA group policy object, displaying the name of the policy object assigned to the remote access VPN connection profile, whether it is stored on the ASA device itself (Internal) or on a AAA server (External), and whether the group is for IKEv1 (IPsec), IKEv2 (IPsec), SSL, or all types of VPN. For external groups, the protocol is unknown and listed as N/A.
- To add an ASA group policy object, click the Add Row button. This opens an object selector, from which you can select an existing policy object or click the Create button to create a new object. For more information about creating group policies, see Creating Group Policies (ASA, PIX 7.0+).
Note![]() You cannot create more than one group policy that includes DfltGrpPolicy in its name. DfltGrpPolicy is the default policy defined on the device; if Security Manager discovers the group during remote access policy discovery, the group appears in the list under the name <device_display_name>DfltGrpPolicy. When you deploy the configuration to the device, the display name prefix is removed so that DfltGrpPolicy is updated correctly. For more information, see Discovering Remote Access VPN Policies.
You cannot create more than one group policy that includes DfltGrpPolicy in its name. DfltGrpPolicy is the default policy defined on the device; if Security Manager discovers the group during remote access policy discovery, the group appears in the list under the name <device_display_name>DfltGrpPolicy. When you deploy the configuration to the device, the display name prefix is removed so that DfltGrpPolicy is updated correctly. For more information, see Discovering Remote Access VPN Policies.
- To edit an object, select it and click the Edit Row button to open the ASA Group Policies Dialog Box.
- To delete an object from the policy, select it and click the Delete Row button. The associated policy objects are not deleted, they are only removed from this policy.
Note![]() You cannot delete the default group policy.
You cannot delete the default group policy.
- (Device view) Select an ASA device, then select Remote Access VPN > Group Policies from the Policy selector.
- (Policy view) Select Remote Access VPN > Group Policies (ASA) from the Policy selector. Select an existing policy or create a new one.
Understanding Group Policies (ASA)
When you configure a remote access IPSec or SSL VPN connection, you must create user groups to which remote clients will belong. A user group policy is a set of user-oriented attribute/value pairs for remote access VPN connections that are stored either internally (locally) on the device or externally on an AAA server. The connection profile uses a user group policy that sets terms for user connections after the connection is established. Group policies let you apply whole sets of attributes to a user or a group of users, rather than having to specify each attribute individually for each user.
Tip![]() Dynamic Access policies take precedence over Group policies. If a setting is not specified in a Dynamic Access policy, an ASA device checks for Group policies that specify the setting.
Dynamic Access policies take precedence over Group policies. If a setting is not specified in a Dynamic Access policy, an ASA device checks for Group policies that specify the setting.
An ASA user group comprises the following attributes:
- Group policy source—Identifies whether the user group’s attributes and values are stored internally (locally) on the security appliance or externally on an AAA server. If the user group is an external type, no other settings need to be configured for it. For more information, see ASA Group Policies Dialog Box.
- Client Configuration settings, which specify the Cisco client parameters for the user group in an Easy VPN or remote access VPN. For more information, see ASA Group Policies Client Configuration Settings.
- Client Firewall Attributes, which configure the firewall settings for VPN clients in an Easy VPN or remote access VPN. For more information, see ASA Group Policies Client Firewall Attributes.
- Hardware Client Attributes, which configure the VPN 3002 Hardware Client settings in an Easy VPN or remote access VPN. For more information, see ASA Group Policies Hardware Client Attributes.
- IPsec settings, which specify tunneling protocols, filters, connection settings, and servers for the user group in an Easy VPN or remote access VPN. For more information, see ASA Group Policies IPSec Settings.
- Clientless settings, which configure the Clientless mode of access to the corporate network in an SSL VPN, for the ASA user group. For more information, see ASA Group Policies SSL VPN Clientless Settings.
- Full Client settings, which configure the Full Client mode of access to the corporate network in an SSL VPN, for the ASA user group. For more information, see ASA Group Policies SSL VPN Full Client Settings.
- General settings that are required for Clientless/Port Forwarding in an SSL VPN. For more information, see ASA Group Policies SSL VPN Settings.
- DNS/WINS settings that define the DNS and WINS servers and the domain name that should be pushed to remote clients associated with the ASA user group. For more information, see ASA Group Policies DNS/WINS Settings.
- Split tunneling that lets a remote client conditionally direct packets over an IPsec or SSL VPN tunnel in encrypted form or to a network interface in clear text form. For more information, see ASA Group Policies Split Tunneling Settings.
- Remote access or SSL VPN session connection settings for the ASA user group. For more information, see ASA Group Policies Connection Settings.
Creating Group Policies (ASA, PIX 7.0+)
Note![]() From version 4.17, though Cisco Security Manager continues to support PIX features/functionality, it does not support any enhancements.
From version 4.17, though Cisco Security Manager continues to support PIX features/functionality, it does not support any enhancements.
Use the Group Policies page to create group policies for ASA or PIX 7.0+ devices used in remote access IPSec VPNs, or ASA devices used in remote access SSL VPNs. For information about group policies, see:
Step 1![]() Do one of the following:
Do one of the following:
- (Device view) With an ASA or PIX 7.0+ device selected, select Remote Access VPN > Group Policies from the Policy selector.
- (Policy view) Select Remote Access VPN > Group Policies (ASA) from the Policy Type selector. Select an existing policy or create a new one.
The Group Policies page opens. The table lists the existing group policies, whether they are defined internally on the device or externally on a AAA server, and the protocol for the group: IKEv1 (IPsec), IKEv2 (IPsec), or SSL.
Step 2![]() Click Add Row (+) to open a dialog box from which you can select a user group from a list of predefined ASA user group objects, or create new ones if necessary. To create a new group, click the Create (+) button in the dialog box.
Click Add Row (+) to open a dialog box from which you can select a user group from a list of predefined ASA user group objects, or create new ones if necessary. To create a new group, click the Create (+) button in the dialog box.
Step 3![]() Select the required ASA user group from the list and click OK. If the required group already exists, you are finished.
Select the required ASA user group from the list and click OK. If the required group already exists, you are finished.
If the required ASA user group does not exist, create it by clicking Create (+). The Add ASA User Group dialog box appears, displaying a list of settings that you can configure for the ASA user group object. For a description of the elements on this dialog box, see ASA Group Policies Dialog Box.
Step 4![]() Enter a name for the object and optionally a description of the object.
Enter a name for the object and optionally a description of the object.
Step 5![]() Select whether to store the ASA user group’s attributes and values locally on the device, or on an external server.
Select whether to store the ASA user group’s attributes and values locally on the device, or on an external server.
Note![]() If you selected to store the ASA user group’s attributes on an external server, you do not need to configure any Technology settings. After you specify the AAA server group that will be used for authentication and a password to the AAA server, click OK and then select the group in the object selector and click OK to add it to the policy.
If you selected to store the ASA user group’s attributes on an external server, you do not need to configure any Technology settings. After you specify the AAA server group that will be used for authentication and a password to the AAA server, click OK and then select the group in the object selector and click OK to add it to the policy.
Step 6![]() If you selected to store the ASA user group’s attributes locally on the device, select the type of VPN for which you are creating the ASA user group from the Technology list:
If you selected to store the ASA user group’s attributes locally on the device, select the type of VPN for which you are creating the ASA user group from the Technology list:
- Easy VPN/IPSec IKEv1—For remote access IPsec VPNs that use IKE version 1 negotiations.
- Easy VPN/IPSec IKEv2—(ASA only.) For remote access IPsec VPNs that use IKE version 2 negotiations.
- SSL Clientless—(ASA only.) For SSL VPNs, all access modes (not just clientless).
Step 7![]() To configure the user group for Easy VPN/IPSec IKEv1 and Easy VPN/IPSec IKEv2, from the Easy VPN/IPSec VPN folder in the Settings pane:
To configure the user group for Easy VPN/IPSec IKEv1 and Easy VPN/IPSec IKEv2, from the Easy VPN/IPSec VPN folder in the Settings pane:
a.![]() Select Client Configuration to configure the Cisco client parameters. For a description of these settings, see ASA Group Policies Client Configuration Settings.
Select Client Configuration to configure the Cisco client parameters. For a description of these settings, see ASA Group Policies Client Configuration Settings.
b.![]() Select Client Firewall Attributes to configure the firewall settings for VPN clients. For a description of these settings, see ASA Group Policies Client Firewall Attributes.
Select Client Firewall Attributes to configure the firewall settings for VPN clients. For a description of these settings, see ASA Group Policies Client Firewall Attributes.
c.![]() Select Hardware Client Attributes to configure the VPN 3002 Hardware Client settings. For a description of these settings, see ASA Group Policies Hardware Client Attributes.
Select Hardware Client Attributes to configure the VPN 3002 Hardware Client settings. For a description of these settings, see ASA Group Policies Hardware Client Attributes.
d.![]() Select IPsec to specify tunneling protocols, filters, connection settings, and servers. For a description of these settings, see ASA Group Policies IPSec Settings.
Select IPsec to specify tunneling protocols, filters, connection settings, and servers. For a description of these settings, see ASA Group Policies IPSec Settings.
Step 8![]() To configure the user group for an SSL VPN, from the SSL VPN folder in the Settings pane:
To configure the user group for an SSL VPN, from the SSL VPN folder in the Settings pane:
a.![]() Select Clientless to configure the Clientless mode of access to the corporate network in an SSL VPN. For a description of these settings, see ASA Group Policies SSL VPN Clientless Settings.
Select Clientless to configure the Clientless mode of access to the corporate network in an SSL VPN. For a description of these settings, see ASA Group Policies SSL VPN Clientless Settings.
b.![]() Select Full Client to configure the Full Client mode of access to the corporate network in an SSL VPN. For a description of these settings, see ASA Group Policies SSL VPN Full Client Settings.
Select Full Client to configure the Full Client mode of access to the corporate network in an SSL VPN. For a description of these settings, see ASA Group Policies SSL VPN Full Client Settings.
c.![]() Select Settings to configure the general settings that are required for clientless and thin client (port forwarding) access modes in an SSL VPN. For a description of these settings, see ASA Group Policies SSL VPN Settings.
Select Settings to configure the general settings that are required for clientless and thin client (port forwarding) access modes in an SSL VPN. For a description of these settings, see ASA Group Policies SSL VPN Settings.
Step 9![]() Specify the following settings for an ASA user group in an Easy VPN/IPSec IKEv1 or IKEv2 VPN and SSL VPN configuration, in the Settings pane:
Specify the following settings for an ASA user group in an Easy VPN/IPSec IKEv1 or IKEv2 VPN and SSL VPN configuration, in the Settings pane:
a.![]() Select DNS/WINS to define the DNS and WINS servers and the domain name that should be pushed to clients associated with the ASA user group. For a description of these settings, see ASA Group Policies DNS/WINS Settings.
Select DNS/WINS to define the DNS and WINS servers and the domain name that should be pushed to clients associated with the ASA user group. For a description of these settings, see ASA Group Policies DNS/WINS Settings.
b.![]() Select Split Tunneling to allow a remote client to conditionally direct encrypted packets through a secure tunnel to the central site and simultaneously allow clear text tunnels to the Internet through a network interface. For a description of these settings, see ASA Group Policies Split Tunneling Settings.
Select Split Tunneling to allow a remote client to conditionally direct encrypted packets through a secure tunnel to the central site and simultaneously allow clear text tunnels to the Internet through a network interface. For a description of these settings, see ASA Group Policies Split Tunneling Settings.
c.![]() Select Connection Settings to configure the SSL VPN connection settings for the ASA user group, such as the session and idle timeouts, including the banner text. For a description of these settings, see ASA Group Policies Connection Settings.
Select Connection Settings to configure the SSL VPN connection settings for the ASA user group, such as the session and idle timeouts, including the banner text. For a description of these settings, see ASA Group Policies Connection Settings.
Step 11![]() Select the ASA user group from the list and click OK.
Select the ASA user group from the list and click OK.
Understanding SSL VPN Server Verification (ASA)
When connecting to a remote SSL-enabled server through clientless SSL VPN, it is important to know that you can trust the remote server, and that it is in fact the server you are trying to connect to. ASA 9.0 introduces support for SSL server certificate verification against a list of trusted certificate authority (CA) certificates for clientless SSL VPN.
When you connect to a remote server via a web browser using the HTTPS protocol, the server will provide a digital certificate signed by a CA to identify itself. Web browsers ship with a collection of CA certificates which are used to verify the validity of the server certificate. This is a form of public key infrastructure (PKI).
Just as browsers provide certificate management facilities, so does the ASA in the form of trusted certificate pool management facility: trustpools. This can be thought of as a special case of trustpoint representing multiple known CA certificates. The ASA includes a default bundle of certificates, similar to that provided with web browsers, but it is inactive until activated by the administrator.
Note![]() If you are already familiar with trustpools from Cisco IOS then you should be aware that the ASA version is similar, but not identical.
If you are already familiar with trustpools from Cisco IOS then you should be aware that the ASA version is similar, but not identical.
For more information on managing trusted certificates, see the following topics:
- Configuring SSL VPN Server Verification (ASA)
- Configuring Trusted Pool Settings (ASA)
- Using the Trustpool Manager
Configuring Trusted Pool Settings (ASA)
Use the Trusted Pool Settings page to configure options for certificate revocation. You can also launch the Trustpool Manager.
(Device View only) Select an ASA device; then select Remote Access VPN > Trusted Pool from the Policy selector.
|
|
|
|---|---|
Whether to check certificates for revocation. Select the appropriate option: If you select this option, also specify the method or methods to use for revocation by selecting the appropriate method (CRL or OCSP) and moving it to the box on the right by clicking >>. Note You can choose either or both methods. If choosing both methods, add the methods in the order in which you want them used. |
|
Optionally, specify override options for a certificate map by selecting the map from the following lists. Each list will include all certificate maps that are configured on the device. |
|
Specifies options for managing the Certificate Revocation List: |
|
Beginning with version 4.9, Security Manager enables checking all CA and ID certificates in the trust points for expiration once every 24 hours. If a certificate is nearing expiration, a syslog will be issued as an alert. You can configure the reminder and recurrence intervals. This feature is supported only in devices running ASA software version 9.4(1) or higher. Begin —Enter the number of days before the expiration in which the first alert will be sent. The range is 1 to 90 days. By default, reminders will start at 60 days prior to expiration. Repeat —Enter the frequency, in number of days, at which the alert will be repeated if the certificate is not renewed. The range is 1 to 14 days. By default reminders will be sent every 7 days. |
|
Beginning with version 4.10, Security Manager enables automatic import of Trustpool certificate bundle. When you enable automatic import, you can configure the URL that the ASA will use to download and import the Trustpool certificate bundle.This feature is supported only in devices running ASA software version 9.5(2) or higher. Beginning with version 4.13, Security Manager provides source interface option that ASA can use to identify the destination URL. This feature is not supported for ASA versions lower to 9.7.1. Interface—Click the Select button and choose the interface. If the interface configured is management-only, the destination URL is routed through management VRF. For non-management interface, the URL is routed through data VRF. If interface is not specified, both the routing table of the management and data VRF are polled to identify the route to reach the URL. Import from a URL —Enter the URL from which the ASA has to download the Trustpool certificate bundle. Download Time —Enter the time at which the ASA will download the certificate bundle. The import takes place daily at the time specified here. Note The default value of the URL is http://www.cisco.com/security/pki/trs/ios_core.p7b and the default value of the download time is 22:00:00. |
|
Launches the Trustpool Manager, which is used to manage Trustpool certificates. You can use the Trustpool Manager to perform the following: For more information, see Using the Trustpool Manager. |
Using the Trustpool Manager
Use the Trustpool Manager to manage the certificates that are included in the trustpool. The Trustpool Manager provides the following functions:
- Updating the trustpool
- Importing a certificate bundle
- Exporting a certificate bundle
- Removing certificates from the trustpool
(Device View only) Select an ASA device, select Remote Access VPN > Trusted Pool from the Policy selector, and then click Launch Trustpool Manager.
The trustpool should be updated if either of the following conditions exists:
- Any certificate in the trustpool is due to expire or has been re-issued.
- The published CA certificate bundle contains additional certificates that are required by a specific application.
To update the certificates in the trustpool, click Refresh Certificates.
Importing a Certificate Bundle
You can import individual certificates or bundles of certificates from a variety of locations in one of the following formats:
- x509 certificates in DER format wrapped in a pkcs7 structure
- a file of concatenated x509 certificates in PEM format (complete with PEM header)
To import a certificate or bundle:
2.![]() Select the location of the bundle:
Select the location of the bundle:
–![]() Import from Cisco published signed root file distribution —Select this option to import from the published distribution site.
Import from Cisco published signed root file distribution —Select this option to import from the published distribution site.
–![]() Import from a URL —If the bundle is hosted on a server, select this option, select the protocol from the list, and enter the URL in the box.
Import from a URL —If the bundle is hosted on a server, select this option, select the protocol from the list, and enter the URL in the box.
–![]() Bundle file on device —If the bundle is stored on the ASA flash file system, select this option and then enter the path to the bundle.
Bundle file on device —If the bundle is stored on the ASA flash file system, select this option and then enter the path to the bundle.
–![]() Select bundle file —If the bundle is stored on your machine, click Import from a file, then click Browse Local Files and navigate to the bundle.
Select bundle file —If the bundle is stored on your machine, click Import from a file, then click Browse Local Files and navigate to the bundle.
–![]() Import default bundle —Select this option to import the default bundle.
Import default bundle —Select this option to import the default bundle.
3.![]() Specify the following import options:
Specify the following import options:
–![]() Clear all certificates before import —Whether to clear the trustpool before importing the bundle.
Clear all certificates before import —Whether to clear the trustpool before importing the bundle.
–![]() Continue to import the bundle if signature validation fails or can’t be performed —Whether to continue import if the signature can not be validated.
Continue to import the bundle if signature validation fails or can’t be performed —Whether to continue import if the signature can not be validated.
Exporting a Certificate Bundle
When you have correctly configured the Trustpool you should export the pool. This will enable you to restore the Trustpool to this point, for example if you wish to remove a certificate that was added to the trustpool after the export. You can export the pool to the Security Manager server file system or your local file system.
To export the certificate bundle:
3.![]() Select the tab that corresponds to the file system you want to export to (local machine or Security Manager server).
Select the tab that corresponds to the file system you want to export to (local machine or Security Manager server).
4.![]() Navigate to the folder where you want to save the trustpool.
Navigate to the folder where you want to save the trustpool.
5.![]() Enter a unique memorable name for the trustpool in the File name box.
Enter a unique memorable name for the trustpool in the File name box.
Removing Certificates from the Trustpool
You can remove certificates from the trustpool using the following methods:
- To remove an individual certificate, select the certificate and click Delete.
- To remove all certificates that are not part of the default bundle, click Clear Trustpool.
Note![]() Before clearing the trustpool you should export the current trustpool so that you can restore your current settings if needed.
Before clearing the trustpool you should export the current trustpool so that you can restore your current settings if needed.
Add/Edit Scripts Dialog Box
Use the Add/Edit Scripts dialog box to define a script to use in mapping the username from the certificate.
- (Device view) Select an ASA device, then select Remote Access VPN > Username from Cert Scripts from the Policy selector.
- (Policy view) Select Remote Access VPN > Username from Cert Scripts (ASA) from the Policy selector. Select an existing policy or create a new one.
|
|
|
|---|---|
Working with IPSec VPN Policies
Certain policies need to be configured for IPSec VPNs. The topics listed below explain these remote access IPsec VPN policies, with the exception of the IKE Proposal policy, which is explained in Configuring an IKE Proposal.
This section contains the following topics:
- Configuring Certificate to Connection Profile Map Policies (ASA)
- Configuring an IPsec Proposal on a Remote Access VPN Server (ASA, PIX 7.0+ Devices)
Configuring Certificate to Connection Profile Map Policies (ASA)
Certificate to connection profile map policies are used for enhanced certificate authentication on ASA devices in remote access IKEv1 IPSec VPNs. They are not used in remote access IKEv2 IPSec or SSL VPNs.
Certificate to connection profile map policies let you define rules to match a user’s certificate to a permission group based on specified fields. To establish authentication, you can use any field of the certificate, or you can have all certificate users share a permission group. You can match the group from the DN rules, the Organization Unit (OU) field, the IKE identity, or the peer IP address. You can use any or all of these methods.
To match user permission groups based on DN fields of the certificate, you define rules that specify the fields to match for a group and then enable each rule for that selected group. A connection profile must already exist in the configuration before you can create a rule for it.
This procedure describes how to configure a Certificate to Connection Profile Map policy for a remote client trying to connect to an ASA server device.
Step 1![]() Do one of the following:
Do one of the following:
- (Device View) Select an ASA device; then select Remote Access VPN > IPSec VPN > Certificate to Connection Profile Maps > Policies from the Policy selector.
- (Policy View) Select Remote Access VPN > IPSec VPN > Certificate to Connection Profile Maps > Policies from the Policy Type selector. Select an existing policy or create a new one.
The Certificate to Connection Profile Map Policies page opens.
Step 2![]() Select any, or all, of the following options to establish authentication and to determine to which connection profile (tunnel group) to map the client:
Select any, or all, of the following options to establish authentication and to determine to which connection profile (tunnel group) to map the client:
- Use Configured Rules to Match a Certificate to a Group —To use the rules defined in the Certificate to Connection Profile Maps > Rules policy. For information on configuring the rules, see Configuring Certificate to Connection Profile Map Rules (ASA).
- Use Certificate Organization Unit (OU) Field to Determine the Group —To use the organizational unit (OU) field of the client certificate.
- Use IKE Identify to Determine the Group —To use the IKE identity.
- Use Peer IP address to Determine the Group —To use the peer’s IP address.
- Use Group URL if Group URL and Certificate Map match different Connection profiles is supported for ASA 9.5(2) Remote Access VPN in Multi-context mode.
Configuring Certificate to Connection Profile Map Rules (ASA)
If you configure certificate to connection profile maps, and select the option to Use Configured Rules to Match a Certificate to a Group (as explained in Configuring Certificate to Connection Profile Map Policies (ASA)), you need to configure the rules required to match a user to a connection profile based on the user certificate.
To match user permission groups based on fields of the certificate, you define rules that specify the fields to match for a group and then enable each rule for that selected group. You must first define a connection profile (tunnel group) before you can create and map a rule to it.
This procedure describes how to configure the Certificate to Connection Profile Map rules and parameters for any remote client trying to connect to an ASA server device.
Tip![]() Certificate to connection profile map policies apply to remote access IKEv1 IPSec VPNs only. They do not apply to IKEv2 or SSL VPNs.
Certificate to connection profile map policies apply to remote access IKEv1 IPSec VPNs only. They do not apply to IKEv2 or SSL VPNs.
- Make sure the connection profiles for which you are creating mapping rules has been configured on the device. See Configuring Connection Profiles (ASA, PIX 7.0+).
- Make sure that you select Use Configured Rules to Match a Certificate to a Group in the Certificate to Connection Profile Maps Policies policy. See Configuring Certificate to Connection Profile Map Policies (ASA).
Step 1![]() (Device view only) With an ASA device selected, select Remote Access VPN > IPSec VPN > Certificate to Connection Profile Maps > Rules from the Policy selector.
(Device view only) With an ASA device selected, select Remote Access VPN > IPSec VPN > Certificate to Connection Profile Maps > Rules from the Policy selector.
The Certificate to Connection Profile Map Rules page is displayed. The policy has two tables:
- Maps table (upper table) —The upper table lists all connection profiles for which you are defining certificate to connection map rules. Each row is a profile map, which includes the name of the connection profile that is being mapped, the priority of the map (lower numbers have higher priority), and the map name. You can configure more than one map for the same connection profile.
–![]() To configure rules for a map, select it and then use the rules table to create, edit, and delete the rules.
To configure rules for a map, select it and then use the rules table to create, edit, and delete the rules.
–![]() To add a map, click the Add Row button and fill in the Map Rule Dialog Box (Upper Table).
To add a map, click the Add Row button and fill in the Map Rule Dialog Box (Upper Table).
–![]() To edit map properties (not rules), select it and click the Edit Row button.
To edit map properties (not rules), select it and click the Edit Row button.
–![]() To delete an entire map, select it and click the Delete Row button.
To delete an entire map, select it and click the Delete Row button.
- Rules table (lower table) —The rules for the map selected in the upper table. You must ensure that the map is actually selected in the upper table: the group title above the rules table should say “ Details for (Connection Profile Name).”
When you select a map, the table shows all rules configured for the map, including the field (subject or issuer), certificate component, matching operator, and the value that the rule is looking for. The remote user must match all configured rules in a map for the device to use the mapped connection profile.
–![]() To add a rule, click the Add Row button and fill in the Map Rule Dialog Box (Lower Table).
To add a rule, click the Add Row button and fill in the Map Rule Dialog Box (Lower Table).
–![]() To edit a rule, select it and click the Edit Row button.
To edit a rule, select it and click the Edit Row button.
–![]() To delete a rule, select it and click the Delete Row button.
To delete a rule, select it and click the Delete Row button.
Step 2![]() To add a rule to a map:
To add a rule to a map:
a.![]() Select the map in the upper table.
Select the map in the upper table.
If the map does not already exist, create it by clicking the Add Row (+) button beneath the upper table and fill in the Map Rule dialog box for creating maps. In the dialog box, you must select the connection profile for the map, assign a relative priority between 1 and 65535 (lower numbers have higher priority), and a unique map name.
b.![]() Ensure that the map is actually selected. Highlighting the map in the table is not sufficient. The heading above the lower table should be “ Details for (Connection Profile Name),” and unless the map is new, the table should show some rules.
Ensure that the map is actually selected. Highlighting the map in the table is not sufficient. The heading above the lower table should be “ Details for (Connection Profile Name),” and unless the map is new, the table should show some rules.
c.![]() To add a new certificate to connection profile matching rule that must be satisfied in order for a remote client to connect to the device using the profile in this map, click the Add Row (+) button beneath the lower table. This opens the Map Rule dialog box with different fields.
To add a new certificate to connection profile matching rule that must be satisfied in order for a remote client to connect to the device using the profile in this map, click the Add Row (+) button beneath the lower table. This opens the Map Rule dialog box with different fields.
Note![]() If you get the error message “Missing Settings, A value ID required for Mapping field, Please select a Mapping,” it means that you have not successfully selected a map in the upper table. Click on the desired map again.
If you get the error message “Missing Settings, A value ID required for Mapping field, Please select a Mapping,” it means that you have not successfully selected a map in the upper table. Click on the desired map again.
d.![]() From the Field list, select whether the rule should examine the Subject or Issuer field of the client certificate.
From the Field list, select whether the rule should examine the Subject or Issuer field of the client certificate.
e.![]() From the Component list, select the component of the client certificate to use for the matching rule.
From the Component list, select the component of the client certificate to use for the matching rule.
f.![]() From the Operator field, select how the component should be compared to the Value field: Equals (exact match is required), Contains (the entire value must appear), Does Not Equal, Does Not Contain.
From the Operator field, select how the component should be compared to the Value field: Equals (exact match is required), Contains (the entire value must appear), Does Not Equal, Does Not Contain.
g.![]() In the Value field, specify the value to match, then click OK to save the rule.
In the Value field, specify the value to match, then click OK to save the rule.
h.![]() Add additional rules to the map as desired.
Add additional rules to the map as desired.
Step 3![]() In the Default Connection Profile field, select the connection profile that should be used for users who do not meet any of the map rules.
In the Default Connection Profile field, select the connection profile that should be used for users who do not meet any of the map rules.
Map Rule Dialog Box (Upper Table)
Use the Map Rule dialog box, when opened for the maps table in the upper part of the Certificate to Connection Profile Maps > Rules policy, to configure maps for which you can then configure rules in the lower table of the Rules policy. For a detailed explanation of configuring these maps and their associated rules, see Configuring Certificate to Connection Profile Map Rules (ASA).
(Device View only) Select an ASA device; then select Remote Access VPN > Certificate to Connection Profile Maps > Rules from the Policy selector. Click the Add Row button beneath the upper table, or select a map in the upper table and click Edit Row.
Map Rule Dialog Box (Lower Table)
Use the Map Rule dialog box, when opened for the rules table in the lower part of the Certificate to Connection Profile Maps > Rules policy, to configure rules for the map selected in the maps table (upper table of the Rules policy). For a detailed explanation of configuring these rules, see Configuring Certificate to Connection Profile Map Rules (ASA).
(Device View only) Select an ASA device; then select Remote Access VPN > IPSec VPN > Certificate to Connection Profile Maps > Rules from the Policy selector. Click the Add Row button beneath the lower table, or select a rule in the lower table and click Edit Row.
Configuring an IPsec Proposal on a Remote Access VPN Server (ASA, PIX 7.0+ Devices)
Note![]() From version 4.17, though Cisco Security Manager continues to support PIX features/functionality, it does not support any enhancements.
From version 4.17, though Cisco Security Manager continues to support PIX features/functionality, it does not support any enhancements.
This procedure describes how to create or edit an IPsec proposal for your remote access VPN server when the server is an ASA or PIX 7.0+ device.
Note![]() Beginning with Cisco Security Manager version 4.17, you can configure and deploy IPSec Proposal policy on ASA multi-context devices running the software version 9.9(2) or later.
Beginning with Cisco Security Manager version 4.17, you can configure and deploy IPSec Proposal policy on ASA multi-context devices running the software version 9.9(2) or later.
If you are configuring an IPsec proposal for IOS or PIX 6.3 devices, including Catalyst 6500/7600 devices, see Configuring an IPsec Proposal on a Remote Access VPN Server (IOS, PIX 6.3 Devices).
An IPsec proposal is a collection of one or more crypto maps. A crypto map combines all the components required to set up IPsec security associations (SAs), including IPsec rules, transform sets, remote peers, and other parameters that might be necessary to define an IPsec SA.
When configuring an IPsec proposal, you must define the external interface through which the remote access clients connect to the server, the IKE version to use during IKE negotiation, and the encryption and authentication algorithms that protect the data in the VPN tunnel. You can also enable reverse route injection and NAT traversal.
For more information on IPsec tunnel concepts, see Understanding IPsec Proposals.
Step 1![]() Do one of the following:
Do one of the following:
- (Device view) Select Remote Access VPN > IPSec VPN > IPsec Proposal (ASA/PIX 7.x) from the Policy selector.
- (Policy view) Select Remote Access VPN > IPSec VPN > IPsec Proposal (ASA/PIX 7.x) from the Policy Type selector. Select an existing policy or create a new one.
The IPsec Proposal page opens and lists the configured proposals, including the VPN endpoint, IPsec transform set, and whether reverse route injection is configured for the proposal.
Step 2![]() Do any of the following:
Do any of the following:
- To add a new IPsec proposal, click the Add Row (+) button and fill in the IPsec Proposal Editor dialog box. For detailed information on the available options, see IPsec Proposal Editor (ASA, PIX 7.0+ Devices).
- To edit an existing proposal, select it and click the Edit Row (pencil) button.
- To delete a proposal, select it and click the Delete Row (trash can) button.
IPsec Proposal Editor (ASA, PIX 7.0+ Devices)
Note![]() From version 4.17, though Cisco Security Manager continues to support PIX features/functionality, it does not support any enhancements.
From version 4.17, though Cisco Security Manager continues to support PIX features/functionality, it does not support any enhancements.
Use the IPsec Proposal Editor to create or edit an IPsec proposal for an ASA or PIX 7.0+ device.
The elements in this dialog box differ according to the selected device. The table below describes the elements on the General tab in the IPsec Proposal Editor dialog box when an ASA or PIX 7.0+ device is selected.
Note![]() For a description of the elements in the dialog box when a PIX 7.0+ or ASA device is selected, see IPsec Proposal Editor (IOS, PIX 6.3 Devices).
For a description of the elements in the dialog box when a PIX 7.0+ or ASA device is selected, see IPsec Proposal Editor (IOS, PIX 6.3 Devices).
- (Device view) Select Remote Access VPN > IPSec VPN > IPsec Proposal (ASA/PIX 7.x) from the Policy selector. Click the Add Row (+) or Edit Row (pencil) buttons.
- (Policy view) Select Remote Access VPN > IPSec VPN > IPsec Proposal (ASA/PIX 7.x) from the Policy Type selector. Select an existing policy or create a new one. Click the Add Row (+) or Edit Row (pencil) buttons.
- Configuring an IPsec Proposal on a Remote Access VPN Server (ASA, PIX 7.0+ Devices)
- Understanding IPsec Proposals
- Creating Interface Role Objects
- Creating AAA Server Group Objects
|
|
|
|---|---|
The external interface through which remote access clients will connect to the server. Enter the name of the interface or interface role object, or click Select to select it or to create a new object. |
|
The IKE versions to use during IKE negotiations. IKEv2 is supported on ASA Software release 8.4(1)+ only with Anyconnect 3.0+ clients. Select either or both options as appropriate. |
|
Available only if you enable IKEv2. Whether to enable the Client Services Server on the ASA for this connection. The Client Services Server provides HTTPS (SSL) access to allow the AnyConnect Downloader to receive software upgrades, profiles, localization and customization files, CSD, SCEP, and other file downloads required by the AnyConnect client. If you select this option, specify the client services port number, which is 443 by default. If you do not enable the Client Services Server, users will not be able to download any of these files that the AnyConnect client might need. |
|
The transform sets to use for your tunnel policy. Transform sets specify which authentication and encryption algorithms will be used to secure the traffic in the tunnel. The transform sets are different for each IKE version; select objects for each supported version. You can select up to 11 transform sets for each. For more information, see Understanding Transform Sets. If more than one of your selected transform sets is supported by both peers, the transform set that provides the highest security will be used. Click Select to select the IPsec transform set policy objects to use in the topology. If the required object is not yet defined, you can click the Create (+) button beneath the available objects list in the selection dialog box to create a new one. For more information, see Configuring IPSec IKEv1 or IKEv2 Transform Set Policy Objects. |
|
Reverse Route Injection (RRI) enables static routes to be automatically inserted into the routing process for those networks and hosts protected by a remote tunnel endpoint. For more information, see Understanding Reverse Route Injection. Select one of the following options to configure RRI on the crypto map: |
|
Whether to allow Network Address Translation traversal (NAT-T). Use NAT traversal when there is a device between a VPN-connected hub and spoke that performs Network Address Translation (NAT) on the IPsec traffic. For information about NAT traversal, see Understanding NAT in VPNs |
|
| ESPv3 Settings (ASA 9.0.1+ only) Specify whether incoming ICMP error messages are validated for cryptography and dynamic cryptography maps, set the per-security association policy, or enable traffic flow packets: |
|
Whether to validate those ICMP error messages received through an IPsec tunnel and destined for an interior host on the private network. |
|
Define how the IPsec subsystem handles large packets that have the do-not-fragment (DF) bit set in the IP header. Choose one of the following: |
|
Enable dummy TFC packets that mask the traffic profile which traverses the tunnel. Note You must have an IKEv2 IPsec proposal set on the Tunnel Policy (Crypto Map) Basic tab before enabling TFC. Traffic Flow Confidentiality is not available when IKEv1 is enabled. Use the Burst, Payload Size, and Timeout parameters to generate random length packets at random intervals across the specified SA. |
|
Working with SSL and IKEv2 IPSec VPN Policies
Certain policies need to be configured for SSL VPNs. These policies are also used with remote access IKEv2 IPSec VPNs. The topics listed below explain these remote access VPN policies.
This section contains the following topics:
- Understanding SSL VPN Access Policies (ASA)
- Configuring Other SSL VPN Settings (ASA)
- Configuring SSL VPN Shared Licenses (ASA 8.2+)
Understanding SSL VPN Access Policies (ASA)
An Access policy specifies the security appliance interfaces on which a remote access SSL or IKEv2 IPsec VPN connection profile can be enabled, the port to be used for the connection profile, Datagram Transport Layer Security (DTLS) settings, the SSL VPN session timeout and maximum number of sessions. You can also specify whether to use the AnyConnect VPN Client or AnyConnect Essentials Client.
For more information about the Anyconnect VPN Client, see Understanding SSL VPN AnyConnect Client Settings. The remainder of this topic explains DTLS and AnyConnect Essentials in more detail.
Datagram Transport Layer Security (DTLS)
Enabling Datagram Transport Layer Security (DTLS) allows the AnyConnect client establishing an SSL VPN connection to use two simultaneous tunnels—an SSL tunnel and a DTLS tunnel. Using DTLS avoids latency and bandwidth problems associated with SSL connections and improves the performance of real-time applications that are sensitive to packet delays. By default, DTLS is enabled when SSL VPN access is enabled on an interface. If you disable DTLS, SSL VPN connections connect with an SSL VPN tunnel only.
Note![]() In order for DTLS to fall back to a TLS connection, you must specify a fallback trustpoint. If you do not specify a fallback trustpoint and the DTLS connection experiences a problem, the connection terminates instead of falling back to the specified trustpoint.
In order for DTLS to fall back to a TLS connection, you must specify a fallback trustpoint. If you do not specify a fallback trustpoint and the DTLS connection experiences a problem, the connection terminates instead of falling back to the specified trustpoint.
AnyConnect Essentials VPN Client
AnyConnect Essentials is a separately licensed VPN client for SSL or IKEv2 IPsec, entirely configured on the adaptive security appliance, that provides the full AnyConnect capability, with the following exceptions:
- No CSD (including HostScan/Vault/Cache Cleaner)
- No clientless SSL VPN
- Optional Windows Mobile Support
The AnyConnect Essentials client provides remote end users running Microsoft Windows Vista, Windows Mobile, Windows XP or Windows 2000, Linux, or Macintosh OS X, with the benefits of a Cisco VPN client. If this feature is disabled, the full AnyConnect VPN client is used. This feature is disabled by default.
Note![]() This license cannot be used at the same time as the shared license for SSL VPN.
This license cannot be used at the same time as the shared license for SSL VPN.
SSL VPN Access Policy Page
Use the SSL VPN Access Policy page to configure access parameters for your remote access SSL or IKEv2 IPsec VPN. For more information about configuring an Access policy, see Configuring an Access Policy.
Tip![]() Any trustpoints that you specify in this policy must also be selected in the Public Key Infrastructure policy. For more information, see Configuring Public Key Infrastructure Policies for Remote Access VPNs.
Any trustpoints that you specify in this policy must also be selected in the Public Key Infrastructure policy. For more information, see Configuring Public Key Infrastructure Policies for Remote Access VPNs.
- (Device View) Select Remote Access VPN > SSL VPN > Access from the Policy selector.
- (Policy View) Select Remote Access VPN > SSL VPN > Access (ASA) from the Policy Type selector. Select an existing policy or create a new one.
|
|
|
|---|---|
The Access Interface table lists the interfaces that are configured for remote access SSL or IKEv2 IPSec VPN connections. The table displays the access settings for each interface: whether the interface is enabled to allow VPN access, whether DTLS is enabled, whether client certificates are required, and the trustpoints used by the interface.
|
|
The Server Name Indication table lists the Server Name Indication mappings that have been defined.
This is not supported for ASA 9.5(2) Remote Access VPN in Multi-context mode. |
|
The port to use for VPN sessions. The default port is 443, for HTTPS traffic. If HTTP port redirection is enabled, the default HTTP port number is 80. To specify a non-default port, the range is 1024 through 65535. This is supported for ASA 9.5(2) Remote Access VPN in Multi-context mode. Enter the port number or the name of a port list object, or click Select to select a port list object or to create a new object. Note If you change the port number, all current SSL VPN connections terminate (upon configuration deployment), and current users must reconnect. |
|
The UDP port to use for DTLS connections. The default port is 443. For details about DTLS, see Understanding SSL VPN Access Policies (ASA). This is supported for ASA 9.5(2) Remote Access VPN in Multi-context mode. Enter the port number or the name of a port list object, or click Select to select a port list object or to create a new object. |
|
The trustpoint (Certificate Authority, or CA server) to use for interfaces that do not have an assigned trustpoint. Enter the name of a PKI enrollment object, or click Select to select the object from a list or to create a new object. This is not supported for ASA 9.5(2) Remote Access VPN in Multi-context mode. |
|
The amount of time, in seconds, that an SSL or IKEv2 IPSec VPN session can be idle before the security appliance terminates it. This value applies only if the Idle Timeout value in the group policy for the user is set to zero (0), which means there is no timeout value; otherwise the group policy Idle Timeout value takes precedence over the timeout you configure here. The minimum value you can enter is 60 seconds (1 minute). The default is 30 minutes (1800 seconds). The maximum is 24 hours (86400 seconds). We recommend that you set this attribute to a short time period. This is because a browser set to disable cookies (or one that prompts for cookies and then denies them) can result in a user not connecting but nevertheless appearing in the sessions database. If the Simultaneous Logins attribute for the group policy is set to one, the user cannot log back in because the database indicates that the maximum number of connections already exists. Setting a low idle timeout removes such phantom sessions quickly, and lets a user log in again. This is supported for ASA 9.5(2) Remote Access VPN in Multi-context mode. |
|
The maximum number of SSL or IKEv2 IPSec VPN sessions allowed. Be aware that the different ASA models have different maximum session limits:
This is supported for ASA 9.5(2) Remote Access VPN in Multi-context mode. |
|
The amount of time, in minutes, to wait before timing out certificate authentication. Valid values are from 1 to 120 minutes. This is not supported for ASA 9.5(2) Remote Access VPN in Multi-context mode. |
|
Whether to present a list of configured connection profiles (tunnel groups) from which the user can select the appropriate profile when the user logs in (for example, in the SSL VPN portal page). If you do not select this option, the user cannot select a profile and must use the default profile for the connection. This is supported for ASA 9.5(2) Remote Access VPN in Multi-context mode. |
|
Whether to allow the user to use the AnyConnect VPN client to make an SSL or IKEv2 IPSec VPN connection. The option is selected by default. For details about AnyConnect VPN clients, see Understanding SSL VPN AnyConnect Client Settings. This is supported for ASA 9.5(2) Remote Access VPN in Multi-context mode. |
|
Whether to enable the AnyConnect Essentials feature, which can be used with both SSL and IKEv2 IPSec VPNs. For details about AnyConnect Essentials VPN clients, see Understanding SSL VPN Access Policies (ASA). |
Access Interface Configuration Dialog Box
Use the Access Interface Configuration dialog box to configure an interface on an ASA device for remote access SSL or IKEv2 IPSec VPN connections.
Open the SSL VPN Access policy (see SSL VPN Access Policy Page), then click Add Row below the interface table, or select a row in the table and click Edit Row.
Server Name Indication Dialog Box
Beginning from version 4.8, Security Manager enables you to configure Server Name Indication mappings used by the enabled VPN interface for authentication. This capability includes the mapping of domain names to trustpoints.
Use the Server Name Indication dialog box to define or modify a domain and trustpoint for each interface.
- You can configure a unique domain name to a trustpoint. However, you can map a trustpoint to multiple domain names. You can configure a maximum of 16 unique trustpoints.
- Server Name Indication mapping of domain names to trustpoints is supported for devices that are running the ASA software version 9.3(2) or higher.
Open the SSL VPN Access policy (see SSL VPN Access Policy Page), then click Add Row below the ServerNameIndication table, or select a row in the table and click Edit Row.
Configuring an Access Policy
This procedure describes how to configure an Access policy on an ASA device. Access policies are required for remote access SSL and IKEv2 IPSec VPN connections. For more information about access policies, see Understanding SSL VPN Access Policies (ASA).
Step 1![]() Do one of the following:
Do one of the following:
- (Device view) With an ASA device selected, select Remote Access VPN > SSL VPN > Access from the Policy selector.
- (Policy view) Select Remote Access VPN > SSL VPN > Access (ASA) from the Policy Type selector. Select an existing policy or create a new one.
The Access page opens. For a description of the elements on this page, see SSL VPN Access Policy Page.
Step 2![]() In the interface table at the top of the policy, configure all of the interfaces on which you will allow remote access SSL or IKEv2 IPSec VPN connections:
In the interface table at the top of the policy, configure all of the interfaces on which you will allow remote access SSL or IKEv2 IPSec VPN connections:
- To add an interface, click the Add Row (+) button beneath the table and fill in the Add Access Interface Configuration dialog box. You must specify the interface name (or an interface role object that identifies the desired interfaces) and whether to allow access on the interface.
You can also specify the PKI enrollment object that identifies the Certificate Authority (CA) server trustpoint for the interface (and a load balancing trustpoint if you use load balancing), whether to enable DTLS connections, and whether to require that the client have a valid certificate to complete a connection. For details about the options, see Access Interface Configuration Dialog Box.
- To edit the settings for an interface, select it and click the Edit Row (pencil) button.
- To delete an interface, select it and click the Delete Row button. Keep in mind that you can edit the interface settings to disable access, so you should delete an interface only if you want to permanently remove it from VPN use.
Step 3![]() Configure the remaining settings. The settings are described in detail in SSL VPN Access Policy Page. The following are the settings that are of particular interest:
Configure the remaining settings. The settings are described in detail in SSL VPN Access Policy Page. The following are the settings that are of particular interest:
- Fallback Trustpoint —The Certificate Authority (CA) server trustpoint to use if an interface does not have a trustpoint configured in the table. Enter the name of a PKI enrollment object, or click Select to select one or to create a new object.
- Allow Users to Select Connection Profile in Portal Page —If you have multiple tunnel groups, selecting this option allows the user to select the correct tunnel group during login. You must select this option for IKEv2 IPSec VPNs.
- Enable AnyConnect Access —The AnyConnect VPN client is a full client; you must enable AnyConnect access if you want to allow full client access to the VPN. You must select this option for IKEv2 IPSec VPNs.
For more information about AnyConnect, including AnyConnect Essentials, see Understanding SSL VPN AnyConnect Client Settings.
- Enable AnyConnect Essentials —Select this option if you are using AnyConnect Essentials clients, which you can use with remote access SSL or IKEv2 IPSec VPNs.
Step 4![]() Any trustpoints that you specify in this policy must also be selected in the Public Key Infrastructure policy. For more information, see Configuring Public Key Infrastructure Policies for Remote Access VPNs.
Any trustpoints that you specify in this policy must also be selected in the Public Key Infrastructure policy. For more information, see Configuring Public Key Infrastructure Policies for Remote Access VPNs.
Configuring Other SSL VPN Settings (ASA)
The SSL VPN Other Settings policy for ASA devices defines settings that include caching, content rewriting, character encoding, proxy and proxy bypass definitions, browser plug-ins, AnyConnect client images and profiles, Kerberos Constrained Delegation, and some other advanced settings.
To configure the Other Settings policy, do one of the following:
- (Device View) Select Remote Access VPN > SSL VPN > Other Settings from the Policy selector.
- (Policy View) Select Remote Access VPN > SSL VPN > Other Settings (ASA) from the Policy Type selector. Select an existing policy or create a new one.
You can then configure the settings on the following tabs:
- Performance tab—To configure caching to improve SSL VPN performance. See Configuring SSL VPN Performance Settings (ASA). This is not supported for ASA 9.5(2) Remote Access VPN in Multi-context mode.
- Content Rewrite tab—To create rules that permit users to browse certain sites and applications without going through the security appliance itself. See Configuring SSL VPN Content Rewrite Rules (ASA). This is not supported for ASA 9.5(2) Remote Access VPN in Multi-context mode.
- Encoding tab—To configure non-default encoding for web pages delivered from CIFS servers. Encoding is normally determined by the remote user’s browser. See Configuring SSL VPN Encoding Rules (ASA). This is not supported for ASA 9.5(2) Remote Access VPN in Multi-context mode.
- Proxy tab—To define HTTP or HTTPS proxy servers, if your network requires them, and proxy bypass rules. See Configuring SSL VPN Proxies and Proxy Bypass (ASA). This is not supported for ASA 9.5(2) Remote Access VPN in Multi-context mode.
- Plug In tab—To define browser plug-ins, which are separate programs that a web browser invokes to perform a dedicated function. See Configuring SSL VPN Browser Plug-ins (ASA). This is not supported for ASA 9.5(2) Remote Access VPN in Multi-context mode.
- Client Settings tab—To configure AnyConnect client images and profiles for downloading to clients. See the following topics:
–![]() Understanding SSL VPN AnyConnect Client Settings
Understanding SSL VPN AnyConnect Client Settings
–![]() Configuring SSL VPN AnyConnect Client Settings (ASA)
Configuring SSL VPN AnyConnect Client Settings (ASA)
This is partially supported for ASA 9.5(2) Remote Access VPN in Multi-context mode. Only the AnyConnect Client Image is supported in ASA 9.5(2) Multiple Context Mode. Beginning with version 4.12, Security Manager provides support for multi-context ASA 9.6(2) and later devices for Admin and User contexts. The CLIs supported are:
During discovery, the AnyConnect Image is not discovered for ASA 9.5(2) remote access VPN Multiple Context mode. After discovery if you want to remove the AnyConnect Image configuration you must use FlexConfig.
- Microsoft KCD Server—To configure Kerberos Constrained Delegation (KCD) for use with clientless SSL VPN connections. See the following topics:
–![]() Understanding Kerberos Constrained Delegation (KCD) for SSL VPN (ASA)
Understanding Kerberos Constrained Delegation (KCD) for SSL VPN (ASA)
–![]() Configuring Kerberos Constrained Delegation (KCD) for SSL VPN (ASA)
Configuring Kerberos Constrained Delegation (KCD) for SSL VPN (ASA)
This is not supported for ASA 9.5(2) Remote Access VPN in Multi-context mode.
- AnyConnect Custom Attributes tab—To configure AnyConnect custom attributes. See Configuring AnyConnect Custom Attributes (ASA). AnyConnect Custom Attributes tab is not supported for ASA 9.5(2) Remote Access VPN in Multi-context mode.
- Advanced tab—To configure the memory, on-screen keyboard, and internal password features. This is not supported for ASA 9.5(2) Remote Access VPN in Multi-context mode.
Note![]() Beginning with 4.15, Cisco Security Manager supports HTTP Strict Transport Security (HSTS). HTTS is a web security policy mechanism which helps to protect websites against protocol downgrade attacks and hijack of cookies.
Beginning with 4.15, Cisco Security Manager supports HTTP Strict Transport Security (HSTS). HTTS is a web security policy mechanism which helps to protect websites against protocol downgrade attacks and hijack of cookies.
You can enable or disable HSTS and also provide the timeout values in the Advanced tab. See Configuring SSL VPN Advanced Settings (ASA).
- SSL Server Verification tab—To enable HTTPS server verification for clientless SSL VPN users. See Configuring SSL VPN Server Verification (ASA). This is not supported for ASA 9.5(2) Remote Access VPN in Multi-context mode.
Tip![]() You must also configure a connection profile policy on the device. See Configuring Connection Profiles (ASA, PIX 7.0+).
You must also configure a connection profile policy on the device. See Configuring Connection Profiles (ASA, PIX 7.0+).
Configuring SSL VPN Performance Settings (ASA)
Caching enhances SSL VPN performance. It stores frequently reused objects in the system cache, which reduces the need to perform repeated rewriting and compressing of content. It reduces traffic between SSL VPN and both the remote servers and end-user browsers, with the result that many applications run much more efficiently.
This procedure describes how to enable caching on your ASA security appliance.
Step 1![]() Do one of the following:
Do one of the following:
- (Device view) With an ASA device selected, select Remote Access VPN > SSL VPN > Other Settings from the Policy selector. Click the Performance tab if it is not already selected.
- (Policy view) Select Remote Access VPN > SSL VPN > Other Settings (ASA) from the Policy Type selector. Select an existing policy or create a new one. Click the Performance tab if it is not already selected.
Step 2![]() Select Enable to enable caching on the security appliance.
Select Enable to enable caching on the security appliance.
If you deselect this option, the cache settings configured on the security appliance do not take effect.
Step 3![]() Configure the following options:
Configure the following options:
- Minimum Object Size —The minimum size of an HTTP object that can be stored in the cache on the security appliance, in kilobytes. The range is 0-10,000 KB. The default is 0 KB.
- Maximum Object Size —The maximum size of an HTTP object that can be stored in the cache on the security appliance, in kilobytes. The range is 0-10,000 KB. The default is 1000 KB. The maximum size must be larger than the minimum size.
- Last Modified Factor —An integer to set a revalidation policy for caching objects that have only the last-modified timestamp, and no other server-set expiration values. The range is 1-100. The default is 20.
The Expires response from the origin web server to the security appliance request, which indicates the time that the response expires, also affects caching. This response header indicates the time that the response becomes stale and should not be sent to the client without an up-to-date check (using a conditional GET operation).
The security appliance can also calculate an expiration time for each web object before it is written to disk. The algorithm to calculate an object’s cache expiration date is as follows:
Expiration date = (Today’s date - Object’s last modified date) * Freshness factor
After the expiration date has passed, the object is considered stale and subsequent requests causes a fresh retrieval of the content by the security appliance. Setting the last modified factor to zero is equivalent to forcing an immediate revalidation, while setting it to 100 results in the longest allowable time until revalidation.
- Expiration Time —The amount of time (in minutes) that the security appliance caches objects without revalidating them. The range is 0-900 minutes. The default is one minute.
Revalidation consists of rejecting the objects from the origin server before serving the requested content to the client browser when the age of the cached object has exceeded its freshness lifetime. The age of a cached object is the time that the object has been stored in the security appliance’s cache without the security appliance explicitly contacting the origin server to check if the object is still fresh.
- Cache Static Content —Whether to cache static content on the security appliance. Each web page can include static and dynamic objects. The security appliance caches individual static objects, such as image files (*.gif, *.jpeg), java applets (.js), and cascading style sheets (*.css).
Configuring SSL VPN Content Rewrite Rules (ASA)
SSL VPN processes application traffic through a content transformation/rewriting engine that includes advanced elements (such as, JavaScript, VBScript, Java, and multi-byte characters) to proxy HTTP traffic depending on whether the user is using an application within or independently of an SSL VPN device.
If you do not want some applications and web resources, such as public web sites, to go through the security appliance, you can create rewrite rules that permit users to browse certain sites and applications without going through the security appliance itself. This is similar to split tunneling in an IPsec VPN connection.
In the Content Rewrite tab of the SSL VPN Other Settings page, you can configure multiple content rewrite rules. The Content Rewrite tab lists all applications for which content rewrite is enabled or disabled.
Tip![]() The security appliance searches rewrite rules by order number, starting with the lowest, and applies the first rule that matches.
The security appliance searches rewrite rules by order number, starting with the lowest, and applies the first rule that matches.
This procedure shows you how to create or edit content rewrite rules.
Step 1![]() Do one of the following:
Do one of the following:
- (Device view) With an ASA device selected, select Remote Access VPN > SSL VPN > Other Settings from the Policy selector.
- (Policy view) Select Remote Access VPN > SSL VPN > Other Settings (ASA) from the Policy Type selector. Select an existing policy or create a new one.
Step 2![]() On the Other Settings page, click the Content Rewrite tab. The Content Rewrite tab displays all applications for which content rewrite is enabled or disabled.
On the Other Settings page, click the Content Rewrite tab. The Content Rewrite tab displays all applications for which content rewrite is enabled or disabled.
The security appliance searches rewrite rules by order number, starting with the lowest, and applies the first rule that matches. The resource mask defines the application string to which the rule is matched.
If a rule does not have a number, it is evaluated after all of the numbered rules.
Step 3![]() Do any of the following:
Do any of the following:
- To add a rule, click the Add Row button beneath the table and fill in the Add Content Rewrite dialog box. The options are described in detail in Add/Edit Content Rewrite Dialog Box.
- To edit a rule, select it, click the Edit Row button, and make your changes in the Edit Content Rewrite dialog box.
- To delete a rule, select it and click the Delete Row button. You are asked to confirm the deletion.
Add/Edit Content Rewrite Dialog Box
Use the Add or Edit Content Rewrite dialog box to configure the rewriting engine that includes advanced elements such as JavaScript, VBScript, Java, and multi-byte characters to proxy HTTP traffic over a SSL VPN connection. For more information about content rewrite rules, see Configuring SSL VPN Content Rewrite Rules (ASA).
From the Content Rewrite tab of the SSL VPN Other Settings policy for ASA devices, click the Add Row button, or select a rule and click the Edit Row button. For detailed information on opening the tab, see Configuring SSL VPN Content Rewrite Rules (ASA).
Configuring SSL VPN Encoding Rules (ASA)
Use the Encoding tab of the SSL VPN Other Settings page to specify the character set to encode in SSL VPN portal pages to be delivered to remote users. By default, the encoding type set on the remote browser determines the character set for SSL VPN portal pages, so you need to set the character encoding only if it is necessary to ensure proper encoding on the browser.
Character encoding is the pairing of raw data (such as 0’s and 1’s) with characters to represent the data. The language determines the character encoding method to use. Some languages use the same method, while others do not. Usually, the geographic region determines the default encoding method used by the browser, but the remote user can change this. The browser can also detect the encoding specified on the page, and render the document accordingly.
The encoding attribute lets you specify the value of the character encoding method in the SSL VPN portal page to ensure that the browser renders it properly, regardless of the region in which the user is using the browser, or any changes made to the browser.
The character encoding attribute is a global setting that, by default, all SSL VPN portal pages inherit. However, you can override the file-encoding attribute for Common Internet File System (CIFS) servers that use character encoding that differs from the value of the character-encoding attribute. You can use different file-encoding values for CIFS servers that require different character encodings.
The SSL VPN portal pages downloaded from the CIFS server to the SSL VPN user encode the value of the SSL VPN file-encoding attribute identifying the server, or if one does not, they inherit the value of the character encoding attribute. The remote user’s browser maps this value to an entry in its character encoding set to determine the proper character set to use. The SSL VPN portal pages do not specify a value if SSL VPN configuration does not specify a file encoding entry for the CIFS server and the character encoding attribute is not set. The remote browser uses its own default encoding if the SSL VPN portal page does not specify the character encoding, or if it specifies a character encoding value that the browser does not support.
In the Encoding tab of the SSL VPN Global Settings page, you can view the currently configured character sets associated with the CIFS server to be encoded in the portal pages. From this tab, you can create or edit the character sets, as described in the following procedure.
Step 1![]() Do one of the following:
Do one of the following:
- (Device view) With an ASA device selected, select Remote Access VPN > SSL VPN > Other Settings from the Policy selector.
- (Policy view) Select Remote Access VPN > SSL VPN > Other Settings (ASA) from the Policy Type selector. Select an existing policy or create a new one.
Step 2![]() On the Other Settings page, click the Encoding tab. The Encoding tab displays the default encoding and a list of CIFS servers for which encoding rules are configured.
On the Other Settings page, click the Encoding tab. The Encoding tab displays the default encoding and a list of CIFS servers for which encoding rules are configured.
Step 3![]() From the Global SSL VPN Encoding Type list, select the attribute that determines the character encoding that all SSL VPN portal pages inherit, except for those from the CIFS servers listed in the table.
From the Global SSL VPN Encoding Type list, select the attribute that determines the character encoding that all SSL VPN portal pages inherit, except for those from the CIFS servers listed in the table.
Note![]() If you choose none or specify a value that the browser on the SSL VPN client does not support, the browser uses its own default encoding. The default global encoding is none.
If you choose none or specify a value that the browser on the SSL VPN client does not support, the browser uses its own default encoding. The default global encoding is none.
You can select from the following encoding types:
Note If you are using Japanese Shift_jis Character encoding, click Do not specify in the Font Family area of the associated Select Page Font pane to remove the font family.
Step 4![]() Do any of the following:
Do any of the following:
- To add a rule, click the Add Row button beneath the table and configure the following settings in the Add File Encoding dialog box:
–![]() CIFS Server IP, CIFS Server Host —Select one of these options to specify the CIFS server either by IP address or hostname. If you select IP address, you can either enter the IP address or the name of a network/host object that specifies one or more individual IP addresses.
CIFS Server IP, CIFS Server Host —Select one of these options to specify the CIFS server either by IP address or hostname. If you select IP address, you can either enter the IP address or the name of a network/host object that specifies one or more individual IP addresses.
If you specify a hostname, the security appliance retains the case you specify, although it ignores the case when matching the name to a server.
–![]() Encoding Type —Select the encoding type. The options are the same as for the global setting described above.
Encoding Type —Select the encoding type. The options are the same as for the global setting described above.
- To edit a rule, select it, click the Edit Row button, and make your changes in the Edit File Encoding dialog box.
- To delete a rule, select it and click the Delete Row button. You are asked to confirm the deletion.
Configuring SSL VPN Proxies and Proxy Bypass (ASA)
Use the Proxy tab of the SSL VPN Other Settings page to configure the security appliance to terminate HTTPS connections and forward HTTP/HTTPS requests to HTTP and HTTPS proxy servers. On this tab, you can also configure the security appliance to perform minimal content rewriting and to specify the types of content to rewrite—external links, XML, or neither.
The security appliance can terminate HTTPS connections and forward HTTP/HTTPS requests to HTTP and HTTPS proxy servers. These servers act as intermediaries between users and the Internet. Requiring all Internet access through a server you control provides another opportunity for filtering to assure secure Internet access and administrative control.
Note![]() The HTTP/HTTPS proxy does not support connections to personal digital assistants.
The HTTP/HTTPS proxy does not support connections to personal digital assistants.
You can specify a proxy auto-configuration (PAC) file to download from an HTTP proxy server; however, you cannot use proxy authentication when specifying the PAC file.
You can configure the security appliance to use proxy bypass when applications and web resources work better with the content rewriting this feature provides. Proxy bypass is an alternative method of content rewriting that makes minimal changes to the original content. It is useful with custom web applications.
You can configure multiple proxy bypass entries. The order in which you configure them is unimportant. The interface and path mask or interface and port uniquely identify a proxy bypass rule.
If you configure proxy bypass using ports rather than path masks, depending on your network configuration, you might need to change your firewall configuration to allow these ports access to the security appliance. Use path masks to avoid this restriction. Be aware, however, that path masks can change, so you might need to use multiple path mask statements to exhaust the possibilities.
This procedure shows you how to define proxies and proxy bypass rules for your SSL VPN.
Step 1![]() Do one of the following:
Do one of the following:
- (Device view) With an ASA device selected, select Remote Access VPN > SSL VPN > Other Settings from the Policy selector.
- (Policy view) Select Remote Access VPN > SSL VPN > Other Settings (ASA) from the Policy Type selector. Select an existing policy or create a new one.
Step 2![]() On the Other Settings page, click the Proxy tab. The Proxy tab displays any currently defined proxies and proxy rules.
On the Other Settings page, click the Proxy tab. The Proxy tab displays any currently defined proxies and proxy rules.
Step 3![]() From the Proxy Type field, select the type of external proxy server to use for SSL VPN connections:
From the Proxy Type field, select the type of external proxy server to use for SSL VPN connections:
- HTTP/HTTPS Proxy Server —To specify proxy servers to handle HTTP or HTTPS requests.
- Proxy Using PAC —To specify a proxy auto-configuration (PAC) file to download from an HTTP proxy server to the user’s browser. Once downloaded, the PAC file uses a JavaScript function to identify a proxy for each URL.
If you select this option, enter the URL for the PAC file in the Specify Proxy Auto Config file URL field. The URL must begin with http:// or the security appliance will not use the PAC file.
Step 4![]() If you select HTTP/HTTPS Proxy Server for the proxy type, configure the settings for the HTTP and HTTPS proxy servers. There are separate settings for the HTTP and HTTPS server, allowing you to use different servers, or to specify only one type of proxy. Configure the following options:
If you select HTTP/HTTPS Proxy Server for the proxy type, configure the settings for the HTTP and HTTPS proxy servers. There are separate settings for the HTTP and HTTPS server, allowing you to use different servers, or to specify only one type of proxy. Configure the following options:
- Enable HTTP Proxy Server, Enable HTTPS Proxy Server —Select either or both of these options to configure the proxy server.
- HTTP Proxy Server (IPv4/IPv6), HTTPS Proxy Server (IPv4/IPv6) —Enter the IP address, or the name of a network/host object that contains the single proxy server’s IP address, for each type of proxy server you are configuring. You can click Select to select the object from a list or to create a new object.
The default ports are 80 for HTTP and 443 for HTTPS.
Beginning with version 4.12, Security Manager supports IPv6 addresses for ASA 9.0(1) or later devices. If the IPv6 address you entered is invalid, Security Manager would throw an error. Security Manager displays a warning message if the object is not available when you select the proxy server from the list.
- HTTP Proxy Port, HTTPS Proxy Port —Enter the port on the proxy server to which HTTP or HTTPS requests will be forwarded. You can also enter the name of a port list object that defines the port, or click Select to select an object or to create a new one.
- Exception Address List —A URL or a comma-delimited list of several URLs to exclude from those that should be sent to the HTTP or HTTPS proxy servers. The string does not have a character limit, but the entire command cannot exceed 512 characters. You can specify literal URLs or use the following wildcards:
–![]() * to match any string, including slashes (/) and periods (.). You must accompany this wildcard with an alphanumeric string.
* to match any string, including slashes (/) and periods (.). You must accompany this wildcard with an alphanumeric string.
–![]() ? to match any single character, including slashes and periods.
? to match any single character, including slashes and periods.
–![]() [x-y] to match any single character in the range of x and y, where x represents one character and y represents another character in the ANSI character set.
[x-y] to match any single character in the range of x and y, where x represents one character and y represents another character in the ANSI character set.
–![]() [!x-y] to match any single character that is not in the range.
[!x-y] to match any single character that is not in the range.
- Authentication User Name, Authentication Password, Confirm —If the proxy server requires user authentication, enter a valid user name and password.
Step 5![]() If necessary, configure proxy bypass rules in the Proxy Bypass table at the bottom of the tab. Proxy bypass rules specify the ASA interface, port, and target URL configured for proxy bypass. Do any of the following:
If necessary, configure proxy bypass rules in the Proxy Bypass table at the bottom of the tab. Proxy bypass rules specify the ASA interface, port, and target URL configured for proxy bypass. Do any of the following:
- To create a proxy bypass rule, click the Add Row button and fill in the Add Proxy Bypass dialog box. For specific information on the attributes of a proxy bypass rule, see Add or Edit Proxy Bypass Dialog Box.
- To edit a proxy bypass rule, select the rule and click the Edit Row button.
- To delete a rule, select it and click the Delete Row button. You are asked to confirm the deletion.
Tip If you configure proxy bypass rules, you must also configure the SSL VPN Access policy. For more information, see Configuring an Access Policy.
Add or Edit Proxy Bypass Dialog Box
Use the Add or Edit Proxy Bypass dialog box to set proxy bypass rules when the security appliance should perform little or no content rewriting.
From the Proxy tab of the SSL VPN Other Settings policy for ASA devices, click the Add Row button, or select a rule and click the Edit Row button. For detailed information on opening the tab, see Configuring SSL VPN Encoding Rules (ASA).
Configuring SSL VPN Browser Plug-ins (ASA)
A browser plug-in is a separate program that a web browser invokes to perform a dedicated function, such as connect a client to a server within the browser window. The security appliance lets you import plug-ins for download to remote browsers in clientless SSL VPN sessions.
Cisco redistributes the following open-source, Java-based components to be accessed as plug-ins for web browsers in Clientless SSL VPN sessions. Cisco tests the plug-ins it redistributes, and in some cases, tests the connectivity of plug-ins we cannot redistribute. These files are available in the \files\vms\repository folder in the product installation folder (usually C:\Program Files\CSCOpx) on the Security Manager server. The actual file names include release numbers:
- rdp-plugin.jar—The Remote Desktop Protocol plug-in lets the remote user connect to a computer running Microsoft Terminal Services. The web site containing the source of the redistributed plug-in is http://properjavardp.sourceforge.net/.
- ssh-plugin.jar—The Secure Shell-Telnet plug-in lets the remote user establish a Secure Shell or Telnet connection to a remote computer. The web site containing the source of the redistributed plug-in is http://javassh.org/.
Note![]() The ssh-plugin.jar provides support for both SSH and Telnet protocols. The SSH client supports SSH Version 1.0.
The ssh-plugin.jar provides support for both SSH and Telnet protocols. The SSH client supports SSH Version 1.0.
- vnc-plugin.jar—The Virtual Network Computing plug-in lets the remote user use a monitor, keyboard, and mouse to view and control a computer with remote desktop sharing turned on. The web site containing the source of the redistributed plug-in is http://www.tightvnc.com.
Note![]() Per the GNU General Public License (GPL), Cisco redistributes plug-ins without having made any changes to them. Per the GPL, Cisco cannot directly enhance these plug-ins.
Per the GNU General Public License (GPL), Cisco redistributes plug-ins without having made any changes to them. Per the GPL, Cisco cannot directly enhance these plug-ins.
The security appliance does the following when you install a plug-in onto the flash device:
- (Cisco-distributed plug-ins only) Unpacks the jar file specified in the URL.
- Writes the file to the csco-config/97/plugin directory on the security appliance file system.
- Enables the plug-in for all future clientless SSL VPN sessions, and adds a main menu option and an option to the drop-down menu next to the Address field of the portal page.
When the user in a clientless SSL VPN session clicks the associated menu option on the portal page, the portal page displays a window to the interface and displays a help pane. The user can select the protocol displayed in the drop-down menu and enter the URL in the Address field to establish a connection.
Note![]() Some Java plug-ins might report a status of connected or online even when a session to the destination service is not set up. The open-source plug-in reports the status, not the security appliance.
Some Java plug-ins might report a status of connected or online even when a session to the destination service is not set up. The open-source plug-in reports the status, not the security appliance.
In the Plug-in tab of the SSL VPN Global Settings page, you can view the currently configured browser plug-ins for clientless SSL VPN browser access. From this tab, you can create or edit the plug-in files, as described in the following procedure.
Plug-in Requirements and Restrictions
Clientless SSL VPN must be enabled on the security appliance to provide remote access to the plug-ins. The minimum access rights required for remote use belong to the guest privilege mode. The plug-ins automatically install or update the Java version required on the remote computer. A stateful failover does not retain sessions established using plug-ins. Users must reconnect following a failover.
Before installing a plug-in, prepare the security appliance as follows:
- Make sure clientless SSL VPN is enabled on an interface on the security appliance.
- Install an SSL certificate onto the security appliance interface to which remote users use a fully-qualified domain name (FQDN) to connect.
Note![]() Do not specify an IP address as the common name (CN) for the SSL certificate. The remote user attempts to use the FQDN to communicate with the security appliance. The remote PC must be able to use DNS or an entry in the System32\drivers\etc\hosts file to resolve the FQDN.
Do not specify an IP address as the common name (CN) for the SSL certificate. The remote user attempts to use the FQDN to communicate with the security appliance. The remote PC must be able to use DNS or an entry in the System32\drivers\etc\hosts file to resolve the FQDN.
Step 1![]() Do one of the following:
Do one of the following:
- (Device view) With an ASA device selected, select Remote Access VPN > SSL VPN > Other Settings from the Policy selector.
- (Policy view) Select Remote Access VPN > SSL VPN > Other Settings (ASA) from the Policy Type selector. Select an existing policy or create a new one.
Step 2![]() On the Other Settings page, click the Plug-in tab. The Plug-in tab lists all configured plug-ins, including the type of plug-in and the name of the File policy object that defines the actual plug-in file.
On the Other Settings page, click the Plug-in tab. The Plug-in tab lists all configured plug-ins, including the type of plug-in and the name of the File policy object that defines the actual plug-in file.
Step 3![]() Do any of the following:
Do any of the following:
- To add a plug-in, click the Add Row button beneath the table and fill in the Add Plug-In Entry dialog box as follows:
–![]() Plug-in —Select the type of plug-in that you are adding:
Plug-in —Select the type of plug-in that you are adding:
–![]() Remote Desktop (RDP) or RDP2—For Remote Desktop Protocol services.
Remote Desktop (RDP) or RDP2—For Remote Desktop Protocol services.
–![]() Secure Shell (SSH), Telnet—For Secure Shell and Telnet services.
Secure Shell (SSH), Telnet—For Secure Shell and Telnet services.
–![]() VNC—For Virtual Network Computing services.
VNC—For Virtual Network Computing services.
–![]() Citrix (ICA)—For Citrix MetaFrame services.
Citrix (ICA)—For Citrix MetaFrame services.
–![]() Plug-in File —The name of the File policy object that defines the plug-in file. Enter the name of the File object or click Select to select an object or to create a new one. For more information on creating File Objects, see Add and Edit File Object Dialog Boxes.
Plug-in File —The name of the File policy object that defines the plug-in file. Enter the name of the File object or click Select to select an object or to create a new one. For more information on creating File Objects, see Add and Edit File Object Dialog Boxes.
- To edit a plug-in, select it, click the Edit Row button, and make your changes in the Edit Plug-In Entry dialog box.
- To delete a plug-in, select it and click the Delete Row button. You are asked to confirm the deletion.
Understanding SSL VPN AnyConnect Client Settings
The Cisco AnyConnect VPN Client provides secure SSL and IKEv2 IPsec connections to the security appliance for remote users. The client gives remote users the benefits of an SSL or IKEv2 IPsec VPN client without the need for network administrators to install and configure clients on remote computers.
Tip![]() IKEv2 IPsec connections require AnyConnect 3.0 or higher clients.
IKEv2 IPsec connections require AnyConnect 3.0 or higher clients.
Without a previously installed client, remote users enter the IP address in their browser of an interface configured to accept SSL or IKEv2 IPsec VPN connections. Unless the security appliance is configured to redirect http:// requests to https://, users must enter the URL in the form https:// <address>.
After the user enters the URL, the browser connects to that interface and displays the login screen. If the user satisfies the login authentication, and the security appliance identifies the user as requiring the client, it downloads the client that matches the operating system of the remote computer. After downloading, the client installs and configures itself, establishes a secure connection and either remains or uninstalls itself (depending on the security appliance configuration) when the connection terminates.
In the case of a previously installed client, when the user authenticates, the security appliance examines the revision of the client and upgrades the client as necessary.
When the client negotiates a connection with the security appliance, it connects using Transport Layer Security (TLS), and optionally, Datagram Transport Layer Security (DTLS). DTLS avoids latency and bandwidth problems associated with some SSL connections and improves the performance of real-time applications that are sensitive to packet delays.
The AnyConnect client can be downloaded from the security appliance, or it can be installed manually on the remote workstation by the system administrator. For more information about installing the client manually, see the Cisco AnyConnect Secure Mobility Client Administrator Guide. AnyConnect documentation is available at http://www.cisco.com/en/US/products/ps10884/tsd_products_support_series_home.html. You can find general information about AnyConnect at http://www.cisco.com/go/anyconnect.
The security appliance downloads the client based on the group policy or username attributes of the user establishing the connection. You can configure the security appliance to automatically download the client, or you can configure it to prompt the remote user about whether to download the client. In the latter case, if the user does not respond, you can configure the security appliance to either download the client after a timeout period or present the login page.
An AnyConnect client profile is a group of configuration parameters, stored in an XML file, that the client uses to configure the connection entries that appear in the client user interface. These parameters (XML tags) include the names and addresses of host computers and settings to enable additional client features.
The AnyConnect client installation includes a profile template, named AnyConnectProfile.tmpl, that you can edit with a text editor and use as a basis to create other profile files. You can also set advanced parameters that are not available through the user interface. The installation also includes a complete XML schema file, named AnyConnectProfile.xsd.
You can add the profile to the Client Settings tab in the Other Settings policy to have it loaded onto the security appliance and subsequently downloaded to the client workstations based on group policies and username attributes.
Cisco AnyConnect Profile Editor
You can configure a profile using the AnyConnect profile editor, a convenient GUI-based configuration tool launched from Cisco Security Manager. The AnyConnect software package for Windows, version 2.5 and later, includes the editor, which activates when you launch the editor from the Add/Edit AnyConnect Client Profile dialog box as long as you have added an appropriate AnyConnect package to the AnyConnect Client Image list.
Note![]() The Cisco AnyConnect Profile Editor is an independent program. For information about configuring AnyConnect profiles, and what AnyConnect Profile Editor can do for you, see the materials available online at http://www.cisco.com/en/US/products/ps10884/products_installation_and_configuration_guides_list.html.
The Cisco AnyConnect Profile Editor is an independent program. For information about configuring AnyConnect profiles, and what AnyConnect Profile Editor can do for you, see the materials available online at http://www.cisco.com/en/US/products/ps10884/products_installation_and_configuration_guides_list.html.
Note![]() Beginning with version 4.7, Security Manager provides support for AnyConnect version 3.2.
Beginning with version 4.7, Security Manager provides support for AnyConnect version 3.2.
Open the Add/Edit AnyConnect Client Profile dialog box, then click Launch Editor (you must first add an appropriate AnyConnect package to the AnyConnect Client Image list before accessing the Add/Edit AnyConnect Client Profile dialog box). The AnyConnect Profile Editor is displayed.
Configuring SSL VPN AnyConnect Client Settings (ASA)
This procedure shows you how to define SSL and IKEv2 IPsec VPN client images and profiles. For a detailed explanation of AnyConnect images and profiles, see Understanding SSL VPN AnyConnect Client Settings.
Tip![]() Ensure that you add AnyConnect images of the required releases. For example, if you are configuring an IKEv2 IPsec VPN, you must include an AnyConnect 3.0 or higher image. In general, the image versions must support the features you are deploying in the remote access VPN.
Ensure that you add AnyConnect images of the required releases. For example, if you are configuring an IKEv2 IPsec VPN, you must include an AnyConnect 3.0 or higher image. In general, the image versions must support the features you are deploying in the remote access VPN.
- Understanding SSL VPN AnyConnect Client Settings
- Cisco AnyConnect Profile Editor
- Understanding and Managing SSL VPN Support Files
- Configuring Other SSL VPN Settings (ASA)
Step 1![]() Do one of the following:
Do one of the following:
- (Device view) With an ASA device selected, select Remote Access VPN > SSL VPN > Other Settings from the Policy selector.
- (Policy view) Select Remote Access VPN > SSL VPN > Other Settings (ASA) from the Policy Type selector. Select an existing policy or create a new one.
Step 2![]() On the Other Settings page, click the Client Settings tab. The tab has two tables listing the configured AnyConnect clients and profiles separately.
On the Other Settings page, click the Client Settings tab. The tab has two tables listing the configured AnyConnect clients and profiles separately.
The AnyConnect images include an order number. The security appliance downloads portions of the AnyConnect images to the remote computer until it achieves a match with the operating system, starting with the highest order number. Therefore, you should give the highest number to the image used by the most commonly-encountered operating system.
Because mobile users have slower connection speeds, you should load the AnyConnect image for Windows Mobile at the top of the list. Alternatively, you can decrease the connection time by specifying the regular expression Windows CE to match the user agent on Windows Mobile devices. When the browser on the mobile device connects to the ASA, it includes the User-Agent string in the HTTP header. The ASA, receiving the string, immediately downloads AnyConnect for Windows Mobile without ascertaining whether the other AnyConnect images are appropriate.
Step 3![]() To add an AnyConnect client image or make changes to the existing list, do any of the following:
To add an AnyConnect client image or make changes to the existing list, do any of the following:
- To add an AnyConnect image, click the Add Row button beneath the table and fill in the Add AnyConnect Client Image dialog box. You need to specify the name of the File object that defines the image and the priority order of the image. You can also specify a regular expression for the connecting client to speed up the download. For detailed information about the options, see Add/Edit AnyConnect Client Image Dialog Box.
- To edit an image, select it, click the Edit Row button, and make your modifications in the Edit AnyConnect Client Image dialog box.
- To delete an image, select it and click the Delete Row button. You are asked to confirm the deletion.
Step 4![]() To add an AnyConnect profile or make changes to the existing list, do any of the following:
To add an AnyConnect profile or make changes to the existing list, do any of the following:
- To add an AnyConnect profile, click the Add Row button beneath the table and configure these options in the Add AnyConnect Client Profile dialog box:
–![]() AnyConnect Profile Name —The name of the profile.
AnyConnect Profile Name —The name of the profile.
To use this profile, ensure that you specify the profile name in an ASA Group Policy object assigned to the security appliance (in the Full Client settings page as described in ASA Group Policies SSL VPN Full Client Settings). Configure the ASA Group Policy object through the remote access Connection Profiles policy for the device as described in Configuring Connection Profiles (ASA, PIX 7.0+).
–![]() AnyConnect Profile Type —Select the type of AnyConnect Profile you are adding or editing: VPN, Network Access Manager, Telemetry, Web Security, ISE Posture, or Customer Experience Feedback.
AnyConnect Profile Type —Select the type of AnyConnect Profile you are adding or editing: VPN, Network Access Manager, Telemetry, Web Security, ISE Posture, or Customer Experience Feedback.
–![]() AnyConnect Profile File —The name of the File object that identifies the Anyconnect client profile XML file. Click Select to select the object or to create a new one. For more information about File objects, see Add and Edit File Object Dialog Boxes.
AnyConnect Profile File —The name of the File object that identifies the Anyconnect client profile XML file. Click Select to select the object or to create a new one. For more information about File objects, see Add and Edit File Object Dialog Boxes.
Note Beginning with version 4.7, Security Manager provides support for AnyConnect version 3.2. If you select ISE Posture as the AnyConnect Profile Type, the AnyConnect Profile File will have a filename extension of.isp.
Note If you are going to create a new profile using the AnyConnect Profile Editor, do not specify an AnyConnect Profile File.
–![]() Enable Storage URL —Beginning with version 4.12, Security Manager enables you to select either Private or Shared option for ASA 9.6(2) or later Multi-Context devices.
Enable Storage URL —Beginning with version 4.12, Security Manager enables you to select either Private or Shared option for ASA 9.6(2) or later Multi-Context devices.
–![]() Launch Editor —Click Launch Editor to use the AnyConnect Profile Editor to edit the profile specified in AnyConnect Profile File or to create a new profile if no profile file is specified. For more information about File objects, see Cisco AnyConnect Profile Editor.
Launch Editor —Click Launch Editor to use the AnyConnect Profile Editor to edit the profile specified in AnyConnect Profile File or to create a new profile if no profile file is specified. For more information about File objects, see Cisco AnyConnect Profile Editor.
- To edit a profile, select it, click the Edit Row button, and make your modifications in the Edit AnyConnect Client Profile dialog box.
- To delete a profile, select it and click the Delete Row button. You are asked to confirm the deletion.
Add/Edit AnyConnect Client Image Dialog Box
Use the Add or Edit AnyConnect Client Image dialog box to create or edit a package file as the client image, and establish the order that the security appliance downloads the image to the remote workstation.
From the Client Settings tab of the SSL VPN Other Settings policy for ASA devices, click the Add Row button for the AnyConnect Client Image table, or select an image and click the Edit Row button. For detailed information on opening the tab, see Configuring SSL VPN AnyConnect Client Settings (ASA).
- Understanding SSL VPN AnyConnect Client Settings
- Configuring SSL VPN AnyConnect Client Settings (ASA)
- Understanding and Managing SSL VPN Support Files
|
|
|
|---|---|
The name of the File object that identifies the Anyconnect client. Click Select to select an object or to create a new one. For more information about File objects, see Add and Edit File Object Dialog Boxes. |
|
The order in which the security appliance downloads the client images to the remote workstation. It downloads the image in priority order. Therefore, you should enter a lower value for the image used by the most commonly-encountered operating system. |
|
A regular expression to match the user agent. Enter a name of an existing regular expression policy object or click Select to select an entry from the Regular Expressions Selector dialog box. To add a new regular expression, click the Add (+) button on the Regular Expressions Selector dialog box. For more information see Add/Edit Regular Expressions. If you are adding an AnyConnect package for Windows Mobile, specify the regular expression Windows CE to match the user agent on Windows Mobile devices. This decreases the connection time of the mobile device. When the browser on the mobile device connects to the adaptive security appliance, it includes the User-Agent string in the HTTP header. The adaptive security appliance, receiving the string, immediately downloads AnyConnect for Windows Mobile without ascertaining whether the other AnyConnect images are appropriate. |
|
Beginning with version 4.12, Security Manager enables you to select either Private or Shared option for ASA 9.6(2) or later Multi-Context devices. |
Understanding Kerberos Constrained Delegation (KCD) for SSL VPN (ASA)
There are many ways to protect network resources through the use of authentication. Many organizations want to use Kerberos to protect certain web applications while using other authentication techniques, such as username and password, digital certificates, RSA SecureID, or SmartCards, to control access to an SSL VPN. However, a restriction in the Kerberos protocol prevents Kerberos authentication if the user has already used another technique to authenticate to the VPN.
Microsoft overcomes this limitation in Kerberos starting with Windows Server 2003. Using protocol transition and constrained delegation, the ASA can authenticate to the Kerberos Key Distribution Center (KCD) on the Windows domain controller and obtain impersonate tickets for users who have authenticated to the ASA using non-Kerberos protocols. The ASA can use the impersonate ticket to obtain other Kerberos service tickets for remote users.
To configure the domain controller so that Kerberos constrained delegation works, you must do the following:
- Each instance of a service that uses Kerberos authentication must have a service principle name (SPN) defined so that clients can identify it on the network. Register the SPN in the Active Directory Service-Principal-Name attribute of the Windows account under which the instance of the service is running. When a service needs to authenticate to another service running on a specific computer, it uses that service’s SPN to differentiate it from other services running on that computer.
The SPN syntax is service_class/host_name:port, where:
–![]() service_class identifies the service. It can be a built-in service, such as http, or a user defined service.
service_class identifies the service. It can be a built-in service, such as http, or a user defined service.
–![]() host_name identifies the fully-qualified domain name or NetBIOS name of the server that hosts the service, but it cannot be an IP address.
host_name identifies the fully-qualified domain name or NetBIOS name of the server that hosts the service, but it cannot be an IP address.
–![]() port identifies the port on which the service runs. You can omit the port if you use the default service port.
port identifies the port on which the service runs. You can omit the port if you use the default service port.
- Create a service account username and password that the ASA can use. Configure the account to allow Kerberos constrained delegation to any authentication protocol. In addition, the user account must not be marked as a sensitive account that cannot be delegated.
To configure the ASA to allow KCD, once the ASA joins the domain, an entry should appear under the Users and Computers list on the domain controller for the ASA. In the Properties dialog box, on the Delegation tab, select Trust this computer for delegation to specified services only, and then select Use any authentication protocol. In the table of authorized services, add all services for which the ASA is delegated for authentication on behalf of users.
Tip![]() For definitive information on configuring this feature on the Windows domain controller, refer to the Microsoft documentation.
For definitive information on configuring this feature on the Windows domain controller, refer to the Microsoft documentation.
For the ASA to use Kerberos constrained delegation, you must configure the ASA as described in Configuring Kerberos Constrained Delegation (KCD) for SSL VPN (ASA). The feature is available on ASA Software release 8.4 and higher only.
Following is an example that explains how Kerberos constrained delegation works with a clientless SSL VPN hosted on an ASA.
Figure 31-1 Kerberos Constrained Delegation Example
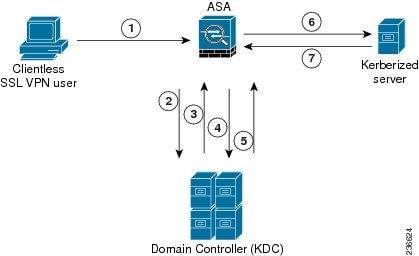
After verifying the identity of an SSL VPN user with the configured authentication mechanism, the ASA uses protocol transition to switch to the Kerberos protocol for authentication on behalf of the user and then sends a Kerberos service ticket instead of the user’s credentials to a published Web server that accepts Kerberos for authentication. Following are the steps:
1.![]() An SSL VPN user session is authenticated by the ASA using the authentication mechanism configured for the user. For example, in case of Smartcard credentials, the ASA extracts the required information (the user’s principle name) from the digital certificate and performs LDAP authorization against Windows Active Directory.
An SSL VPN user session is authenticated by the ASA using the authentication mechanism configured for the user. For example, in case of Smartcard credentials, the ASA extracts the required information (the user’s principle name) from the digital certificate and performs LDAP authorization against Windows Active Directory.
2.![]() After successful authentication, the user logs into the ASA SSL VPN portal page. The VPN user accesses a web service by entering a URL in the portal page or by clicking on a bookmark. If the access requires authentication, the server challenges the ASA for credentials and along with the challenge sends a list of authentication mechanisms supported by the server. Based on the HTTP headers in the challenge, the ASA deduces whether the server requires Kerberos authentication. If connecting to a backend server requires Kerberos authentication, then the ASA requests an impersonate ticket, for itself on behalf the user, from the KDC.
After successful authentication, the user logs into the ASA SSL VPN portal page. The VPN user accesses a web service by entering a URL in the portal page or by clicking on a bookmark. If the access requires authentication, the server challenges the ASA for credentials and along with the challenge sends a list of authentication mechanisms supported by the server. Based on the HTTP headers in the challenge, the ASA deduces whether the server requires Kerberos authentication. If connecting to a backend server requires Kerberos authentication, then the ASA requests an impersonate ticket, for itself on behalf the user, from the KDC.
3.![]() The KDC returns the requested tickets to the ASA. Even though these tickets are passed to the ASA, they contain the user’s authorization data.
The KDC returns the requested tickets to the ASA. Even though these tickets are passed to the ASA, they contain the user’s authorization data.
Note![]() These first steps comprise protocol transition; after these steps, a user who authenticated to the ASA using a non-Kerberos authentication protocol is transparently authenticated to the KDC using Kerberos.
These first steps comprise protocol transition; after these steps, a user who authenticated to the ASA using a non-Kerberos authentication protocol is transparently authenticated to the KDC using Kerberos.
4.![]() The ASA now requests a service ticket from the KDC for the specific service that the user wants to access. The service ticket request contains the SPN (the unique identifier) of the service.
The ASA now requests a service ticket from the KDC for the specific service that the user wants to access. The service ticket request contains the SPN (the unique identifier) of the service.
5.![]() The KDC returns a service ticket for the specific service to the ASA.
The KDC returns a service ticket for the specific service to the ASA.
6.![]() The ASA uses the service ticket to request access to the web service, in the above scenario this is sent to the web server in a HTTP GET request.
The ASA uses the service ticket to request access to the web service, in the above scenario this is sent to the web server in a HTTP GET request.
7.![]() The web server authenticates the Kerberos service ticket and grants access to the service. An authentication failure will display an appropriate error message after acknowledgment of which the portal will be displayed.
The web server authenticates the Kerberos service ticket and grants access to the service. An authentication failure will display an appropriate error message after acknowledgment of which the portal will be displayed.
Configuring Kerberos Constrained Delegation (KCD) for SSL VPN (ASA)
Use the Microsoft KCD Server tab of the SSL VPN Other Settings page to configure Kerberos Constrained Delegation (KCD) for clientless SSL VPNs hosted on an ASA.
KCD addresses a limitation of Kerberos. If a user authenticates to the SSL VPN using a method other than Kerberos, the user cannot access Kerberos-protected resources. This prevents a remote access device, such as ASA, from authenticating users using non- Kerberos methods and still provide single sign-on access to Kerberos-authenticated web applications in the enterprise.
If this limitation applies to your network, you can configure KCD to get around the limitation. KCD offloads the Kerberos authentication to the ASA. Users log into the corporate network using the SSL VPN portal, and from then on, access Kerberos-protected services in a transparent fashion.
- KCD requires ASA release 8.4+. If you configure KCD for other releases, the configuration is ignored.
- The feature is used with clientless SSL VPN access only.
- Microsoft Windows Server (2003 or 2008), configured as domain controllers, are required for KCD.
- If you use SSL VPN Bookmark policy objects to define bookmarks to include on the SSL VPN portal page, you might need to add explicit service principle name (SPN) parameters to bookmarks if a service uses a non-default port. For services that use Kerberos authentication, an SPN must be defined in the Service-Principle-Name attribute of the account under which the service runs.
Bookmarks need to reflect this configuration. The SPN is a parameter on the URL: http://<url>?SPN=<spn> or http://<url>?SPN=<spn>. For example, http://owa.example.com?SPN=http/owa:444. For more details about the SPN syntax, see Understanding Kerberos Constrained Delegation (KCD) for SSL VPN (ASA).
- To configure this feature, you must also configure the Hostname, DNS, and NTP policies. Configure both hostname and domain name in the Hostname policy.
- Kerberos authentication requires that the clock between the hosts to be synchronized with a maximum drift of 5 minutes (this is the default setting). This restriction is applicable to the clocks on the ASA, the domain controller, and the application servers. Configuring the same NTP server for all servers should address the requirement.
Step 1![]() Do one of the following:
Do one of the following:
- (Device view) With an ASA device selected, select Remote Access VPN > SSL VPN > Other Settings from the Policy selector.
- (Policy view) Select Remote Access VPN > SSL VPN > Other Settings (ASA) from the Policy Type selector. Select an existing policy or create a new one.
Step 2![]() On the Other Settings page, click the Microsoft KCD Server tab.
On the Other Settings page, click the Microsoft KCD Server tab.
Step 3![]() Select Configure KCD and configure the following options:
Select Configure KCD and configure the following options:
- KCD Server —The AAA server group object that identifies the Microsoft KCD server (the domain controller) to use for Kerberos Constrained Delegation. Enter the name of the object or click Select to select it from a list or to create a new object. The object must use a Kerberos AAA server policy object to identify the domain controller.
- Username, Password, Confirm —A user account that the ASA can use to join the Active Directory domain.
For the ASA to use Kerberos protocol transition and constrained delegation, and obtain service tickets on behalf of the remote access users, the account used by the ASA to authenticate with the domain controller must be configured in Active Directory and configured to allow Kerberos constrained delegation to any authentication protocol. In addition, the user account must not be marked as a sensitive account that cannot be delegated. For more information about Active Directory configuration requirements, see Understanding Kerberos Constrained Delegation (KCD) for SSL VPN (ASA).
Configuring AnyConnect Custom Attributes (ASA)
AnyConnect custom attributes allow for a more expeditious delivery and deployment of new endpoint features by giving the ASA the ability to generically support the addition of new client controls without the need for an ASA software upgrade.
In the AnyConnect Custom Attribute tab of the SSL VPN Other Settings page, you can view configured AnyConnect custom attributes, add new attributes, and modify or delete existing attributes.
Step 1![]() Do one of the following:
Do one of the following:
- (Device view) With an ASA device selected, select Remote Access VPN > SSL VPN > Other Settings from the Policy selector.
- (Policy view) Select Remote Access VPN > SSL VPN > Other Settings (ASA) from the Policy Type selector. Select an existing policy or create a new one.
Step 2![]() On the Other Settings page, click the AnyConnect Custom Attribute tab. The AnyConnect Custom Attribute tab lists all defined custom attributes.
On the Other Settings page, click the AnyConnect Custom Attribute tab. The AnyConnect Custom Attribute tab lists all defined custom attributes.
Step 3![]() Do any of the following:
Do any of the following:
- To add a custom attribute, click the Add Row button beneath the table and fill in the Add AnyConnect Custom Attribute dialog box. The options are described in detail in Add/Edit AnyConnect Custom Attribute Dialog Box.
- To edit a custom attribute, select it, click the Edit Row button, and make your changes in the Edit Plug-In Entry dialog box.
- To delete a custom attribute, select it and click the Delete Row button. You are asked to confirm the deletion.
Add/Edit AnyConnect Custom Attribute Dialog Box
Use the Add or Edit AnyConnect Custom Attribute dialog box to add or modify an AnyConnect custom attribute. AnyConnect custom attributes allow for a more expeditious delivery and deployment of new endpoint features by giving the ASA the ability to generically support the addition of new client controls without the need for an ASA software upgrade.
Beginning with version 4.7, Security Manager enables to add Custom Attribute Data to an existing Custom Attribute Type for ASA devices running the software version 9.3(1) or higher. Use the Add or Edit AnyConnect Custom Attribute Data dialog box to add or modify the attribute name and attribute value for an existing AnyConnect custom attribute type. For more information see Add/Edit AnyConnect Custom Attribute Data Dialog Box.
From the AnyConnect Custom Attribute tab of the SSL VPN Other Settings policy for ASA devices, click the Add Row button for the AnyConnect Custom Attributes table, or select an attribute and click the Edit Row button. For detailed information on opening the tab, see Configuring AnyConnect Custom Attributes (ASA).
- Understanding SSL VPN AnyConnect Client Settings
- Configuring SSL VPN AnyConnect Client Settings (ASA)
- Understanding and Managing SSL VPN Support Files
Add/Edit AnyConnect Custom Attribute Data Dialog Box
Beginning with Security Manager version 4.7, you can use the Add or Edit AnyConnect Custom Attribute Data dialog box to add or modify the attribute name and attribute value for an existing AnyConnect custom attribute type.
Click the AnyConnect Custom Attribute tab of the SSL VPN Other Settings policy for ASA devices. On the Custom Attribute table, select an attribute type and then click the Add Row button for the Custom Attribute Data table. Or on the Custom Attribute Data table select an existing Custom Attribute Data and click the Edit Row button.
For each attribute type, you can define multiple attribute names with corresponding values.
For information on adding or modifying an attribute type, see Understanding SSL VPN AnyConnect Client Settings.
- Understanding SSL VPN AnyConnect Client Settings
- Add/Edit AnyConnect Custom Attribute Dialog Box
- Configuring SSL VPN AnyConnect Client Settings (ASA)
- Understanding and Managing SSL VPN Support Files
Configuring SSL VPN Advanced Settings (ASA)
Use the Advanced tab of the SSL VPN Other Settings page to configure the memory, on-screen keyboard, and internal password features on ASA devices. Beginning with Cisco Security Manager 4.15, you can also enable the HSTS support and specify the timeout values. All of these settings are optional.
Step 1![]() Do one of the following:
Do one of the following:
- (Device view) With an ASA device selected, select Remote Access VPN > SSL VPN > Other Settings from the Policy selector.
- (Policy view) Select Remote Access VPN > SSL VPN > Other Settings (ASA) from the Policy Type selector. Select an existing policy or create a new one.
Step 2![]() On the Other Settings page, click the Advanced Tab.
On the Other Settings page, click the Advanced Tab.
Step 3![]() In the Memory Size field, specify the amount of memory you want to allocate to SSL VPN sessions. The default is 50%.
In the Memory Size field, specify the amount of memory you want to allocate to SSL VPN sessions. The default is 50%.
To change the setting, select one of the following options and enter the desired number:
- % of Total Physical Memory —As a percentage of total memory. Default is 50%.
- Kilobytes —In kilobytes. 20KB is the minimum setting allowed. Cisco recommends that you do not specify memory in terms of KB because different ASA models have different total amounts of memory, for example:
Note![]() When you change the memory size, the new setting takes effect only after the system reboots.
When you change the memory size, the new setting takes effect only after the system reboots.
Step 4![]() In the Enable On-Screen Keyboard field, select one of the following options:
In the Enable On-Screen Keyboard field, select one of the following options:
- Disabled —The on-screen keyboard is not displayed. Users must input their credentials using the standard keyboard. This is the default.
- On All Pages —Allows a user to input credentials using an on-screen keyboard, which is displayed whenever logon credentials are required.
- On Logon Page Only —Allows a user to input credentials using an on-screen keyboard, which is displayed on the logon page but not on any other pages that require credentials.
Step 5![]() Select Allow Users to Enter Internal Password to require an additional password when accessing internal sites. This feature is useful if you require that the internal password be different from the SSL VPN password. For example, you can use a one-time password for authentication to ASA and another password for internal sites.
Select Allow Users to Enter Internal Password to require an additional password when accessing internal sites. This feature is useful if you require that the internal password be different from the SSL VPN password. For example, you can use a one-time password for authentication to ASA and another password for internal sites.
Note![]() The HSTS option is available for ASA 9.8.2 devices only.
The HSTS option is available for ASA 9.8.2 devices only.
Step 6![]() In the HTTP Strict Transport Security (HSTS) area, do the following:
In the HTTP Strict Transport Security (HSTS) area, do the following:
- To enable HSTS support, select the Enable HSTS Header check box. HSTS feature can be enabled by sending header to clients. To disable the support, clear this check box.
- If you have selected the Enable HSTS Header check box, in HSTS Header Timeout enter the timeout value. If you leave this field blank, Cisco Security Manager will use the default Timeout value of 10886400.
Configuring SSL VPN Server Verification (ASA)
When connecting to a remote SSL-enabled server through clientless SSL VPN, it is important to know that you can trust the remote server, and that it is in fact the server you are trying to connect to. ASA 9.0 introduces support for SSL server certificate verification against a list of trusted certificate authority (CA) certificates for clientless SSL VPN.
When you connect to a remote server via a web browser using the HTTPS protocol, the server will provide a digital certificate signed by a CA to identify itself. Web browsers ship with a collection of CA certificates which are used to verify the validity of the server certificate. This is a form of public key infrastructure (PKI).
Just as browsers provide certificate management facilities, so does the ASA in the form of trusted certificate pool management facility: trustpools. This can be thought of as a special case of trustpoint representing multiple known CA certificates. The ASA includes a default bundle of certificates, similar to that provided with web browsers, but it is inactive until activated by the administrator.
Note![]() If you are already familiar with trustpools from Cisco IOS then you should be aware that the ASA version is similar, but not identical.
If you are already familiar with trustpools from Cisco IOS then you should be aware that the ASA version is similar, but not identical.
This procedure describes how to enable HTTPS server verification for clientless SSL VPN users.
- Configuring Other SSL VPN Settings (ASA)
- Configuring Trusted Pool Settings (ASA)
- Using the Trustpool Manager
Step 1![]() Do one of the following:
Do one of the following:
- (Device view) With an ASA device selected, select Remote Access VPN > SSL VPN > Other Settings from the Policy selector. Click the SSL Server Verification tab.
- (Policy view) Select Remote Access VPN > SSL VPN > Other Settings (ASA) from the Policy Type selector. Select an existing policy or create a new one. Click the SSL Server Verification tab.
Step 2![]() Select Enable to enable HTTPS Server Verification for Clientless SSL VPN users.
Select Enable to enable HTTPS Server Verification for Clientless SSL VPN users.
Step 3![]() Specify the action you want to be taken if server certificate verification fails:
Specify the action you want to be taken if server certificate verification fails:
- Disconnect user from Https page – Disconnect if the server could not be verified.
- Allow user to continue to Https page – Allow the user to continue the connection, even if the check failed.
Configuring SSL VPN Shared Licenses (ASA 8.2+)
Use the SSL VPN Shared License page to configure your SSL VPN Shared License.
You can purchase a shared license with a large number of SSL or remote access IKEv2 IPsec VPN sessions and share the sessions as needed among a group of ASA devices by configuring one of the ASA devices as a shared license server, and the rest as clients. For the server license, you can share 500-50,000 licenses in increments of 500 and 50,000-1,040,000 licenses in increments of 1000.
A license is consumed by each remote access user that makes an SSL or IKEv2 IPsec connection.
Note![]() The shared license cannot be used at the same time as the AnyConnect Essentials license.
The shared license cannot be used at the same time as the AnyConnect Essentials license.
The following topics explain the procedure for configuring shared licenses:
- Configuring an ASA Device as a Shared License Client
- Configuring an ASA Device as a Shared License Server
- (Device View) Select an ASA device using version 8.2 or higher, and select Remote Access VPN > SSL VPN > Shared License from the Policy selector.
- (Policy View) Select Remote Access VPN > SSL VPN > Shared License (ASA 8.2+) from the Policy Type selector. Select an existing policy or create a new one.
Configuring an ASA Device as a Shared License Client
This procedures describes how to configure an ASA device as a shared license client.
Tip![]() You must ensure that the SSL VPN Shared License Client activation key is present on the device.
You must ensure that the SSL VPN Shared License Client activation key is present on the device.
Step 1![]() Do one of the following:
Do one of the following:
- (Device view) With an ASA device selected, select Remote Access VPN > SSL VPN > Shared License from the Policy selector.
- (Policy view) Select Remote Access VPN > SSL VPN >Shared License (ASA 8.2+) from the Policy Type selector. Select an existing policy or create a new one.
The SSL VPN Shared License page appears (see Configuring SSL VPN Shared Licenses (ASA 8.2+)).
Step 2![]() Select Shared License Client as the role of the device.
Select Shared License Client as the role of the device.
Step 3![]() In the Shared Secret field, enter and confirm a case-sensitive string (4-128 characters) used for communicating with the shared license server.
In the Shared Secret field, enter and confirm a case-sensitive string (4-128 characters) used for communicating with the shared license server.
Step 4![]() In the License Server field, enter the IP address or the name of a network/host object that identifies the ASA device configured as the license server.
In the License Server field, enter the IP address or the name of a network/host object that identifies the ASA device configured as the license server.
Step 5![]() In the License Server Port field, enter the number of the TCP port on which the license server communicates.
In the License Server Port field, enter the number of the TCP port on which the license server communicates.
Step 6![]() Select the role of the client:
Select the role of the client:
- Client Only —When selected, the client acts only as the client. In this case, you can specify another device as a backup server.
- Backup Server —When selected, the client also acts as the backup server. In this case, you must also specify the interfaces to be used for this purpose.
Configuring an ASA Device as a Shared License Server
This procedures describe how to configure an ASA device as a shared license server.
Tip![]() You must ensure that the SSL VPN Shared License Server activation key is present on the device.
You must ensure that the SSL VPN Shared License Server activation key is present on the device.
Step 1![]() Do one of the following:
Do one of the following:
- (Device view) With an ASA device selected, select Remote Access VPN > SSL VPN > Shared License from the Policy selector.
- (Policy view) Select Remote Access VPN > SSL VPN >Shared License (ASA 8.2+) from the Policy Type selector. Select an existing policy or create a new one.
The SSL VPN Shared License page appears (see Configuring SSL VPN Shared Licenses (ASA 8.2+)).
Step 2![]() Select Shared License Server as the role of the device.
Select Shared License Server as the role of the device.
Step 3![]() In the Shared Secret field, enter and confirm a case-sensitive string (4-128 characters) used for communicating with the shared license server.
In the Shared Secret field, enter and confirm a case-sensitive string (4-128 characters) used for communicating with the shared license server.
Step 4![]() In the License Server Port field, enter the number of the TCP port on which the license server communicates.
In the License Server Port field, enter the number of the TCP port on which the license server communicates.
Step 5![]() In the Refresh Interval field, enter a value between 10-300 seconds to be used as the refresh interval. Default is 30 seconds.
In the Refresh Interval field, enter a value between 10-300 seconds to be used as the refresh interval. Default is 30 seconds.
Step 6![]() In the Interfaces field, enter or select the interfaces to be used for communicating with clients.
In the Interfaces field, enter or select the interfaces to be used for communicating with clients.
Step 7![]() (Optional.) Select Configure Backup shared SSL VPN License Server to configure a backup server for the shared license server, then configure the following:
(Optional.) Select Configure Backup shared SSL VPN License Server to configure a backup server for the shared license server, then configure the following:
- Backup License Server —The IP address, or network/host object that contains the address, of the server to act as a backup license server if the current one is unavailable.
- Backup Server Serial Number —The serial number of the backup license server.
- HA Peer Serial Number —(Optional) The serial number of the backup server of a failover pair.
Customizing Clientless SSL VPN Portals
You can customize the web site and its contents that you use for the portal page for a browser-based clientless SSL VPN. ASA devices allow much more customization than IOS devices. You can create several policy objects that define the look of the web pages the user sees when logging into or out of the VPN and the home page for the portal, as well as the bookmarks and smart tunnels available to the user.
This section contains the following topics:
- Configuring ASA Portal Appearance Using SSL VPN Customization Objects
- Localizing SSL VPN Web Pages for ASA Devices
- Creating Your Own SSL VPN Logon Page for ASA Devices
- Configuring SSL VPN Bookmark Lists for ASA and IOS Devices
- Using the Post URL Method and Macro Substitutions in SSL VPN Bookmarks
- Configuring SSL VPN Smart Tunnels for ASA Devices
- Configuring WINS/NetBIOS Name Service (NBNS) Servers To Enable File System Access in SSL VPNs
Configuring ASA Portal Appearance Using SSL VPN Customization Objects
An SSL VPN Customization object describes the appearance of browser-based clientless SSL VPN web pages displayed to users. This includes the Logon page displayed when they connect to the ASA security appliance, the Home page displayed after authentication, and the Logout page displayed when users log out of the SSL VPN service.
You use SSL VPN Customization objects when defining ASA group objects or Remote Access VPN Connection policies for ASA devices. You can create several customization objects and define multiple ASA group or connection profiles so that each user group sees web pages designed specifically for their use. Customization can include localizing the web pages in the languages appropriate for each group. For more information about localization, see Localizing SSL VPN Web Pages for ASA Devices.
Initially, when a user first connects, the default customization object identified in the connection profile determines how the logon screen appears. If the user selects a different group from the connection profile list on the logon page, and that group has its own customization, the screen changes to reflect the customization object for the selected group. After the remote user is authenticated, the screen appearance is determined by the customization object that has been assigned to the group policy.
After you create the SSL VPN customization object as described in this procedure, you can use the object to specify the portal characteristics in these policies:
- On the SSL VPN > Settings page in an ASA group policy object (see ASA Group Policies SSL VPN Settings), which you then select in one of these policies:
–![]() Remote Access VPN > Group Policies
Remote Access VPN > Group Policies
–![]() Remote Access VPN > Connection Profiles on the General tab
Remote Access VPN > Connection Profiles on the General tab
- In the Remote Access VPN > Connection Profiles policy, you can also specify the SSL VPN customization object on the SSL tab (see SSL Tab (Connection Profiles)).
- Localizing SSL VPN Web Pages for ASA Devices
- Creating Policy Objects
- Add and Edit SSL VPN Customization Dialog Boxes
Step 1![]() Select Manage > Policy Objects to open the Policy Object Manager (see Policy Object Manager).
Select Manage > Policy Objects to open the Policy Object Manager (see Policy Object Manager).
Tip You can also create SSL VPN Customization objects when defining policies or objects that use this object type. For more information, see Selecting Objects for Policies.
Step 2![]() Select SSL VPN Customization from the Object Type selector. The SSL VPN Customization page opens, displaying a list of the existing SSL VPN Customization objects.
Select SSL VPN Customization from the Object Type selector. The SSL VPN Customization page opens, displaying a list of the existing SSL VPN Customization objects.
Step 3![]() Right-click in the work area and select New Object.
Right-click in the work area and select New Object.
The Add SSL VPN Customization dialog box appears (see Add and Edit SSL VPN Customization Dialog Boxes).
Step 4![]() Enter a name for the object and optionally a description of the object.
Enter a name for the object and optionally a description of the object.
Step 5![]() Before you configure settings for the various pages, use the Preview button to view the default settings. Clicking Preview opens a browser window to display the current settings for the Logon page, Portal page, or Logout page, whichever one is selected in the table of contents (selecting a page within one of these folders is the same as selecting the parent folder).
Before you configure settings for the various pages, use the Preview button to view the default settings. Clicking Preview opens a browser window to display the current settings for the Logon page, Portal page, or Logout page, whichever one is selected in the table of contents (selecting a page within one of these folders is the same as selecting the parent folder).
Tip Click Preview after making any changes to settings to verify that the changes are what you desire.
Step 6![]() Configure the settings for the Logon page. This web page is the one users see first when connecting to the SSL VPN portal. It is used for logging into the VPN. Select the following items in the Logon Page folder in the table of contents on the left of the dialog box to view and change the settings:
Configure the settings for the Logon page. This web page is the one users see first when connecting to the SSL VPN portal. It is used for logging into the VPN. Select the following items in the Logon Page folder in the table of contents on the left of the dialog box to view and change the settings:
- Logon Page —Specify the title of the web page, which is displayed in the browser’s title bar.
- Title Panel —Determine whether the Logon page will have a title displayed in the web page itself. If you enable the title panel, you can specify the title, font, font size and weight, styles, and colors used. You can also select a File object that identifies a logo graphic. For more information about the settings, see SSL VPN Customization Dialog Box—Title Panel.
- Language —If you want to configure translation tables for other languages on the ASA device and use them, you can configure the supported languages and allow users to choose their language. For information about translation tables and localization support, see Localizing SSL VPN Web Pages for ASA Devices. For more information about the settings, see SSL VPN Customization Dialog Box—Language.
- Logon Form —Configure the labels and colors used in the form that accepts user logon information. For more information about the settings, see SSL VPN Customization Dialog Box—Logon Form.
- Informational Panel —If you want to provide extra information to the user, you can enable an informational panel and add text and a logo graphic. For more information about the settings, see SSL VPN Customization Dialog Box—Informational Panel.
- Copyright Panel —If you want to include copyright information on the logon page, you can enable the copyright panel and enter your copyright statement. For more information about the settings, see SSL VPN Customization Dialog Box—Copyright Panel.
- Full Customization —If you do not want to use the security appliance’s built-in logon page, even customized, you can instead enable full customization and supply your own web page. For information on creating the required file, see Creating Your Own SSL VPN Logon Page for ASA Devices. For more information about the settings, see SSL VPN Customization Dialog Box—Full Customization.
Step 7![]() Configure the settings for the Portal page. This is the home page for the SSL VPN portal, and is displayed after the users log in. Select the following items in the Portal Page folder in the table of contents on the left of the dialog box to view and change the settings:
Configure the settings for the Portal page. This is the home page for the SSL VPN portal, and is displayed after the users log in. Select the following items in the Portal Page folder in the table of contents on the left of the dialog box to view and change the settings:
- Portal Page —Specify the title of the web page, which is displayed in the browser’s title bar.
- Title Panel —Determine whether the Portal page will have a title displayed in the web page itself. If you enable the title panel, you can specify the title, font, font size and weight, styles, and colors used. You can also select a File object that identifies a logo graphic. For more information about the settings, see SSL VPN Customization Dialog Box—Title Panel.
- Toolbar —Determine whether the Portal page will have a toolbar, which contains a field for entering a URL to browse. For more information about the settings, see SSL VPN Customization Dialog Box—Toolbar.
- Applications —Determine which application buttons will appear on the page. For more information about the settings, see SSL VPN Customization Dialog Box—Applications.
- Custom Panes —Determine how you want to organize the body of the Portal page. The default is a single column with no internal panes. You can create a multiple-column layout, create internal panes that display text or references to URLs, and determine in which column and row to place the panes. For more information about the settings, see SSL VPN Customization Dialog Box—Custom Panes.
- Home Page —Determine how and whether to display URL lists on the home page, and whether to use your own web page for the main body of the Portal page. For more information about the settings, see SSL VPN Customization Dialog Box—Home Page.
Step 8![]() Select Logout Page to configure the settings of the page displayed when a user logs out of the SSL VPN. You can configure the title, message text, fonts, and colors. For more information about the settings, see SSL VPN Customization Dialog Box—Logout Page.
Select Logout Page to configure the settings of the page displayed when a user logs out of the SSL VPN. You can configure the title, message text, fonts, and colors. For more information about the settings, see SSL VPN Customization Dialog Box—Logout Page.
Step 9![]() (Optional) Under Category, select a category to help you identify this object in the Objects table. See Using Category Objects.
(Optional) Under Category, select a category to help you identify this object in the Objects table. See Using Category Objects.
Step 10![]() (Optional) Select Allow Value Override per Device to allow the properties of this object to be redefined on individual devices. See Allowing a Policy Object to Be Overridden.
(Optional) Select Allow Value Override per Device to allow the properties of this object to be redefined on individual devices. See Allowing a Policy Object to Be Overridden.
Step 11![]() Click OK to save the object.
Click OK to save the object.
Localizing SSL VPN Web Pages for ASA Devices
Localization is the process of providing text in a language that is appropriate for the target users. When you create an SSL VPN Customization object for defining the look of browser-based clientless SSL VPN web pages hosted on an ASA device, you can configure the pages to use the desired language.
To see localized web pages correctly, users must configure their browsers to use UTF-8 encoding (for example, in Internet Explorer, select View > Encoding > Unicode (UTF-8). They also must install the required fonts or language support files for their language using the Regional and Language Options control panel. On the Languages tab, click Details to install the desired languages, and select the appropriate supplemental language settings for East Asian, complex scripting, and right-left languages. On the Advanced tab, select the desired code page conversion tables. If users do not configure the browser correctly, they might see boxes instead of characters.
There are two techniques you can use to localize SSL VPN web pages that are hosted on an ASA device. These techniques are not mutually exclusive; you can use both of them. These are the techniques:
- Configure the SSL VPN Customization object using the desired language —When you create the SSL VPN Customization object, you can enter text for labels and messages in non-English, non-ASCII languages in UTF-8 encoding. To enter non-ASCII languages in UTF-8 encoding, you must configure Windows with the correct locale setting and have the required fonts installed. Use the Regional and Language Options control panel to configure your system and install files required for complex script or East Asian languages. If you want to type in text directly, you also need to install an appropriate keyboard; otherwise, you can use a text editor that supports the language’s characters and copy and paste text from a document that contains the text you want to use.
You can also enter non-ASCII languages into SSL VPN Bookmarks objects.
- Configure translation tables on the ASA device to support the languages you want to make available —To enable the security appliance to provide language translation for the portal and screens displayed to users, you must define the necessary languages in a translation table and import the table into the security appliance. The software image package for the security appliance includes a translation table template. Every language you list in an SSL VPN Customization object must have a corresponding translation table on the device. Conversely, translation tables for languages that are not listed in the SSL VPN Customization object are ignored.
If you use this technique, you must use the ASA CLI or ASDM to configure and upload the translation tables. You cannot manage the translation tables with Security Manager. However, the SSL VPN Customization object includes settings that allow you to configure automatic browser language selection and to enable users to select their desired language. Thus, if you install translation tables for ten languages, the pages defined in the SSL VPN Customization object will be available to users in all of those languages. For more information on these settings, see SSL VPN Customization Dialog Box—Language.
Although both of the following features require translation tables, they are separate and complementary:
–![]() Automatic Browser Language Selection —Automatic browser language selection attempts to select the appropriate language based on the user’s browser settings. This technique does not ask for user input. In the SSL VPN Customization object, you create a list of languages that will be used in the negotiation with the browser. During a connection, the security appliance receives a list of languages (and their priorities) from the browser, and looks through your list of languages top to bottom until a match is found. If there is no match, then the language you defined in the list as the default language is used. If you do not specify a default language, English is used.
Automatic Browser Language Selection —Automatic browser language selection attempts to select the appropriate language based on the user’s browser settings. This technique does not ask for user input. In the SSL VPN Customization object, you create a list of languages that will be used in the negotiation with the browser. During a connection, the security appliance receives a list of languages (and their priorities) from the browser, and looks through your list of languages top to bottom until a match is found. If there is no match, then the language you defined in the list as the default language is used. If you do not specify a default language, English is used.
The languages on the security appliance are labels for the translation tables. The languages must mirror those of the browser, and can consist of groups of up to 8 alphanumeric characters (starting from alpha characters), separated by hyphens. For example, fr-FR-paris-univ8. However, when you add a language to the list in Security Manager, only the first two characters are available.
When looking for a match, the security appliance starts with the longest language name, and if it does not match, it discards the rightmost group of the name. For example, if the preferred language on the browser is fr-FR-paris-univ8, and the security appliance supports fr-FR-paris-univ8, fr-FR-paris, fr-FR, and fr, it matches fr-FR-paris-univ8 and uses the translated strings from that translation table. If fr is the only language on the security appliance, the security appliance considers it a match also, and uses that translation table.
For more information about setting up translation tables, see the user documentation for the ASA device and operating system or the ASDM online help.
–![]() Language Selector —By enabling the language selector, you provide the user with the ability to actively select the desired language from a list of languages that you support. This technique does not rely on the browser language settings being configured correctly. The language selector is displayed on the logon page.
Language Selector —By enabling the language selector, you provide the user with the ability to actively select the desired language from a list of languages that you support. This technique does not rely on the browser language settings being configured correctly. The language selector is displayed on the logon page.
Creating Your Own SSL VPN Logon Page for ASA Devices
You can create your own custom SSL VPN Logon page rather than use the page provided by the security appliance for browser-based clientless SSL VPNs. This is called full customization, and replaces the settings you can configure in the SSL VPN Customization policy object.
To provide your own Logon page, you must create the page, copy it to the Security Manager server, and identify the page on the Full Customization page of the SSL VPN Customization object dialog box. For information on creating SSL VPN Customization objects, see Configuring ASA Portal Appearance Using SSL VPN Customization Objects.
When you enable full customization, all other settings for the Logon page configured in the policy object are ignored. When you deploy your configuration to the ASA device, Security Manager copies your custom page to the device.
The Logon page you create must include all of the HTML code required to present the page correctly, and include special Cisco HTML code that provides the functions for the login form and the Language Selector drop-down list. Keep the following in mind when you create the HTML file:
- The file extension must be .inc.
- All images in the custom Logon page must be present on the security appliance. Replace the file path with the keyword /+CSCOU+/, which is an internal directory on the ASA device. When you upload an image to the device, it is saved in this directory.
- Use the csco_ShowLoginForm(’lform’) Javascript function to add the login form to the page. This form prompts for the username, passwords, and group information. You must include this function somewhere on the page.
- Use the csco_ShowLanguageSelector(’selector’) Javascript function to add the Language Selector drop-down list to the page. You do not have to use this function if you are not supporting the use of more than one language.
Configuring SSL VPN Bookmark Lists for ASA and IOS Devices
When you configure a browser-based clientless SSL VPN, you can define a list of bookmarks, or URLS, to include on the SSL VPN portal page. Use SSL VPN bookmarks policy objects to define bookmark lists.
You can create SSL VPN bookmark objects for SSL VPNs hosted on IOS devices or ASA devices. However, these device types allow different bookmark configurations, the ASA device allowing more configuration options than IOS devices. Besides allowing more configuration options, you can also create bookmarks for ASA devices in non-English, non-ASCII languages. For more information on localizing the bookmarks and portal for ASA devices, see Localizing SSL VPN Web Pages for ASA Devices.
After you create the SSL VPN bookmark object as described in this procedure, you can use the object to specify the bookmark object in the Portal Web Pages or Bookmarks fields in these policies:
- ASA devices—On the SSL VPN > Clientless page in an ASA group policy object (see ASA Group Policies SSL VPN Clientless Settings), which you then select in one of these policies:
–![]() Remote Access VPN > Group Policies
Remote Access VPN > Group Policies
–![]() Remote Access VPN > Connection Profiles on the General tab
Remote Access VPN > Connection Profiles on the General tab
- ASA devices—In the Remote Access VPN > Dynamic Access policy, you can specify the SSL VPN bookmark object on the Main > Bookmarks tab (see Main Tab).
- IOS devices—On the Clientless page in a user group policy object configured for SSL VPN (see User Group Dialog Box—Clientless Settings), which you then select in the Remote Access VPN > SSL VPN policy on the General tab.
- Creating Group Policies (ASA, PIX 7.0+)
- Configuring Dynamic Access Policies
- Configuring Connection Profiles (ASA, PIX 7.0+)
- Configuring an SSL VPN Policy (IOS)
- Creating Policy Objects
- Policy Object Manager
Step 1![]() Select Manage > Policy Objects to open the Policy Object Manager (see Policy Object Manager).
Select Manage > Policy Objects to open the Policy Object Manager (see Policy Object Manager).
Tip You can also create SSL VPN bookmark objects when you define policies or objects that use this object type. For more information, see Selecting Objects for Policies.
Step 2![]() Select SSL VPN Bookmarks from the Object Type selector. The SSL VPN Bookmarks page opens, displaying a list of the existing SSL VPN bookmark objects.
Select SSL VPN Bookmarks from the Object Type selector. The SSL VPN Bookmarks page opens, displaying a list of the existing SSL VPN bookmark objects.
Step 3![]() Right-click in the work area, then select New Object.
Right-click in the work area, then select New Object.
The Add SSL VPN Bookmark dialog box appears (see Add or Edit Bookmarks Dialog Boxes).
Step 4![]() Enter a name for the object and optionally a description of the object.
Enter a name for the object and optionally a description of the object.
Step 5![]() If you are creating the object for an SSL VPN hosted on an IOS device, you can enter a name for the heading that is displayed above the bookmarks list in the Bookmarks Heading (IOS) field.
If you are creating the object for an SSL VPN hosted on an IOS device, you can enter a name for the heading that is displayed above the bookmarks list in the Bookmarks Heading (IOS) field.
Step 6![]() The Bookmarks table displays any URLs that are defined for the object. To add a bookmark, click the Add Row button below the table; to edit an existing bookmark, select it and click the Edit Row button.
The Bookmarks table displays any URLs that are defined for the object. To add a bookmark, click the Add Row button below the table; to edit an existing bookmark, select it and click the Edit Row button.
The Add/Edit SSL VPN Bookmark Entry dialog box opens. For more information about the fields on this dialog box, see Add or Edit Bookmark Entry Dialog Boxes.
- In the Bookmark Option field, select whether you are defining a bookmark (Enter Bookmark) or adding bookmarks from another SSL VPN bookmark object (Include Existing Bookmarks). If you are including an existing object, enter the object’s name or click Select to select it from a list of existing objects.
- If you are creating the object for use on an IOS device, enter the title of the bookmark, which is displayed to users, and the URL. Be careful to select the correct protocol for the URL. Click OK to add the bookmark to the table of bookmarks.
- If you are creating the object for use on an ASA device, you have many more options. Besides the title and the URL, you can define a subtitle and image icon for the bookmark plus other options.
Tip If you choose the protocols RDP, SSH, Telnet, VNC, or ICA, you must configure the plug-in for the protocol in the Remote Access VPN > SSL VPN > Other Settings policy (see Configuring SSL VPN Browser Plug-ins (ASA)).
You can also configure the bookmark to use the Post method rather than the Get method. If you use Post, you must configure the post parameters by clicking Add Row beneath the Post Parameters table. For more information on Post parameters, see these topics:
–![]() Using the Post URL Method and Macro Substitutions in SSL VPN Bookmarks
Using the Post URL Method and Macro Substitutions in SSL VPN Bookmarks
–![]() Add and Edit Post Parameter Dialog Boxes
Add and Edit Post Parameter Dialog Boxes
Click OK to add the bookmark to the table of bookmarks.
Step 7![]() (Optional) Under Category, select a category to help you identify this object in the Objects table. See Using Category Objects.
(Optional) Under Category, select a category to help you identify this object in the Objects table. See Using Category Objects.
Step 8![]() (Optional) Select Allow Value Override per Device to allow the properties of this object to be redefined on individual devices. See Allowing a Policy Object to Be Overridden.
(Optional) Select Allow Value Override per Device to allow the properties of this object to be redefined on individual devices. See Allowing a Policy Object to Be Overridden.
Step 9![]() Click OK to save the object.
Click OK to save the object.
Using the Post URL Method and Macro Substitutions in SSL VPN Bookmarks
One of the options you have for configuring bookmarks on an SSL VPN hosted on an ASA device is the method used by a URL, either Get or Post. The Get method is the standard method; a user clicks the URL and is taken to the web page. The Post method is useful when processing the data might involve changes to it, for example, storing or updating data, ordering a product, or sending e-mail.
If you choose the Post URL method, you must configure Post parameters for bookmark entries. Because these are often personalized resources that contain the user ID and password or other input parameters, you might need to define clientless SSL VPN macro substitutions.
Clientless SSL VPN macro substitutions let you configure users for access to personalized resources that contain the user ID and password or other input parameters. Examples of such resources include bookmark entries, URL lists, and file shares.
Note![]() For security reasons, password substitutions are disabled for file access URLs (cifs://). Also for security reasons, use caution when introducing password substitutions for web links, especially for non-SSL instances.
For security reasons, password substitutions are disabled for file access URLs (cifs://). Also for security reasons, use caution when introducing password substitutions for web links, especially for non-SSL instances.
You can use the following macro substitutions:
- Logon Information Substitutions — The security appliance obtains values for these substitutions from the SSL VPN Logon page. It recognizes these strings in user requests, and replaces them with the value specific to the user before it passes the request on to a remote server.
These are the available macro substitutions:
The username used to log into the SSL VPN.
The password used to log into the SSL VPN.
–![]() CSCO_WEBVPN_INTERNAL_PASSWORD
CSCO_WEBVPN_INTERNAL_PASSWORD
The internal resource password entered when logging into the SSL VPN.
–![]() CSCO_WEBVPN_CONNECTION_PROFILE
CSCO_WEBVPN_CONNECTION_PROFILE
The connection profile associated with the user group selected when logging into the SSL VPN.
For example, if a URL list contains the link http://someserver/homepage/CSCO_WEBVPN_USERNAME.html, the security appliance translates it to the following unique links:
–![]() For USER1 the link becomes http://someserver/homepage/USER1.html
For USER1 the link becomes http://someserver/homepage/USER1.html
–![]() For USER2 the link is http://someserver/homepage/USER2.html
For USER2 the link is http://someserver/homepage/USER2.html
In the following example, cifs://server/users/CSCO_WEBVPN_USERNAME lets the security appliance map a file drive to specific users:
–![]() For USER1 the link becomes cifs://server/users/USER1
For USER1 the link becomes cifs://server/users/USER1
–![]() For USER2 the link is cifs://server/users/USER2
For USER2 the link is cifs://server/users/USER2
- RADIUS/LDAP Vendor-Specific Attributes (VSAs) —These substitutions let you set substitutions configured on either a RADIUS or an LDAP server. These are the available macro substitutions:
For information on configuring bookmarks, see Configuring SSL VPN Bookmark Lists for ASA and IOS Devices.
Configuring SSL VPN Smart Tunnels for ASA Devices
A smart tunnel is a connection between an application running on a user’s workstation and a private site. The connection uses a clientless (browser-based) SSL VPN session with the security appliance as the pathway and proxy server. Smart tunnels do not require the user to connect the application to the local port, so the application can gain access to the network without giving the user administrative privileges, as is required for full tunnel support. If you do not otherwise configure the network to allow access to an application, you can create a smart tunnel for those applications that you want to support.
You can configure smart tunnel access to an application under the following conditions:
- The application is a Winsock 2, TCP-based application and there is a browser plug-in for the application. Cisco distributes plug-ins for some applications for use in clientless SSL VPN, including SSH (for both SSH and Telnet sessions), RDP, and VNC. You must supply or obtain plug-ins for any other applications. Configure plug-ins in the Remote Access VPN > SSL VPN > Other Settings policy on the Plug-Ins tab.
- The user’s workstation is a supported platform. See the Cisco ASA 5500 Series Adaptive Security Appliances documentation that corresponds with your ASA version for supported platforms, http://www.cisco.com/en/US/products/ps6120/products_installation_and_configuration_guides_list.html.
Users of Microsoft Windows Vista who use smart tunnels (or port forwarding) must add the URL of the ASA device to the Trusted Site zone. Configure the Trusted Site zone in Internet Explorer (Tools > Internet Options, Security tab).
- The user’s browser must be enabled with Java, Microsoft ActiveX, or both.
- If the user’s workstation requires a proxy server to reach the security appliance, the URL of the terminating end of the connection must be in the list of URLs excluded from proxy services. In this configuration, smart tunnels support only basic authentication.
Tip![]() A stateful failover does not retain smart tunnel connections. Users must reconnect following a failover.
A stateful failover does not retain smart tunnel connections. Users must reconnect following a failover.
You configure smart tunnel access for an application by creating an SSL VPN smart tunnel list policy object and including that object in an ASA group policy object. You then assign the ASA group policy object to a device in the Remote Access VPN > Group Policies policy.
Step 1![]() Create an SSL VPN smart tunnel list policy object:
Create an SSL VPN smart tunnel list policy object:
a.![]() Select Manage > Policy Objects to open the Policy Object Manager (see Policy Object Manager), and select SSL VPN Smart Tunnel Lists from the table of contents.
Select Manage > Policy Objects to open the Policy Object Manager (see Policy Object Manager), and select SSL VPN Smart Tunnel Lists from the table of contents.
Tip You can also create SSL VPN smart tunnel list objects when you create or edit the ASA group policy object. For more information, see Selecting Objects for Policies.
b.![]() Click the Add Object button to open the Add and Edit Smart Tunnel List Dialog Boxes.
Click the Add Object button to open the Add and Edit Smart Tunnel List Dialog Boxes.
c.![]() Enter a name for the object, up to 64 characters.
Enter a name for the object, up to 64 characters.
d.![]() To the table of applications, add those applications for which you are granting smart tunnel access (click the Add Row button to open the Add and Edit A Smart Tunnel Entry Dialog Boxes). Consider the following:
To the table of applications, add those applications for which you are granting smart tunnel access (click the Add Row button to open the Add and Edit A Smart Tunnel Entry Dialog Boxes). Consider the following:
- Enter an application name that is easy to understand and include version numbers if you support more than one version. For example, Microsoft Outlook.
- For the application path, entering only the filename, for example, outlook.exe, is the simplest and most maintainable option. This allows the user to install the application in any folder. Enter the full path if you want to enforce a specific installation structure.
- Hash values are optional, but you can use them to prevent spoofing. Without hash values, a user can rename an application to a supported filename; the security appliance checks only the filename and path (if specified). However, if you enter hash values, you must maintain them as users apply patches or application upgrades. For specific information on determining hash values, see Add and Edit A Smart Tunnel Entry Dialog Boxes.
e.![]() You can also incorporate other SSL VPN smart list objects into the object. This allows you to create a core set of smart list objects that you can use repeatedly in other objects.
You can also incorporate other SSL VPN smart list objects into the object. This allows you to create a core set of smart list objects that you can use repeatedly in other objects.
f.![]() Click OK to save the object.
Click OK to save the object.
Step 2![]() (Optional) Create an SSL VPN smart tunnel auto sign-on list policy object:
(Optional) Create an SSL VPN smart tunnel auto sign-on list policy object:
a.![]() Select Manage > Policy Objects to open the Policy Object Manager (see Policy Object Manager), and select SSL VPN Smart Tunnel Auto Signon Lists from the table of contents.
Select Manage > Policy Objects to open the Policy Object Manager (see Policy Object Manager), and select SSL VPN Smart Tunnel Auto Signon Lists from the table of contents.
Tip You can also create SSL VPN smart tunnel auto sign-on list objects when you create or edit the ASA group policy object. For more information, see Selecting Objects for Policies.
b.![]() Click the Add Object button to open the Add and Edit Smart Tunnel Auto Signon List Dialog Boxes.
Click the Add Object button to open the Add and Edit Smart Tunnel Auto Signon List Dialog Boxes.
c.![]() Enter a name for the object, up to 64 characters.
Enter a name for the object, up to 64 characters.
d.![]() To the table of smart tunnel auto sign-on entries, add the servers for which to automate the submission of login credentials during smart tunnel setup (click the Add Row button to open the Add and Edit Smart Tunnel Auto Signon Entry Dialog Boxes).
To the table of smart tunnel auto sign-on entries, add the servers for which to automate the submission of login credentials during smart tunnel setup (click the Add Row button to open the Add and Edit Smart Tunnel Auto Signon Entry Dialog Boxes).
e.![]() You can also incorporate other SSL VPN smart tunnel auto sign-on list objects into the object. This allows you to create a core set of smart tunnel auto sign-on list objects that you can use repeatedly in other objects.
You can also incorporate other SSL VPN smart tunnel auto sign-on list objects into the object. This allows you to create a core set of smart tunnel auto sign-on list objects that you can use repeatedly in other objects.
f.![]() Click OK to save the object.
Click OK to save the object.
Step 3![]() Configure the ASA group policy object to use the SSL VPN smart tunnel list object:
Configure the ASA group policy object to use the SSL VPN smart tunnel list object:
a.![]() Edit (or create) the ASA group policy object either from the Policy Object Manager or the Remote Access VPN > Group Policies policy. The object must be configured to support SSL VPNs. (You can also edit these objects from the Remote Access VPN > Connection Profiles policy from an individual profile.)
Edit (or create) the ASA group policy object either from the Policy Object Manager or the Remote Access VPN > Group Policies policy. The object must be configured to support SSL VPNs. (You can also edit these objects from the Remote Access VPN > Connection Profiles policy from an individual profile.)
b.![]() Select the SSL VPN > Clientless folder from the table of contents to open ASA Group Policies SSL VPN Clientless Settings.
Select the SSL VPN > Clientless folder from the table of contents to open ASA Group Policies SSL VPN Clientless Settings.
c.![]() Enter the name of the SSL VPN smart tunnel list object in the Smart Tunnel field.
Enter the name of the SSL VPN smart tunnel list object in the Smart Tunnel field.
d.![]() Select Auto Start Smart Tunnel to automatically start smart tunnels for the applications when the user connects to the SSL VPN portal.
Select Auto Start Smart Tunnel to automatically start smart tunnels for the applications when the user connects to the SSL VPN portal.
If you do not select this option, users must start smart tunnel access using the Application Access > Start Smart Tunnels button on the clientless SSL VPN portal page.
e.![]() Enter the name of the SSL VPN smart tunnel auto sign-on list object in the Smart Tunnel Auto Signon Server List field.
Enter the name of the SSL VPN smart tunnel auto sign-on list object in the Smart Tunnel Auto Signon Server List field.
f.![]() If the universal naming convention (domain\username) is required for authentication, specify the Windows domain to add it to the username during auto sign-on in the Domain Name field. For example, enter CISCO to specify CISCO\qa_team when authenticating for the username qa_team. You must also check the Use Domain option when configuring associated entries in the auto sign-on server list.
If the universal naming convention (domain\username) is required for authentication, specify the Windows domain to add it to the username during auto sign-on in the Domain Name field. For example, enter CISCO to specify CISCO\qa_team when authenticating for the username qa_team. You must also check the Use Domain option when configuring associated entries in the auto sign-on server list.
Configuring WINS/NetBIOS Name Service (NBNS) Servers To Enable File System Access in SSL VPNs
Note![]() From version 4.17, though Cisco Security Manager continues to support IOS features/functionality, it does not support any enhancements.
From version 4.17, though Cisco Security Manager continues to support IOS features/functionality, it does not support any enhancements.
Clientless SSL VPN uses WINS and the Common Internet File System (CIFS) protocol to access or share files, printers, and other machine resources on remote systems. The ASA or IOS device uses a proxy CIFS client to provide this access transparently; users appear to have direct access to the file systems (subject to individual file and user permissions).
When users attempt a file-sharing connection to a Windows computer by using its computer name, the file server they specify corresponds to a specific WINS name that identifies a resource on the network. The security appliance queries WINS or NetBIOS name servers to map WINS names to IP addresses. SSL VPN requires NetBIOS to access or share files on remote systems.
You use WINS server list policy objects to configure the list of WINS servers that are used to resolve these Microsoft file-directory share names. The WINS server list objects define the NetBIOS Name Service (NBNS) server list on the device (using the nbns-list and nbns-server commands) for Common Internet File System (CIFS) name resolution.
After creating the WINS server list policy object, you can configure it in the following policies and policy objects, and also select the file access services that you want to allow:
- ASA devices—In the Remote Access VPN > Connection Profiles policy, specify the WINS server list object on the SSL tab (see SSL Tab (Connection Profiles)).
Select the file access options on the SSL VPN > Clientless page in an ASA group policy object (see ASA Group Policies SSL VPN Clientless Settings), which you then select in one of these policies:
–![]() Remote Access VPN > Group Policies
Remote Access VPN > Group Policies
–![]() Remote Access VPN > Connection Profiles on the General tab
Remote Access VPN > Connection Profiles on the General tab
- IOS devices—On the Clientless page in a user group policy object configured for SSL VPN (see User Group Dialog Box—Clientless Settings), which you then select in the Remote Access VPN > SSL VPN policy on the General tab.
Step 1![]() Select Manage > Policy Objects to open the Policy Object Manager.
Select Manage > Policy Objects to open the Policy Object Manager.
Tip You can also create WINS server list objects when defining policies or objects that use this object type. For more information, see Selecting Objects for Policies.
Step 2![]() Select WINS Server Lists from the Object Type selector.
Select WINS Server Lists from the Object Type selector.
The WINS Server List page opens, displaying the currently defined WINS server list objects.
Step 3![]() Right-click in the work area and select New Object to open the Add or Edit WINS Server List Dialog Box.
Right-click in the work area and select New Object to open the Add or Edit WINS Server List Dialog Box.
Step 4![]() Enter a name for the object and optionally a description of the object.
Enter a name for the object and optionally a description of the object.
Step 5![]() Click the Add Row button below the table, or select a server in the table and click Edit Row, to configure the WINS servers defined in the object. Configure these settings:
Click the Add Row button below the table, or select a server in the table and click Edit Row, to configure the WINS servers defined in the object. Configure these settings:
- Server —The IP address of the WINS server. You can select a network/host object or enter the address directly.
- Set as Master Browser —Select this option if the server is a primary browser, which maintains the list of computers and shared resources.
Other fields are optional; change them if you want non-default values. For more information, see Add or Edit WINS Server Dialog Box.
Click OK to save your changes.
Step 6![]() (Optional) Under Category, select a category to help you identify this object in the Objects table. See Using Category Objects.
(Optional) Under Category, select a category to help you identify this object in the Objects table. See Using Category Objects.
Step 7![]() (Optional) Select Allow Value Override per Device to allow the properties of this object to be redefined on individual devices. See Allowing a Policy Object to Be Overridden.
(Optional) Select Allow Value Override per Device to allow the properties of this object to be redefined on individual devices. See Allowing a Policy Object to Be Overridden.
Step 8![]() Click OK to save the object.
Click OK to save the object.
 Feedback