Configuring Cisco TrustSec MACSec

This chapter describes how to configure Cisco TrustSec MACSec on Cisco NX-OS devices.

This chapter includes the following sections:

Finding Feature Information

Your software release might not support all the features documented in this module. For the latest caveats and feature information, see the Bug Search Tool at https://tools.cisco.com/bugsearch/ and the release notes for your software release. To find information about the features documented in this module, and to see a list of the releases in which each feature is supported, see the "New and Changed Information"chapter or the Feature History table in this chapter.

Information About MACsec

This section provides information about MACsec, and contains the following sections:

Cisco TrustSec Architecture

The Cisco TrustSec security architecture builds secure networks by establishing clouds of trusted network devices. Each device in a cloud is authenticated by its neighbors. Communication on the links between devices in the cloud is secured with a combination of encryption, message integrity checks, and data-path replay protection mechanisms. Cisco TrustSec uses the device and user identification information acquired during authentication for classifying, or coloring, the packets as they enter the network. This packet classification is maintained by tagging packets on ingress to the Cisco TrustSec network so that they can be properly identified for the purpose of applying security and other policy criteria along the data path. The tag, also called the security group tag (SGT), allows the network to enforce the access control policy by enabling the endpoint device to act upon the SGT to filter traffic.


Note


Ingress refers to entering the first Cisco TrustSec-capable device encountered by a packet on its path to the destination, and egress refers to leaving the last Cisco TrustSec-capable device on the path.


Figure 1. Cisco TrustSec Network Cloud Example. This figure shows an example of a Cisco TrustSec network cloud. In this example, several networking devices and an endpoint device are inside the cloud. One endpoint device and one networking device are outside the cloud because they are not Cisco TrustSec-capable devices or they have been refused access.

The Cisco TrustSec architecture consists of the following major components:

Authentication
Verifies the identity of each device before allowing it to join the Cisco TrustSec network
Authorization
Decides the level of access to the Cisco TrustSec network resources for a device based on its authenticated identity
Access Control
Applies access policies on a per-packet basis using the source tags on each packet
Secure communication
Provides encryption, integrity, and data-path replay protection for the packets that flow over each link in the Cisco TrustSec network

A Cisco TrustSec network has the following entities:

Supplicants
Devices that attempt to join a Cisco TrustSec network
Authenticators (AT)
Devices that are already part of a Cisco TrustSec network
Authorization Server
Servers that might provide authentication information, authorization information, or both

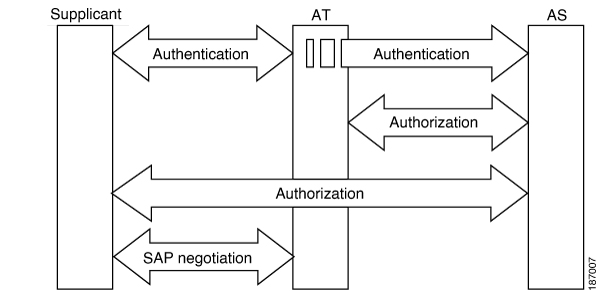
When the link between the supplicant and the AT comes up, the following sequence of events might occur:

Authentication (802.1X)
The authentication server authenticates the supplicant or the authentication is completed if you configure the devices to unconditionally authenticate each other.
Authorization
Each side of the link obtains policies, such as SGT and ACLs, that apply to the link. A supplicant might need to use the AT as a relay if it has no other Layer 3 route to the authentication server.
Security Association Protocol Negotiation
The EAPOL-Key exchange occurs between the supplicant and the AT to negotiate a cipher suite, exchange security parameter indexes (SPIs), and manage keys. Successful completion of all three tasks results in the establishment of a security association (SA).

The ports stay in the unauthorized state (blocking state) until the SA protocol negotiation is complete.

Figure 2. SA Protocol Negotiation. This figure shows the SA protocol negotiation, including how the ports stay in unauthorized state until the SA protocol negotiation is complete.

SA protocol negotiation can use any of the following modes of operation:

  • Galois/Counter Mode (GCM) encryption

  • GCM authentication (GMAC)

  • No encapsulation (clear text)

  • Encapsulation with no encryption or authentication

Based on the IEEE 802.1AE standard, Cisco TrustSec uses ESP-128 GCM and GMAC.

Authentication

Cisco TrustSec authenticates a device before allowing it to join the network. Cisco TrustSec uses 802.1X authentication with Extensible Authentication Protocol Flexible Authentication through Secure Tunnel (EAP-FAST) as the Extensible Authentication Protocol (EAP) method to perform the authentication.

Cisco TrustSec and Authentication

Cisco TrustSec uses EAP-FAST for authentication. EAP-FAST conversations allow other EAP method exchanges inside the EAP-FAST tunnel using chains, which allows administrators to use traditional user authentication methods, such as Microsoft Challenge Handshake Authentication Protocol Version 2 (MSCHAPv2), while still having security provided by the EAP-FAST tunnel.

Figure 3. Cisco TrustSec Authentication. This figure shows the EAP-FAST tunnel and inner methods used in Cisco TrustSec.
Cisco TrustSec Enhancements to EAP-FAST

The implementation of EAP-FAST for Cisco TrustSec has the following enhancements:

Authenticate the authenticator
Securely determines the identity of the AT by requiring the AT to use its protected access credential (PAC) to derive the shared secret between itself and the authentication server. This feature also prevents you from configuring RADIUS shared secrets on the authentication server for every possible IP address that can be used by the AT.
Notify each peer of the identity of its neighbor
By the end of the authentication exchange, the authentication server has identified the supplicant and the AT. The authentication server conveys the identity of the AT, and whether the AT is Cisco TrustSec-capable, to the supplicant by using additional type-length-value parameters (TLVs) in the protected EAP-FAST termination. The authentication server also conveys the identity of the supplicant and whether the supplicant is Cisco TrustSec-capable to the AT by using RADIUS attributes in the Access-Accept message. Because each peer knows the identity of its neighbor, it can send additional RADIUS Access-Requests to the authentication server to acquire the policy to be applied on the link.
AT posture evaluation
The AT provides its posture information to the authentication server whenever it starts the authentication exchange with the authentication server on behalf of the supplicant.
802.1X Role Selection

In 802.1X, the AT must have IP connectivity with the authentication server because it has to relay the authentication exchange between the supplicant and the AT using RADIUS over UDP/IP. When an endpoint device, such as a PC, connects to a network, it is obvious that it should act as a supplicant. However, in the case of a Cisco TrustSec connection between two network devices, the 802.1X role of each network device might not be immediately apparent to the other network device.

Instead of requiring manual configuration of the AT and supplicant roles for the Cisco NX-OS devices, Cisco TrustSec runs a role-selection algorithm to automatically determine which Cisco NX-OS device acts as the AT and which device acts as the supplicant. The role-selection algorithm assigns the AT role to the device that has IP reachability to a RADIUS server. Both devices start both the AT and supplicant state machines. When a Cisco NX-OS device detects that its peer has access to a RADIUS server, it terminates its own AT state machine and assumes the role of the supplicant. If both Cisco NX-OS devices have access to a RADIUS server, the algorithm compares the MAC addresses used as the source for sending the EAP over LAN (EAPOL) packets. The Cisco NX-OS device that has the MAC address with the higher value becomes the AT and the other Cisco NX-OS device becomes the supplicant.

Cisco TrustSec Authentication Summary

By the end of the Cisco TrustSec authentication process, the authentication server has performed the following actions:

  • Verified the identities of the supplicant and the AT

  • Authenticated the user if the supplicant is an endpoint device

At the end of the Cisco TrustSec authentication process, the AT and the supplicant have the following information:

  • Device ID of the peer

  • Cisco TrustSec capability information of the peer

  • Key used for the SA protocol

Device Identities

Cisco TrustSec does not use IP addresses or MAC addresses as device identities. Instead, assign a name (device ID) to each Cisco TrustSec-capable Cisco NX-OS device to identify it uniquely in the Cisco TrustSec network. This device ID is used for the following:

  • Looking up authorization policy

  • Looking up passwords in the databases during authentication

Device Credentials

Cisco TrustSec supports password-based credentials. The authentication servers may use self-signed certificates instead. Cisco TrustSec authenticates the supplicants through passwords and uses MSCHAPv2 to provide mutual authentication even if the authentication server certificate is not verifiable.

The authentication server uses these credentials to mutually authenticate the supplicant during the EAP-FAST phase 0 (provisioning) exchange, where a PAC is provisioned in the supplicant. Cisco TrustSec does not perform the EAP-FAST phase 0 exchange again until the PAC expires and only performs EAP-FAST phase 1 and phase 2 exchanges for future link bringups. The EAP-FAST phase 1 exchange uses the PAC to mutually authenticate the authentication server and the supplicant. Cisco TrustSec uses the device credentials only during the PAC provisioning (or reprovisioning) steps.

The authentication server uses a temporarily configured password to authenticate the supplicant when the supplicant first joins the Cisco TrustSec network. When the supplicant first joins the Cisco TrustSec network, the authentication server authenticates the supplicant using a manufacturing certificate and then generates a strong password and pushes it to the supplicant with the PAC. The authentication server also keeps the new password in its database. The authentication server and the supplicant use this password for mutual authentication in all future EAP-FAST phase 0 exchanges.

User Credentials

Cisco TrustSec does not require a specific type of user credentials for endpoint devices. You can choose any type of authentication method for the user (for example, MSCHAPv2, LEAP, generic token card (GTC), or OTP) and use the corresponding credentials. Cisco TrustSec performs user authentication inside the EAP-FAST tunnel as part of the EAP-FAST phase 2 exchange.

Native VLAN Tagging on Trunk and FabricPath Ports

MACSec is supported over FabricPath through native VLAN tagging on trunk and FabricPath ports feature. Native VLAN tagging can be configured either globally or on an interface for control packets and data packets. Use the following commands to enable native VLAN tagging globally:

  • vlan dot1q tag native exclude control

  • vlan dot1q tag native fabricpath

  • vlan dot1q tag native fabricpath exclude control

Use the following commands to enable native VLAN tagging on FabricPath ports:

  • switchport trunk native vlan tag exclude control

  • switchport fabricpath native vlan tag

  • switchport fabricpath native vlan tag exclude control

Native VLAN tagging provides support for tagged and untagged modes when sending or receiving packets. The following table explains the mode for a packet on a global configuration or port configuration for the above commands.

Tagging Configuration

TX-Control

TX-Data (Native VLAN)

RX-Control

RX-Data

Global trunk port tagging

Untagged

Tagged

Untagged and tagged

Tagged

Global FabricPath tagging

Untagged

Untagged

Untagged and tagged

Untagged and tagged

Global FabricPath tagging for data packets

Untagged

Tagged

Untagged and tagged

Tagged

Port-level trunk port tagging

Untagged

Tagged

Untagged and tagged

Tagged

Port-level Fabricpath tagging

Untagged

Untagged

Untagged and tagged

Untagged and tagged

Port-level FabricPath tagging for data packets

Untagged

Tagged

Untagged and tagged

Tagged

MACsec

MACsec is an IEEE 802.1AE standards based Layer 2 hop-by-hop encryption that provides data confidentiality and integrity for media access independent protocols.

MACsec, provides MAC-layer encryption over wired networks by using out-of-band methods for encryption keying. The MACsec Key Agreement (MKA) Protocol provides the required session keys and manages the required encryption keys.

The 802.1AE encryption with MKA is supported on all types of links, that is, host facing links (links between network access devices and endpoint devices such as a PC or IP phone), or links connected to other switches or routers.

MACsec encrypts the entire data except for the Source and Destination MAC addresses of an Ethernet packet.

To provide MACsec services over the WAN or Metro Ethernet, service providers offer Layer 2 transparent services such as E-Line or E-LAN using various transport layer protocols such as Ethernet over Multiprotocol Label Switching (EoMPLS) and L2TPv3.

The packet body in an EAP-over-LAN (EAPOL) Protocol Data Unit (PDU) is referred to as a MACsec Key Agreement PDU (MKPDU). When no MKPDU is received from a participants after 3 hearbeats (each hearbeat is of 2 seconds), peers are deleted from the live peer list. For example, if a client disconnects, the participant on the switch continues to operate MKA until 3 heartbeats have elapsed after the last MKPDU is received from the client.

CTS MACSEC GCM 256-Bit and Extended Packet Sequence Number Support

The SAP GCM cipher suite that is available in the releases earlier than Cisco Nexus Release 7.3(0)DX(1), supports 128-bit AES key generation, which is used to encrypt and decrypt data. M3 line card, support for which is introduced in Cisco Nexus Release 7.3(0)DX(1), has the capability to encrypt or decrypt data with 256-bit AES key with 64-bit sequence number.

CTS MACsec GCM 256-bit feature, which is an extension of the SAP GCM cipher suite, is introduced in the Cisco Nexus Release 7.3(0)DX(1) leverages the 256-bit AES key capability of the hardware.


Note


CTS MACsec GCM 256-bit feature is supported only in M3 line card. The GCM 256-bit encryption mode is supported in Cisco Nexus Release 7.3(0)DX(1) and later releases.


The M3 line card has the capability to support the 64-bit sequence number, which is the Extended Packet Sequence Number (XPN). The CTS Manager makes the driver to program the XPN bit in the hardware when GCM-256 encryption mode is enabled. As per XPN standard, the encryption input vector requires the following two fields:

  • 32-bit Short Secure Channel Identifier (SSCI)

  • 96-bit salt

These fields are constant values for the SAP protocol and are sent by the CTS manager to the driver to enable them to be programmed in the hardware.


Note


While performing ISSU from earlier releases to Cisco Nexus Release 7.3(0)DX(1) to restore the SAP session structure from the persistent storage service (PSS), the CTS manager ensures that the existing 128-bit AES key enabled interfaces are not affected.


Note


The newly introduced GCM encryption mode is not supported in the releases earlier to Cisco Nexus Release 7.3(0)DX(1). So, when the user migrates from Cisco Nexus Release 7.3(0)DX(1) to any releases earlier to it with the saved configuration, using copy running-config startup-config command where gcm-encrypt-256 keyword is saved in Cisco Nexus Release 7.3(0)DX(1), the unsaved configuration has to be prompted to be removed before migrating to the earlier releases.


Prerequisites for Cisco TrustSec MACSec

Cisco TrustSec has the following prerequisites:

  • You must install the Advanced Services license if your device is running a Cisco NX-OS release prior to 6.1.

  • You must enable the 802.1X feature.

  • You must enable the 802.1X feature before you enable the Cisco TrustSec feature. Although none of the 802.1X interface level features are available, 802.1X is required for the device to authenticate with RADIUS.

  • You must enable the Cisco TrustSec feature.

Default Settings for Cisco TrustSec Parameters

This table lists the default settings for Cisco TrustSec parameters.

Table 1. Default Cisco TrustSec Parameters Settings

Parameter

Default

Cisco TrustSec

Disabled

SXP

Disabled

SXP default password

None

SXP reconcile period

120 seconds (2 minutes)

SXP retry period

60 seconds (1 minute)

Caching

Disabled

Feature History for Cisco TrustSec MACSec

This table lists the release history for this feature.

Table 2. Feature History for Cisco TrustSec MACSec

Feature Name

Releases

Feature Information

CTS MACSEC GCM 256-Bit and Extended Packet Sequence Number Support

7.3(0)DX(1)

Added support for the feature.

Cisco TrustSec MACsec over FabricPath on F3

7.2(1)D1(1)

Added support for Cisco TrustSec MACsec on F3 series modules on FabricPath.

Cisco TrustSec Support on Port-Channel Members

7.2(0)D1(1)

Added Cisco TrustSec Support o Port-Channel members.

Cisco TrustSec

6.2(2)

Added the ability to encrypt the SAP PMK and display the PMK in encrypted format in the running configuration.

Cisco TrustSec

6.2(2)

Added the show cts sap pmk command to display the hexadecimal value of the configured PMK.

Cisco TrustSec

6.2(2)

Added the show cts capability interface command to display the Cisco TrustSec capability of interfaces.

Cisco TrustSec

6.2(2)

Added the brief keyword to the show cts interface command to display a brief summary for all CTS-enabled interfaces.

Cisco TrustSec

6.1(1)

Added MACsec support for 40G and 100G M2 Series modules.

Cisco TrustSec

4.2(1)

No change from Release 4.1.

Guidelines and Limitations for Cisco TrustSec MACSec

Please see the Cisco Nexus 7000 I/O Module Comparison Matrix for hardware support for Cisco TrustSec’s MACSec (802.1ae).

Cisco TrustSec has the following guidelines and limitations:

Cisco TrustSec MACSec—The following set of requirements must be used when deploying MACSec over SP-provided pseudowire connections. These requirements help to ensure the right service, quality, or characteristics are ordered from the SP.

The Nexus 7000 supports MACSec over Point-to-Point links, including those using DWDM, as well as non-PtP links such as EoMPLS where the following conditions are met:

  • There is no re-ordering or buffering of packets on the MACSec link.

  • No additional frames can be injected to the MACSec link.

  • There must be end-to-end link event notification—if the edge device or any intermediate device loses a link then there must be notifications sent so that the customer is aware of the link failure as the service will be interrupted.

For MACSec links that have a bandwidth that is greater than or equal to 40G, multiple security associations (SCI/AN pairs) are established with each Security Association Protocol (SAP) exchange.

When you change the CTS MACSec port mode from Cache Engine (CE) mode to FabricPath mode, CRC errors are displayed in the CTS MACSec link until native VLAN tagging is disabled on the FabricPath core port. Such configuration changes that occur on a CTS port should be flapped. However, this could cause possible traffic disruptions. In such circumstances, to avoid the display of CRC errors and traffic disruptions, perform the following steps:

  • Disable the cache engine port while having the CTS MACSec enabled.

  • Change the port mode to FabricPath mode.

  • Disable the native VLAN tagging on the FabricPath core port.

  • Enable the port.

When the M3 line card interoperates with older line cards, the user must configure only the legacy modes on the M3 line card for the link to be up. The configuration on both the peers must be consistent. On older line cards, the GCM-256 bit option is prevented because capability is not available.

On F2E line cards when MACSEC is enabled on a port with 1G operating speed, all MACSEC dropped packets will be reported as CRC error packets in addition to the actual CRC packets. This is a known limitation.

MACSEC integration between F348XP-25 and M108X2-12L modules is supported.

Cisco Nexus 7000 Series Switches has the debounce timer feature to delay the notification of link change, which can decrease traffic loss due to network reconfiguration. This feature affects the CTS MACSec and if delays on links are higher, the MACSec-enabled links may not come up. To bring the link up, increase the value of debounce timer link down from its default value 100. For more information about debounce timer, see the Configuring the Debounce Timer section in the Cisco Nexus 7000 Series NX-OS Interfaces Configuration Guide.

Configuring Cisco TrustSec MACSec

This section provides information about the configuration tasks for Cisco TrustSec MACSec.

Enabling the Cisco TrustSec MACSec Feature

You must enable both the 802.1X feature and the Cisco TrustSec feature on the Cisco NX-OS device before you can configure Cisco TrustSec MACSec feature.


Note


You cannot disable the 802.1X feature after you enable the Cisco TrustSec MACSec feature.


SUMMARY STEPS

  1. configure terminal
  2. feature dot1x
  3. feature cts
  4. exit
  5. (Optional) show cts
  6. (Optional) show feature
  7. (Optional) copy running-config startup-config

DETAILED STEPS

  Command or Action Purpose

Step 1

configure terminal

Example:

switch# configure terminal
switch(config)#

Enters global configuration mode.

Step 2

feature dot1x

Example:

switch(config)# feature dot1x

Enables the 802.1X feature.

Step 3

feature cts

Example:

switch(config)# feature cts

Enables the Cisco TrustSec feature.

Step 4

exit

Example:

switch(config)# exit
switch#

Exits global configuration mode.

Step 5

(Optional) show cts

Example:

switch# show cts
(Optional)

Displays the Cisco TrustSec configuration.

Step 6

(Optional) show feature

Example:

switch# show feature
(Optional)

Displays the enabled status for features.

Step 7

(Optional) copy running-config startup-config

Example:

switch# copy running-config startup-config
(Optional)

Copies the running configuration to the startup configuration.

Configuring Cisco TrustSec Device Credentials

You must configure unique Cisco TrustSec credentials on each Cisco TrustSec-enabled Cisco NX-OS device in your network. Cisco TrustSec uses the password in the credentials for device authentication.


Note


You must also configure the Cisco TrustSec credentials for the Cisco NX-OS device on the Cisco Secure ACS. See the documentation at:

http://www.cisco.com/c/en/us/support/security/secure-access-control-system/products-installation-and-configuration-guides-list.html

Before you begin

Ensure that you have enabled Cisco TrustSec.

SUMMARY STEPS

  1. configure terminal
  2. cts device-id name password password
  3. exit
  4. (Optional) show cts
  5. (Optional) show cts environment
  6. (Optional) copy running-config startup-config

DETAILED STEPS

  Command or Action Purpose

Step 1

configure terminal

Example:

switch# configure terminal
switch(config)#

Enters global configuration mode.

Step 2

cts device-id name password password

Example:

switch(config)# cts device-id MyDevice1 password CiscO321

Configures a unique device ID and password. The name argument has a maximum length of 32 characters and is case sensitive.

Note


To remove the configuration of device ID and the password, use the no form of the command.

Step 3

exit

Example:

switch(config)# exit
switch#

Exits global configuration mode.

Step 4

(Optional) show cts

Example:

switch# show cts
(Optional)

Displays the Cisco TrustSec configuration.

Step 5

(Optional) show cts environment

Example:

switch# show cts environment
(Optional)

Displays the Cisco TrustSec environment data.

Step 6

(Optional) copy running-config startup-config

Example:

switch# copy running-config startup-config
(Optional)

Copies the running configuration to the startup configuration.

Configuring Native VLAN Tagging

Configuring Native VLAN Tagging Globally

Perform this task to configure native VLAN tagging globally.

Before you begin

Ensure that you enabled Cisco TrustSec.

SUMMARY STEPS

  1. configure terminal
  2. vlan dot1q tag native {fabricpath} exclude control

DETAILED STEPS

  Command or Action Purpose

Step 1

configure terminal

Example:

switch# configure terminal

Enters global configuration mode.

Step 2

vlan dot1q tag native {fabricpath} exclude control

Example:

switch(config)# vlan do1q tag native exclude control

Tags control and data packets as appropriate.

  • Use exclude control keyword to tag data packets only.

  • Use fabricpath keyword to tag control and data packets on fabricpath ports.

Configuring Native VLAN Tagging on an Interface

Perform this task to configure native VLAN tagging globally.

Before you begin

Ensure that you enabled Cisco TrustSec.

SUMMARY STEPS

  1. configure terminal
  2. interface type slot/port
  3. vlan dot1q tag native {fabricpath} exclude control

DETAILED STEPS

  Command or Action Purpose

Step 1

configure terminal

Example:

switch# configure terminal

Enters global configuration mode.

Step 2

interface type slot/port

Example:

switch(config)# interface ethernet 1/4

Specifies the interface that you want to add to a channel group, and enters the interface configuration mode.

Step 3

vlan dot1q tag native {fabricpath} exclude control

Example:

switch(config-if)# vlan do1q tag native exclude control

Tags control and data packets as appropriate.

  • Use exclude control keyword to tag data packets only.

  • Use fabricpath keyword to tag control and data packets on fabricpath ports.

Configuring Cisco TrustSec Authentication, Authorization, and Data Path Security

This section provides information about the configuration tasks for Cisco TrustSec authentication, authorization, and data path security.

Cisco TrustSec Configuration Process for Cisco TrustSec Authentication and Authorization

Follow these steps to configure Cisco TrustSec authentication and authorization:

Procedure

Step 1

Enable the Cisco TrustSec feature. See Enabling the Cisco TrustSec SGT Feature.

Step 2

Enable Cisco TrustSec authentication. See Enabling Cisco TrustSec Authentication.

Step 3

Enable 802.1X authentication for Cisco TrustSec on the interfaces.


Configuring Data-Path Replay Protection for Cisco TrustSec on Interfaces and Port Profiles

By default, the Cisco NX-OS software enables the data-path reply protection feature. You can disable the data-path replay protection feature on the interfaces for Layer 2 Cisco TrustSec if the connecting device does not support SA protocol.

When this task is configured on a port profile, any port profile that joins the group inherits the configuration.


Caution


For the data-path replay protection configuration to take effect, you must enable and disable the interface, which disrupts traffic on the interface.


Before you begin

Ensure that you enabled Cisco TrustSec authentication on the interface.

SUMMARY STEPS

  1. configure terminal
  2. interface ethernet slot/port [- port2]
  3. cts dot1x
  4. no replay-protection
  5. exit
  6. shutdown
  7. no shutdown
  8. exit
  9. (Optional) show cts interface {all | brief | ethernet slot/port}
  10. (Optional) copy running-config startup-config

DETAILED STEPS

  Command or Action Purpose

Step 1

configure terminal

Example:
switch# configure terminal
switch(config)#

Enters global configuration mode.

Step 2

interface ethernet slot/port [- port2]

Example:
switch(config)# interface ethernet 2/2
switch(config-if)#

Specifies a single port or a range of ports and enters interface configuration mode.

Step 3

cts dot1x

Example:
switch(config-if)# cts dot1x
switch(config-if-cts-dot1x)#

Enables 802.1X authentication for Cisco TrustSec and enters Cisco TrustSec 802.1X configuration mode.

Step 4

no replay-protection

Example:
switch(config-if-cts-dot1x)# no replay-protection

Disables data-path replay protection. The default is enabled.

Use the replay-protection command to enable data-path replay protection on the interface.

Step 5

exit

Example:
switch(config-if-cts-dot1x)# exit
switch(config-if)#

Exits Cisco TrustSec 802.1X configuration mode.

Step 6

shutdown

Example:
switch(config-if)# shutdown

Disables the interface.

Step 7

no shutdown

Example:
switch(config-if)# no shutdown

Enables the interface and disables the data-path reply protection feature on the interface.

Step 8

exit

Example:
switch(config-if)# exit
switch(config)#

Exits interface configuration mode.

Step 9

(Optional) show cts interface {all | brief | ethernet slot/port}

Example:
switch(config)# show cts interface all
(Optional)

Displays the Cisco TrustSec configuration on the interface.

Step 10

(Optional) copy running-config startup-config

Example:
switch(config)# copy running-config startup-config
(Optional)

Copies the running configuration to the startup configuration.

Configuring SA Protocol Operation Modes for Cisco TrustSec on Interfaces and Port Profiles

You can configure the SA protocol operation mode on the interfaces for Layer 2 Cisco TrustSec. The default SA protocol operation mode is GCM-encrypt.

When this task is configured on a port profile, any port profile that joins the group inherits the configuration.


Caution


For the SA protocol operation mode configuration to take effect, you must enable and disable the interface, which disrupts traffic on the interface.


Before you begin

Ensure that you enabled Cisco TrustSec authentication on the interface.

SUMMARY STEPS

  1. configure terminal
  2. interface ethernet slot/port [- port2]
  3. cts dot1x
  4. sap modelist [gcm-encrypt | gcm-encrypt-256 | gmac | no-encap | null]
  5. exit
  6. shutdown
  7. no shutdown
  8. exit
  9. (Optional) show cts interface {all | brief | ethernet slot/port}
  10. (Optional) copy running-config startup-config

DETAILED STEPS

  Command or Action Purpose

Step 1

configure terminal

Example:
switch# configure terminal
switch(config)#

Enters global configuration mode.

Step 2

interface ethernet slot/port [- port2]

Example:
switch(config)# interface ethernet 2/2
switch(config-if)#

Specifies a single interface or a range of interfaces and enters interface configuration mode.

Step 3

cts dot1x

Example:
switch(config-if)# cts dot1x
switch(config-if-cts-dot1x)#

Enables 802.1X authentication for Cisco TrustSec and enters Cisco TrustSec 802.1X configuration mode.

Step 4

sap modelist [gcm-encrypt | gcm-encrypt-256 | gmac | no-encap | null]

Example:
switch(config-if-cts-dot1x)# sap modelist gmac

Configures the SA protocol authentication mode on the interface.

Use the gcm-encrypt keyword for GCM encryption. This option is the default.

Use the gcm-encrypt-256 keyword for 256-bit GCM encryption.

Use the gmac keyword for GCM authentication only.

Use the no-encap keyword for no encapsulation for SA protocol on the interface and no SGT insertion.

Use the null keyword for encapsulation without authentication or encryption for SA protocol on the interface. Only the SGT is encapsulated.

Step 5

exit

Example:
switch(config-if-cts-dot1x)# exit
switch(config-if)#

Exits Cisco TrustSec 802.1X configuration mode.

Step 6

shutdown

Example:
switch(config-if)# shutdown

Disables the interface.

Step 7

no shutdown

Example:
switch(config-if)# no shutdown

Enables the interface and SA protocol operation mode on the interface.

Step 8

exit

Example:
switch(config-if)# exit
switch(config)#

Exits interface configuration mode.

Step 9

(Optional) show cts interface {all | brief | ethernet slot/port}

Example:
switch(config)# show cts interface all
(Optional)

Displays the Cisco TrustSec configuration on the interface.

Step 10

(Optional) copy running-config startup-config

Example:
switch(config)# copy running-config startup-config
(Optional)

Copies the running configuration to the startup configuration.

Regenerating SA Protocol Keys on an Interface

You can trigger an SA protocol exchange to generate a new set of keys and protect the data traffic flowing on an interface.

Before you begin

Ensure that you enabled Cisco TrustSec.

SUMMARY STEPS

  1. cts rekey ethernet slot/port
  2. (Optional) show cts interface {all | brief | ethernet slot/port}

DETAILED STEPS

  Command or Action Purpose

Step 1

cts rekey ethernet slot/port

Example:
switch# cts rekey ethernet 2/3

Generates the SA protocol keys for an interface.

Step 2

(Optional) show cts interface {all | brief | ethernet slot/port}

Example:
switch# show cts interface all
(Optional)

Displays the Cisco TrustSec configuration on the interfaces.

Configuring Cisco TrustSec Authentication in Manual Mode

You can manually configure Cisco TrustSec on an interface if your Cisco NX-OS device does not have access to a Cisco Secure ACS or authentication is not needed because you have the MAC address authentication bypass feature enabled. You must manually configure the interfaces on both ends of the connection.


Note


You cannot enable Cisco TrustSec on interfaces in half-duplex mode. Use the show interface command to determine if an interface is configured for half-duplex mode.


Caution


For the Cisco TrustSec manual mode configuration to take effect, you must enable and disable the interface, which disrupts traffic on the interface.


Before you begin

Ensure that you enabled Cisco TrustSec.

SUMMARY STEPS

  1. configure terminal
  2. interface interface slot/port
  3. cts manual
  4. sap pmk {key [left-zero-padded] [display encrypt] | encrypted encrypted_pmk | use-dot1x} [modelist {gcm-encrypt |gcm-encrypt-256 | gmac | no-encap | null}]
  5. (Optional) policy dynamic identity peer-name
  6. (Optional) policy static sgt tag [trusted]
  7. exit
  8. shutdown
  9. no shutdown
  10. exit
  11. (Optional) show cts interface {all | brief | ethernet slot/port}
  12. (Optional) show cts sap pmk {all | interface ethernet slot/port}
  13. (Optional) copy running-config startup-config

DETAILED STEPS

  Command or Action Purpose

Step 1

configure terminal

Example:

switch# configure terminal
switch(config)#

Enters global configuration mode.

Step 2

interface interface slot/port

Example:

switch(config)# interface ethernet 2/2
switch(config-if)#

Specifies an interface and enters interface configuration mode.

Step 3

cts manual

Example:

switch(config-if)# cts manual
switch(config-if-cts-manual)#

Enters Cisco TrustSec manual configuration mode.

Note


You cannot enable Cisco TrustSec on interfaces in half-duplex mode.

Step 4

sap pmk {key [left-zero-padded] [display encrypt] | encrypted encrypted_pmk | use-dot1x} [modelist {gcm-encrypt |gcm-encrypt-256 | gmac | no-encap | null}]

Example:

switch(config-if-cts-manual)# sap pmk fedbaa modelist gmac

Configures the SA protocol pairwise master key (PMK) and operation mode. SA protocol is disabled by default in Cisco TrustSec manual mode.

The key argument is a hexadecimal value with an even number of characters and a maximum length of 32 characters.

Use the left-zero-padded keyword to pad zeros to the left of the entered string if the PMK length is less than 32 bytes.

Use the display encrypt keyword to specify that the configured PMK be displayed in AES-encrypted format in the running configuration.

Use the encrypted encrypted_pmk keyword to specify an encrypted PMK string of 64 bytes (128 hexadecimal characters).

Use the use-dot1x keyword when the peer device does not support Cisco TrustSec 802.1X authentication or authorization but does support SA protocol data path encryption and authentication.

The mode list configures the cipher mode for the data path encryption and authentication as follows:

Use the gcm-encrypt keyword for GCM encryption. This option is the default.

Use the gcm-encrypt-256 keyword for GCM encryption.

Use the gmac keyword for GCM authentication.

Use the no-encap keyword for no encapsulation and no SGT insertion.

Use the null keyword for encapsulation of the SGT without authentication or encryption.

Step 5

(Optional) policy dynamic identity peer-name

Example:

switch(config-if-cts-manual)# policy dynamic identity MyDevice2
(Optional)

Configures a dynamic authorization policy download. The peer-name argument is the Cisco TrustSec device ID for the peer device. The peer name is case sensitive.

Note


Ensure that you have configured the Cisco TrustSec credentials and AAA for Cisco TrustSec.

Note


The policy dynamic and policy static commands are mutually exclusive. Only one can be applied at a time. To change from one to the other, you must use the no form of the command to remove the configuration before configuring the other command.

Step 6

(Optional) policy static sgt tag [trusted]

Example:

switch(config-if-cts-manual)# policy static sgt 0x2 
(Optional)

Configures a static authorization policy. The tag argument is a decimal value or a hexadecimal value in the format 0xhhhh . The decimal range is from 2 to 65519, and the hexadecimal range is from 0x2 to 0xffef. The trusted keyword indicates that traffic coming on the interface with this SGT should not have its tag overridden.

Note


The policy dynamic and policy static commands are mutually exclusive. Only one can be applied at a time. To change from one to the other, you must use the no form of the command to remove the configuration before configuring the other command.

Step 7

exit

Example:

switch(config-if-cts-manual)# exit
switch(config-if)#

Exits Cisco TrustSec manual configuration mode.

Step 8

shutdown

Example:

switch(config-if)# shutdown

Disables the interface.

Step 9

no shutdown

Example:

switch(config-if)# no shutdown

Enables the interface and enables Cisco TrustSec authentication on the interface.

Step 10

exit

Example:

switch(config-if)# exit
switch(config)#

Exits interface configuration mode.

Step 11

(Optional) show cts interface {all | brief | ethernet slot/port}

Example:

switch# show cts interface all
(Optional)

Displays the Cisco TrustSec configuration for the interfaces.

Step 12

(Optional) show cts sap pmk {all | interface ethernet slot/port}

Example:

switch# show cts sap pmk all
(Optional)

Displays the hexadecimal value of the configured PMK for all interfaces or a specific Ethernet interface.

Step 13

(Optional) copy running-config startup-config

Example:

switch# copy running-config startup-config
(Optional)

Copies the running configuration to the startup configuration.

Configuring Cisco TrustSec Authentication in Dot1x Mode

SUMMARY STEPS

  1. configure terminal
  2. interface interface slot/port
  3. cts manual
  4. sap pmk {key [left-zero-padded] [display encrypt] | encrypted encrypted_pmk | use-dot1x} [modelist {gcm-encrypt | gcm-encrypt-256 | gmac | no-encap | null}]
  5. exit
  6. shutdown
  7. no shutdown
  8. exit
  9. (Optional) show cts interface {all | brief | ethernet slot/port}
  10. (Optional) show cts sap pmk {all | interface ethernet slot/port}
  11. (Optional) copy running-config startup-config

DETAILED STEPS

  Command or Action Purpose

Step 1

configure terminal

Example:

switch# configure terminal
switch(config)#

Enters global configuration mode.

Step 2

interface interface slot/port

Example:

switch(config)# interface ethernet 2/29-30
switch(config-if-range)#

Specifies an interface and enters interface configuration mode.

Step 3

cts manual

Example:

switch(config-if-range)# cts dot1x
switch(config-if-cts-dot1x)#

Enters Cisco TrustSec Dot1x configuration mode.

Step 4

sap pmk {key [left-zero-padded] [display encrypt] | encrypted encrypted_pmk | use-dot1x} [modelist {gcm-encrypt | gcm-encrypt-256 | gmac | no-encap | null}]

Example:

switch(config-if-cts-dot1x)# sap modelist gcm-encrypt-256

Configures the SAP pairwise master key (PMK) and operation mode. SAP is disabled by default in Cisco TrustSec manual mode.

The key argument is a hexadecimal value with an even number of characters and a maximum length of 32 characters.

Use the left-zero-padded keyword to pad zeros to the left of the entered string if the PMK length is less than 32 bytes.

Use the display encrypt keyword to specify that the configured PMK be displayed in AES-encrypted format in the running configuration.

Use the encrypted encrypted_pmk keyword to specify an encrypted PMK string of 64 bytes (128 hexadecimal characters).

Use the use-dot1x keyword when the peer device does not support Cisco TrustSec 802.1X authentication or authorization but does support SAP data path encryption and authentication.

The mode list configures the cipher mode for the data path encryption and authentication as follows:

Use the gcm-encrypt keyword for GCM encryption. This option is the default.

Use the gcm-encrypt-256 keyword for 256-bit GCM encryption.

Use the gmac keyword for GCM authentication.

Use the no-encap keyword for no encapsulation and no SGT insertion.

Use the null keyword for encapsulation of the SGT without authentication or encryption.

Step 5

exit

Example:

switch(config-if-cts-dot1x)# exit
switch(config-if)#

Exits Cisco TrustSec Dot1x configuration mode.

Step 6

shutdown

Example:

switch(config-if)# shutdown

Disables the interface.

Step 7

no shutdown

Example:

switch(config-if)# no shutdown

Enables the interface and enables Cisco TrustSec authentication on the interface.

Step 8

exit

Example:

switch(config-if)# exit
switch(config)#

Exits interface configuration mode.

Step 9

(Optional) show cts interface {all | brief | ethernet slot/port}

Example:

switch# show cts interface all
(Optional)

Displays the Cisco TrustSec configuration for the interfaces.

Step 10

(Optional) show cts sap pmk {all | interface ethernet slot/port}

Example:

switch# show cts sap pmk all
(Optional)

Displays the hexadecimal value of the configured PMK for all interfaces or a specific Ethernet interface.

Step 11

(Optional) copy running-config startup-config

Example:

switch# copy running-config startup-config
(Optional)

Copies the running configuration to the startup configuration.

Cisco TrustSec Support on Port-Channel Members

Before Cisco NX-OS Release 7.2(0)D1(1), configuration compatibility on port-channel member interfaces with respect to TrustSec configuration was not enforced. Also, Cisco TrustSec configuration was not allowed on port-channel interfaces.

However, from Cisco NX-OS Release 7.2(0)D1(1), TrustSec configuration compatibility on port-channel members is enforced and also Trustsec configuration on port-channel interfaces is allowed. The following sections provide more information:

Configuration Models

The following are the configuration models:

  • Cisco TrustSec configuration on port-channel interfaces:

    Any Cisco TrustSec configuration performed on a port-channel interface is inherited by all its member interfaces.

  • Cisco TrustSec configuration on port-channel member interfaces:

    Port-channel compatibility parameters are not allowed to be configured on port-channel member interfaces.

    Other Cisco TrustSec configurations, such as MACSec configuration, which would not result in incompatibility, are allowed on port-channel member interfaces.

  • Adding new members to a port-channel:

    • Using the channel-group command:

      Addition of new members is accepted, if the configuration on the port-channel and that on all members are compatible; if not, the addition is rejected.


      Note


      If Cisco TrustSec is not configured on the port-channel and the Cisco TrustSec configuration on the members being added is compatible, the addition is accepted and the port-channel inherits the compatibility parameters from the member interfaces.


    • Using the channel-group force command:

      If the interfaces being added are capable of supporting the port-channel configuration, they inherit the compatibility parameters from the port-channel and the addition is accepted. However, if some interfaces being added are not capable of supporting the port-channel configuration, the addition is rejected.

User Interface Updates for Cisco NX-OS Release 7.2(0)D1(1)

The following are the updates to the user interfaces after Cisco NX-OS Release 7.2(0)D1(1):

  • When the channel group or channel-group force command is issued, if there is any incompatibility in the Cisco TrustSec configuration, an error message is displayed to the user pointing to the incompatible configuration.

  • The show run and show start command displays the Cisco TrustSec configuration on port-channel interfaces as well along with that on physical ethernet interfaces.

  • The show cts role-based sgt-map command displays the port-sgt learnt mappings that was learnt on the port-channel interface, if applicable.

In-Service Software Upgrades

When In-Service Software Upgrades (ISSU) is performed from a lower version that does not support this feature, as soon as the ISSU is completed, all port-channels inherit the compatibility parameters from their first configured member interface. A warning level syslog is generated for port-channels on which the configuration incompatibility is detected.

Verifying the Cisco TrustSec MACSec Configuration

To display Cisco TrustSec MACSec configuration information, perform one of the following tasks:

Command

Purpose

show cts

Displays Cisco TrustSec information.

show cts capability interface {all | ethernet slot/port}

Displays the Cisco TrustSec capability of all interfaces or a specific Ethernet interface.

show cts credentials

Displays Cisco TrustSec credentials for EAP-FAST.

show cts environment-data

Displays Cisco TrustSec environmental data.

show cts interface {all | brief | ethernet slot/port}

Displays the Cisco TrustSec configuration for the interfaces.

show cts pacs

Displays Cisco TrustSec authorization information and PACs in the device key store.

show running-config cts

Displays the Cisco TrustSec information in the running configuration.

Additional References for Cisco TrustSec MACSec

This sections provides additional information related to implementing Cisco TrustSec.

Related Documentation

Related Topic

Document Title

Cisco NX-OS licensing

Cisco NX-OS Licensing Guide

Command Reference

Cisco Nexus 7000 Series NX-OS Security Command Reference