Getting Started with
Your Device Configuration
Quick Setup Tasks
On the first day with your new device, you can perform a number of tasks to ensure that your device is online, reachable and easily configured. The Day 0 wizard allows you to quickly set up your device with the minimum configuration required to enable traffic to pass through the network.
- Quick Setup: Accessing the Configuration Setup Wizard
- Quick Setup: Configuration Basic Device Settings
- Quick Setup: Configuring Interfaces
- Quick Setup: Configuring Layer 3 Settings
- Quick Setup: Configuring Advanced Device Settings
Quick Setup: Accessing the Configuration Setup Wizard
When you first set up the switch, use the Configuration Setup wizard to enter the initial IP information. This enables the switch to connect to local routers and the Internet. You can then access the switch through the IP address for further configuration.
|
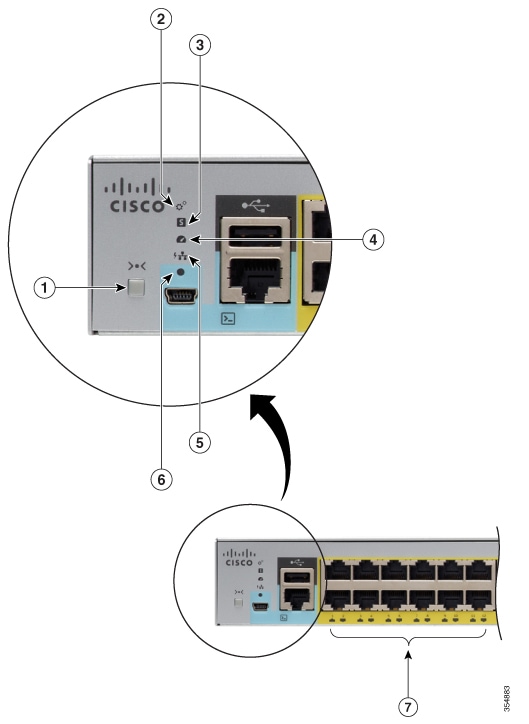
1 |
Mode button |
2 |
SYST LED (system) |
|
3 |
STAT LED (status) |
4 |
SPEED LED |
|
5 |
PoE LED 1 |
6 |
Console LED |
|
7 |
Port LEDs |
||
Quick Setup: Configuration Basic Device Settings
Setting a hostname and creating a user account is the first task you will perform on your device. Typically, as a network administrator, you will want to control access to your device and prevent unauthorized users from seeing your network configuration or manipulating your settings.
| Step 1 | Log on using the default username and password provided with the device. |
| Step 2 | Enter a hostname to identify your device on the network. The hostname can be alphanumeric, case sensitive, can contain special characters, and can have a maximum of 32 characters. |
| Step 3 | Enter a username that is unique and between 8 and 64 characters long. |
| Step 4 | Set a password of up to 32 alphanumeric characters. The username password combination you set gives you privilege 15 access. The string cannot start with a number, is case sensitive, and allows spaces but ignores leading spaces. |
| Step 5 | Enter the password again in the Enable Password field. |
| Step 6 | Set the device time and date. |
| Step 7 | Click Interface Configuration. |
Quick Setup: Configuring Interfaces
Next, configure VLANs on your device and assign interfaces to them.
| Step 1 | In the
Data
VLAN field, enter the VLAN on which to carry IP data traffic. All
ports, by default, are associated with data VLAN 1.
Separating voice and data traffic creates a security boundary preventing data applications from accessing voice traffic. |
| Step 2 | In the Voice VLANfield, enter the VLAN on which to carry IP voice traffic. |
| Step 3 | Hold the CTRL key down to select multiple access ports, from the Access Ports drop-down list. An access port carries traffic for the VLAN configured on the interface. If a VLAN is not configured for the access port, the interface carries traffic on the default VLAN. |
| Step 4 | To enable PortFast on all the specified access ports, select the Portfast enable check box. Devices that connect to PortFast enabled ports can connect to the network immediately, instead of waiting for the port to transition from the listening and learning states to the forwarding state. If your device connects to endpoints (for example, to phones and computers and not to other switches or hubs), select to enable PortFast on the interface. |
| Step 5 | Select the uplink port. The uplink port functions as a trunk port connecting to a switch or router. A trunk port carries traffic for all the VLANs that are accessible by a specific device. Trunk ports mark traffic with unique identifying tags (802.1Q tags, when configured), to ensure that traffic is accurately directed to its designated VLAN. |
| Step 6 | Click Layer 3 Configuration. To go back and update configuration details, click Previous. |
Quick Setup: Configuring Layer 3 Settings
Configure Layer 3 settings to enable your device to connect to Layer 3 devices and pass traffic outside of the network.
| Step 1 | In the Default Gateway field, enter the IP address of the default gateway that will allow endpoints and devices on your network to communicate with endpoints on other networks. |
| Step 2 | Assign an IP to an interface or VLAN. You can assign IP addresses to multiple interfaces including data and voice VLANs. You cannot assign an IP address to a GigabitEthernet interface. |
| Step 3 | Click Advanced Configuration. To go back and update configuration details, click Previous. |
Quick Setup: Configuring Advanced Device Settings
| Step 1 | Select Enable telnet check box to enable access to the device using Telnet. |
| Step 2 | Select Enable SSH check box to enable access to the device using SSH. |
| Step 3 | Enter a domain name for the device. |
| Step 4 | In the RSA Key field, enter the RSA key size. The Rivest, Shamir, and Adelman (RSA) key is based on the RSA algorithm and is used to authenticate SSH access to the device. The recommended minimum RSA key size is 1024. |
| Step 5 | To enable Auto-QoS on access ports connected to Cisco IP phones, select the Auto-QoS for Cisco Phones checkbox. This field may not be displayed, if your device does not support Auto-QoS. |
| Step 6 | To enable Auto-QoS on uplink ports connecting to a trusted switch or router, select the Auto-QoS for Uplinks checkbox . This field may not be displayed, if your device does not support Auto-QoS. |
| Step 7 | Click Summary to verify your configuration on the Summary page. |
| Step 8 | Verify your
configuration and click
Submit to save your changes. To go back and update
configuration details, click
Previous.
When you click Submit, the device is configured and exits the Configuration Setup page. The PC displays a message and then attempts to connect with the new device IP address. If you configured the device with an IP address that is in a different subnet from the PC, connectivity between the PC and the device is lost. |
| Step 9 | Disconnect the device from the PC, and install the device in your network. |
 Feedback