Unpacking the Rack

This chapter contains the following sections:

Unpacking a Cisco R-Series Rack

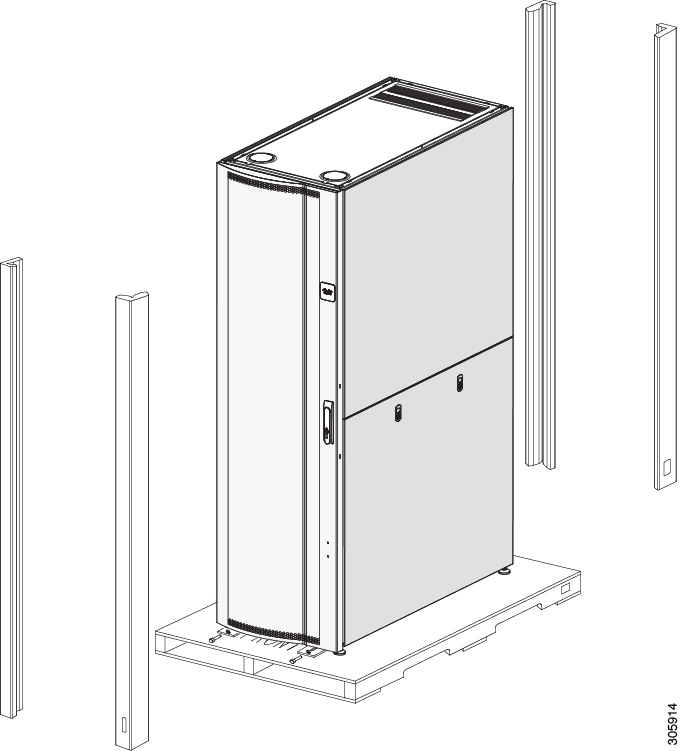
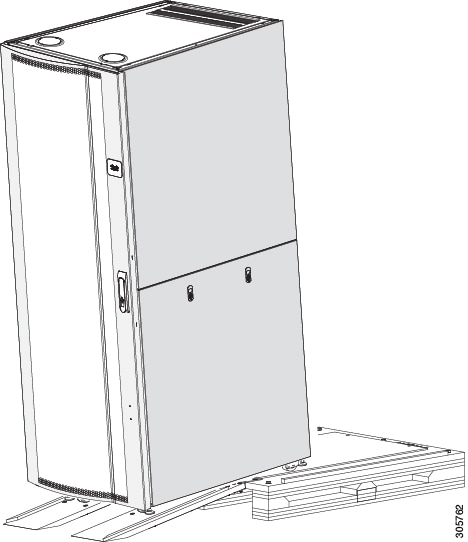
This section describes how to unpack and prepare a Cisco R42612 rack to be moved to its installation site. The Cisco R42612 rack ships on a wooden pallet with cardboard and plastic covering the rack.


Note

You will probably need to perform this procedure in the loading dock area of the building. A fork lift or chain hoist may be needed.


Remove the Packaging

To remove the protective packaging from the Cisco R42612 rack, complete the following steps:

Procedure


Step 1

Remove the nylon straps that secure the cardboard sheathing.

Step 2

Remove the cardboard top piece.

Step 3

Remove the plastic latches that hold the cardboard sheathing together, as shown in the following figure.

Figure 1. Removing the Straps, Cardboard Top, and Plastic Latches


Step 4

Remove the clear plastic that covers the rack and pallet.

Step 5

Remove the four cardboard corner frames and other packaging material that covers the Cisco R42612 rack.

Figure 2. Removing the Corner Frames

Accessories

The accessories that are available for the Cisco R42612 rack include the items listed in the following table.

Table 1. Cisco R42612 Accessories

PID

Quantity

Item

RACK2-JOIN-001

1

Cisco R42612 joining kit

RACK2_GRND-001

1

Cisco R42612 grounding kit

RACK_BLANK-001

1

Blanking panel

RACK-CBLMGT-001

1

D-ring

RACK-CBLMGT-003

1

Brush strip

RACK-CBLMGT-011

10

Velcro straps

RACK-FASTEN-001

100

Mounting screws, M6

RACK-FASTEN-002

50

Cage nuts, M6

Safety Guidelines

Before you move the Cisco R42612 rack cabinet off the pallet and to its final location, read the following important safety guidelines.


Warning

To prevent bodily injury when mounting or servicing this unit in a rack, you must take special precautions to ensure that the system remains stable. The following guidelines are provided to ensure your safety:

  • This unit should be mounted at the bottom of the rack if it is the only unit in the rack.

  • When mounting this unit in a partially filled rack, load the rack from the bottom to the top with the heaviest component at the bottom of the rack.

  • If the rack is provided with stabilizing devices, install the stabilizers before mounting or servicing the unit in the rack.


Warning

Make sure that your equipment rack is properly ventilated.


Warning

After installing system components in a rack, never pull more than one component out of the rack on its slide assemblies at one time. The weight of more than one extended component could cause the rack to tip over and injure someone.


Warning

Make sure that your rack is bolted to the floor.


Warning

Three people are required to lift the rack. Grasp the rack underneath the lower edge and lift with both hands. To prevent injury, keep your back straight and lift with your legs, not your back.


Caution

The Cisco R42612 rack weighs over 300 pounds. you will need a forklift, chain hoist, or professional mover to remove the rack from the pallet and move it to the installation location.


Caution

If you must move the Cisco R42612 rack after installation, remove UCS and other installed components and move them separately.


Caution

Install the heaviest devices at the bottom of the Cisco R42612 rack.


Caution

If you have multiple cabinets joined together, they must be disconnected before moving.


Removing the Cisco Cisco R42612 Rack from the Pallet

To remove the Cisco Cisco R42612 rack from the pallet, follow these steps:

Procedure


Step 1

Read the safety information before you move the Cisco R42612 rack off the pallet.

Step 2

Because the weight of the empty or populated Cisco R42612 rack cabinet is significant, be sure to have enough trained movers to move the cabinet off the pallet and to its installation site.

Step 3

Use a 3/8" or 1/2" flat-blade screwdriver to raise the four leveling feet (one per corner) to their highest position so that you can roll the rack on its casters. See the following figure.

Figure 3. Raising the Leveling Feet
Step 4

Open the doors and remove the bolts that hold the rack-retaining brackets to the pallet and the Cisco R42612 rack. See the following figure. Save the brackets and the bolts.

Figure 4. Removing the Brackets
Step 5

(Optional) To reduce the weight of the rack for easier handling, remove the side panels (if Included). See Removing and Installing Side Panels.

Step 6

(Optional) To reduce the weight of the rack for easier handling, remove the front door. See Removing and Installing the Front Door.

Step 7

(Optional) To reduce the weight of the rack for easier handling, remove the rear doors. See Removing and Installing Rear Doors.

Step 8

For racks with equipment that is already installed, use the four bolts from the front of the rack that were set aside in Step 4 to secure the two ramps to the pallet at the rear of the rack. Predrilled holes are hardware are provided there. See the following figure.

Figure 5. Installing the Ramps
Step 9

Remove the rack from the pallet. For racks that already have equipment installed, roll the rack to the rear of the pallet and down the ramps, as shown in the following figure.

Figure 6. Using the Ramps to Remove the Rack from the Pallet

For an empty rack, carefully roll the Cisco R42612 rack toward the front of the pallet. Lift the rack enough to slide the pallet out from under the rack. We recommend lifting the Cisco R42612 rack with a fork lift, a chain hoist, or professional movers. Empty racks are not shipped with ramps.

Caution 

Designate one person whose only job is to slide the pallet out from under the Cisco R42612 rack. The rack is too heavy for two or three people to lift; use a forklift, chain hoist, or professional movers.

Step 10

Store the pallet and packaging material for future use if you have to ship the empty Cisco R42612 rack cabinet.

Step 11

Make sure that the location where the rack will be installed has the required power and meets the description detailed Power Source.

Step 12

Verify that the doors that you must pass through on the way to the installation location can accommodate the width and height of the Cisco R42612 rack on its wheels.

Step 13

Verify that the flooring ready.

Step 14

Roll the rack to the location where it will be installed.