IM and Presence Service Network Setup

Configuration changes and service restart notifications

Service Restart Notifications

If you make a configuration change in Cisco Unified CM IM and Presence Administration that impacts an IM and Presence XCP service, you will need to restart XCP services for your changes to take effect. IM and Presence Service notifies you of exactly which node the configuration change impacts and of any service that you must restart. An Active Notifications popup window displays on each page of Cisco Unified CM IM and Presence Administration to serve as a visual reminder that you must restart services. Use your mouse to hover over the dialog bubble icon to see the list of active notifications (if any) and associated severity levels. From the list of active notifications you can go directly to Cisco Unified IM and Presence Serviceability, where you can restart the required service.

It is good practice to monitor the service restart popup window for service restart notifications, particularly if you make configuration changes after you deploy IM and Presence Service in the network. Most tasks in the accompanying documentation indicate if service restarts are required.

See the Online Help topic on Service Restart Notifications for information about the types of service notifications, and the service notification security levels.


Note

It is not recommended to do back-to-back restarts of the Cisco XCP Router and/or Cisco Presence Engine. However, if you do need to do a restart: restart the first service, wait for all of the JSM sessions to be recreated. After all of the JSM sessions are created, then do the second restart.


Cisco XCP Router Restart

The Cisco XCP Router must be running for all availability and messaging services to function properly on IM and Presence Service. This applies to both SIP-based and XMPP-based client messaging. If you restart the Cisco XCP Router, IM and Presence Service automatically restarts all active XCP services.

The topics in this module indicate if you need to restart the Cisco XCP Router following a configuration change. Note that you must restart the Cisco XCP Router, not turn off and turn on the Cisco XCP Router. If you turn off the Cisco XCP Router, rather than restart this service, IM and Presence Service stops all other XCP services. Subsequently when you then turn on the XCP router, IM and Presence Service will not automatically turn on the other XCP services; you need to manually turn on the other XCP services.

Restart Cisco XCP Router Service

Procedure


Step 1

On IM and Presence Service, choose Cisco Unified IM and Presence Serviceability > Tools > Control Center - Network Services.

Step 2

Choose the node from the Server list box and select Go.

Step 3

Click the radio button next to the Cisco XCP Router service in the IM and Presence Service section.

Step 4

Click Restart.

Step 5

Click OK when a message indicates that restarting may take a while.


Restarting Services with High Availability

If you make any system configuration changes, or system upgrades, that require you to disable High Availability and then restart either the Cisco XCP router, Cisco Presence Engine, or the server itself, you must allow sufficient time for Cisco Jabber sessions to be recreated before you enable High Availability. Otherwise, Presence won't work for Jabber clients whose sessions aren't created.

Make sure to follow this process:

Procedure


Step 1

Before you make any changes, check the Presence Topology window in Cisco Unified CM IM and Presence Administration window (System > Presence Topology). Take a record of the number of assigned users to each node in each Presence Redundancy Group.

Step 2

Disable High Availability in each Presence Redundancy Group and wait at least two minutes for the new HA settings to synchronize.

Step 3

Do whichever of the following is required for your update:

  • Restart the Cisco XCP Router
  • Restart the Cisco Presence Engine
  • Restart the server
Step 4

After the restart, monitor the number of active sessions on all nodes.

Step 5

For each node, run the show perf query counter "Cisco Presence Engine" ActiveJsmSessions CLI command on each node to confirm the number of active sessions on each node. The number of active sessions should match the number that you recorded in step 1 for assigned users. It should take no more than 15 minutes for all sessions to resume.

Step 6

Once all of your sessions are created, you can enable High Availability within the Presence Redundancy Group.

Note 

If 30 minutes passes and the active sessions haven't yet been created, restart the Cisco Presence Engine. If that doesn't work, there is a larger system issue for you to fix.

Note 

It is not recommended to do back-to-back restarts of the Cisco XCP Router and/or Cisco Presence Engine. However, if you do need to do a restart: restart the first service, wait for all of the JSM sessions to be recreated. After all of the JSM sessions are created, then do the second restart.


DNS Domain Configuration

The Cisco Unified Communications Manager IM and Presence Service supports flexible node deployment across any number of DNS domains. To support this flexibility, all IM and Presence Service nodes within the deployment must have a node name set to that node's Fully Qualified Domain Name (FQDN). Some sample node deployment options are described below.

Note

If any IM and Presence Service node name is based on the hostname only, then all IM and Presence Service nodes must share the same DNS domain.

There is no requirement that the IM and Presence Service default domain or any other IM domain that is hosted by the system to align with the DNS domain. An IM and Presence Service deployment can have a common presence domain, while having nodes deployed across multiple DNS domains.


Note

If you have Cisco Jabber connected over VPN, during the TLS handshake between the IM and Presence Service and the Cisco Jabber client, the IM and Presnece server performs a reverse lookup for the client’s IP subnet. If the reverse lookup fails, the TLS handshake times out in the client machine.


For more information, see Changing IP Address and Hostname for Cisco Unified Communications Manager and IM and Presence Service.

IM and Presence Service Clusters Deployed in Different DNS Domain or Subdomains

IM and Presence Service supports having the nodes associated with one IM and Presence Service cluster in a different DNS domain or subdomain to the nodes that form a peer IM and Presence Service cluster. The diagram below highlights a sample deployment scenario that is supported.

Figure 1. IM and Presence Service Clusters Deployed in Different DNS Domain or Subdomains


IM and Presence Service Nodes Within Cluster Deployed in Different DNS Domains or Subdomains

IM and Presence Service supports having the nodes within any IM and Presence Service cluster deployed across multiple DNS domains or subdomains. The diagram below highlights a sample deployment scenario that is supported.

Figure 2. IM and Presence Service Nodes Within a Cluster Deployed in Different DNS Domains or Subdomains


Note

High availability is also fully supported in scenarios where the two nodes within a presence redundancy group are in different DNS domains or subdomains.


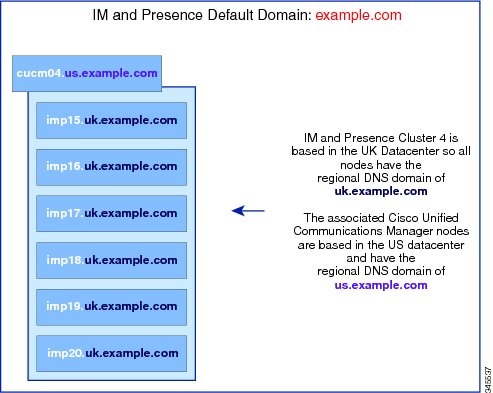
IM and Presence Service Nodes Within Cluster Deployed in DNS Domain That is Different Than the Associated Cisco Unified Communications Manager Cluster

IM and Presence Service supports having the IM and Presence Service nodes in a different DNS domain to their associated Cisco Unified Communications Manager cluster. The diagram below highlights a sample deployment scenario that is supported.

Figure 3. IM and Presence Service Nodes Within a Cluster Deployed in a DNS Domain That is Different Than the Associated Cisco Unified Communications Manager Cluster


Note

To support Availability Integration with Cisco Unified Communications Manager, the CUCM Domain SIP Proxy service parameter must match the DNS domain of the Cisco Unified Communications Manager cluster.

By default, the CUCM Domain SIP Proxy service parameter is set to the DNS domain of the IM and Presence database publisher node. Therefore, if the DNS domain of the IM and Presence database publisher node differs from the DNS domain of the Cisco Unified Communications Manager cluster, you must update this service parameter using the Cisco Unified CM IM and Presence Administration GUI on the IM and Presence database publisher node. Refer to the topic Specify DNS domain associated with Cisco Unified Communications Manager for more information.


Specify DNS Domain Associated with Cisco Unified Communications Manager Cluster


Note

This procedure is required only if the DNS domain of the IM and Presence database publisher node differs from that of the Cisco Unified Communications Manager nodes.


IM and Presence Service maintains Access Control List (ACL) entries for all Cisco Unified Communications Manager nodes within the cluster. This enables seamless sharing of Availability between the nodes. These ACL entries are FQDN based and are generated by appending the Cisco Unified Communications Manager hostname to the DNS domain of the IM and Presence database publisher node.

If the DNS domain of the IM and Presence database publisher node differs from that of the Cisco Unified Communications Manager nodes, then invalid ACL entries will be added. To avoid this, you must perform the following procedure from the Cisco Unified CM IM and Presence Administration GUI of the IM and Presence database publisher node.

Procedure


Step 1

Choose Cisco Unified CM IM and Presence Administration > System > Service Parameters.

Step 2

From the Server drop-down list, choose the IM and Presence Service node.

Step 3

From the Service drop-down list, choose Cisco SIP Proxy.

Step 4

Edit the CUCM Domain field in the General Proxy Parameters (Clusterwide) section to match the DNS domain of the Cisco Unified Communications Manager nodes.

By default this parameter is set to the DNS domain of the IM and Presence database publisher node.

Step 5

Click Save.


IM and Presence Service Default Domain Configuration

Follow this procedure if you want to change the default domain value for IM and Presence Service within a cluster. This procedure is applicable if you have a DNS or non-DNS deployment.


Caution

Disable high availability for the presence redundancy group before you stop any services as part of this procedure. If you stop the services while high availability is enabled, a system failover occurs. Before you disable High Availability, take a record of the number of assigned users for each node via the Presence Topology window.

After disabling High Availability, wait at least two minutes for the new HA settings to sync across the cluster before you make any further configuration changes.


This procedure changes only the default domain of the IM and Presence Service cluster. It does not change the DNS domain associated with any IM and Presence Service node within that cluster. For instructions on how to change the DNS domain of an IM and Presence Service node, see Changing IP Address and Hostname for Cisco Unified Communications Manager and IM and Presence Service.


Note

The default domain is configured when you add an IM and Presence Service publisher node to Cisco Unified Communications Manager. If the system fails to retrieve the default domain value from the Cisco Unified Communications Manager during node installation, the default domain value is reset to DOMAIN.NOT.SET. Use this procedure to change the IM and Presence Service default domain value to a valid domain value.


Procedure


Step 1

Stop the following services on all IM and Presence Service nodes in your cluster in the order listed:

  • Cisco Client Profile Agent

  • Cisco XCP Router
    Note 

    When you stop the Cisco XCP Router, all XCP feature service is automatically stopped.

  • Cisco Sync Agent

  • Cisco SIP Proxy

  • Cisco Presence Engine

Step 2

On the IM and Presence Service database publisher node, perform the following steps to configure the new domain value:

  1. Choose Cisco Unified CM IM and Presence Administration > Presence > Settings > Advanced Configuration.

  2. Choose Default Domain.

  3. In the Domain Name field, enter the new presence domain and click Save.

    A system update can take up to 1 hour to complete. If the update fails, the Re-try button appears. Click Re-try to reapply the changes or click Cancel.

Step 3

On all nodes in the cluster, manually start all services that had been stopped at the beginning of this procedure.

On every node in the cluster, manually restart any XCP feature services that were previously running.


What to do next

If high availability was enabled before the update, confirm that your Cisco Jabber sessions have been recreated before you re-enable High Availability. Otherwise, Presence won't work for Jabber clients whose sessions weren't created.

To obtain the number of Jabber sessions, run the show perf query counter "Cisco Presence Engine" ActiveJsmSessions CLI command on all cluster nodes. The number of active sessions should match the number of users that you recorded when you disabled high availability. If all of your Jabber sessions aren't recreated after 30 minutes, you have a larger system issue. Once your Jabber sessions are active, re-enable High Availability within your presence redundancy groups.

IM Address Configuration

IM Address Configuration Requirements

The IM and Presence Service default domain and the IM address scheme that you use must be consistent across all IM and Presence Service clusters. The IM address scheme you set affects all user JIDs and cannot be performed in a phased manner without disrupting communication between clusters which may have different settings.

If any of the deployed clients do not support directory URI as the IM address, administrators should disable the directory URI IM address scheme.

The following services must be stopped on all nodes in the cluster before you can configure the IM address scheme:
  • Cisco Client Profile Agent

  • Cisco XCP Router

  • Cisco Sync Agent

  • Cisco SIP Proxy

  • Cisco Presence Engine

See the interactions and restrictions topics for detailed requirements that are specific to each of the IM address schemes, and see the IM address configuration planning topics for additional information before you configure the IM address on IM and Presence Service.

UserID@Default_Domain IM Address Interactions and Restrictions

The following restrictions apply to the UserID@Default_Domain IM address scheme:
  • The UserID@Default_Domain IM address must be unique and cannot match existing IM addresses, directory URIs, or UserIDs. Otherwise, errors will result

  • If the UserID is already in UPN format, the IM and Presence Service will escape the first @ (for example, if the userID is alice@cisco.com, the IM address would be alice%20%cisco.com@cisco.com).

  • All IM addresses are part of the IM and Presence default domain, therefore, multiple domains are not supported.

  • The IM address scheme must be consistent across all IM and Presence Service clusters.

  • The default domain value must be consistent across all clusters.

  • If userid is mapped to an LDAP field on Cisco Unified Communications Manager, that LDAP mapping must be consistent across all clusters.

Directory URI IM Address Interactions and Restrictions

To support multiple domain configurations, you must set Directory URI as the IM address scheme for IM and Presence Service.


Caution

If you configure the node to use Directory URI as the IM address scheme, Cisco recommends that you deploy only clients that support Directory URI. Any client that does not support Directory URI will not work if the Directory URI IM address scheme is enabled. Cisco recommends that you use the UserID@Default_Domain IM address scheme and not the Directory URI IM address scheme if you have any deployed clients that do not support Directory URI.


Observe the following restrictions and interactions when using the Directory URI IM address scheme:

  • The directory URI must be unique and cannot match an existing IM address, directory URI, or UserID. Otherwise, errors will result.

  • If any UserIDs are in UPN format (for example, the UserID is alice@cisco.com) and directory URI is used for the IM address scheme, the directory URI must be different from the UserID, or errors will result.

  • All users have a valid Directory URI value configured on Cisco Unified Communications Manager.

  • All deployed clients must support Directory URI as the IM address and use either EDI-based or UDS-based directory integration.


    Note

    For UDS-based integration with Jabber, you must be running at least release 10.6 of Jabber.


  • The IM address scheme must be consistent across all IM and Presence Service clusters.

  • All clusters must be running a version of Cisco Unified Communications Manager that supports the Directory URI addressing scheme.

  • If LDAP Sync is disabled, you can set the Directory URI as a free-form URI. If LDAP Directory Sync is enabled, you can map the Directory URI to the email address (mailid) or the Microsoft OCS/Lync SIP URI (msRTCSIP-PrimaryUserAddress).

  • The Directory URI IM address settings are global and apply to all users in the cluster. You cannot set a different Directory URI IM address for individual users in the cluster.

  • If you configure directory URI as the IM addressing format, users must have a valid directory URI or the Jabber client will be unable to log in. Please note that the domain portion of the URI cannot start with a number and cannot contain an IP address.

    For example, joe@5.cisco.com, joe@cisco.5com, and joe@10.10.10.1 are all invalid directory URIs.

    joe5@.cisco.com or 5joe@.cisco.com are valid directory URIs.

Configure IM Address Task Flow

Complete the following tasks to configure IM addressing for your system.


Note

If you only want to edit existing IM user addresses and you do not want to change the default domain or the IM addressing scheme, you can proceed to step 4.

Procedure

  Command or Action Purpose
Step 1

Stop Services

You must stop essential IM and Presence services before updating your IM addressing configuration.

Step 2

Assign IM Addressing Scheme

Update your IM addressing configuration with new settings such as the default domain and IM addressing scheme.

Step 3

Restart Services

Restart essential IM and Presence services. You must restart services before updating user addresses or provisioning users.

Step 4

Update IM user addresses

Update IM user addresses by configuring the corresponding user settings in Cisco Unified Communications Manager. The IM addressing scheme that you configured determines which end user information derives the IM address.

Stop Services

Prior to updating your IM addressing scheme configuration stop essential IM and Presence Services. Make sure to stop services in the prescribed order.

Before you begin

If you have High Availability (HA) configured, disable it before you stop services. Otherwise, a system failover will occur. To do this:

  • In the Presence Topology window of the IM and Presence Service, take a record of the number of assigned users for each cluster node.

  • In the Presence Redundancy Group Configuration window of Cisco Unified Communications Manager, disable high availability in the subcluster.

  • After your changes, wait at least two minutes for the HA settings to sync across the cluster before you stop services.

For details on High Availability, see the 'Presence Redundancy Groups' chapter of the System Configuration Guide for Cisco Unified Communications Manager at http://www.cisco.com/c/en/us/support/unified-communications/unified-communications-manager-callmanager/products-installation-and-configuration-guides-list.html.

Procedure


Step 1

From Cisco Unified IM and Presence Serviceability, choose Tools > Control Center – Network Services

Step 2

Stop the following IM and Presence Services, in this order, by selecting the service and clicking the Stop button:

  1. Cisco Sync Agent

  2. Cisco Client Profile Agent

Step 3

After both services have stopped, choose Tools > Control Center – Feature Services and stop the following services in this order:

  1. Cisco Presence Engine

  2. Cisco SIP Proxy

Step 4

After both services have stopped, choose Tools > Control Center – Feature Services and stop the following service:

  • Cisco XCP Router
Note 
When you stop the XCP Router service, all related XCP feature services stop automatically.

What to do next

After services are stopped, you can update your IM addressing scheme.

Assign IM Addressing Scheme

Assign IM Addressing Scheme

Use this procedure to configure a new domain and IM address scheme, or to update an existing domain and address scheme.


Note

Make sure that the IM addressing scheme that you configure is consistent across all clusters.

Before you begin

Make sure to stop services before you configure an addressing scheme. For details, see:

Stop Services

Procedure


Step 1

In Cisco Unified CM IM and Presence Administration, choose Presence > Settings > Advanced Configuration.

Step 2

To assign a new default domain, check the Default Domain check box and, in the text box, enter the new domain.

Step 3

To change the address scheme, check the IM Address Scheme check box, and select one of the following options from the drop-down list box:

  • UserID@[Default_Domain]—Each IM user address is derived from the UserID along with the default domain. This is the default setting.
  • Directory URI—Each IM user address matches the directory URI that is configured for that user in Cisco Unified Communications Manager.
Step 4

Click Save.

If you chose Directory URI as the IM address scheme, you may be prompted to ensure that the deployed clients can support multiple domains. Click OK to proceed or click Cancel.

If any user has an invalid Directory URI setting, a dialog box appears. Click OK to proceed or click Cancel, and then fix the user settings before reconfiguring the IM address scheme.

A system update can take up to 1 hour to complete. Click Re-try to reapply the changes or click Cancel.


Note

For additional confirmation that there are no duplicate or overlapping directory URIs or userIDs, do the following:
  • Run the utils users validate all CLI command to check the system for duplicate or overlapping directory URIs and userIDs.

  • Verify that the Cisco IM and Presence Data Monitor network service is running (the service is running by default). The service runs periodic checks automatically for duplicate and overlapping directory URIs and userIDs. To set the check interval, see Set User Check Interval


What to do next

After your addressing scheme is assigned, you can restart services.

Restart Services

Restart Services

Once your IM addressing scheme is configured, restart services. You must do this prior to updating user address information or provisioning new users. Make sure to follow the prescribed order in starting services.

Before you begin

Assign IM Addressing Scheme

Procedure


Step 1

From Cisco Unified IM and Presence Serviceability, choose Tools > Control Center – Network Services.

Step 2

Start the following service by selecting the service and clicking the Start button:

  • Cisco XCP Router
Step 3

After the service starts, choose Tools > Control Center – Feature Services and start the following services in this order:

  1. Cisco SIP Proxy

  2. Cisco Presence Engine

Step 4

Confirm that the Cisco Presence Engine service is running on all nodes before proceeding to the next step.

Step 5

Choose Tools > Control Center – Network Services and start the following services in this order:

  1. Cisco Client Profile Agent

  2. Cisco Sync Agent


What to do next

If you had High Availability enabled prior to the update, you can re-enable it after all of your Cisco Jabber sessions are recreated. If it has been less than 30 minutes since services restarted, confirm that your Jabber sessions are recreated by running the show perf query counter "Cisco Presence Engine" ActiveJsmSessions CLI command on all cluster nodes. The number of active sessions should match the number of users that you recorded when you disabled high availability prior to the upgrade. If it takes more than 30 minutes for your sessions to resume, you have a larger system issue. Once your Jabber sessions are active, re-enable High Availability within your presence redundancy groups.

Once services are up and running, you can update end user IM addresses. IM addresses are derived from user IDs or directory URIs that are provisioned in Cisco Unified Communications Manager depending on which IM address scheme you configured.

Domain Management for IM and Presence Service Clusters

You can manually add, update, and delete local IM address domains using the Cisco Unified CM IM and Presence Administration GUI.

The IM and Presence Domain window displays the following domains:
  • Administrator-managed IM address domains. These are internal domains that are added manually but not yet assigned to any users, or they were added automatically by the Sync Agent but the user's domain has since changed and so it is no longer in use.

  • System-managed IM address domains. These are internal domains that are in use by a user in the deployment and which can be added either manually or automatically.

If the domain appears in the IM and Presence Domain window, the domain is enabled. There is no enabling or disabling of domains.

The Cisco Sync Agent service performs a nightly audit and checks the Directory URI of each user on the local cluster, and on the peer cluster if interclustering is configured, and automatically builds a list of unique domains. A domain changes from being administrator managed to system managed when a user in the cluster is assigned that domain. The domain changes back to administrator managed when the domain is not in use by any user in the cluster.


Note

All IM and Presence Service and Cisco Unified Communications Manager nodes and clusters must support multiple domains to use this feature. Ensure that all nodes in the IM and Presence Service clusters are operating using Release 10.0 or greater and that Directory URI IM addressing is configured.


IM Domain Management Interactions and Restrictions

  • You can add or delete only administrator-managed domains that are associated with the local cluster.

  • You cannot edit system managed domains.

  • You cannot edit system-managed or administrator managed domains that are associated with other clusters.

  • It is possible to have a domain configured on two clusters, but in use on only the peer cluster. This appears as a system-managed domain on the local cluster, but is identified as being in use on only the peer cluster.

  • Some security certificates may need to be regenerated after you manually add, update, or delete a domain. When generating a self-signed certificate or a certificate signing request (CSR), the Subject Common Name (CN) is set to the FQDN of the node, while the local IM and Presence default domain and all additional domains hosted by the system are added to the certificate as Subject Alt Names (SAN).

  • For XMPP Federation over TLS, you must regenerate the TLS certificate if adding or removing an IM address domain.

View IM Address Domains

All system-managed and administrator-managed presence domains across the IM and Presence Service deployment are displayed in the Presence > Domains> Find and List Domains window. A check mark in one of the information fields indicates if a domain is associated with the local cluster and/or with any peer clusters. The following information fields are displayed for administrator-managed presence domains:
  • Domain

  • Configured on Local Cluster

  • Configured on Peer Cluster(s)

The following information fields are displayed for system-managed presence domains:
  • Domain

  • In use on Local Cluster

  • In use on Peer Cluster(s)

Procedure


Choose Cisco Unified CM IM and Presence Administration > Presence > Domains. The Find and List Domains window appears.


Add or Update IM Address Domains

You can manually add IM address domains to your local cluster and update existing IM address domains that are on your local cluster using Cisco Unified CM IM and Presence Administration GUI.

You can enter a domain name of up to a maximum of 255 characters and each domain must be unique across the cluster. Allowable values are any upper- or lowercase letter (a-zA-Z), any number (0-9), the hyphen (-), or the dot (.). The dot serves as a domain label separator. Domain labels must not start with a hyphen. The last label (for example, .com) must not start with a number. Abc.1om is an example of an invalid domain.

System-managed domains cannot be edited because they are in use. A system-managed domain automatically becomes an administrator-managed domain if there are no longer users on the system with that IM address domain (for example, if the users are deleted). You can edit or delete administrator-managed domains.

Procedure


Step 1

Choose Cisco Unified CM IM and Presence Administration > Presence > Domains.

The Find and List Domains window appears displaying all administrator-managed and system-managed IM address domains.

Step 2

Perform one of the following actions:

  • Click Add New to add a new domain. The Domains window appears.

  • Choose the domain to edit from the list of domains. The Domains window appears.

Step 3

Enter a unique domain name up to a maximum of 255 characters in the Domain Name field, and then click Save.

Tip 

A warning message appears. If you are using TLS XMPP Federation, proceed to generate a new TLS certificate.


Delete IM Address Domains

You can delete administrator-managed IM address domains that are in the local cluster using Cisco Unified CM IM and Presence Administration GUI.

System-managed domains cannot be deleted because they are in use. A system-managed domain automatically becomes an administrator-managed domain if there are no longer users on the system with that IM address domain (for example, if the users are deleted). You can edit or delete administrator-managed domains.


Note

If you delete an administrator-managed domain that is configured on both local and peer clusters, the domain remains in the administrator-managed domains list; however, that domain is marked as configured on the peer cluster only. To completely remove the entry, you must delete the domain from all clusters on which it is configured.


Procedure


Step 1

Choose Cisco Unified CM IM and Presence Administration > Presence > Domains.

The Find and List Domains window appears displaying all administrator-managed and system-managed IM address domains.

Step 2

Choose the administrator-managed domains to delete using one of the following methods, and then click Delete Selected.

  • Check the check box beside the domains to delete.

  • Click Select All to select all domains in the list of administrator-managed domains.

Tip 

Click Clear All to clear all selections.

Step 3

Click OK to confirm the deletion or click Cancel.


Routing Information Configuration on IM and Presence Service

Routing Communication Recommendations

Router-to-router communication is the default mechanism for establishing the XCP route fabric on IM and Presence Service. In this case, IM and Presence Service dynamically configure all router-to-router connections between nodes in a cluster. Choose this routing configuration type if not all the nodes in your cluster are in the same multicast domain. Note that when you choose router-to-router communication:

  • Your deployment incurs the additional performance overhead while IM and Presence Service establishes the XCP route fabric.

  • You do not need to restart the Cisco XCP Router on all nodes in your deployment when you add a new node.

  • If you delete or remove a node, you must restart the Cisco XCP Router on all nodes in your deployment.

Alternatively, you can choose MDNS for your deployment. A requirement for MDNS routing is that all nodes in the cluster are in the same multicast domain. MDNS routing can seamlessly support new XCP routers joining the XCP route fabric.

If you choose MDNS as the routing communication, you must have multicast DNS enabled in your network. In some networks multicast is enabled by default or enabled in a certain area of the network, for example, in an area that contains the nodes that form the cluster. In these networks, you do not need to perform any additional configuration in your network to use MDNS routing. When multicast DNS is disabled in the network, MDNS packets cannot reach the other nodes in a cluster. If multicast DNS is disabled in your network, you must perform a configuration change to your network equipment to use MDNS routing.

Configure MDNS Routing and Cluster ID

At installation, the system assigns a unique cluster ID to the IM and Presence database publisher node. The systems distributes the cluster ID so that all nodes in your cluster share the same cluster ID value. The nodes in the cluster use the cluster ID to identify other nodes in the multicast domain using MDNS. A requirement for MDNS routing is that the cluster ID value is unique to prevent nodes in one standalone IM and Presence Service cluster from establishing router-to-router connections with nodes in another standalone cluster. Standalone clusters should only communicate over intercluster peer connections.

Choose Cisco Unified CM IM and Presence Administration > Presence > Settings > Standard Configuration to view or configure the cluster ID value for a cluster. If you change the cluster ID value, make sure that the value remains unique to your IM and Presence Service deployment.


Note

If you deploy the Chat feature, IM and Presence Service uses the cluster ID value to define chat node aliases. There are certain configuration scenarios that may require you to change the cluster ID value. See the Group Chat module for details.


Configure Routing Communication

To allow the nodes in a cluster to route messages to each other, you must configure the routing communication type. This setting determines the mechanism for establishing router connections between nodes in a cluster. Configure the routing communication type on the IM and Presence database publisher node, and IM and Presence Service applies this routing configuration to all nodes in the cluster.

For single node IM and Presence Service deployments, we recommend that you leave the routing communication type at the default setting.


Caution

You must configure the routing communication type before you complete your cluster configuration and start to accept user traffic into your IM and Presence Service deployment.


Before you begin

  • If you want to use MDNS routing, confirm that MDNS is enabled in your network.
  • If you want to use router-to-router communication, and DNS is not available in your network, for each node you must configure the IP address as the node name in the cluster topology. To edit the node name, choose Cisco Unified CM IM and Presence Administration > System > Presence Topology, and click the edit link on a node. Perform this configuration after you install IM and Presence Service, and before you restart the Cisco XCP Router on all nodes.

Attention

When using the Cisco Jabber client, certificate warning messages can be encountered if the IP address is configured as the IM and Presence Service node name. To prevent Cisco Jabber from generating certificate warning messages, the FQDN should be used as the node name.


Procedure


Step 1

Choose Cisco Unified CM IM and Presence Administration > System > Service Parameters.

Step 2

Choose an IM and Presence Service node from the Server drop-down list.

Step 3

Choose Cisco XCP Router from the Service drop-down list.

Step 4

Choose one of these Routing Communication Types from the menu:

  • Multicast DNS (MDNS) - Choose Multicast DNS communication if the nodes in your cluster are in the same multicast domain. Multicast DNS communication is enabled by default on IM and Presence Service.
  • Router to Router - Choose Router-to-Router communication if the nodes in your cluster are not in the same multicast domain.
Step 5

Click Save.

Step 6

Restart the Cisco XCP Router service on all nodes in your deployment.


Configure Cluster ID

At installation, the system assigns a default unique cluster ID to the IM and Presence database publisher node. If you configure multiple nodes in the cluster, the systems distributes the cluster ID so that each node in your cluster shares the same cluster ID value.

We recommend that you leave the cluster ID value at the default setting. If you do change the cluster ID value, note the following:

  • If you choose MDNS routing, all nodes must have the same cluster ID to allow them to identify other nodes in the multicast domain.
  • If you are deploying the Group Chat feature, IM and Presence Service uses the cluster ID value for chat node alias mappings, and there are certain configuration scenarios that may require you to change the cluster ID value. See the Group Chat module for details.

If you change the default Cluster ID value, you only need to make this change on the IM and Presence database publisher node, and the system replicates the new Cluster ID value to the other nodes in the cluster.

Procedure


Step 1

Choose Cisco Unified CM IM and Presence Administration > Presence > Settings > Standard Configuration.

Step 2

View or edit the Cluster ID value.

Note 

By default, IM and Presence Service assigns the cluster ID value "StandaloneCluster" to a cluster.

Step 3

Click Save.

Tip 

IM and Presence Service does not permit the underscore character (_) in the Cluster ID value. Ensure the Cluster ID value does not contain this character.


Configure Throttling Rate for Availability State Change Messages

To prevent an overload of the on IM and Presence Service, you can configure the rate of availability (presence) changes sent to the Cisco XCP Router in messages per second. When you configure this value, IM and Presence Service throttles the rate of availability (presence) changes back to meet the configured value.

Procedure


Step 1

Choose Cisco Unified CM IM and Presence Administration > System > Service Parameters.

Step 2

Choose the IM and Presence Service node from the Server menu.

Step 3

Choose Cisco Presence Engine from the Service menu.

Step 4

In the Clusterwide Parameters section, edit the Presence Change Throttle Rate parameter. This parameter defines the number of presence updates per second.

Step 5

Click Save.


IPv6 Configuration

To enable IPv6 for IM and Presence Service, you must perform the following tasks:
  • Configure IPv6 on Eth0 for each IM and Presence Service node in the cluster using either the Cisco Unified IM and Presence OS Administration GUI or the Command Line Interface.

  • Enable the IPv6 enterprise parameter for the IM and Presence Service cluster.

You must configure IPv6 for both the IM and Presence Service enterprise network and for Eth0 on each IM and Presence Service node for IPv6 to be used; otherwise, the system attempts to use IPv4 for IP traffic. For example, if the enterprise parameter is set to IPv6 and only one of two nodes in the cluster has their Eth0 port set for IPv6, then only the node with the port set to IPv6 is enabled for IPv6. The other node will attempt to use IPv4.

For configuration changes to the IPv6 enterprise parameter to take affect, you must restart the following services on IM and Presence Service:
  • Cisco SIP Proxy

  • Cisco Presence Engine

  • Cisco XCP Router

For instructions to configure IPv6 for IM and Presence Service, see Configuration and Administration of IM and Presence Service on Cisco Unified Communications Manager.

For more information about using the Command Line Interface to configure IPv6 parameters, see the Cisco Unified Communications Manager Administration Guide and the Command Line Interface Guide for Cisco Unified Communications Solutions.

IPv6 Interactions and Restrictions

Observe the following interactions and restrictions when configuring IPv6 on IM and Presence Service and when interacting with external IPv6 devices and networks:
  • You can use IPv6 for your external interfaces on IM and Presence Service even though the connection between IM and Presence Service and Cisco Unified Communications Manager uses IPv4.

  • You must configure IPv6 for the IM and Presence Service enterprise network and for Eth0 on each IM and Presence Service node to use IPv6; otherwise, the system attempts to use IPv4 for IP traffic on the external interfaces. For example, if the enterprise parameter is set to IPv6 and only one of two nodes in the cluster has their Eth0 port set for IPv6, then only the node with the port set to IPv6 is enabled for IPv6. The other node will attempt to use IPv4.


    Note

    If for any reason IPv6 gets disabled for either the enterprise parameter or for ETH0 on the IM and Presence Service node, the node can still perform internal DNS queries and connect to the external LDAP or database server if the server hostname that is configured on IM and Presence Service is a resolvable IPv6 address.


  • For federation, you must enable IM and Presence Service for IPv6 if you need to support federated links to a foreign Enterprise that is IPv6 enabled. This is true even if there is an ASA installed between the IM and Presence Service node and the federated Enterprise. The ASA is transparent to the IM and Presence Service node.

  • If IPv6 is configured for any of the following items on the IM and Presence Service node, the node will not accept incoming IPv4 packets and will not automatically revert to using IPv4. To use IPv4, you must ensure that the following items are configured for IPv4 if they appear in your deployment:
    • Connection to an external database.

    • Connection to an LDAP server.

    • Connection to an Exchange server.

    • Federation deployments.

Enable IPv6 on Eth0 for IM and Presence Service

Use Cisco Unified IM and Presence Operating System Administration GUI to enable IPv6 on the Eth0 port of each IM and Presence Service node in the cluster to use IPv6. You must reboot the node to apply the changes.


Note

To complete the IPv6 configuration, you must also enable the IPv6 enterprise parameter for the cluster and set the IPv6 name parameter after configuring Eth0 and rebooting the node.


Procedure


Step 1

Choose Cisco Unified IM and Presence OS Administration > Settings > IP > Ethernet IPv6. The Ethernet IPv6 Configuration window appears.

Step 2

Check the Enable IPv6 check box.

Step 3

Choose the Address Source:

  • Router Advertisement
  • DHCP
  • Manual Entry

If you selected Manual Entry, enter the IPv6 Address, Subnet Mask, and the Default Gateway values.

Step 4

Check the Update with Reboot check box.

Tip 

Do not check the Update with Reboot check box if you want to manually reboot the node at a later time, such as during a scheduled maintenance window; however, the changes you made do not take effect until you reboot the node.

Step 5

Click Save.

If you checked the Update with Reboot check box, the node reboots and the changes are applied.


What to do next

Proceed to enable the IPv6 enterprise parameter for the IM and Presence Service cluster using Cisco Unified CM IM and Presence Administration, and then set the IPv6 name parameter using Common Topology.

Disable IPv6 on Eth0 for IM and Presence Service

Use Cisco Unified IM and Presence Operating System Administration GUI to disable IPv6 on the Eth0 port of each IM and Presence Service node in the cluster that you do not want to use IPv6. You must reboot the node to apply the changes.


Note

If you do not want any of the nodes in the cluster to use IPv6, make sure the IPv6 enterprise parameter is disabled for the cluster.


Procedure


Step 1

Choose Cisco Unified CM IM and Presence OS Administration > Settings > IP > Ethernet IPv6. The Ethernet IPv6 Configuration window appears.

Step 2

Uncheck the Enable IPv6 check box.

Step 3

Check the Update with Reboot check box.

Tip 

Do not check the Update with Reboot check box if you want to manually reboot the node at a later time, such as during a scheduled maintenance window; however, the changes you made do not take effect until you reboot the node.

Step 4

Choose Save.

If you checked the Update with Reboot check box, the node reboots and the changes are applied.


Enable IPv6 Enterprise Parameter

Use Cisco Unified CM IM and Presence Administration to enable the IPv6 enterprise parameter for the IM and Presence Service cluster. You must restart the following services to apply the changes:
  • Cisco SIP Proxy

  • Cisco Presence Engine

  • Cisco XCP Router


Tip

To monitor system restart notifications using Cisco Unified CM IM and Presence Administration, select System > Notifications.


Before you begin

Ensure that you have configured the following for IPv6 before restarting any services:
  • Enable IPv6 for ETH0 on each IM and Presence Service node using Cisco Unified CM IM and Presence Administration.

  • Set the IPv6 name parameter using Common Topology.

Procedure


Step 1

Choose Cisco Unified CM IM and Presence Administration > System > Enterprise Parameters. The Enterprise Parameters Configuration window appears

Step 2

Choose True in the IPv6 panel.

Step 3

Choose Save.


What to do next

Restart the services on the IM and Presence Service node to apply the changes.

Configure Proxy Server Settings

Procedure


Step 1

Choose Cisco Unified CM IM and Presence Administration > Presence > Routing > Settings.

Step 2

Choose On for the Method/Event Routing Status.

Step 3

Choose Default SIP Proxy TCP Listener for the Preferred Proxy Server.

Step 4

Click Save.


Services on IM and Presence Service

Turn On Services for IM and Presence Service

The following procedure lists the services that you must turn on when you deploy a basic IM and Presence Service configuration. Turn on these services on each node in your IM and Presence Service cluster.

You may need to turn on other optional services depending on the additional features that you deploy on IM and Presence Service. See the IM and Presence Service documentation relating to those specific features for further details. If you have manually stopped any services so that you could configure certain system components or features, use this procedure to manually restart those services.

The Cisco XCP Router service must be running for a basic IM and Presence Service deployment. IM and Presence Service turns on the Cisco XCP Router by default. Verify that this network service is on by choosing Cisco Unified IM and Presence Serviceability > Control Center - Network Services.

Procedure


Step 1

Choose Cisco Unified IM and Presence Serviceability > Tools > Service Activation.

Step 2

Choose the IM and Presence Service node from the Server menu.

You can also change the status of Cisco Unified Communications Manager services by choosing a Cisco Unified Communications Manager node from this menu.

Step 3

For a basic IM and Presence Service deployment, turn on the following services:

  • Cisco SIP Proxy

  • Cisco Presence Engine

  • Cisco XCP Connection Manager

  • Cisco XCP Authentication Service

Step 4

Click Save.