Precision Queues

Precision Queue Routing

You can create multidimensional precision queues based on predefined business criteria. Agents automatically become members of these precision queues based on their attributes, dramatically simplifying configuration and scripting.

To implement Precision Routing, you create precision queues and implement in your call routing scripts.

A precision queue includes:

  • Terms - A term compares an attribute against a value. For example, you can create the following term: English > 6
  • Expressions - An expression is a collection of at least one or more terms. For example, if you require an agent who can speak English, is from Dallas and is proficient in sales, you can create the following expression: English > 6 AND Dallas == TRUE AND Sales > 6. You can create up to ten terms for each expression.
  • Steps - A step is a collection of at least one or more expressions. When you create a precision queue, you must configure at least one step. You can configure up to ten steps. A step may also include wait time and a Consider If formula. Use wait time to assign a maximum amount of time for the system to wait for an available agent on a step. Use a Consider If formula to evaluate the step at runtime, for example, if the Caller is a Gold or Bronze level.

To configure Precision Routing, you must complete the following tasks:

  1. Create attributes.
  2. Assign attributes to agents.
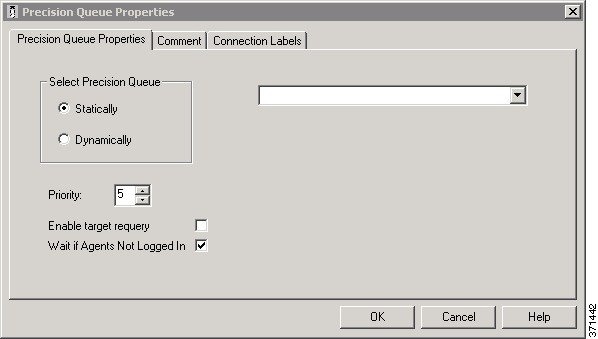
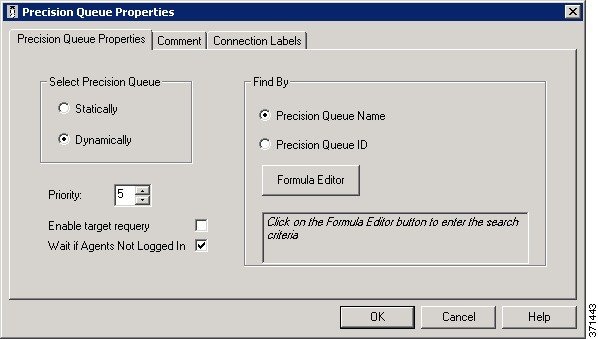
  3. Create precision queues.
  4. Create routing scripts.

Scripting Precision Queues

To implement Precision Routing in your contact center, you must create scripts.

You can create and use configured (static) and dynamic precision queue nodes in your scripts. Static precision queue nodes target a single, configured precision queue. When the script utilizes a single precision queue, use static precision queues. Dynamic precision queue nodes are used to target one or more previously configured precision queues. Use dynamic precision queues when you want a single routing script for multiple precision queues (for example, when the overall call treatment does not vary from one precision queue to another). Dynamic precision queues can simplify and reduce the overall number of routing scripts in the system.

Precision Queues are peripheral gateway (PG) agnostic. Precision queues do not care on which PG an agent resides.

Precision Queue Script Node

You can use the Precision Queue script node to queue a call or task based on caller requirements until agents with desired proficiency become available. This node contains multiple agent selection criterion which are separated into steps.

Figure 1. Precision Queue Script Node


A single call can be queued on multiple precision queues. If an agent becomes available in one of the precision queues, the call is routed to that resource. You cannot reference multiple precision queues with a single Precision Queue node. However, you can execute multiple Precision Queue nodes sequentially to achieve this.

The Precision Queue node includes a Priority field, which sets the initial queuing priority for the calls processed through this node versus other calls queued to the other targets using different nodes. The priority is expressed as an integer from 1 (top priority) to 20 (least priority). The default value is 5.

If more than one call is queued to a precision queue when an agent becomes available, the queued call with the lowest priority number is routed to the target first. For example, assume an agent in a precision queue becomes available and two calls are queued to that precision queue. If one call has priority 3 and the other has priority 5, the call with priority 3, the lower value, is routed to the precision queue while the other call continues to wait. If the priorities of the two calls are same, then the call queued first is routed first.

VRU script instructions are not sent to the VRU. If a call enters the Precision Queue node and no resource is available, the call is queued to the precision queue and the node transfers the call to the default VRU, if the call is not already on a VRU. The script flow then exits immediately through the success branch and continues to a Run External Script node to instruct the VRU what to do while holding the call until an agent becomes available. Typically, this invokes a Network VRU script that plays music-on-hold, possibly interrupted on a regular basis with an announcement. The script flow can also use other queuing nodes to queue the same call to other targets, for example, Queue to Skill Group and Queue to Agent.

Precision Queue Properties Dialog Box - Static Precision Queue

The following list describes the Precision Queue Properties dialog box for a static precision queue script node.

Figure 2. Precision Queue Properties Dialog Box—Static Precision Queue

The following property is unique to static precision queues:

  • Drop-down list—To route calls that enter this node to a static precision queue, you must select a precision queue from the list.

The following properties are common to static and dynamic precision queues:

  • Select Precision Queue radio buttons—You can select one of the following options for each a precision queue:

    • Statically—Select this option to choose a single precision queue to be selected for all the calls that enter this node.

    • Dynamically—Select this option to select a precision queue on a call-by-call basis based on a formula.

  • Priority selection—To select the initial queuing priority for calls processed through this node, you can select from 1 to 20. The default is 5.

  • Enable target requery check box—To enable the requery feature for calls processed through this node, select this check box. When a requery occurs, for example if a call is presented to an available agent and the agent does not answer, the script continues through the failure terminal. The script can then inspect the call variable RequeryStatus to determine what to do next. The typical action in case of a No Answer is to queue the call again to other precision queues, and increase the priority so that it is taken out of the queue before regular queued calls.

  • Wait if Agents Not Logged In check box — When this check box is selected and the agents who are associated with a step are not logged in, then the router will wait for the time that is configured for that step. When this check box is not selected, the router will not wait on any step. However, on the last step, the router will wait indefinitely irrespective of the selection.

Precision Queue Properties Dialog Box - Dynamic Precision Queue

The following list describes the Precision Queue Properties dialog box for a dynamic precision queue script node.

Use dynamic precision queues when you want a single routing script for multiple precision queues (for example, when the overall call treatment does not vary from one precision queue to another). Dynamic precision queues can simplify and reduce the overall number of routing scripts in the system.

Figure 3. Precision Queue Properties Dialog Box—Dynamic Precision Queue

The following properties are unique to dynamic precision queues:

  • Find By radio buttons—To dynamically route calls that enter this node to a Precision Queue name or ID, use the Find By radio buttons.

    • Precision Queue Name radio—Select this option to dynamically route calls that enter this node to a Precision Queue name.

    • Precision Queue ID—Select this option to dynamically route calls that enter this node to a Precision Queue ID.

  • Formula Editor button—To determine to which Precision Queue name or ID to route calls that enter this node, click the Formula Editor button to create a formula. The formula is then evaluated at run time to select a precision queue by either name or by database ID. For example, you can use the formula "Call.PeripheralVariable4" to look up the Precision Queue if call variable 4 contained the Precision Queue name, as a result of a database lookup or from call processing.


Note

The section on static precision queues describes the properties that are common to static and dynamic precision queues.


Queuing Behavior of the Precision Queue Node

Precision queues internally are configured with one or more time-based steps, each with a configured wait time. After a call is queued, the first step begins and the timer starts. This occurs although the execution path of the script exited the success node and a new node may be targeted (for example, Run Ext. Script).

If the timer for the first step expires, control moves to the second step (assuming one exists), and so on. As long as the call remains in queue and there are steps left to execute, the call internally continues to move between steps regardless of the path the call takes after it leaves the precision queue node. If a call is queued to two or more precision queues, the call internally walks through the steps for each precision queue in parallel. After the call reaches the last step on a precision queue, it remains queued on that step until the call is routed, abandoned, or ended.

Precision Queue Reports

Reporting provides a complete view of all the queues in the system with both real time and historical metrics. You can use filtering to narrow down the view to specific attributes.

To run real-time or historical reports, you can use Cisco Unified Intelligence Center reporting templates. For more information about Cisco Unified Intelligence Center template reports, see the Report Template Reference Guide for Cisco Unified Intelligence Center at http://www.cisco.com/c/en/us/support/customer-collaboration/unified-intelligence-center/products-user-guide-list.html.

These reporting templates work with Precision Routing:

Agent Real Time - This report displays, for each agent, the active skill group or active precision queue, the state, and the call direction within each media routing domain into which the agent is logged.

Agent Team Real Time - This report displays the current status for each selected agent team and displays the current state and the active skill group or active precision queue for each agent in the selected agent teams.

Agent Precision Queue Membership - This report displays selected agents, the media routing domain into which the agent is logged, and the active precision queue with up to the maximum supported number of associated attributes.

Precision Queue Real Time All Fields - This report displays the current status of selected precision queues.

Agent Precision Queue Historical All Fields - This report displays activity for selected agents for a selected interval, sorted by precision queue.

Precision Queue Configuration

Precision queues are a combination of steps that include attributes, defined terms for the selected attributes, wait times, and Consider If formulas.

Precision queues are configured using the Unified CCE Administration Precision Queue tool, not the Configuration Manager.

For more information on precision queues and precision routing, see the Cisco Unified Contact Center Enterprise Features Guide at http://www.cisco.com/en/US/products/sw/custcosw/ps1844/products_feature_guides_list.html.

Configure Precision Queues

Precision Queues are configured using the Precision Queue tool in Unified CCE Administration, not the Configuration Manager.

Before you begin

Before you create precision queues, ensure that you complete the following prerequisites:

  • Create attributes.

  • Assign attributes to agents.

Procedure


Step 1

Click the New button. The page refreshes and a new page appears.

Step 2

In the Name dialog box, type a name for the precision queue.

Note 

You can enter a combination of up to 32 alphanumeric characters and underscores. Precision queue names are case-sensitive.

Step 3

(Optional) In the Description dialog box, type any useful information about the precision queue that you wish to note. You can use the description to note the logic behind your queue criteria or for which call type(s) this queue is designed.

Note 

You can enter a combination of alphanumeric characters and underscores only.

Step 4

Select the Media Routing Domain for this precision queue. The field defaults to Cisco_Voice. To select a Media Routing Domain: Click the magnifying glass to display the Select Media Routing Domain list. Click the link to select a Media Routing Domain and close the list. Click the X icon to clear the selection and reapply Cisco_Voice.

Step 5

From the Service Level Type list, select the service level type to use for reporting on your service level agreement. The default value is Ignore Abandoned Calls. In the Service Level Threshold dialog box, type the time in seconds that calls are to be answered based on your service level agreement.

Note 

The time entered in this box is used to report on service level agreements and does not impact how long a call remains in a precision queue. The length of time a call remains in a step is determined by each individual step wait time.

Step 6

From the Agent Order list, select one of the following options to determine which agents receive calls from this queue:

  • Longest Available Agent - This represents an agent that has been available the longest.

  • Most Skilled Agent - This represents an agent that best matches the terms in a step. This is accomplished by totaling the agent’s proficiency attribute ratings for that step and selecting the agent with the highest value.

  • Least Skilled Agent - This represents an agent that least matches the terms in a step. This is accomplished by totaling the agent’s proficiency attribute ratings for that step and selecting the agent with the lowest value.

The default value is Longest Available Agent.

Step 7

(Optional) Bucket Intervals. Select the Bucket Interval whose bounds are to be used to measure the time slot in which calls are answered. The field defaults to Use System Default. To select a different bucket interval: Click the magnifying glass to display the Select Bucket Interval list. Click the link to select a bucket interval and close the list. Click the X icon to clear the selection and reapply Use System Default.

Step 8

Click the numbered step builder link (‘Step 1’, ‘Step 2’, and so on). The Step Builder interface pops up. You must build at least one step before you can save the precision queue. Click the magnifying glass in the Select Attribute dialog box and select an attribute. The Select Attribute dialog box will open with the list of Attributes on the system. You can sort and search through the Attributes. Click on an Attribute name to select it for that term. Click the X icon to clear your selection.

Step 9

If you selected a Boolean attribute, from the value list select == (is equal to) or != (does not equal).

OR

If you selected a proficiency attribute, from the operator list, select one of the following operators:

  • == (is equal to)

  • != (does not equal)

  • < (is less than)

  • <= (is less than or equal to)

  • > (is greater than)

  • >= (is greater than or equal to)

Then, for either attribute type, select a value from the values list.

Step 10

To add an additional term, click Add Attribute and return to step 7.

OR

To add an additional expression, click the drop down arrow and click Add Expression and return to step 7.

OR

Proceed to the next step.

Note 

When you add an attribute, you can select OR or AND to specify the logic between the previous and current attributes. The default value is AND.

When you add an expression, you can select OR or AND to specify the logic between the previous and current expressions. The default value is OR.

You can add up to 10 expressions or up to 10 terms to a step.

After you add 10 expressions or 10 terms to a step, the Add Attribute button is disabled.

To delete a term, click the X icon.

If you are not on the last step of the Precision Queue, then you can enter a Wait Time (in seconds). A call will queue at a particular step looking for an available agent matching the step criteria up until the time specified in the wait time field for that step. A blank (or zero) wait time indicates that the call will immediately proceed to the next step if there are no available agents matching the step criteria.

If you are not on the last step of the Precision Queue, then you can enter a Consider If formula for that step.

Consider If expression

You can use a Consider If expression to evaluate a call (within a step) against additional criteria. Each time a call reaches a step with a Consider If expression, the expression is evaluated. If the value for the expression returns as true, the call is considered for the step. If the value returns as false, the call moves to the next step. If no expression is provided for a step, the step is always considered for calls.

Note 

You cannot add a Consider If expression to the last step.

To add a Consider If expression, you can type the expression into the Consider If box. Alternatively, you can use the Script Editor to build the expression and then copy and paste it into the Consider If box. Objects used in consider if expressions are case-sensitive. All Consider If expressions that you add to a precision queue must be valid. If you add an invalid expression, you cannot save the precision queue. To ensure that the expression is valid, use Script Editor to build and validate the expression.

Note 

It is possible that a valid Consider If expression can become invalid. For example, if you delete an object used in the expression after you create or update the precision queue, the expression is no longer valid.

Only the following scripting objects are valid in a Consider If expression:

  • Call

  • PQ

  • Skillgroup

  • ECC

  • PQ Step

  • Call Type

  • You can use custom functions in a Consider If expression and you can create custom functions (in Script Editor).

Example:

Consider If expression examples

PQ.PQ1.LoggedOn > 1 - Evaluates whether there is more than one agent logged into this queue.

CallType.CallType1.CallsRoutedToday > 100 - Evaluates whether more than 100 calls of this call type were routed today.

PQStep.PQ1.1.RouterAgentsLoggedIn > 1 - Evaluates whether there is more than one router agent logged into this queue for step 1.

CustomFunction(Call.PeripheralVariable1) > 10 - Evaluates whether this expression using a custom function returns a value greater than ten.

Step 11

Click OK. The step appears in the precision queue with the agent count. The agent count represents the number of configured agents that match the step criteria.

Note 

For a particular step, an equal or greater number of agents should be available to select from than in the previous step. If less agents are available to select from, a warning icon appears beside the agent count.

Step 12

To add an additional step, click Add Step and then return to step.

Note 

The Add Step button is disabled until you add at least one expression to the previous step. You can add up to 10 steps. After you reach 10 steps, the Add Step button is disabled. To delete a step, click the X icon.

Step 13

Click Save.

A message appears indicating that the precision queue was successfully saved and the summary page reappears.


Edit Precision Queue

Procedure


Step 1

In the summary view, navigate or search for the precision queue to edit.

Step 2

In the list, click the precision queue name. The page refreshes and the edit view appears.

Step 3

Complete required changes and click Save.

The page refreshes and the summary view appears. A message appears at the top of the page indicating whether or not the save was successful.


Delete Precision Queue

You cannot delete a precision queue that is referenced statically in any version of a saved script. Specifically, before you can delete a precision queue that is referenced statically in a script, you must remove the precision queue from every saved version of the script. If you reference a precision queue dynamically in a script and there are calls queued against the precision queue, you can delete the precision queue. Any calls queued against the deleted precision queue will be default routed.


Note

When deleting a precision queue that is referenced by a dynamic precision queue node, this precision queue's calls will be default routed.


Procedure


Step 1

On the Precision Queue Summary page, select the precision queue to delete.

Step 2

Click the X icon.

You receive a prompt to confirm that you want to delete the precision queue.

Step 3

To delete the queue, click Yes. Otherwise, click No.