Configuration of Campaigns and Imports

Outbound Option Configuration Process Overview

The process of configuring Outbound Option involves the following procedures:

  • Configuring dialed numbers (DNs) for agent reservation and transferring to IVR

  • Creating a skill group and a route for the campaign

  • Creating an import rule to schedule contact and do-not-call imports

  • Creating a query rule to filter contact records based on SQL queries and associate those records with an import

  • Create a campaign to define campaign settings, such as the campaign name, description, answering machine detection, personal callback settings, dial settings, query rule selections, and skill group selections

  • Create call types to map the DNs to a reservation or transfer to IVR routing script

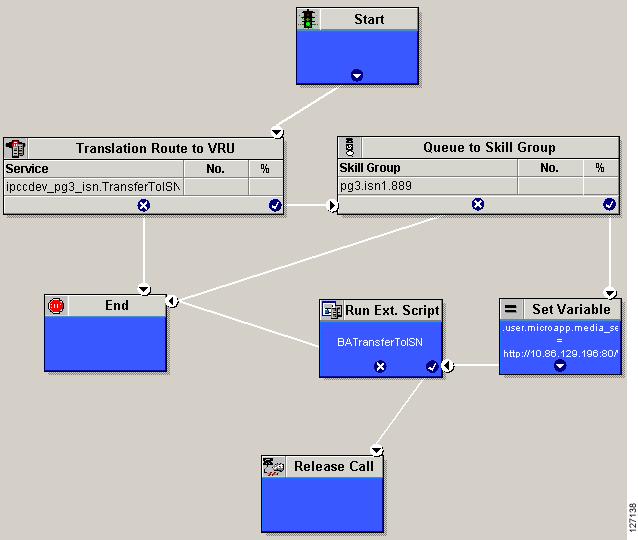
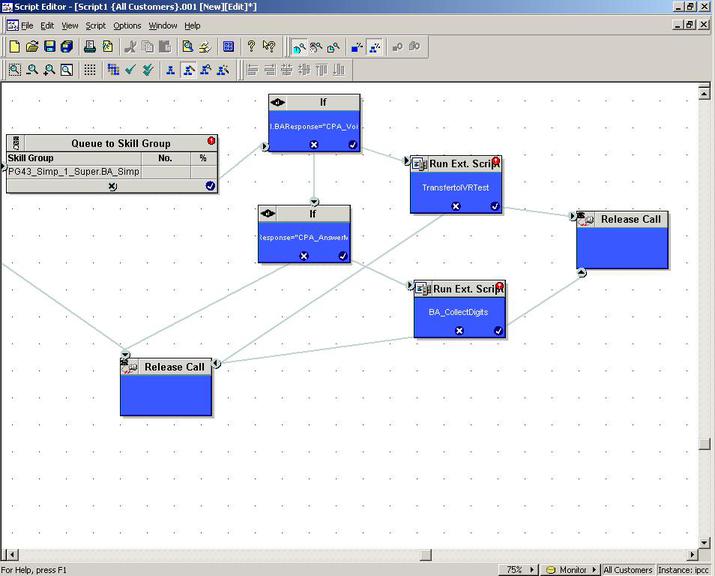
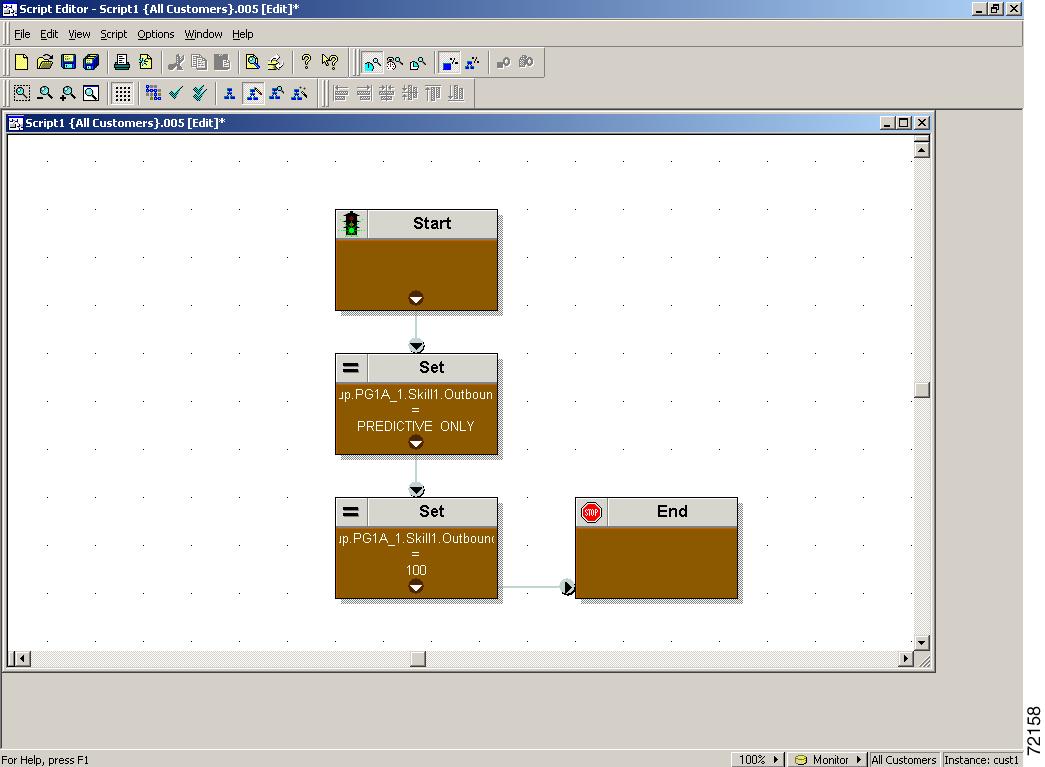
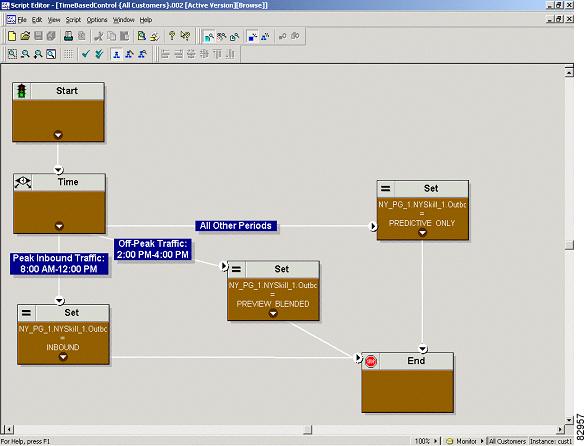
  • Create reservation, transfer to IVR, and administrative scripts

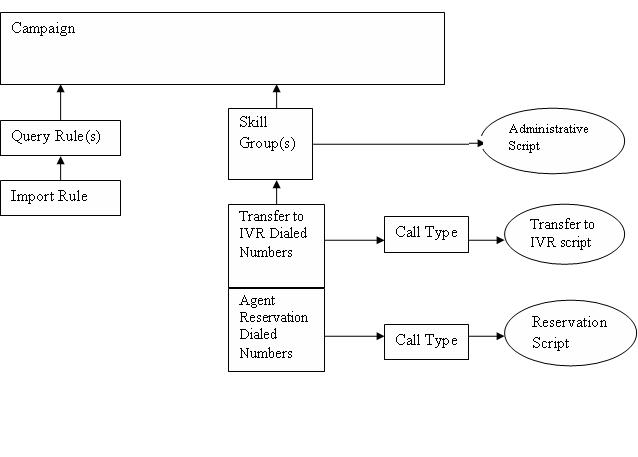
The following figure provides a high-level overview of this process.


Configuration Process Task Maps

This section contains configuration process task map tables that list the steps for creating an agent campaign and a transfer to IVR campaign.

Campaign Task List

The following table lists the steps required to create an agent campaign. An agent campaign requires an agent reservation script. A transfer to VRU campaign does not require agent reservation.

Table 1. Steps for Creating an Agent Campaign

Step Number

Task

Where Discussed

1

Create a Dialed Number (DN) on the MR client.

Create Dialed Numbers

2

Create DN for Abandon to VRU on the MR PG for the SIP Dialer.

Create Dialed Numbers

3

Create DN for AMD to VRU on the MR PG.

Create Dialed Numbers

4

Configure an Import Rule.

Create Import Rule

5

Configure Query Rules.

Create a Query Rule

6

Configure a Campaign.

Create a Campaign

7

Configure a Call Type.

Create a Call Type

8

Configure Reservation Script.

Set Up Reservation Script

9

Configure transfer to VRU scripts for AMD and Abandon to VRU.

Configure a Transfer to VRU Script

10

Map Scripts to Call Types and DNs.

Map Scripts, Call Types, and Dialed Numbers

11

Configure Administrative Script.

Set Up Administrative Script

Transfer to VRU Campaign Tasks

The following table lists the steps required to create a transfer to VRU campaign, in the order that you need to perform these steps, and the location (in this document or in another Cisco document) of the instructions for the task.

Step Number

Task

Where Discussed

1

Configure Network VRU.

Configuration for Send to VRU Campaign

2

Create a Dialed Number (DN) for Abandon to VRU on the MR PG.

Create Dialed Numbers

3

Create DN for AMD to VRU on the MR PG.

Create Dialed Numbers

4

Configure an Import Rule.

Create Import Rule

5

Configure Query Rules.

Create a Query Rule

6

Configure a Campaign.

Create a Campaign

7

Configure Call Type.

Create a Call Type

8

Configure transfer to VRU script.

Configure a Transfer to VRU Script

9

Map Scripts to Call Types and DNs.

Map Scripts, Call Types, and Dialed Numbers

10

Configure Administrative Script.

Set Up Administrative Script

Preliminary Configuration Requirements

You use specific instances of the following for your Outbound Option campaign:

  • Skill Groups

  • Agent Targeting Rules

  • Call Types

  • Dialed Numbers

Configure Skill Group

Procedure


Step 1

In ICM Configuration Manager, open the Skill Group Explorer tool.

Step 2

Ensure that the Select filter data section displays the PIM.

Step 3

Click Retrieve.

Step 4

Click Add Skill Group.

Step 5

Set the Media Routing Domain to Cisco_Voice.

Step 6

Enter a peripheral name and number (record them):____________________. (You can either enter a name or allow the system to generate the name.)

Step 7

Check ICM picks the agent.

Step 8

Click Add Route.

Step 9

Enter a name for the new route (any name is allowed).

Step 10

Click Save.


Agent Targeting Rules for Outbound Option

For Outbound Option campaigns, configure an Agent Targeting Rule that uses the routing client for the MR PG with your agents who handle outbound calls.

For more information on configuring Agent Targeting Rules, see the section on peripherals and trunk groups in Configuration Guide for Cisco Unified ICM/Contact Center Enterprise at https://www.cisco.com/c/en/us/support/customer-collaboration/unified-contact-center-enterprise/products-installation-and-configuration-guides-list.html.

Create a Call Type

The dialed numbers and routing scripts that you create reference call types, so you should create them as needed. For example, you can create one call type for an agent campaign and another for a VRU campaign. You associate the call types with the dialed numbers you create.

For more information about using call types, see Scripting and Media Routing Guide for Cisco Unified ICM/Contact Center Enterprise

Perform the following steps to create the call type that the routing scripts you create will reference.

Procedure


Step 1

In ICM Configuration Manager, double-click the Call Type List tool.

Step 2

Click Retrieve.

Step 3

Click Add.

Step 4

Enter the Name for the call type.

Step 5

Accept the defaults for all other fields.

Step 6

Click Save.


Create the Dialed Numbers

Before you configure an Outbound Option campaign, create the dialed numbers to specify for certain fields on the Campaign Skill Group tab page. The following table lists these fields, the purpose for each dialed number, and the routing client for that dialed number.

Campaign Skill Group Tab Field Name

Purpose

Associated Routing Client

Dialed Number

Dialed Number to reserve agents. Not applicable for Transfer to VRU campaigns.

Configure on the MR routing clients for each Dialer.

After AMD and for transfer to VRU

Dialed Number for Transfer to VRU.

Configure on the MR Peripheral PG.

When no agents are available

Dialed Number for Transfer to VRU.

Configure on the MR Peripheral PG.

For agent campaigns, create all three dialed numbers. For transfer to VRU campaigns, create the dialed numbers for the After AMD and for transfer to VRU field.

Procedure


Step 1

In the Configuration Manager, double-click the Dialed Number/Script Selector List tool.

Step 2

Click Add.

Step 3

On the Attributes tab:

  1. For Routing Client, select the routing client listed in the preceding table.

  2. For Media Routing Domain, select Cisco_Voice.

  3. Enter values for the Dialed Number String/Script Selector and Name. The Dialed Number allows only alphanumeric and (.) and (_) as valid characters; there is a ten-character limitation.

Step 4

Click Save.

Step 5

For Unified CCE configurations that have more than one Dialer component, repeat these steps to create the dialed number for each media routing client.

Step 6

On the Dialed Number Mapping tab, click Add.

Step 7

In the Calling Line ID radio set, select All.

Step 8

In the Caller-entered digits radio set, select All.

Step 9

In the Call type drop-down list, select the MR call type.

Step 10

Click OK in the Dialed Number Map Entry dialog, and then click Save.


Note


The Personal Callback feature requires a second dialed number. This dialed number must have the PersonalCallback dialed number string. Map all Calling Line IDs and all Caller-entered digits to the call type for the MR routing client. Multiple dialers require multiple dialed numbers—One for each routing client for a given skill group.


Contact and Do Not Call List Imports

Outbound Option campaigns require you to import lists of customers to call and to not call. Create these lists before creating your campaign.

Import Rule Files

Outbound Option campaigns require you to import these lists of contact information:

  • Do Not Call List—A text file that lists phone numbers that the campaign should not dial. These files must match a specified format.

  • Contact List—A text file that lists customers to consider contacting as part of the campaign. You can specify the format of the records using a set of standard and custom column types.

Do Not Call Lists

The import rule file for a Do Not Call list contains a list of phone numbers that the Dialer should not call.

Each entry in an import rule file for a Do Not Call List must be a single phone number of no more than 20 characters.

The Do Not Call table can support up to 60 million entries. But, the information is also stored in memory in the Campaign Manager process. Unless you set the Overwrite table option, each import appends to the table. A single large import or several smaller ones can create a Do Not Call list in memory that consumes all the memory for the process. A Do Not Call entry uses 16 bytes of memory. So, 60 million entries require approximately 1 GB of memory on the Logger Side A platform.


Note


To clear the Do Not Call list, import a blank file with the Overwrite table option enabled.


Contact Lists

The import rule file for a Contact list contains the list of customers that you want to contact for a campaign. If any of the phone numbers appear in the Do Not Call table, the Dialer does not call those numbers.

Unlike the import rule file for Do Note Call lists, you can define the format of entries in the Contact list as follows:

  • Each row has a limit of 1024 characters.

  • You specify the columns in each entry on the Import Rule Definition tab of the Outbound Option configuration dialog. The tab provides a set of standard column types to choose from. It also provides a Custom type for flexibility.

    Custom attributes are only useful for filtering out customer contacts into different dialing lists based on your business needs. For example, use a custom entry called "Amount Owed" to add contacts that owe more into a different dialing list with a higher priority.


    Note


    These custom attributes are not forwarded to the agent desktop.


  • You specify if the columns are comma-delimited, pipe-delimited, or fixed-format on the Import Rule General tab of the Outbound Option configuration dialog.


    Note


    For fixed-format columns, the number of characters in the entry for each column must exactly match the column definition. If the data for a field does not fill the specified width of the column, pad the entry with spaces to the defined character width.


When the import runs, the data is read and the import file is renamed or deleted so that it is not reimported. This allows you to read and review the import file (if necessary) to troubleshoot problems.

Create Do Not Call List Import File

When creating a Do_Not_Call list file, format it correctly.


Note


Remember that the Do_Not_Call table created from these lists can grow to consume all available memory. The default import appends each new list to the existing table.

To clear the Do Not Call list, import a blank file with the Overwrite table option enabled.


Procedure

Step 1

Using a text editor, create a text file to contain the do-not-call phone numbers.

Step 2

For each Do-Not-Call entry, enter a phone number of up to 20 characters on a new line.

Step 3

Save the text file to the local server.


The Campaign Manager reads from the Do_Not_Call table. The campaign Manager marks Dialing List entries as Do Not Call entries only when it fetches the Dialing List entry that is an exact, digit-for-digit match. This allows Do Not Call imports to happen while a Campaign is running without rebuilding the Dialing List.


Note


For a base number plus extension, this entry must match a Do-Not-Call entry for that same base number and same extension. The dialer will not dial the extension.


Example

The following is an example of a Do_Not_Call list:

2225554444

2225556666

2225559999

Create Contact Import File

When creating a contact import file, observe the format you designed according to the database rules set up in Import Rule Definition tab.

The following example assumes that you have contact information with AccountNumber, FirstName, LastName, and Phone column types.

Procedure

Step 1

Using a text editor, create a text file that contains the information for these fields.

Step 2

Enter an account number, first name, last name, and phone number for each entry on a new line.

Use either Comma Delimited, Pipe Delimited, or Fixed Format, as defined on the Import Rule General tab.

Step 3

Save the text file to the local server.


Example

The following is an example of a contact import file in the comma-delimited format:

6782,Henry,Martin,2225554444

3456,Michele,Smith,2225559999

4569,Walker,Evans,2225552000

The following is the same example in Fixed Format with the following column definitions:

  • Custom - VARCHAR(4)

  • FirstName - VARCHAR(10)

  • LastName - VARCHAR(10)

  • Phone - VARCHAR(20)

6782Henry Martin 2225554444

3456Michele Smith 2225559999

4569Walker Evans 2225552000

Each field must match the length given in the import rule. In the example shown, spaces have been added to make the FirstName and the LastName fields to each be 10 characters long.

Create Import Rule

The Import Rule defines how Outbound Option:

  • Locates the imported file and defines the name of the contact table into which the import process places the contact information.

  • Recognizes and defines the contact list data in the imported file. The Import Rule defines the import format of the user contact list (fixed format, comma-delimited, or pipe-delimited fields). The rule also defines the format and fields for the Import Rule file.

  • Schedules updates for your calling lists imports.


Note


When you add or modify any field in the existing import rule table, you have to change the target table name . Otherwise, you will not be able to save the import rule change.

Changing the target table name creates a new table, but does not remove the old table. The old table remains in the database, but the system does not use it.


When you import records, take note of the following:

  • The dialing rate/CPS is affected.

  • The "record fetch query performance" is also affected if you are importing huge numbers of records. The performance of the query impacts the call rate.

Perform the following steps to create an import rule.

Procedure


Step 1

In the Configuration Manager, expand the Outbound Option menu and double-click Outbound Option Import Rule.

Step 2

Click Retrieve.

Step 3

Click Add at the bottom of the list box area of the window. Then fill out the necessary information on the following tabs:

  1. Import Rule General tab

  2. Import Rule Definition tab

  3. Import Rule Schedule tab

Note


For details of these tabs, see the Outbound Option section of the Configuration Manager Online Help.

Step 4

Click Save.


Note


If you edit an import rule, the changes take effect on the next import.

Import Rule Deletion

When you delete an import rule, the corresponding contact table is deleted.

If you are using Outbound Option High Availability and either Side A or Side B is down when the rule is deleted, the corresponding table on that side is not deleted. However, when the side restarts, the table is then automatically deleted.

Outbound Option Campaign Creation

Create a Query Rule

The Query Rule component defines the SQL rule that the Outbound Option Import process uses to build the dialing list for a particular campaign. Based on SQL queries to the database, the rule defines how the contact records from the Outbound Option database are selected to be inserted in the dialing list.

Perform the following steps to create a query rule.

Procedure


Step 1

In Unified CCE Configuration Manager, expand the Outbound Options menu, then open the Outbound Option Query Rule component.

Step 2

Click Retrieve.

Step 3

Click Add at the bottom of the list box area of the window.

Step 4

Fill in the appropriate information on the Query Rule General tab page. See the online help for details of the fields on this tab.

Step 5

Click Save.


Delete a Query Rule

When you delete a query rule, the corresponding Dialing List table is also deleted.

If you are using Outbound Option High Availability and either Side A or Side B is down when the rule is deleted, the corresponding table on that side is not deleted. However, when the side restarts, the table is then automatically deleted.

Create a Campaign

Use the Outbound Option Campaign tool to define or modify the settings that apply to a campaign. You can also add or delete a campaign through this tool.

You can define two types of campaigns: agent-based, and transfer to VRU. However, only one campaign type can be configured per campaign.

Before you create a campaign, first configure the following information:

  • A dialed number for accessing the agent reservation script

  • A dialed number for transferring the call to the VRU for AMD

  • A dialed number for transferring the call to the VRU for abandon treatment when no agents are available.

Perform the following steps to create a campaign.

Procedure


Step 1

In Unified CCE Configuration Manager, expand the Outbound Option menu, then open the Outbound Option Campaign component.

Step 2

Click Retrieve.

Step 3

Click Add at the bottom of the list box area of the window.

Step 4

Fill in the fields described on the following tabs. See the online help for detailed descriptions of the fields:

  1. Campaign General tab.

  2. Campaign Purpose tab.

  3. Query Rule Selection tab.

  4. Skill Group Selection tab.

  5. Call Target tab.

Step 5

Click Save.


Modification of Maximum Number of Attempts in a Campaign

You can recall customers who were previously not reached without having to import their phone numbers again by increasing the maximum number of attempts amount in the Maximum attempts field on the Campaign General tab page This option is useful if the campaign import is an append type instead of an overwrite type.


Note


Do not update the Maximum attempts field while the campaign is in progress. Modifying this option in the campaign configuration results in an update of all customer records that were not successfully contacted. The Campaign Manager can update only about 20 records per second, and no new customer records are delivered to the dialer for this campaign while this update is in progress.


You can view how many records have been closed and how many were successfully reached by using the Call Summary Count per Campaign Real Time report. See Reports for more information.

Maximum Attempts per Phone Number in a Record

If you want to dial all the phone numbers in a record at least once, set the EnableMaxAttemptsPerNumber registry key, which is created automatically. This key can be located at: HKEY_LOCAL_MACHINE\SOFTWARE\Cisco Systems Inc \ICM\ <instance-Name>\LoggerA\BlendedAgent\CurrentVersion and the default value is "0."

The registry key controls the behavior of the software to determine how the Max Attempts, that configured in each campaign, are used. The two values for EnableMaxAttemptsPerNumber are 0 and 1. When it is set to 0, the behavior does not change from previous releases. When it set to 1, the new behavior is enabled.

Enabling the new behavior causes each phone number associated with the record, to be dialed Max Attempt times. (When set to 0 the default behavior is to attempt each record Max Attempt times, where each number within the record is counted as an attempt.

Example

Assume that we have 2 records that are configured in a campaign. Record 1 has 3 numbers that are associated with it and record 2 has 2 numbers that are associated with it. Also assume that all call attempts fail to reach a voice connection.

John Smith 5551111 5552222 5553333

Jane Doe 6661111 6662222

When Max Attempts = 3 and EnableMaxAttempts= 0 all 3 numbers for John Smith will be dialed once, for a total of 3 attempts. First number for Jane Doe will be dialed twice and the second number dialed once, for a total of 3 attempts.

When Max Attempts = 1 and EnableMaxAttempts= 0. First number of John Smith and Jane Doe will be dialed.

When Max Attempts = 1 and EnableMaxAttempts= all 3 numbers for John Smith will be dialed once. All 2 numbers for Jane Doe will be dialed once.

When Max Attempts = 2 and EnableMaxAttempts= 1 all 3 numbers for John Smith will be dialed twice. All 2 numbers for Jane Doe will be dialed twice.

Notes on Editing a Campaign in Progress

You can edit most campaign configuration settings while a campaign is running. The changes take effect with new calls after the setting has been changed. However, do not edit the following settings while a campaign is in progress:

  • Do not modify the MaxAttempts value. Modifying this value while a campaign is in progress can cause a long delay in record retrieval and longer agent idle times.

  • Do not delete a skill group while a campaign is in progress.

Outbound Option Scripting

Outbound Option uses Unified CCE scripting configured on the Administrative Workstation to manage campaigns.

There are two types of scripts:

  • Administrative Scripts

  • Agent Reservation Routing Scripts

Administrative Scripts for Outbound Option

Outbound Option administrative scripts enable, disable, or throttle campaign skill groups for outbound campaigns. The scripts can also automatically close out a skill group for a specific campaign. The administrative scripts can use time or any other conditional factor that the script can access to close a skill group. You can perform this scripting at the skill group level to provide more flexibility for managing larger campaigns with multiple skill groups.

Enable a campaign skill group by setting the campaign mode to one of the available modes: Preview, Direct Preview, Progressive, or Predictive. Schedule an administrative script to run at regular intervals. Disable the campaign skill group in the administrative script by creating a script node to change the campaign mode to inbound for that skill group.

An administrative script controls a campaign skill group. You can only map a campaign skill group to one campaign at a time. Multiple administrative scripts controlling the same skill group can result in conflicting campaign mode requests.


Note


Both the Outbound API and administrative scripts can set the dialing mode for a campaign. The value set by the administrative script takes precedence over the value set by the API.


You can also use administrative scripts to control the percentage of agents that a campaign skill group can use. A script can also set whether to use a skill group for other campaigns or inbound calls.


Note


To allow the outbound control and percent configured values from Campaign Skill group (set by either the Configuration Manager Campaign Skill Group tab or the Campaign API) to apply without restarting the router. If you use an administrative script to set the outbound control and percent variables in operation and if you want to employ these configured value on the Campaign Skillgroup, set the outbound control and percent variable to -1 in the administrative script accordingly.


Note


You can set a default for the skill group dialing mode and reservation percentage in the Skill Group Selection dialog. A Set node in the administrative script can override these settings.


Routing Scripts for Outbound Option

Two types of routing scripts are described later in this document. One is for Agent Campaign and one is for VRU Campaign.

The Dialer uses Reservation scripts to reserve agents for specific outbound campaigns and personal callbacks. With this type of script, the Dialer makes a route request through its Media Routing Client using the configured dialed number for the campaign skill group. Each campaign has its own dialed number and reservation scripting. If an agent is not available, the default behavior is for the script to end the call and the Dialer receives an error. The Dialer retries the reservation request when it sees available agents in the skill group statistics as described in the Dialer description earlier in this chapter. You can queue reservation calls which have scripts that distribute agents across campaigns when those agents are skilled for multiple, active campaigns.

A call can be transferred to a VRU as part of a transfer to VRU campaign, or transferred to non-VRU campaigns for answering machine or abandons. A transfer to VRU campaign places a route request call to a CTI Route Point dialed number on the Agent PG. This enables the campaign to transfer the call context of the customer call to the VRU. You can add incoming call context to the call while the VRU treats the call.

Set Up Reservation Script

Use the Script Editor application to create a reservation script that uses the dialed number for the Outbound Routing Type and routes through one of the following methods:

  • Using a Select node to the previously configured skill group.

  • Using Dynamic Route Target by ID in the Skill Group node.

Script for Agent Campaign

The following steps and accompanying diagrams provide an example of how to create a script for an agent campaign.

Procedure

Using the Call Type Manager in Script Editor, associate the MR (and Personal Callback, if used) dialed numbers with the configured call type and newly created reservation script.

Figure 1. Sample Script for Agent Campaign Without Personal Callback (Using Select Node)


Figure 2. Sample Script for Agent Campaign Without Personal Callback (Using Dynamic Route Target by ID)


Map Scripts, Call Types, and Dialed Numbers

After you create a reservation script, associate that script with the call type and dialed number configured for the campaign. To make the association, perform the following steps.

Procedure

Step 1

In Script Editor, open the script.

Step 2

Select Script > Call Type Manager. A Call Type Manager dialog opens.

Step 3

On the Schedules tab, select the call type from the Call Type drop-down list.

Step 4

Click Add. A Call Type Schedule dialog opens.

Step 5

Select the script and click OK.

Step 6

Click OK to save your changes and close the Call Type Manager.


Send to VRU

If your solution uses Unified CVP Type 10, you can use the Send to VRU node in a routing script for a VRU campaign. The following example illustrates creating a script for a VRU campaign.

Procedure


Step 1

Use the Dialed Number tool to associate the MR dialed numbers with the configured call type.

Step 2

Use the Script Editor Call Type Manager to associate the call type with the newly created reservation script.

Note


See the Script Editor online help for information about using the Script Editor application.


Routing Script for Send to VRU

Configure a Transfer to VRU Script


Note


For a solution that uses Type 2 IVR (such as IPIVR) or any other solution that requires a translation route to IVR, configure a translation route before you start this procedure. See the Cisco Unified Contact Center Enterprise Installation and Upgrade Guide for instructions.


Perform the following steps to configure a Transfer to VRU script for Outbound Option campaigns.

Procedure


Step 1

Use the Script Editor to create a Transfer to VRU script that includes Translation Route to VRU, Queue to Skill Group, Run Ext. Script, and Set Variable nodes. The following diagram illustrates an example.

Figure 3. Sample CVP Routing Script


Note

 
  • The Transfer to VRU feature requires that a translation route to a skill group must be specified in a Transfer to VRU script. It also requires that the translation route must point at a Queue to Skill node.

  • See the Scripting and Media Routing Guide for Cisco Unified ICM/Contact Center Enterprise for task-based information about using Script Editor. See the Script Editor online help for detailed information about the Script Editor options.

Step 2

To implement answering machine detection as part of this transfer to VRU script, include an IF node that evaluates the value of the BAResponse variable and prescribes a call treatment depending on the CPA result of the call (whether the call detected voice or an answering machine).

The following is an example of such an If node.

Figure 4. BAResponse If Node


Step 3

Create a VRU script. (Be aware that this script is different from a reservation script.) The VRU script contains a list of commands that tell the VRU what type of information to play to the customer, such as a prerecorded message using a .wav file. The VRU script can also collect survey information by requesting the customer press specific numbers. Consult your Unified CVP, IP/IVR, or documentation for your other third-party VRU for more information.

Step 4

Associate the reservation script with the call type and dialed number configured for the campaign.


Set Up an Administrative Script

Use the Script Editor application to create an administrative script for each skill group to set the OutboundControl variable and the skill group reservation percentage. The Outbound Option Dialer uses the value of this variable to determine which mode each skill group uses.


Note


  • If the script does not set the OutboundControl variable, the skill group defaults to inbound.

  • Make sure that the routing client for the translation route labels is Unified CM, which makes the outgoing call.


Perform the following steps to create the administrative script:

Procedure


Step 1

Open the Script Editor application.

Step 2

Select File > New > Administrative Script.

Step 3

Create an administrative script.

You can use one script to control all Outbound Option skill groups or multiple scripts to control multiple Outbound Option skill groups. If you want to control skill groups at different times of the day, you need multiple administrative scripts. But, if you are going to initialize the groups all in the same way, you need only one script with multiple Set nodes.

Step 4

Set up the script with the following required nodes: Start, Set Variable, and End.

The following diagram displays a simple administrative script that sets both the OutboundControl variable and the outbound percentage for a skill group. A script in a production call center is typically more complex, perhaps changing these variables due to time of day or service level.

Figure 5. Sample Administrative Script


Note


A transfer to VRU requires an IF node in the administrative script to disable it if the VRU is not available. Also, to ensure timely responses to VRU outages, set the administrative script to run every minute.

Step 5

Set the OutboundControl variable. Setting this variable enables contact center managers to control the agent mode. Set this variable to one of the values listed in the following table.

Note


You can set a default for the skill group dialing mode and reservation percentage in the Skill Group Selection dialog. A Set node in the administrative script can override these settings.

Table 2. OutboundControl Variable Values

Value String

Description

INBOUND

Agents take inbound calls only. The skill group cannot do Outbound Option dialing.

PREDICTIVE_ONLY

Agents in the skill group only take outbound Predictive calls.

PREVIEW_ONLY

Agents in the skill group only take outbound Preview calls.

PROGRESSIVE_ONLY

Agents in the skill group only take outbound Progressive calls.

PREVIEW_DIRECT_ONLY

Agents only place outbound calls and hear ringtones, such as phone ringing or busy signal.

PREDICTIVE_BLENDED

Agents in the skill group can take inbound calls and also take calls for a predictive campaign.

PREVIEW_BLENDED

Agents in the skill group can take inbound calls and also take calls for a preview campaign.

PROGRESSIVE_BLENDED

Agents in the skill group can take inbound calls and also take calls for a progressive campaign.

PREVIEW_DIRECT_BLENDED

Agents in the skill group can take inbound calls and also take calls for a preview direct campaign.

Note


If you remove a Set node from the administrative script, the OutboundControl variable maintains the value from the last time that the script ran. However, when the Central Controller restarts, the value resets to INBOUND.

Step 6

Set the OutboundPercent variable in the same administrative script. Select the OutboundPercent variable in the Set Properties window and enter the agent percentage in the Value field. This variable controls the percentage of active agents in the skill group to use for Outbound Option dialing. For example, for an OutboundPercent of 50% with 100 active agents in the skill group, the system allocates 50 agents for Outbound Option dialing. You can use the rest of the agents for inbound or other active campaigns.

Note

 
  • The OutboundPercent variable also applies to Transfer To VRU campaigns, by controlling the percentage of VRU Ports that are considered for the campaign skill group.

  • This variable does not allocate specific agents for Outbound Option dialing, just a total percentage. The default is 0%.

Step 7

Schedule the script.

  1. Select Script > Administrative Manager. An Administrative Manager dialog box appears.

  2. Click Add.

  3. On the Script tab, select the administrative script.

  4. On the Period tab, specify the run frequency of the script. (Guideline for frequency is every minute of every day.)

  5. Optionally, enter a description on the Description tab.

  6. Click OK to close the Add Administrative Schedule dialog box.

  7. Click OK to close the Administrative Manager.


Sample Administrative Scripts

The following sections describe sample administrative scripts.

Administrative Script: TimeBasedControl

The following figure is a simple example of setting skill group modes for maximizing the resource utilization in a call center based on time of day.

Figure 6. TimeBasedControl Script


This script divides the day into three parts:

  • Peak Inbound Traffic Period (8:00 AM to 12:00 PM): During this time, the skill group variable is set to INBOUND only, because more agents are required to handle inbound calls.

  • Off-Peak Traffic Period (2:00PM to 4:00PM): During this time, the skill group variable is set to PREVIEW_BLENDED, so that when an agent is not on an inbound call, Outbound Option presents the agent with Preview calls. While the agent is reviewing the calls and when the agent is on a Preview outbound call, Unified ICM software does not route an inbound call to that agent. As soon as the agent is finished with the Preview call, Unified ICM software routes an inbound call to the agent. If there are no inbound calls, Outbound Option reserves the agent for another outbound call.

  • All Other Periods: For the rest of the day, the skill group variable is set to PREDICTIVE_ONLY so that if any agents are logged-in, Outbound Option immediately reserves the agents for outbound calls.

Administrative Script: Transfer to VRU Campaign

A Transfer to VRU campaign sample script is similar to the sample script for TimeBasedControl. The only skill group modes allowed for Transfer to VRU campaign, however, are PREDICTIVE_ONLY or PROGRESSIVE_ONLY.

(Optional) Configure Personal Callbacks

Personal Callback is an optional feature in Outbound Option. Personal Callback enables an agent to schedule a callback to a customer for a specific date and time. A personal callback connects the agent who originally spoke to the customer back to the customer at the customer-requested time.

This section describes how to configure your system to handle personal callbacks. When you create campaigns, you enable the callback feature individually for each campaign.

You configure some personal callback options through the registry. If a personal callback record is not associated with a campaign, the record follows the rules configured within the registry.

Procedure


Step 1

In the Unified CCE Configuration Manager, select Outbound Option.

Step 2

In the Campaign tool, select the Campaign General tab.

Step 3

Open a predefined campaign.

Step 4

Check personal callback.

Personal callback is now enabled. Next, you configure the personal callback registry entries.

Step 5

Configure a call type for personal callback.

For information about creating call types, see the administration documentation.

Step 6

Create a dialed number with the name PersonalCallback on the outbound routing client.

For information about configuring dialed numbers, see the administration documentation.

Step 7

Open regedit on Logger Side A and Logger Side B.

Step 8

Navigate to the following locations: HKEY_LOCAL_MACHINE\SOFTWARE\Cisco Systems, Inc.\ICM\<instance name>\LoggerA\BlendedAgent\CurrentVersion and HKEY_LOCAL_MACHINE\SOFTWARE\Cisco Systems, Inc.\ICM\<instance name>\LoggerB\BlendedAgent\CurrentVersion in the Outbound Option registry.

Step 9

Configure the personal callback registry entries listed in the following table. (Enter the values in decimal format.)

Note


Outbound Option enforces at runtime the minimum and maximum values in the table. The registry does not validate the values.

Name

Default Value (integers)

Description

CallbackTimeLimit

15

Calculates the callback time range, in minutes, for each personal callback. Outbound Option queries the Personal Callback List for callback records, where the CallbackDateTime value is between the current time and the CallbackTimeLimit.

PersonalCallbackTimeToRetryBusy

1

Sets the amount of time, in minutes, that the Outbound Option Dialer waits before retrying a personal callback to a busy number. The valid range is from 1 to 10.

PersonalCallbackTimeToRetryNoAnswer

20

Sets the amount of time, in minutes, that the Outbound Option Dialer waits before retrying an unanswered personal callback. The valid range is from 5 to 60.

PersonalCallbackTimeToRetryReservation

5

Sets the amount of time, in minutes, that the Outbound Option Dialer waits before retrying to reserve an unavailable agent. The valid range is from 1 to 10.

PersonalCallbackMaxAttemptsDefault

5

Sets the maximum number of times a personal callback is attempted. The valid range is from 1 to 10. When the maximum attempts reach 0, the record is not tried again and the status is set to "M" (maxed out).

PersonalCallbackTimeToCheckForRecords

5

The interval time, in minutes, at which the Outbound Option Dialer checks the Campaign Manager for personal callback records. The valid range is from 1 to 30.

PersonalCallbackDaysToPurgeOldRecords

5

The number of days after the personal callback was scheduled (CallbackDateTime) to keep the record before purging it. The valid range is from 1 to 30.

PersonalCallbackRecordsToCache

20

The number of personal callback records to send to the Outbound Option Dialer at one time. The valid range is from 5 to 200.

PersonalCallbackSaturdayAllowed

0

Indicates whether personal callbacks are allowed on Saturdays:

  • 0: Personal callbacks are not allowed on Saturdays and are rescheduled for the next allowable day.

  • 1: Personal callbacks are allowed on Saturdays.

PersonalCallbackSundayAllowed

0

Indicates whether personal callbacks are allowed on Sundays:

  • 0: Personal callbacks are not allowed on Sundays and are rescheduled for the next allowable day.

  • 1: Personal callbacks are allowed on Sundays.

PersonalCallbackCallStatusToPurge

C, M

If needed, create this registry entry.

String containing the call status types to consider when purging old personal callback records. For example, if the string contains "C,M,F,L,I," all calls with these call statuses are purged from the database. (If the registry entry is missing, the default is assumed.)

Note

 
The call status values can optionally be delimited using a comma, a hyphen, a semicolon, or a colon. For more information about call status values, see the Database Schema Handbook for Cisco Unified Contact Center Enterprise at https://www.cisco.com/en/US/products/sw/custcosw/ps1844/prod_technical_reference_list.html.

PersonalCallbackNoAnswerRingLimit

4

If needed, create this registry entry.

The number of times a customer phone rings before classifying the call as an unanswered. The valid range is from 2 to 10.

Step 10

Create an enterprise skill group and an enterprise route.

Step 11

In Script Editor, create a routing script that sets up the Personal Callback reservation.

Include the following nodes:
  • Add a queue-to-agent node.

  • Add a Wait node after the Queue to Agent node. Use a value that is less than the TimeToWaitForMRIResponse Dialer registry setting. The default value is 600 seconds.

  • End the script in a Release Node, instead of an End Node, to limit "No Default Label" errors in the Router Log Viewer.

Figure 7. Personal Callback Reservation Script


Step 12

Configure the Queue to Agent node.


Create an Enterprise Skill Group

To use the Personal Callback feature, create the enterprise skill group for the agent using the Enterprise Skill Group List tool.

Procedure


Step 1

In the List tools, open the Enterprise Skill Group List tool.

Step 2

Create an enterprise skill group:

  1. In the Add Name field, type the enterprise name.

  2. Click Add.

  3. Select the skill group, and then click Save.

Step 3

In the Attributes tab, click Add to add the skill group or groups.

Step 4

Click Save.


Create an Enterprise Route

After you create the enterprise skill group for the agent, create an enterprise route. This route targets the enterprise skill group.

Procedure


Step 1

In the List tools, open the Enterprise Route List tool.

Step 2

Create an enterprise route:

  1. In the Name field, type the enterprise route.

  2. Click Add.

  3. Select the route, and click Save.

Step 3

In the Attributes tab, add the route.

Step 4

Click Save.


Configure Queue to Agent Node

Procedure


Step 1

In Script Editor, double-click the Queue to Agent node.

Step 2

Press Change in the Queue to agent type section.

Step 3

Click Lookup agent reference by expression, then click OK.

Step 4

In the Agent Expression column, enter Call.PreferredAgentID.

Step 5

Select the enterprise skill group.

Step 6

Select the enterprise route.

Step 7

Confirm that the Peripheral column is left blank.

Step 8

Click OK to save the Queue to Agent node.

Step 9

Save and then schedule the script. When scheduling the script, use the call type that is configured for personal callback.


Final Configuration and Verification

Configure Translation Route for Use with SIP Dialer

Configure the translation route for the transfer-to-IVR campaign or the agent campaign to transfer a connected outbound call with ECC call variables from the SIP Dialer to a VRU Peripheral.

You need configure the network VRU as Type 2 for IP IVR, or as Type 10 for CVP.

For more information about configuring the translation routes, see the Translation Route Wizard online help and Configuration Guide for Cisco Unified ICM/Contact Center Enterprise at https://www.cisco.com/c/en/us/support/customer-collaboration/unified-contact-center-enterprise/products-installation-and-configuration-guides-list.html.

Multi-Tenant Customer Instances Configuration

Outbound Option Multi-Tenant is no longer supported beginning with Release 9.0(1).

SIP Dialer Recording Parameters Configuration

When recording is enabled in a campaign on the SIP dialer, the number of recording files that result can be large. The following table lists registry settings that you can adjust to regulate the number of recording sessions and the maximum recording file size.

Registry Setting

Default Setting

Description

MaxAllRecordFiles

500,000,000

The maximum recording file size (in bytes) of all recording files. per SIP Dialer.

MaxMediaTerminationSessions

200

The maximum number of media termination sessions per SIP Dialer if recording is enabled in the Campaign configuration.

MaxPurgeRecordFiles

100,000,000

The maximum recording file size (in bytes) that the SIP Dialer deletes when the total recording file size, MaxAllRecordFiles, is reached.

MaxRecordingSessions

100

The maximum number of recording sessions per SIP Dialer if recording is enabled in the Campaign configuration.

Recording files are in the HKEY_LOCAL_MACHINE\SOFTWARE\Cisco Systems, Inc.\ICM\<customer instance>\Dialer directory.


Note


Only the G.711 codec is supported for recording. To record outbound calls, configure the G.711 on the voice gateway.

Verification of Dialed Number DN/Script Selector Configuration

Outbound Option places agents in the Reserved state before using them for an outbound call. The dialer uses the dialed number to route to an agent. The following procedure describes how to verify that this mechanism works properly.

Verify DN/Script Selector Configuration

When an Outbound Option Dialer is installed in a Unified CCE environment, the dialer uses the dialed number to make routing requests through the Media Routing (MR) Peripheral Gateway. The following verification steps assume that you have completed all the applicable configuration and reservation script generation.

Procedure

Step 1

Log in an agent to a skill group participating in an outbound campaign, and make the agent available. (Note the dialed number, which was configured in the Skill Group Selection tab in the Campaign component.) If a different dialed number is used for predictive and preview calls, make sure to verify both dialed numbers.

Step 2

Run the Script Editor application and select the Call Tracer utility from the Script > Call Tracer menu. Select the routing client that is associated with the MR PG and select the Dialed Number.

Step 3

Press Send Call to simulate a route request and note the results. If a label was returned for the agent who was logged in above, the reservation script is working properly and the dialer can reserve agents through this script.


Verify Campaign Configuration

As a final step to verify that you configured your Outbound Option campaign correctly, create a small campaign of one or two entries that dial work phones or your mobile phone.