Video Contact Center

Video Contact Center

Video Contact Center provides high-quality video collaboration between customers and agents. Depending on how Video Contact Center is deployed, customers may connect with agents either from within the enterprise network or from devices outside the enterprise.

Packaged Contact Center supports the following Video Contact Center capabilities:

  • Video communication between agents and callers

  • Video on Hold - Videos are played to callers when they are placed on hold by an agent.

  • Video-in-Queue - Video-in-Queue can play videos before and while a caller is in queue. This feature presents high-definition video prompts that allow callers to navigate a video menu using DTMF keys.

  • Cisco MediaSense recording - Packaged CCE supports audio recording; video recording and playback is not supported.

Packaged CCE supports four Video Contact Center deployments:

  1. Video Contact Center for enterprise callers

  2. Video Contact Center with Jabber Guest

  3. Remote Expert Mobile

  4. Remote Expert Branch, including Kiosk/Immersive


Important


This guide does not discuss Remote Expert Branch or Remote Expert Mobile.

For all information about the Remote Expert Mobile deployment for Packaged CCE, see the Cisco Contact Center Solutions and Unified Communications Manager Solution Configuration Guide for Remote Expert Mobile, available at https://www.cisco.com/c/en/us/support/customer-collaboration/remote-expert-mobile/tsd-products-support-series-home.html.


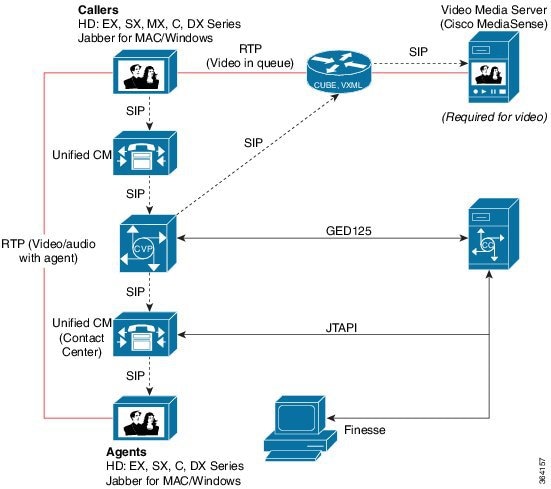
1. Video Contact Center for Enterprise Callers

You can deploy Video Contact Center so that only callers within the enterprise network can engage in video calls with agents. These callers use endpoints that are registered to the Cisco Unified Communications Manager. For example, company employees can have a video call with your IT help desk.

To transition from a voice contact center to a Video Contact Center for enterprise callers, Packaged CCE requires the following components:

  • Cisco MediaSense to store, stream, and play video content. MediaSense can also record video calls.

  • Telepresence MCU Video Conference Bridge to facilitate multi-party video conferences.

  • Cisco Unified Border Element (Cisco UBE) that connects video calls from Unified CVP to Cisco MediaSense to queue the calls or play video prompts.

  • Video endpoints for agents and callers

For example, this is a traditional voice deployment:


After the transition to Video Contact Center for enterprise callers, the deployment looks like this:


See the Contact Center Enterprise Compatibility Matrix at https://www.cisco.com/c/en/us/support/customer-collaboration/packaged-contact-center-enterprise/products-device-support-tables-list.html for the supported versions of these components.

2. Video Contact Center with Jabber Guest

Packaged Contact Center Enterprise supports Video Contact Center with Jabber Guest as an add-on to Video Contact Center. In Video Contact Center with Jabber Guest, callers outside the enterprise network use a Cisco Jabber application or browser client for video calls with agents.

In addition to the components required for enterprise callers, Video Contact Center with Jabber Guest deployments also requires these components:

  • Cisco Jabber Guest Server, to connect Jabber client video callers with agents.

  • Cisco Expressway Edge and Core, to enable Jabber client traffic to reach the Jabber Guest Server through the enterprise's firewall.

After the transition to Video Contact Center with Jabber Guest, the deployment looks like this:


See the Contact Center Enterprise Compatibility Matrix at https://www.cisco.com/c/en/us/support/customer-collaboration/packaged-contact-center-enterprise/products-device-support-tables-list.html for the supported versions of these components.

Video Prerequisites

Licenses

Before installing Video Contact Center solutions, acquire the necessary licenses for these products:

  • Cisco Telepresence MCU video conference bridge

  • Cisco MediaSense

  • Cisco Unified Border Element

  • Cisco Jabber Guest Server - Video Contact Center with Jabber Guest deployments only

  • Expressway Edge and Core - Video Contact Center with Jabber Guest deployments only

Cisco Telepresence MCU Video Conference Bridge License Requirements

For license requirements for the supported Cisco Telepresence MCU conference bridges, see the Ordering Guide for Cisco Customer Contact Solutions at this location on cisco.com.

Cisco MediaSense License Requirements

You need the following licenses to run Cisco MediaSense with Video Contact Center:

  • Media Sense Base License for the number of concurrent non-redundant sessions required.

  • Video Session Licenses for the number of concurrent non-redundant video sessions required.

  • MediaSense Server Software Licenses for the Primary and Secondary servers that provide database and media operations.

  • MediaSense Expansion Server Software Licences for servers that provide additional capacity for media operations.

Additional ordering and licensing information is available to Cisco Partners in the following documents:

Cisco Unified Border Element License Requirements

A software license is required to run Cisco Unified Border Element. If you have already deployed Cisco UBE, you can re-use the existing ports. However, if you need additional sessions to support Video Contact Center, you need to purchase additional Cisco UBE ports. See the Cisco Unified Border Element and Gatekeeper Ordering Guide at https:/​/​www.cisco.com/​en/​US/​prod/​collateral/​voicesw/​ps6790/​gatecont/​ps5640/​order_​guide_​c07_​462222.html.

Cisco Jabber Guest License Requirements - Video Contact Center with Jabber Guest Deployments Only

Cisco Jabber Guest is licensed and obtained through User Connect Licensing (UCL), Cisco Unified Workspace Licensing (CUWL), and other ordering mechanisms. Contact a sales representative from a Cisco partner or from Cisco for ordering details. No license keys are provided or required for the Cisco Jabber Guest software.

Cisco Expressway License Requirements - Video Contact Center with Jabber Guest Deployments Only

The following table describes the license requirements for using Cisco Expressway with Cisco Jabber Guest.

Table 1. License Requirements for Using Cisco Expressway with Cisco Jabber Guest

License

Requirement

Note

Rich Media Session licenses

2 Rich Media Session licenses are required per Cisco Jabber Guest session:
  • 1 Rich Media Session license on the Cisco Expressway-E for each Cisco Jabber Guest session

  • 1 Rich Media Session license on the Cisco Expressway-C for each Cisco Jabber Guest session

TURN relay license

TURN licensed on Cisco Expressway

When you order Cisco Expressway, a TURN relay license is included.

Advanced Networking (AN) license

If Cisco Jabber Guest is installed in a dual-NIC deployment, an AN license is required on Cisco Expressway.

When you order Cisco Expressway, an AN license is included.

Video Contact Center Restrictions

Packaged CCE supports Video Contact Center solutions with the restrictions described in this table.


Note


Packaged CCE Video Contact Center does not support any features that are not included in this document.


Restriction Type Restriction

Packaged CCE features

Packaged CCE Video Contact Center solutions do not support the following features:

  • Agent Greeting

  • Whisper Announcement

  • Mobile Agent

  • Silent Monitor

  • Remote Silent Monitor

  • Video on Hold (caller-initiated)

  • Outbound Dialer

  • Courtesy Callback

Jabber endpoints

Use Jabber as a video endpoint only. As for all endpoints, all call controls (except for answer, mute, and hangup) must be done via the agent desktop.

Audio codec

Cisco MediaSense does not support G.711 a-law codec for video playback.

Video resolution scaling

MediaSense does not support video resolution scaling. For example, a 320p video plays at 320p on every device, and a 1080p video plays at 1080p on every device. Supported devices properly handle any necessary up- or down-scaling themselves.

Agent and supervisor desktop features

Agent desktops support a limited set of features for video agents, as follows:

  • Standard actions — Agent log in, Agent State (Ready, Not Ready), Dial, Answer, Release, and CTI data.

  • Additional services — Hold, Retrieve, Alternate, Reconnect, and Blind/Consult Transfer/Conference.

Agent desktops do not support these features for video agents:

  • Silent Monitor

  • Supervisor Barge-In

  • Intercept

Supported Video Formats and Codecs

Cisco MediaSense supports the following formats and codecs for uploaded videos:

  • MP4 video with up to 1080p resolution

  • H.264 video codec

  • AAC-LD MP4A-LATM audio codec

Videos play back using the AAC-LD MP4A-LATM, G.711 mu-law, or G.722 codec, depending on the endpoint.

Set Up Video Contact Center Components

You must set up Cisco Packaged Contact Center Enterprise before installing and configuring additional Video Contact Center components.

See the Cisco Packaged Contact Center Enterprise Installation and Upgrade Guide at https://www.cisco.com/c/en/us/support/customer-collaboration/packaged-contact-center-enterprise/products-installation-guides-list.html.

Video Contact Center

Install and configure these components for all Video Contact Center deployments. This table includes links to installation and configuration instructions for each component, and notes specific to Video Contact Center configuration.

Component Task

Related Document

Notes

Deploy Cisco UBE

Cisco IOS Voice Command Reference

Confirm that Cisco UBE is enabled on the system. In the terminal window, type:
show cube status

If Cisco UBE is disabled, type the following text to enable it:

Voice service voip
				Mode border-element
				Allow-connections sip to sip

Install and configure Cisco MediaSense

Installation and Administration Guide for Cisco MediaSense at https://www.cisco.com/c/en/us/support/customer-collaboration/mediasense/tsd-products-support-series-home.html

The system default incoming call configuration in MediaSense is set to Record Audio Only. Change this setting to Record Audio and Video in order to record video calls.

Follow the instructions to Edit the System Default Incoming Call Rule in the Administer and Configure MediaSense chapter to change this setting.

Integrate MediaSense and Cisco UBE

Installation and Administration Guide for Cisco MediaSense at https://www.cisco.com/c/en/us/support/customer-collaboration/mediasense/tsd-products-support-series-home.html

Follow the instructions for MediaSense Setup with Cisco Unified Border Element in the Administer and Configure MediaSense chapter.

Be sure to add the username for the AXL Administrator to the Standard Unified Communications Manager Administrators group and Standard AXL API Access roles in Unified Communications Manager, if necessary.

Configure Unified Communications Manager for the Cisco Telepresence MCU conference bridge

Cisco TelePresence MCU 45X0, 53X0 and MCU MSE 8510 Deployment Guide at https://www.cisco.com/c/en/us/support/conferencing/telepresence-mcu-5300-series/products-installation-guides-list.html

Follow the instructions in the Deploying an MCU as a Unified CM media resource section.

Video Contact Center with Jabber Guest

For Video Contact Center with Jabber Guest deployments, install and configure these additional components. This table includes links to installation and configuration instructions for each component, and notes specific to Video Contact Center with Jabber Guest configuration.

Component Task

Related Document

Installation and Configuration Notes

Deploy Cisco Expressway Edge and Expressway Core (Expressway-C and Expressway-E), including firewall configuration

Cisco Expressway Basic Configuration Deployment Guide at https://www.cisco.com/c/en/us/support/unified-communications/expressway-series/products-installation-and-configuration-guides-list.html

Cisco Expressway on Virtual Machine Installation Guide at https://www.cisco.com/c/en/us/support/unified-communications/expressway-series/products-installation-guides-list.html

Deploy Expressway-C and Expressway-E before installing and configuring Cisco Jabber Guest Server. Once installed, confirm the configuration details using the appendices listed in the Cisco Expressway Basic Configuration Deployment Guide.

Install and Configure Cisco Jabber Guest Server

Cisco Jabber Guest Installation and Administration Guide at https://www.cisco.com/c/en/us/support/unified-communications/jabber-guest/tsd-products-support-install-and-upgrade.html

Follow the instructions for the Dual NIC Deployment.

Skip any steps that you completed while setting up the Expressway components earlier. Review the instructions in the Cisco Jabber Guest Installation and Administration Guide to verify that you correctly configured the Expressway-E and Expressway-C.

Configure Video-in-Queue

Video-in-Queue (VIQ) is an optional feature in Unified CVP. Depending on configuration, the caller interacts through high-definition video prompt or navigates a video menu using DTMF keys. The following figure displays the topology and call flow for an enterprise deployment.

  1. New call from Unified CM to Unified CVP.

  2. New call to Packaged CCE from Unified CVP.

  3. Play Unified CVP Studio video application.

  4. Unified CVP sends the call to the Cisco UBE/VXML Gateway.

  5. Unified CVP VXML Server application instructs VXML Gateway to connect to specific dialed number (DN).

  6. Cisco UBE sends call to Video Media Server with that DN. Caller gets static video.

  7. Agent is now available.

  8. Unfied CVP sends call to an agent.

The Unified CVP Studio VideoConnect element plays a specific video prompt for video endpoints. VideoConnect also collects and integrates the DTMF input during video-prompt playback with the Unified Call Studio or Unified CCE scripting environment.


Note


Video-in-Queue does not play during a Unified Communications Manager Failover.


Note


When setting up the Video-in-Queue for Unified CVP, set the MediaSense Incoming Call Configuration > Action to play once.

Video-in-Queue Configuration Sequence

To set up Video-in-Queue, perform the following tasks:

Sequence

Task

Notes
Configure Cisco Unified Communications Manager

1

Configure the SIP Trunk to MediaSense

2

Configure Video on Hold

Configure Cisco MediaSense

3

Upload Video File to play to callers

4

Associate the Dialed Number with the Video File

The Dialed Number for the video must match the following settings on other components:
  • VXML/Cisco UBE gateway dial peer configuration: destination-pattern

  • Unified CVP Call Studio Script: VideoConnect element VideoMedia Server DN setting

  • Packaged CCE routing script: "video_id" value for the Set variable that points to the Unified CVP Studio script for Video-in-Queue

Configure Cisco UBE/VXML Gateway

5

Configure Cisco Unified Border Element/VXML Gateway for Video to connect a dial-peer to MediaSense and configure video capabilities on the gateway.

The destination-pattern must match the pattern used for the Dialed Number that you associated with the uploaded video in MediaSense Administration.

Write the Cisco Unified CVP Call Studio Script

6

Create Unified CVP Call Studio Script for Video-in-Queue

Write the Packaged CCE Routing Script

7

If necessary, create a new dialed number and call type using Unified CCE Administration for the Video-in-Queue routing script you will create in the next step.

8

Create Script Editor Routing Script for Video-in-Queue that invokes the Unified CVP Call Studio script.

The "application" value in the Set variable must be set to the name of the Unified CVP Call Studio script.

The "video_id" value for the Set variable must the Dialed Number for the video in MediaSense Administration.

Configure Unified Communications Manager

After the postinstallation process for a Cisco MediaSense server, access your Unified CM server. In Unified CM Administration, configure the SIP Trunk and video endpoints.

To configure Unified CM for video on hold, see the section on video on hold.

Configure the SIP Trunk to MediaSense

Video Contact Center requires two Unified Communications Manager SIP Trunks:

  • A SIP trunk to Unified CVP to handle the Contact Center routing and VXMLGW interactions. Video Contact Center uses the SIP trunk to Unified CVP that is already configured as part of Packaged CCE.

  • A SIP trunk to MediaSense for forking calls via Cisco UBE.

You must set up the SIP trunk to MediaSense.

Procedure

Step 1

Login to Unified CM as an Administrator user.

Step 2

Click Device > Trunk.

Step 3

Click Add New.

Step 4

Select SIP Trunk from the Trunk Type drop-down menu.

Step 5

Leave the Device Protocol set to SIP.

Step 6

Select None(Default) from the Trunk Service Type drop-down menu.

Step 7

Click Next.

Step 8

Enter the Device Name and Description for the SIP trunk, and Destination Address for MediaSense server.

Step 9

Select a Device Pool from the Device Pool drop-down menu.

Step 10

In the SIP Information section, enter a destination address for the MediaSense server in the Destination field.

Step 11

Select Non Secure SIP Trunk Profile from the SIP Trunk Security Profile drop-down menu.

Step 12

Select the appropriate SIP profile for your deployment from the SIP Profile drop-down menu.

Step 13

Click Save.


Provision Video Endpoints

Provision your video endpoints by following the documentation for your endpoints and the Cisco Unified Communications Manager Administration Guide at https://www.cisco.com/c/en/us/support/unified-communications/unified-communications-manager-callmanager/products-maintenance-guides-list.html.

This section provides additional configuration necessary for video endpoints.

Configure Multiline Settings for Video Phones

You configure multiline settings for video phones in both Unified CCE Administration and Unified Communications Manager Administration. After changing the settings, you must restart the Peripheral Gateway services on the Side A and Side B Unified CCE PGs.

Procedure

Step 1

Log in to Unified CCE Administration as an Administrator, and perform the following steps:

  1. Navigate to Overview > Call Settings > Miscellaneous > Main Site tab.

    For 4K and 12K deployments, this system-level site specific configurations for agents are performed on the Configuration Manger tool. For more information, refer the Configuration Manager online help.

  2. Select All Lines from the Agent Phone Line Control drop-down menu.

  3. Click Save.

Step 2

On the Unified Communications Manager publisher, log in to Unified CM Administration as an Administrator, and perform the following steps:

  1. Navigate to Cisco Unified Communications Manager Administration > Bulk Administration.

  2. Use the Unified Communications Bulk Administration Tool to modify the device profiles for all phones as follows:

    • Set Maximum Number of Calls to 2. This value indicates that the phones do not allow multiple calls per line.

    • Set Busy Trigger to 1. This value indicates that if the line is in use, other calls presented to that line are rejected with a busy cause.

    For more information about the Unified Communications Manager Bulk Administration Tool, see the Cisco Unified Communications Manager Bulk Administration Guide at https://www.cisco.com/c/en/us/support/unified-communications/unified-communications-manager-callmanager/products-maintenance-guides-list.html.

Step 3

Restart the Peripheral Gateway services as follows:

  1. On the Side A Unified CCE PG, use the Unified CCE Service Control tool to restart PG1A and PG2A.

  2. On the Side B Unified CCE PG, use the Unified CCE Service Control tool to restart PG1B and PG2B.


Set the Default Maximum Session Bit Rate for Video Calls

Unified Communications Manager Region settings are set by default to a maximum session bit rate of 384 kbps for video calls. This bit rate does not support HD video. You must change the default value to a value higher than 6000 kbps.

Procedure

Step 1

In Cisco Unified Communications Manager Administration, navigate to System > Region Information > Region.

Step 2

Enter Default in the text field and click Find.

Step 3

Click Default in the results.

Step 4

In the Modify Relationships to other Regions > Maximum Session Bit Rate for Video Calls section, select the kpbs radio button and enter a value higher than 6000.

Step 5

Click Save.


Configure Cisco MediaSense

Use a Video Media Server to upload, store, and play back video prompts. Cisco MediaSense is the Video Media Server that provides network-based multimedia capture, streaming, and recording. Cisco MediaSense records conversations on the network rather than on a device. This process simplifies the architecture, lowers costs, provides optimum scalability, and facilitates use by analytics applications from Cisco technology partners.

Upload Video File

After installing Cisco MediaSense, upload a video MP4 file.

Procedure

Step 1

Go to Administration > Media File Management and click Add.

Step 2

Type in the Title (filename) and Description, and then browse to the location of the video MP4 file.

Step 3

Click Save to upload the video file to MediaSense server.


What to do next

Associate the file with a new dialed number.

Associate the Dialed Number with the Video File

Once you upload a video file, associate the file with a dialed number.

Procedure

Step 1

Go to Administration > Incoming Call Configuration and click Add.

Step 2

Click Address, and type the address of the appropriate dialed number.

Step 3

In the Action drop-down menu, choose Play Once.

Step 4

In the Media File drop-down menu, choose the appropriate video file.

The file is now associated with this dialed number.

Configure Cisco Unified Border Element/VXML Gateway for Video

This example Cisco Unified Border Element/VXML Gateway dial-peer code shows the configuration needed to connect a dial-peer to a Video Media Server:

application
service cvp_videoconnect flash:cvp_videoconnect.tcl

     voice service voip

allow-connections sip to sip
dial-peer voice 6000 voip
destination-pattern 6000T 
session protocol sipv2
session target ipv4:10.78.26.142
voice-class sip midcall-signaling block
dtmf-relay rtp-nte
codec g711ulaw
video codec h264
no vad

The following code from the example connects Cisco UBE/VXML Gateway to MediaSense:

application
service cvp_videoconnect flash:cvp_videoconnect.tcl

voice service voip

     allow-connections sip to sip

Important


You need to add the destination-pattern code to configure video capabilities on the gateway. The destination-pattern must match the pattern used for the Dialed Number that you associated with the uploaded video in MediaSense Administration.


Create Unified CVP Call Studio Script for Video-in-Queue

The CVP Studio VideoConnect element plays the specific video prompts for video endpoints. VideoConnect also collects and integrates the DTMF input during video prompt playback within a standard scripting environment.

When scripting in Cisco Unified Call Studio, unlike with ICM scripting, there is no reverse ability for the media files. The script writer can point to Properties > AudioSettings > Default Audio Path URI in the application and a single Media Server or the ACE VIP address for a farm of Media Servers.

The following graphic shows a sample CVP studio script:


Table 2. Settings
Name (Label) Required Default Notes
Video Media Server DN Yes None

Video Media Server Destination Number. Example: 5000.

Must be a valid dialed number on Cisco Unified Border Element and Video Media Server.

Digit Match Pattern No None

Pattern to use for matching incoming digit collection. Leave blank for no digit collection. Example: 600.

Must be a valid pattern for Cisco IOS gateway. The pattern format is the same as the destination-pattern format used in IOS gateway dial-peers.

No Input Timeout No No timeout

Maximum time (secs) to wait for caller input. Example: 15.

The following table describes the different ways a video call is completed/terminated:

Exit State Notes
End_of_media Video played to completion and the video server disconnected.
Caller_input Caller entered a DTMF string that matched the specified digit collection pattern.
No_input No input received before the input timeout expired on a digit collection pattern.
Error An error or other unexpected termination occurred.
Caller_hangup Caller disconnected while video in progress.

The following table describes element data that is created when one of these exit states is not completed:

Name Type Notes
callerdtmf string The digit string value captured.
result string Video call outcome.

Set Up Packaged CCE Routing Script for Video-in-Queue

To configure the Packaged CCE routing script for Video-in-Queue, complete these steps:

  1. Create a new dialed number (if required) for the Video-in-Queue script.

    Complete this step using the Dialed Number tool in Unified CCE Administration. For instructions, see the Cisco Packaged Contact Center Enterprise Administration and Configuration Guide at

    https://www.cisco.com/c/en/us/support/customer-collaboration/packaged-contact-center-enterprise/tsd-products-support-series-home.html.
  2. Associate the dialed number with either a new or existing call type.

    Complete this step using the Dialed Number and Call Type tools in Unified CCE Administration. For instructions, see the Cisco Packaged Contact Center Enterprise Administration and Configuration Guide at https://www.cisco.com/c/en/us/support/customer-collaboration/packaged-contact-center-enterprise/tsd-products-support-series-home.html,

  3. Create a routing script in Script Editor that invokes the Unified CVP Call Studio script that you created for Video-in-Queue.

  4. Schedule the routing script for the call type in the Script Editor Call Type Manager.

Create Script Editor Routing Script for Video-in-Queue

The following illustration is a sample Script Editor script for Video-in-Queue. In this script:

  • The Set variable is set to "application=VideoIVR;video_id=7000019" where application is the name of the Unified CVP Call Studio application, and video_id indicates the video to play. The video_id is the Dialed Number for the video in MediaSense Administration.

  • The RunExtScript node uses the standard "GS,Server,V" to invoke the Unified CVP VXML application.

  • You can receive the DTMF digits back from CVP Studio application in the "Call.user.microapp.FromExtVXML[0]".


After creating your script, schedule the routing script using Call Type Manager in Script Editor.

Schedule Routing Script

You schedule a script by associating it with a call type as follows:

Procedure

Step 1

Choose Script > Call Type Manager. The Call Type Manager dialog box opens.

Figure 1. Call Type Manager Dialog Box—Schedules Tab

Step 2

Select the call type to associate with the script.

Step 3

Click Add. The Add Call Type Schedule dialog box opens.

Step 4

In the Script tab, select the script to schedule:

Figure 2. Add Call Type Dialog Box - Script Tab

Step 5

In the Period tab, choose the information to define the period for which the schedule will be effective.

Figure 3. Add Call Type Schedule Dialog Box - Period Tab

Step 6

Optionally, in the Description tab, enter a description of the schedule.

Step 7

Click OK in the Add Call Type Schedule dialog box.

Step 8

Click OK in the Call Type Manager dialog box.

Note

 
The schedule is not saved until you click OK in the Call Type Manager dialog box.

Configure Video on Hold

After configuring the Cisco MediaSense server, Video on Hold (VOH) is available. Once you configure video on hold, videos are played to callers when they are placed on hold by an agent.

To upload new video files for VOH, you must perform the steps in the following sections:

Configure MediaSense for Video on Hold

Follow these instructions to add the new media file to the Media Resource Group List (MRGL) in Cisco MediaSense.

Procedure


Step 1

Login to MediaSense as an Administrator user.

Step 2

Click Administration > Media File Management.

Step 3

Click Add.

Step 4

Enter the Title, Description, and File.

Step 5

Click Save.

Step 6

Click Administration > Incoming Call Configuration.

Step 7

Click Add.

Step 8

Enter the Address and Action, and then choose your recently added media file.

Step 9

Click Save.

Step 10

Login to Unified CM to apply this MRGL to the Device Pool of the client side video endpoints.


What to do next

Configure Unified CM for Video on Hold.

Configure Unified CM for Video on Hold

After you add your new media file to MediaSense, follow these instructions to add a SIP trunk to the MediaSense server and add the Video on Hold server to the Media Resource Group List.


Note


In video conference use cases, the video conference bridge is a call leg on Cisco Unified Border Element. Ensure that you select the added Media Resource Group List (MRGL) on the SIP trunk to Cisco Unified Border Element.


Procedure


Step 1

Log in as an Administrator user.

Step 2

Click Device > Trunk.

Step 3

Click Add New.

Step 4

Click Trunk Type > SIP Trunk.

Step 5

Click Next.

Step 6

Enter the Device Name, Description, Device Pool, and Destination Address for the MediaSense server.

Step 7

Click Save.

Step 8

Click Media Resources > Video On Hold Server.

Step 9

Click Add New.

Step 10

Enter the Name, Description, Default Video Content Identifier (Address from previous section) and recently added SIP Trunk to the MediaSense server.

Alternatively, configure a call studio script to prompt the caller for a list of videos, and play the video matching the number the user selected.

Step 11

Click Save.

Step 12

Click Device > Trunk and select the trunk.

Step 13

Click Reset.

Step 14

Click Media Resources > Media Resource Group (MRG).

Step 15

Click Add New.

Step 16

Enter the Name and Description, and then move the new Video on Hold server to Selected Media Resources.

Step 17

Click Save.

Step 18

Click Media Resources > Media Resource Group List (MRGL).

Step 19

Click Find and then select an existing MRGL.

Step 20

Add the new MRG to the MRGL above the Music on Hold entry (for priority).