Phones
Phones
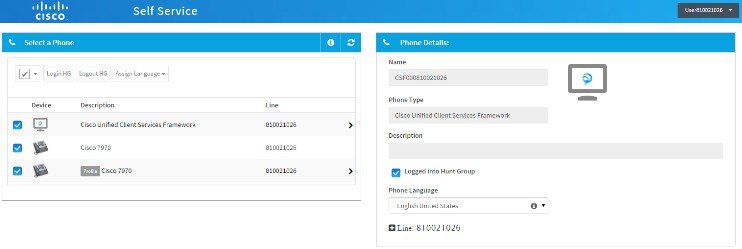
When you click the
![]() icon on the button bar or Quick Menu, the Phones screen appears as shown in the
following example.
icon on the button bar or Quick Menu, the Phones screen appears as shown in the
following example.
-
Logged into Hunt Group check box — If the phone is a member of a hunt group, you can check or uncheck the box have your phone ring when a call is made to the hunt group. If checked, the phone rings when a call is made to the hunt group. If unchecked, the phone does not ring when a call is made to the hunt group.
-
Phone Language — A dropdown list for phone language. Options available are determined by the language packs installed on the Cisco Unified Communications Manager. If a language is not chosen, the Unified Communications Manager default language is displayed on the phone LCD.
-
Line labels—Line labels allow you to identify your phone line so that you can distinguish between different phone lines. For example, you might label Line 1 with the text “Direct Line to Warehouse1”.
-
Missed calls—The Log Missed Calls check box is used to save a record of all missed calls in the Call History for the phone. If checked, missed calls are logged. If unchecked, missed calls are not logged.
-
Visual and audible Message Waiting Indication (MWI) setting—You can choose how you are alerted when there are messages waiting for you. Visual options are Use System Policy (indications set up by your system administrator), Prompt Only (a unique audible prompt that beeps when you pick up the phone), Light Only (a visual lamp that lights when messages are waiting), Light and Prompt (both visual and audible indicators), and None (no indicators). Audible options are Default, Off, or On.
-
Ring settings—Ring settings determine how your phone rings when an incoming call is received. You can configure different rings for when you are already on a call and when you are not on a call. Options are : Use System Default, Disable, Flash Only, Ring Once, Ring, and Beep Only.
Manage a Phone
Add a Personal Phone
The ability to add, edit, or delete personal phones is only available if your Self-Service interface has been set up for this capability. Contact your System Administrator for more information.
| Step 1 | Click
|
| Step 2 | In the Your
Personal Phones section of the screen, click
+ Add a Phone to add a new personal phone.
The Name/Phone screen appears:  |
| Step 3 | In the Description field, enter a name for your phone. |
| Step 4 | In the Number field, enter a number for your phone. |
| Step 5 | Set the Simultaneous Ring toggle switch to either Ring or Off as required. If Ring is selected, this phone rings simultaneously when your company phone rings. If Off is selected, simultaneous ring is disabled. |
| Step 6 | Click Next. The Line/Time Zone screen appears:  |
| Step 7 | Check or uncheck the Line check box. When checked, simultaneous ring is active for the selected lines. |
| Step 8 | Choose the required time zone for the phone from the drop-down list. |
| Step 9 | Check or uncheck the Set advanced timer options for simultaneous ring check box. If checked, configure the following: |
| Step 10 | Click Next. The Ring Schedule screen appears:  |
| Step 11 | Configure the phone's ring schedule: choose either Ring 24/7 or Add a ring schedule as follows: |
| Step 12 | Click Save when complete to add the phone or Cancel to cancel the changes. |
Changes made in Self-Service are automatically synchronized with Cisco Unified Communications Manager.
Edit a Personal Phone
| Step 1 | Click Dashboard on the button bar. |
| Step 2 | In the Your Personal Phones section of the screen, click the Edit icon next to the phone that you want to edit. |
| Step 3 | Edit the name of your phone in the Description field if required. |
| Step 4 | Edit the number of your phone in the Number field if required. |
| Step 5 | Edit the Simultaneous Ring (SR) On/Off toggle switch if required. |
| Step 6 | Click Next and edit other phone details as required. See Add a Personal Phone for details. |
| Step 7 | An alternative way to edit personal phone settings is to check the check box next to the phone you want to edit. You can then choose the relevant items to edit, such as Delete, SR On, SR Off, Ring 24/7, and Assign Ring Template. |
| Step 8 | Click Save when complete to implement the changes or Cancel to cancel the changes. Changes made in Self Service are automatically synchronized with Cisco Unified Communications Manager. |
 Feedback