Users

LDAP Synchronization Overview

Lightweight Directory Access Protocol (LDAP) synchronization helps you to provision and configure end users for your system. During LDAP synchronization, the system imports a list of users and associated user data from an external LDAP directory into the Cisco Unified Communications Manager database. In addition, you can configure a regular synchronization schedule to pick up any changes in your employee data.

User ID and Directory URI

When you synchronize your LDAP directory server with Cisco Unified Communications Manager, you can populate the end user configuration tables in both the Cisco Unified Communications Manager and the Cisco Unified Communications Manager IM and Presence Service databases with attributes that contain values for the following:
  • User ID—You must specify a value for the user ID on Cisco Unified Communications Manager. This value is required for the default IM address scheme and for users to sign in. The default value is sAMAccountName.


    Important


    If the attribute for the user ID is other than sAMAccountName and you are using the default IM address scheme in Cisco Unified Communications Manager IM and Presence Service, you must specify the attribute as the value for the parameter in your client configuration file as follows:

    The CDI parameter is UserAccountName.
    <UserAccountName>attribute-name</UserAccountName>

    If you do not specify the attribute in your configuration, and the attribute is other than sAMAccountName, the client cannot resolve contacts in your directory. As a result, users do not get presence and cannot send or receive instant messages.


  • Directory URI—You should specify a value for the directory URI if you plan to:
    • Enable URI dialing in Cisco Jabber.

    • Use the directory URI address scheme on Cisco Unified Communications Manager IM and Presence Service version 10 and higher.

Directory attribute synchronization

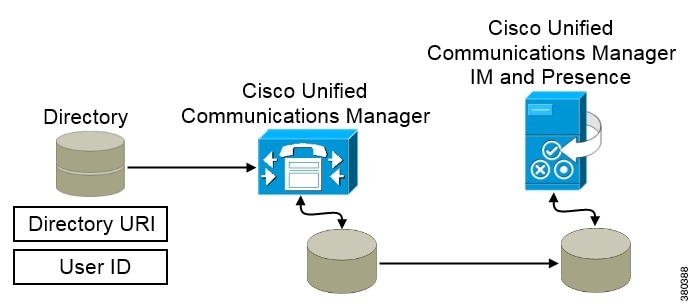
When Cisco Unified Communications Manager synchronizes with the directory source, it retrieves the values for the directory URI and user ID and populates them in the end user configuration table in the Cisco Unified Communications Manager database.

The Cisco Unified Communications Manager database then synchronizes with the Cisco Unified Communications Manager IM and Presence Service database. As a result, the values for the directory URI and user ID are populated in the end user configuration table in the Cisco Unified Communications Manager IM and Presence Service database.

Configure Users Workflow

Procedure

  Command or Action Purpose

Step 1

Activate Services

Turn on the required services to synchronize user settings from your LDAP directory with Cisco Unified Communications Manager and with the IM and Presence Service.

Step 2

Enable LDAP Directory Synchronization

Allow Cisco Unified Communications Manager to synchronize user settings from your LDAP directory. Select the attribute from your LDAP directory that you want Cisco Unified Communications Manager to synchronize with for the User ID.

Step 3

Configure LDAP Directory Sync

Configure Cisco Unified Communications Manager to synchronize with your LDAP directory. Set up an automatic synchronization schedule, map the standard user fields, and assign the imported users to access control groups.

Step 4

Authentication options

Select your authentication option:

  • Enable SAML SSO in the client.

  • Authenticate with the LDAP server.

Step 5

Perform Synchronization

Synchronize Cisco Unified Communications Manager with the directory server.

Step 6

Associate Service Profile to User

Associate the service profile to the users.

Step 7

Prepopulate Contact Lists in Bulk

Populate the contact list for your users.

Activate Services

You must activate the following services before you can integrate with your corporate LDAP server:

  • Cisco DirSync service—you must activate this service if you want to synchronize end user settings from a corporate LDAP directory.

  • (Cisco Unified Communications Manager IM and Presence Service) Cisco Sync Agent service—this service keeps data synchronized between the IM and Presence Service node and Cisco Unified Communications Manager. When you perform the synchronization with your directory server, Cisco Unified Communications Manager then synchronizes the data with IM and Presence Service.

Procedure


Step 1

From Cisco Unified Serviceability, choose Tools > Service Activation.

Step 2

From the Server drop-down list box, choose the publisher node.

Step 3

Under Directory Services, click the Cisco DirSync radio button.

Step 4

Click Save.

Step 5

Choose Tools > Control Center - Network Services.

Step 6

From the Server drop-down list box, choose the IM and Presence Service node.

Step 7

Under IM and Presence Services, click the Cisco Sync Agent radio button.

Step 8

Click Save.


Enable LDAP Directory Synchronization

Perform this procedure if you want to configure Cisco Unified Communications Manager to synchronize end user settings from a corporate LDAP directory.

Procedure


Step 1

In Cisco Unified CM Administration, choose System > LDAP > LDAP System.

The LDAP System Configuration window opens.

Step 2

Check the Enable Synchronizing from LDAP Server check box to allow Cisco Unified Communications Manager to import users from your LDAP directory.

Step 3

From the LDAP Server Type drop-down list box, choose the type of LDAP directory server that your company uses.

Step 4

From the LDAP Attribute for User ID drop-down list box, choose the attribute from your corporate LDAP directory that you want Cisco Unified Communications Manager to synchronize with for the User ID field in the End User Configuration window.

This value is required for the default IM address scheme and for users to sign in. The default value is sAMAccountName.

If you do not specify the attribute in your configuration, and the attribute is other than sAMAccountName, the client cannot resolve contacts in your directory. As a result, users do not get presence and cannot send or receive instant messages.

Step 5

Click Save.


Configure LDAP Directory Sync

Use this procedure to configure Cisco Unified Communications Manager to synchronize with an LDAP directory. LDAP directory synchronization allows you to import end user data from an external LDAP directory into the Cisco Unified Communications Manager database such that it displays in End User Configuration window. You can set up a sync schedule so that updates made to the LDAP directory propagate to Cisco Unified Communications Manager regularly.

For help with the fields and their descriptions, refer to the online help.

Procedure


Step 1

In Cisco Unified CM Administration, choose System > LDAP > LDAP Directory.

Step 2

Perform one of the following steps:

  • Click Find and select an existing LDAP directory.
  • Click Add New to create a new LDAP directory.

Step 3

In the LDAP Configuration Name text box, assign a unique name to the LDAP directory.

Step 4

In the LDAP Manager Distinguished Name field, enter a user ID with access to the LDAP directory server.

Step 5

Enter and confirm the password details.

Step 6

In the LDAP Directory Synchronization Schedule fields, create a schedule that Cisco Unified Communications Manager uses to synchronize data with the external LDAP directory.

Step 7

Complete the Standard User Fields to be Synchronized section. For each End User field, choose an LDAP attribute. The synchronization process assigns the value of the LDAP attribute to the end user field in Cisco Unified Communications Manager.

  1. Select one of the following LDAP attributes from the Directory URI drop-down list:

    • msRTCSIP-primaryuseraddress—This attribute is populated in the AD when Microsoft Lync or Microsoft OCS are used. This is the default attribute.

    • mail

Step 8

To assign the imported end users to an access control group that is common to all the imported end users, do the following:

  1. Click Add to Access Control Group.

  2. In the popup window, click the corresponding check box for each access control group that you want to assign to the imported end users.

  3. Click Add Selected.

At a minimum you should assign the user to the following access control groups:

  • Standard CCM End Users

  • Standard CTI Enabled—This option is used for desk phone control.

If you provision users with secure phone capabilities, do not assign the users to the Standard CTI Secure Connection group.

Certain phone models require additional control groups, as follows:

  • Cisco Unified IP Phone 9900, 8900, or 8800 series or DX series, select Standard CTI Allow Control of Phones supporting Connected Xfer and conf.

  • Cisco Unified IP Phone 6900 series, select Standard CTI Allow Control of Phones supporting Rollover Mode.

Note


For Cisco Unified Communications Manager 9.x, you must assign end users to access control groups on the End User Configuration window (User Management > End User).

Step 9

In the LDAP Server Information area, enter the hostname or IP address of the LDAP server.

Step 10

If you want to create a secure connection to the LDAP server, check the Use TLS check box.

Step 11

Click Save.


Authentication options

Authenticate with the LDAP Server

Perform this procedure if you want to enable LDAP authentication so that end user passwords are authenticated against the password that is assigned in the company LDAP directory. LDAP authentication gives system administrators the ability to assign an end user a single password for all company applications. This configuration applies to end user passwords only and does not apply to end user PINs or application user passwords. When users sign in to the client, the presence service routes that authentication to Cisco Unified Communications Manager. Cisco Unified Communications Manager then sends that authentication to the directory server.

Procedure


Step 1

Open the Cisco Unified CM Administration interface.

Step 2

Select System > LDAP > LDAP Authentication.

Step 3

Select Use LDAP Authentication for End Users.

Step 4

Specify LDAP credentials and a user search base as appropriate.

See the Cisco Unified Communications Manager Administration Guide for information about the fields on the LDAP Authentication window.

Step 5

Select Save.


Configure the Client to Authenticate with the LDAP Server

If you are configuring authentication to use LDAP credentials, you must also configure the client.
Procedure

Step 1

Update the jabber-config.xml file with the LDAP_UseCredentialsFrom parameter.

Example:
<LDAP_UseCredentialsFrom>CUCM</LDAP_UseCredentialsFrom>

Step 2

If the LDAP server is deployed in a different domain than the domain where Cisco Unified Communications Manager IM and Presence service and Cisco Unified Communications Manager are deployed, configure the LDAPUserDomain parameter. If you don't configure this parameter, by default it uses the value for the PresenceDomain mandatory parameter.

Example:
<LdapUserDomain>example.com</LdapUserDomain>

Authenticate with Anonymous Binding

You can configure anonymous binding as a means of authenticating users to the LDAP server. Using anonymous binding prevents users from entering credentials on the Accounts tab of the Options menu in Jabber.

Procedure


In the jabber-config.xml file, configure the LdapAnonymousBinding parameter with true or false values.

Example:

<LdapAnonymousBinding>true</LdapAnonymousBinding>

For more information on configuring this parameter, see the Parameters Reference Guide for Cisco Jabber.


Manual User Authentication

You can set up service authentication where users manually enter their own credentials in the Jabber client for the required services.

Users are manually prompted to enter their own credentials when no service authentication is configured (for example, in service profiles or on the LDAP server).

Users enter their credentials on the Accounts tab of the Options menu in Jabber.

Enable SAML SSO in the Client

Before you begin

  • Enable SSO on Cisco Unified Communications Applications 10.5.1 Service Update 1—For information about enabling SAML SSO on this service, read the SAML SSO Deployment Guide for Cisco Unified Communications Applications, Release 10.5.

  • Enable SSO on Cisco Unity Connection version 10.5—For more information about enabling SAML SSO on this service, read Managing SAML SSO in Cisco Unity Connection.

Procedure


Step 1

Deploy certificates on all servers so that the certificate can be validated by a web browser, otherwise users receive warning messages about invalid certificates. For more information about certificate validation, see Certificate Validation.

Step 2

Ensure Service Discovery of SAML SSO in the client. The client uses standard service discovery to enable SAML SSO in the client. Enable service discovery by using the following configuration parameters: ServicesDomain, VoiceServicesDomain, and ServiceDiscoveryExcludedServices. For more information about how to enable service discovery, see Configure Service Discovery for Remote Access.

Step 3

Define how long a session lasts.

A session is comprised of cookie and token values. A cookie usually lasts longer than a token. The life of the cookie is defined in the Identity Provider, and the duration of the token is defined in the service.

Step 4

When SSO is enabled, all Cisco Jabber users sign in using SSO by default. Administrators can change this on a user-by-user basis so that certain users do not use SSO and instead sign in with their Cisco Jabber username and password. To disable SSO for a Cisco Jabber user, set the value of the SSO_Enabled parameter to FALSE.

If you have configured Cisco Jabber not to ask users for their email address, their first sign in to Cisco Jabber may be non-SSO. In some deployments, the parameter ServicesDomainSsoEmailPrompt needs to be set to ON. This ensures that Cisco Jabber has the information required to perform a first-time SSO sign in. If users signed in to Cisco Jabber previously, this prompt is not needed because the required information is available.


Certificate-Based SSO Authentication for Mobile Clients

This configuration is only necessary for Cisco Jabber for iPhone and iPad. Cisco Jabber for Android requires no similar configuration.

To enable this feature, configure the same settings for SSO Login Behavior for iOS in both Cisco Unified Communications Manager and Cisco Unity Connection.

With Expressway for Mobile and Remote Access, configure Jabber for iPhone and iPad clients to use the embedded Safari browser in the VCS Expressway admin console. For more information, see the Cisco Expressway installation guides at https://www.cisco.com/c/en/us/support/unified-communications/expressway-series/products-installation-guides-list.html.

You cannot enable the Common Identity (CI) for Webex Messenger. To enable embedded Safari to connect to voicemail using client certificate-based SSO authentication, you must disable CI.

Configuring Certificate-Based SSO Authentication on Cisco Unified Communications Manager

This configuration is only supported on Cisco Unified Communications Manager 11.5 or later.

Procedure

Step 1

In Cisco Unified CM Administration, go to System > Enterprise Parameters.

Step 2

In the SSO configuration section, scroll down to SSO Login Behavior for iOS and choose Use native browser.

Step 3

Select Save


Configuring Certificate-Based SSO Authentication on Cisco Unity Connection

Procedure

Step 1

In Cisco Unity Connection Administration, go to System Settings > Enterprise Parameters.

Step 2

In the SSO Configuration section, scroll down to SSO Login Behavior for iOS and choose Use native browser.

Step 3

Select Save.


Perform Synchronization

After you add a directory server and specify the authentication method, you can synchronize Cisco Unified Communications Manager with the directory server.

Procedure


Step 1

Select System > LDAP > LDAP Directory.

Step 2

Click Find and select the LDAP directory that you configured.

The LDAP Directory window opens.

Step 3

Select Perform Full Sync Now.

Note


The amount of time it takes for the synchronization process to complete depends on the number of users that exist in your directory. If you synchronize a large directory with thousands of users, you should expect the process to take some time.


User data from your directory server is synchronized to the Cisco Unified Communications Manager database. Cisco Unified Communications Manager then synchronizes the user data to the IM and Presence Service database.

Associate Service Profile to User

Associate Service Profile to Individual Users

Associate service profiles with individual users.

Procedure


Step 1

Open the Cisco Unified CM Administration interface.

Step 2

Select User Management > End User.

The Find and List Users window opens.

Step 3

Specify the appropriate filters in the Find User where field and then select Find to retrieve a list of users.

Step 4

Select the appropriate username from the list.

The End User Configuration window opens.

Step 5

Locate the Service Settings section.

Step 6

Select Home Cluster.

Step 7

For Phone mode deployments, ensure the Enable User for Unified CM IM and Presence (Configure IM and Presence in the associated UC Service Profile) option is not selected.

For all other deployments, check the Enable User for Unified CM IM and Presence (Configure IM and Presence in the associated UC Service Profile) checkbox.

Step 8

Select your service profile from the UC Service Profile drop-down list.

Important


Cisco Unified Communications Manager release 9.x only—If the user has only instant messaging and presence capabilities (IM only), select Use Default. Cisco Unified Communications Manager release 9.x applies the default service profile regardless of what you select from the UC Service Profile drop-down list.

Step 9

Select Save.


Associate Service Profile to Users in Bulk

Add the service profile to multiple users.

Procedure


Step 1

Open the Cisco Unified CM Administration interface.

Step 2

Select Bulk Administration > Users > Update Users > Query.

The Find and List Users To Update window opens.

Step 3

Specify the appropriate filters in the Find User where field and then select Find to retrieve a list of users.

Step 4

Select Next.

The Update Users Configuration window opens.

Step 5

For Phone mode deployments, disable instant messaging and presence, check one check box for Enable User for Unified CM IM and Presence.

For all other deployments, select both check boxes for Enable User for Unified CM IM and Presence.

Step 6

Select the UC Service Profile check box and then select your service profile from the drop-down list.

Important


Cisco Unified Communications Manager release 9.x only — If the user has only instant messaging and presence capabilities (IM only), you must select Use Default.

For IM only users — Cisco Unified Communications Manager release 9.x always applies the default service profile regardless of what you select from the UC Service Profile drop-down list.

Step 7

In the Job Information section, specify if you want to run the job immediately or at a later time.

Step 8

Select Submit.


Prepopulate Contact Lists in Bulk

You can pre-populate user contact lists with the Bulk Administration Tool (BAT).

In this way you can prepopulate contact lists for users so that they automatically have a set of contacts after the initial launch of the client.

Cisco Jabber supports up to 300 contacts in a client contact list.

Procedure

  Command or Action Purpose

Step 1

Create a CSV file that defines the contact list you want to provide to users.

Create CSV to Import Contact Lists

Step 2

Use the BAT to import the contact list in bulk to a set of users.

Upload Contact List Using BAT

Create CSV to Import Contact Lists

Structure of the CSV File

The CSV file must have the following format:

<User ID>, <User Domain>, <Contact ID>, <Contact Domain>, <Nickname>, <Group Name>

Sample CSV file entry:

userA,example.com,userB,example.com,buddyB,General

Table 1. Description of Input File Parameters

Parameter

Description

User ID

Required parameter. The user ID of the IM and Presence Service user. It can have a maximum 132 characters.

User Domain

Required parameter. The Presence domain of the IM and Presence Service user. It can have a maximum of 128 characters.

Contact ID

Required parameter. The user ID of the contact list entry. It can have a maximum of 132 characters.

Contact Domain

Required parameter. The Presence domain of the contact list entry. The following restrictions apply to the format of the domain name:

  • Length must be less than or equal to 128 characters
  • Contains only numbers, upper- and lowercase letters, and hyphens (-)
  • Must not start or end with hyphen (-)
  • Length of label must be less than or equal to 63 characters
  • Top-level domain must be characters only and have at least two characters

Nickname

The nickname of the contact list entry. It can have a maximum of 255 characters.

Group Name

Required parameter. The name of the group to which the contact list entry is to be added. It can have a maximum of 255 characters.

Upload Contact List Using BAT

Before you begin

Create a CSV file with contacts.

Procedure


Step 1

Open the Cisco Unified CM IM and Presence Administration interface.

Step 2

Select Bulk Administration > Upload/Download Files.

Step 3

Select Add New.

Step 4

Select Choose File to locate and choose the CSV file.

Step 5

Choose Contact Lists as the target.

Step 6

Choose Import Users' Contacts - Custom File as the Transaction Type.

Step 7

Select Save to upload the file.


Configure Authentication for UDS Contact Search

Cisco Jabber supports authenticated directory queries when searching for contacts. The authentication is configured on Cisco Unified Communications Manager release 11.5 or later.

Procedure


Step 1

コマンドライン インターフェイスにログインします。

Step 2

utils contactsearchauthentication status コマンドを実行し、このノードの連絡先検索の認証の設定を確認します。

Step 3

連絡先検索の認証の設定が必要な場合、

  • 認証を有効にするには、utils contactsearchauthentication enable コマンドを実行します。
  • 認証を無効にするには、utils contactsearchauthentication disable コマンドを実行します。

Step 4

すべての のクラスタノードに対してこの手順を繰り返します。

Note

 
変更を有効にするには、電話をリセットする必要があります。

Enable Extended UDS Contact Source

Before you begin

Extended UDS contact search is only available on Cisco Unified Communications Manager release 11.5(1) or later.

Procedure


Step 1

Open the Cisco Unified CM Administration interface.

Step 2

Select System > LDAP > LDAP Search

Step 3

To enable user searches to be performed using an enterprise LDAP directory server, check the Enable user search to Enterprise Directory Server check box.

Step 4

Configure the fields in the LDAP Search Configuration window. See the online help for more information about the fields and their configuration options.

Step 5

Select Save.