- About this Guide
- Ultra Services Platform Overview
- Introduction to UGP
- System Operation and Configuration
- Getting Started
- System Settings
- Config Mode Lock Mechanisms
- Management Settings
- Verifying and Saving Your Configuration
- System Interfaces and Ports
- System Security
- Secure System Configuration File
- Software Management Operations
- Smart Licensing
- Monitoring the System
- Bulk Statistics
- System Logs
- Troubleshooting
- Packet Capture (PCAP) Trace
- System Recovery
- Access Control Lists
- Congestion Control
- Routing
- VLANs
- BGP MPLS VPNs
- Content Service Steering
- Session Recovery
- Interchassis Session Recovery
- Support Data Collector
- Engineering Rules
- StarOS Tasks
- NETCONF and ConfD
- ICSR Checkpointing
- UGP SDR CLI Command Strings
- VPC Commands
- KPI Descriptions
- Initial StarOS Configuration
- Using the StarOS Quick Setup Wizard
- Using the StarOS CLI for Initial Configuration
- Configuring System Administrative Users
- Configuring the System for Remote Access
- Configuring SSH Options
- Configuring the Management Interface with a Second IP Address
- VM Hardware Verification
Getting
Started
Initial StarOS Configuration
Following successful installation of UGP across all VMs, you must configure a set of StarOS parameters via the active Control Function (CF) VM. You then save these settings in a configuration file on the active CF that is accessed whenever a VM in the UGP instance is rebooted. The standby CF and all Service Function (SF) VMs read this configuration file from the active CF.
This chapter provides instructions for connecting to the active CF console port and creating the initial local context management configuration.
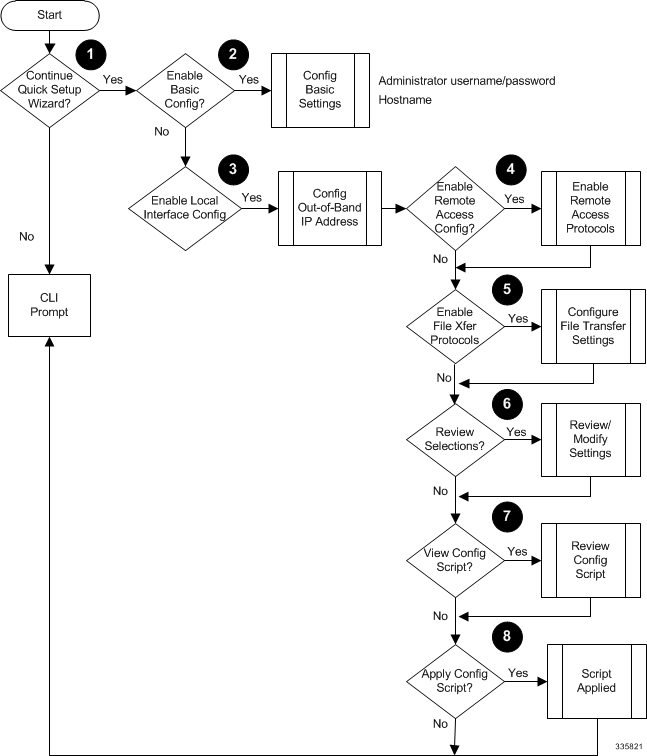
Using the StarOS Quick Setup Wizard
The Quick Setup Wizard consists of three parts:
-
Configuring a context-level security administrator and hostname
-
Configuring the Ethernet interface for out-of-band (OOB) management
-
Configuring the system for remote CLI access via Telnet, Secure Shell (SSH), or File Transfer Protocol (FTP)
The following figure and table provides a flow diagram that shows the run logic of the wizard along with additional information and notes.
Sample Quick Setup Script
This is how the setup script appears if you run the EXEC mode setup command:
[local]host_name# setup
1. Do you wish to continue with the Quick Setup Wizard[yes/no]: yes
2. Enable basic configuration[yes/no]: yes
3. Change chassis key value[yes/no]: yes
4. New chassis key value: chassis_key
5. Create new tech-support password[yes/no]: yes
6. New tech-support password: new_password
7. local context administrator username[admin]: context_admin_username
8. local context administrator password: context_admin_password
9. confirm local context administrator password: context_admin_password
10. hostname[asr5500]: hostname
Using the StarOS CLI for Initial Configuration
The initial configuration consists of the following:
-
Configuring a context-level security administrator and hostname
-
Configuring the Ethernet interface on the vNIC
This section provides instructions for performing these tasks using the CLI.
Configuring System Administrative Users
This section describes some of the security features that allow security administrators to control user accounts.
Limiting the Number of Concurrent CLI Sessions
Security administrators can limit the number of concurrent interactive CLI sessions. Limiting the number of concurrent interactive sessions reduces the consumption of system-wide resources. It also prevents a user from potentially accessing sensitive user in formation which is already in use.
Most privileged accounts do not require multiple concurrent logins.
Configuring the maximum number of sessions is recommended for all privileged accounts.
StarOS supports three login authentication methods:
For additional information on configuring the maximum number of sessions for TACACS+ Server users, see Operation. For additional information on configuring the maximum number of sessions for Local-User users and AAA context users, see Configuring Context-Level Administrative Users.
Each authentication method must be configured separately because each of the three authentication methods can use the same user name.
Automatic Logout of CLI Sessions
Security administrators can configure an automatic logout of certain user accounts. Limiting the number of minutes that an interactive CLI session can be in use reduces the consumption of system-wide resources. It also prevents a user from potentially accessing a user account in a terminal window which is left idle. All authentication methods described in this section support both the idle session timeout technique and the absolute session timeout technique.
Most privileged accounts do not require an indefinite login timeout limit.
Configuring the session timeout is strongly recommended for all privileged accounts.
The idle timeout and session timeout fields in the show tacacs summary and show tacacs session id commands allow administrators to configure an automatic logout of certain accounts.
Session Timeout: allows a security administrator to specify the maximum amount of minutes that a user can be logged in to a session before the session is automatically disconnected.
Idle Timeout: allows a security administrator to specify the maximum amount of minutes that a session can remain in an idle state before the session is automatically disconnected.
The session timeout and idle timeout fields are not exclusive. If both are specified, then the idle timeout should always be lower than the session timeout since a lower session timeout will always be reached first.
For additional information on configuring the maximum number of minutes that an interactive CLI session can be in use, see the idle-sessions threshold command and the clear tacacs sessions CLI command in the CLI Reference and the show tacacs summary and show tacacs session id in the Statistics and Counter Reference.
Configuring the System for Remote Access
Configure the system for remote access. An administrative user may access the instance from a remote location over the management network:
-
Telnet
-
Secure Shell (SSH)
-
File Transfer Protocol (FTP) (secured or unsecured)
-
Trivial File Transfer Protocol (TFTP)
 Note | If there are two simultaneous telnet sessions, and one administrator deletes the context into which the other administrator is logged, the administrator in the deleted context will not be automatically kicked into the local context. Although the deleted context will still appear in the CLI prompt, context specific commands will generate errors. |
Note | For maximum security, use SSH v2. |
| Step 1 | Enter the context configuration mode by entering the following command:
[local]cf_host_name(config) context local [local]cf_host_name(config-ctx) | ||||
| Step 2 | Configure the system to allow Telnet access, if desired:
[local]cf_host_name(config-ctx) server telnetd
| ||||
| Step 3 | Configure the system to allow SSH access, if desired:
[local]cf_host_name(config-ctx) ssh generate key [ type v2-rsa ]
[local]cf_host_name(config-ctx) server sshd [local]cf_host_name(config-sshd) subsystem sftp [local]cf_host_name(config-sshd) exit | ||||
| Step 4 | Configure the system to allow FTP access, if desired, by entering the following command:
[local]cf_host_name(config-ctx) server ftpd
| ||||
| Step 5 | Exit the configuration mode by entering the following command:
[local]cf_host_name(config-ctx) end [local]cf_host_name | ||||
| Step 6 | Verify the configuration by entering the following command:
[local]cf_host_name show configuration
The CLI output should be similar to the sample output: context local interface interface_name ip address ipaddress subnetmask exit subscriber default exit administrator admin_name password admin_password server telnetd server ftpd ssh generate key server sshd subsystem sftp exit port ethernet 1/1 bind interface interface_name local exit port ethernet 1/1 no shutdown exit snmp engine-id local 800007e580ed826c191ded2d3d end | ||||
| Step 7 | Verify the configuration of the IP routes by entering the following command: [local]cf_host_name show ip route
The CLI output should be similar to the sample output: "*" indicates the Best or Used route. Destination Nexthop Protocol Prec Cost Interface *0.0.0.0/0 ipaddress static 1 0 vnic1 *network 0.0.0.0 connected 0 0 vnic1 | ||||
| Step 8 | Verify the interface binding by entering the following command:
[local]cf_host_name show ip interface name interface_name
interface_name is the name of the interface that was configured in step 7b.The CLI output should be similar to the sample output: Intf Name: vnic1 Description: IP State: UP (Bound to 1/1 untagged, ifIndex 83951617) IP Address: ipaddress Subnet Mask: subnetmask Bcast Address: bcastaddress MTU: 1500 Resoln Type: ARP ARP timeout: 3600 secsL3 monitor LC-port switchover: DiasabledNumber of Secondary Addresses: 0 | ||||
| Step 9 | Save your configuration as described in the Verifying and Saving Your Configuration chapter. |
Configuring SSH Options
SSHv2 RSA is the only version of SSH supported under StarOS. Keywords previously supported for SSHv1 RSA and SSHv2 DSA have been removed from or concealed within the StarOS CLI.
A keyword that was supported in a previous release may be concealed in subsequent releases. StarOS continues to parse concealed keywords in existing scripts and configuration files created in a previous release. But the concealed keyword no longer appears in the command syntax for use in new scripts or configuration files. Entering a question mark (?) will not display a concealed keyword as part of the Help text. Removed keywords generate an error message when parsed.
Version 1 of the SSH protocol is now obsolete due to security vulnerabilities. The v1-rsa keyword has been removed for the Context Configuration mode ssh command. Running a script or configuration that uses the SSHv1-RSA key returns an error message and generates an event log. The output of the error message is shown below:
CLI print failure Failure: SSH V1 contains multiple structural vulnerabilities and is no longer considered secure. Therefore we don't support v1-rsa SSH key any longer, please generate a new v2-rsa key to replace this old one.
If the system boots from a configuration that contains the v1-rsa key, you can expect a boot failure when logging in through SSH. The workaround is to log in via the Console port, re-generate a new ssh v2-rsa key, and configure server sshd. It will then be possible to log in via ssh.
The v2-dsa keyword is now concealed for the Context Configuration mode ssh command
The v1-rsa keyword has been removed from the Exec mode show ssh key CLI command.
- SSH Host Keys
- Authorized SSH User Access
- SSH User Login Restrictions
- SSH User Login Authentication
- Secure Session Logout
- SSH Client Login to External Servers
- Enabling NETCONF
SSH Host Keys
SSH key-based authentication uses two keys, one "public" key that anyone is allowed to see, and another "private" key that only the owner is allowed to see. You create a key pair, securely store the private key on the device you want to log in from, and store the public key on the system (UGP) that you wish to log into.
SSH host keys are generated within a specified StarOS context. The context is associated with a user interface.
You set or remove an administrative user name having authorized keys for access to the sshd server associated with context.
- Setting SSH Key Size
- Configuring SSH Key Generation Wait Time
- Specifying SSH Encryption Ciphers
- Generating SSH Keys
- Setting SSH Key Pair
Setting SSH Key Size
The Global Configuration mode ssh key-size CLI command configures the key size for SSH key generation for all contexts (RSA host key only).
Configuring SSH Key Generation Wait Time
SSH keys can only be generated after a configurable time interval has expired since the last key generation. The ssh key-gen wait-time command specifies this wait time in seconds. The default interval is 300 seconds (5 minutes).
Specifying SSH Encryption Ciphers
The SSH Configuration mode ciphers CLI command configures the cipher priority list in sshd for SSH symmetric encryption. It changes the cipher options for that context.
| Step 1 | Enter the SSH
Configuration mode.
[local]host_name(config-ctx)# server sshd
|
| Step 2 | Specify the
desired encryption algorithms.
[local]host_name(config-sshd)# ciphers algorithms
The default string for algorithms in a Normal build is: blowfish-cbc,3des-cbc,aes128-cbc,aes128-ctr,aes192-ctr,aes256-ctr,aes128-gcm@openssh.com,aes256-gcm@openssh.com,
chacha20-poly1305@openssh.com
The default string for algorithms in a Trusted build is: aes256-ctr,aes192-ctr,aes128-ctr
|
| Step 3 | Exit the SSH
Configuration mode.
[local]host_name(config-sshd)# end [local]host_name# |
Generating SSH Keys
The ssh generate command generates a public/private key pair which is to be used by the SSH server. The v1-rsa keyword has been removed from and the v2-dsa keyword concealed within the ssh generate CLI command. The only keyword available for generating SSH keys is v2-rsa.
The generated key pair remains in use until the command is issued again.
Setting SSH Key Pair
The ssh key command sets the public/private key pair to be used by the system. The v2-dsa keyword is concealed in the ssh key command.
[local]host_name(config-ctx)# ssh key data length octets type v2-rsa
For releases prior to 20.0, StarOS supports a maximum of 64 configurable authorized SSH keys. For release 20.0 and higher, StarOS supports a maximum of 200 configurable authorized SSH keys. |
Authorized SSH User Access
You must authorize users to access a StarOS context from a specific host with an SSH authentication-key pair.
Authorizing SSH User Access
The SSH Configuration mode authorized-key command grants user access to a context from a specified host.
| Step 1 | Go to the SSH
Configuration mode.
[local]host_name(config-ctx)# server sshd
[local]host_name(config-sshd)#
|
| Step 2 | Specify
administrative user access via the
authorized-key command.
[local]host_name(config-sshd)# authorized-key username user_name host host_ip [ type { v2-dsa | v2-rsa } ]
|
SSH User Login Restrictions
An administrator can restrict SSH access to the StarOS CLI to a "white list" of allowed users. Access to a service may be restricted to only those users having a legitimate need. Only explicitly allowed users will be able connect to a host via SSH. The user name may optionally include a specific source IP address.
The AllowUsers list consists of user name patterns, separated by space. If the pattern takes the form 'USER' then login is restricted for that user. If pattern is in the format 'USER@IP_ADDRESS' then USER and IP address are separately checked, restricting logins to those users from the specified IP address.
The default is to allow unrestricted access by any user.
Creating an Allowed Users List
The allowusers add command allows an administrator to create a list of users who may log into the StarOS CLI.
| Step 1 | Enter the
context configuration mode.
[local]host_name(config)# context context_name
[local]host_name(config-ctx)#
|
| Step 2 | Go to the SSH
Configuration mode.
[local]host_name(config-ctx)# server sshd
|
| Step 3 | Configure the
SSH user list.
[local]host_name(config-sshd)# allowusers add user_list
user_list specifies a list of user name patterns, separated by spaces, as an alphanumeric string of 1 through 999 characters. If the pattern takes the form 'USER' then login is restricted for that user. If the pattern is in the format 'USER@IP_ADDRESS' then user name and IP address are separately checked, restricting logins to those users from that particular IP address. If the pattern is in the format 'USER@<context>@IP_ADDRESS' then user name, StarOS context and IP address are separately checked, restricting logins to those users associated with the specific context from that particular IP address. If you exceed either of the above limits, an error message is displayed. The message prompts you to use a regular expression pattern to shorten the string, or remove all the allowusers with no allowusers add or default allowusers add and re-configure. For additional information, see the SSH Configuration Mode Commands chapter in the Command Line Interface Reference. |
| Step 4 | Exit the SSH
Configuration mode.
[local]host_name(config-sshd)# end
[local]host_name#
|
SSH User Login Authentication
-
User tries to login with local context username through local context (VPN) interface with authorized-key configured on local context.
-
User tries to login with non-local context username through non-local context interface with authorized-key configured on non-local context.
-
User tries to login with local context username through non-local context interface with authorized-key configured on local context.
-
User tries to login with non-local context username through local context interface with authorized-key configured on non-local context.
A failure to authenticate based on the current system configuration prevents the login and generates an error message.
StarOS does not permit users with different user IDs but having the same public SSH key to login to an unauthorized context. Authentication of the user takes into account the authorized-key/user-account pairing.
For StarOS release 21.0 onwards, a user cannot access the /flash directory if the user logs in from a non-local context.
Secure Session Logout
When StarOS is disconnected from an SSH client, the default behavior has sshd terminate the CLI or SFTP session in about 45 seconds (using default parameters). Two SSH Configuration mode CLI commands allow you to disable or modify this default sshd disconnect behavior.
For higher security, Cisco recommends at least a client-alive-countmax of 2 and client-alive-interval of 5. Smaller session logout values may lead to occasional ssh session logouts. Adjust values to balance security and user friendliness.
The client-active-countmax command sets the number of client-alive messages which may be sent without sshd receiving any messages back from the SSH client (default =3). If this threshold is reached while the client-alive messages are being sent, sshd disconnects the SSH client thus terminating the session.
The client-alive-interval command sets a timeout interval in seconds (default = 15) after which if no data has been received from the SSH client, sshd sends a message through the encrypted channel to request a response from the client. The number of times that the message is sent is determined by the client-alive-countmax parameter. The approximate amount of time before sshd disconnects an SSH client disconnect = client-alive-countmax X client-alive-interval.
The client-alive mechanism is valuable when the client or server depend on knowing when a connection has become inactive.
The client-alive messages are sent through the encrypted channel and, therefore, are not spoofable.
These parameter apply to SSH protocol version 2 only.
Changing Default sshd Secure Session Logout Parameters
| Step 1 | Enter the
context configuration mode.
[local]host_name# configure
|
| Step 2 | Go to the SSH
Configuration mode.
[local]host_name(config)# context context_name
|
| Step 3 | Set the
ClientAliveCountmax parameter to 2.
[local]host_name(config-sshd)# client-alive-countmax 2
|
| Step 4 | Set the
ClientAliveInterval parameter to 5 seconds.
[local]host_name(config-sshd)# client-alive-interval 5
|
| Step 5 | Exit the SSH
Configuration mode.
[local]host_name(config-sshd)# end [local]host_name# |
SSH Client Login to External Servers
StarOS supports public key authentication for SSH/SFTP access from the StarOS gateway to external servers. You configure this feature by generating SSH client key pairs and pushing the client public key to external servers
Note | By default StarOS only supports username-password authentication to external servers. |
- Setting SSH Client Ciphers
- Setting Preferred Authentication Methods
- Generating SSH Client Key Pair
- Pushing an SSH Client Public Key to an External Server
Setting SSH Client Ciphers
The SSH Client Configuration mode ciphers CLI command configures the cipher priority list when logging into an external server.
| Step 1 | Enter the SSH
Client Configuration mode.
[local]host_name(config)# client ssh
|
| Step 2 | Specify the
desired encryption algorithms.
[local]host_name(config-ssh)# ciphers algorithms
The default string for algorithms in a Normal build is: aes256-ctr,aes192-ctr,aes128-ctr,aes256-gcm@openssh.com,aes128-gcm@openssh.com,chacha20-poly1305@openssh.com, blowfish-cbc,3des-cbc,aes128-cbc The default string for algorithms in a Trusted build is: aes256-ctr,aes192-ctr,aes128-ctr
|
| Step 3 | Exit the SSH
Client Configuration mode.
[local]host_name(config-ssh)# end [local]host_name# |
Setting Preferred Authentication Methods
The SSH Client Configuration mode preferredauthentications CLI command configures the preferred methods of authentication.
| Step 1 | Enter the SSH
Client Configuration mode.
[local]host_name(config)# client ssh
|
| Step 2 | Specify the
preferred authentication methods.
[local]host_name(config-ssh)# preferredauthentications methods
|
| Step 3 | Exit the SSH
Client Configuration mode.
[local]host_name(config-ssh)# exit [local]host_name(config)# |
Generating SSH Client Key Pair
You use commands in the SSH Client Configuration mode to specify a private key and generate the SSH client key pair.
| Step 1 | Enter the SSH
client configuration mode.
[local]host_name(config)# client ssh
[local]host_name(config-ssh)#
|
| Step 2 | Enter SSH
private key information and key type.
[local]host_name(config-ssh)# ssh key private_key_string length key_length [ type v2-rsa ]
[local]host_name(config-ssh)#
key private_key_string specifies a private key value as an alphanumeric string of 1 through 4499 characters. length key_length specifies the length of the key in bytes as an integer from 0 through 65535. type v2-rsa specifies the SSH client key type. The only supported SSH client key type is v2-rsa. |
| Step 3 | Generate SSH
client key pair.
[local]host_name(config-ssh)# ssh generate key [ type v2-rsa ]
[local]host_name(config-ssh)#
type v2-rsa specifies the SSH client key type. The only supported SSH client key type is v2-rsa. |
| Step 4 | Verify that the
SSH client key has been generated.
[local]host_name(config-ssh)# do show ssh client key
|
| Step 5 | Exit the SSH
Client Configuration mode.
[local]host_name(config-ssh)# exit
[local]host_name(config)#
|
Pushing an SSH Client Public Key to an External Server
You must push the SSH client public key to an external server to support SSH/SFTP access to that server.
| Step 1 | From the Exec
mode run the
push ssh-key
command.
[local]host_name# push ssh-key { host_name | host_ip_address } user username [ context context_name ]
[local]host_name#
host_name specifies the remote server using its logical host name which must be resolved via DNS lookup. It is expressed as an alphanumeric string of 1 to 127 characters. host_ip_address is expressed in IPv4 dotted-decimal or IPv6 colon-separated-hexadecimal notation. user username specifies a valid username on the external server as an alphanumeric string of 1 to 79 characters. context context_name specifies a valid context name. The context name is optional. If it is not provided the current context is used for processing. |
| Step 2 | Repeat Step 1 to support SSH/SFTP access on other external servers. |
| Step 3 | Test SSH client
login to an external server.
local]host_name# ssh { hostname | ip_address } user username port port_number
|
Enabling NETCONF
An SSH key is a requirement before NETCONF protocol and the ConfD engine can be enabled in support of Cisco Network Service Orchestrator (NSO).
Refer to the NETCONF and ConfD appendix in this guide for detailed information on how to enable NETCONF.
Configuring the Management Interface with a Second IP Address
If necessary, you can configure a second IP address on the vNIC management interface.
| Command or Action | Purpose | |
|---|---|---|
| Step 1 | Enter the configuration mode by entering the following command at the prompt: |
[local]host_name configure [local]host_name(config) |
| Step 2 | Enter the following to enter the context configuration mode: |
[local]host_name(config) context local [local]host-name(config-ctx) |
| Step 3 | Enter the interface slot number and port number via the following command: |
[local]host_name(config-ctx) 1/1 [local]host_name(config-if-eth) |
| Step 4 | Enter the secondary IP address and subnet mask by entering the following command: |
[local]host_name(config-if-eth) { ip | ipv } address ipaddress subnet_mask secondary
|
| Step 5 | Exit the configuration mode by entering the following command: |
[local]host_name(config-if-eth) end
|
| Step 6 | Confirm the interface ip addresses by entering the following command: | [local]host_name show config context local
The CLI output should look similar to this example:config context local interface interface_name ip address ipaddress subnetmask ip address ipaddress subnetmask secondary exit |
| Step 7 | Continue with Verifying and Saving Your Interface and Port Configuration. |
VM Hardware Verification
To prevent resource allocation issues, it is important that all VMs used for in the system have the same size CPU and the same size memory. To balance performance across all interfaces, make sure that the service ports and DI ports have the same throughput capabilities.
To verify the hardware configuration for all cards or a specific card, use the show cloud hardware [card_number} command. Sample output from this command on card 1 (CF) is shown here:
[local]s1# show cloud hardware 1

Card 1:
   CPU Nodes               : 1
   CPU Cores/Threads       : 8
   Memory                  : 16384M (qvpc-di-medium)
   Hugepage size           : 2048kB
   cpeth0                  :
     Driver                : virtio_net
   loeth0                  :
     Driver                : virtio_net
Sample output from this command on card 3 (SF) is shown here:
[local]s1# show cloud hardware 1

Card 3:
   CPU Nodes               : 1
   CPU Cores/Threads       : 8
   Memory                  : 16384M (qvpc-di-medium)
   Hugepage size           : 2048kB
   cpeth0                  :
     Driver                : vmxnet3
   port3_10                :
     Driver                : vmxnet3
   port3_11                :
     Driver                : vmxnet3
To display the optimum configuration of the underlying VM hardware, use the show hardware optimum. To compare your current VM configuration to the optimum configuration, use the show cloud hardware test command. Any parameters not set to the optimum are flagged with an asterisk, as shown in this sample output. In this example, the CPU cores/threads and memory are not configured optimally.
[local]s1# show cloud hardware test 1

Card 1:
   CPU Nodes               : 1
*  CPU Cores/Threads       : 8                                Optimum value is 4
*  Memory                  : 8192M (qvpc-di-medium)           Optimum value is 16384
   Hugepage size           : 2048kB
   cpeth0                  :
     Driver                : virtio_net
   loeth0                  :
     Driver                : virtio_net
To display the configuration file on the config disk or local flash, use the show cloud configuration card_number command. The location parameter file on flash memory is defined during the installation. And the config disk is usually created by the orchestrator and then attached to the card. Sample output from this command is shown here for card 1:
[local]s1# show cloud configuration 1

Card 1:
  Config Disk Params:
-------------------------
    No config disk available

  Local Params:
-------------------------
CARDSLOT=1
CARDTYPE=0x40010100
CPUID=0
To display the IFTASK configuration for all cards or a specific card, use the show cloud hardware iftask command. By default, the cores are configured to be used for both PMD and VNPU. Sample output from this command on card 4 is shown here:
[local]mySystem# show cloud hardware iftask 4
Card 4:
  Total number of cores on VM:      24
  Number of cores for PMD only:     0
  Number of cores for VNPU only:    0
  Number of cores for PMD and VNPU: 3
  Number of cores for MCDMA:        4
  Hugepage size:           2048 kB
  Total hugepages:     16480256 kB
  NPUSHM hugepages:           0 kB
  CPU flags: avx sse sse2 ssse3 sse4_1 sse4_2
  Poll CPU's: 1 2 3 4 5 6 7
  KNI reschedule interval: 5 us
 Feedback