Overview of Cisco Embedded Wireless Controller on Catalyst Access Points

Cisco Embedded Wireless Controller on Catalyst Access Points are the next generation of wireless controllers built for the Intent-based networking. The Cisco controllers are IOS XE based and integrates the RF Excellence from Aironet with Intent-based Networking capabilities of IOS XE to create the best-in-class wireless experience for your evolving and growing organization.

The controllers are deployable in physical form factors and can be managed using Cisco Catalyst Center, Netconf/YANG, web-based GUI, or CLI.

The configuration data model is based on design principles of reusability, simplified provisioning, enhanced flexibility and modularization to help manage networks as they scale up and simplify the management of dynamically changing business and IT requirements.

Elements of the New Configuration Model

The following diagram depicts the elements of the new configuration model.
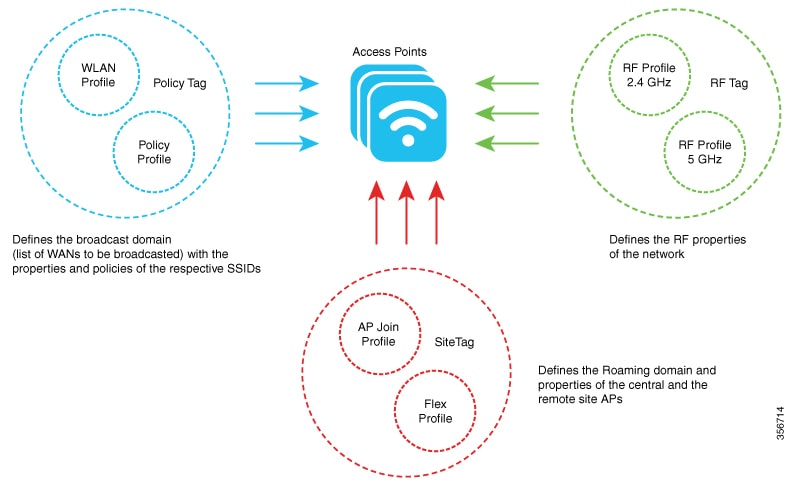
Tags

The property of a tag is defined by the property of the policies associated to it, which in turn is inherited by an associated client or an AP. There are various type of tags, each of which is associated to different profiles. Every tag has a default that is created when the system boots up.

Profiles

Profiles represent a set of attributes that are applied to the clients associated to the APs or the APs themselves. Profiles are reusable entities that can be used across tags.

Configuration Workflow

The following set of steps defines the logical order of configuration. Apart from the WLAN profile, all the profiles and tags have a default object associated with it.

  1. Create the following profiles:

    • WLAN

    • Policy

    • AP Join

    • Flex

    • RF

  2. Create the following tags:

    • Policy

    • Site

    • RF

  3. Associate tags to an AP.

Figure 1. Configuration Workflow

Initial Setup

Setting up the Controller

The initial configuration wizard in Cisco Embedded Wireless Controller on Catalyst Access Points is a simplified, out-of-the-box installation and configuration interface for controller. This section provides instructions to set up a controller to operate in a small, medium, or large network wireless environment, where access points can join and together as a simple solution provide various services, such as corporate employee or guest wireless access on the network.


Note


From Cisco IOS XE Amsterdam 17.1.x onwards, date and time will not reflect in the web UI unless it is synched with Network Time Protocol (NTP).


Note


We recommend that you use the wireless ewc-ap factory-reset command to reset the EWC device to Day0 state (with the configuration wizard). This command also resets all the APs and EWC-APs in the network to Day0 state. You can use the erase startup-config command to remove the configuration from the device. However, this is not synced to other devices in the network.


Note


After completing the Day0 wizard, the internal AP disjoins, and rejoins after one minute.


Note


The wireless management must be the AP Gigabit port and you cannot have several SVIs configured in IOS-XE.


Note


You must run the write memory command after copying a new TAR file.


Configuring the Controller Using Day 0 Wizard (GUI)

To confugure the controller using day 0 wizard, complete the following steps:

Before you begin

When the AP has rebooted in the EWC mode, it broadcasts a provisioning SSID ending with the last digits of the MAC address. You can connect to provisioning SSID using the PSK password.

You can then open a browser and be redirected to mywifi.cisco.com, which takes you to the AP web UI. Enter the username as webui and password as cisco.

Note: The web redirection to the EWC configuration portal only works if you are connected to the provisioning SSID. It does not work if your laptop is connected to another wifi network or on the wired network. You cannot configure the AP from the wired network even if you enter the EWC IP address when it is in day0 wizard provisioning mode

Procedure


Step 1

Log on to the controller and in the Configuration Setup Wizard, go to the General Settings page.

Step 2

In the Configuration Mode option, select one of the following:

  1. Non Mesh: Complete the following fields:

    1. Host Name: Enter the hostname.

    2. Country: From the drop-down list, choose the appropriate country code.

      Note


      As required by the End User License Agreement, please ensure appropriate country code selection so that the unleashed network does not violate local and national regulatory restrictions. Improper country code assignment can disrupt wireless transmissions and may result in government imposed penalties and sanctions on operators of wireless networks utilizing devices set to improper country codes.

    3. In the Management User Settings section, enter the username and password.

    4. In the Wireless Management Settings section, check the DHCP check box, to display the DHCP server IP address.

    5. In the Wireless Network section, click Add to create atleast one WLAN.

  2. Mesh: Complete the following fields:

    1. Host Name: Enter the hostname.

    2. Country: Click the '+' icon to enter the appropriate country code.

    3. In the Management User Settings section, enter the username and password.

    4. In the Wireless Management Settings section, check the DHCP check box, to display the DHCP server IP address.

    5. In the Wireless Mesh Settings section, complete the following fields:

      • Check the Enable Wireless Bridge check box to enable the feature.

      • In the Mesh AP MAC Address field, enter the MAC address or click the '+' icon select the MAC address from the list of Mesh AP MAC addresses that are displayed.

    6. In the Wireless Network section, click Add to create atleast one WLAN.

Step 3

Click Finish.


Configuring the Controller Using Day 0 Wizard (CLI)

To configure the controller using the Day 0 wizard, follow the steps given below. The following steps are common for configuring mesh and non-mesh APs. The existing Day 0 workflow enables the configuration with the factory-reset command.

Before you begin

  • The available options in brackets after each configuration parameter. The default value in all uppercase letters.

  • If you enter an incorrect response, the controller provides you with an appropriate error message, such as an invalid response, and returns you to the wizard prompt.

  • Press the hyphen key to return to the previous command line.

Procedure


Step 1

Enter the wireless ewc-ap factory-reset command to initiate the Day 0 workflow. This command reboots the device when you confirm the action.

Step 2

When the device restarts and when you are prompted with the initial configuration dialog, enter Yes to start the dialog.

Example:

Would you like to enter the initial configuration dialog? [yes/no]: Yes

Step 3

Enter valid inputs to the following questions that are prompted for mesh and non-mesh APs:

  1. Enter the country code for the operation.

    Note

     
    Enter help to view the list of available country codes.

    You can enter more than one country code if you want to manage APs in multiple countries from a single controller. To do so, separate the country codes with a comma (for example, US,CA,MX). After the configuration wizard runs, you must assign each AP joined to the controller to a specific country.

    Example:

    Configure country code(s) for wireless operation in ISO format [US]: US,CH,CN,GB
  2. Enter the country code to configure the AP profile.

    Example:

    Configure default wireless AP profile country code in ISO format [US]:
    
  3. Enter the hostname.

    Example:

    Enter the hostname [EWC]: EWC
  4. Enter the details to configure credentials for management access on the APs.

    Example:

    Configure credentials for management access on Access Points? [yes]: yes
     [AP] Enter the management username: EWC_User
     [AP] Enter the management password: ********
     [AP] Reenter the password: ********
     [AP] Enter the privileged mode access password: ********
     [AP] Reenter the password: ********
  5. Enter the management credentials.

    Example:

    Enter the management username: EWC_User
    Enter the password: ********
    Reenter the password: ********
  6. Configure the DHCP interface.

    Example:

    Configure interface as DHCP [yes/no]? [no]: yes
  7. Configure the wireless network settings.

    Example:

    Configure Wireless network settings? [yes]: yes
     Enter the network name or service set identifier (SSID): test
     Choose the network type
       1. Employee
       2. Guest
     Enter your selection [1]: 1
     Choose the security type
       1. WPA Personal
       2. WPA Enterprise
     Enter your selection [2]: 1
     Enter the pre-shared key: ****

For non-mesh APs, the configuration ends here. Save or discard the configuration.

Step 4

To configure mesh capable APs, follow the steps given below:

  1. Configure mesh mode on the AP.

    Example:

    Set Internal AP in mesh mode [yes/no]? [no]: yes
  2. Configure additional mesh access points (MAPs).

    Example:

    Configure additional MAPs [yes/no]? [no]: yes
    Enter a comma separated list of max 20 Mesh AP ethernet macs (format: 'aabbccddeeff' or 'aabb.ccdd.eeff'): aabbccddeeff, 1122.3344.5566
  3. Enable wireless bridging.

    Example:

    Enable wireless bridging [yes/no]? [no]: yes

Example

The configuration for mesh APs is complete. The following configuration script is generated from the entered choices:
!

ap profile default-ap-profile
country US

!
hostname EWC
!
ap profile default-ap-profile
mgmtuser username EWC_User password 0 test secret 0 test

!
username EWC_User privilege 15 secret 9 $x$xxxxxxxxxx9xxxxxxxxxxjxxxxxxxxxxzxxxxxxxxxxOxxxxxxxxxxxxxxx

!
wireless management interface GigabitEthernet0

!

interface GigabitEthernet0
ip address dhcp

!
wlan test 1 test
security wpa psk set-key ascii 0 test
no security wpa akm dot1x
security wpa akm psk
no shut

!

wireless tag policy default-policy-tag
wlan test policy default-policy-profile

!
end
wireless country US
wireless country CH
wireless country CN
wireless country GB
aaa new-model
aaa authentication login default local
aaa authorization credential-download default local
username 3C5731C58478 mac
 

!
ap profile default-ap-profile
ssid broadcast persistent
username aabbccddeeff mac
username 112233445566 mac


wireless mesh security psk provisioning
wireless mesh security psk provisioning default_psk

!
wireless profile mesh default-mesh-profile
security psk
ethernet-bridging
ethernet-vlan-transparent

What to do next

Save or discard the configuration.

[0] Go to the IOS command prompt without saving this config.
[1] Return back to the setup without saving this config.
[2] Save this configuration to nvram and exit.

Enter your selection:

Example:
Enter your selection: 2

Interactive Help

The Cisco Embedded Wireless Controller on Catalyst Access Points GUI features an interactive help that walks you through the GUI and guides you through complex configurations.

You can start the interactive help in the following ways:

  • By hovering your cursor over the blue flap at the right-hand corner of a window in the GUI and clicking Interactive Help.

  • By clicking Walk-me Thru in the left pane of a window in the GUI.

  • By clicking Show me How displayed in the GUI. Clicking Show me How triggers a specific interactive help that is relevant to the context you are in.

    For instance, Show me How in Configure > AAA walks you through the various steps for configuring a RADIUS server. Choose Configuration> Wireless Setup > Advanced and click Show me How to trigger the interactive help that walks you through the steps relating to various kinds of authentication.

The following features have an associated interactive help:

  • Configuring AAA

  • Configuring FlexConnect Authentication

  • Configuring 802.1x Authentication

  • Configuring Local Web Authentication

  • Configuring OpenRoaming

  • Configuring Mesh APs


Note


If the WalkMe launcher is unavailable on Safari, modify the settings as follows:

  1. Choose Preferences > Privacy.

  2. In the Website tracking section, uncheck the Prevent cross-site tracking check box to disable this action.

  3. In the Cookies and website data section, uncheck the Block all cookies check box to disable this action.


Resetting Cisco Embedded Wireless Controller on Catalyst Access Points

To reset the controller on Catalyst APs to factory defaults, follow the steps given below:

Procedure


Step 1

Unplug the Access Point from its power source.

Step 2

Plug in the console cable and open serial session on your computer or laptop.

Step 3

Press and hold the Mode/Reset button on the AP.

Step 4

Plug in the AP back to its power source while still pressing the Mode/Reset button.

Step 5

Continue holding the button until a prompt is displayed in the serial session on your computer or laptop.

Note

 
The console session also displays for how long the button has been pressed. At least 20 seconds of button press is required for a complete restart.

What to do next

When the AP reboots, use the default credentials Cisco/Cisco to log in.