Notification
Services
- Email Notifications
- Multiple Email Notification Configuration
- SMS Notifications
- Multiple SMSC Server Configuration
- Real Time Notifications
- Service Option Configuration
Email Notifications
Configure Notifications
CPS supports sending email notifications to one primary and one secondary email server, or alternatively to a pool of email servers (See Multiple Email Notification Configuration).
When configured for one primary and one secondary email server, CPS will send all email notifications to the primary server. If the primary fails, CPS will retry the notification to the secondary server, if configured. If the secondary server notification fails, CPS will log that the notification was unable to be delivered.
To configure the primary and secondary email server connections that CPS will use to send email notifications to subscribers:
| Step 1 | Login to Policy Builder. | ||||||||||
| Step 2 | Go to . | ||||||||||
| Step 3 | Click the check box next to Email Notification Configuration. | ||||||||||
| Step 4 | View the
Notification Configuration screen that drops down.
The following
parameters can be configured under Email Notification Configuration:
 | ||||||||||
| Step 5 | (Optional) To configure a secondary (backup) email server, click the check box next to Secondary Email Server and configure the parameters for the secondary server. | ||||||||||
| Step 6 | Go to Configure Messages to configure the message to be sent for the notification configuration. |
Configure Messages
Substitution value can be set from SPR, Balance, or the session and placed in the email body using $[variable].
In the following example, we are using a subscriber AVP code for email. The value “$email” is used in the body of the text and replaced then the email is sent.
We are also using $timeStamp to add the Date/Time.

The following parameters can be configured under Email Notifications:
|
Parameter |
Description |
|---|---|
|
Name |
Name of the message. |
|
Message Encoding (DCS) |
Select the required message coding from drop-down list. Valid values are ISO-8859-1, US-ASCII, UTF-16 (UCS-2) and UTF-8. Default value is UTF-8. |
|
Subject |
This is the subject line of the email to the subscriber. |
|
From Email Address |
The From field in the email. |
|
Reply To Email Address |
Who the subscriber may reply to. |
|
Body (Text/Plain) |
The text of the email the subscriber receives in plain format |
|
Body (Text/HTML) |
The text of the email the subscriber receives in HTML format. |
To pull the values from SPR and replace in the email, we use the service option setting from the notification:

For the timestamp, use the Value Retriever.
For the email, select from the “Pull value from…” column.

For reference, our subscriber has a Custom Data AVP set in the details of his subscriber record. This is where the value is being pulled from in Control Center:

Logging
2015-05-01 14:34:46,345 [pool-2-thread-1] DEBUG c.b.n.impl.NotificationsManager.? - Email encoding : UTF8
2015-05-01 14:34:46,345 [pool-2-thread-1] DEBUG c.b.n.impl.NotificationsManager.? - Email Text body : Date/Time: 1430512486305
Dear bob@cisco.com, your new session has started
2015-05-01 14:34:46,345 [pool-2-thread-1] DEBUG c.b.n.impl.NotificationsManager.? - Email HTML body : <br/><br/>
Date/Time: 1430512486305
<br/><br/>
<b>Dear bob@cisco.com, your new session has started.</b>
To use Email Notifications, we need to configure Service Options. For more information on the configuration, refer to Service Option Configuration.
Multiple Email Notification Configuration
Configure Notifications
This section describes how to configure CPS to send email notifications to multiple email servers.
When multiple email servers are configured, CPS utilizes a round-robin selection scheme to distribute the email notifications to subscribers. No weighting is used when selecting the email servers from the configured pool.
If CPS detects that the running status of an email server is DOWN, CPS will automatically skip this server and send the notifications to the next email server. If a message cannot be delivered by an email server, CPS will retry the same message to the next email server.
 Note | In a CPS High Availability deployment, where two Policy Director (load balancer) VMs (lb01 and lb02) are used, each Policy Director operates a separate notification service. As a result, email notifications are first balanced across each Policy Director, and then each Policy Director delivers the message to an email server in a round robin fashion. This can result in concurrent messages being delivered to the same email server. |
The following SNMP Notifications (Alarms) are used to monitor these email server connections. Refer to CPS SNMP and Alarms Guide, Release 9.1.0 and prior releases or CPS SNMP, Alarms and Clearing Procedures Guide, Release 10.0.0 and later releases for more information.
-
AllEmailNotificationServerDown
-
AtLeastOneEmailNotificationServerUp
-
EmailNotificationServerDown
-
EmailNotificationServerUp
To generate the SNMP Notifications (alarms), you need to configure -Dnotification.interface.monitor.emailserver=true in /etc/broadhop/qns.conf file. After configuring the parameter, run the following commands:
/var/qps/install/current/scripts/build_all.sh
/var/qps/install/current/scripts/upgrade/reinit.sh
Note | Before continuing with these steps to add a pool of email servers, first remove the Primary and Secondary servers configured under the Email Notification section of Policy Builder. |
To configure a pool of email server connections that CPS uses to send email notifications to subscribers:
-
Login to Policy Builder.
-
Go to .
-
Click the check box next to Multiple Email Notification Configuration.
-
View the Notification Configuration screen that drops down.
-
Click Add to add an email server to the list.
Figure 6. Multiple Email Notification Configuration 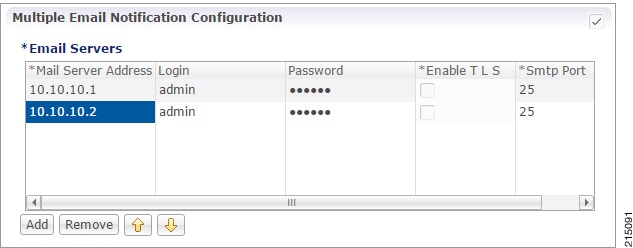
Note
Moving an entry up or down in the table reflects only the display order; it has no impact on the selection when processing email notifications.The following parameters can be configured for each email server:
Table 3 Email Notification Configuration Parameters Parameter
Description
Mail Server Address
IP address or host name of the mail server to which the notification emails will be sent. Only IMAP email is supported at this time.
Login/Password
Enter any login and password information needed.
Enable TLS
Enables transport layer security. This option is used for connecting to services other than basic IMAP services, such as Google’s Gmail.
Smtp Port
Specifies the SMTP port. This option is used for connecting to services other than basic IMAP services, such as Google’s Gmail.
-
Go to Message Configuration, to configure the message to be sent for the notification configuration.
SMS Notifications
Configure Notifications
CPS supports sending Short Message Service (SMS) notifications to one primary and one secondary SMSC server, or alternatively to a pool of SMSC servers (See Multiple SMSC Server Configuration).
The following section describes how to configure CPS to send SMS notifications to a primary SMSC server and a secondary SMSC server.
| Step 1 | Login to Policy Builder. | ||||||||||||||||||||||||||||||||||
| Step 2 | Go to . | ||||||||||||||||||||||||||||||||||
| Step 3 | Click the check box next to SMS Notification Configuration. | ||||||||||||||||||||||||||||||||||
| Step 4 | View the
Notification Configuration screen that drops down.
The following parameters can be configured under SMS Notification:
Other then the parameters mentioned in Table 1, the user can configure the following parameters after selecting Retry Configuration check box. The following parameters can be configured under Retry.
Go to Message Configuration, to configure the SMS message to be sent for the notification configuration done above. |
Configure Messages
-
Select .
-
From right side, click SMS Notification under Create Child to open the pane.
The following parameters can be configured under SMS Notification: Table 6 SMS Notification Parameters Parameter
Description
Name
Name of the notification message. This name is used later in the policy definition to send the SMS.
Source Address
Source address of the SMS message.
Callback Number
This is an optional field. This parameter is used to configure the callback number adhering to specification.The input format is a hexadecimal string. It will correspond to the exact hexadecimal sent in the stream.
Currently, only a single callback number is supported.
For more information, refer to SMS Notification Extension.
Address TON
Type of Number for the source. It defines the format of the phone numbers.
Values: ABBREVIATED, ALPHANUMERIC, INTERNATIONAL, NATIONAL, NETWORK_SPECIFIC, SUBSCRIBER_NUMBER, UNKNOWN
Address NPI
Numbering Plan Indicator. It defines the format of the addresses.
Values: DATA, ERMES, INTERNET, ISDN, LAND_MOBILE, NATIONAL, PRIVATE, TELEX, UNKNOWN, WAP
Message Class (DCS)
The message class per the SMPP specification. Valid values are CLASS0, CLASS1, CLASS2. Default value is CLASS1.
Message Encoding (DCS)
Defines the alphabet and byte encoding used for the message. Valid values are US-ASCII (7 bit), ISO-8859-1 (8 bit), and UTF-16 (UCS-2) which is 16 bit. Default value is US-ASCII.
Override Character Limit (Advanced)
Some SMSCs create multi-part messages for long SMS messages instead of having CPS create the multiple messages. This option provides such behavior by overriding the default single message size.
This option is for advanced use only. The reason is that if space in the message submitted from CPS does not allow for header information, such as the User Data Header (UDH), then many SMSC are not accepted the messages at all.
Compressed (DCS)
Select this check box to set whether compression is used per the SMPP specification. Default is false.
Use Plugin Config Data Coding Instead (DCS
Select this check box when you want to use the value specified in Data Coding field in the Notifications Configuration screen instead of the Message Class, Message Encoding, Compressed, and Contain Message Class values on this screen.
Contain Message Class
Select this check box to set whether the contain message class options is used per the SMPP specification. Default is false.
Use Message Encoding with Plugin Config Data Coding
Select this check box when the “Use Plugin Config Data Coding Instead” check box above is checked. The check box "Use Plugin Config Data Coding Instead” must be true to use this value.
This check box allows the Message Encoding value on this screen to define the byte conversion method that is used in conjunction with the Data Coding value in the Notifications Configuration screen.
By default, the byte conversion method is US-ASCII regardless of the Plugin Configuration’s Data Coding value. Other UTF-16 conversions may use Big Endian, Little Endian or Byte Order Mark (BOM).
This field is also important for ensuring the proper division of messages, particularly for non-English languages, for multi-part SMS message support.
Message
The text that the subscriber receives.
SMS messages have character limits dependent on the selected DCS values. Text in excess of this limit triggers the submission of the multi-part messages to the SMSC.
WAP Settings
WAP push over SMS has been added to facilitate another way of initiation of notification from ANDSF server to the client (UE).
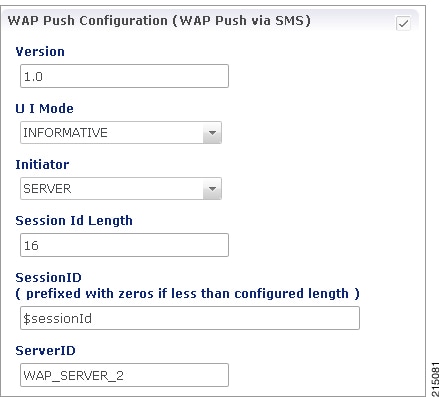
The following parameters can be configured under WAP Push Configuration:
For more information on WAP fields, click WAP Fields.
To use SMS Notifications, we need to configure Service Options. For more information on the configuration, refer to Service Option Configuration.
SMS Notification Extension
A new Service Configuration named as SmsNotificationExtension has been added. Note that since its an extension, it needs the base NotificationService also configured as a part of the main service for it to fetch the base template details. For example, an operator can specify their call-center number for subscribers to call back.

The following parameters are configured under SmsNotificationExtension:
|
Parameter |
Description |
||
|---|---|---|---|
|
Priority |
If there are multiple SMS Notification Extension configurations, this parameter will decide which Service configuration and corresponding parameter values to use. Higher the value, higher precedence it will have. For example, if there are two extension templates having priority as 1 and 2 each, the one with priority value 2 will be used. Default value is 0. |
||
|
Callback Number |
This is the service configuration level value for the callback number. This will satisfy the need of overriding the template value.
Currently, only a single callback number is supported. |
||
|
Override Callback Of Template |
This parameter helps to decide whether to use the service configuration callback number to override the template or not. Default value is true. |
Configure a service with the base Notification Service and select the SMS Notification Template.

Create a Use Case Template using the new SMS Extension.
Add multiple extensions at service option level and configure the corresponding values.

Configure a Service which has the NotificationService configured with corresponding SMS Template chosen and on top we can add the other SMSExtensions.
Multiple SMSC Server Configuration
Configure Notifications
This section describes how to configure CPS to send SMS notifications to multiple SMSC servers.
When multiple SMSC servers are configured, CPS utilizes a round-robin selection scheme to distribute the SMS notifications to subscribers. No weighting is used when selecting the SMSC servers from the configured pool.
If CPS detects that the running status of an SMSC server is DOWN, or if the SMSC server is marked disabled in the Policy Builder interface, CPS will automatically skip this server and send the messages to the next SMSC server. If a message cannot be sent to an SMSC server, CPS will retry to send it to the next SMSC server.
In the event that an SMSC server goes down, CPS can also be configured to reconnect to the server automatically. The frequency at which CPS will attempt to reconnect is also configurable.
Note | In a CPS High Availability deployment, where two Policy Director (load balancer) VMs (lb01 and lb02) are used, each Policy Director operates a separate notification service. As a result, SMS notifications are first balanced across each Policy Director, and then each Policy Director delivers the message to an SMSC server in a round robin fashion. This can result in concurrent SMS messages being delivered to the same SMSC server. |
The following SNMP Notifications (Alarms) have been introduced to monitor the SMSC server connections. Refer to CPS SNMP and Alarms Guide, Release 9.1.0 and prior releases or CPS SNMP, Alarms and Clearing Procedures Guide, Release 10.0.0 and later releases for more information.
-
AllSMSCNotificationServerDown
-
AtLeastOneSMSCNotificationServerUp
-
SMSCNotificationServerDown
-
SMSCNotificationServerUp
Note | Before continuing with these steps to add a pool of SMSC servers, first remove the Primary and Secondary servers configured under the SMS Notification Configuration section of Policy Builder. |
To configure CPS to send SMS notifications to a pool of SMSC servers:
-
Login to Policy Builder.
-
Go to .
-
Click the check box next to Multiple SMSC Server Configuration.
-
View the Notification Configuration screen that drops down.
-
Click Add to add an SMSC server to the list.
Note
Moving an entry up or down in the table reflects only the display order; it has no impact on the selection when processing SMS notifications.The following parameters can be configured for each SMSC server:
Table 9 SMSC Server Parameters Parameter
Description
Admin Status
This field allows the operator to disable a specific SMSC server without removing the configuration entirely. If a server is disabled, CPS will not send any SMS notifications to it.
SMSC Host Address
The TCP/IP address or host name of the SMPP server, that is, the URL of the SMSC host that pushes the SMS message.
SMSC Port
The TCP/IP port on the SMPP server to which the gateway connects.
Binding Type
TX (transmit)
or
TRX (transceiver)
System ID
The user name to use when connecting to the SMSC server
Password
The password to use when connecting to the SMSC server.
Enquire Link Time
Specifies the time between Enquiry Link operations in seconds. CPS performs an Enquire Link operation to the SMSC server to keep the connection alive.
Default: 5000 seconds.
System Type
An optional login parameter used only if required by the SMSC server. The SMSC system administrator provides this value, usually a short text string.
Registered Delivery
Optional field for some custom deployments.
DataCoding
Optional field for some custom deployments.
Data Coding can be used instead of the Message Encoding and the other DCS fields on the Notification message definition screen, but should be used with care.
Note If it is necessary to use a specific value in this field for data coding, then the message alphabet information should be included in the Data Coding value per the SMS specification as well as any other necessary data coding information. The result is a combination of the capabilities of the SMSC and is not totally controlled by CPS. Priority Flag
Optional field for some custom deployments.
Reconnect SMSC SMS
If checked, CPS will attempt to reconnect to an SMSC server if the connection was lost or server was down.
Reconnect SMSC Timer (seconds)
The interval in which CPS will attempt to reconnect to the SMSC server.
Default: 300 seconds
Refer to Message Configuration, to configure the SMS message to be sent for the notification configuration done above.
Real Time Notifications
Configure Notifications
| Step 1 | Log in to Policy Builder. | ||||||
| Step 2 | Go to . | ||||||
| Step 3 | Click the check box next to Realtime Notification Configuration. | ||||||
| Step 4 | View the
Notification Configuration screen that drops down
The following parameters can be configured under Realtime Notification Configuration.
Go to Configure Messages, to configure the realtime notification message to be sent for the notification configuration done above. |
Configure Messages
To create the realtime notification to be sent by CPS, perform the following steps:
| Step 1 | Select . |
| Step 2 | On the
right-hand-side panel, click
Real
Time Notification under
Create
Child to open the Notifications pane.
 The following parameters can be configured under Real Time Notifications: The following example shows a JSON payload template for reference only.
{
  "notifications": [
     {
        "ctn_id": "$msisdn",
        "eventType":"$eventType",
        "eventData":{
           "services":["$service"]
        }
     }
  ]
}
The following figure shows the configuration of NotificationService parameters in a use case template that pertains to the JSON example above. 
The following example shows an XML payload template for reference only.
<?xml version="1.0" encoding="utf-8"?>
    <soapenv:Envelope xmlns:soapenv="http://schemas.xmlsoap.org/soap/envelope/"
xmlns:ser="http://localhost:8080/dataTest/services/">
    <soapenv:Header/>
    <soapenv:Body>
        <ser:NewServiceStartedRequest>
           <UserId>$userId</UserId>
           <Balance>$balance</Balance>
           <Quota>$quota</Quota>
           <Timestamp>$timeStamp</Timestamp>
       </ser:NewServiceStartedRequest>
    </soapenv:Body>
</soapenv:Envelope>
The following figure shows the configuration of NotificationService parameters in a use case template that pertains to the XML example above. 
Message Parameters (using the example XML payload template):
For more information on service options, refer to Service Option Configuration. |
Service Option Configuration
This section provides an example Service Options configuration which can be used for SMS, EMAIL, Apple Push, and GMC notifications. The bodies of the messages are identical to make the service options parameters simpler to follow.
Adding substitute values into the message body
To substitute any value into your message, add the character '$' to the beginning of the variable name. For example, Ex. $userName.
This set of substitute variables are used as an example for SMS, EMAIL, Apple Push, and GCM.
You assign the variables their value using the Notification Service Parameters.
There are four values provide for the example configuration:
-
Notification To Send: Select the Notification you want from the list.
-
Timestamp: This value is pulled using Timestamp Retriever. Use the select box from the Value Retriever field.
-
userId: This value is pulled using Session User Name Retriever. Use the select box from the Value Retriever field.
-
Nickname: We are filling this value using the Subscriber AVP Code action, pulling from the Custom Data attached to the subscriber. You can see these values in the Control Center.
nickName example: Custom AVP in the Control Center
Figure 14. nickName Configuration 
Apple Push Notification Destination
By default, this notification will go the Destination set in the Notifications section under the subscriber details for the type of Notification being sent.
For example, an Apple Push message will go to Apple Push Destination, and SMS to SMS, and so on.

To override the destination set for the subscriber, you can use the Override Destination field in the Service Option.
 Feedback