Patch Upgrade Procedure

VNFM Upgrade Operations

The information provided in this section is applicable only when you upgrade your software to release 6.2 and beyond.


Important

If you're upgrading to any releases prior to 6.2, follow the upgrade instructions in the Upgrading the Ultra Services Platform Deployment chapter of this guide.


Caution

Upgrade/redeployment operations are disruptive as they involve terminating VMs for the various components that comprise the deployment. When upgrading UAS software roles, all related data is lost. As such, it is strongly recommended that you backup all files related to the deployment including configuration files, logs, and images before performing the upgrade or redeployment. Refer to Backing Up Deployment Information for more information.


Important

The process described in this section is supported only with Ultra M deployments based on OSP 10 and that leverage the Hyper-Converged architecture.


Limitations

The following limitations exist with the VNFM upgrade feature:

  • This functionality is only available after upgrading to the 6.2 release.

  • The rolling VNFM patch upgrade process can only be used to upgrade to new releases that have a compatible database schema. As new releases become available, Cisco will provide information as to whether or not this functionality can be used to perform the upgrade.

  • For Ultra M deployments, AutoDeploy and AutoIT must be upgraded before using this functionality. Upgrading these products will terminate the VNF deployment.

  • For stand-alone AutoVNF deployments, AutoVNF must be upgraded before using this functionality. Upgrading these products will terminate the VNF deployment.

  • Make sure there are no additional operations running while performing an upgrade/rolling upgrade process.

  • Upgrade/rolling upgrade procedure should be done only in a maintenance window.

Feature Description


Important

In 6.2, this feature was not fully qualified and was made available only for testing purposes. In 6.3 and later releases, this functionality is fully qualified. For more information, contact your Cisco Accounts representative.

With this release, the ESC-based VNFM can optionally be upgraded as part of a rolling patch upgrade process in order to preserve the operational state of the VNF and UAS deployments.


Important

The VNFM upgrade process is supported for Ultra M deployments that leverage the Hyper-Converged architecture and for stand-alone AutoVNF deployments.

VNFM Upgrade Workflow

This section describes the sequence in which the rolling patch upgrade of VNFM occurs.

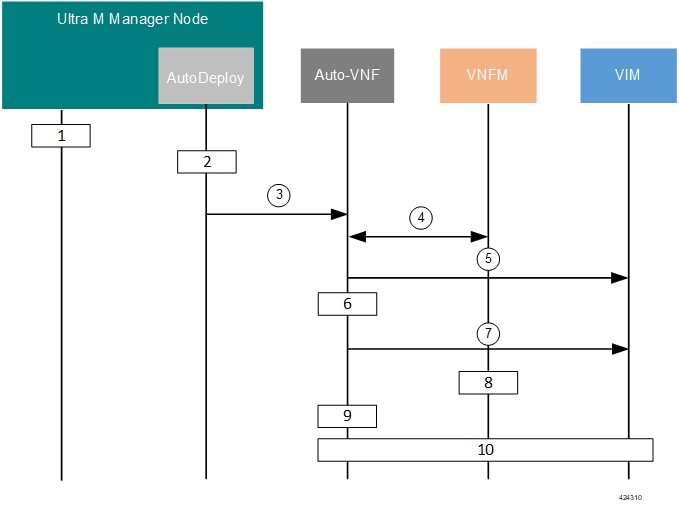
Figure 1 illustrates the VNFM upgrade process for Ultra M deployments. For stand-alone AutoVNF deployments, the upgrade software image is uploaded to the onboarding server (step 1) and the upgrade command is executed from AutoVNF (step 3).

Figure 1. VNFM Upgrade Process Flow
  1. Onboard the new USP ISO containing the VNFM upgrade image to the Ultra M Manager node.

  2. Update the deployment network service descriptor (NSD) to identify the new package and onboard it.

    nsd nsd_name_including_vnfm_vnfd 
    vnf-package [ previous_package_desriptor_name upgrade_package_descriptor_name ] 

    Package information is defined in the VNF package descriptor (vnf-packaged) as follows:

    <---SNIP---> 
    vnf-packaged <upgrade_package_descriptor_name> 
     location           <package_url> 
     validate-signature false 
     configuration staros 
      external-url /home/ubuntu/system.cfg 
    <---SNIP---> 

    The package must then be referenced in the virtual descriptor unit (VDU) pertaining to the UEM:

    <---SNIP---> 
    vdu esc 
     vdu-type         cisco-esc 
     login-credential esc_login 
     netconf-credential esc_netconf 
     image vnf-package 
     vnf-rack         vnf-rack1 
     vnf-package primary <upgrade_package_descriptor_name> 
     vnf-package secondary <previous_package_descriptor_name> 
    
    <---SNIP---> 

    Important

    The secondary image is used as a fallback in the event an issue is encountered through the upgrade process. If no secondary image is specified, the upgrade process will stop and generate an error log.


  3. The rolling upgrade request is triggered through AutoDeploy which initiates the process with AutoVNF.

  4. AutoVNF determines which VNFM VM is active and which is standby by communicating with each of the VMs over the management interface.

  5. AutoVNF triggers the shutdown of the standby VNFM via the VIM.

  6. AutoVNF waits until the VIM confirms that the standby VNFM VM has been completely terminated.

  7. AutoVNF initiates the deployment of a new VNFM VM via the VIM using the upgrade image. The VNFM VM is deployed in standby mode.

  8. The standby VNFM VM synchronizes data with the active VNFM VM.

  9. AutoVNF waits until the VIM confirms that the new VM has been deployed and is in standby mode. If it detects that there is an issue with the VM, AutoVNF re-initiates the VNFM VM with the previous image. If no issues are detected, AutoVNF proceeds with the upgrade process.

  10. Repeat the steps 4 to 7 for the VNFM VM that is currently active.

Initiating the VNFM Upgrade

VNFM upgrades are initiated through a remote procedure call (RPC) executed from the ConfD command line interface (CLI) or via a NETCONF API.

Via the CLI

To perform an upgrade using the CLI, log in to AutoDeploy (Ultra M deployments) or AutoVNF (stand-alone AutoVNF deployments) as the ConfD CLI admin user and execute the following command:

update-sw nsd-id <nsd_name> rolling { true | false } vnfd <vnfd_name> vnf-package <pkg_id> 

NOTES:

  • <nsd_name> and <vnfd_name> are the names of the network service descriptor (NSD) file and VNF descriptor (VNFD) (respectively) in which the VNF component (VNFC) for the VNFM VNF component is defined.

  • If the rolling false operator is used, the upgrade terminates the entire deployment. In this scenario, the vnfd<vnfd_name> operator should not be included in the command. If it is included, a transaction ID for the upgrade is generated and failed. The AutoVNF upstart log reflects this status.

  • <pkg_id> is the name of the USP ISO containing the upgraded VNFM VM image.

  • Ensure that the upgrade package is defined as a VNF package descriptor within the NSD and that it is specified as the primary package in the VNFM VDU configuration.

  • Ensure that the current (pre-upgrade) package is specified as the secondary package in the VNFM VDU configuration in order to provide rollback support in the event of errors.

Via the NETCONF API

Operation: nsd:update-sw

Namespace: xmlns:nsd="http://www.cisco.com/usp/nfv/usp-nsds"

Parameters:

Parameter Name

Required

Type

Description

nsd

M

string

NSD name

rolling

M

boolean

Specifies if the rolling is enabled (true) /disabled (false)

vnfd

M

string

VNFD name, mandatory in case of rolling upgrade

package

M

string

Package descriptor name that should be used to update the vnfd instance mentioned by “vnfd”

NOTES:

  • If the rolling false operator is used, the upgrade terminates the entire deployment. In this scenario, the vnfd<vnfd_name> operator should not be included in the command. If it is included, a transaction ID for the upgrade is generated and failed. The AutoVNF upstart log reflects this status.

  • Ensure that the upgrade package is defined as a VNF package descriptor within the NSD and that it is specified as the primary package in the VNFM VDU configuration.

  • Ensure that the current (pre-upgrade) package is specified as the secondary package in the VNFM VDU configuration in order to provide rollback support in the event of errors.

Example RPC
<nc:rpc message-id="urn:uuid:bac690a2-08af-4c9f-8765-3c907d6e12ba"  <nsd xmlns="http://www.cisco.com/usp/nfv/usp-nsds">
    <nsd-id>fremont-autovnf</nsd-id>
    <vim-identity>vim1</vim-identity>
    <vnfd xmlns="http://www.cisco.com/usp/nfv/usp-nsds">
      <vnfd-id>esc</vnfd-id>
      <vnf-type>esc</vnf-type>
      <version>6.0</version>
      <configuration>
        <boot-time>1800</boot-time>
        <set-vim-instance-name>true</set-vim-instance-name>
      </configuration>
      <external-connection-point>
        <vnfc>esc</vnfc>
        <connection-point>eth0</connection-point>
      </external-connection-point>
      <high-availability>true</high-availability>
      <vnfc>
        <vnfc-id>esc</vnfc-id>
        <health-check>
          <enabled>false</enabled>
        </health-check>
        <vdu>
          <vdu-id>esc</vdu-id>
        </vdu>
        <connection-point>
          <connection-point-id>eth0</connection-point-id>
          <virtual-link>
            <service-vl>mgmt</service-vl>
          </virtual-link>
        </connection-point>
        <connection-point>
          <connection-point-id>eth1</connection-point-id>
          <virtual-link>
            <service-vl>orch</service-vl>
          </virtual-link>
        </connection-point>
      </vnfc>
    </vnfd>
  </nsd>
  <vim xmlns="http://www.cisco.com/usp/nfv/usp-uas-common">
    <vim-id>vim1</vim-id>
    <api-version>v2</api-version>
    <auth-url>http://172.21.201.218:5000/v2.0</auth-url>
    <user>vim-admin-creds</user>
    <tenant>abcxyz</tenant>
  </vim>
  <secure-token xmlns="http://www.cisco.com/usp/nfv/usp-secure-token">
    <secure-id>vim-admin-creds</secure-id>
    <user>abcxyz</user>
    <password>******</password>
  </secure-token>
  <vdu xmlns="http://www.cisco.com/usp/nfv/usp-uas-common">
    <vdu-id>esc</vdu-id>
    <vdu-type>cisco-esc</vdu-type>
    <flavor>
      <vcpus>2</vcpus>
      <ram>4096</ram>
      <root-disk>40</root-disk>
      <ephemeral-disk>0</ephemeral-disk>
      <swap-disk>0</swap-disk>
    </flavor>
    <login-credential>esc_login</login-credential>
    <netconf-credential>esc_netconf</netconf-credential>
    <image>
      <vnf-package>usp_throttle</vnf-package>
    </image>
    <vnf-rack>abcxyz-vnf-rack</vnf-rack>
    <vnf-package>
      <primary>usp_6_2t</primary>
      <secondary>usp_throttle</secondary>
    </vnf-package>
    <volume/>
  </vdu>
  <secure-token xmlns="http://www.cisco.com/usp/nfv/usp-secure-token">
    <secure-id>esc_login</secure-id>
    <user>admin</user>
    <password>******</password>
  </secure-token>
  <secure-token xmlns="http://www.cisco.com/usp/nfv/usp-secure-token">
    <secure-id>esc_netconf</secure-id>
    <user>admin</user>
    <password>******</password>
  </secure-token>
  <vnf-packaged xmlns="http://www.cisco.com/usp/nfv/usp-uas-common">
    <vnf-package-id>usp_throttle</vnf-package-id>
    <location>http://192.168.200.61:5000/isos/fremont-autovnf_usp_throttle</location>
    <validate-signature>false</validate-signature>
    <configuration>
      <name>staros</name>
      <external-url>http://192.168.200.61:5000/isos/fremont-autovnf_usp_throttle_staros</external-url>
    </configuration>
  </vnf-packaged>
</config>
 

UAS Upgrade Operations

The information provided in this section is applicable only when you upgrade your software to release 6.2 and beyond.


Important

If you're upgrading to any releases prior to 6.2, follow the upgrade instructions in the Upgrading the Ultra Services Platform Deployment chapter of this guide.


Caution

Upgrade/redeployment operations are disruptive as they involve terminating VMs for the various components that comprise the deployment. When upgrading UAS software roles, all related data is lost. As such, it is strongly recommended that you backup all files related to the deployment including configuration files, logs, and images before performing the upgrade or redeployment. Refer to Backing Up Deployment Information for more information.


Important

The process described in this section is supported only with Ultra M deployments based on OSP 10 and that leverage the Hyper-Converged architecture.


Feature Description (AutoDeploy and AutoIT)


Important

In 6.2, this feature was not fully qualified and was made available only for testing purposes. In 6.3 and later releases, this functionality is fully qualified. For more information, contact your Cisco Accounts representative.

With this release, these UAS modules can optionally be upgraded as part of a rolling upgrade process in order to preserve the operational state of the VNF and UAS deployments. The rolling upgrade process is possible as long as the AutoDeploy and AutoIT were deployed in high availability (HA) mode. This allows their CDBs to be synchronized between the active and standby instances.


Important

The AutoDeploy and AutoIT rolling upgrade processes are supported for Ultra M deployments that leverage the Hyper-Converged architecture and for stand-alone AutoVNF deployments.


AutoDeploy and AutoIT Upgrade Workflow

The rolling upgrade process for AutoDeploy and AutoIT occurs as follows:

  1. Onboard the new USP ISO containing the UAS upgrade image to the Ultra M Manager node.

  2. The rolling upgrade is triggered via a script on baremetal server or undercloud system, wherever the AutoDeploy/AutoIT is deployed.

  3. The script terminates the first AutoDeploy or AutoIT VM instance.

  4. Upon successful termination of the VM, the script deploys a new VM instance. If it detects that there is an issue with the VM, the script re-initiates the VM with the previous image. If no issues are detected, the script proceeds with the upgrade process.

  5. Repeat the steps 3 and 4 for the second AutoDeploy or AutoIT VM instance.


Important

If AutoDeploy and AutoIT were not deployed with HA mode enabled, or if you prefer to perform an upgrade through a complete reinstall, you must first terminate the current installation using the information and instructions in the Ultra Services Platform Deployment Automation Guide.


Upgrading AutoDeploy or AutoIT

AutoDeploy and AutoIT upgrades are performed by executing a script manually.

  1. Log on to the AutoDeploy VM as the root user.

  2. Initiate the upgrade from another VM:

    1. Execute the upgrade script:

      ./boot_uas.py --kvm { --autodeploy | --autoit } --upgrade-uas 
    2. Enter the password for the user ubuntu at the prompt.

    3. Enter the path and name for the upgrade image at the prompt.

  3. Upon completion of the upgrade, check the software version.

    1. Login to the ConfD CLI as the admin user.

      confd_cli –u admin –C 
    2. Enter the admin user password when prompted.

    3. View the status.

      show uas 

      Example command output:

      uas version               6.2.0
      uas state                 active
      uas external-connection-point 172.28.185.132
      INSTANCE IP     STATE  ROLE
      -------------------------------------
      172.28.185.133  alive  CONFD-MASTER
      172.28.185.134  alive  CONFD-SLAVE
      
      NAME           LAST HEARTBEAT
      ------------------------------------
      AutoIT-MASTER  2018-03-24 21:24:30
      USPCFMWorker   2018-03-24 21:24:30
      USPCHBWorker   2018-03-24 21:24:30
      USPCWorker     2018-03-24 21:24:30
       

Limitations

The following limitations exist with the API-based AutoDeploy, AutoIT and AutoVNF upgrade feature:

  • This functionality is only available after upgrading to the 6.2 release.

  • Regardless of the UAS component (AutoDeploy, AutoIT, or AutoVNF), the rolling patch upgrade process can only be used to upgrade to new releases that have a compatible database schema. As new releases become available, Cisco will provide information as to whether or not this functionality can be used to perform the upgrade.

  • For Ultra M deployments, AutoDeploy and AutoIT must be upgraded before using this functionality to upgrade AutoVNF. Upgrading these products will terminate the VNF deployment.

  • Make sure there are no additional operations running while performing an upgrade/rolling upgrade process.

  • Upgrade/rolling upgrade procedure should be done only in a maintenance window.

Feature Description (AutoVNF)


Important

In 6.2, this feature was not fully qualified and was made available only for testing purposes. In 6.3 and later releases, this functionality is fully qualified. For more information, contact your Cisco Accounts representative.

With this release, AutoVNF can optionally be upgraded as part of a rolling upgrade process in order to preserve the operational state of the VNF and UAS deployments.


Important

The AutoVNF upgrade process is supported for Ultra M deployments that leverage the Hyper-Converged architecture and for stand-alone AutoVNF deployments.

AutoVNF Upgrade Workflow

This section describes the sequence in which the AutoVNF upgrade procedure will be performed.

Figure 1 illustrates the AutoVNF upgrade process for Ultra M deployments. For stand-alone AutoVNF deployments, the upgrade software image is uploaded to the onboarding server (step 1) and the upgrade command is executed from AutoVNF (step 3).

Figure 2. AutoVNF Upgrade Process Flow
  1. Onboard the new USP ISO containing the UAS upgrade image to the Ultra M Manager node.

  2. Update the deployment network service descriptor (NSD) to identify the new package and onboard it.

    nsd nsd_name_including_vnfm_vnfd 
    vnf-package [ previous_package_desriptor_name upgrade_package_descriptor_name ] 

    Package information is defined in the VNF package descriptor (vnf-packaged) as follows:

    <---SNIP---> 
    vnf-packaged <upgrade_package_descriptor_name> 
     location           <package_url> 
     validate-signature false 
     configuration staros 
      external-url /home/ubuntu/system.cfg 
    <---SNIP---> 

    The package must then be referenced in the virtual descriptor unit (VDU) pertaining to the UEM:

    <---SNIP---> 
    vdu autovnf 
     vdu-type         automation-service 
     login-credential autovnf_login 
     scm              scm 
     image vnf-package 
     vnf-rack         vnf-rack1 
     vnf-package primary <upgrade_package_descriptor_name> 
     vnf-package secondary <previous_package_descriptor_name> 
    
    <---SNIP---> 

    Important

    The secondary image is used as a fallback in the event an issue is encountered through the upgrade process. If no secondary image is specified, the upgrade process will stop and generate an error log.
  3. The rolling upgrade request is triggered through AutoDeploy which initiates the process with the VIM through AutoIT.

  4. AutoIT determines which AutoVNF VM is active and which is standby by communicating with each of the VMs over the management interface.

  5. AutoIT triggers the shutdown of the standby AutoVNF VM via the VIM.

  6. AutoIT waits until the VIM confirms that the standby AutoVNF VM has been completely terminated.

  7. AutoIT initiates the deployment of a new AutoVNF VM via the VIM using the upgrade image. The AutoVNF VM is deployed in standby mode.

  8. The standby AutoVNF VM synchronizes data with the active AutoVNF VM.

  9. AutoIT waits until the VIM confirms that the new VM has been deployed and is in standby mode. If it detects that there is an issue with the VM, AutoIT re-initiates the AutoVNF VM with the previous image. If no issues are detected, AutoIT proceeds with the upgrade process.

  10. Repeat the steps 4 to 7 for the AutoVNF VM that is currently active.

Initiating the AutoVNF Upgrade

AutoVNF upgrades are initiated through a remote procedure call (RPC) executed from the ConfD command line interface (CLI) or via a NETCONF API.

Via the CLI

To perform an upgrade using the CLI, log in to AutoDeploy (Ultra M deployments) or AutoVNF (stand-alone AutoVNF deployments) as the ConfD CLI admin user and execute the following command:

update-sw nsd-id <nsd_name> rolling { true | false } vnfd <vnfd_name> vnf-package <pkg_id> 

NOTES:

  • <nsd_name> and <vnfd_name> are the names of the network service descriptor (NSD) file and VNF descriptor (VNFD) (respectively) in which the VNF component (VNFC) for the VNFM VNF component is defined.

  • If the rolling false operator is used, the upgrade terminates the entire deployment. In this scenario, the vnfd<vnfd_name> operator should not be included in the command. If it is included, a transaction ID for the upgrade is generated and failed. The AutoVNF upstart log reflects this status.

  • <pkg_id> is the name of the USP ISO containing the upgraded VNFM VM image.

  • Ensure that the upgrade package is defined as a VNF package descriptor within the NSD and that it is specified as the primary package in the AutoVNF VDU configuration.

  • Ensure that the current (pre-upgrade) package is specified as the secondary package in the AutoVNF VDU configuration in order to provide rollback support in the event of errors.

Via the NETCONF API

Operation: nsd:update-sw

Namespace: xmlns:nsd="http://www.cisco.com/usp/nfv/usp-nsds"

Parameters:

Parameter Name

Required

Type

Description

nsd

M

string

NSD name

rolling

M

boolean

Specifies if the rolling is enabled (true) /disabled (false)

vnfd

M

string

VNFD name, mandatory in case of rolling upgrade

package

M

string

Package descriptor name that should be used to update the vnfd instance mentioned by “vnfd”

NOTES:

  • If the rolling false operator is used, the upgrade terminates the entire deployment. In this scenario, the vnfd<vnfd_name> operator should not be included in the command. If it is included, a transaction ID for the upgrade is generated and failed. The AutoVNF upstart log reflects this status.

  • Ensure that the upgrade package is defined as a VNF package descriptor within the NSD and that it is specified as the primary package in the AutoVNF VDU configuration.

  • Ensure that the current (pre-upgrade) package is specified as the secondary package in the AutoVNF VDU configuration in order to provide rollback support in the event of errors.

Example RPC
<nc:rpc message-id="urn:uuid:bac690a2-08af-4c9f-8765-3c907d6e12ba"  <nsd xmlns="http://www.cisco.com/usp/nfv/usp-nsds">
    <nsd-id>fremont-autovnf</nsd-id>
    <vim-identity>vim1</vim-identity>
    <vnfd xmlns="http://www.cisco.com/usp/nfv/usp-nsds">
      <vnfd-id>esc</vnfd-id>
      <vnf-type>esc</vnf-type>
      <version>6.0</version>
      <configuration>
        <boot-time>1800</boot-time>
        <set-vim-instance-name>true</set-vim-instance-name>
      </configuration>
      <external-connection-point>
        <vnfc>esc</vnfc>
        <connection-point>eth0</connection-point>
      </external-connection-point>
      <high-availability>true</high-availability>
      <vnfc>
        <vnfc-id>esc</vnfc-id>
        <health-check>
          <enabled>false</enabled>
        </health-check>
        <vdu>
          <vdu-id>esc</vdu-id>
        </vdu>
        <connection-point>
          <connection-point-id>eth0</connection-point-id>
          <virtual-link>
            <service-vl>mgmt</service-vl>
          </virtual-link>
        </connection-point>
        <connection-point>
          <connection-point-id>eth1</connection-point-id>
          <virtual-link>
            <service-vl>orch</service-vl>
          </virtual-link>
        </connection-point>
      </vnfc>
    </vnfd>
  </nsd>
  <vim xmlns="http://www.cisco.com/usp/nfv/usp-uas-common">
    <vim-id>vim1</vim-id>
    <api-version>v2</api-version>
    <auth-url>http://172.21.201.218:5000/v2.0</auth-url>
    <user>vim-admin-creds</user>
    <tenant>abcxyz</tenant>
  </vim>
  <secure-token xmlns="http://www.cisco.com/usp/nfv/usp-secure-token">
    <secure-id>vim-admin-creds</secure-id>
    <user>abcxyz</user>
    <password>******</password>
  </secure-token>
  <vdu xmlns="http://www.cisco.com/usp/nfv/usp-uas-common">
    <vdu-id>esc</vdu-id>
    <vdu-type>cisco-esc</vdu-type>
    <flavor>
      <vcpus>2</vcpus>
      <ram>4096</ram>
      <root-disk>40</root-disk>
      <ephemeral-disk>0</ephemeral-disk>
      <swap-disk>0</swap-disk>
    </flavor>
    <login-credential>esc_login</login-credential>
    <netconf-credential>esc_netconf</netconf-credential>
    <image>
      <vnf-package>usp_throttle</vnf-package>
    </image>
    <vnf-rack>abcxyz-vnf-rack</vnf-rack>
    <vnf-package>
      <primary>usp_6_2t</primary>
      <secondary>usp_throttle</secondary>
    </vnf-package>
    <volume/>
  </vdu>
  <secure-token xmlns="http://www.cisco.com/usp/nfv/usp-secure-token">
    <secure-id>esc_login</secure-id>
    <user>admin</user>
    <password>******</password>
  </secure-token>
  <secure-token xmlns="http://www.cisco.com/usp/nfv/usp-secure-token">
    <secure-id>esc_netconf</secure-id>
    <user>admin</user>
    <password>******</password>
  </secure-token>
  <vnf-packaged xmlns="http://www.cisco.com/usp/nfv/usp-uas-common">
    <vnf-package-id>usp_throttle</vnf-package-id>
    <location>http://192.168.200.61:5000/isos/fremont-autovnf_usp_throttle</location>
    <validate-signature>false</validate-signature>
    <configuration>
      <name>staros</name>
      <external-url>http://192.168.200.61:5000/isos/fremont-autovnf_usp_throttle_staros</external-url>
    </configuration>
  </vnf-packaged>
</config>
 

UEM Upgrade Operations

The information provided in this section is applicable only when you upgrade your software to release 6.2 and beyond.


Important

If you're upgrading to any releases prior to 6.2, follow the upgrade instructions in the Upgrading the Ultra Services Platform Deployment chapter of this guide.


Caution

Upgrade/redeployment operations are disruptive as they involve terminating VMs for the UEM, CF, and SF components that comprise the VNF. It is strongly recommended that you backup all files related to the deployment including configuration files, logs, and images before performing the upgrade or redeployment. Refer to Backing Up Deployment Information for more information.


Important

The process described in this section is supported only with Ultra M deployments based on OSP 10 and that leverage the Hyper-Converged architecture.


Limitations

The following limitations exist with the UEM upgrade feature:

  • This functionality is only available after upgrading to the 6.2 release.

  • The rolling UEM patch upgrade process can only be used to upgrade to new releases that have a compatible database schema. As new releases become available, Cisco will provide information as to whether or not this functionality can be used to perform the upgrade.

  • For Ultra M deployments, AutoDeploy and AutoIT must be upgraded before using this functionality. Upgrading these products will terminate the VNF deployment.

  • For stand-alone AutoVNF deployments, AutoVNF must be upgraded before using this functionality. Upgrading these products will terminate the VNF deployment.

  • Make sure there are no additional operations running while performing an upgrade/rolling upgrade process.

  • Upgrade/rolling upgrade procedure should be done only in a maintenance window.

Feature Description


Important

In 6.2, this feature was not fully qualified and was made available only for testing purposes. In 6.3 and later releases, this functionality is fully qualified. For more information, contact your Cisco Accounts representative.

With this release, the UEM can optionally be upgraded as part of a rolling patch upgrade process in order to preserve the operational state of the VNF, UAS, and VNFM deployments.

UEM Upgrade Workflow

The upgrade flow depends on the number of VM instances in UEM cluster.

If there are two VM instances in the UEM cluster then UEM Master VM acts also as UEM Standby VM. That is, one instance plays the role of both Master and Standby, while the other instance acts as Slave.

If there are three VM instances in the UEM cluster then there are dedicated VM instances for each role: Master, Slave and Standby. That is, one instance acts as Master, the 2nd instance acts as Slave and the 3rd instance acts as Standby.

In the rolling patch upgrade process, each of the VMs in the UEM Zookeeper cluster is upgraded one at a time. By default, the upgrade attempts to upgrade the slave VM first and the Zookeeper-elected leader VM last as illustrated in Figure 3.

Figure 3. UEM VM Upgrade Order for 2 VM based UEM Cluster


Figure 4. UEM VM Upgrade Order for 3 VM based UEM Cluster

Important

The UEM patch upgrade process is supported for Ultra M deployments that leverage the Hyper-Converged architecture and for stand-alone AutoVNF deployments.


Figure 3 illustrates the UEM patch upgrade process for Ultra M deployments. For stand-alone AutoVNF deployments, the upgrade software image is uploaded to the onboarding server (step 1) and the upgrade command is executed from AutoVNF (step 3).

Figure 5. UEM Patch Upgrade Process Flow
  1. Onboard the new USP ISO containing the UEM upgrade image to the Ultra M Manager node.

  2. Update the deployment network service descriptor (NSD) to identify the new package and onboard it.

    nsd nsd_name_including_vnfm_vnfd 
    vnf-package [ previous_package_desriptor_name upgrade_package_descriptor_name ] 

    Package information is defined in the VNF package descriptor (vnf-packaged) as follows:

    <---SNIP---> 
    vnf-packaged <upgrade_package_descriptor_name> 
     location           <package_url> 
     validate-signature false 
     configuration staros 
      external-url /home/ubuntu/system.cfg 
    <---SNIP---> 

    The package must then be referenced in the virtual descriptor unit (VDU) pertaining to the UEM:

    <---SNIP---> 
    vdu em 
     vdu-type         element-manager 
     login-credential em_login 
     scm              scm 
     image vnf-package 
     vnf-rack         vnf-rack1 
     vnf-package primary <upgrade_package_descriptor_name> 
     vnf-package secondary <previous_package_descriptor_name> 
    
    <---SNIP---> 

    Important

    The secondary image is used as a fallback in the event an issue is encountered through the upgrade process. If no secondary image is specified, the upgrade process will stop and generate an error log.


  3. The rolling upgrade request is triggered through AutoDeploy which initiates the process with AutoVNF.

  4. AutoVNF obtains the UEM HA VIP from the Oper data and communicates with the corresponding UEM to determine the IP addresses of the eth0 interface for each VM in the UEM cluster. This information is maintained in a file on the VM named ip.txt.

    AutoVNF then uses the address information to communicate with each UEM to determine their Zookeeper state (master, slave, and standby).

    The upgrade order is illustrated in Figure 2. The rest of this procedure assumes that that the standby UEM VM is the Zookeeper-elected leader.

  5. AutoVNF triggers the shutdown of the slave UEM VM via the VNFM.

  6. The VNFM works with VIM to remove the slave UEM VM.

  7. AutoVNF waits until the VNFM confirms that the slave UEM VM has been completely terminated.

  8. AutoVNF initiates the deployment of a new UEM VM via the VNFM using the upgrade image.

  9. The VNFM works with the VIM to deploy the new UEM VM.


    Important

    • If the ESC does not receive the “SERVICE UPDATE” notification for the newly added VM instances, the upgrade will fail and require a manual intervention.

    • If ESC state (service/VM state ) is not ‘ACTIVE’, then the upgrade will not proceed. You need to manually verify the logs to determine the reason for the inactive state.


  10. The slave UEM VM synchronizes data with the master UEM VM.

  11. AutoVNF waits until the VNFM confirms that the new VM has been deployed and is in slave mode.

    If AutoVNF detects that there is an issue with the VM, it re-initiates the UEM VM with the previous image if it was identified as a secondary image in the UEM VDU.

    If no issues are detected, AutoVNF proceeds with the upgrade process.

  12. Repeat the steps 4 to 10 for the UEM VM that is currently the master. Once the master goes down, the slave UEM becomes the master.

    If an issue is encountered during the upgrade of the second UEM VM (e.g. the master UEM VM in this scenario), then the process stops completely and AutoVNF upstart logs are generated.

  13. Repeat the steps 4 to 8 for the standby VM. In this case, the UEM is re-deployed as the standby VM.

Initiating the UEM Patch Upgrade

UEM patch upgrades are initiated through a remote procedure call (RPC) executed from the ConfD command line interface (CLI) or via a NETCONF API.

Via the CLI

To perform an upgrade using the CLI, log in to AutoDeploy (Ultra M deployments) or AutoVNF (stand-alone AutoVNF deployments) as the ConfD CLI admin user and execute the following command:

update-sw nsd-id <nsd_name> rolling { true | false } vnfd <vnfd_name> vnf-package <pkg_id> 

NOTES:

  • <nsd_name> and <vnfd_name> are the names of the network service descriptor (NSD) file and VNF descriptor (VNFD) (respectively) in which the VNF component (VNFC) for the UEM VNF component is defined.

  • If the rolling false operator is used, the upgrade terminates the entire deployment. In this scenario, the vnfd<vnfd_name> operator should not be included in the command. If it is included, a transaction ID for the upgrade is generated and failed. The AutoVNF upstart log reflects this status.

  • <pkg_id> is the name of the USP ISO containing the upgraded UEM VM image.

  • Ensure that the upgrade package is defined as a VNF package descriptor within the NSD and that it is specified as the primary package in the UEM VDU configuration.

  • Ensure that the current (pre-upgrade) package is specified as the secondary package in the UEM VDU configuration in order to provide rollback support in the event of errors.

Via the NETCONF API

Operation: nsd:update-sw

Namespace: xmlns:nsd="http://www.cisco.com/usp/nfv/usp-nsds"

Parameters:

Parameter Name

Required

Type

Description

nsd

M

string

NSD name

rolling

M

boolean

Specifies if the rolling is enabled (true) /disabled (false)

vnfd

M

string

VNFD name, mandatory in case of rolling upgrade

package

M

string

Package descriptor name that should be used to update the vnfd instance mentioned by “vnfd”

NOTES:

  • If the rolling false operator is used, the upgrade terminates the entire deployment. In this scenario, the vnfd<vnfd_name> operator should not be included in the command. If it is included, a transaction ID for the upgrade is generated and failed. The AutoVNF upstart log reflects this status.

  • Ensure that the upgrade package is defined as a VNF package descriptor within the NSD and that it is specified as the primary package in the UEM VDU configuration.

  • Ensure that the current (pre-upgrade) package is specified as the secondary package in the UEM VDU configuration in order to provide rollback support in the event of errors.

Example RPC
<nc:rpc message-id="urn:uuid:bac690a2-08af-4c9f-8765-3c907d6e12ba"  <nsd xmlns="http://www.cisco.com/usp/nfv/usp-nsds">
    <nsd-id>fremont-autovnf</nsd-id>
    <vim-identity>vim1</vim-identity>
    <vnfd xmlns="http://www.cisco.com/usp/nfv/usp-nsds">
      <vnfd-id>esc</vnfd-id>
      <vnf-type>esc</vnf-type>
      <version>6.0</version>
      <configuration>
        <boot-time>1800</boot-time>
        <set-vim-instance-name>true</set-vim-instance-name>
      </configuration>
      <external-connection-point>
        <vnfc>esc</vnfc>
        <connection-point>eth0</connection-point>
      </external-connection-point>
      <high-availability>true</high-availability>
      <vnfc>
        <vnfc-id>esc</vnfc-id>
        <health-check>
          <enabled>false</enabled>
        </health-check>
        <vdu>
          <vdu-id>esc</vdu-id>
        </vdu>
        <connection-point>
          <connection-point-id>eth0</connection-point-id>
          <virtual-link>
            <service-vl>mgmt</service-vl>
          </virtual-link>
        </connection-point>
        <connection-point>
          <connection-point-id>eth1</connection-point-id>
          <virtual-link>
            <service-vl>orch</service-vl>
          </virtual-link>
        </connection-point>
      </vnfc>
    </vnfd>
  </nsd>
  <vim xmlns="http://www.cisco.com/usp/nfv/usp-uas-common">
    <vim-id>vim1</vim-id>
    <api-version>v2</api-version>
    <auth-url>http://172.21.201.218:5000/v2.0</auth-url>
    <user>vim-admin-creds</user>
    <tenant>abcxyz</tenant>
  </vim>
  <secure-token xmlns="http://www.cisco.com/usp/nfv/usp-secure-token">
    <secure-id>vim-admin-creds</secure-id>
    <user>abcxyz</user>
    <password>******</password>
  </secure-token>
  <vdu xmlns="http://www.cisco.com/usp/nfv/usp-uas-common">
    <vdu-id>esc</vdu-id>
    <vdu-type>cisco-esc</vdu-type>
    <flavor>
      <vcpus>2</vcpus>
      <ram>4096</ram>
      <root-disk>40</root-disk>
      <ephemeral-disk>0</ephemeral-disk>
      <swap-disk>0</swap-disk>
    </flavor>
    <login-credential>esc_login</login-credential>
    <netconf-credential>esc_netconf</netconf-credential>
    <image>
      <vnf-package>usp_throttle</vnf-package>
    </image>
    <vnf-rack>abcxyz-vnf-rack</vnf-rack>
    <vnf-package>
      <primary>usp_6_2t</primary>
      <secondary>usp_throttle</secondary>
    </vnf-package>
    <volume/>
  </vdu>
  <secure-token xmlns="http://www.cisco.com/usp/nfv/usp-secure-token">
    <secure-id>esc_login</secure-id>
    <user>admin</user>
    <password>******</password>
  </secure-token>
  <secure-token xmlns="http://www.cisco.com/usp/nfv/usp-secure-token">
    <secure-id>esc_netconf</secure-id>
    <user>admin</user>
    <password>******</password>
  </secure-token>
  <vnf-packaged xmlns="http://www.cisco.com/usp/nfv/usp-uas-common">
    <vnf-package-id>usp_throttle</vnf-package-id>
    <location>http://192.168.200.61:5000/isos/fremont-autovnf_usp_throttle</location>
    <validate-signature>false</validate-signature>
    <configuration>
      <name>staros</name>
      <external-url>http://192.168.200.61:5000/isos/fremont-autovnf_usp_throttle_staros</external-url>
    </configuration>
  </vnf-packaged>
</config>