部署软件代理
 Note |
注销后,使用自动角色映射从 LDAP 或 AD 帐户下载安装程序脚本会失败。要让安装程序脚本不间断地访问集群,请启用“使用本地身份验证”(Use Local Authentication)。 |
在部署时,Cisco Secure Workload 集群会根据运行代理的主机特定的一组参数来为代理分配唯一身份。如果主机名和 BIOS UUID 是参数集的一部分,则可能会遇到以下问题:
-
克隆虚拟机并保留 BIOS UUID 和主机名时以及即时克隆 VDI 时注册失败。发生注册失败的原因是 Cisco Secure Workload 已有一个使用相同参数集的注册软件代理。您可以使用 OpenAPI 来删除已注册的代理。在某些情况下,启动时配置的重复 BIOS UUID 在一段时间后会被 VMware 更改。重启思科 Cisco Secure Workload 服务后,代理注册就会恢复。
-
如果更改主机名并重启主机,则会为代理生成一个新身份。经过一段时间后,多余或旧的代理将被标记为不活动。有关详细信息,请参阅常见问题解答部分。
支持的平台和要求
有关支持的平台和软件代理的其他要求的信息,请参阅:
安装用于深度可视性和执行的 Linux 代理
安装 Linux 代理的要求和前提条件
支持的 Linux 代理安装方法
安装 Linux 代理以实现深度可视性和执行的方法:
使用代理映像安装程序方法安装 Linux 代理
建议使用自动安装程序脚本方法来安装 Linux 代理。如果有特殊原因需要使用手动方法,请使用映像安装程序方法。
前提条件:
对于 SaaS 集群以及在具有多个租户的本地集群的非默认租户上安装代理,请在 user.cfg 文件中配置 ACTIVATION_KEY 和 HTTPS_PROXY。有关详细信息,请参阅(仅限手动安装)更新用户配置文件。
要使用代理映像方法来安装 Linux 代理,请执行以下操作:
Procedure
|
Step 1 |
导航至代理安装方法:
|
||
|
Step 2 |
点击代理映像安装程序 (Agent Image Installer)。 |
||
|
Step 3 |
在平台 (Platform) 字段中,输入 Linux。 |
||
|
Step 4 |
输入所需的代理类型和代理版本,然后从结果中下载所需的代理版本。 |
||
|
Step 5 |
将 RPM 软件包复制到所有 Linux 主机进行部署。
|
||
|
Step 6 |
使用根权限运行 RPM 命令,具体取决于您的平台。
|
使用代理脚本安装程序方法安装 Linux 代理
我们建议使用安装程序脚本方法来部署 Linux 代理,以实现深度可视性和执行。
Note |
|
要使用脚本安装程序方法来安装 Linux 代理,请执行以下操作:
Procedure
|
Step 1 |
导航至代理安装方法:
|
||
|
Step 2 |
点击代理脚本安装程序 (Agent Script Installer)。 |
||
|
Step 3 |
从选择平台 (Select Platform) 下拉列表中选择 Linux。 要查看支持的 Linux 平台,请点击显示支持的平台 (Show Supported Platforms)。 |
||
|
Step 4 |
选择要安装代理的租户。
|
||
|
Step 5 |
如果要为工作负载分配标签,请选择标签键并输入标签值。 当安装的代理报告主机上的 IP 地址时,此处选择的安装程序 CMDB 标签,以及已分配给该主机报告的 IP 的其他已上传 CMDB 标签,将自动分配给新的 IP 地址。如果上传的 CMDB 标签与安装程序的 CMDB 标签发生冲突:
|
||
|
Step 6 |
如果需要 HTTP 代理才能与 Cisco Secure Workload 通信,请选择是 (Yes),然后输入有效的代理 URL。 |
||
|
Step 7 |
在安装程序到期 (Installer expiration) 部分中,选择一个选项:
|
||
|
Step 8 |
点击下载 (Download) 并将文件保存到本地磁盘。 |
||
|
Step 9 |
在 Linux 主机上复制安装程序 shell 脚本并运行以下命令以授予脚本执行权限:
|
||
|
Step 10 |
要安装代理,请使用根权限运行以下命令:
|
我们建议按照脚本使用详细信息中的规定运行预先检查。
bash tetration_linux_installer.sh [--pre-check] [--skip-pre-check=<option>] [--no-install] [--logfile=<filename>] [--proxy=<proxy_string>] [--no-proxy] [--help] [--version] [--sensor-version=<version_info>] [--ls] [--file=<filename>] [--save=<filename>] [--new] [--reinstall] [--unpriv-user] [--force-upgrade] [--upgrade-local] [--upgrade-by-uuid=<filename>] [--basedir=<basedir>] [--logbasedir=<logbdir>] [--tmpdir=<tmp_dir>] [--visibility] [--golden-image]
  --pre-check: run pre-check only
  --skip-pre-check=<option>: skip pre-installation check by given option; Valid options include 'all', 'ipv6' and 'enforcement'; e.g.: '--skip-pre-check=all' will skip all pre-installation checks; All pre-checks will be performed by default
  --no-install: will not download and install sensor package onto the system
  --logfile=<filename>: write the log to the file specified by <filename>
  --proxy=<proxy_string>: set the value of CL_HTTPS_PROXY, the string should be formatted as http://<proxy>:<port>
  --no-proxy: bypass system wide proxy; this flag will be ignored if --proxy flag was provided
  --help: print this usage
  --version: print current script's version
  --sensor-version=<version_info>: select sensor's version; e.g.: '--sensor-version=3.4.1.0'; will download the latest version by default if this flag was not provided
  --ls: list all available sensor versions for your system (will not list pre-3.1 packages); will not download any package
  --file=<filename>: provide local zip file to install sensor instead of downloading it from cluster
  --save=<filename>: download and save zip file as <filename>
  --new: remove any previous installed sensor
  --reinstall: reinstall sensor and retain the same identity with cluster; this flag has higher priority than --new
  --unpriv-user=<username>: use <username> for unpriv processes instead of tet-sensor
  --force-upgrade: force sensor upgrade to version given by --sensor-version flag; e.g.: '--sensor-version=3.4.1.0 --force-upgrade'; apply the latest version by default if --sensor-version flag was not provided
  --upgrade-local: trigger local sensor upgrade to version given by --sensor-version flag: e.g.: '--sensor-version=3.4.1.0 --upgrade-local'; apply the latest version by default if --sensor-version flag was not provided
  --upgrade-by-uuid=<filename>: trigger sensor whose uuid is listed in <filename> upgrade to version given by --sensor-version flag; e.g.: '--sensor-version=3.4.1.0 --upgrade-by-uuid=/usr/local/tet/sensor_id'; apply the latest version by default if --sensor-version flag was not provided
  --basedir=<base_dir>: instead of using /usr/local use <base_dir> to install agent. The full path will be <base_dir>/tetration
  --logbasedir=<log_base_dir>: instead of logging to /usr/local/tet/log use <log_base_dir>. The full path will be <log_base_dir>/tetration
  --tmpdir=<tmp_dir>: instead of using /tmp use <tmp_dir> as temp directory
  --visibility: install deep visibility agent only; --reinstall would overwrite this flag if previous installed agent type was enforcer
  --golden-image: install Cisco Secure Workload Agent but do not start the Cisco Secure Workload Services; use to install Cisco Secure Workload Agent on Golden Images in VDI environment or Template VM. On VDI/VM instance created from golden image with different host name, Cisco Secure Workload Services will work normally
Note |
|
验证 Linux 代理安装
Procedure
|
运行命令 sudo rpm -q tet-sensor 输出示例: 具体输出可能会因平台和架构而异。 |
安装用于深度可视性和执行的 Windows 代理
安装 Windows 代理的要求和前提条件
-
请参阅“支持的平台和要求”部分。
-
安装和执行服务需要具有管理员权限。
-
Npcap 必须安装在运行 Windows 2008 R2 的工作负载上,而当安装的代理版本低于版本 3.8 时也必须安装。如果尚未安装 Npcap 驱动程序,代理会在服务启动后在后台安装推荐的 Npcap 版本。有关详细信息,请参阅 Npcap 版本信息。
-
1 GB 存储空间用于代理和日志文件。
-
启用代理安装所需的 Windows 服务。如果您的 Windows 主机已经过安全强化,或者偏离了默认配置,则某些 Windows 服务可能已被禁用。有关详细信息,请参阅“必需的 Windows 服务”部分。
-
在监控主机的安全应用上配置的安全排除,可能会阻止代理安装或代理活动。有关详细信息,请参阅安全排除项。
支持的 Windows 代理安装方法
有两种方法可以安装 Windows 代理,以实现深度可视性和执行。
您还可以使用黄金映像进行安装。有关详细信息,请参阅在 VDI 实例或 VM 模板上部署代理 (Windows)。
使用代理脚本安装程序方法安装 Windows 代理
建议使用脚本安装程序方法来部署 Windows 代理,以实现深度可视性和执行。
Note |
|
要使用脚本安装程序方法来安装 Windows 代理,请执行以下操作:
Procedure
|
Step 1 |
导航至代理安装方法:
|
||
|
Step 2 |
点击代理脚本安装程序 (Agent Script Installer)。 |
||
|
Step 3 |
从选择平台 (Select Platform) 下拉菜单中,选择 Windows。 要查看支持的 Windows平台,请点击显示支持的平台 (Show Supported Platforms)。 |
||
|
Step 4 |
选择要安装代理的租户。
|
||
|
Step 5 |
如果要为工作负载分配标签,请选择标签键并输入标签值。 当安装的代理报告主机上的 IP 地址时,此处选择的安装程序 CMDB 标签,以及已分配给该主机报告的 IP 的其他已上传 CMDB 标签,将分配给新的 IP 地址。如果上传的 CMDB 标签与安装程序的 CMDB 标签发生冲突:
|
||
|
Step 6 |
如果需要 HTTP 代理才能与 Cisco Secure Workload 通信,请选择是 (Yes),然后输入有效的代理 URL。 |
||
|
Step 7 |
在安装程序到期 (Installer expiration) 部分下,从可用选项中选择一个选项:
|
||
|
Step 8 |
点击下载 (Download) 并将文件保存到本地磁盘。 |
||
|
Step 9 |
将安装程序 PowerShell 脚本复制到所有 Windows 主机进行部署,并以管理权限运行该脚本。
|
# powershell -ExecutionPolicy Bypass -File tetration_windows_installer.ps1 [-preCheck] [-skipPreCheck <Option>] [-noInstall] [-logFile <FileName>] [-proxy <ProxyString>] [-noProxy] [-help] [-version] [-sensorVersion <VersionInfo>] [-ls] [-file <FileName>] [-save <FileName>] [-new] [-reinstall] [
-npcap] [-forceUpgrade] [-upgradeLocal] [-upgradeByUUID <FileName>] [-visibility] [-goldenImage] [-installFolder <Installation Path>]
  -preCheck: run pre-check only
  -skipPreCheck <Option>: skip pre-installation check by given option; Valid options include 'all', 'ipv6' and 'enforcement'; e.g.: '-skipPreCheck all' will skip all pre-installation checks; All pre-checks will be performed by default
  -noInstall: will not download and install sensor package onto the system
  -logFile <FileName>: write the log to the file specified by <FileName>
  -proxy <ProxyString>: set the value of HTTPS_PROXY, the string should be formatted as http://<proxy>:<port>
  -noProxy: bypass system wide proxy; this flag will be ignored if -proxy flag was provided
  -help: print this usage
  -version: print current script's version
  -sensorVersion <VersionInfo>: select sensor's version; e.g.: '-sensorVersion 3.4.1.0.win64'; will download the latest version by default if this flag was not provided
  -ls: list all available sensor versions for your system (will not list pre-3.1 packages); will not download any package
  -file <FileName>: provide local zip file to install sensor instead of downloading it from cluster
  -save <FileName>: downloaded and save zip file as <FileName>
  -new: remove any previous installed sensor; previous sensor identity has to be removed from cluster in order for the new registration to succeed
  -reinstall: reinstall sensor and retain the same identity with cluster; this flag has higher priority than -new
  -npcap: overwrite existing npcap
  -forceUpgrade: force sensor upgrade to version given by -sensorVersion flag; e.g.: '-sensorVersion 3.4.1.0.win64 -forceUpgrade'; apply the latest version by default if -sensorVersion flag was not provided
  -upgradeLocal: trigger local sensor upgrade to version given by -sensorVersion flag; e.g.: '-sensorVersion 3.4.1.0.win64 -upgradeLocal'; apply the latest version by default if -sensorVersion flag was not provided
  -upgradeByUUID <FileName>: trigger sensor whose uuid is listed in <FileName> upgrade to version given by -sensorVersion flag; e.g.: '-sensorVersion 3.4.1.0.win64 -upgradeByUUID "C:\\Program Files\\Cisco Tetration\\sensor_id"'; apply the latest version by default if -sensorVersion flag was not provided
  -visibility: install deep visibility agent only; -reinstall would overwrite this flag if previous installed agent type was enforcer
  -goldenImage: install Cisco Secure Workload Agent but do not start the Cisco Secure Workload Services; use to install Cisco Secure Workload Agent on Golden Images in VDI environment or Template VM. On VDI/VM instance created from golden image with different host name, Cisco Secure Workload Services will work normally
  -installFolder: install Cisco Secure Workload Agent in a custom folder specified by -installFolder e.g.: '-installFolder "c:\\custom sensor path"'; default path is "C:\Program Files\Cisco Tetration"
使用代理映像安装程序方法安装 Windows 代理
建议使用自动安装程序脚本方法来安装 Windows 代理。如果有特殊原因需要使用手动方法,请使用映像安装程序方法。
Note |
当现有代理已在主机上运行时,请勿手动部署旧版 MSI 代理。 |
软件包中与站点相关的文件:
-
ca.cert - 必需 - 用于传感器通信的 CA 证书。
-
enforcer.cfg - 仅在安装执行传感器时为必需 - 包含执行终端的配置。
-
sensor_config - 必需 - 深度可视性传感器的配置。
-
sensor_type - 传感器的类型(执行或深度可视性)。
-
site.cfg - 必需 - 全局站点终端配置。
-
user.cfg - 对于 SaaS - 必需 - 传感器激活密钥和代理配置。
前提条件:
对于 SaaS 集群以及在具有多个租户的本地集群的非默认租户上安装代理,请在 user.cfg 文件中配置 ACTIVATION_KEY 和 HTTPS_PROXY。有关详细信息,请参阅(仅限手动安装)更新用户配置文件。
要使用代理映像方法来安装 Windows 代理,请执行以下操作:
Procedure
|
Step 1 |
导航至代理安装方法:
|
||||||||||||||||||
|
Step 2 |
点击代理映像安装程序 (Agent Image Installer)。 |
||||||||||||||||||
|
Step 3 |
在平台 (Platform) 字段中,输入 Windows。 |
||||||||||||||||||
|
Step 4 |
输入所需的代理类型和代理版本,然后从结果中下载所需的代理版本。 |
||||||||||||||||||
|
Step 5 |
将 tet-win-sensor<version>.win64-<clustername>.zip 文件复制到所有 Windows 主机进行部署。 |
||||||||||||||||||
|
Step 6 |
确保您具有管理权限并提取 ZIP 文件。 |
||||||||||||||||||
|
Step 7 |
在提取的文件夹中,运行以下命令以安装代理: 此外,以下选项可用于 MSI 安装程序。
|
Note |
|
验证 Windows 代理安装
Procedure
|
Step 1 |
确保文件夹 |
|
Step 2 |
确保用于深度可视性和执行的服务 - TetSensor 存在且处于运行状态。使用管理权限运行命令 运行命令 检查状态是否为正在运行 (Running) 运行命令 检查显示名称是否为 Cisco Secure Workload 深度可视性 (Cisco Secure Workload Deep Visibility) 或 运行命令 services.msc 查找 Cisco Secure Workload 深度可视性 (Cisco Secure Workload Deep Visibility) 的名称 检查状态是否为正在运行 (Running) |
在已配置的服务用户情景中验证 Windows 代理
-
确保服务 TetSensor(用于深度可视性)和 TetEnforcer(用于执行)在配置的服务用户情景中运行。TetSensor 和 TetEnforcer 在同一服务用户情景中运行。
使用管理员权限运行命令
cmd.exe运行命令
sc qc tetsensor检查 SERVICE_START_NAME <configured service user>
运行命令
sc qc tetenforcer检查 SERVICE_START_NAME <configured service user>
或
运行命令
services.msc查找 Cisco Secure Workload 深度可视性 (Cisco Secure Workload Deep Visibility) 的名称
检查 <configured service user> 的登录身份
查找名称 Cisco Secure Workload 执行 (Cisco Secure Workload Enforcement)
检查 <configured service user> 的登录身份
或
运行命令
tasklist /v | find /i “tet”运行命令
tasklist /v | find /i “cswengine”检查正在运行的进程的用户情景(第 5 列)
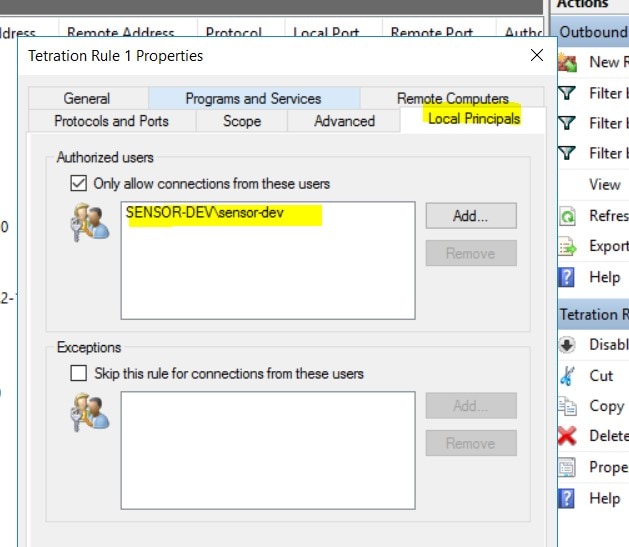
修改服务帐户
在安装 Windows 代理后,使用以下方法之一修改现有的深度可视性和执行服务。
-
使用 services.msc。
图 1. 根据 services.msc 帐户修改服务帐户 
-
使用任何第三方应用来配置服务。
-
使用以下命令:
-
以管理员身份运行 cmd。
-
通过运行以下命令,使用服务帐户名称来修改服务:
-
sc config tetsensor obj= <service user name> password= <password> -
sc config tetenforcer obj= <service user name> password= <password>
-
-
通过运行以下命令来验证服务配置:
-
sc qc tetsensor -
sc qc tetenforcer
-
-
通过运行以下命令来重启 tetsensor 和 tetenforcer 服务:
-
sc stop tetsensor / tetenforcer -
sc start tetsensor / tetenforcer
-
-
在 VDI 实例或 VM 模板上部署代理 (Windows)
默认情况下,代理服务会在代理安装后自动启动。在黄金镜像上安装时,必须使用安装程序标记来阻止这些服务启动。从黄金映像克隆实例时,代理服务会按预期自动启动。
代理不会在黄金 VM 上安装 Npcap,但如有需要,会在从黄金映像克隆的 VM 实例上自动安装。有关详细信息,请参阅 Windows 代理安装程序和 Npcap。
在 VDI 环境或 VM 模板中的黄金映像上安装代理
Procedure
|
Step 1 |
使用 MSI 安装程序或 PowerShell 安装程序脚本,在 VDI 环境或虚拟机模板的黄金镜像上安装代理: 使用 nostart=yes 的 MSI 安装程序
或 使用带有 -goldenImage 标志的 PowerShell 安装程序。
|
|
Step 2 |
确保文件夹 |
|
Step 3 |
确保 TetSensor 服务(用于深度可视性)存在并且已停止: 使用管理员权限运行命令 运行命令 检查状态是否为已停止 (Stopped)。 |
|
Step 4 |
确保服务 TetEnforcer(用于执行)存在且已停止: 运行命令 sc query tetenforcer。 检查状态是否为已停止 (Stopped) 。 |
|
Step 5 |
虚拟机模板现已配置。 |
|
Step 6 |
关闭 VM 模板。 |
创建新的 VDI 实例虚拟机
Procedure
|
Step 1 |
通过克隆虚拟机模板创建新的 VDI 实例虚拟机。 |
||
|
Step 2 |
重启 VDI 实例 VM。 |
||
|
Step 3 |
重启 VDI 实例 VM 后,请确保服务 - TetSensor(用于深度可视性)和 TetEnforcer(用于执行) - 在配置的服务情景中运行。请参阅验证代理是否已安装。 |
||
|
Step 4 |
在 VDI 实例虚拟机上,确保 NPCAP 驱动程序已安装并正在运行: 使用管理员权限运行命令 运行命令 检查状态是否正在运行 |
||
|
Step 5 |
在 VDI 实例虚拟机上,确保使用有效的 sensor_id 来注册代理:
|
Windows 代理安装程序和 Npcap - 适用于 Windows 2008 R2
-
有关受支持的 Npcap 版本,请参阅https://www.cisco.com/go/secure-workload/requirements/agents上的支持矩阵。
-
安装:
如果未安装 Npcap,代理会在服务启动十秒后安装受支持的版本。如果用户已安装 Npcap,但其版本早于支持的版本,则 Npcap 无法升级。手动升级或卸载 Npcap,使用选项 overwritenpcap=yes 来运行代理安装程序,或使用 -npcap 来运行安装程序脚本,以获取支持的 Npcap 版本。如果任何应用正在使用 Npcap 驱动程序,则代理稍后会升级 Npcap。
-
升级:
如果 Npcap 是由 Windows Agent 安装的,且版本早于支持的版本,则 Npcap 会在服务启动十秒后升级到支持的版本。如果任何应用正在使用 Npcap 驱动程序,则代理稍后会升级 Npcap。如果 Npcap 不是由 Windows 代理安装,则不会升级 Npcap。
-
卸载:
如果 Npcap 是由 Windows 代理安装的,则代理会卸载 Npcap。如果 Npcap 由用户安装,但由代理安装程序使用 overwritenpcap=yes 进行升级,则不会卸载 Npcap。如果任何应用正在使用 Npcap 驱动程序,则代理不会卸载 Npcap。
Windows 代理流捕获:适用于除 Windows Server 2008 R2 之外的所有 Windows 操作系统
从最新版本的 Windows 开始,该代理使用 ndiscap.sys(Microsoft 内置)驱动程序和使用 Windows 的事件跟踪 (ETW) 框架来捕获网络流。
在升级到最新版本期间:
-
代理从 npcap.sys 切换到 ndiscap.sys。
-
在以下情况时,代理安装程序会卸载 Npcap:
-
Npcap 由代理安装。
-
未使用 Npcap。
-
操作系统版本并非 Windows Server 2008 R2。
-
代理服务启动后,代理会创建 ETW 会话 CSW_MonNet 和 CSW_MonDns(用于 DNS 数据),同时启动网络流捕获。
Note |
|
安装用于深度可视性和执行的 AIX 代理
Note |
进程树、软件包 (CVE) 和取证事件报告功能在 AIX 上不可用。此外,由于操作系统限制,这些功能的某些方面可能在其他支持的平台的特定次要版本上不可用。 |
安装 AIX 代理的要求和前提条件
-
请参阅支持的平台和要求。
-
深度可视性的其他要求:
-
用于安装和执行服务的根权限。
-
代理和日志文件的存储要求:500 MB。
-
在监控主机的任何安全应用上配置的安全排除。这些排除是为了防止其他安全应用阻止代理安装或代理活动。有关详细信息,请参阅安全排除项。
-
AIX 仅支持 20 台网络设备的流捕获(如果版本为 AIX 7.1 TL3 SP4 或更早,则为 6 台网络设备)。深度可视性代理最多从 16 台网络设备捕获,而其他 4 个捕获会话可用于专用的通用系统(例如,tcpdump)。
-
深度可视性代理执行以下操作,以确保对 20 台网络设备进行流捕获:
-
代理会在代理目录 (/opt/cisco/tetration/chroot/dev/bpf0 - /opt/cisco/tetration/chroot/dev/bpf15) 下创建 16 个 bpf 设备节点
-
tcpdump 和其他使用 bpf 的系统工具将扫描系统设备节点 (/dev/bpf0-/dev/bpf19),直至找到未使用的节点 (!EBUSY)
-
代理创建的 bpf 节点和系统 bpf 节点会共享相同的主/次要文件,而每个主要或次要文件仅由一个实例(tcpdump 或代理)打开。
-
代理不会访问系统设备节点,也不会像 tcpdump 那样创建系统设备节点(如果不存在,tcpdump-D 会创建 /dev/bpf0. . . /dev/bpf19)。
-
-
在某些情况下,在系统上运行 iptrace 可防止来自 tcpdump 和深度可视性代理的流捕获。这是一个已知的设计问题,需要与 IBM 核实。
-
要检查是否存在此场景,请在安装代理之前运行 tcpdump。如果错误消息为 tcpdump: BIOCSETIF: en0: File exists,则 iptrace 已阻止流捕获。停止 iptrace 以解决问题。
-
-
并非所有深度可视性功能在 AIX 中都不受支持。数据包和进程记帐属于不支持的类型。
-
-
策略执行的其他要求:
-
如果启用了 IP 安全过滤器(即 smitty IPsec4),则代理安装会在预先检查中失败。建议您在安装代理之前禁用 IP 安全过滤器。
-
如果在运行 Cisco Secure Workload 执行器代理时启用了 IP 安全,则会报告错误并停止执行。请联系支持人员,以便在执行器代理运行时安全地禁用 IP 安全过滤器。
-
使用代理脚本安装程序方法安装 AIX 代理
深度可视性和执行 AIX 代理只能使用代理脚本安装方法进行安装。
Note |
|
要安装 AIX 代理,请执行以下操作:
Procedure
|
Step 1 |
导航至代理安装方法:
|
||
|
Step 2 |
点击代理脚本安装程序 (Agent Script Installer)。 |
||
|
Step 3 |
从选择平台 (Select Platform) 下拉菜单中,选择 AIX。 要查看支持的 AIX 平台,请点击显示支持的平台 (Show Supported Platforms)。 |
||
|
Step 4 |
选择要安装代理的租户。
|
||
|
Step 5 |
如果要为工作负载分配标签,请选择标签键并输入标签值。 当安装的代理报告主机上的 IP 地址时,此处选择的安装程序 CMDB 标签,以及已分配给该主机报告的 IP 的其他已上传 CMDB 标签,将自动分配给新的 IP 地址。如果上传的 CMDB 标签与安装程序的 CMDB 标签发生冲突:
|
||
|
Step 6 |
如果需要 HTTP 代理才能与 Cisco Secure Workload 通信,请选择是 (Yes),然后输入有效的代理 URL。 |
||
|
Step 7 |
在安装程序到期 (Installer expiration) 部分下,从可用选项中选择一个选项:
|
||
|
Step 8 |
点击下载 (Download) 并将文件保存到本地磁盘。 |
||
|
Step 9 |
将安装程序 shell 脚本复制到所有 AIX 主机上进行部署。 |
||
|
Step 10 |
要授予脚本执行权限,请运行以下命令:
|
||
|
Step 11 |
要安装代理,请使用根权限运行以下命令:
|
我们建议按照脚本使用详细信息中的规定运行预先检查。
AIX 安装程序脚本使用详细信息:
ksh tetration_installer_default_enforcer_aix.sh [--pre-check] [--pre-check-user] [--skip-pre-check=<option>] [--no-install] [--logfile=<filename>] [--proxy=<proxy_string>] [--no-proxy] [--help] [--version] [--sensor-version=<version_info>] [--ls] [--file=<filename>] [--osversion=<osversion>] [--save=<filename>] [--new] [--reinstall] [--unpriv-user] [--libs=<libs.zip|tar.Z>] [--force-upgrade] [--upgrade-local] [--upgrade-by-uuid=<filename>] [--logbasedir=<logbdir>] [--tmpdir=<tmp_dir>] [--visibility] [--golden-image]
  --pre-check: run pre-check only
  --pre-check-user: provide alternative to nobody user for pre-check su support
  --skip-pre-check=<option>: skip pre-installation check by given option; Valid options include 'all', 'ipv6' and 'enforcement'; e.g.: '--skip-pre-check=all' will skip all pre-installation checks; All pre-checks will be performed by default
  --no-install: will not download and install sensor package onto the system
  --logfile=<filename>: write the log to the file specified by <filename>
  --proxy=<proxy_string>: set the value of HTTPS_PROXY, the string should be formatted as http://<proxy>:<port>
  --no-proxy: bypass system wide proxy; this flag will be ignored if --proxy flag was provided
  --help: print this usage
  --version: print current script's version
  --sensor-version=<version_info>: select sensor's version; e.g.: '--sensor-version=3.4.1.0'; will download the latest version by default if this flag was not provided
  --ls: list all available sensor versions for your system (will not list pre-3.3 packages); will not download any package
  --file=<filename>: provide local zip file to install sensor instead of downloading it from cluster
  --osversion=<osversion>: specify osversion for --save flag;
  --save=<filename>: download and save zip file as <filename>; will download package for osversion given by --osversion flag; e.g.: '--save=myimage.aix72.tar.Z --osversion=7.2'
  --new: remove any previous installed sensor; previous sensor identity has to be removed from cluster in order for the new registration to succeed
  --reinstall: reinstall sensor and retain the same identity with cluster; this flag has higher priority than --new
  --unpriv-user=<username>: use <username> for unpriv processes instead of tet-snsr
  --libs=<libs.zip|tar.Z>: install provided libs to be used by agents
  --force-upgrade: force sensor upgrade to version given by --sensor-version flag; e.g.: '--sensor-version=3.4.1.0 --force-upgrade'; apply the latest version by default if --sensor-version flag was not provided
  --upgrade-local: trigger local sensor upgrade to version given by --sensor-version flag: e.g.: '--sensor-version=3.4.1.0 --upgrade-local'; apply the latest version by default if --sensor-version flag was not provided
  --upgrade-by-uuid=<filename>: trigger sensor whose uuid is listed in <filename> upgrade to version given by --sensor-version flag; e.g.: '--sensor-version=3.4.1.0 --upgrade-by-uuid=/usr/local/tet/sensor_id'; apply the latest version by default if --sensor-version flag was not provided
  --logbasedir=<log_base_dir>: instead of logging to /opt/cisco/tetration/log use <log_base_dir>. The full path will be <log_base_dir>/tetration
  --tmpdir=<tmp_dir>: instead of using /tmp use <tmp_dir> as temp directory
  --visibility: install deep visibility agent only; --reinstall would overwrite this flag if previous installed agent type was enforcer
  --golden-image: install Cisco Secure Workload Agent but do not start the Cisco Secure Workload Services; use to install Cisco Secure Workload Agent on Golden Images in VDI environment or Template VM. On VDI/VM instance created from golden image with different host name, Cisco Secure Workload Services will work normally
验证 AIX 代理安装
过程
|
运行命令
Subsystem Group PID Status tet-sensor 1234567 active
Subsystem Group PID Status tet-enforcer 7654321 active |
安装 Kubernetes 或 OpenShift 代理以实现深度可视性和执行
要求和前提条件
操作系统支持信息可在代理 OS 支持矩阵 (Agent OS support matrix)中找到。
要求
-
安装脚本需要 Kubernetes 或 OpenShift 管理员凭证,以便在集群节点上启动特权代理 Pod。
-
Cisco Secure Workload 实体在 tetration 命名空间中创建。
-
节点或 Pod 安全策略必须允许特权模式 Pod。
-
busybox:1.33 映像必须预安装或可从 Docker Hub 下载。
-
对于容器化的行时,如果未设置 config_path,请修改 config.toml(默认位置:/etc/containerd/config.toml),如下所示: ``` [plugins."io.containerd.grpc.v1.cri".registry] config_path = "/etc/containerd/certs.d" ```重启 containerd 后台守护程序。
-
要在 Kubernetes 或 OpenShift 控制平面节点上运行,–toleration 标志可用于传入 Cisco Secure Workload Pod 的容差。通常通过的容差是 NoSchedule 容差,通常会阻止 Pod 在控制平面节点上运行。
-
对于 Windows 工作节点:
-
支持的 Windows 工作节点容器运行时:ContainerD。
-
ContainerD 配置:配置以下 containerd 更改。 ``` [plugins."io.containerd.grpc.v1.cri".registry] config_path = "/etc/containerd/certs.d" ```删除 registry.mirrors下的配置。默认配置文件位置为 C:\Program Files\containerd\config.toml。
在配置更改后,重启 containerd 后台守护程序。
-
映像 mcr.microsoft.com/oss/kubernetes/windows-host-process-containers-base-image:v1.0.0 必须在 Windows 工作节点上预安装或可下载。
-
正在升级到较新版本的现有 Kubernetes 代理会自动包含 Windows 守护进程集代理。但是,前一个脚本不会卸载 Windows 守护进程集代理。下载最新的安装程序脚本,以便卸载 Windows 守护进程集代理。
-
支持的型号:
-
Microsoft Windows Server 2022
-
Windows Server 2019
-
Kubernetes 1.27 及更高版本
-
-
策略执行要求
OpenShift 不支持基于 IPVS 的 kube-proxy 模式。
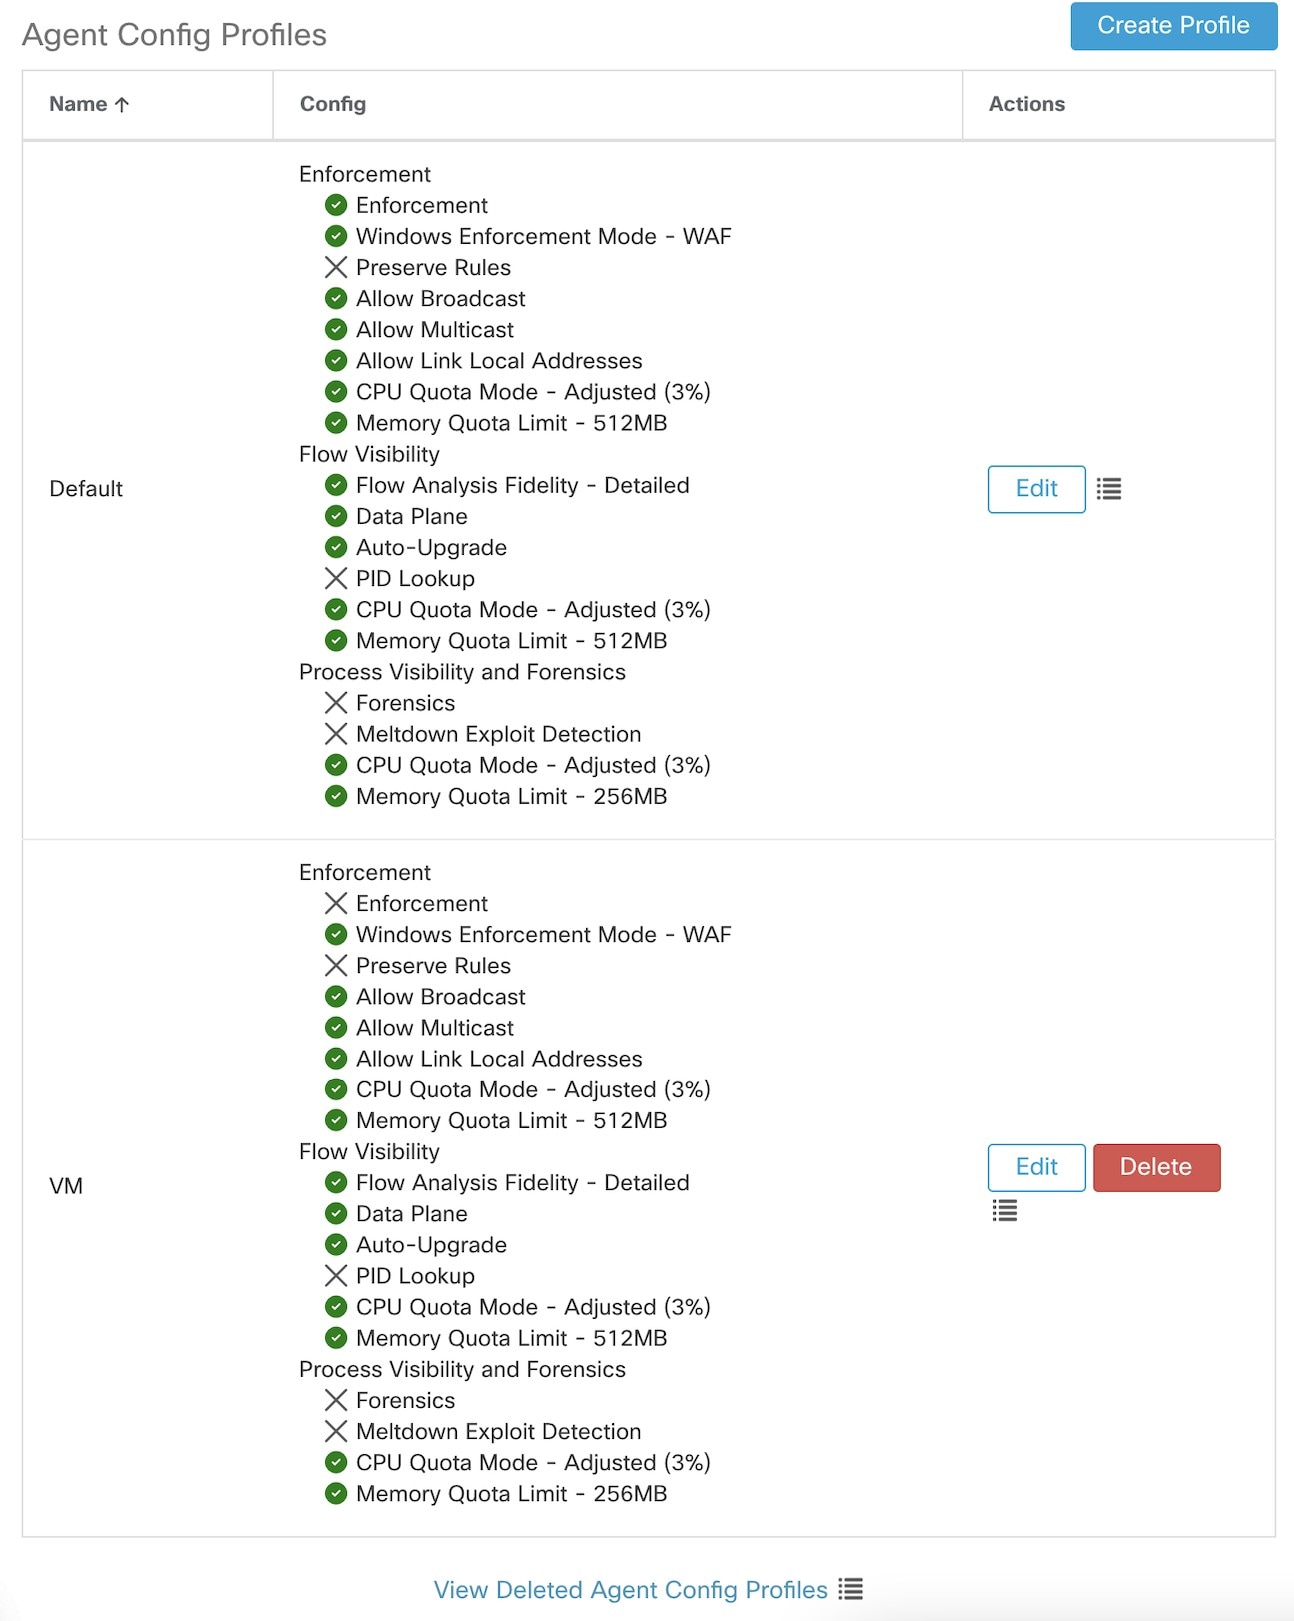
这些代理应配置为启用保留规则选项。有关更多信息,请参阅创建代理配置文件。
为使执行正常运行,任何已安装的 CNI 插件都必须:
-
在所有节点和 Pod 之间提供平面地址空间(IP 网络)。不支持伪装源 Pod IP 以进行集群内通信的网络插件。
-
不干扰 Cisco Secure Workload 执行代理使用的 Linux iptables 规则或标记(标记位 21 和 20 用于允许和拒绝 NodePort 服务的流量)
以下 CNI 插件经过测试,可满足上述要求:
-
Calico (3.13) 与以下 Felic 配置:(ChainInsertMode: Append, Ipta- blesRefreshInterval: 0) 或 (ChainInsertMode: Insert, IptablesFilterAllowAction: Return, IptablesMangleAllowAction: Return, IptablesRefreshInterval: 0)。所有其他选项均使用各自的默认值。
有关设置这些选项的详细信息,请参阅 Felex 配置参考。
使用代理脚本安装程序方法安装 Kubernetes 或 OpenShift 代理
Note |
代理脚本安装程序方法会在稍后包含的节点上自动安装代理。 |
Procedure
|
Step 1 |
导航至代理安装方法:
|
||
|
Step 2 |
点击代理脚本安装程序 (Agent Script Installer)。 |
||
|
Step 3 |
从选择平台 (Select Platform) 下拉菜单中,选择 Kubernetes。 要查看支持的 Kubernetes 或 OpenShift 平台,请点击显示支持的平台 (Show Supported Platforms)。 |
||
|
Step 4 |
选择要安装代理的租户。
|
||
|
Step 5 |
如果需要 HTTP 代理才能与 Cisco Secure Workload 通信,请选择是 (Yes),然后输入有效的代理 URL。 |
||
|
Step 6 |
点击下载 (Download) 并将文件保存到本地磁盘。 |
||
|
Step 7 |
在 Linux 机器上运行安装程序脚本,该机器可访问 Kubernetes API 服务器和具有管理权限的 kubectl 配置文件,并将其作为默认上下文/集群/用户。 安装程序会尝试从默认位置 (~/.kube/config) 读取文件。但是,您可以使用 --kubeconfig 命令来明确指定配置文件的位置。 |
安装脚本提供了验证 Cisco Secure Workload 代理守护进程集和已安装 Pod 的说明。
Note |
下载前在代理安装程序页面上配置的 HTTP 代理仅控制 Cisco Secure Workload 代理连接到 Cisco Secure Workload 集群的方式。此设置不会影响 Kubernetes 或 OpenShift 节点获取 Docker 映像的方式,因为这些节点上的容器运行时会使用自己的代理配置。如果没有从 Cisco Secure Workload 集群获取 Docker 映像,请调试容器的映像提取过程,并添加合适的 HTTP 代理。 |
安装用于深度可视性和执行的 Solaris 代理
安装 Solaris 代理的要求和前提条件
使用代理脚本安装程序方法安装 Solaris 代理
已安装的 Solaris 代理支持深度可视性和进程或软件包可视性。
Procedure
|
Step 1 |
导航至代理安装方法:
|
||
|
Step 2 |
点击代理脚本安装程序 (Agent Script Installer)。 |
||
|
Step 3 |
从选择平台 (Select Platform) 下拉菜单中,选择 Solaris。 要查看支持的 Solaris 平台,请点击显示支持的平台 (Show Supported Platforms)。 |
||
|
Step 4 |
选择要安装代理的租户。
|
||
|
Step 5 |
如果要为工作负载分配标签,请选择标签键并输入标签值。 当已安装的代理报告主机上的 IP 地址时,此处选择的安装程序 CMDB 标签以及已分配给此主机报告的 IP 的其他上传 CMDB 标签将自动分配给新的 IP 地址。当安装的代理报告主机上的 IP 地址时,此处选择的安装程序 CMDB 标签,以及已分配给该主机报告的 IP 的其他已上传 CMDB 标签,将被自动分配给新的 IP 地址。如果上传的 CMDB 标签与安装程序的 CMDB 标签发生冲突:
|
||
|
Step 6 |
如果需要 HTTP 代理才能与 Cisco Secure Workload 通信,请选择是 (Yes),然后输入有效的代理 URL。 |
||
|
Step 7 |
在安装程序到期 (Installer expiration) 部分下,从可用选项中选择一个选项:
|
||
|
Step 8 |
点击下载 (Download) 并将文件保存到本地磁盘。 |
||
|
Step 9 |
在 Solaris 主机上复制安装程序 shell 脚本并运行以下命令以授予脚本执行权限:
|
||
|
Step 10 |
要安装代理,请使用根权限运行以下命令:
|
我们建议按照脚本使用详细信息中的规定运行预先检查。
Solaris 安装程序脚本使用详细信息:
tetration_installer_default_sensor_solaris.sh [--pre-check] [--skip-pre-check=<option>] [--no-install] [--logfile=<filename>] [--proxy=<proxy_string>] [--no-proxy] [--help] [--version] [--sensor-version=<version_info>] [--ls] [--file=<filename>] [--save=<filename>] [--new] [--reinstall] [--unpriv-user] [--force-upgrade] [--upgrade-local] [--upgrade-by-uuid=<filename>] [--basedir=<basedir>] [--logbasedir=<logbdir>] [--tmpdir=<tmp_dir>] [--visibility] [--golden-image]
  --pre-check: run pre-check only
  --skip-pre-check=<option>: skip pre-installation check by given option; Valid options include 'all', 'ipv6' and 'enforcement'; e.g.: '--skip-pre-check=all' will skip all pre-installation checks; All pre-checks will be performed by default
  --no-install: will not download and install sensor package onto the system
  --logfile=<filename>: write the log to the file specified by <filename>
  --proxy=<proxy_string>: set the value of CL_HTTPS_PROXY, the string should be formatted as http://<proxy>:<port>
  --no-proxy: bypass system wide proxy; this flag will be ignored if --proxy flag was provided
  --help: print this usage
  --version: print current script's version
  --sensor-version=<version_info>: select sensor's version; e.g.: '--sensor-version=3.4.1.0'; will download the latest version by default if this flag was not provided
  --ls: list all available sensor versions for your system (will not list pre-3.1 packages); will not download any package
  --file=<filename>: provide local zip file to install sensor instead of downloading it from cluster
  --save=<filename>: download and save zip file as <filename>
  --new: remove any previous installed sensor; previous sensor identity has to be removed from cluster in order for the new registration to succeed
  --reinstall: reinstall sensor and retain the same identity with cluster; this flag has higher priority than --new
  --unpriv-user=<username>: use <username> for unpriv processes instead of nobody
  --force-upgrade: force sensor upgrade to version given by --sensor-version flag; e.g.: '--sensor-version=3.4.1.0 --force-upgrade'; apply the latest version by default if --sensor-version flag was not provided
  --upgrade-local: trigger local sensor upgrade to version given by --sensor-version flag: e.g.: '--sensor-version=3.4.1.0 --upgrade-local'; apply the latest version by default if --sensor-version flag was not provided
  --upgrade-by-uuid=<filename>: trigger sensor whose uuid is listed in <filename> upgrade to version given by --sensor-version flag; e.g.: '--sensor-version=3.4.1.0 --upgrade-by-uuid=/usr/local/tet/sensor_id'; apply the latest version by default if --sensor-version flag was not provided
  --logbasedir=<log_base_dir>: instead of logging to /opt/cisco/secure-workload/log use <log_base_dir>. The full path will be <log_base_dir>/secure-workload
  --tmpdir=<tmp_dir>: instead of using /tmp use <tmp_dir> as temp directory
  --visibility: install deep visibility agent only; --reinstall would overwrite this flag if previous installed agent type was enforcer
  --golden-image: install Cisco Secure Workload Agent but do not start the Cisco Secure Workload Services; use to install Cisco Secure Workload Agent on Golden Images in VDI environment or Template VM. On VDI/VM instance created from golden image with different host name, Cisco Secure Workload Services will work normally
验证 Solaris 代理安装
-
对于 Solaris 11.4,请运行命令
sudo pkg list tet-sensor单个输出条目确认主机上已安装 Solaris 代理。以下是示例输出:
名称(发布服务器)
版本
IFO
tet-sensor (cisco)
3.8.1.1
i--
(仅限手动安装)更新用户配置文件
只有涉及以下所有内容的安装才需要执行以下程序:
-
Cisco Secure Workload SaaS 或具有多个租户的本地集群(仅使用默认租户的本地集群不需要此程序)
-
手动安装
-
Linux 或 Windows 平台
代理需要激活密钥才能注册到 Cisco Secure Workload 集群。它们需要使用集群激活密钥。此外,他们可能需要使用 HTTPS 代理来访问集群。
Note |
在 Windows 环境中,如果手动安装时使用了激活密钥和代理选项,则无需手动配置 user.cfg。 |
在安装前,请在用户配置文件中配置所需的变量:
Procedure
|
Step 1 |
要检索激活密钥,请导航至,点击安装程序 (Installer) 选项卡,点击使用经典打包安装程序手动安装 (Manual Install using classic packaged installers),然后点击代理激活密钥 (Agent Activation Key)。 |
|
Step 2 |
打开 Cisco Secure Workload 代理安装文件夹中的 |
|
Step 3 |
将激活密钥添加到 ACTIVATION_KEY 变量。示例: |
|
Step 4 |
如果代理需要 HTTPS 代理,请使用 HTTPS_PROXY 变量来添加 http 协议代理服务器和端口。示例: |
其他类代理工具
AnyConnect 代理
具有网络可视性模块 (NVM) 的思科 AnyConnect 安全移动代理支持的平台不需要 Secure Wrokload 代理。AnyConnect 连接器会注册这些代理,并将流观察结果、资产和标签导出到 Cisco Secure Workload。有关详细信息,请参阅 AnyConnect 连接器。
对于 Windows、Mac 或 Linux 平台,请参阅《思科 AnyConnect 安全移动客户端产品手册》。
ISE 代理
向 Cisco Identity Services Engine (ISE) 注册的终端不需要在终端上安装 Cisco Secure Workload 代理。ISE 连接器通过 ISE 设备上的 pxGrid 服务从 ISE 收集有关终端的元数据。它将终端注册为 Cisco Secure Workload 上的 ISE 代理,并推送这些终端上资产的标签。有关详细信息,请参阅 ISE 连接器。
SPAN 代理
SPAN 代理与 ERSPAN 连接器配合使用。有关详细信息,请参阅 ERSPAN 连接器。
第三方和其他思科产品
-
对于使用 Cisco Secure Workload中配置的外部协调器的集成,
-
对于使用在 Cisco Secure Workload中配置的连接器的集成。
请参阅什么是连接器。
连接信息
在工作负载上安装代理时,它通常会与 Cisco Secure Workload 集群上托管的后端服务建立多个网络连接。连接数会因代理类型及其功能而异。
下表记录了各种代理类型建立的各种永久连接。
|
代理类型 |
配置服务器 |
收集器 |
执行后端 |
|---|---|---|---|
|
可视性(本地) |
CFG-SERVER-IP:443 |
COLLECTOR-IP:5640 |
不适用 |
|
可视性 (SaaS) |
CFG-SERVER-IP:443 |
COLLECTOR-IP:443 |
不适用 |
|
安全策略 (本地) |
CFG-SERVER-IP:443 |
COLLECTOR-IP:5640 |
ENFORCER-IP:5660 |
|
执行 (SaaS) |
CFG-SERVER-IP:443 |
COLLECTOR-IP:443 |
ENFORCER-IP:443 |
|
docker 映像 |
CFG-SERVER-IP:443 |
不适用 |
不适用 |
图例:
-
CPG-SERVER-IP 是配置服务器的 IP 地址。
-
COLLECTOR-IP 是收集器的 IP 地址。深度可视性和执行代理连接到所有可用的收集器。
-
ENFORCER-IP 是执行终端的 IP 地址。执行代理仅连接到其中一个可用终端。
-
对于 Kubernetes/OpenShift 代理部署,安装脚本不包含代理软件 - 包含代理软件的 Docker 映像由每个 Kubernetes/OpenShift 节点从 Cisco Secure Workload 集群提取。这些连接由容器运行时映像获取组件建立,并指向 CFG-SERVER-IP:443。
导航至平台 (Platform) > 集群配置 (Cluster Configuration),了解配置服务器 IP 和收集器 IP。
-
传感器 VIP (Sensor VIP) 用于配置服务器 IP:已为此集群中的配置服务器设置的 IP 地址。
-
外部 IP 用于收集器 IP 和执行器 IP:如果填充此字段,则在分配外部集群 IP 地址时,选择过程仅限于此列表中定义的属于外部网络的 IP 地址。
Note |
|
如果工作负载位于防火墙后面,或者主机防火墙服务已启用,则到集群的连接可能会被拒绝。在此情况下,管理员必须创建适当的防火墙策略来允许连接。


 反馈
反馈