 Feedback Feedback
|
Table Of Contents
Manipulating WSA
Logical EntitiesCustomer Ports—Physical Port Allocation
Manipulating WSA
Logical Entities
This chapter explains how to create, modify, and use the logical entities available in the Cisco WSA Explorer application:
Contracts
The following sections give detailed information about the Contracts entity:
Contracts—Description
Contracts is the second-level logical entity in WSA (refer to ",") immediately after Customers. Each customer has at least one contract and each contract has at least one project.
Contracts—Create
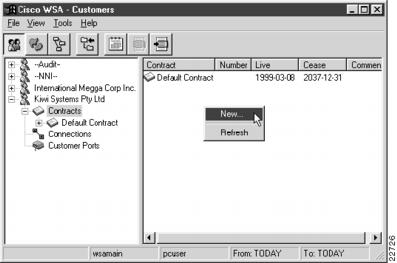
To create a new Contract, select Contracts from the customer view and activate the New... right mouse menu from the list view popup menu, as shown in , "".
Figure 4-1 Contracts List
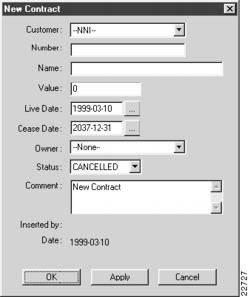
A New Contract dialog appears, as shown in , "".
Figure 4-2 New Contract
Select the customer for which this new contract is being created and give a reference Number and a Name. This can be any string value, not just numeric, possibly from an external sales order processing system.
Note
Take care when selecting the customer for which this new contract is being created. The customer that you are currently browsing in the WSA Explorer Client is not passed to the new contract dialog and the list of customers is simply in alphabetical order.
The live and cease dates you choose will influence the generated default live and cease dates for the projects created within this contract. Consequently they also influence the default live and cease dates for customer ports assigned to those projects.
Choose an appropriate owner for this contract and set its status as required.
Once you complete the settings for this Contract, press OK to save the record and close the dialog. If you decide not to create this new Contract, press Cancel to close the dialog.
Note
When you create a new contract, one default project is created within it. The properties of this automatically-generated project can be modified if required. Refer to Projects—Modify.
Contracts—Modify
To modify an existing Contract, select Contracts in the customer view and activate the Properties... right mouse menu from the item menu, as shown in , "".
Figure 4-3 Selecting a Contract for Modification
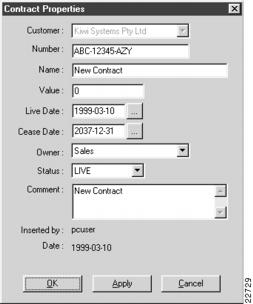
A Contract Properties dialog appears, as shown in , "".
Figure 4-4 Contract Properties
Once you complete the settings for this Contract, press OK to save the record and close the dialog. If you decide not to modify the properties, press Cancel to close the dialog.
Contracts—Delete
Note
This version of Cisco WSA does not allow deletion of contracts.
Customer Ports
The following sections give detailed information about the Customer Ports entity:
•
Customer Ports—Physical Port Allocation
Customer Ports—Description
Customer Ports creation is achieved in two stages, creating the port record in the database and then allocating it a physical port.
Until a customer port has been allocated a physical port, it cannot be used as the end point of a Connection or Net Link.
Customer Ports—Create
To create a new Customer Port, select Customer Ports from the customer view and activate the New... right mouse menu from the list view popup menu, as shown in , "".
Figure 4-5 Customer Port List
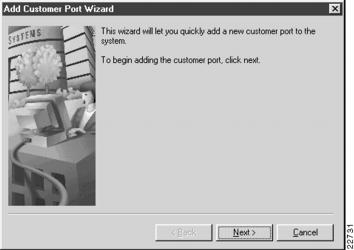
An Add Customer Port Wizard appears, as shown in , "".
Figure 4-6 Add Customer Port Wizard
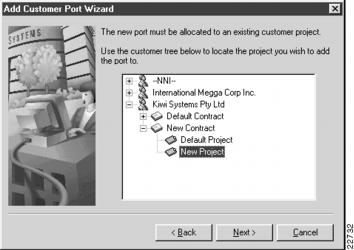
Click Next to continue and select a project to which to add the customer port, as shown in , "".
Figure 4-7 Selecting a Project
Note
Only select a project belonging to the Network to Network Interconnect (NNI) customer if you really do intend to create a port that will be used for a Net Link (Trunk or NNI). Refer to the section Net Links.
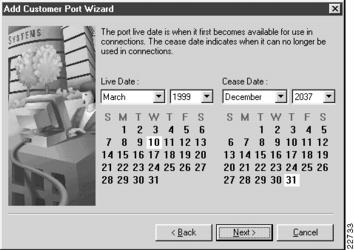
Click Next to continue, and select live and cease dates for the customer port, as shown in , "".
Figure 4-8 Selecting Live and Cease Dates
Click Next to continue and select the physical port type and template, along with the initial and required statuses for the customer port, as shown in , "".
Figure 4-9 Port Settings
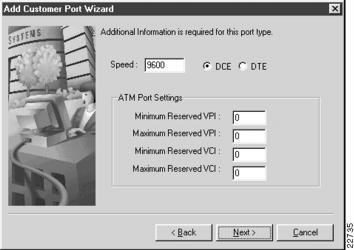
Click Next to continue, and set any additional information for the selected port type, as shown in , "".
Figure 4-10 Additional Port Settings
Note
If the Customer Port you are creating is Frame Relay, you will be prompted here to define whether the interface is to be channelized and, if so, the number of time slots to consume on the physical port.
Click Next to continue, choose a location for the new Customer Port, and enter a reference for it, as shown in , "".
Figure 4-11 Setting the Location
Once you complete the settings for this Customer Port, press Finish to create the record. If you decide not to create this new Customer Port, press Cancel to close the Wizard.
When the customer port is successfully created, you are asked if you wish to create another Customer Port, as shown in , "".
Figure 4-12 Add Another Prompt
Press Yes to return to the Add Customer Port Wizard, or press No to close the Wizard and return to the Customer Port List.
Customer Ports—Physical Port Allocation
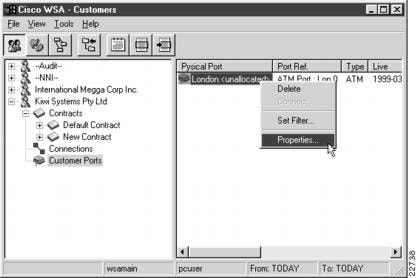
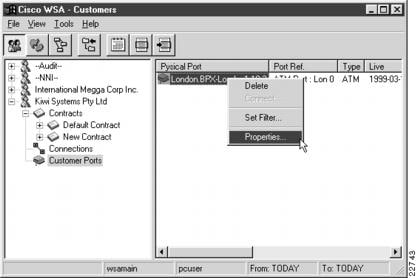
To allocate a physical port to an existing Customer Port, select Customer Ports in the customer view and activate the Properties... right mouse menu from the item menu, as shown in , "".
Figure 4-13 Selecting a Customer Port for Port Allocation
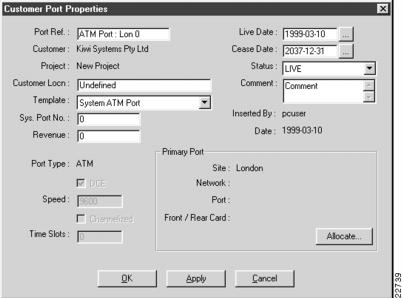
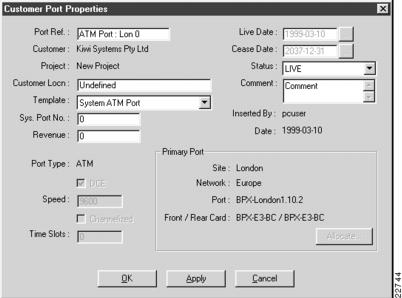
A Customer Port Properties dialog appears, as shown in , "".
Figure 4-14 Customer Port Properties
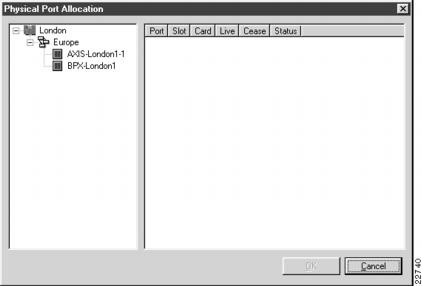
Press Allocate and a Physical Port Allocation dialog appears, as shown in , "".
Figure 4-15 Physical Port Allocation
Select a node from the tree view and then select a physical port from the list, as shown in , "".
Figure 4-16 Selecting an Individual Port
Note
If the Customer Port to which you are allocating this physical port is for Frame Relay and is using more than one time slot on a channelized interface, you must select the appropriate number of consecutive time slots from this dialog (an extra TSlot column appears in the list for channelized interfaces) before the OK button is available for selection.
Once you are satisfied that the physical port you have chosen is suitable, press OK to allocate it to the Customer Port and close the dialog. If you decide not to allocate a physical port at this time, press Cancel to close the dialog.
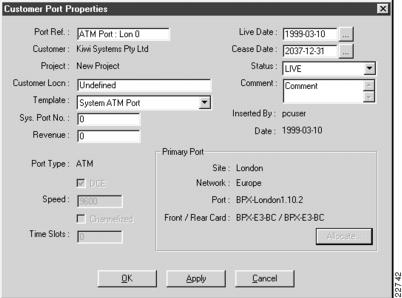
When the physical port has been allocated, the customer port properties appear, as shown in , "".
Figure 4-17 Customer Port Properties After Physical Port Allocation
Note
After allocating the physical port, it is not possible to change your mind and choose a different physical port. Allocate... is disabled. However, at this point the changes to the Customer Port record have yet to be committed to the database, so it is possible to start again on the port allocation process by pressing Cancel, which cancels the allocation just made.
Once you complete this allocation, press OK to save the record and close the dialog. If you decide to cancel this allocation, press Cancel to close the dialog.
Customer Ports—Modify
To modify an existing Customer Port, select Customer Ports in the customer view and activate the Properties... right mouse menu from the item menu, as shown in ,
".Figure 4-18 Selecting a Customer Port for Modification
A Customer Port Properties dialog appears, as shown in , "".
Figure 4-19 Customer Port Properties
After port allocation, the only Customer Port properties that can be modified are the soft attributes of reference, customer defined location, system port number, revenue, status, and comment.
Once you complete the settings for this Customer Port, press OK to save the record and close the dialog. If you decide not to modify the properties, press Cancel to close the dialog.
Customer Ports—Delete
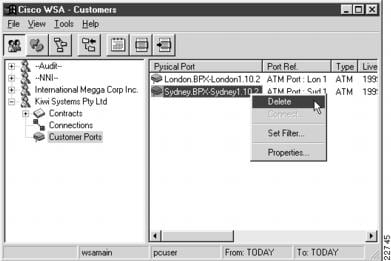
To delete a Customer Port, select Customer Ports in the tree view and activate the Delete... right mouse menu from the item menu, as shown in , "".
Figure 4-20 Selecting a Customer Port for Deletion
A delete confirmation dialog appears. Press Yes to delete the Customer Port; press No if you decide not to delete it.
If the Customer Port selected for deletion is being used by any connections, you will not be allowed to delete it and a dialog will inform you of this, as shown in , "".
Figure 4-21 Unable to Delete Customer Port
Customers
The following sections give detailed information about the Customers entity:
Customers—Description
Customers are regarded as the top level logical entity in WSA. Refer to "," for details. Each customer has at least one contract and each contract has at least one project.
When a new customer is created, a default contract and project are created, which can be modified later, as described in the section Customers—Modify.
Customers—Create
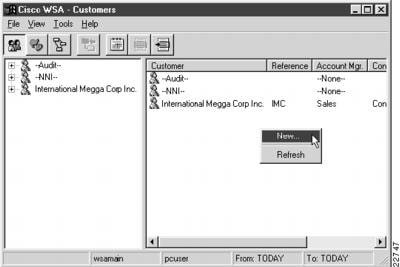
To create a new Customer, select the Customers tool bar button and activate the New... right mouse menu from the list view popup menu, as shown in , "".
Figure 4-22 Customer List
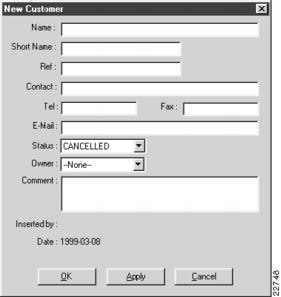
A New Customer dialog appears, as shown in , "".
Figure 4-23 New Customer
All fields except the comment are mandatory. Outside the customer list, only the name is used.
Once you complete the settings for this Customer, press OK to save the record and close the dialog. If you decide not to create this new Customer, press Cancel to close the dialog.
Customers—Modify
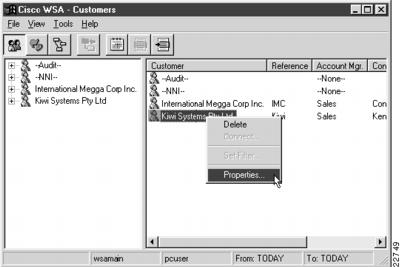
To modify an existing Customer, select the Customers tool bar button and activate the Properties... right mouse menu from the item menu, as shown in , "".
Figure 4-24 Selecting a Customer for Modification
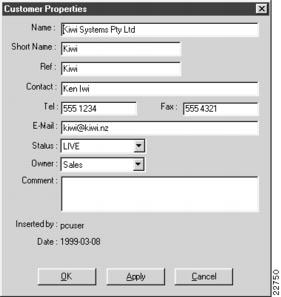
A Customer Properties dialog appears, as shown in , "".
Figure 4-25 Customer Properties
Once you complete the settings for this Customer, press OK to save the record and close the dialog. If you decide not to modify the properties, press Cancel to close the dialog.
Customers—Delete
Note
This version of Cisco WSA does not allow deletion of customers.
Projects
The following sections give detailed information about the Projects entity:
Projects—Description
Projects are the third logical entity in WSA (refer to ",") between contracts and customer ports. Customer ports are owned by projects.
Projects—Create
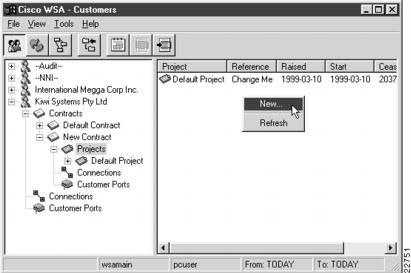
To create a new Project, select Projects from the customer view and activate the New... right mouse menu from the list view popup menu, as shown in , "".
Figure 4-26 Project List
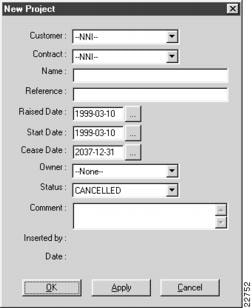
A New Project dialog appears, as shown in , "".
Figure 4-27 New Project
Select a Customer and Contract. Then supply a name and reference for the new project.
Note
Take care when selecting the Customer and Contract for the new project. The Customer and Contract that you are currently browsing in the WSA Explorer Client are not passed to the new project dialog, and the list of customers is simply in alphabetical order.
The live and cease dates that you choose will influence the generated default live and cease dates for the customer ports created within this project. Therefore, they influence the default live and cease dates for connections created on those customer ports.
Choose an appropriate owner for this project and set its status as required.
Once you complete the settings for this Project, press OK to save the record and close the dialog. If you decide not to create this new Project, press Cancel to close the dialog.
Projects—Modify
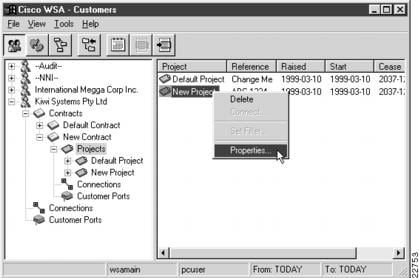
To modify an existing Project, select Projects in the tree view and activate the Properties... right mouse menu from the item menu, as shown in , "".
Figure 4-28 Selecting a Project for Modification
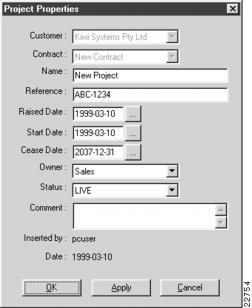
A Project Properties dialog appears, as shown in , "".
Figure 4-29 Project Properties
Once you complete the settings for this Project, press OK to save the record and close the dialog. If you decide not to modify the properties, press Cancel to close the dialog.
Projects—Delete
Note
This version of Cisco WSA does not allow deletion of Projects.
