Table Of Contents
Managing Events and Alarms
Managing Events
Viewing the Events Log
Configuring Event Destinations
Configuring Event Security
Configuring Event Filters
Enabling RMON Alarms
Enabling RMON Alarms by Port
Enabling RMON Alarms for VSANs
Enabling RMON Alarms for Physical Components
Managing RMON Alarms and Events
Configuring RMON Controls
Managing RMON Alarms
Managing RMON Event Severity Levels
Viewing the RMON Log
Configuring the Call Home Feature
Overview of Features
Configuration Overview
Configuring Call Home Attributes
Configuring Call Home Destination Attributes
Configuring Call Home E-Mail Addresses
Configuring Call Home Alerts
Configuring Call Home Profiles
Configuring the Syslog
Configuring Syslog Attributes
Configuring Syslog Servers
Configuring Syslog Priorities
Managing Events and Alarms
By configuring how events are reported, you can monitor those events more effectively and take corrective action, if necessary. Cisco Fabric Manager provides the following features for reporting and responding to network events:
•SNMP events—These are preconfigured notifications, including SNMPv2 traps and SNMPv3 informs.
•RMON alarms—These are configurable notifications that you can set based on thresholds for various network events.
•Call Home—This is a feature that lets you configure automatically generated e-mail messages or other responses to specific events.
•Syslog—This is a standard message log that records various network and system events.
Note The Fabric Manager allows you to manage events on multiple Cisco MDS 9000 Family switches. The Device Manager allows you to manage events on a single Cisco MDS 9000 Family switch.
This chapter describes how to configure events using the Fabric Manager and Device Manager. For information about events and configuring them using the command-line interface (CLI), refer to the Cisco 9000 Family Configuration Guide.
This chapter includes the following sections:
•Managing Events
•Enabling RMON Alarms
•Managing RMON Alarms and Events
•Configuring the Call Home Feature
•Configuring the Syslog
Managing Events
This section describes how to manage events and includes the following topics:
•Viewing the Events Log
•Configuring Event Destinations
•Configuring Event Security
•Configuring Event Filters
Viewing the Events Log
To view the events log from the Device Manager, choose SNMP Log from the Events menu. The Events Log dialog box displays a log of events for a single switch and shows the display-only information described in Table 8-1.
Table 8-1 Events > SNMP Log —Display-Only Attributes
Display-Only Attribute
|
Description
|
DateAndTime
|
Displays the local date and time the event was logged.
|
Type
|
Displays the type of notification that occurred.
|
Details
|
Displays the details of the event that was logged.
|
To manage the SNMP log, choose SNMP Log from the Events menu and click the Controls tab. The Controls tab provides summary statistics about the SNMP log and allows you to change the default settings for the log.
The dialog box shows the display-only information described in Table 8-2.
Table 8-2 Events > SNMP Log —Display-Only Attributes
Display-Only Attribute
|
Description
|
NotificationsLogged
|
The number of log entries. The same event written to multiple logs is counted multiple times.
|
NotifcationsBumped
|
The number of log entries discarded to make room for a new entry due to lack of resources or reaching the maximum log size. This does not include entries discarded due to the value set for the AgeOut attribute.
|
Table 8-3 describes the configurable attributes for the SNMP log.
Caution Changing these values from different Fabric Manager workstations at the same time may cause unpredictable results.
Table 8-3 Events > SNMP Log —Display-Only Attributes
Display-Only Attribute
|
Description
|
EntryLimit
|
The maximum number of notification entries stored in the log. A value of 0 means no limit.
|
AgeOut
|
The number of minutes an event is kept in a log before it is automatically removed. A value of 0 means entries are not aged out.
|
Configuring Event Destinations
Cisco MDS 9000 Family switches, like other SNMP-enabled devices, send events (traps and informs) to configurable destinations, called trap receivers in SNMPv2. To configure event destinations from the Fabric Manager, choose Events > Destinations on the menu tree. To configure event destinations from the Device Manager, choose Destinations from the Events menu.
The dialog box from the Fabric Manager displays event destination information for multiple switches. Figure 8-1 shows the dialog box with the Addresses tab selected from the Device Manager. This dialog box displays event destinations for a single switch.
Figure 8-1 Events > Destinations Dialog Box, Device Manager
Both dialog boxes show the display-only information described in Table 8-4.
Table 8-4 Events > Destinations—Display-Only Attributes
Display-Only Attribute
|
Description
|
Switch
|
Displays the switch name or IP address. This attribute is only displayed from the Fabric Manager.
|
Security
|
Displays the security.
|
Types
|
Displays the type of notification to be generated for an event (traps for v2c or informs for v3).
|
Table 8-5 describes the configurable attributes for event destinations.
Table 8-5 Events > Destinations—Configurable Attributes
Configurable Attribute
|
Description
|
Address/Port
|
Specifies the IP address and port of the event destination.
|
Security
|
Identifies the version of SNMP, such as v2c for version 2c, or v3 for version 3.
|
Types
|
Identifies the type of events (traps for v2c or informs for v3).
|
Timeout
|
Specifies the amount of time an application must wait for a response.
Note The timeout value can be based on a particular retransmission algorithm and on the number of timeouts that have occurred. Consider the type of message when configuring the timeout value. For example, if a message has a security level that requires both authentication and privacy, you should increase the timeout value to compensate for the extra processing time needed for the authentication and encryption processing.
|
RetryCount
|
Specifies the default number of retries to be attempted when a response is not received for a generated message. If an application provides its own retry count, the value of this attribute is ignored.
|
Status
|
Specifies the row status. Valid values are:
•active
•notInService
•notReady
•createAndGo
•createAndWait
•destroy
|
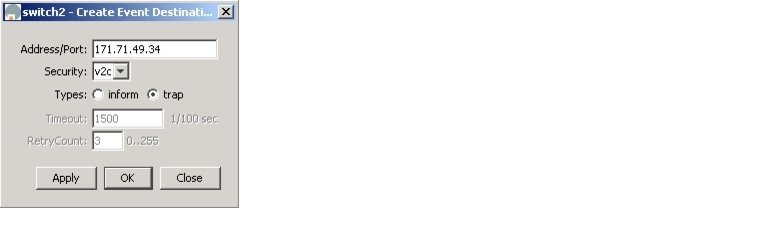
To create an event destination, click Create on the Device Manager dialog box or click the Create Row button on the Fabric Manager toolbar.
From Device Manager, you see the dialog box shown in Figure 8-2.
Figure 8-2 Create Destinations Dialog Box, Device Manager
The dialog box from the Fabric Manager lets you select a switch.
The Timeout option lets you specify the length of time in 1/100 seconds that the system should wait to make a connection. The Retry Count option lets you specify how many times the system should retry.
See Table 8-4 for information about the other fields on this dialog box.
Complete the fields and click Apply to create the event destination or click OK to create the destination and close the window.
Configuring Event Security
Caution This is an advanced function that should only be used by administrators having experience with SNMPv3.
To configure event security from the Fabric Manager, choose Events > Security on the menu tree. To configure event security from the Device Manager, choose Destinations from the Events menu and click the Security tab.
The dialog box from the Fabric Manager displays event security information for multiple switches. The dialog box from Device Manager displays event security for a single switch.
Both dialog boxes show the display-only information described in Table 8-6.
Table 8-6 Events > Security—Display-Only Attributes
Display-Only Attribute
|
Description
|
Switch
|
Displays the switch ID. This attribute is only displayed from the Fabric Manager.
|
Name
|
Displays the principal on whose behalf the SNMP messages are generated.
|
Table 8-7 describes the configurable security attributes for event destinations.
Table 8-7 Event Destinations Security—Configurable Attributes
Configurable Attribute
|
Description
|
MPModel
|
Specifies the message processing model to be used when generating SNMP messages.
|
SecurityModel
|
Specifies the security model to be used when generating SNMP messages.
|
SecurityName
|
Specifies the community string (v1, v2) or user name (v3) on whose behalf SNMP messages are generated.
|
SecurityLevel
|
Specifies the level of security to be used when generating SNMP messages. Valid values are:
•NoAuthNoPriv—No authorization with no privacy (encryption)
•authNoPriv—Authorization with no privacy (encryption)
•authPriv—Authorization with privacy (encryption)
|
Configuring Event Filters
To configure event filters from the Fabric Manager, choose Events > FC Filters or Other Filters on the menu tree. To configure event filters from the Device Manager, choose Filters from the Events menu.
Figure 8-3 shows the Event Filters dialog box from the Device Manager, which displays event filters for a single switch. Fabric Manager displays two different dialog boxes, which list the same event filters for multiple switches, in different order.
Figure 8-3 Event Filters Dialog Box
To configure event filters, check the check box next to the appropriate filter name. The event filters are described in Table 8-8.
Table 8-8 Event Filters
Event Filter
|
Description
|
FSPF - Nbr State Changes
|
Issues a notification when the local switch learns of a change in the neighbor's state on an interface on a VSAN.
|
Domain Mgr - ReConfig Fabrics
|
Issues a notification when sending or receiving a ReConfigureFabric request on a VSAN.
|
Zone Server - Request Rejects
|
Issues a notification when a zone server request is rejected.
|
Zone Server - Merge Failures
|
Issues a notification when a zone merge fails.
|
Zone Server - Merge Successes
|
Issues a notification when a zone merge occurs.
|
Zone Server - Default Zone Behavior Change
|
Issues a notification when default zone behavior is changed (exclusive or inclusive).
|
FabricConfigServer - Request Rejects
|
Issues a notification when a fabric configuration server request is rejected.
|
RSCN - ILS Request Rejects
|
Issues a notification when an RSCN ILS request is rejected.
|
RSCN - ELS Request Rejects
|
Issues a notification when an RSCN ELS request is rejected.
|
SNMP - Bad Logins
|
Enables or disables generation of an SNMP authenticationFailure trap.
Note We recommend that you save this attribute in nonvolatile memory so that it remains constant across reinitializations of the network management system.
|
VRRP
|
Specifies whether a VRRP-enabled router can generate SNMP traps.
|
Enabling RMON Alarms
This section describes how to define and enable preconfigured RMON alarms and includes the following topics:
•Enabling RMON Alarms by Port
•Enabling RMON Alarms for VSANs
•Enabling RMON Alarms for Physical Components
The "Managing RMON Alarms and Events" section provides information about changing the default controls for RMON alarms, viewing the alarm events that have been defined, defining custom event severity levels, and viewing the event log.
Enabling RMON Alarms by Port
To enable alarm notifications by port from the Device Manager, choose Threshold Manager from the Events menu and click the Ports tab. (See Figure 8-4.)
Figure 8-4 RMON Threshold Manager, Ports Tab
To configure an RMON alarm for one or more ports, follow these steps:
Step 1 Select the ports to monitor.
a. Click the Selected radio button.
b. Click the button to the right of the Selected field to display all ports.
c. Select the ports you want to monitor.
Alternatively, click the appropriate radio button to select ports by type:
•All ports
•xE ports
•Fx ports
Step 2 Click the check box for each variable that you want to monitor.
Step 3 Enter the threshold value in the Value column.
Step 4 Enter the sampling period in seconds.
Step 5 Select one of the following severity levels to assign to the alarm:
•Fatal
•Warning
•Critical
•Error
•Information
Step 6 Click Create.
Step 7 Confirm the operation to define an alarm and a log event when the system prompts you to define a severity event.
If you do not confirm the operation, the system only defines a log event.
Enabling RMON Alarms for VSANs
To manage RMON alarm service attributes for selected VSANs from the Device Manager, choose Threshold Manager from the Events menu and click the Services tab. Figure 8-5 shows the Threshold Manager dialog box with the Services tab selected.
Figure 8-5 Threshold Manager, Services Tab
To enable an RMON alarm for one or more VSANs, follow these steps:
Step 1 Enter one or more VSANs to monitor in the VSAN Id(s) field.
Step 2 Click the check box for each variable that you want to monitor.
Step 3 Enter the threshold value in the Value column.
Step 4 Enter the sampling period in seconds.
Step 5 Select a severity level to assign to the alarm:
Step 6 Click Create.
Step 7 Confirm the operation to define an alarm and a log event when the system prompts you to define a severity event.
If you do not confirm the operation, the system only defines a log event.
Enabling RMON Alarms for Physical Components
To configure RMON alarm physical attributes from the Device Manager, choose Threshold Manager from the Events menu and click the Physical tab. Figure 8-6 shows the Create RMON Alarms dialog box with the Physical tab selected.
Figure 8-6 Threshold Manager, Physical Tab
To configure an RMON alarm for a physical component, follow these steps:
Step 1 Click the check box for each variable that you want to monitor.
Step 2 Enter the threshold value in the Value column.
Step 3 Enter the sampling period in seconds.
Step 4 Select one of the following severity levels to assign to the alarm:
•Fatal
•Warning
•Critical
•Error
•Information
Step 5 Click Create.
Step 6 Confirm the operation to define an alarm and a log event when the system prompts you to define a severity event.
If you do not confirm the operation, the system only defines a log event.
Managing RMON Alarms and Events
This section describes changing the default controls for RMON alarms, viewing the alarm events that have been defined, defining custom event severity levels, and viewing the event log. It includes the following topics:
•Configuring RMON Controls
•Managing RMON Alarms
•Managing RMON Event Severity Levels
•Viewing the RMON Log
Configuring RMON Controls
To change the default controls for RMON alarms, choose Threshold Manager from the Device Manager menu. You see the Threshold Manager window shown earlier in Figure 8-4.
Click More on the Threshold Manager window. You see the dialog box shown in Figure 8-7.
Figure 8-7 RMON Thresholds Controls Dialog Box
Table 8-9 describes the configurable attributes for RMON controls.
Table 8-9 RMON Alarms > Controls—Configurable Attributes
Configurable Attribute
|
Description
|
AlarmEnable
|
Enables or disables the RMON alarm feature on this device.
|
MaxAlarms
|
Specifies the maximum number of entries allowed in the alarmTable.
|
Managing RMON Alarms
To view the alarms that have already been enabled, choose Threshold Manager from the Events menu and click the More button on the Threshold Manager dialog box. Then click the Alarms tab. You see the dialog box shown in Figure 8-8.
Figure 8-8 RMON Thresholds—Alarms Tab
To create a customized threshold entry, click the Create button. You see the dialog box shown in Figure 8-9.
Figure 8-9 Create RMON Thresholds Alarms
The dialog boxes show the display-only information described in Table 8-10.
Table 8-10 Events > RMON Alarms—Display-Only Attributes
Display-Only Attribute
|
Description
|
Switch
|
Displays the switch ID. This attribute is only displayed from the Fabric Manager.
|
Falling—Threshold
|
Displays a threshold for the sampled statistic. When the sampled value falls equal to or below this threshold, an event is generated.
|
Falling—Event
|
Displays the ID of the event that is generated when the sampled value falls equal to or below this threshold.
|
Table 8-11 describes the configurable attributes for RMON alarm thresholds.
Table 8-11 Events > RMON Alarms—Configurable Attributes
Configurable Attribute
|
Description
|
Index
|
Specifies the ID of the RMON alarm. Valid values are 1 to 65535. By default, the index values from 1 through 5 are assigned to predefined event severity levels, as follows:
•1—Fatal
•2—Critical
•3—Error
•4—Warning
•5—Information
|
Interval
|
Specifies the time interval, in seconds, over which the data is sampled and compared with the rising and falling thresholds. Valid values are 1 to 3600 seconds.
|
Variable
|
Specifies the variable to be sampled.
|
SampleType
|
Specifies the method of sampling the selected variable and calculating the value to be compared against the thresholds. Valid values are:
•absoluteValue—The value of the selected variable is compared directly with the thresholds at the end of the sampling interval.
•deltaValue— The value of the selected variable at the last sample is subtracted from the current value, and the difference is compared with the thresholds.
|
StartupAlarm
|
Specifies the alarm that is sent when a threshold is exceeded. Valid values are:
•risingAlarm—A single rising alarm is generated.
•fallingAlarm—A single falling alarm is generated.
•risingOrFallingAlarm—Either a rising or a falling alarm is generated.
|
RisingTheshold
|
Specifies the threshold for the sampled statistic.
When the current sampled value is greater than or equal to this threshold, and the value at the last sampling interval was less than this threshold, a single event is generated.
A single event is also generated if the first sample is greater than or equal to this threshold and the StartupAlarm is either a risingAlarm or a risingOrFallingAlarm.
After a rising event is generated, another rising event is not generated until the sampled value falls below this threshold and reaches the FallingThreshold.
|
RisingEventIndex
|
Specifies the ID of the event that is generated when a rising threshold is crossed. Valid values are 0 to 65535, where 0 indicates that no event is to be generated.
|
Owner
|
Specifies the person who configured the RMON alarm thresholds.
|
Managing RMON Event Severity Levels
To define customized RMON event severity levels, select Threshold Manager from the Events menu and click More on the Threshold Manager dialog box. Then click the Events tab on the RMON Thresholds dialog box. You see the dialog box shown in Figure 8-10.
Figure 8-10 RMON Thresholds Events Tab
To create a new threshold entry, click the Create button. You see the dialog box shown in Figure 8-11.
Figure 8-11 Create RMON Thresholds Events
Table 8-12 describes the attributes for RMON event thresholds.
Table 8-12 RMON Alarms > Events—Configurable Attributes
Configurable Attribute
|
Description
|
Index
|
Specifies the event severity level identifier. By default, the index values from 1 through 5 are assigned to predefined event severity levels, as follows:
•1—Fatal
•2—Critical
•3—Error
•4—Warning
•5—Information
|
Description
|
Provides a description of this event severity level.
|
Type
|
Specifies the type of response to the event. Valid values are:
•none—No event is generated.
•log—An entry is made in the log table for each event.
•snmptrap—An SNMP trap is sent to one or more management stations.
•logandtrap—An entry is made in the log table and an SNMP trap is sent for each event.
|
Community
|
Specifies the SNMP community to authenticate the SNMP trap.
|
Owner
|
Specifies the person who configured the RMON alarm thresholds.
|
Viewing the RMON Log
To view the RMON log from the Device Manager, select Threshold Manager from the Events menu and click More on the Threshold Manager dialog box. Then click the Log tab on the RMON Thresholds dialog box. You see the dialog box shown in Figure 8-12.
Figure 8-12 Events > RMON Alarms > Logs Dialog Box, Fabric Manager
The RMON Log dialog box shows the display-only information described in Table 8-13.
Table 8-13 RMON Log—Display-Only Attributes
Display-Only Attribute
|
Description
|
Switch
|
Displays the switch ID. This attribute is only displayed from the Fabric Manager.
|
EventId, Id
|
Displays the event ID.
|
Time
|
Displays the time this log entry was created.
|
Description
|
Describes the event that triggered this log entry.
|
Configuring the Call Home Feature
This section describes how to configure the Call Home feature, which automatically sends e-mail notifications in response to configurable events. This section includes the following topics:
•Overview of Features
•Configuration Overview
•Configuring Call Home Attributes
•Configuring Call Home Destination Attributes
•Configuring Call Home E-Mail Addresses
•Configuring Call Home Alerts
•Configuring Call Home Profiles
Overview of Features
You can use Call Home for direct paging of a network support engineer, E-mail notification to a Network Operations Center, and utilization of Cisco AutoNotify services for direct case generation with the Technical Assistance Center. Call Home provides the following features:
•Fixed set of predefined alerts and trigger events on the switch.
•Automatic execution and attachment of relevant command output.
•Multiple message format options:
–Short Text — Suitable for pagers or printed reports.
–Plain Text — Full formatted message information suitable for human reading.
–XML — Matching readable format using Extensible Markup Language (XML) and Document Type Definitions (DTDs) named Messaging Markup Language (MML). The MML DTD is published on the Cisco Connection Online (CCO) website at http://www.cisco.com/. The XML format enables communication with the Cisco Systems TAC group.
•Multiple concurrent message destinations. Up to 50 e-mail destination addresses are allowed for each format type.
•Message categories include system, environment, switching module hardware, services module hardware, supervisor module, hardware, inventory, and test.
Configuration Overview
When configuring Call Home, keep the following points in mind:
•You must configure at least one E-mail server and at least one destination profile. The destination profile(s) used depends on whether the notification is sent to a pager, email, or automated service such as Cisco AutoNotify.
•You must configure the contact name (SNMP server contact), phone, and street address information before enabling Call Home.
•The Cisco MDS 9000 switch must have IP connectivity to an E-mail server.
•To use Cisco AutoNotify you must obtain an active service contract for the device.
To configure Call Home, use the different tabs on the Call Home dialog box, as summarized below:
Step 1 Assign contact information and enable the Call Home feature using the General tab (see the "Configuring Call Home Attributes" section). The Call Home feature is not enabled by default, and you must enter an e-mail address that identifies the source of Call Home notifications.
Step 2 Configure the destination e-mail addresses for Call Home notifications using the Destinations tab (see the "Configuring Call Home Destination Attributes" section). You can identify one more more e-mail addresses that will receive Call Home notifications.
Step 3 Identify your SMTP server using the E-mail Setup tab (see the "Configuring Call Home E-Mail Addresses" section). You need to identify a message server to which your switch has access. This message server will forward the Call Home notifcations to the destinations.
Step 4 Test Call Home by sending a test message using the Alerts tab (see the "Configuring Call Home Alerts" section). You should test the Call Home feature to make sure it works.
Configuring Call Home Attributes
To assign contact information and enable the Call Home feature from the Fabric Manager, choose Events > Call Home > General on the menu tree. To assign contact information and enable the Call Home feature from the Device Manager, choose Call Home from the Events menu and click the General tab.
Figure 8-13 shows the dialog box with the General tab selected from the Device Manager. This view displays Call Home attributes for a single switch. The dialog box from the Fabric Manager displays Call Home information for multiple switches.
Figure 8-13 Events > Call Home Dialog Box, Device Manager
Both dialog boxes provide the display-only information described in Table 8-14.
Table 8-14 describes the attributes for the Call Home feature.
Table 8-14 Events > Call Home—Configurable Attributes
Configurable Attribute
|
Description
|
Switch
|
Displays the switch ID. This is a display-only attribute in Fabric Manager only.
|
Contact
|
Specifies the identity of the person to be notified.
|
PhoneNumber
|
Specifies the phone number of the person to be notified when an alert occurs.
|
EmailAddress
|
Specifies the e-mail address of the person to be notified when an alert occurs.
|
StreetAddress
|
Specifies the street address of the person to be notified when an alert occurs.
|
CustomerId
|
Specifies the customer ID of the person to be notified when an alert occurs.
|
ContractId
|
Specifies the contract between the customer and the support partner.
|
SiteId
|
Specifies the site ID of the device on which an alert has occurred.
|
DeviceServicePriority
|
Specifies the service priority for the device. Valid values are:
•Emergency
•Alert
•Critical
•Error
•Warning
•Notification
•Information
•Debug
|
Enable
|
Enables Call Home alerts.
|
Configuring Call Home Destination Attributes
To configure the destination e-mail addresses for Call Home notifications, choose Events > Call Home > Destinations on the menu tree. To configure the destination e-mail addresses from the Device Manager, choose Call Home from the Events menu and click the Destination tab.
The dialog box from the Fabric Manager displays Call Home information for multiple switches. Figure 8-14 shows the dialog box with the Destinations tab selected from the Device Manager. This view displays Call Home attributes for a single switch.
Figure 8-14 Events > Call Home > Destination Dialog Box, Device Manager
Table 8-15 describes the Destinations attributes for the Call Home feature.
Table 8-15 Events > Call Home > Destination—Configurable Attributes
Configurable Attribute
|
Description
|
ProfileName, Id
|
Displays the profile name and ID assigned to the destination.
|
EmailAddress
|
Displays the e-mail address of the destination.
|
To create a new Call Home destination, follow these steps:
Step 1 Click Create on the Device Manager dialog box, or click the Create Row button on the Fabric Manager toolbar.
From the Device Manager, you see the dialog box shown in Figure 8-15.
Figure 8-15 Create Call Home Destination
From the Fabric Manager, you can select one or more switches to which the configuration applies.
Step 2 Select the profile name from the pull-down list.
Step 3 Enter a number identifier for the destination.
Step 4 Enter the e-mail address for the destination.
Step 5 Click Create.
Configuring Call Home E-Mail Addresses
To identify your SMTP server from the Fabric Manager, choose Events > Call Home > Email Setup on the menu tree. To identify your SMTP server from the Device Manager, choose Call Home from the Events menu and click the Email Setup tab.
The dialog box from the Fabric Manager displays Call Home information for multiple switches. Figure 8-16 shows the dialog box with the EmailAddresses tab selected from the Device Manager. This view displays Call Home attributes for a single switch.
Figure 8-16 Events > Call Home > Email Setup Dialog Box, Device Manager
Table 8-16 describes the configurable e-mail setup attributes for the Call Home feature.
Table 8-16 Events > Call Home > Destination—Configurable Attributes
Configurable Attribute
|
Description
|
From
|
Specifies the e-mail address to be used in the From field when sending the e-mail message using SMTP.
|
ReplyTo
|
Specifies the e-mail address to be used in the To field when sending the e-mail message using SMTP.
|
SMTP Server: Address
|
Specifies the address of the SMTP server.
|
SMTP Server: Port
|
Specifies the port of the SMTP server.
|
Configuring Call Home Alerts
To test Call Homefrom the Fabric Manager, choose Events > Call Home > Alerts on the menu tree. To test Call Home from the Device Manager, choose Call Home from the Events menu and click the Alerts tab.
The dialog box from the Fabric Manager displays Call Home information for multiple switches. Figure 8-17 shows the dialog box with the Alerts tab selected from the Device Manager. This view displays Call Home attributes for a single switch.
Figure 8-17 Events > Call Home > Alerts Dialog Box, Device Manager
Both dialog boxes show the display-only information described in Table 8-17.
Table 8-17 Events > Call Home > Alerts—Display-Only Attributes
Display-Only Attribute
|
Description
|
Switch
|
Displays the switch ID. This attribute is only displayed from the Fabric Manager.
|
Status
|
Displays the status of the alert.
|
LastTimeSent
|
Displays the date and time the last alert was sent.
|
Number Sent
|
Displays the number of alerts sent.
|
Table 8-18 describes the configurable alert attributes for the Call Home feature.
Table 8-18 Events > Call Home > Alerts—Configurable Attributes
Configurable Attribute
|
Description
|
Test
|
Specifies the type of test:
•test
•test&inventory
|
Configuring Call Home Profiles
To configure Call Home attributes from the Fabric Manager, choose Events > Call Home > Profiles on the menu tree. To configure Call Home attributes from the Device Manager, choose Call Home from the Events menu and click the Profiles tab.
The dialog box from the Fabric Manager displays Call Home information for multiple switches. Figure 8-18 shows the dialog box with the Alerts tab selected from the Device Manager. This view displays Call Home attributes for a single switch.
Figure 8-18 Events > Call Home > Profiles Dialog Box, Device Manager
Both dialog boxes show the display-only information described in Table 8-19.
Table 8-19 Call Home > Profiles—Display-Only Attributes
Display-Only Attribute
|
Description
|
Switch
|
Displays the switch ID. This attribute is only displayed from the Fabric Manager.
|
Profile
|
Displays the profile of the Call Home message to be sent when an alert occurs. Valid values are:
•xml
•full_txt
•short_txt
|
MsgFormat
|
Displays the format of the Call Home message to be sent when an alert occurs. Valid values are:
•mml
•fullText
•shortText
|
Table 8-20 describes the configurable profile attributes for the Call Home feature.
Table 8-20 Call Home > Profiles—Configurable Attributes
Configurable Attribute
|
Description
|
MaxMsgSize
|
Specifies the maximum size of the Call Home message.
|
Configuring the Syslog
This section describes how to configure the syslog and includes the following topics:
•Configuring Syslog Attributes
•Configuring Syslog Servers
•Configuring Syslog Priorities
Configuring Syslog Attributes
To configure syslog attributes from the Fabric Manager, choose Events > Syslog > General on the menu tree. To configure syslog attributes from the Device Manager, choose Syslog from the Events menu and click the General tab.
The dialog box from the Fabric Manager displays syslog information for multiple switches. Figure 8-19 shows the Syslog dialog box with the General tab selected from the Device Manager. This view displays syslog information for a single switch.
Figure 8-19 Events > Syslog > General Dialog Box, Device Manager
The Fabric View dialog box shows the display-only information described in Table 8-21.
Table 8-21 Events > Syslog > General—Display-Only Attributes
Display-Only Attribute
|
Description
|
Switch
|
Displays the switch ID. This attribute is only displayed from the Fabric Manager.
|
Table 8-22 describes the configurable general attributes for the syslog.
Table 8-22 Events > Syslog > General—Configurable Attributes
Configurable Attribute
|
Description
|
ConsoleEnable
|
Enables syslog messages at the console.
|
ConsoleMsgSeverity
|
Specifies the minimum severity of the messages sent to the console. Valid values are:
•Emergency
•Alert
•Critical
•Error
•Warning
•Notification
•Information
•Debug
|
LogFileName
|
Specifies the name of the log file to which syslog messages are sent.
|
LogFileMsgSeverity
|
Specifies the minimum severity of the messages sent to the log file. Valid values are:
•Emergency
•Alert
•Critical
•Error
•Warning
•Notification
•Information
•Debug
|
Configuring Syslog Servers
To configure syslog attributes from the Fabric Manager, choose Events > Syslog > Servers on the menu tree. To configure syslog servers from the Device Manager, choose Syslog from the Events menu and click the Servers tab.
The dialog box from the Fabric Manager displays syslog information for multiple switches. Figure 8-20 shows the Syslog dialog box with the Servers tab selected from the Device Manager. This view displays syslog information for a single switch.
Figure 8-20 Events > Syslog > Servers Dialog Box, Device Manager
Both dialog boxes show the display-only information described in Table 8-23.
Table 8-23 Events > Syslog > Servers—Display-Only Attributes
Display-Only Attribute
|
Description
|
Switch
|
Displays the switch ID. This attribute is only displayed from the Fabric Manager.
|
Table 8-24 describes the configurable server attributes for the syslog.
Table 8-24 Events > Syslog > Servers—Configurable Attributes
Configurable Attribute
|
Description
|
Index
|
Specifies the server ID.
|
IpAddress
|
Specifies the IP address of the server.
|
MsgSeverity
|
Specifies the minimum severity of the messages sent to the server. Valid values are:
•Emergency
•Alert
•Critical
•Error
•Warning
•Notification
•Information
•Debug
|
To add a syslog server, click Create. You see the dialog box shown in Figure 8-21.
Figure 8-21 Create Syslog Servers
Complete the fields on this dialog box and click OK.
Configuring Syslog Priorities
To configure syslog priorities from the Device Manager, choose Syslog from the Events menu and click the Priorities tab. To configure syslog attributes from the Fabric Manager, choose Events > Syslog > Priorities on the menu tree.
Figure 8-22 shows the Syslog dialog box with the Servers tab selected from the Device Manager. This view displays syslog information for a single switch. The dialog box from the Fabric Manager displays syslog information for multiple switches.
Figure 8-22 Events > Syslog > Priorities Dialog Box, Device Manager
Both dialog boxes show the display-only information described in Table 8-25.
Table 8-25 Events > Syslog > Priorities—Display-Only Attributes
Display-Only Attribute
|
Description
|
Switch
|
Displays the switch ID. This attribute is only displayed from the Fabric Manager.
|
Facility
|
Displays the system log message facility.
|
Table 8-26 describes the configurable priorities for the syslog.
Table 8-26 Events > Syslog > Priorities—Configurable Attributes
Configurable Attribute
|
Description
|
Severity
|
Specifies the minimum severity of the messages sent to the syslog. Valid values are:
•Emergency
•Alert
•Critical
•Error
•Warning
•Notification
•Information
•Debug
|