- About This Guide
- Getting Started Installing or Upgrading Cisco Vision Dynamic Signage Director
- Installing Cisco Vision Dynamic Signage Director for the First Time
- Using the Software Manager to Upgrade Cisco Vision Dynamic Signage Director Software, Language Packs, and Fonts
- Verifying the Upgrade
- Upgrading the DMP Firmware
- Smart Software Licensing
- Appendix A: Post-Upgrade Checklist
- Appendix B: Port Reference
Upgrading Cisco Vision Director Software, Language Packs, and Fonts
This module describes using the Cisco Vision Dynamic Signage Director Software Manager to:
■![]() Upgrade an existing Cisco Vision Director to a later release in the supported upgrade path.
Upgrade an existing Cisco Vision Director to a later release in the supported upgrade path.
■![]() Install language packs and fonts.
Install language packs and fonts.
This module includes the following topics:
■![]() Using Cisco Vision Director to Update Existing Software
Using Cisco Vision Director to Update Existing Software
Best Practices
Caution: Do not alter the RAID configuration prior to upgrade.
Before you begin upgrading an existing Cisco Vision Dynamic Signage Director server, consider the following best practices:
■![]() Choose an appropriate down time to perform the upgrade on the server when there is adequate time to complete and verify the upgrade before any scheduled events and to allow time to resolve any unexpected issues.
Choose an appropriate down time to perform the upgrade on the server when there is adequate time to complete and verify the upgrade before any scheduled events and to allow time to resolve any unexpected issues.
■![]() See Release Notes for Cisco Vision Dynamic Signage Director Release 6.3 for the latest information about hardware and software requirements, changes, important notes, and caveats for your software release.
See Release Notes for Cisco Vision Dynamic Signage Director Release 6.3 for the latest information about hardware and software requirements, changes, important notes, and caveats for your software release.
■![]() Know the required hardware and software versions for other devices supporting your Cisco Vision Director solution. Upgrade those devices as needed. For example, generally only certain firmware versions are supported for the DMP hardware, or a new firmware version is needed to provide additional functionality supported by the Cisco Vision Dynamic Signage Director software.
Know the required hardware and software versions for other devices supporting your Cisco Vision Director solution. Upgrade those devices as needed. For example, generally only certain firmware versions are supported for the DMP hardware, or a new firmware version is needed to provide additional functionality supported by the Cisco Vision Dynamic Signage Director software.
■![]() Perform a backup and restore of the primary and secondary servers:
Perform a backup and restore of the primary and secondary servers:
–![]() Perform a backup of the currently active primary server.
Perform a backup of the currently active primary server.
–![]() Restore the backup data onto the standby secondary server.
Restore the backup data onto the standby secondary server.
Note: To do the restore, run the config service on the secondary server.
For more information about performing a backup and restore on a Cisco Vision Dynamic Signage Director Server, see the “Backing Up and Restoring Cisco Vision Dynamic Signage Director Servers” module of the Cisco Vision Administration Guide: Dynamic Signage Director.
■![]() Promote the secondary server to primary.
Promote the secondary server to primary.
For more information about promoting a secondary server to primary, see the “Configuring Failover Between Redundant Cisco Vision Dynamic Signage Director Servers module of the Cisco Vision Administration Guide: Dynamic Signage Director.
■![]() Access the promoted secondary server to perform the upgrade.
Access the promoted secondary server to perform the upgrade.
■![]() It is difficult to recover from an interrupted installation process if the Linux shell is accidentally closed or the network drops. We highly recommended that you use a server console connection method that does not pose a risk to the success of upgrade completion, if the session breaks during upgrade. You also can use a monitor and keyboard that are directly connected to the Cisco Vision Dynamic Signage Director server into the web browser interface.
It is difficult to recover from an interrupted installation process if the Linux shell is accidentally closed or the network drops. We highly recommended that you use a server console connection method that does not pose a risk to the success of upgrade completion, if the session breaks during upgrade. You also can use a monitor and keyboard that are directly connected to the Cisco Vision Dynamic Signage Director server into the web browser interface.
Prerequisites
Be sure that the following requirements are met before you upgrade your server:
■![]() Your server is running a minimum of Cisco Vision Dynamic Signage Director Release 6.2.0-1046 (SP5). See the Release Notes for 6.3 to be certain you followed the upgrade paths.
Your server is running a minimum of Cisco Vision Dynamic Signage Director Release 6.2.0-1046 (SP5). See the Release Notes for 6.3 to be certain you followed the upgrade paths.
■![]() You have the IP address for the server where you want to upload the ISO upgrade image. Use this information as part of the URL to access the ISO upload utility.
You have the IP address for the server where you want to upload the ISO upgrade image. Use this information as part of the URL to access the ISO upload utility.
■![]() You have a supported browser version for Cisco Vision Dynamic Signage Director. For more information about the latest supported browsers, see Rendered Versions and Support in the Cisco Vision Content Planning and Specifications Guide, Release 6.3.
You have a supported browser version for Cisco Vision Dynamic Signage Director. For more information about the latest supported browsers, see Rendered Versions and Support in the Cisco Vision Content Planning and Specifications Guide, Release 6.3.
Preparing for Upgrade
Before you begin an upgrade process, be sure to backup all data to the secondary machine, then power it down. Before upgrading, take a VM snapshot so you can recover, if necessary.
Before upgrading to Release 6.3, verify that your virtual machine meets the minimum requirements for the current deployment. See Getting Started Installing or Upgrading Cisco Vision Dynamic Signage Director. If your virtual machine does not meet the minimum requirements, your existing configuration may get downgraded upon installing Release 6.3.
What To Do Next
■![]() Upgrade your system to Cisco Vision Dynamic Signage Director Release 6.3.
Upgrade your system to Cisco Vision Dynamic Signage Director Release 6.3.
Using Cisco Vision Director to Update Existing Software
The ISO upgrade procedure for Cisco Vision Dynamic Signage Director includes the following tasks:
1.![]() Downloading an ISO service pack or upgrade file from the software download site on Cisco.com to your laptop.
Downloading an ISO service pack or upgrade file from the software download site on Cisco.com to your laptop.
2.![]() Uploading the ISO file from your laptop to the Cisco Vision Dynamic Signage Director server using the Manage Software > Upgrade interface.
Uploading the ISO file from your laptop to the Cisco Vision Dynamic Signage Director server using the Manage Software > Upgrade interface.
3.![]() Installing the ISO image using the install function in the Manage Software > Upgrade interface.
Installing the ISO image using the install function in the Manage Software > Upgrade interface.
ISO Upgrade Files
You can store multiple ISO upgrade files on a Cisco Vision Dynamic Signage Director server. The files will be displayed with a version number and the ISO filename in the Manage Software > Upgrade interface for you to select which file to install.
Disk Maintenance
There is no automatic aging of ISO upgrade files, but you can delete files directly in the Software Manager. Delete ISO files via the TUI: Troubleshooting > Disk Monitoring > Delete Files > Clean upgrade ISO files.
The System Status interface has a gauge for % Disk Utilization or you can use the TUI to get file system usage.
Note: To conserve disk space if you have installed language packs in your current system, use the Software Manager prior to upgrade to remove the language files. There is no harm to the system if you do not remove them. However, the language files will not appear in the Software Manager for removal after you upgrade; they will remain in storage.
Upgrade Tasks
To upgrade your Cisco Vision Dynamic Signage Director server, complete the following tasks:
■![]() Downloading ISO Upgrade Files from Cisco.com (required)
Downloading ISO Upgrade Files from Cisco.com (required)
■![]() Uploading and Installing an ISO Upgrade File on Cisco Vision Director Server (required)
Uploading and Installing an ISO Upgrade File on Cisco Vision Director Server (required)
■![]() Rebooting the Cisco Vision Dynamic Signage Director Server (required)
Rebooting the Cisco Vision Dynamic Signage Director Server (required)
■![]() Installing Language Packs (as required)
Installing Language Packs (as required)
■![]() Installing Fonts (as required)
Installing Fonts (as required)
Downloading ISO Upgrade Files from Cisco.com
Download the upgrade files to a location, such as a laptop computer, where you can access them for installation onto the Cisco Vision Dynamic Signage Director server.
To download an ISO upgrade file:
1.![]() Go to the Cisco Vision Director software download site.
Go to the Cisco Vision Director software download site.
Note: This site page is available from the Cisco StadiumVision Director product support page by clicking Download Software > Cisco StadiumVision Director.
2.![]() Select the ISO upgrade or service pack file (as available), and optionally the companion sha512checksum file, and download them.
Select the ISO upgrade or service pack file (as available), and optionally the companion sha512checksum file, and download them.
Table 1 shows the filename conventions used for ISO upgrades.
Note: Choose the ISO for SV-DIRECTOR.
|
|
|---|
■ |
1.“XXX” represents the build number of the image in the file. |
Download the files using one of the following methods:
–![]() Download both files at one time—Select each file and click Add to Cart. Then at the top of the download page, click the “Download Cart (2 items)” link.
Download both files at one time—Select each file and click Add to Cart. Then at the top of the download page, click the “Download Cart (2 items)” link.
–![]() Download each file independently—Click the Download Now button in the file selection box for each file.
Download each file independently—Click the Download Now button in the file selection box for each file.
3.![]() (Optional) To verify the integrity of your upgrade file from the download, use the Manage Software UI to verify the checksum on the.iso file.
(Optional) To verify the integrity of your upgrade file from the download, use the Manage Software UI to verify the checksum on the.iso file.
The SHA512 checksum is calculated by the system and is shown on the Manage Software UI. Compare what is shown on the UI and the downloaded SHA512 checksum. The values should match. If they do not, retry the download. See the Uploading Task.
Uploading and Installing an ISO Upgrade File on Cisco Vision Director Server
After you download the ISO upgrade file from Cisco.com, use the Manage Software UI to upload the file to the Cisco Vision Dynamic Signage Director server and to install the upgrade image.
Prerequisites
Know the IP address of the server where you want to upload the file. Use a supported browser version for Cisco Vision Dynamic Signage Director.
Task
To upload and install an ISO upgrade file on the Cisco Vision Dynamic Signage Director server:
1.![]() Log into Cisco Vision Dynamic Signage Director as an Administrator.
Log into Cisco Vision Dynamic Signage Director as an Administrator.
2.![]() From your browser, go to the following URL:
From your browser, go to the following URL:
where x.x.x.x is replaced by the IP address of the server where you want to upload the upgrade software.
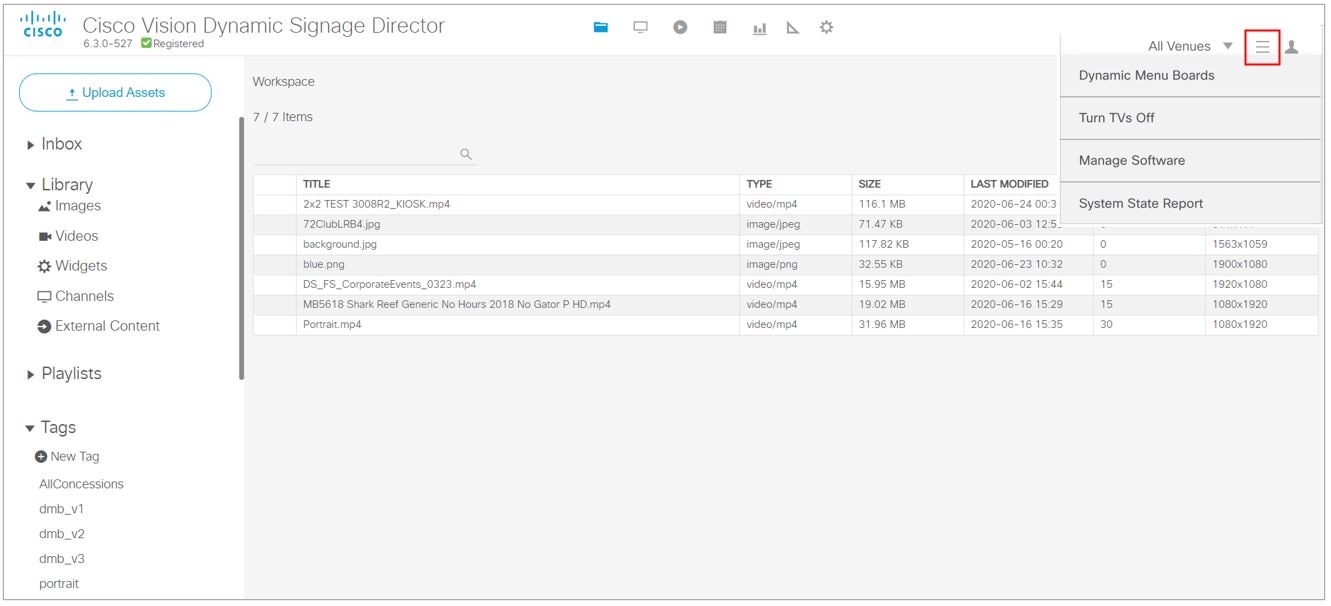
3.![]() Click More > Manage Software.
Click More > Manage Software.
4.![]() Click Upgrade tab. Select the file that you want to upload and click the Upload icon (Figure 1). Roll over action icons (boxed). The Upload ISO File dialog box appears.
Click Upgrade tab. Select the file that you want to upload and click the Upload icon (Figure 1). Roll over action icons (boxed). The Upload ISO File dialog box appears.
Figure 1 ISO File Selection and Upload
5.![]() Navigate to the location of the ISO upgrade file that you downloaded from Cisco.com. Select the file that you want to upload and click Choose. The file name populates the Name field.
Navigate to the location of the ISO upgrade file that you downloaded from Cisco.com. Select the file that you want to upload and click Choose. The file name populates the Name field.
6.![]() Click Upload. The file is sent to the server.
Click Upload. The file is sent to the server.
When the ISO upload completes, one of the following occurs:
–![]() When the image is validated and uploaded successfully, a message displays stating that the ISO image has been uploaded.
When the image is validated and uploaded successfully, a message displays stating that the ISO image has been uploaded.
–![]() The image upload failed. Retry the upload.
The image upload failed. Retry the upload.
Caution: The upload might take several minutes. Do not refresh or reload the Software Manager page while the upload process is running. Any interruption will corrupt the ISO image being uploaded.
Note : Upon successful upload, you will see an entry with the newly uploaded upgraded ISO file. Verify that the displayed checksum matches the checksum from the Cisco download site.
8.![]() The installation process begins and status messages display.
The installation process begins and status messages display.
9.![]() After the installation completes, Cisco Vision Dynamic Signage Director services restart.
After the installation completes, Cisco Vision Dynamic Signage Director services restart.
Rebooting the Cisco Vision Dynamic Signage Director Server
To reboot the Cisco Vision Dynamic Signage Director server:
1.![]() Log into the TUI as installer. The TUI Main Menu displays.
Log into the TUI as installer. The TUI Main Menu displays.
2.![]() Go to the Cisco Vision Server Administration menu.
Go to the Cisco Vision Server Administration menu.
4.![]() At the confirmation prompt, press Y to start the reboot process.
At the confirmation prompt, press Y to start the reboot process.
Installing Language Packs
Note: Language packs are release-specific. When the language packs for 6.3 become available, upload the relevant language pack and install it. Install language packs for Release 6.3, after you install or upgrade to the required 6.3 release.
Upload and install only the specific language(s) that you want to support through the independent installation of Language Packs. Perform the upload and installation of the language packs using Cisco Vision Dynamic Signage Director.
1.![]() Download the desired language pack from Cisco.com.
Download the desired language pack from Cisco.com.
2.![]() Log into Cisco Vision Dynamic Signage Director as an Administrator.
Log into Cisco Vision Dynamic Signage Director as an Administrator.
3.![]() Go to More > Manage Software.
Go to More > Manage Software.
4.![]() Click Language Packs tab (Figure 2).
Click Language Packs tab (Figure 2).
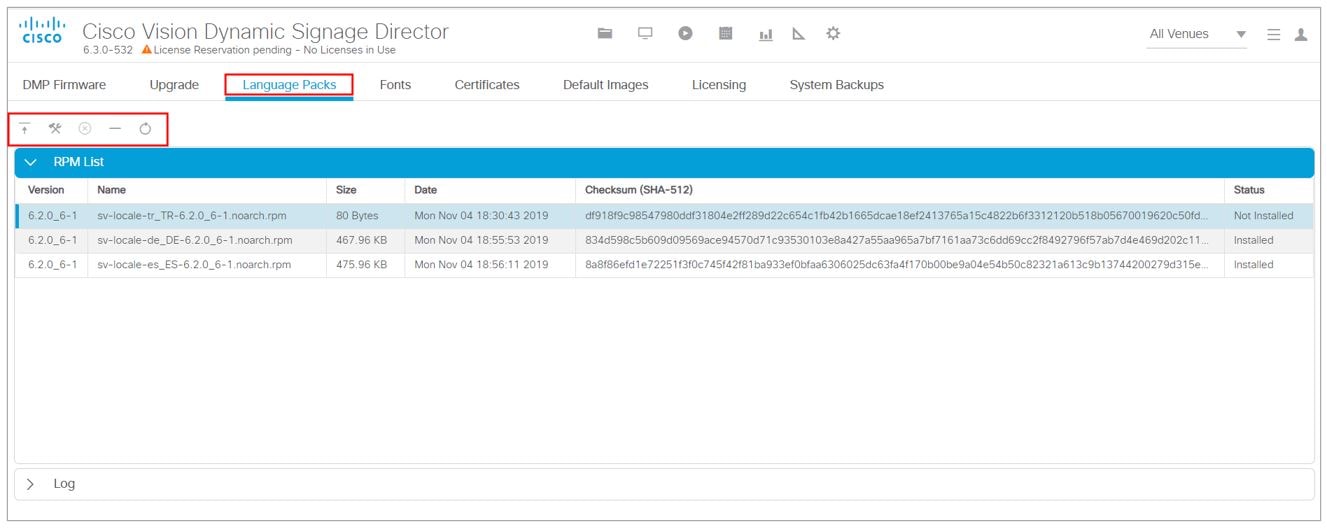
6.![]() In the File Upload dialog box, navigate to the downloaded Language Pack RPM file, and click Open. The language pack is sent to the server.
In the File Upload dialog box, navigate to the downloaded Language Pack RPM file, and click Open. The language pack is sent to the server.
7.![]() Click Install/Upgrade to install the language pack.
Click Install/Upgrade to install the language pack.
Note: If you are using a secondary Cisco Vision Dynamic Signage Director server, install the language pack on both the primary and secondary servers.
8.![]() To transfer the locales to the digital media players, do the following:
To transfer the locales to the digital media players, do the following:
a.![]() Click Device Management > Restore Default Settings (Figure 3).
Click Device Management > Restore Default Settings (Figure 3).
b.![]() In the Devices panel, select the digital media player(s).
In the Devices panel, select the digital media player(s).
c.![]() To execute the command, click the Play (Send Command) icon.
To execute the command, click the Play (Send Command) icon.
Figure 3 Restore Default Settings in Device Management

9.![]() Stage content to the digital media players.
Stage content to the digital media players.
For more information, see the “Staging Content to the Media Player” topic in the Cisco Vision Director Operations Guide.
Installing Fonts
Note: Follow these guidelines to install new fonts on your system for use in the Widgets tool. These fonts are not used for external HTML pages. This section includes the following topics:
■![]() Guidelines for Installing Fonts
Guidelines for Installing Fonts
Guidelines for Installing Fonts
Note: In Cisco Vision Director, the unifont.ttf font is embedded in the media player firmware. This means that the font is available as a fallback font to external HTML pages that might not explicitly reference fonts in their CSS.
Consider the following guidelines before installing fonts:
■![]() To save system memory on the media player, install fonts that have the minimal set of required characters.
To save system memory on the media player, install fonts that have the minimal set of required characters.
■![]() Asian languages like Chinese (which contain more glyphs) require more memory.
Asian languages like Chinese (which contain more glyphs) require more memory.
■![]() The fallback font is Arial; it is the default font in cases where the widget or external URL is referencing a font that is not available.
The fallback font is Arial; it is the default font in cases where the widget or external URL is referencing a font that is not available.
■![]() Only True Type fonts (.ttf) and OpenType fonts (.otf) are supported.
Only True Type fonts (.ttf) and OpenType fonts (.otf) are supported.
Procedure
Note: Fonts must be TrueType (.ttf) or OpenType (.otf).
2.![]() Log into Cisco Vision Dynamic Signage Director as an Administrator.
Log into Cisco Vision Dynamic Signage Director as an Administrator.
3.![]() Go to More > Manage Software.
Go to More > Manage Software.
4.![]() Click Fonts tab (Figure 4).
Click Fonts tab (Figure 4).
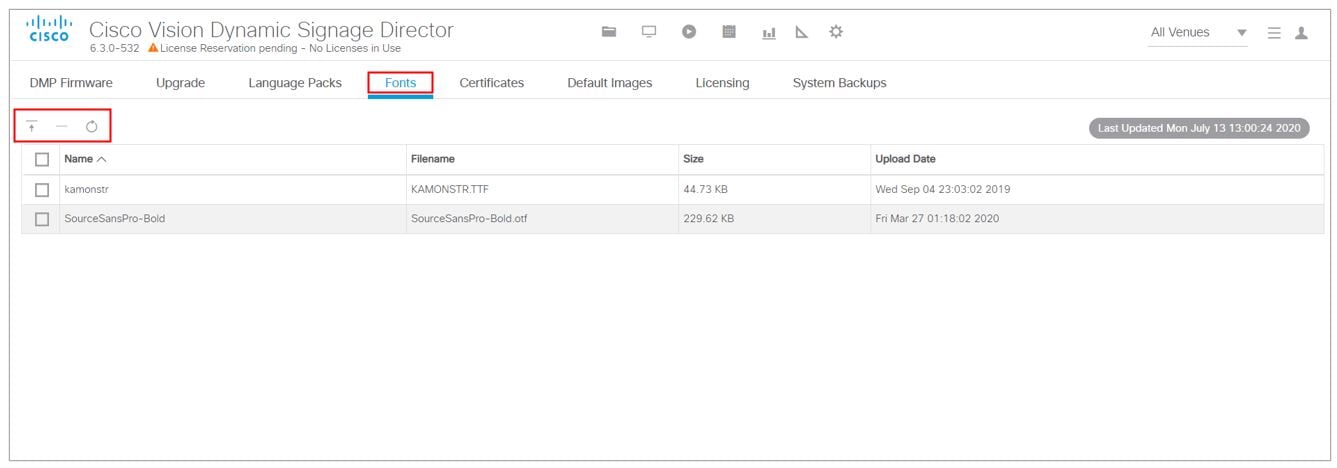
6.![]() In the Font Upload dialog box, do the following:
In the Font Upload dialog box, do the following:
b.![]() Navigate to the location of your font file and click Open.
Navigate to the location of your font file and click Open.
7.![]() Stage content to the media player.
Stage content to the media player.
For more information, see the “Staging Content to the Media Player” topic in the Cisco Vision Director Operations Guide.
What to Do Next
■![]() Follow the steps in Verifying the Upgrade to verify that the upgrade process was successful.
Follow the steps in Verifying the Upgrade to verify that the upgrade process was successful.
■![]() Use Appendix A: Post-Upgrade Checklist to complete the required verification steps.
Use Appendix A: Post-Upgrade Checklist to complete the required verification steps.
■![]() Import DMP Certificates. See Importing Certificates on the DMP in the Cisco Vision Administration Guide: Release 6.3 or the Release Notes for Cisco Vision Dynamic Signage Director, Release 6.3.
Import DMP Certificates. See Importing Certificates on the DMP in the Cisco Vision Administration Guide: Release 6.3 or the Release Notes for Cisco Vision Dynamic Signage Director, Release 6.3.
 Feedback