- About This Guide
- Getting Started Installing or Upgrading Cisco Vision Dynamic Signage Director
- Installing Cisco Vision Dynamic Signage Director for the First Time
- Using the Software Manager to Upgrade Cisco Vision Dynamic Signage Director Software, Language Packs, and Fonts
- Verifying the Upgrade
- Upgrading the DMP Firmware
- Smart Software Licensing
- Appendix A: Post-Upgrade Checklist
- Appendix B: Port Reference
Cisco Vision Software Installation and Upgrade Guide: Dynamic Signage Director Release 6.3
Bias-Free Language
The documentation set for this product strives to use bias-free language. For the purposes of this documentation set, bias-free is defined as language that does not imply discrimination based on age, disability, gender, racial identity, ethnic identity, sexual orientation, socioeconomic status, and intersectionality. Exceptions may be present in the documentation due to language that is hardcoded in the user interfaces of the product software, language used based on RFP documentation, or language that is used by a referenced third-party product. Learn more about how Cisco is using Inclusive Language.
- Updated:
- August 5, 2020
Chapter: Smart Software Licensing
Smart Software Licensing
Overview
Cisco Smart Software Licensing is a simplified and standardized process for managing licenses for Cisco products in the cloud. Smart Software Licensing provides complete visibility into license ownership and consumption. It renders a unified experience across all product lines. Using Smart Software Licensing, Cisco products / software can automatically self-register upon configuration, making it easier to manage your software subscriptions. Our valued customers will have a 90-day grace period, allowing you to evaluate the Smart Software Licensing system and add additional products. At the end of the 90-day trial period, you must purchase a license for each product in your deployment.
Note: License Management is accessible to Administrators only.
To access your license interface:
1.![]() Click More > Manage Software.
Click More > Manage Software.
2.![]() Click the Licensing tab (Figure 1).
Click the Licensing tab (Figure 1).
Figure 1 Smart Licensing Interface
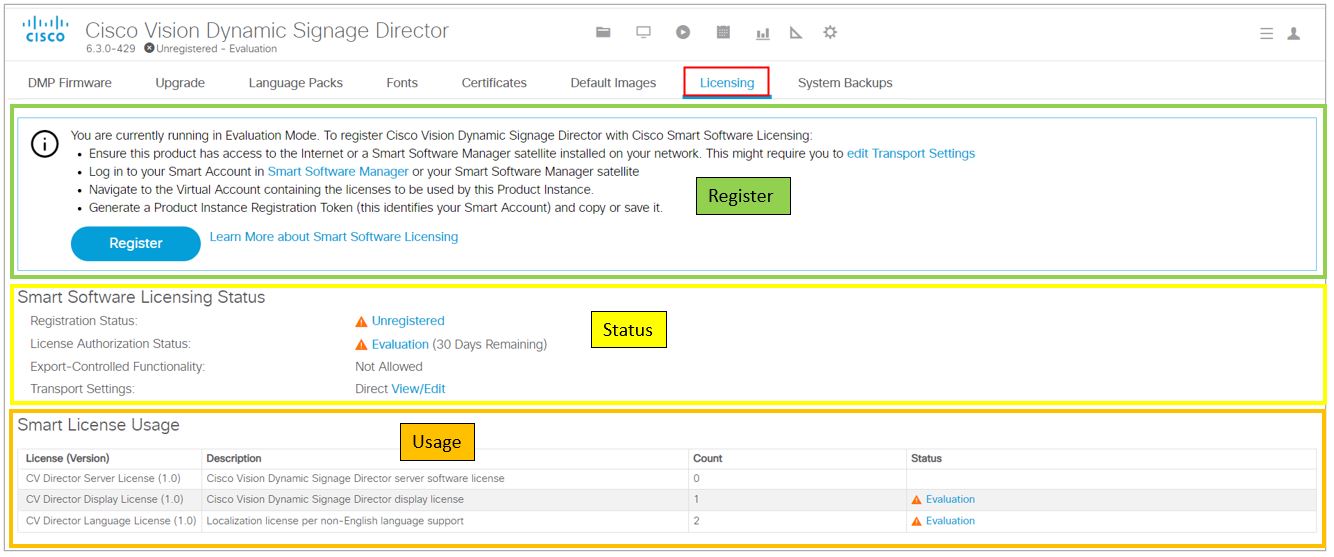
This interface is explained with three elements:
■![]() Registering Smart Software Licensing
Registering Smart Software Licensing
Registering Smart Software Licensing
Cisco Smart Software Licensing allows you to manage and control the licenses for your Cisco products from a central location instead of dealing with your licenses locally.
Create a Smart Account
The first step to enabling smart software licensing is to create a Smart Account with Cisco, unless your organization has already established one.
To start the Smart Software licensing process:
1.![]() Click Smart Software Manager in the text. The Cisco Software Central window appears.
Click Smart Software Manager in the text. The Cisco Software Central window appears.
2.![]() Click Get a Smart Account. Follow the instructions.
Click Get a Smart Account. Follow the instructions.
This does not register your Cisco Vision Director deployment with Cisco Smart Software Licensing. Cisco Vision Director will be in Evaluation Mode until you register the product with the Smart Software Licensing application.
Register Cisco Vision Director Products with Smart Licensing Software
To register your license with Smart Software Licensing:
1.![]() After you complete enabling a Smart Account, go back the Cisco Vision Director, click More > Manage Software > Licensing and click Smart Software Licensing link in blue text. The Smart Software Licensing screen appears.
After you complete enabling a Smart Account, go back the Cisco Vision Director, click More > Manage Software > Licensing and click Smart Software Licensing link in blue text. The Smart Software Licensing screen appears.
3.![]() In the General tab, click New Token. The Create New Token dialog box appears.
In the General tab, click New Token. The Create New Token dialog box appears.
4.![]() Fill in all the fields and click Create Token. Max. Number of Uses defines how many times this token can be use for registering Cisco Vision Director.
Fill in all the fields and click Create Token. Max. Number of Uses defines how many times this token can be use for registering Cisco Vision Director.
5.![]() A confirmation green check box flashes. You see the new token information listed in the table.
A confirmation green check box flashes. You see the new token information listed in the table.
6.![]() In the Actions drop-down arrow, click Copy or Download to get the token information.
In the Actions drop-down arrow, click Copy or Download to get the token information.
7.![]() In the Cisco Vision Director UI, click Register. The Smart Software Licensing Product Registration box appears.
In the Cisco Vision Director UI, click Register. The Smart Software Licensing Product Registration box appears.
8.![]() Paste the token information from the Smart Licensing server in the black box and click Register.
Paste the token information from the Smart Licensing server in the black box and click Register.
Use the checkbox if the product is already registered.
Wait a few moments for the software to register and refresh the screen.
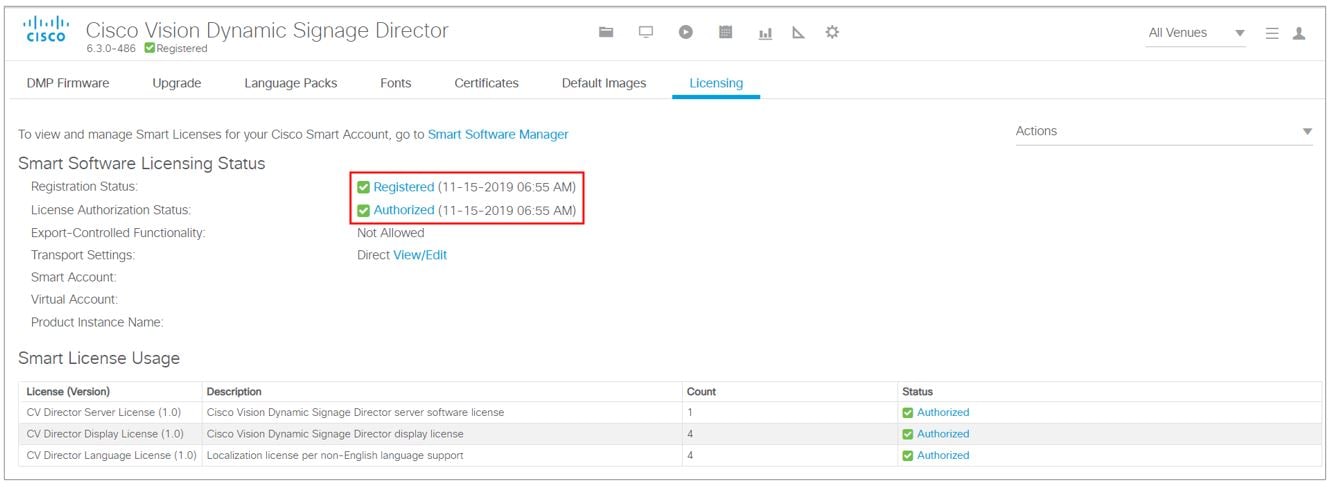
You see three lines appear: one for CV Director, one for the Displays (DMPs), and one for Language Packs (Figure 1)—all granted for one purchased Director license. When you register Cisco Vision Director (the parent purchase), the number of licenses purchased against the parent, meaning the Displays (DMPs) and Languages, versus the actual usage of the parent (Director, usually 1), the total number of DMPs and language pack s are compared. For example, if the licenses purchased for Displays (DMPs) is 500 and you use 250, the status of the License is Authorized. Conversely, if you specify 500 and you use 750 DMPs, then the status of your license is Out of Compliance.
Note: Once you register your Director license, the corresponding number of DMPs you are using will be authorized. It may take up to an hour to show that your licenses are authorized. In the meantime, you may see a Non-Compliant orange caution symbol. Later, when more Director / Devices / Language Packs are added to the parent license, the count updates every and the usage will be reported to the Licensing Smart Account Server.
Note: After an upgrade, Cisco Vision Director remains in Unregistered—Evaluation mode for 90 days. After 90 days, the Evaluation period expires.
Smart Software Licensing Status
This portion of the screen shows the status of your current licenses. Click on any of the icon links showing on your screen for more information. The links are notifications only.
Use the Actions pull-down to perform a license registration function (Figure 2). You can do the following with your licenses:
■![]() Renew Authorization now—renews authorization for a valid license on Director
Renew Authorization now—renews authorization for a valid license on Director
■![]() Renew Registration now—renews registration for a valid license on Director
Renew Registration now—renews registration for a valid license on Director
■![]() Reregister—process is like registration
Reregister—process is like registration
■![]() Deregister—releases the licenses used by Director software
Deregister—releases the licenses used by Director software
Figure 2 License Register Actions

License registration is renewed every six months automatically. The info bubble on the Authorization status (Figure 3) mentions three dates:
1.![]() When did Director send the last Authorization request?
When did Director send the last Authorization request?
2.![]() When will the next Authorization request be sent?
When will the next Authorization request be sent?
3.![]() When will the Authorization Period expire?
When will the Authorization Period expire?
Figure 3 License Renewal Information Pop-Up

Choose Renew Authorization now to renew authorization from the Action drop-down (Figure 2).
Check the info bubbles for dates for authorization. Use the Action drop-down.
Reserve Cisco Vision Director Products with Smart Software Licensing
When you use Cisco Vision Director without registering and requesting a license, you run in Evaluation Mode. You see the orange caution symbol at the top of your screen reminding you to register your license, no matter which interface you use. Click on the Unregistered link and a pop-up displays (Figure 4).
Figure 4 Registration Information

Likewise, click on the Evaluation link for more information.
To reserve a license and use that license when it is registered:
1.![]() Click start here. The Smart Software License Reservation box appears.
Click start here. The Smart Software License Reservation box appears.
2.![]() Click Confirm. The box changes to allow you to Generate a license token.
Click Confirm. The box changes to allow you to Generate a license token.
3.![]() Click Generate. The License Reservation Request Code box appears with the code string.
Click Generate. The License Reservation Request Code box appears with the code string.
4.![]() Click Copy to Clipboard or Save to File.
Click Copy to Clipboard or Save to File.
5.![]() Use the generated Reservation Request Code and generate an Authorization Code from the Licensing Server.
Use the generated Reservation Request Code and generate an Authorization Code from the Licensing Server.
After generating the Reservation Request Code, the status changes.
6.![]() Enter the Authorization Code: The Authorization Code generated from the Licensing Server has to be entered here and the reservation process continues.
Enter the Authorization Code: The Authorization Code generated from the Licensing Server has to be entered here and the reservation process continues.
Figure 5 shows a successful registration.
Figure 5 License Status Successfully Registered
If, for any reason you canceled the process before the code was visible in the registration box, you can recover it.
In the Registration zone, click View Request Code (Figure 6).

You can purchase more than one Cisco Vision Director license and choose to deploy them however you want, even in one venue.
Note: You must also register your secondary server—in case of a fail-over.
1.![]() Access the Smart Licensing server and generate the Authorization Code, like above.
Access the Smart Licensing server and generate the Authorization Code, like above.
2.![]() Enter the Authorization Code in the pop-up.
Enter the Authorization Code in the pop-up.
After updating, Cisco Vision Director provides confirmation code.
3.![]() Enter the code in the Licensing Server window and click the “Code is Entered” to acknowledge the update in the Licensing Server.
Enter the code in the Licensing Server window and click the “Code is Entered” to acknowledge the update in the Licensing Server.
Transport Settings
The transport settings interface controls how you link from the cloud Smart Software Manager to Cisco Vision Director. There are three options available:
■![]() Direct—whereby the product communicates directly with Cisco’s licensing server.
Direct—whereby the product communicates directly with Cisco’s licensing server.
■![]() Transport Gateway—the gateway or satellite must have access to the internet. Select this and enter the URL of the Transport Gateway or Cisco Smart Software Licensing satellite used to communicate with the Cisco Smart Licensing server.
Transport Gateway—the gateway or satellite must have access to the internet. Select this and enter the URL of the Transport Gateway or Cisco Smart Software Licensing satellite used to communicate with the Cisco Smart Licensing server.
■![]() HTTP/HTTPS Proxy— Select this and enter the URL and port number for the HTTP or HTTPS proxy server used to communicate with the Cisco Smart Licensing server.
HTTP/HTTPS Proxy— Select this and enter the URL and port number for the HTTP or HTTPS proxy server used to communicate with the Cisco Smart Licensing server.
1.![]() Click edit Transport Settings. The Transport Setting box appears (Figure 7).
Click edit Transport Settings. The Transport Setting box appears (Figure 7).

Note: If you select anything but Direct, you must provide the URL, IP Address and Port information. We recommend using the Direct option.
Smart License Usage
The Smart License Usage portion of the screen gives you the dashboard status of your licenses by product. The License column shows the specific type of product registered successfully. In this example, we show Dynamic Signage Director server, Cisco Vision Director DMPs and a Language Pack license (Figure 8).

Here is a table showing the Product Identification numbers.
 Feedback