Manage Licenses

Cisco Crosswork Planning supports Cisco Smart Licensing. A license is required to use all the features in Cisco Crosswork Planning. If you have questions about obtaining a license, contact your Cisco support representative or system administrator.

This chapter contains the following topics:

Cisco Smart Licensing Overview

Cisco Smart Licensing is a flexible licensing model that provides you with an easier, faster, and more consistent way to purchase and manage software across the Cisco portfolio and across your organization. And it’s secure – you control what users can access. With Smart Licensing you get:

  • Easy Activation: Smart Licensing establishes a pool of software licenses that can be used across the entire organization—no more PAKs (Product Activation Keys).

  • Unified Management: My Cisco Entitlements (MCE) provides a complete view into all of your Cisco products and services in an easy-to-use portal, so you always know what you have and what you are using.

  • License Flexibility: Your software is not node-locked to your hardware, so you can easily use and transfer licenses as needed.

Workflow: Smart Licensing Configuration

The high-level steps involved in configuring Cisco Smart Licensing are as follows:

Table 1. Smart Licensing Configuration Workflow

Step

Action

1. Set up a Smart Account on Cisco Software Central (software.cisco.com).

Go to Smart Account Request and follow the instructions on the website.

2. (Optional) Configure transport settings.

Configure the Transport Mode Between Cisco Crosswork Planning and CSSM.

3. Register Cisco Crosswork Planning with the Cisco Smart Software Manager (CSSM).

See:

A Cisco Smart Account provides the repository for Smart enabled products and enables you to activate Cisco licenses, monitor license usage and track Cisco purchases. The Cisco Smart Software Manager (CSSM) enables you to manage all your Cisco Smart software licenses from one centralized website. With Cisco Smart Software Manager, you may create and manage multiple virtual accounts within your Smart Account to manage licenses. For a more detailed overview on Cisco Licensing, go to cisco.com/go/licensingguide.

In the Cisco Crosswork Planning UI, from the main menu, choose Licensing. The Smart License page opens. On this page, you can register Cisco Crosswork Planning, edit the transport settings, renew the license, and de-register the application.

Configure the Transport Mode Between Cisco Crosswork Planning and CSSM

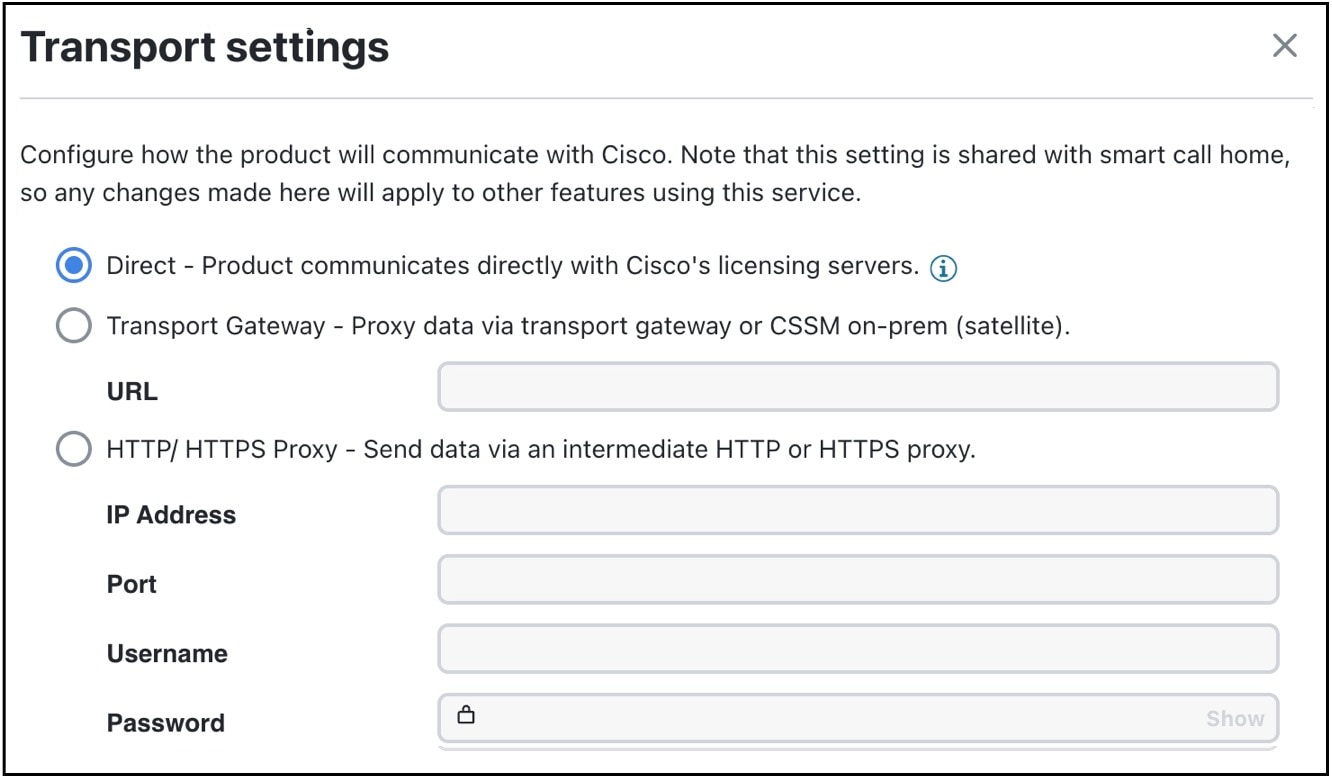
You can configure the transport settings to decide how Cisco Crosswork Planning communicates with CSSM.

  • Direct: Cisco Crosswork Planning directly connects with CSSM.

  • Transport Gateway: Cisco Crosswork Planning communicates via a Transport Gateway or CSSM On-prem, which replicates the cloud-based user experience but keeps all communication on premises. For more information on the CSSM On-prem option, see the Smart Software Manager guide.


    Note


    Cisco Crosswork Planning supports only SmartTransport URL. The URL is in the format: http://<SSM-ONPREM-IP>/SmartTransport.


  • HTTP/HTTPS Proxy: Cisco Crosswork Planning communicates to the direct mode end point via the configured proxy, if proxy is configured.


Note


Transport settings cannot be changed while the Cisco Crosswork Planning product is in Registered mode. You have to de-register to change them.


Procedure


Step 1

From the main menu, choose Licensing. The Smart License page opens.

Step 2

The Transport settings field displays the current transport mode selected. To modify, click View / Edit. The Transport settings dialog box is displayed.

Figure 1. Transport Settings Dialog Box

Step 3

Select the relevant transport mode and make relevant entries in the fields provided.

Step 4

Click Save.


Register Cisco Crosswork Planning via Token

To enable the licensed features, the Cisco Crosswork Planning application must be registered to CSSM using a registration ID token. Once registered, an Identity Certificate is saved securely in the Smart Account and used for all ongoing communications. The certificate is valid for one year and will be renewed automatically after six months to ensure continuous operation.


Note


For information on generating the registration token, please refer to the support resources provided in the Cisco Software Central web page.


Before you begin

Confirm that you have a Smart Account. If not, go to Smart Account Request and follow the instructions on the website.

Procedure


Step 1

From the main menu, choose Licensing. The registration status and license authorization status will be Unregistered and Evaluation mode respectively.

Figure 2. Smart Software Licensing Unregistered Example

Step 2

In the Smart Software Licensing information box at the top, click Register.

The Smart Software Licensing Product Registration dialog box is displayed.

Figure 3. Smart Software Licensing Product Registration Dialog Box

Step 3

In the Product instance registration token field, enter the registration token generated from your Smart Account. Make sure the token ID is accurate and within validity period.

Step 4

(Optional) If you are re-registering the application, check the Re-register this product registration if it is already registered check box.

Step 5

Click Register. It may take a few minutes to process the registration. If successful, the 'Product Registration completed successfully' message is displayed.

The registration status and license authorization status will be updated as Registered and Authorized respectively.

Note

 
  • It will take a minimum of 20 seconds for the request to succeed. If you do not get the correct response from the backend within the first 20 seconds, the UI will continue to check every 10 seconds for up to five minutes. If no response is obtained after five minutes, the system will display a generic error message.

  • If you encounter a registration error (for example, "Communication send error" or "Invalid response from licensing cloud"), wait for some time and retry the registration. If the error persists after multiple attempts, contact the Cisco Customer Experience team.

  • In some cases, after successful registration, the page may need to be refreshed manually to see the updated status.


Manually Perform Licensing Actions

The renewal of registration and authorization is automatically enabled for Cisco Crosswork Planning, by default. However, in the event of a communication failure between the application and the Cisco server, these actions can be manually initiated. You can use the Actions drop-down button to manually renew, re-register and de-register the application.

Before you begin

Make sure that the application is in Registered mode.

Procedure


Step 1

From the main menu, choose Licensing. The Smart License page appears.

Step 2

Click the Actions drop-down button and select the relevant option for the following quick actions.

  1. Actions > Renew Authorization: To renew the authorization manually if the automatic renewal service fails at the end of 30 days.

  2. Actions > Renew Registration: To renew the registration manually if the automatic renewal service fails at the end of 6 months.

  3. Actions > Re-register: Re-register the application, for example, on account of the expiry of registration tokens.

  4. Actions > De-register: De-register the application, for example, when the transport settings need to be changed.

    Note


    Once de-registered, the application will be moved to Evaluation mode (if evaluation period is available) or Evaluation Expired mode. For more information, see License Authorization Statuses.


Register Cisco Crosswork Planning via Offline Reservation

When Smart Licensing is used, Cisco Crosswork Planning shares usage information to CSSM at regular intervals. If you do not want to connect with CSSM regularly, Cisco Smart Licensing provides an option of offline reservation.

Before you begin

Confirm that you have a Smart Account. If not, go to Smart Account Request and follow the instructions on the website.

Procedure


Step 1

From the main menu, choose Licensing.

Step 2

In the Smart Software Licensing information box at the top, click Register.

The Smart Software Licensing Product Registration dialog box is displayed.

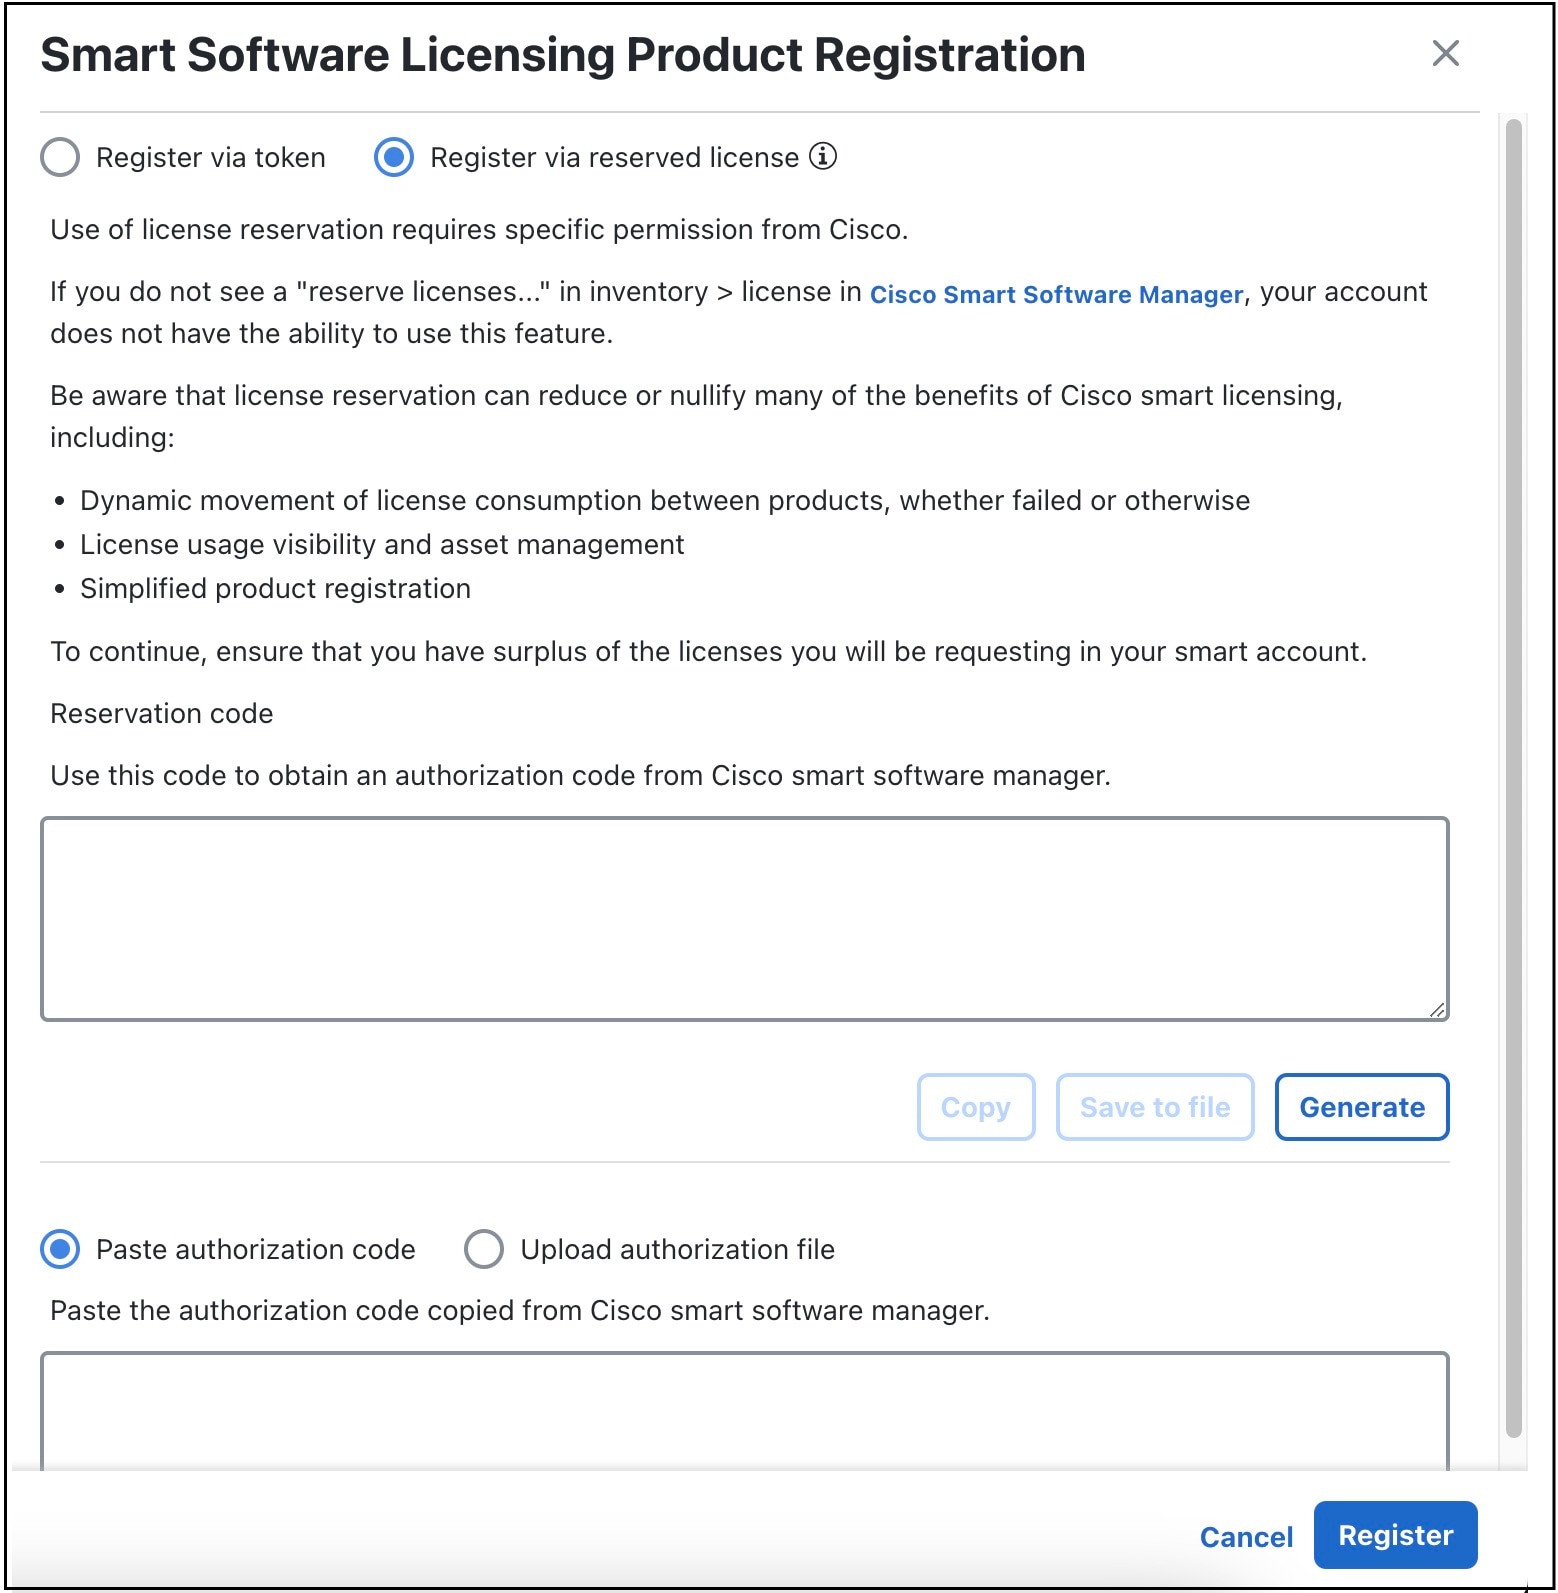
Step 3

Choose the Register via reserved license option.

Figure 4. Smart Software Licensing Product Registration Dialog Box

Step 4

Click the Generate button under the Reservation code section. Your Reservation Request Code is generated and populated in the text field. Copy this code using Copy button.

Step 5

Go to CSSM and select the appropriate Virtual Account.

Step 6

Click the Licenses tab, then click License Reservation. Paste the Reservation Request Code that you generated in Step 3 and click Next.

Step 7

On the Select Licenses page, select the type of reservation you need. Then, click Next.

Step 8

On the Review and Confirm page, click Generate Authorization Code. Copy the code using the Copy to Clipboard button.

Step 9

Navigate back to the Smart Software Licensing Product Registration page in the Cisco Crosswork Planning UI. Select the Paste authorization code radio button and paste the authorization code in the text field.

Step 10

Click Register. It may take a few minutes to process the registration.

The registration status and license authorization status will be updated as Registered and Authorized respectively.


Update Offline Reservation

Use the Update Reservation option to update the license counts reserved via offline reservation.

Procedure


Step 1

From the main menu, choose Licensing. Make a note of the Product Instance Name (available under the Smart Software Licensing Status section).

Step 2

Go to CSSM and select the appropriate virtual account.

Step 3

Click the name of the product instance that matches your Product Instance Name.

Step 4

For this product instance, click the Actions drop-down button and choose Update Reservation.

Step 5

In the Select Licenses screen, select the Reserve a Specific License radio button, update the count of the necessary licenses from the list and click Next.

Step 6

In the Review and Confirm page, click Generate Authorization Code. Copy the code using Copy to Clipboard button.

Step 7

Navigate back to the Smart License page on the Cisco Crosswork Planning UI. Click the Actions drop-down button and choose Update Reservation. Paste the Authorization Code that you generated in the previous step and click Update.

A Confirmation Code is generated. You can find this under the Smart Software Licensing Status section. Copy this code.

Step 8

Navigate back to CSSM. Click the required product instance name.

Step 9

Click the Actions drop-down button and choose Enter Confirmation Code.

Step 10

Enter/paste the Reservation Confirmation Code that was generated in Step 7 and click OK.

The license count will be updated on the Smart License page of the Cisco Crosswork Planning UI.


Disable Offline Reservation

Use the Return Reservation option to release the reserved licenses. Once the licenses are released, the application will be moved to Evaluation mode (if evaluation period is available), or Evaluation Expired mode. For more information, see License Authorization Statuses.

Procedure


Step 1

From the main menu, choose Licensing. Make a note of the Product Instance Name (available under the Smart Software Licensing Status section).

Step 2

Click the Actions drop-down button and choose Return Reservation.

Step 3

In the Confirm Return Reservation window, click Confirm.

A Release Code (Reservation Return Code) is generated. Copy this code using the Copy button.

Step 4

Navigate to CSSM and select the appropriate virtual account.

Step 5

Click the name of the product instance that matches your Product Instance Name.

Step 6

For this product instance, click the Actions drop-down button and choose Remove.

Step 7

In the Remove Reservation pop-up, paste the Reservation Return Code that you generated in Step 3 and click Remove Reservation.

The Registration status will be updated to Unregistered in the Smart License page of the Cisco Crosswork Planning UI.

Step 8

Navigate back to the Smart License page in the Cisco Crosswork Planning UI. Click the Actions drop-down button and choose Disable License Reservation.


Update License Counts

In Cisco Crosswork Planning, you can enter number of licenses for usage as per your requirement. Ensure that you have a sufficient number of licenses in the Virtual Account; otherwise, it will be out of compliance.

For the tools in the Cisco Crosswork Planning Design application to function correctly, you must have the appropriate number of licenses. Follow these steps to update the license counts.

Procedure


Step 1

From the main menu, choose Licensing.

Step 2

Under the License usage section, click Update license count.

The Update License Count window appears.

Step 3

Enter the required license count in the Modified count column.

Figure 5. Update License Count

There are three types of licenses in Cisco Crosswork Planning:

  • CP_RTM_ESS—You can choose to have either 1 license or a number of licenses equal to the number of nodes in the network. Cisco Crosswork Planning Collector application functions even if only one license is available. However, for Cisco Crosswork Planning Design application, the count must match the number of nodes in the network. This is necessary for the tools and initializers to function correctly.

  • CP_RTU_ESS—You can have a count of 1 for both Cisco Crosswork Planning Collector and Design applications to function correctly.

  • CP_RTU_ADV—You can have a count of 1 for both Cisco Crosswork Planning Collector and Design applications to function correctly.

Step 4

Click Save.


License Authorization Statuses

Based on the registration status, you can see the following License Authorization Statuses.

Table 2. License Authorization Statuses

Registration Status

License Authorization Status

Description

Unregistered

Evaluation mode

A 90-day evaluation period during which the licensed features of the application can be freely used. This state is initiated when you use the application for the first time.

Evaluation Expired

The application has not been successfully registered at the end of the evaluation period. During this state, the application features are disabled, and you must register to continue using the application.

Registered Expired

The application is unable to contact the CSSM before the expiration of Identity Certificates and has returned to the unregistered state. The application resumes the remaining evaluation period, if available. At this stage, new registration ID token is required to reregister the application.

Registered

Authorized (In Compliance)

The application has been fully authorized to use the reserved licensed features. The authorization is automatically renewed every 30 days.

Out of Compliance

The associated Virtual Account does not have enough licenses to reserve for the application’s current feature use. You must renew the entitlement/usage limit registered with the token to continue using the application.

Authorization Expired

The application is unable to communicate with the CSSM for 90 days or more, and the authorization has expired.