Managing a Brownfield VXLAN BGP EVPN Fabric

This chapter explains how to migrate a Brownfield fabric into Cisco DCNM.

Overview

This use case shows how to migrate an existing VXLAN BGP EVPN fabric to Cisco DCNM. The transition involves migrating existing network configurations to DCNM.

Typically, your fabric would be created and managed through manual CLI configuration or custom automation scripts. Now, you can start managing the fabric through DCNM. After the migration, the fabric underlay and overlay networks will be managed by DCNM.

For information about MSD fabric migration, see Migrating an MSD Fabric with Border Gateway Switches.

Prerequisites

  • DCNM-supported NX-OS software versions. For details, refer Cisco DCNM Release Notes.

  • Underlay routing protocol is OSPF or IS-IS.

  • The supported underlay is based on the DCNM 10.2(1) POAP template's best practices for the VXLAN fabric (dcnm_ip_vxlan_fabric_templates.10.2.1.ST.1.zip) available on Cisco.com.

  • The following fabric-wide loopback interface IDs must not overlap:

    • Routing loopback interface for IGP/BGP.

    • VTEP loopback ID

    • Underlay rendezvous point loopback ID if ASM is used for multicast replication.

  • BGP configuration uses the ‘router-id’, which is the IP address of the routing loopback interface.

  • If the iBGP peer template is configured, then it must be configured on the leaf switches and route reflectors. The template name that needs to be used between leaf and route reflector should be identical.

  • The BGP route reflector and multicast rendezvous point (if applicable) functions are implemented on spine switches. Leaf switches do not support the functions.

  • Familiarity with VXLAN BGP EVPN fabric concepts and functioning of the fabric from the DCNM perspective.

  • Fabric switch nodes are operationally stable and functional and all fabric links are up.

  • vPC switches and the peer links are up before the migration. Ensure that no configuration updates are in progress or changes pending.

  • Create an inventory list of the switches in the fabric with their IP addresses and credentials. DCNM uses this information to connect to the switches.

  • Shut down any other controller software you are using presently so that no further configuration changes are made to the VXLAN fabric. Alternatively, disconnect the network interfaces from the controller software (if any) so that no changes are allowed on the switches.

  • The switch overlay configurations must have the mandatory configurations defined in the shipping DCNM Universal Overlay profiles. Additional network or VRF overlay related configurations found on the switches are preserved in the freeform configuration associated with the network or VRF DCNM entries.

  • All the overlay network and VRF profile parameters such as VLAN name and route map name should be consistent across all devices in the fabric for the brownfield migration to be successful.

Guidelines and Limitations

  • Fabric interfaces can be numbered or unnumbered.

  • Various other interface types are supported.

  • From Cisco DCNM Release 11.5(1), the brownfield import in DCNM supports the simplified NX-OS VXLAN EVPN configuration CLIs. For more information, see Cisco Nexus 9000 Series NX-OS VXLAN Configuration Guide, Release 9.3(x).

  • The following features are unsupported.

    • eBGP underlay

    • Layer 3 port channel

  • Take a backup of the switch configurations and save them before the migration.

  • Adding a switch with Preserve-config=yes (brownfield) is not supported in a fabric with existing switches. Add the switch with Preserve-config=no instead.

  • No configuration changes (unless instructed to do so in this document) must be made to the switches until the migration is completed. Else, significant network issues can occur.

  • Migration to Cisco DCNM is only supported for Cisco Nexus 9000 switches.

  • Multi-line banner configuration on the switch is preserved in the switch_freeform configuration, along with other configurations captured in the switch_freeform configuration, if any.

  • From DCNM Release 11.2(1), the Border Spine and Border Gateway Spine roles are supported for the brownfield migration.

  • Fabrics with IS-IS Level-1 and Level-2 are supported for the Brownfield migration.

  • Switches with the Cisco NX-OS Release 7.0(3)I4(8b) and 7.0(4)I4(x) images support the Brownfield migration. For information about feature compatibility, refer your respective platform documentation and for information about the supported software images, see Compatibility Matrix for Cisco DCNM.

    Note the following guidelines and limitations:

    • The VLAN name for the network or VRF is not captured in the overlay profile if at least one of the non-spine switches have the Cisco NX-OS Release 7.0(3)I4(8b) and 7.0(4)I4(x) images. The VLAN name is captured in the freeform config associated with the overlay network or VRF. The VLAN name can be changed by updating the freeform config. For more information, see Modifying VLAN Names in a Switch with Cisco NX-OS Release 7.0(3)I4(8b) and 7.0(4)I4(x) Images.

    • Config compliance difference for TCAM CLIs on Cisco Nexus 9300 Series switches and Cisco Nexus 9500 Series switches with X9500 line cards. For more information, see Resolving Config Compliance Error on Switches with Cisco NX-OS Release 7.0(3)I4(8b) and 7.0(4)I4(x) Images.

    • The overlay profile refresh feature is unsupported for the brownfield migration of switches with the Cisco NX-OS Release 7.0(3)I4(8b) and 7.0(4)I4(x) images.

  • Cisco Nexus 9500 Series Switches are supported as VTEPs with border spine, BGW spine, or leaf roles for Cisco NX-OS Release 7.0.3.I7(3) or later.

  • During the brownfield migration in the Cisco DCNM Release 11.1(1), the overlay configuration profiles are deployed to switches and all the overlay related configurations are captured in the respective network or VRF freeform configs. Post migration, switches have both the original configuration CLIs and the config-profiles.

    From Cisco DCNM Release 11.2(1), during the brownfield migration, the overlay config-profiles are deployed to the switches, and the original configuration CLIs are removed. Post migration, the switches only have the configuration profiles and any extra configuration that is not part of the configuration profile if the switches in the brownfield migration have the following Cisco NX-OS images:

    • Cisco NX-OS Release 7.0(3)I7(6) or newer

    • Cisco NX-OS Release 9.2(3) or newer

    If the switches do not meet these requirements, the brownfield migration behavior is the same as described for the Cisco DCNM Release 11.1(1).

  • First, guidelines for updating the settings are noted. Then each VXLAN fabric settings tab is explained:

    • Some values (BGP AS Number, OSPF, etc) are considered as reference points to your existing fabric, and the values you enter must match the existing fabric values.

    • For some fields (such as IP address range, VXLAN ID range), the values that are auto-populated or entered in the settings are only used for future allocation. The existing fabric values are honored during migration.

    • Some fields relate to new functions that may not exist in your existing fabric (such as advertise-pip). Enable or disable it as per your need.

    • At a later point in time, after the fabric transition is complete, you can update settings if needed.

Fabric Topology Overview

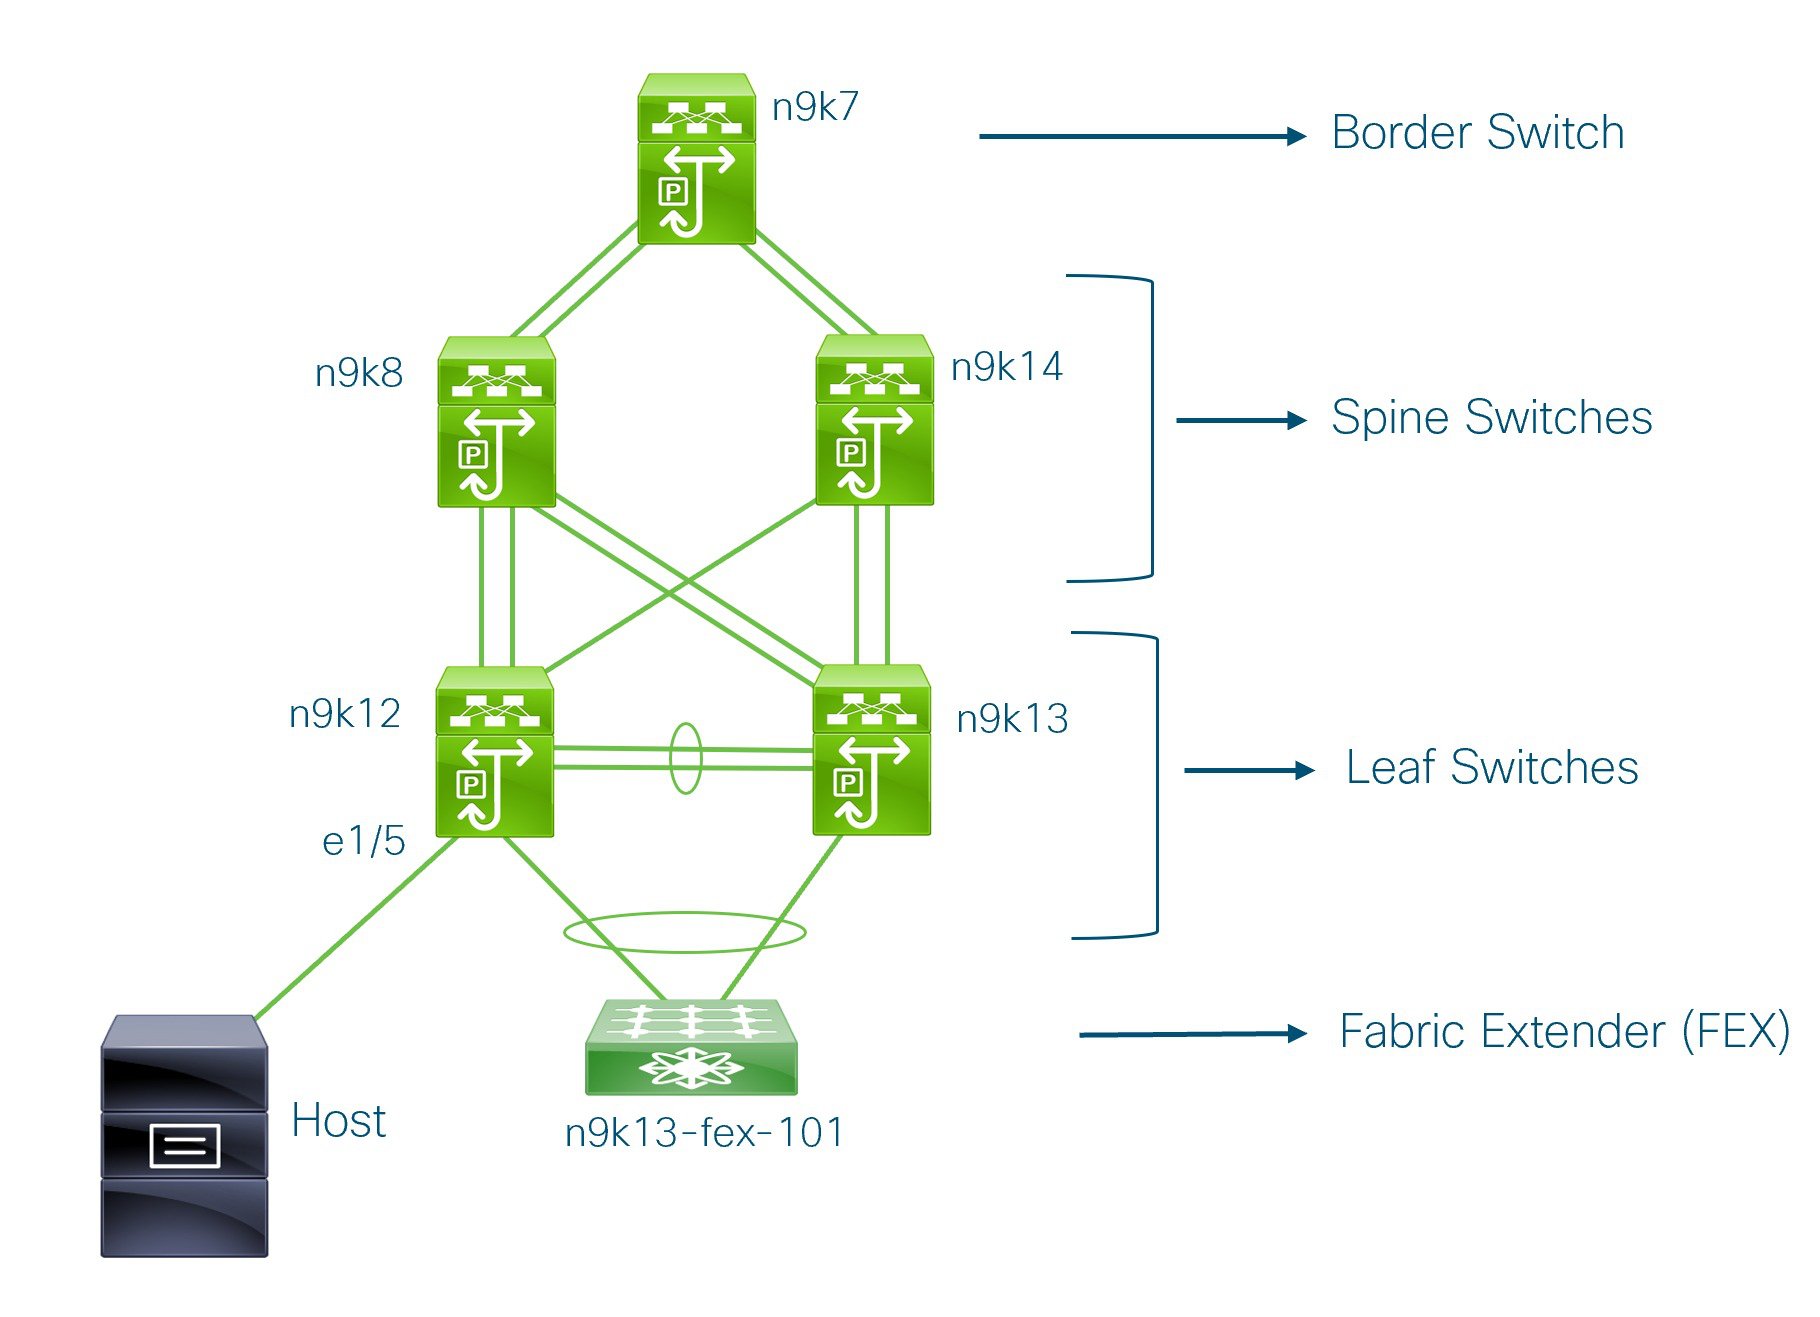
This example use case uses the following hardware and software components:

  • Five Cisco Nexus 9000 Series Switches running NX-OS Release 7.0(3)I7(6)

  • One Fabric Extender or FEX

  • One host

For information about the supported software images, see Compatibility Matrix for Cisco DCNM.

Before we start the transition of the existing fabric, let us see its topology.

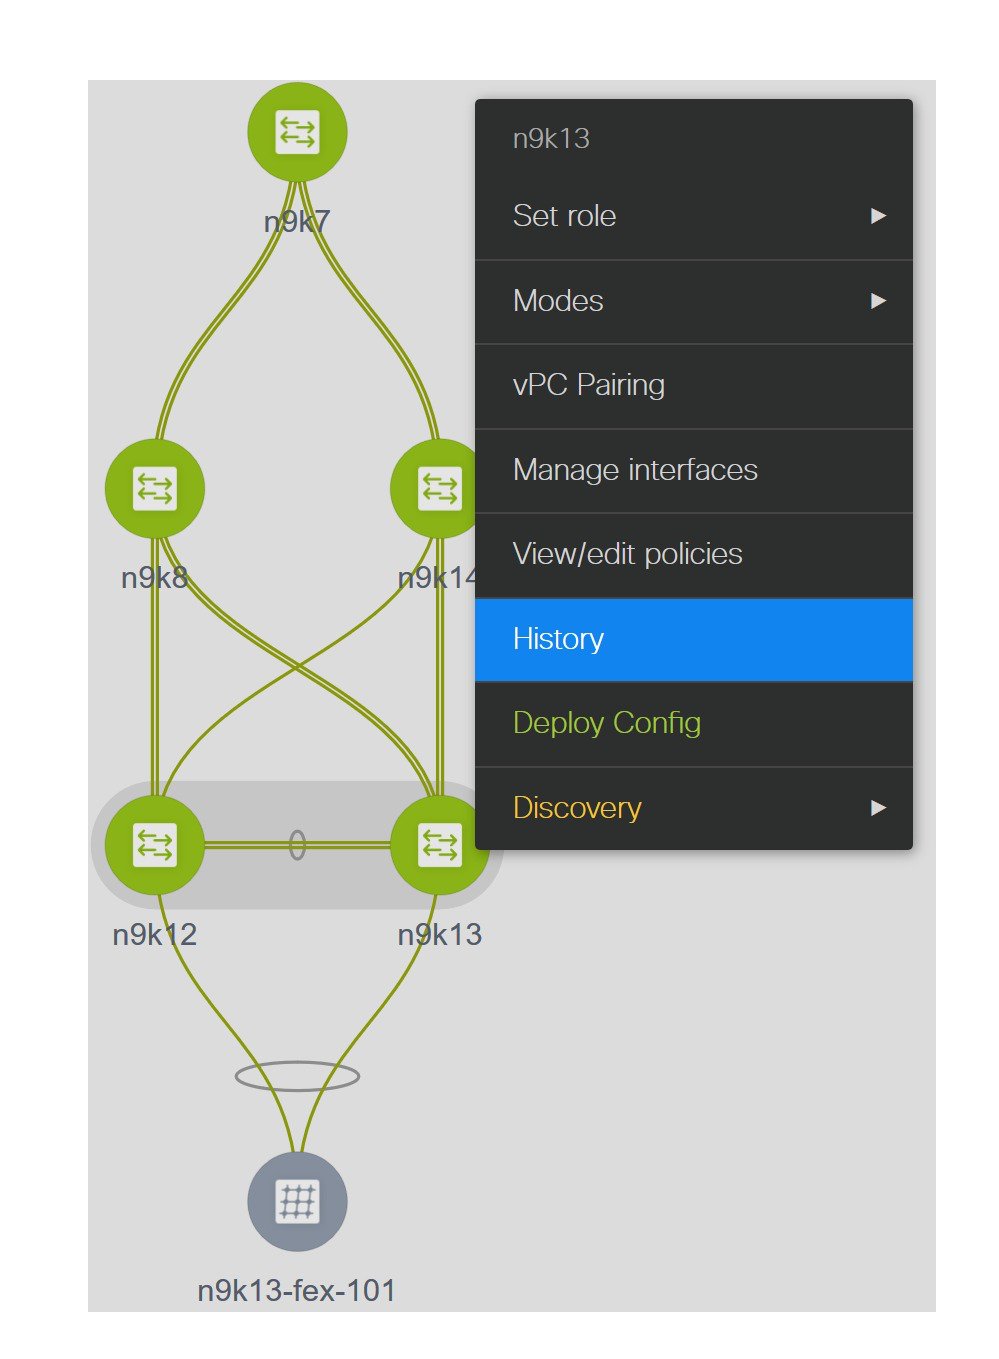
You can see that there is a border switch, two spine switches, two leaf switches, and a Fabric Extender or FEX.

A host is connected to the n9k12 leaf switch through the interface Ethernet 1/5.

Verifying the Existing VXLAN BGP EVPN Fabric

Let us check the network connectivity of the n9k12 switch from the console terminal.

Procedure


Step 1

Verify the Network Virtual Interface or NVE in the fabric.

n9k12# show nve vni summary
Codes: CP - Control Plane        DP - Data Plane
       UC - Unconfigured

Total CP VNIs: 84    [Up: 84, Down: 0]
Total DP VNIs: 0    [Up: 0, Down: 0]

There are 84 VNIs in the control plane and they are up. Before the Brownfield migration, make sure that all the VNIs are up.

Step 2

Check consistency and failures of vPC.

n9k12# show vpc
Legend:        
                (*) - local vPC is down, forwarding via vPC peer-link

vPC domain id                     : 2   
Peer status                       : peer adjacency formed ok      
vPC keep-alive status             : peer is alive                 
Configuration consistency status  : success                       
Per-vlan consistency status       : success                       
Type-2 consistency status         : success                       
vPC role                          : secondary                     
Number of vPCs configured         : 40                            
Peer Gateway                      : Enabled                       
Dual-active excluded VLANs        : -                             
Graceful Consistency Check        : Enabled                       
Auto-recovery status              : Enabled, timer is off.(timeout = 300s)
Delay-restore status              : Timer is off.(timeout = 60s)          
Delay-restore SVI status          : Timer is off.(timeout = 10s)          
Operational Layer3 Peer-router    : Disabled                              
.
.
.

Step 3

Check the EVPN neighbors of the n9k-12 switch.

n9k12# show bgp l2vpn evpn summary
BGP summary information for VRF default, address family L2VPN EVPN
BGP router identifier 192.168.0.4, local AS number 65000
BGP table version is 637, L2VPN EVPN config peers 2, capable peers 2
243 network entries and 318 paths using 57348 bytes of memory
BGP attribute entries [234/37440], BGP AS path entries [0/0]
BGP community entries [0/0], BGP clusterlist entries [2/8]

Neighbor        V    AS MsgRcvd MsgSent   TblVer  InQ OutQ Up/Down  State/PfxRcd
192.168.0.0     4 65000     250      91      637    0    0 01:26:59 75
192.168.0.1     4 65000     221      63      637    0    0 00:57:22 75

You can see that there are two neighbors corresponding to the spine switches.

Note that the ASN is 65000.

Step 4

Verify the VRF information.

n9k12# show run vrf internet

!Command: show running-config vrf Internet
!Running configuration last done at: Fri Aug  9 01:38:02 2019
!Time: Fri Aug  9 02:48:03 2019                              

version 7.0(3)I7(6) Bios:version 07.59 

interface Vlan347
  vrf member Internet

interface Vlan349
  vrf member Internet

interface Vlan3962
  vrf member Internet

interface Ethernet1/25
  vrf member Internet 

interface Ethernet1/26
  vrf member Internet 
vrf context Internet  
  description Internet
  vni 16777210        
  ip route 204.90.141.0/24 204.90.140.129 name LC-Networks
  rd auto                                                 
  address-family ipv4 unicast                             
    route-target both auto
    route-target both auto evpn
router ospf 300
  vrf Internet
    router-id 204.90.140.3
    redistribute direct route-map allow
    redistribute static route-map static-to-ospf
router bgp 65000
  vrf Internet
    address-family ipv4 unicast
      advertise l2vpn evpn

The VRF Internet is configured on this switch.

The host connected to the n9k-12 switch is part of the VRF Internet.

You can see the VLANs associated with this VRF.

Specifically, the host is part of Vlan349.

Step 5

Verify the layer 3 interface information.

n9k12# show run interface vlan349

!Command: show running-config interface Vlan349
!Running configuration last done at: Fri Aug  9 01:38:02 2019
!Time: Fri Aug  9 02:49:27 2019

version 7.0(3)I7(6) Bios:version 07.59

interface Vlan349
  no shutdown
  vrf member Internet
  no ip redirects
  ip address 204.90.140.134/29
  no ipv6 redirects
  fabric forwarding mode anycast-gateway

Note that the IP address is 204.90.140.134. This IP address is configured as the anycast gateway IP.

Step 6

Verify the physical interface information. This switch is connected to the Host through the interface Ethernet 1/5.

n9k12# show run interface ethernet1/5

!Command: show running-config interface Ethernet1/5
!Running configuration last done at: Fri Aug  9 01:38:02 2019
!Time: Fri Aug  9 02:50:05 2019

version 7.0(3)I7(6) Bios:version 07.59

interface Ethernet1/5
  description to host
  switchport mode trunk
  switchport trunk native vlan 349
  switchport trunk allowed vlan 349,800,815
  spanning-tree bpduguard enable
  mtu 9050

You can see that this interface is connected to the host and is configured with VLAN 349.

Step 7

Verify the connectivity from the host to the anycast gateway IP address.

host# ping 204.90.140.134 count unlimited interval 1
PING 204.90.140.134 (204.90.140.134): 56 data bytes
64 bytes from 204.90.140.134: icmp_seq=0 ttl=254 time=1.078 ms
64 bytes from 204.90.140.134: icmp_seq=1 ttl=254 time=1.129 ms
64 bytes from 204.90.140.134: icmp_seq=2 ttl=254 time=1.151 ms
64 bytes from 204.90.140.134: icmp_seq=3 ttl=254 time=1.162 ms
64 bytes from 204.90.140.134: icmp_seq=4 ttl=254 time=1.84 ms
64 bytes from 204.90.140.134: icmp_seq=5 ttl=254 time=1.258 ms
64 bytes from 204.90.140.134: icmp_seq=6 ttl=254 time=1.273 ms
64 bytes from 204.90.140.134: icmp_seq=7 ttl=254 time=1.143 ms

We let the ping command run in the background while we transition the existing brownfield fabric into DCNM.


Creating a VXLAN BGP EVPN Fabric

This procedure describes how to create a VXLAN BGP EVPN fabric in DCNM.

Procedure


Step 1

Choose Control > Fabric Builder.

The Fabric Builder screen appears. When you log in for the first time, the Fabrics section has no entries. After you create a fabric, it is displayed on the Fabric Builder screen, wherein a rectangular box represents each fabric.

A standalone or member fabric contains Switch_Fabric (in the Type field), the AS number (in the ASN field), and mode of replication (in the Replication Mode field).

Step 2

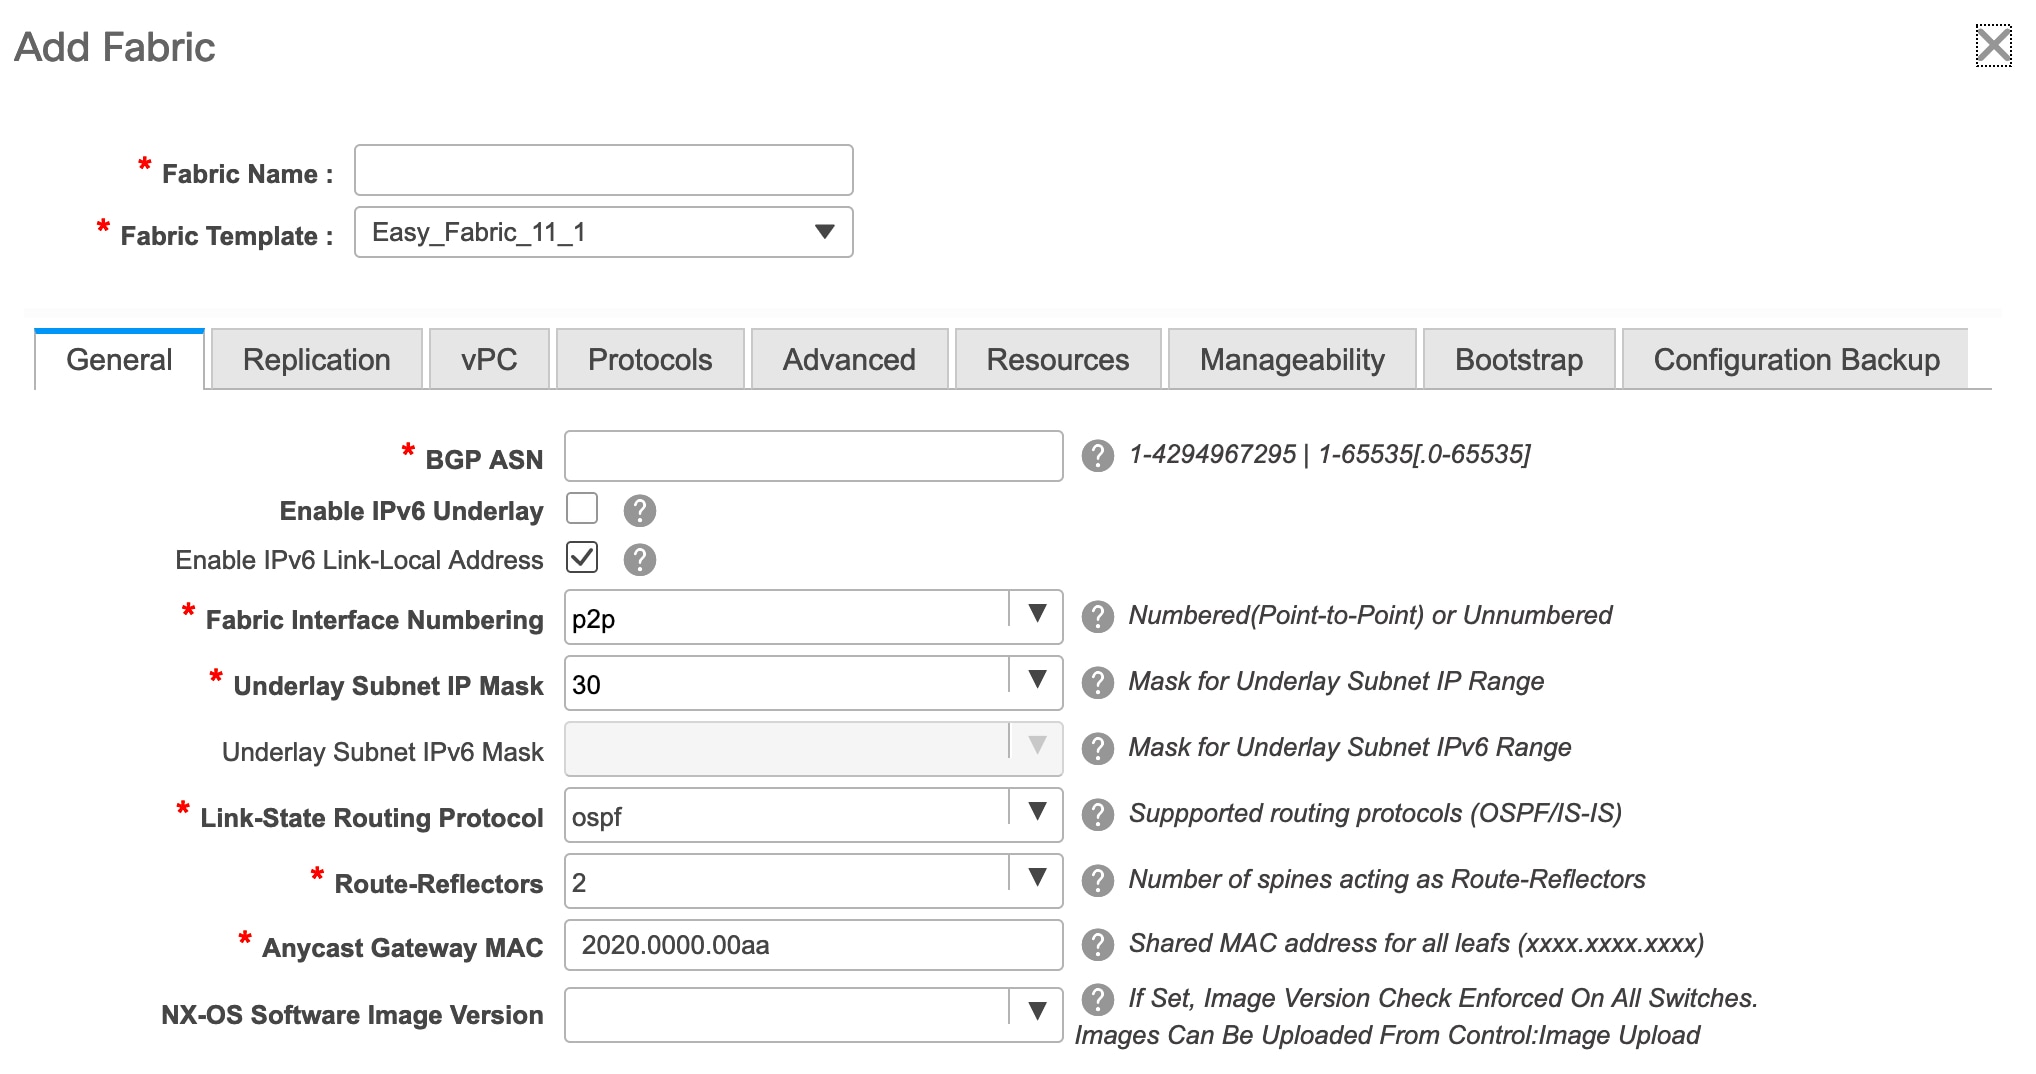
Click Create Fabric. The Add Fabric window appears.

Fabric Template - From the drop-down menu, choose the Easy_Fabric_11_1 fabric template. The fabric settings for creating a standalone fabric comes up.

Fabric Name - Enter the name of the fabric.

The tabs and their fields in the screen are explained in the subsequent points. The overlay and underlay network parameters are included in these tabs.

Note


If you are creating a standalone fabric as a potential member fabric of an MSD fabric (used for provisioning overlay networks for fabrics that are connected through EVPN Multi-Site technology), then browse through the Multi-Site Domain for VXLAN BGP EVPN Fabrics topic before member fabric creation.

Step 3

The General tab is displayed by default. The fields in this tab are:

BGP ASN: Enter the BGP AS number the fabric is associated with.

Enable IPv6 Underlay: Select this check box to enable the IPv6 underlay feature.

Brownfield migration is supported for the VXLANv6 fabrics. Note that L3 vPC keep-alive using IPv6 address is not supported for brownfield migration. This vPC configuration is deleted after the migration. However, L3 vPC keep-alive using IPv4 address is supported.

For information about IPv6 underlay, see Configuring a VXLANv6 Fabric.

Fabric Interface Numbering: Specify whether you are using a point-to-point (p2p) or unnumbered network in your existing setup.

Underlay Subnet IP Mask - Specify the subnet mask you are using for the fabric underlay IP address subnets in your existing setup.

Route-Reflectors – The Route Reflector count is only applicable post-migration. The existing route reflector configuration is honored when importing into the DCNM setup.

The number of spine switches that are used as route reflectors for transporting BGP traffic. Choose 2 or 4 from the drop-down box. The default value is 2.

To deploy spine devices as route reflectors, DCNM sorts the spine devices based on their serial numbers, and designates two or four spine devices as route reflectors. If you add more spine devices, existing route reflector configuration will not change.

Increasing the count - You can increase the route reflectors from two to four at any point in time. Configurations are automatically generated on the other 2 spine devices designated as route reflectors.

Decreasing the count

When you reduce four route reflectors to two, you must remove the unneeded route reflector devices from the fabric. Follow these steps to reduce the count from 4 to 2.

  1. Change the value in the drop-down box to 2.

  2. Identify the spine switches designated as route reflectors.

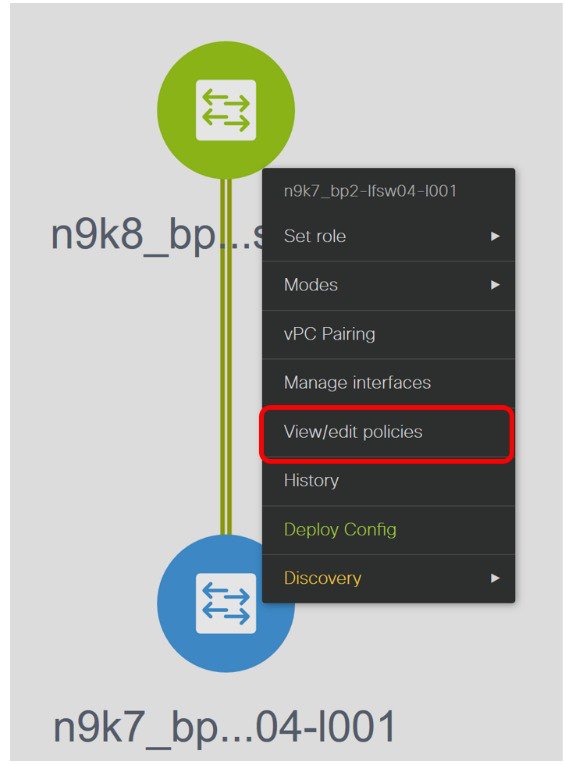
    An instance of the rr_state policy is applied on the spine switch if it is a route reflector. To find out if the policy is applied on the switch, right-click the switch, and choose View/edit policies. In the View/Edit Policies screen, search rr_state in the Template field. It is displayed on the screen.

  3. Delete the unneeded spine devices from the fabric (right-click the spine switch icon and choose Discovery > Remove from fabric).

    If you delete existing route reflector devices, the next available spine switch is selected as the replacement route reflector.

  4. Click Save and Deploy at the top right part of the fabric topology screen.

You can preselect RRs and RPs before performing the first Save & Deploy operation. For more information, see Preselecting Switches as Route-Reflectors and Rendezvous-Points..

Anycast Gateway MAC: Enter the Anycast gateway MAC address of the existing fabric.

NX-OS Software Image Version: Leave this field blank. You can update this post-transition, as desired.

Step 4

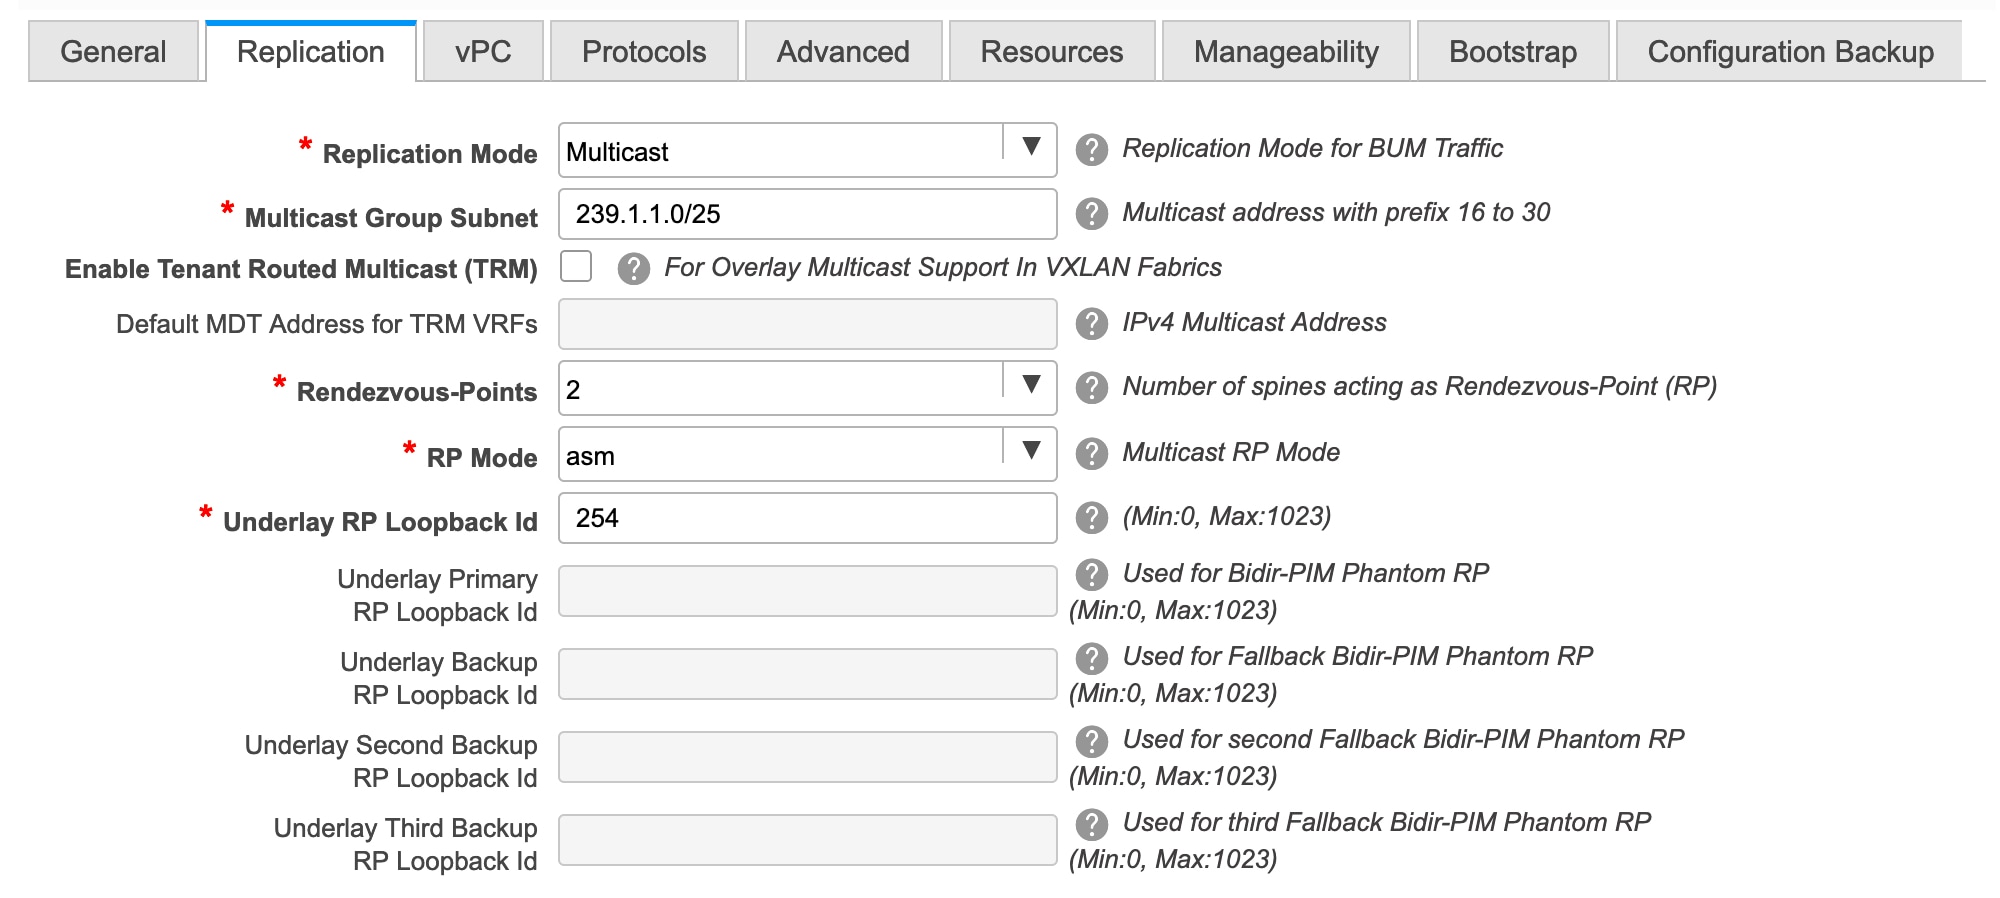
Click the Replication tab. Most of the fields are auto generated.

Replication Mode: The mode of replication that is used in the existing fabric, Ingress Replication, or Multicast.

When you choose Ingress replication, the multicast replication fields get disabled.

Multicast Group Subnet - The IP address prefix for multicast communication is used for post-migration allocation. The IP address prefix used in your existing fabric is honored during the transition.

A unique IP address is allocated from this group for each overlay network.

Enable Tenant Routed Multicast – Select the check box to enable Tenant Routed Multicast (TRM) as the fabric overlay multicast protocol.

If you enable TRM, the Multicast address for TRM must be entered. All the TRM specific tenant configuration is captured in the switch freeform policy linked to the tenant network and VRF profile.

Note that the TRM feature is unsupported on switches with the Cisco NX-OS Release 7.0(3)I4(8b) and 7.0(4)I4(x) images.

Default MDT address for TRM VRFs – Enter the default multicast distribution tree (MDT) IPv4 address for TRM VRFs.

Rendezvous-Points - Enter the number of spine switches acting as rendezvous points.

RP mode – Select asm (Any-Source Multicast) or bidir (Bidirectional PIM) mode.

When you choose ASM, the BiDir related fields are not enabled.

The asm RP mode supports up to 4 RPs.

The bidir mode supports up to 2 RPs. An error message is displayed if the BIDIR configuration indicates that more than 2 RPs are used.

After brownfield migration, only 2 RPs are supported in the migrated fabric. An error message is displayed when you click Save & Deploy after changing the RP count to 4.

If an RP is down or deleted from the fabric, this RP cannot be replaced by another spine as Easy Fabric does not remember the configuration of a removed switch. Easy Fabric uses a specific scheme to generate RP configuration for Bidir. Therefore, the generated Bidir configuration will not work with the brownfield imported configuration. After brownfield migration, if you change the RP count or add new spine or leaf switches, you should manually configure the PIM-Bidir feature. If a manual configuration is required, a warning message is displayed after you click Save & Deploy. For more information, see Manually Adding PIM-BIDIR Configuration for Leaf or Spine Post Brownfield Migration.

You can also modify a brownfield imported bidir configuration to use the configuration generated by Fabric Builder. For more information, see Changing a Brownfield Imported BIDIR Configuration.

Underlay RP Loopback ID – The loopback ID has to match your existing setup's loopback ID. This is the loopback ID used for the rendezvous point (RP), for multicast protocol peering purposes in the fabric underlay.

The next two fields are enabled if you choose BIDIR-PIM as the multicast mode of replication.

Underlay Primary RP Loopback ID – The primary loopback ID used for the phantom RP, for multicast protocol peering purposes in the fabric underlay.

Underlay Backup RP Loopback ID – The secondary loopback ID used for the phantom RP, for multicast protocol peering purposes in the fabric underlay.

The next two fields are enabled if Rendezvous-Points is set to 4. However, the fabric can have only 2 RPs for the brownfield migration.

Underlay Second Backup RP Loopback Id – The second fallback loopback ID for Phantom RP, for multicast protocol peering purposes in the fabric underlay.

Underlay Third Backup RP Loopback Id – The third fallback loopback ID for Phantom RP, for multicast protocol peering purposes in the fabric underlay.

Step 5

Click the vPC tab. Most of the fields are auto generated.

vPC Peer Link VLAN - Enter the VLAN ID used for the vPC peer link SVI in the existing fabric.

Make vPC Peer Link VLAN as Native VLAN - Enables vPC peer link VLAN as Native VLAN.

vPC Peer Keep Alive option – Choose the management or loopback option, as used in the existing fabric. If you want to use IP addresses assigned to the management port and the management VRF, choose management. If you use IP addresses assigned to loopback interfaces (and a non-management VRF), choose loopback.

If you only use IPv6 addresses on the management interface, you must use the loopback option.

During the transition, the switch configuration is not checked for the following fields in the vPC tab. The switch configurations will get updated if they are different.

vPC Auto Recovery Time - Specify the vPC auto recovery time-out period in seconds, as needed.

vPC Delay Restore Time - Specify the vPC delay restore period in seconds, as needed.

vPC Peer Link Port Channel ID - Specifies the Port Channel ID for a vPC Peer Link. By default, the value in this field is 500. Change the value based on your existing settings.

vPC IPv6 ND Synchronize – Enables IPv6 Neighbor Discovery synchronization between vPC switches. The check box is enabled by default. Clear the check box to disable the function as needed.

vPC advertise-pip - Select the check box to enable the Advertise PIP feature.

Note that the Advertise PIP feature is unsupported on switches with the Cisco NX-OS Release 7.0(3)I4(8b) and 7.0(4)I4(x) images.

Enable the same vPC Domain Id for all vPC Pairs: Enable the same vPC Domain ID for all vPC pairs. When you select this field, the vPC Domain Id field is editable.

vPC Domain Id - Specifies the vPC domain ID to be used on all vPC pairs.

vPC Domain Id Range - Specifies the vPC Domain Id range to use for new pairings.

Enable Qos for Fabric vPC-Peering - Enable QoS on spines for guaranteed delivery of vPC Fabric Peering communication. For more information, see QoS for Fabric vPC-Peering.

Note


QoS for vPC fabric peering and queuing policies options in fabric settings are mutually exclusive.

Qos Policy Name - Specifies QoS policy name that should be same on all fabric vPC peering spines. The default name is spine_qos_for_fabric_vpc_peering.

Step 6

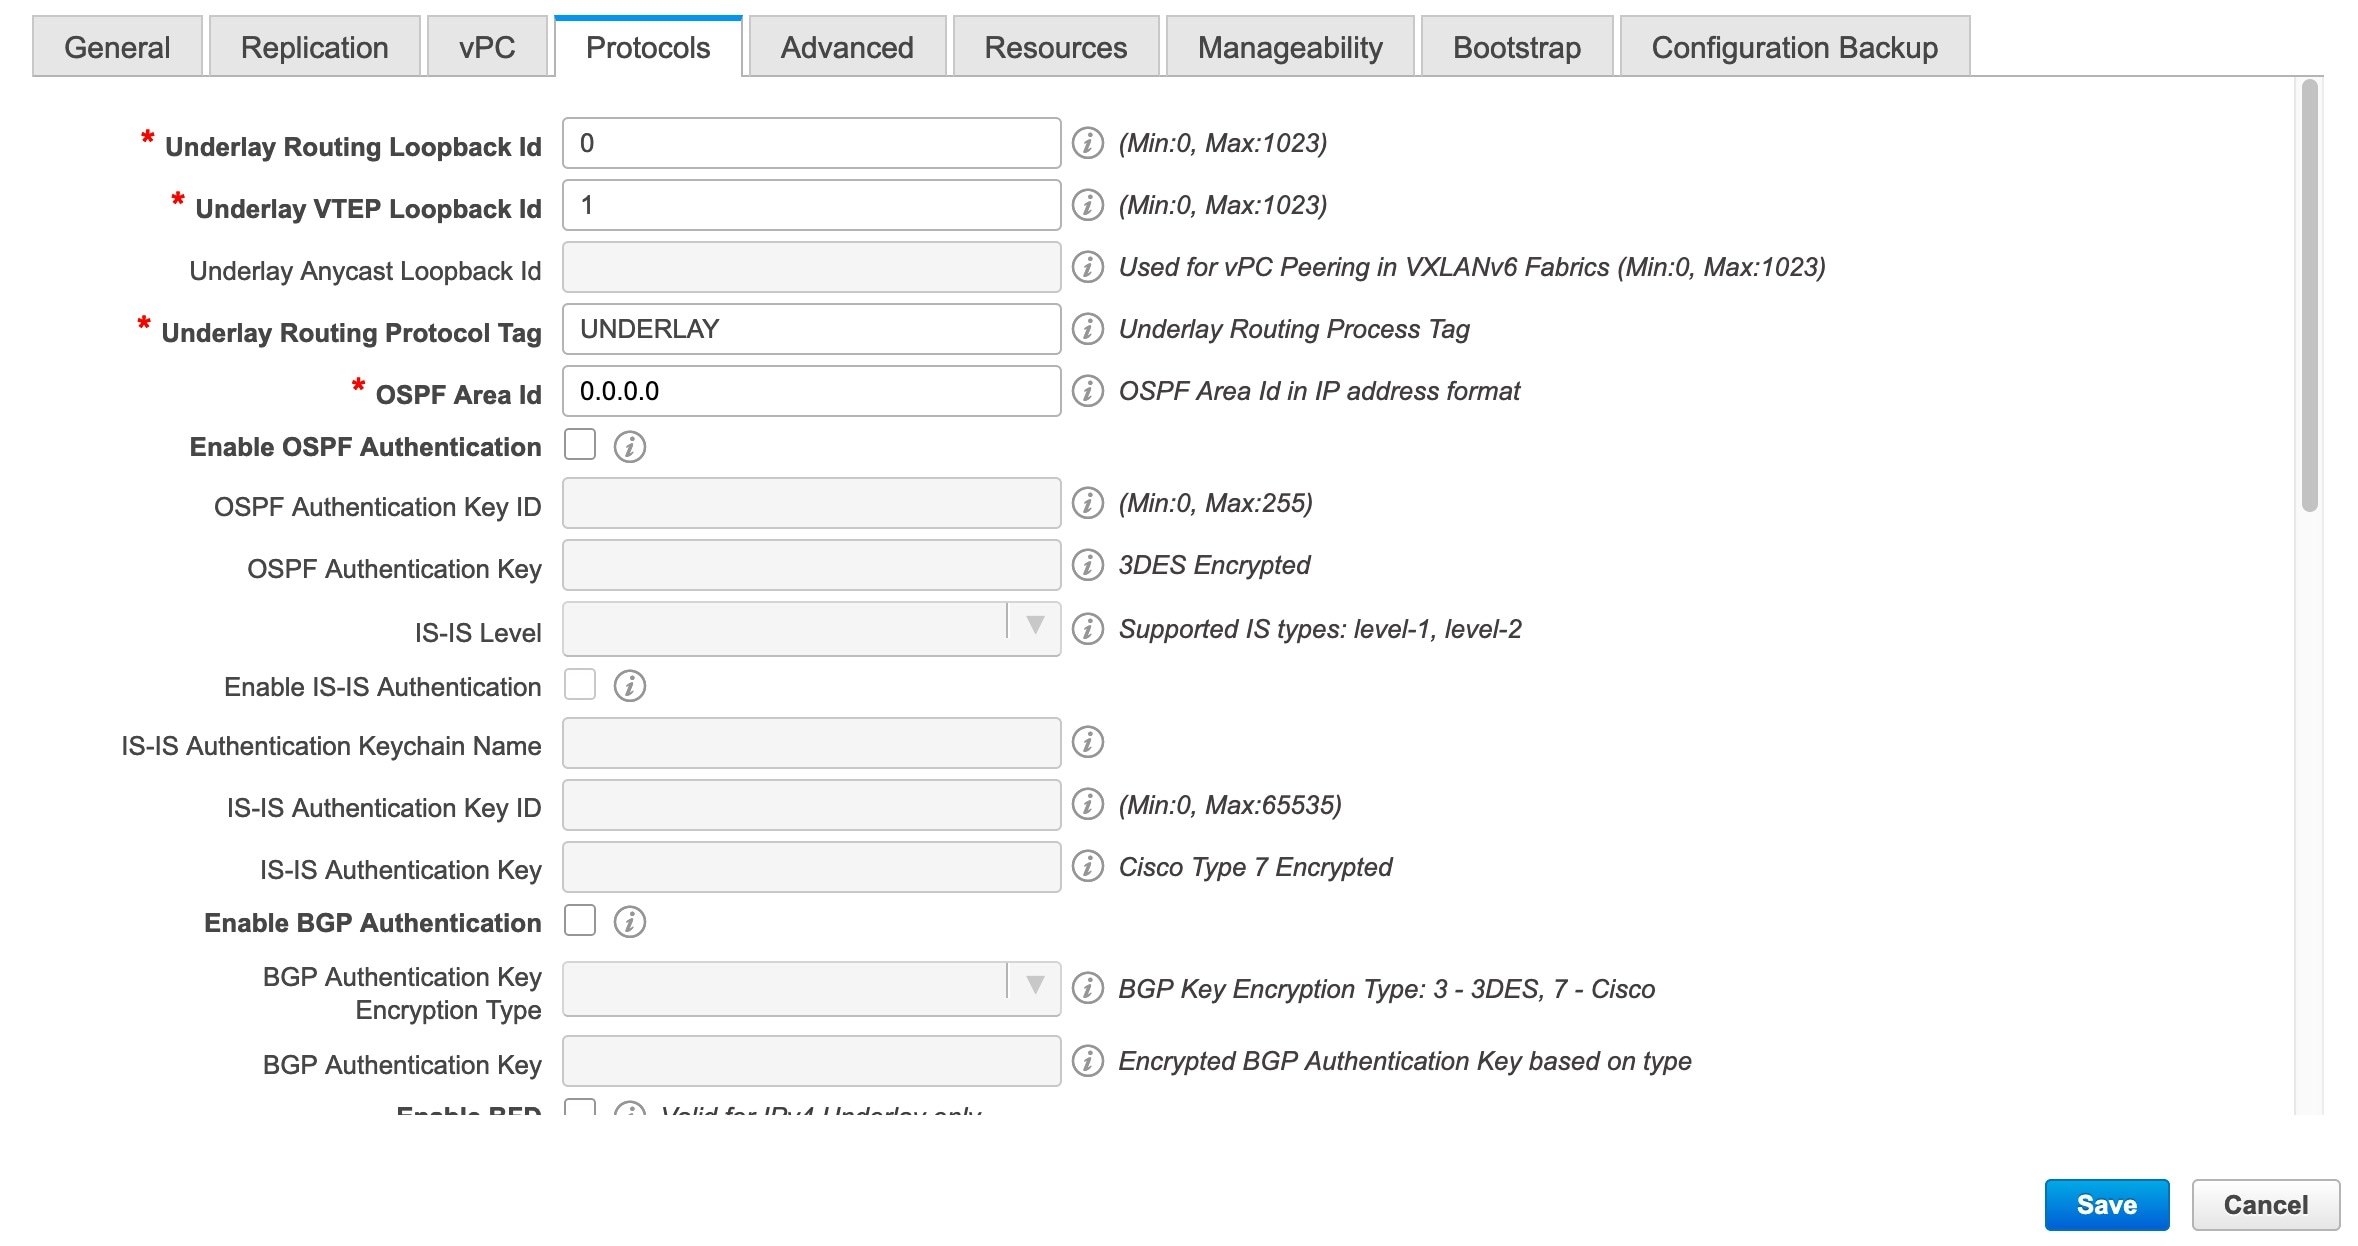
Click the Protocols tab. Most of the fields are auto generated. You can update the fields if needed.

Underlay Routing Loopback Id - The loopback interface ID is populated as 0 since loopback0 is usually used for fabric underlay IGP peering purposes. This must match the existing configuration on the switches. This must be the same across all the switches.

Underlay VTEP Loopback Id - The loopback interface ID is populated as 1 since loopback1 is usually used for the VTEP peering purposes. This must match the existing configuration on the switches. This must be the same across all the switches where VTEPs are present.

Link-State Routing Protocol Tag - Enter the existing fabric’s routing protocol tag in this field to define the type of network.

OSPF Area ID – The OSPF area ID of the existing fabric, if OSPF is used as the IGP within the fabric.

Note


The OSPF or IS-IS authentication fields are enabled based on your selection in the Link-State Routing Protocol field in the General tab.

Enable OSPF Authentication – Select the check box to enable the OSPF authentication. Deselect the check box to disable it. If you enable this field, the OSPF Authentication Key ID and OSPF Authentication Key fields are enabled.

OSPF Authentication Key ID – Enter the OSPF authentication key ID.

OSPF Authentication Key - The OSPF authentication key must be the 3DES key from the switch.

Note


Plain text passwords are not supported. Login to the switch, retrieve the OSPF authentication details.

You can obtain the OSPF authentication details by using the show run ospf command on your switch.


# show run ospf | grep message-digest-key
ip ospf message-digest-key 127 md5 3 c7c83ec78f38f32f3d477519630faf7b

In this example, the OSPF authentication key ID is 127 and the authentication key is c7c83ec78f38f32f3d477519630faf7b.

For information about how to configure a new key and retrieve it, see Retrieving the Authentication Key.

IS-IS Level - Select the IS-IS level from this drop-down list.

Enable IS-IS Authentication - Select the check box to enable IS-IS authentication. Deselect the check box to disable it. If you enable this field, the IS-IS authentication fields are enabled.

IS-IS Authentication Keychain Name - Enter the keychain name.

IS-IS Authentication Key ID - Enter the IS-IS authentication key ID.

IS-IS Authentication Key - Enter the Cisco Type 7 encrypted key.

Note


Plain text passwords are not supported. Login to the switch, retrieve the IS-IS authentication details.

You can obtain the IS-IS authentication details by using the show run | section “key chain” command on your switch.


# show run | section “key chain”
key chain CiscoIsisAuth
  key 127
      key-string 7 075e731f

In this example, the keychain name is CiscoIsisAuth, the key ID is 127, and the type 7 authentication key is 075e731f.

Enable BGP Authentication - Select the check box to enable BGP authentication. Deselect the check box to disable it. If you enable this field, the BGP Authentication Key Encryption Type and BGP Authentication Key fields are enabled.

BGP Authentication Key Encryption Type – Choose the 3 for 3DES encryption type, and 7 for Cisco encryption type.

BGP Authentication Key - Enter the encrypted key based on the encryption type.

Note


Plain text passwords are not supported. Login to the switch, retrieve the BGP authentication details.

You can obtain the BGP authentication details by using the show run bgp command on your switch.


# show run bgp
neighbor 10.2.0.2 
remote-as 65000 
password 3 sd8478fswerdfw3434fsw4f4w34sdsd8478fswerdfw3434fsw4f4w3

In this example, the BGP authentication key is displayed after the encryption type 3.

Enable PIM Hello Authentication - Enables the PIM hello authentication.

PIM Hello Authentication Key - Specifies the PIM hello authentication key.

Enable BFD feature – Select the check box to enable the BFD feature.

The BFD feature is disabled by default.

Make sure that the BFD feature setting matches with the switch configuration. If the switch configuration contains feature bfd but the BFD feature is not enabled in the fabric settings, config compliance generates diff to remove the BFD feature after brownfield migration. That is, no feature bfd is generated after migration.

From Cisco DCNM Release 11.3(1), BFD within a fabric is supported natively. The BFD feature is disabled by default in the Fabric Settings. If enabled, BFD is enabled for the underlay protocols with the default settings. Any custom required BFD configurations must be deployed via the per switch freeform or per interface freeform policies.

The following config is pushed after you select the Enable BFD check box:

feature bfd

For information about BFD feature compatibility, refer your respective platform documentation and for information about the supported software images, see Compatibility Matrix for Cisco DCNM.

Enable BFD for iBGP: Select the check box to enable BFD for the iBGP neighbor. This option is disabled by default.

Enable BFD for OSPF: Select the check box to enable BFD for the OSPF underlay instance. This option is disabled by default, and it is grayed out if the link state protocol is ISIS.

Enable BFD for ISIS: Select the check box to enable BFD for the ISIS underlay instance. This option is disabled by default, and it is grayed out if the link state protocol is OSPF.

Enable BFD for PIM: Select the check box to enable BFD for PIM. This option is disabled by default, and it is be grayed out if the replication mode is Ingress.

Here are the examples of the BFD global policies:


router ospf <ospf tag>
   bfd

router isis <isis tag>
  address-family ipv4 unicast
    bfd

ip pim bfd

router bgp <bgp asn>
  neighbor <neighbor ip>
    bfd

Enable BFD Authentication: Select the check box to enable BFD authentication. If you enable this field, the BFD Authentication Key ID and BFD Authentication Key fields are editable.

Note

 
  • BFD Authentication is not supported when the Fabric Interface Numbering field under the General tab is set to unnumbered. The BFD authentication fields will be grayed out automatically. BFD authentication is valid for only for P2P interfaces.

  • After you upgrade from DCNM Release 11.2(1) with BFD enabled to DCNM Release 11.3(1), the following configs are pushed to the switch:

    
    no ip redirects
    no ipv6 redirects

BFD Authentication Key ID: Specifies the BFD authentication key ID for the interface authentication. The default value is 100.

BFD Authentication Key: Specifies the BFD authentication key.

For information about how to retrieve the BFD authentication parameters, see Retrieving the Authentication Key.

iBGP Peer-Template Config – Add iBGP peer template configurations on the leaf switches and route reflectors to establish an iBGP session between the leaf switch and route reflector. Set this field based on switch configuration. If this field is blank, it implies that the iBGP peer template is not used. If the iBGP peer template is used, enter the peer template definition as defined on the switch. The peer template name on devices configured with BGP should be the same as defined here.

Note


If you use the iBGP peer template, include the BGP authentication configuration in this template config field. Additionally, uncheck the Enable BGP Authentication check box to avoid duplicating the BGP configuration.

Until Cisco DCNM Release 11.3(1), iBGP peer template for iBGP definition on the leafs or border role devices and BGP RRs were same. From DCNM Release 11.4(1), the following fields can be used to specify different configurations:

  • iBGP Peer-Template Config – Specifies the config used for RR and spines with border role.

  • Leaf/Border/Border Gateway iBGP Peer-Template Config – Specifies the config used for leaf, border, or border gateway. If this field is empty, the peer template defined in iBGP Peer-Template Config is used on all BGP enabled devices (RRs, leafs, border, or border gateway roles).

In brownfield migration, if the spine and leaf use different peer template names, both the iBGP Peer-Template Config and Leaf/Border/Border Gateway iBGP Peer-Template Config fields need to be set according to the switch config. If spine and leaf use the same peer template name and content (except for the “route-reflector-client” CLI), only iBGP Peer-Template Config field in fabric setting needs to be set. If the fabric settings on iBGP peer templates do not match the existing switch configuration, an error message is generated and the migration will not proceed.
Step 7

Click the Advanced tab. Most of the fields are auto generated.

VRF Template and VRF Extension Template: Specifies the VRF template for creating VRFs, and the VRF extension template for enabling VRF extension to other fabrics.

Network Template and Network Extension Template: Specifies the network template for creating networks, and the network extension template for extending networks to other fabrics.

You must not change the templates when migrating. Only the Universal templates are supported for overlay migration.

Site ID - The ID for this fabric if you are moving this fabric within an MSD. You can update this field post-migration.

Intra Fabric Interface MTU - Specifies the MTU for the intra fabric interface. This value should be an even number.

Layer 2 Host Interface MTU - Specifies the MTU for the layer 2 host interface. This value should be an even number.

Power Supply Mode - Choose the appropriate power supply mode.

CoPP Profile - Choose the Control Plane Policing (CoPP) profile policy used in the existing fabric. By default, the strict option is populated.

VTEP HoldDown Time - Specifies the NVE source interface hold down time.
Brownfield Overlay Network Name Format: Enter the format to be used to build the overlay network name during a brownfield import or migration. The network name should not contain any white spaces or special characters except underscore (_) and hyphen (-). The network name must not be changed once the brownfield migration has been initiated. See the Creating Networks for the Standalone Fabric section for the naming convention of the network name. The syntax is [<string> | $$VLAN_ID$$] $$VNI$$ [<string>| $$VLAN_ID$$] and the default value is Auto_Net_VNI$$VNI$$_VLAN$$VLAN_ID$$. When you create networks, the name is generated according to the syntax you specify. The following table describes the variables in the syntax.

Variables

Description

$$VNI$$

Specifies the network VNI ID found in the switch configuration. This is a mandatory keyword required to create unique network names.

$$VLAN_ID$$

Specifies the VLAN ID associated with the network.

VLAN ID is specific to switches, hence DCNM will pick the VLAN ID from one of the switches, where the network is found, randomly and use it in the name.

We recommend not to use this unless the VLAN ID is consistent across the fabric for the VNI.

<string>

This variable is optional and you can enter any number of alphanumeric characters that meet the network name guidelines.

Example overlay network name: Site_VNI12345_VLAN1234

Note


Ignore this field for greenfield deployments. The Brownfield Overlay Network Name Format applies for the following brownfield imports:

  • CLI-based overlays

  • Configuration profile-based overlay where the configuration profiles were created in Cisco DCNM Release

    10.4(2).

Enable VXLAN OAM - Enables the VXLAM OAM function for existing switches.

This is enabled by default. Clear the check box to disable VXLAN OAM function.

If you want to enable the VXLAN OAM function on specific switches and disable on other switches in the fabric, you can use freeform configurations to enable OAM and disable OAM in the fabric settings.

Note


The VXLAN OAM feature in Cisco DCNM is only supported on a single fabric or site.

Note that the NGOAM feature is unsupported on switches with the Cisco NX-OS Release 7.0(3)I4(8b) and 7.0(4)I4(x) images.

Enable Tenant DHCP – Select the check box to enable the tenant DHCP support.

Note


Ensure that Enable Tenant DHCP is enabled before enabling DHCP related parameters in the overlay profiles.

Enable NX-API - Specifies enabling of NX-API.

Enable NX-API on HTTP - Specifies enabling of NX-API on HTTP.

Enable Policy-Based Routing (PBR) - Select this check box to enable routing of packets based on the specified policy. For information on Layer 4-Layer 7 service, refer Layer 4-Layer 7 Service.

Enable Strict Config Compliance - Enable the Strict Config Compliance feature by selecting this check box. By default, this feature is disabled. For more information, refer Strict Configuration Compliance.

Note


If Strict Config Compliance is enabled in a fabric, you cannot deploy Network Insights for Resources on Cisco DCNM.

Enable AAA IP Authorization - Enables AAA IP authorization, when IP Authorization is enabled in the AAA Server.

Greenfield Cleanup Option – Enable or disable the switch cleanup option for Greenfield switches. This is applicable post-migration when new switches are added.

Enable Precision Time Protocol (PTP): Enables PTP across a fabric. When you select this check box, PTP is enabled globally and on core-facing interfaces. Additionally, the PTP Source Loopback Id and PTP Domain Id fields are editable. For more information, see Precision Time Protocol for Easy Fabric in Cisco DCNM LAN Fabric Configuration Guide.

PTP Source Loopback Id: Specifies the loopback interface ID Loopback that is used as the Source IP Address for all PTP packets. The valid values range from 0 to 1023. The PTP loopback ID cannot be the same as RP, Phantom RP, NVE, or MPLS loopback ID. Otherwise, an error will be generated. The PTP loopback ID can be the same as BGP loopback or user-defined loopback which is created from DCNM.

If the PTP loopback ID is not found during Save & Deploy, the following error is generated:

Loopback interface to use for PTP source IP is not found. Please create PTP loopback interface on all the devices to enable PTP feature.

PTP Domain Id: Specifies the PTP domain ID on a single network. The valid values range from 0 to 127.

Enable MPLS Handoff: Select the check box to enable the MPLS Handoff feature. For more information, see Border Provisioning Use Case in VXLAN BGP EVPN Fabrics - MPLS SR and LDP Handoff.

Note: For the brownfield import, you need to select the Enable MPLS Handoff feature. Most of the IFC configuration will be captured in switch_freeform.

Underlay MPLS Loopback Id: Specifies the underlay MPLS loopback ID. The default value is 101.

Enable TCAM Allocation: TCAM commands are automatically generated for VXLAN and vPC Fabric Peering when enabled.

Enable Default Queuing Policies: Check this check box to apply QoS policies on all the switches in this fabric. To remove the QoS policies that you applied on all the switches, uncheck this check box, update all the configurations to remove the references to the policies, and save and deploy. From Cisco DCNM Release 11.3(1), pre-defined QoS configurations are included that can be used for various Cisco Nexus 9000 Series Switches. When you check this check box, the appropriate QoS configurations are pushed to the switches in the fabric. The system queuing is updated when configurations are deployed to the switches. You can perform the interface marking with defined queuing policies, if required, by adding the required configuration to the per interface freeform block.

Review the actual queuing policies by opening the policy file in the template editor. From Cisco DCNM Web UI, choose Control > Template Library. Search for the queuing policies by the policy file name, for example, queuing_policy_default_8q_cloudscale. Choose the file and click the Modify/View template icon to edit the policy.

See the Cisco Nexus 9000 Series NX-OS Quality of Service Configuration Guide for platform specific details.

N9K Cloud Scale Platform Queuing Policy: Choose the queuing policy from the drop-down list to be applied to all Cisco Nexus 9200 Series Switches and the Cisco Nexus 9000 Series Switches that ends with EX, FX, and FX2 in the fabric. The valid values are queuing_policy_default_4q_cloudscale and queuing_policy_default_8q_cloudscale. Use the queuing_policy_default_4q_cloudscale policy for FEXes. You can change from the queuing_policy_default_4q_cloudscale policy to the queuing_policy_default_8q_cloudscale policy only when FEXes are offline.

N9K R-Series Platform Queuing Policy: Choose the queuing policy from the drop-down list to be applied to all Cisco Nexus switches that ends with R in the fabric. The valid value is queuing_policy_default_r_series.

Other N9K Platform Queuing Policy: Choose the queuing policy from the drop-down list to be applied to all other switches in the fabric other than the switches mentioned in the above two options. The valid value is queuing_policy_default_other.

Enable MACsec - Enables MACsec for the fabric. For more information, see MACsec Support in Easy Fabric and eBGP Fabric.

Leaf Freeform Config and Spine Freeform Config - You can enter these fields after fabric transitioning is complete, as needed.

Intra-fabric Links Additional Config - You can enter this field after fabric transitioning is complete, as needed.

Step 8

Click the Resources tab.

Manual Underlay IP Address AllocationDo not select this check box if you are transitioning your VXLAN fabric management to DCNM.

Review the ranges and ensure they are consistent with the existing fabric. The migration will honor the existing resources as found on the fabric. The range settings apply to post migration allocation.

Underlay Routing Loopback IP Range - Specifies loopback IP addresses for the protocol peering.

Underlay VTEP Loopback IP Range - Specifies loopback IP addresses for VTEPs.

Underlay RP Loopback IP Range - Specifies the anycast or phantom RP IP address range.

Underlay Subnet IP Range - IP addresses for underlay P2P routing traffic between interfaces.

Layer 2 VXLAN VNI Range and Layer 3 VXLAN VNI Range - Specifies the VXLAN VNI IDs for the fabric.

Network VLAN Range and VRF VLAN Range - VLAN ranges for the Layer 3 VRF and overlay network.

Subinterface Dot1q Range - Specifies the subinterface range when L3 sub interfaces are used.

VRF Lite Deployment - Specify the VRF Lite method for extending inter fabric connections.

The VRF Lite Subnet IP Range field specifies resources reserved for IP address used for VRF LITE when VRF LITE IFCs are auto-created. If you select Back2BackOnly, ToExternalOnly, or Back2Back&ToExternal then VRF LITE IFCs are auto-created.

Auto Deploy Both - This check box is applicable for the symmetric VRF Lite deployment. When you select this check box, it would set the auto deploy flag to true for auto-created IFCs to turn on symmetric VRF Lite configuration.

This check box can be selected or deselected when the VRF Lite Deployment field is not set to Manual. In the case, a user explicitly unchecks the auto-deploy field for any auto-created IFCs, then the user input is always given the priority. This flag only affects the new auto-created IFC and it does not affect the existing IFCs.

VRF Lite Subnet IP Range and VRF Lite Subnet Mask – These fields are populated with the DCI subnet details. Update the fields as needed.

The values shown in your screen are automatically generated. If you want to update the IP address ranges, VXLAN Layer 2/Layer 3 network ID ranges or the VRF/Network VLAN ranges, ensure the following:

Note


When you update a range of values, ensure that it does not overlap with other ranges. You should only update one range of values at a time. If you want to update more than one range of values, do it in separate instances. For example, if you want to update L2 and L3 ranges, you should do the following.

  1. Update the L2 range and click Save.

  2. Click the Edit Fabric option again, update the L3 range and click Save.

Service Network VLAN Range - Specifies a VLAN range in the Service Network VLAN Range field. This is a per switch overlay service network VLAN range. The minimum allowed value is 2 and the maximum allowed value is 3967.

Route Map Sequence Number Range - Specifies the route map sequence number range. The minimum allowed value is 1 and the maximum allowed value is 65534.

The remaining tabs do not require updates. However, their purpose is mentioned.

Step 9

Click the Manageability tab.

Enter the DNS, NTP, AAA, or syslog servers’ IP address, VRF, and other applicable information matching the switch configuration. If there are more than two servers for these features, add the configurations of the additional servers to the Leaf Freeform Config and Spine Freeform Config fields in the Advanced tab.

Note


If AAA configs are not specified in the fabric settings, switch_freeform PTI with source as UNDERLAY_AAA and description as DCNM Extra AAA Configurations will be created.

Step 10

Click the Bootstrap tab. Update the fields in this tab post transition, when new switches are added to the fabric.

Step 11

Click the Configuration Backup tab. Leave the fields in this tab blank. You can update post transition.

Step 12

Click Save after filling and updating relevant information. A note appears briefly at the bottom right part of the screen, indicating that the fabric is created. When a fabric is created, the fabric page comes up. The fabric name appears at the top left part of the screen.

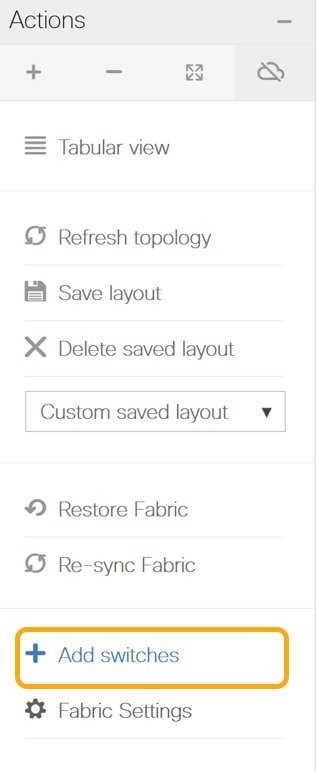
The Actions panel at the left part of the screen allows you to perform various functions. One of them is the Add switches option to add switches to the fabric. After you create a fabric, you should add fabric devices. The process is explained next:


Adding Switches and Transitioning VXLAN Fabric Management to DCNM

Let us discover and add switches to the newly created fabric.

Procedure


Step 1

Click Add Switches in the Actions menu.

Step 2

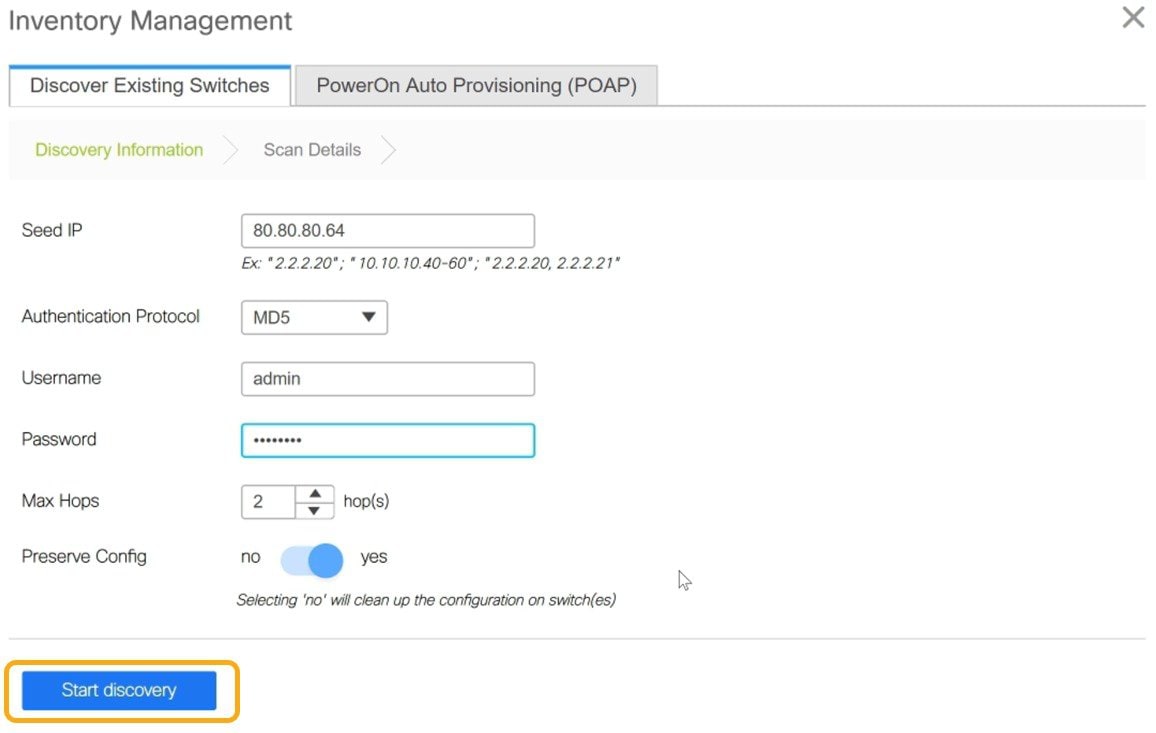
Under the Discover Existing Switches tab, enter the IP address of the switch in the Seed IP field. Enter the username and password of the switches that you want to discover.

By default, the value in the Max Hops field is 2. The switch with the specified IP address and the switches that are 2 hops from it will be populated after the discovery is complete.

Make sure that the Preserve Config toggle button is set to yes.

The yes setting means that the current configuration of the switches will be retained.

Important - Ensure that the Preserve Config field remains set to yes. Selecting no can cause significant configuration loss and fabric disruption.

The POAP tab is only used for adding new switches to the fabric. Use the tab only after migrating your existing fabric to DCNM.

Step 3

Click Start discovery.

The switch with the specified IP address and switches up to two hops away (depending on the setting of Max Hops) from it are populated in the Scan Details section.

Step 4

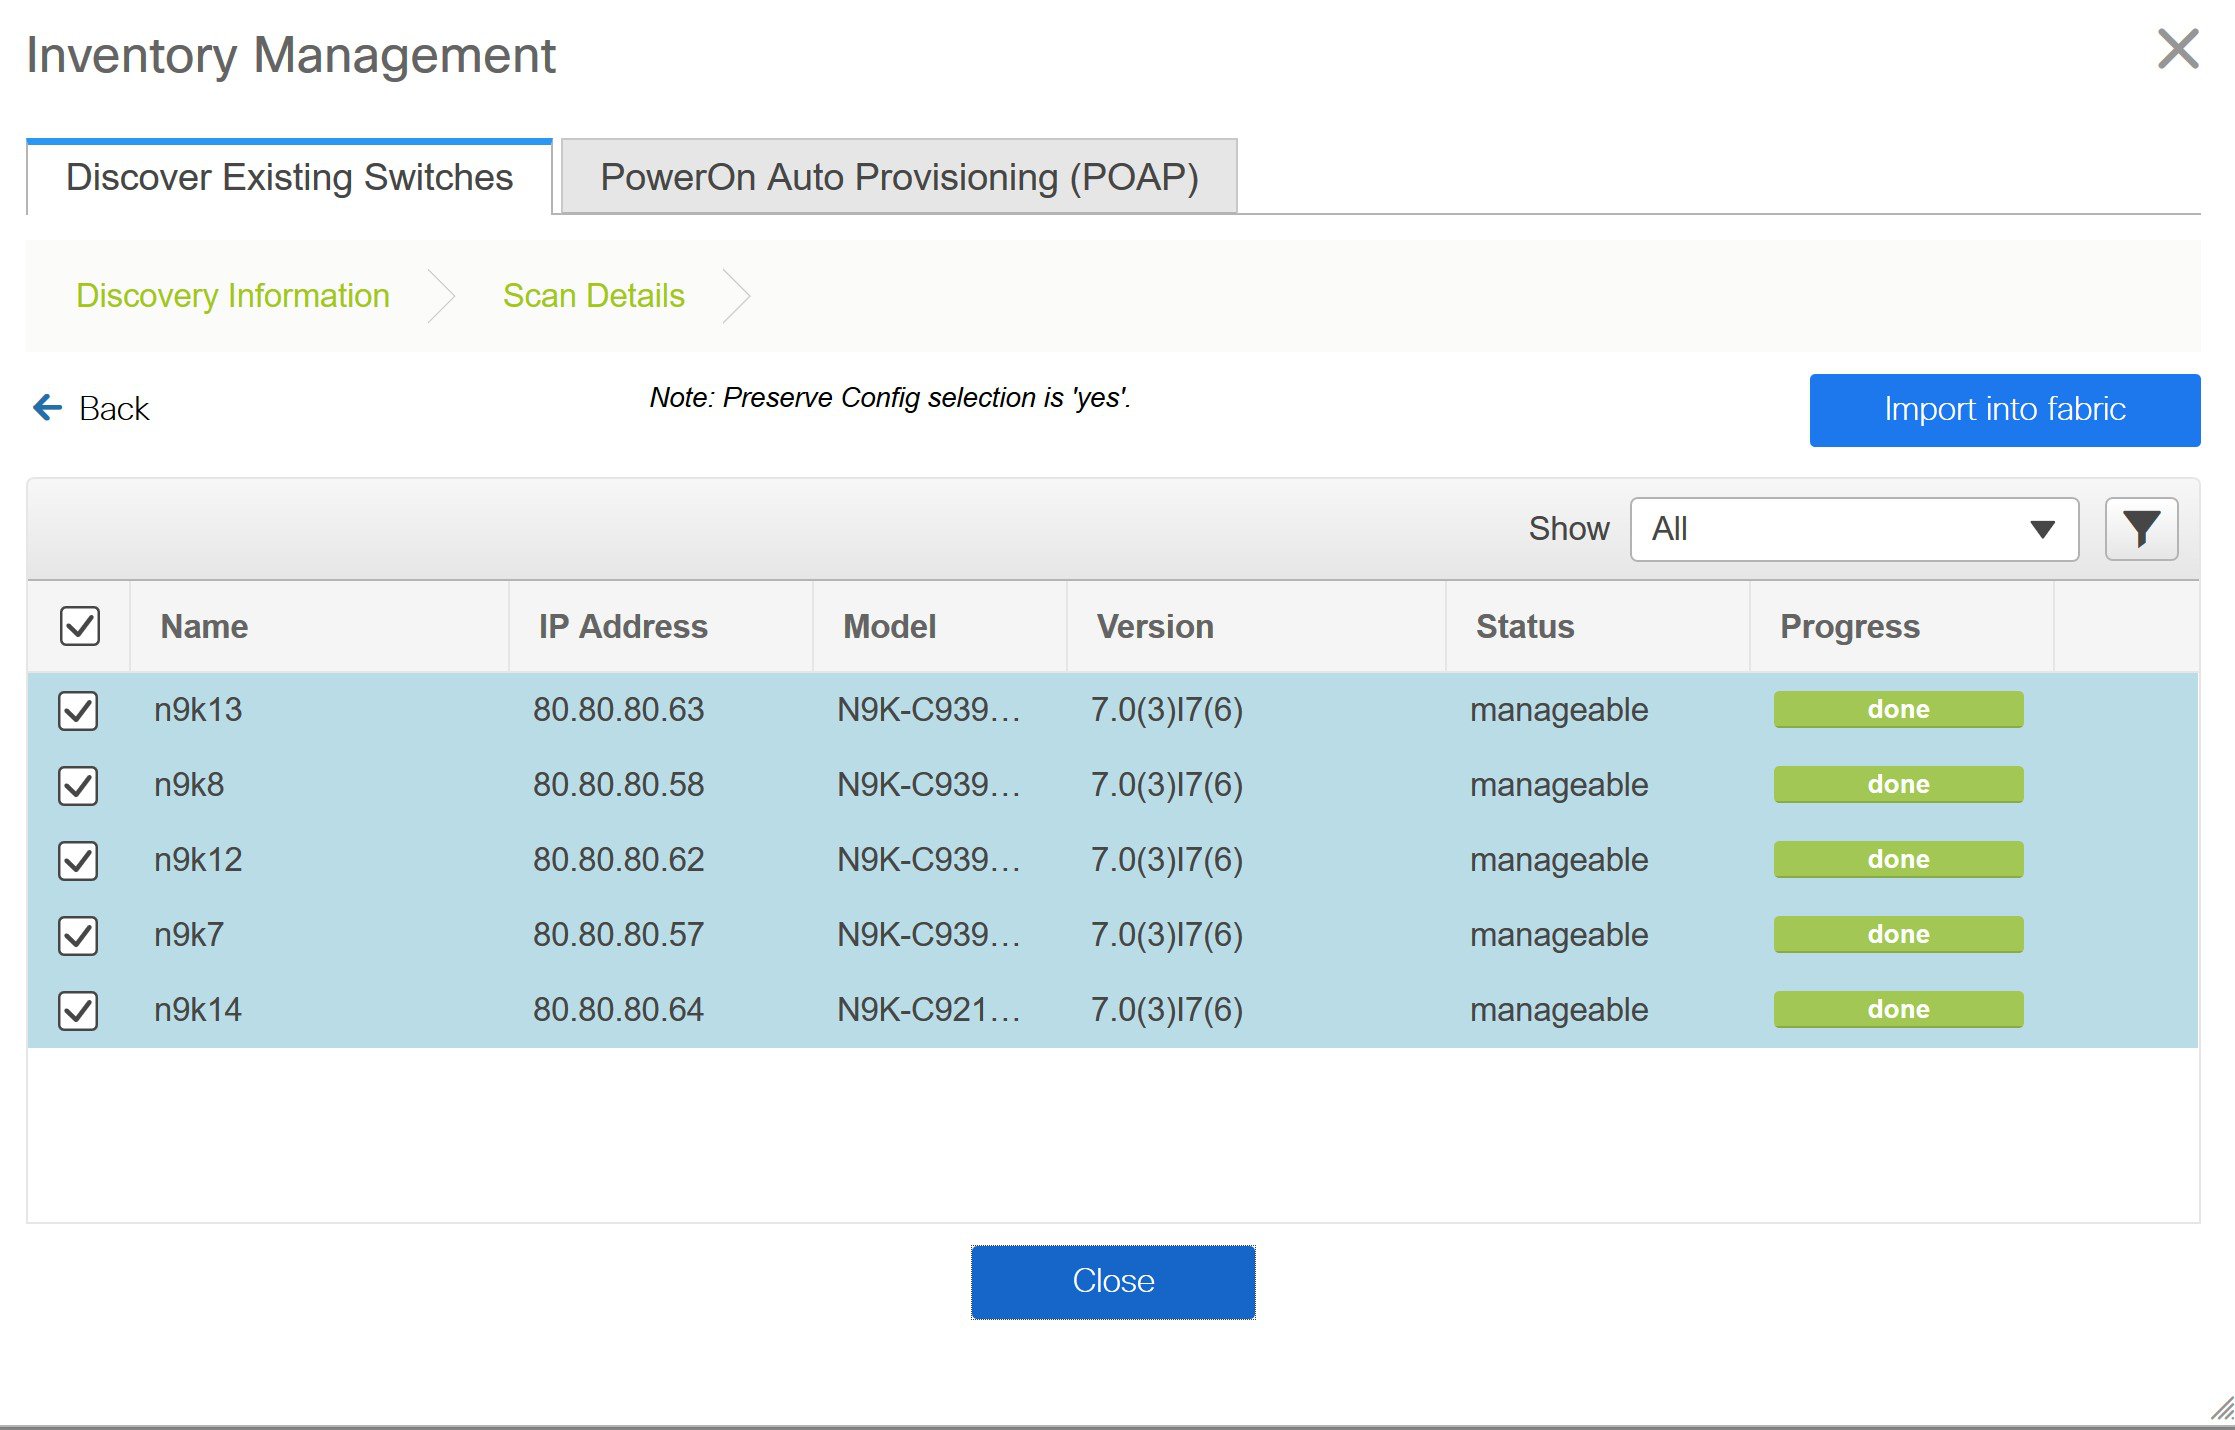
Check the check box next to the switches that have to be imported into the fabric and click Import into fabric.

It is best practice to discover multiple switches at the same time in a single attempt. The switches must be cabled and connected to the DCNM server and the switch status must be manageable.

If switches are imported in multiple attempts, then all the switches must be added to the fabric before you make any changes to the fabric, that is, before you click Save & Deploy.

Step 5

Click Import into fabric.

The switch discovery process is initiated. The Progress column displays progress for all the selected switches. It displays done for each switch after completion.

Note


You should not close the screen and try to import switches again until all selected switches are imported or an error message comes up.

If an error message comes up, close the screen. The fabric topology screen comes up. The error messages are displayed at the top-right part of the screen. Resolve the errors and initiate the import process again by clicking Add Switches in the Actions panel.

Step 6

After a successful import, the progress bar shows Done for all the switches. Click Close.

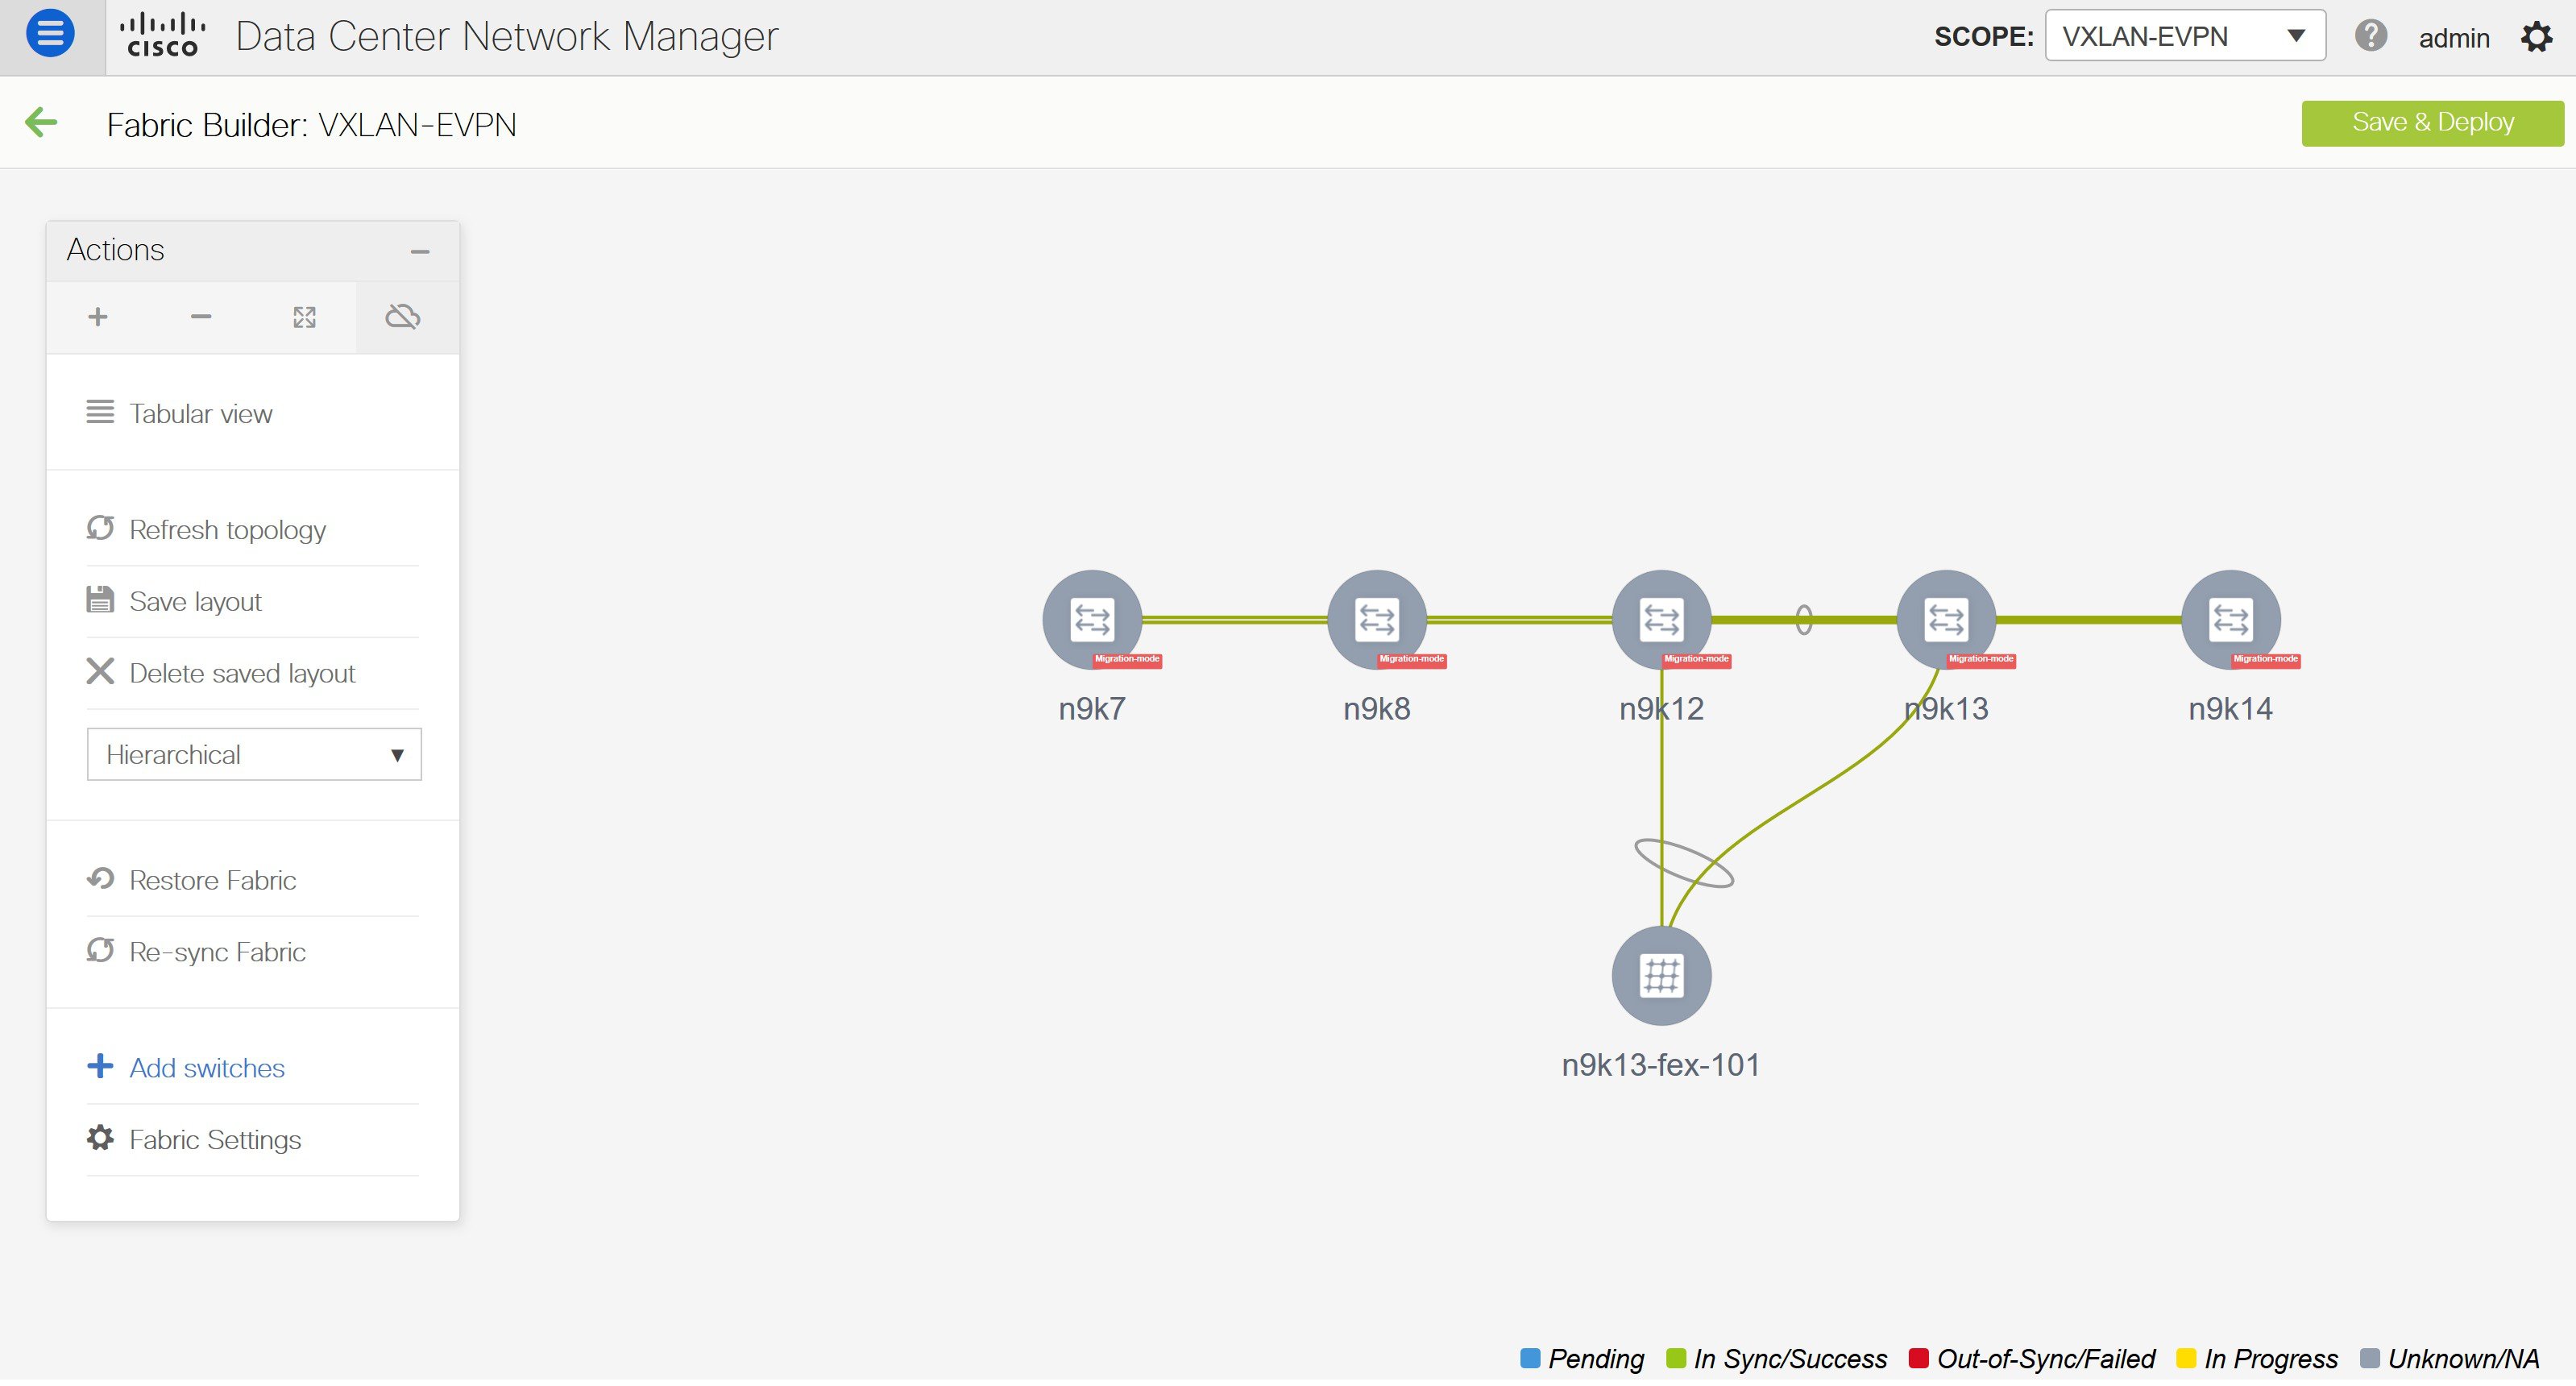
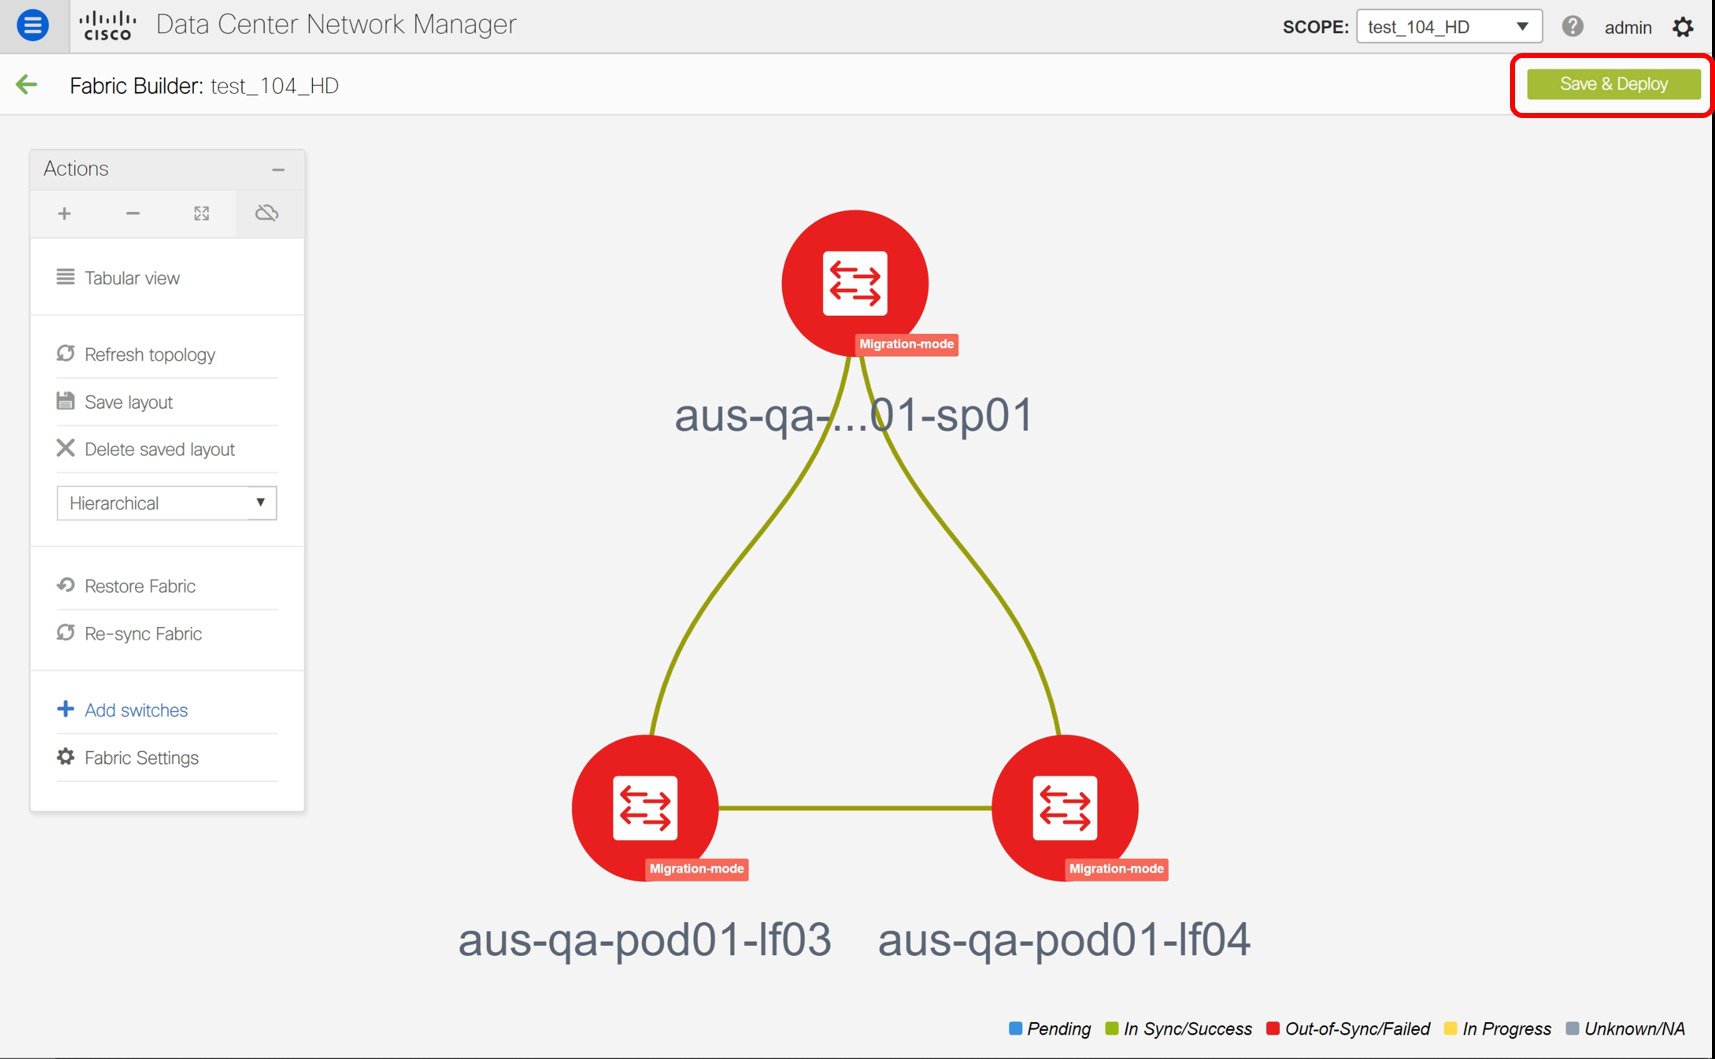
After closing the window, the fabric topology window comes up again. The switch is in Migration Mode now, and the Migration mode label is displayed on the switch icons.

At this point, you must not try to add Greenfield or new switches. Support is not available for adding new switches during the migration process. It might lead to undesirable consequences for your network. However, you can add a new switch after the migration process is complete.

Step 7

After all the network elements are discovered, they are displayed in the Fabric Builder window in a connected topology. Each switch is assigned the Leaf role by default.

The switch discovery process might fail for a few switches, and the Discovery Error message is displayed. However, such switches are still displayed in the fabric topology. You should remove such switches from the fabric (Right-click the switch icon and click Discovery > Remove from fabric), and import them again.

You should not proceed to the next step until all switches in the existing fabric are discovered in DCNM.

If you choose the Hierarchical layout for display (in the Actions panel), the topology automatically gets aligned as per role assignment, with the leaf switches at the bottom, the spine switches connected on top of them, and the border switches at the top.

Note


The supported roles for switches with the Cisco NX-OS Release 7.0(3)I4(8b) and 7.0(4)I4(x) images are Border Leaf, Border Spine, Leaf, and Spine

Step 8

Right-click the n9k-7 switch, select Set Role, and choose Border from the Roles drop-down list.

Similarly, set the Spine role for the n9k-14 and n9k-8 spine switches.

Note


You need to manually create a vPC pairing when the L3 keep alive is configured on the switches. Otherwise, the vPC configuration is automatically picked up from the switches. For more information, see Adding a vPC L3 Peer Keep-Alive Link.

vPC Pairing - The vPC pairing must be done for switches where the Layer 3 vPC peer-keep alive is used. The vPC configuration is automatically picked up from the switches when the vPC peer keep alive is established through the management option. This pairing reflects in the GUI only after the migration is complete.

  1. Right-click the switch icon and click vPC Pairing to set a vPC switch pair.

    The Select vPC peer screen comes up. It lists potential vPC peer switches.

  2. Select the appropriate switch and click OK. The fabric topology comes up again. The vPC pair is formed now.

Note


Check if you have added all switches from the current fabric. If you have missed adding switches, add them now. Once you are certain that you have imported all existing switches, move to the next step, the Save and Deploy option.

Step 9

Click Save & Deploy.

When you click Save & Deploy, DCNM obtains switch configurations and populates the state of every switch from the current running config to the current expected config, which is the intended state maintained in DCNM.

The Saving Fabric Configuration message comes up immediately. This indicates that overlay and underlay network migration, and switch and port channel settings migration to DCNM is initiated.

If there are configuration mismatches, error messages are displayed. Update changes in the fabric settings or the switch configuration as needed, and click Save and Deploy again.

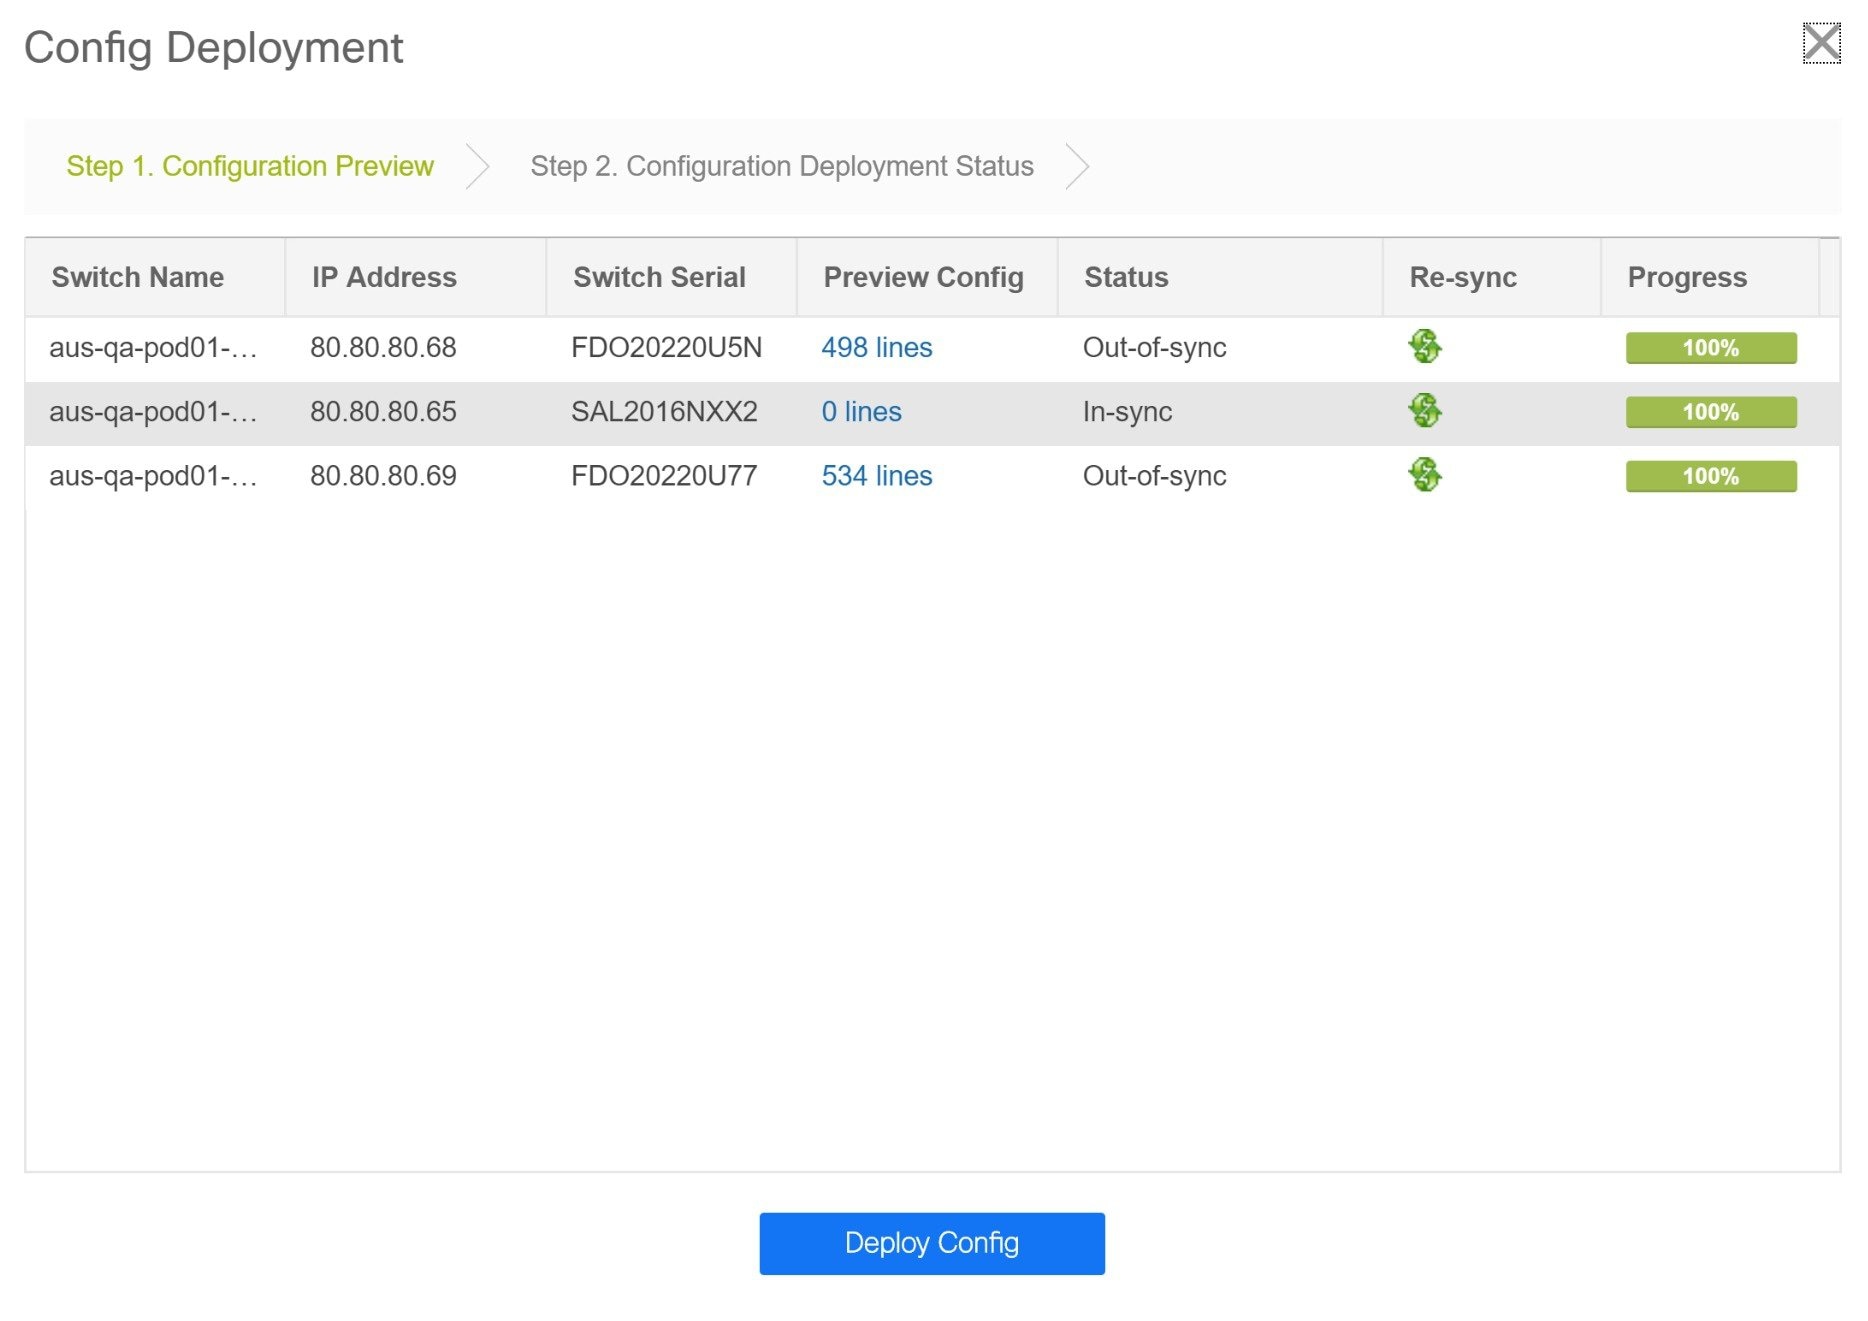
After the migration of underlay and overlay networks, the Configuration Deployment screen comes up.

Note

 
  • The brownfield migration requires best practices to be followed on the existing fabric such as maintain consistency of the overlay configurations. For more information, see the Control chapter.

  • Any errors or inconsistencies that are found during the migration is reported in fabric errors. The switches continue to remain in the Migration mode. You should fix these errors and complete the migration again by clicking Save & Deploy until no errors are reported.

Step 10

After the configurations are generated, review them by clicking the links in the Preview Config column.

We strongly recommend that you preview the configuration before proceeding to deploy it on the switches. Click the Preview Config column entry. The Config Preview screen comes up. It lists the pending configurations on the switch.

The Side-by-side Comparison tab displays the running configuration and expected configuration side-by-side.

The Pending Config tab displays the set of configurations that need to be deployed on a switch in order to go from the current running configuration to the current expected or intended configuration.

The Pending Config tab may show many config lines that will be deployed to the switches. Typically, on a successful brownfield import, these lines correspond to the configuration profiles pushed to the switches for a overlay network configuration. Note that the existing network and VRF-related overlay configurations are not removed from the switches.

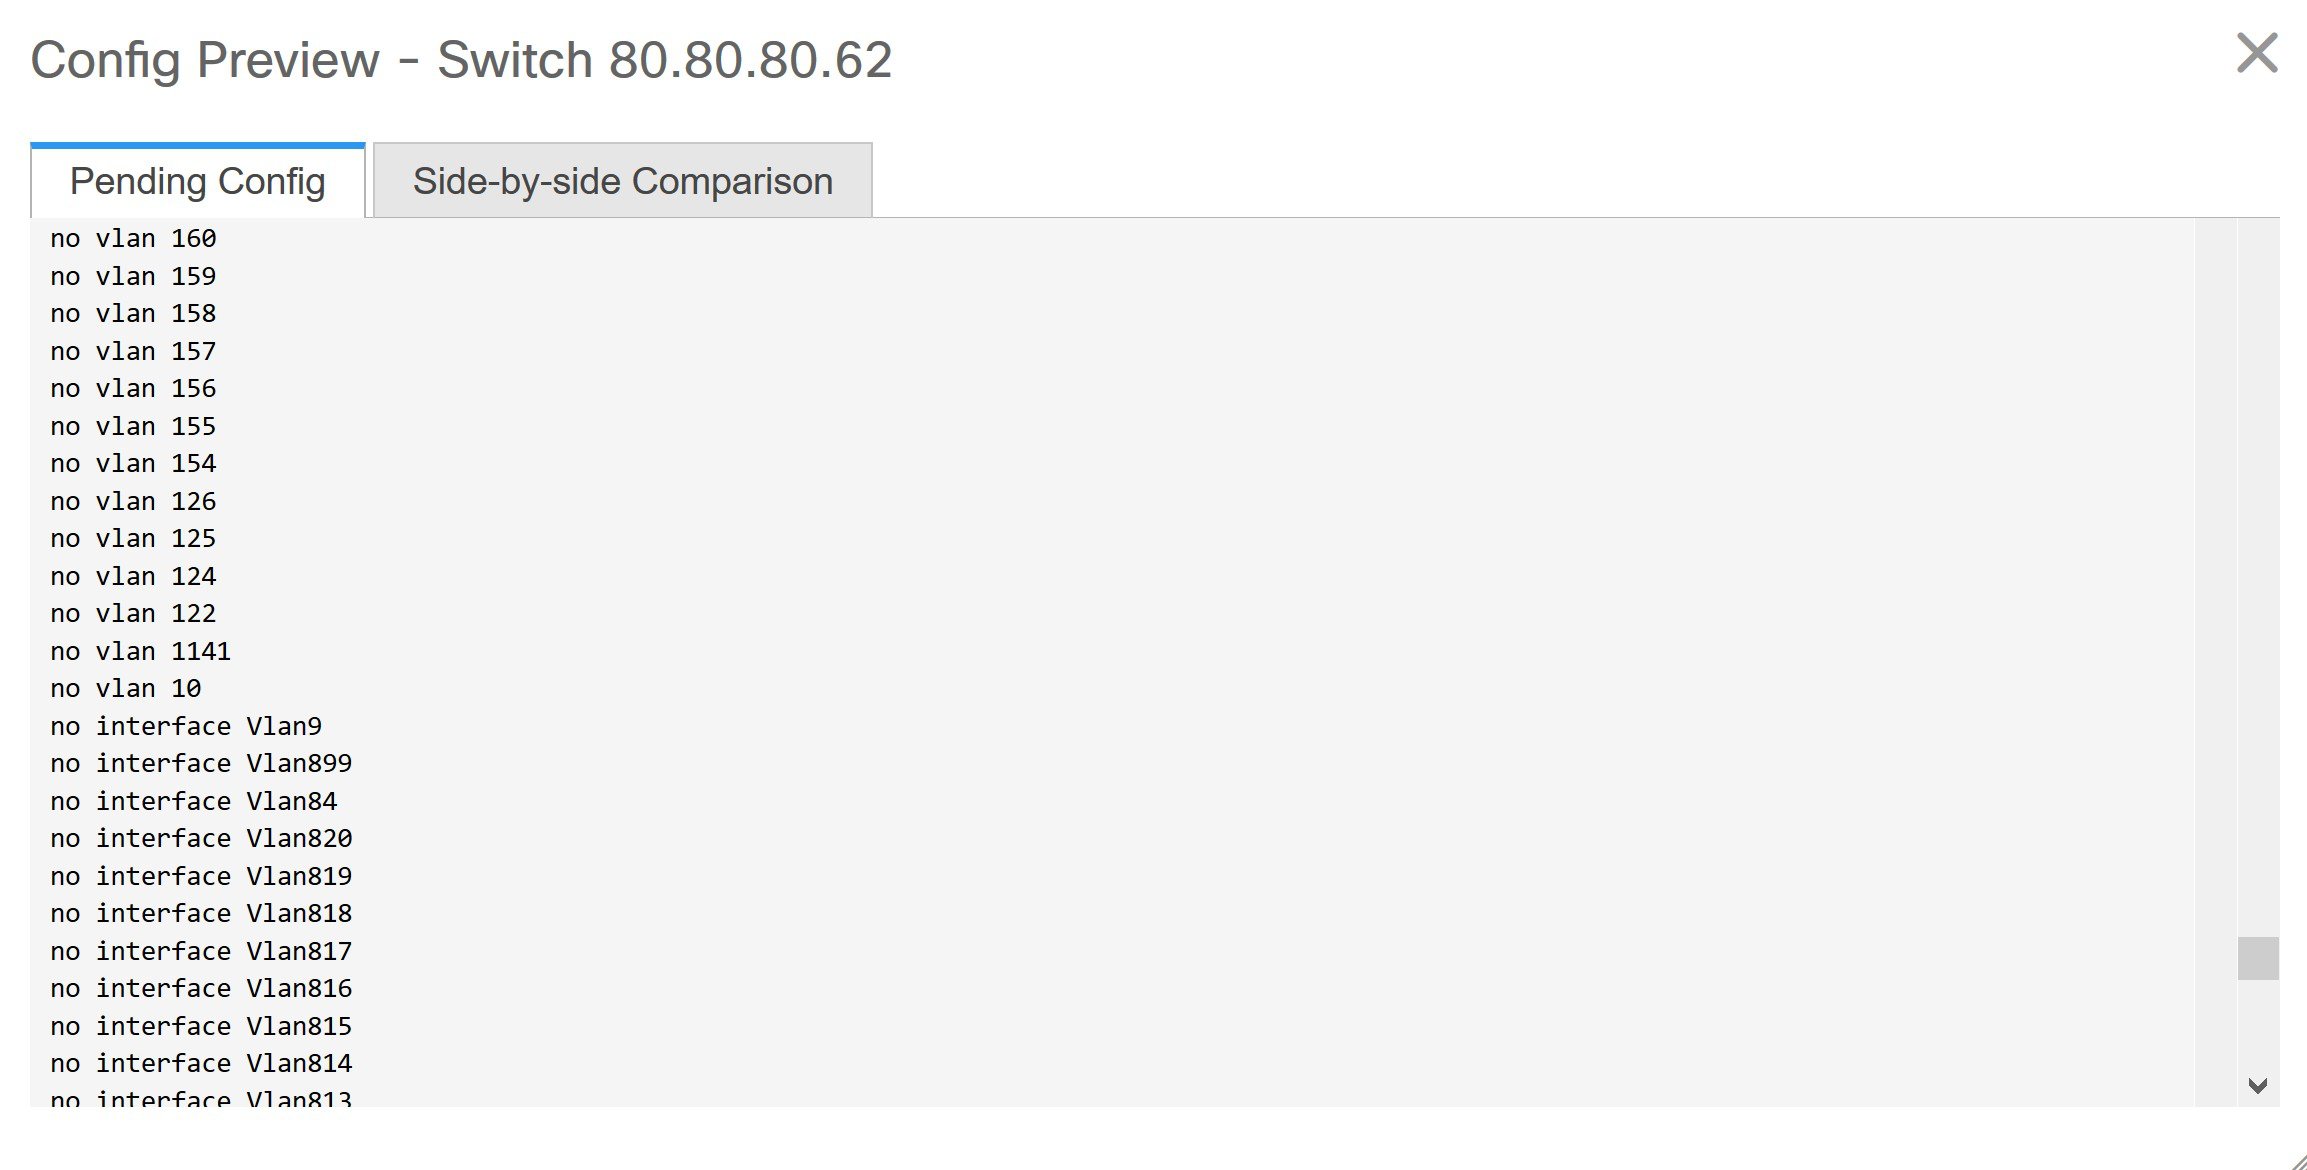
The configuration profiles are DCNM required constructs for managing the VXLAN configurations on the switches. During the Brownfield import process, they capture the same information as the original VXLAN configurations already present on the switches. In the following image, the configuration profile with vlan 160 is applied.

As part of the import process, after the configuration profiles are applied, the original CLI based configuration references will be removed from the switches. These are the ‘no’ CLIs that will be seen towards the end of the diffs. The VXLAN configurations on the switches will be persisted in the configuration profiles. In the following image, you can see that the configurations will be removed, specifically, no vlan 160.

The Side-by-side Comparison tab displays the Running Config and Expected Config on the switch.

Step 11

Close the Config Preview Switch window after reviewing the configurations.

Step 12

Click Deploy Config to deploy the pending configuration onto the switches.

If the Status column displays FAILED, investigate the reason for failure to address the issue.

The progress bar shows 100% for each switch. After correct provisioning and successful configuration compliance, close the screen.

In the fabric topology screen that comes up, all imported switch instances are displayed in green color, indicating successful configuration. Also, the Migration Mode label is not displayed on any switch icon.

DCNM has successfully imported a VXLAN-EVPN fabric.

Post-transitioning of VXLAN fabric management to DCNM - This completes the transitioning process of VXLAN fabric management to DCNM. Now, you can add new switches and provision overlay networks for your fabric. For details, refer the respective section in the Fabrics topic in the configuration guide.

Fabric Options

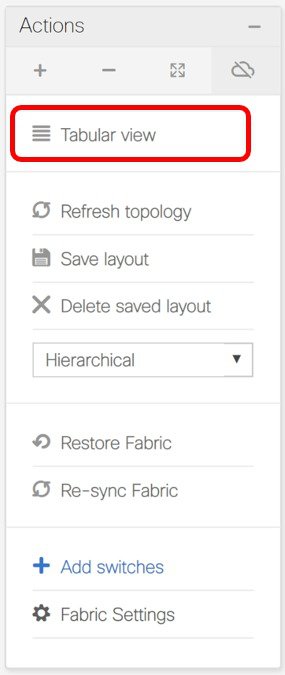
  • Tabular View - By default, the switches are displayed in the topology view. Use this option to view switches in the tabular view.

  • Refresh topology - Allows you to refresh the topology.

  • Save Layout – Saves a custom view of the topology. You can create a specific view in the topology and save it for ease of use.

  • Delete saved layout – Deletes the custom view of the topology

  • Topology views - You can choose between Hierarchical, Random and Custom saved layout display options.

    • Hierarchical - Provides an architectural view of your topology. Various Switch Roles can be defined that draws the nodes on how you configure your CLOS topology.

    • Random - Nodes are placed randomly on the screen. DCNM tries to make a guess and intelligently place nodes that belong together in close proximity.

    • Custom saved layout - You can drag nodes around to your liking. Once you have the positions as how you like, you can click Save Layout to remember the positions. Next time you come to the topology, DCNM will draw the nodes based on your last saved layout positions.

  • Restore Fabric – Allows you to restore the fabric to a prior DCNM configuration state (one month back, two months back, and so on). For more information, see the Restore Fabric section.

  • Backup Now: You can initiate a fabric backup manually by clicking Backup Now. Enter a name for the tag and click OK. Regardless of the settings you choose under the Configuration Backup tab in the Fabric Settings dialog box, you can initiate a backup using this option.

  • Resync Fabric - Use this option to resynchronize DCNM state when there is a large scale out-of-band change, or if configuration changes do not register in the DCNM properly. The resync operation does a full CC run for the fabric switches and recollects “show run” and “show run all” commands from the switches. When you initiate the re-sync process, a progress message is displayed on the screen. During the re-sync, the running configuration is taken from the switches. The Out-of-Sync/In-Sync status for the switches is recalculated based on the intent defined in DCNM.

  • Add Switches – Allows you to add switch instances to the fabric.

  • Fabric Settings – Allows you to view or edit fabric settings.


Verifying the Import of the VXLAN BGP EVPN Fabric

Let us verify whether the Brownfield migration was successful.

Verifying VXLANs and Commands on Switches

Procedure


Step 1

To verify the VXLANs in this fabric, double click a switch and click Show more details in the switch pane.

Step 2

Click the VXLAN tab.

You can see that all the VXLANs have been migrated successfully.

Note


You can verify remaining information by clicking the different tabs in this window.

Step 3

Right-click a switch and select History to see the commands pushed by DCNM.

Step 4

Click the Success hyperlink under the Status column to view the commands pushed by DCNM.


Verifying Resources

DCNM has a resource manager that tracks all the resources used in a fabric. Navigate to Control > Management > Resources in the left menu.

The resources that are being utilized by the VXLAN EVPN fabric such as VLAN IDs, port channel IDs, point to point IP addresses, and loopback IDs are displayed in this window.

Verifying Networks

Procedure


Step 1

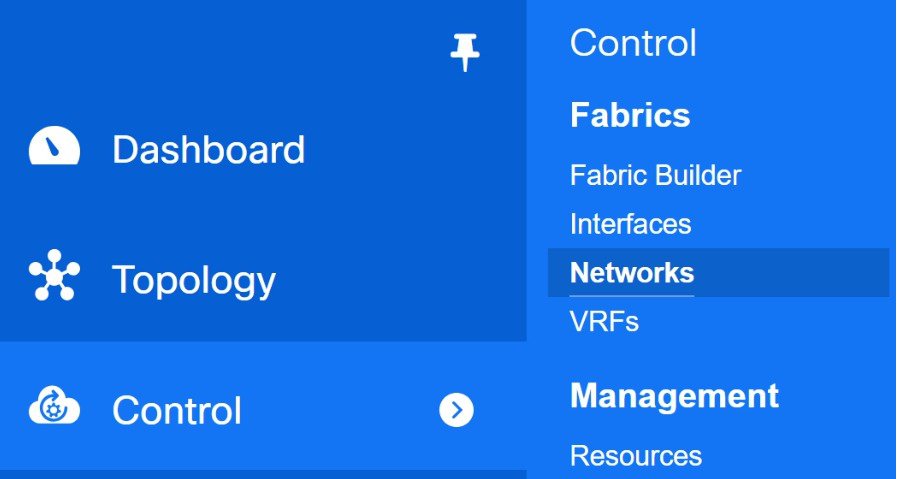
From the menu, choose Control > Fabrics > Networks.

Step 2

Choose VXLAN-EVPN from the Scope drop-down list.

All the networks that are displayed in this window were learned and populated by DCNM as part of the brownfield migration.

Step 3

From the Show drop-down list, choose Quick Filter and enter 349 in the VLAN ID field.

This network is associated with the VLAN ID 349 and is configured with the anycast IP 204.90.140.134.

You can see that this network has been deployed.

Select this network and click Continue.

Step 4

Click Detailed View.

This network has been deployed on the leaf switches and the border switch.

Note that Ethernet 1/5 is one of the ports on the leaf switch.

Let us verify the overlay network associated with this interface.

Step 5

From the menu, click Control > Fabrics > Interfaces.

All the imported interfaces, including port channels, vPC, and mgmt0 interfaces are displayed in the Interfaces window.

Step 6

In the name field, enter Ethernet 1/5.

This interface is attached to the host through the n9k-12 switch.

Step 7

In the Overlay Networks column, click Networks that corresponds to the n9k-12 switch and the Ethernet 1/5 interface.

These are the networks that are attached to the Ethernet 1/5 interface.

VLAN 349 is also one among them.

You can click this network to see the expected config.

Step 8

Select the n9k-12 switch corresponding to the Ethernet1/5 interface and click the Edit icon.

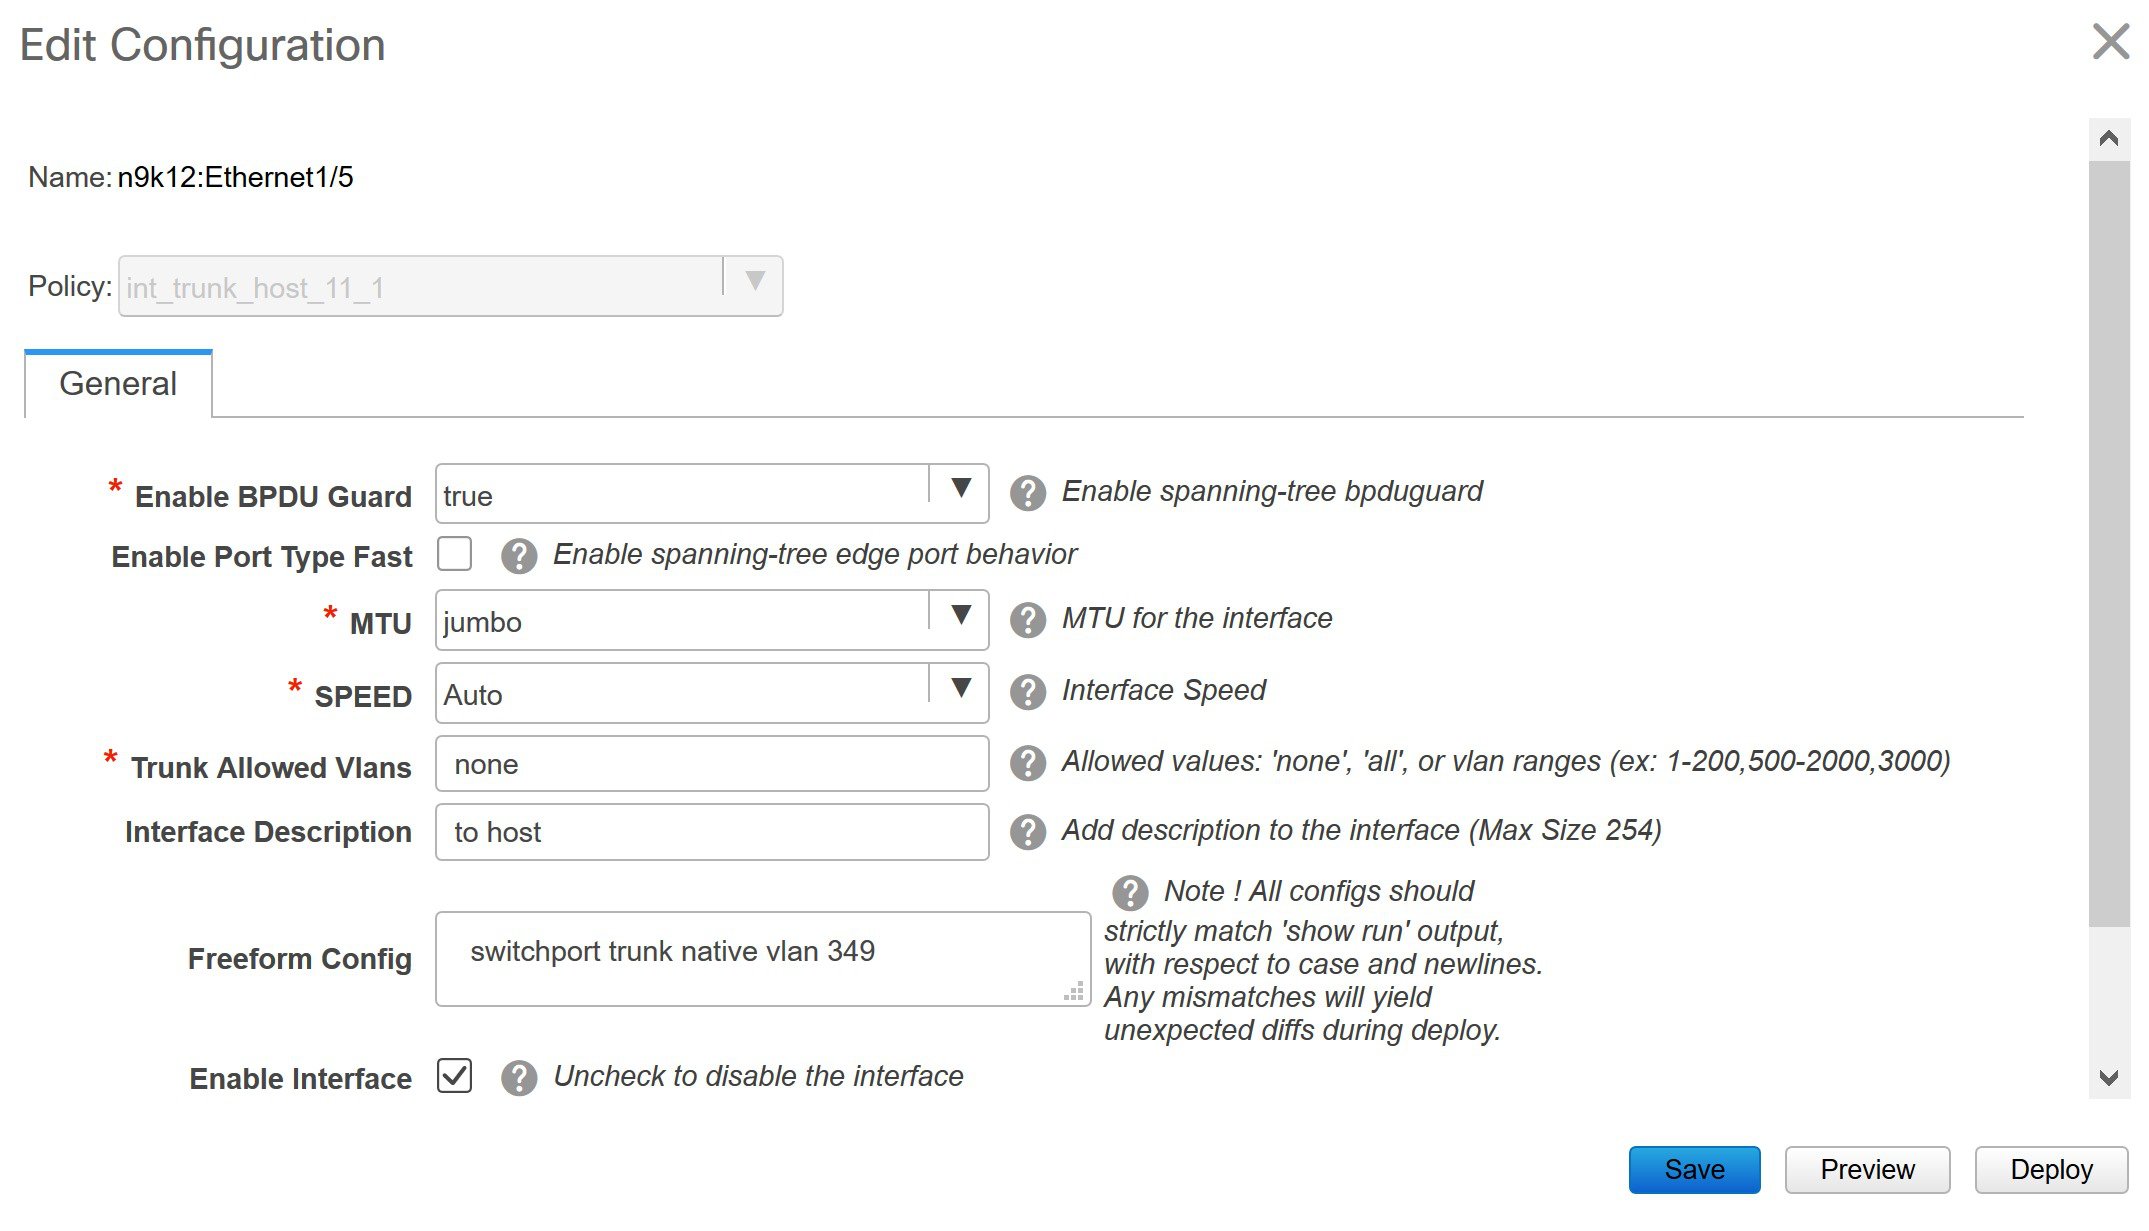
You can see that all the settings for this interface have been successfully imported, including the BPDU guard settings and the interface description.

Let us go back to the host.

The ping command is still running.

Step 9

End the ping command.

64 bytes from 204.90.140.134: icmp_seq=4100 ttl=254 time=1.188 ms
64 bytes from 204.90.140.134: icmp_seq=4101 ttl=254 time=1.122 ms
64 bytes from 204.90.140.134: icmp_seq=4102 ttl=254 time=1.224 ms
64 bytes from 204.90.140.134: icmp_seq=4103 ttl=254 time=1.09 ms
64 bytes from 204.90.140.134: icmp_seq=4104 ttl=254 time=1.054 ms
64 bytes from 204.90.140.134: icmp_seq=4105 ttl=254 time=1.079 ms
64 bytes from 204.90.140.134: icmp_seq=4106 ttl=254 time=1.172 ms
64 bytes from 204.90.140.134: icmp_seq=4107 ttl=254 time=1.226 ms
--- 204.90.140.134 ping statistics ---
4108 packets transmitted, 4108 packets received, 0.00% packet loss
round-trip min/avg/max = 1.003/1.264/3.412 ms

You can see that 4108 packets are transmitted and received during the migration, and there was zero percent packet loss.

The Brownfield fabric is successfully migrated in to DCNM.


Configuration Profiles Support for Brownfield Migration

Cisco DCNM Release 11.3(1) supports the Brownfield import of fabrics with VXLAN overlay provisioned with configuration profiles. This import process recreates the overlay configuration intent based on the configuration profiles. The underlay migration is performed with the usual Brownfield migration.

This feature can be used to recover your existing Easy fabric when a DCNM backup is not available to be restored. In this case, you must install the latest DCNM release, create a fabric, and then import the switches into the fabric.

Note that this feature is not recommended for the DNCM upgrade. For more information, see Cisco DCNM Installation and Upgrade Guide for LAN Fabric Deployment.

The following are the guidelines for the support of configuration profiles:

  • The Brownfield migration of configuration profiles is supported for the Easy_Fabric_11_1 template.

  • The configuration profiles on the switches must be a subset of the default overlay Universal profiles. If extra configuration lines are present that are not part of the Universal profiles, unwanted profile refreshes will be seen. In this case, after you click Save & Deploy, review the diffs using the Side-by-side Comparison feature and deploy the changes.

  • Brownfield migration with switches having a combination of VXLAN overlay configuration profiles and regular CLIs is not supported. If this condition is detected, an error is generated, and migration is aborted. All the overlays must be with either configuration profiles or regular CLIs only.

Migrating a Bottom-Up VXLAN Fabric to DCNM

This procedure shows how to migrate a bottom-up VXLAN fabric to DCNM.

Typically, your fabric is created and managed through manual CLI configuration or custom automation scripts. After the migration, the fabric underlay and overlay networks can be managed by using DCNM.

The guidelines and limitations, and prerequisites for bottom-up VXLAN migration are the same as the Brownfield migration. For more information, see Brownfield Deployment-Transitioning VXLAN Fabric Management to DCNM.

  1. Create a VXLAN BGP EVPN fabric.

    For more information, see the Creating a New VXLAN BGP EVPN Fabric section in Brownfield Deployment-Transitioning VXLAN Fabric Management to DCNM.

  2. Add switch instances to the fabric.

    For more information, follow the Step 1 to Step 5 in the Adding Switch Instances and Transitioning VXLAN Fabric Management section in Brownfield Deployment-Transitioning VXLAN Fabric Management to DCNM.

  3. Click Save & Deploy to sync configurations between the switches and DCNM.

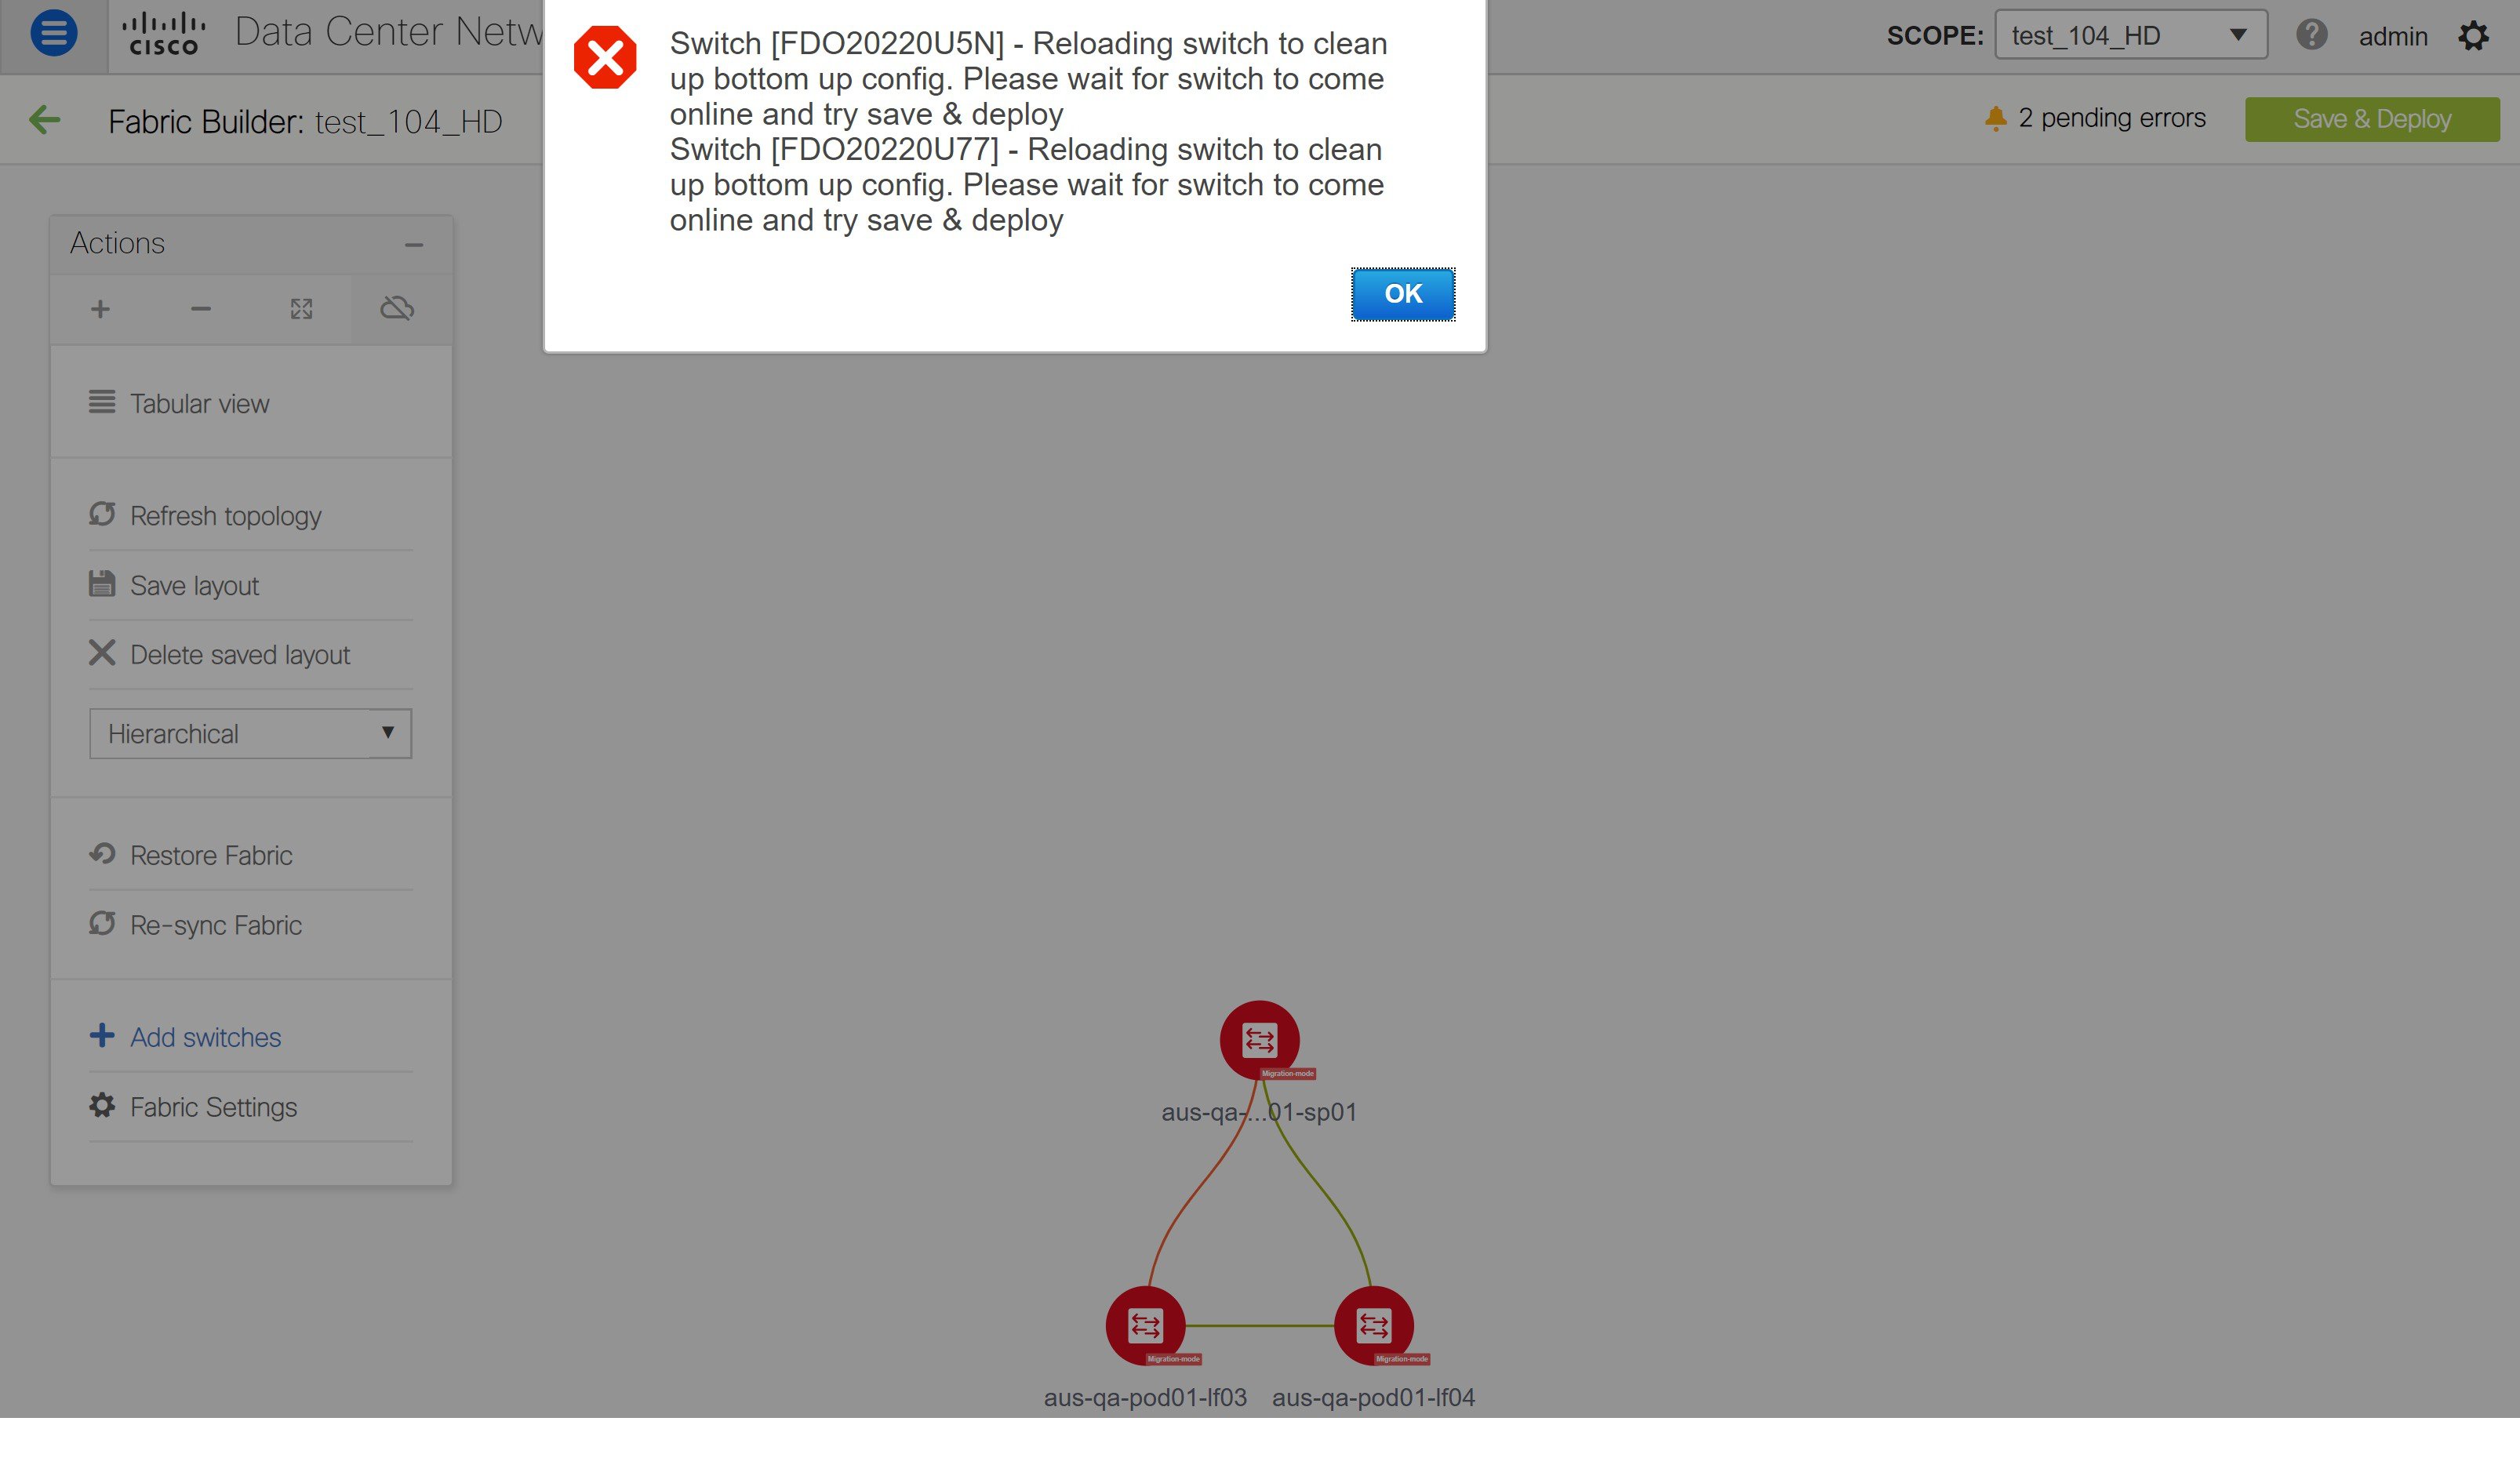
    If the added switches contain bottom-up configurations, an error is displayed saying – Reloading switch to clean up bottom up config. Please wait for switch to come online and try Save & Deploy.

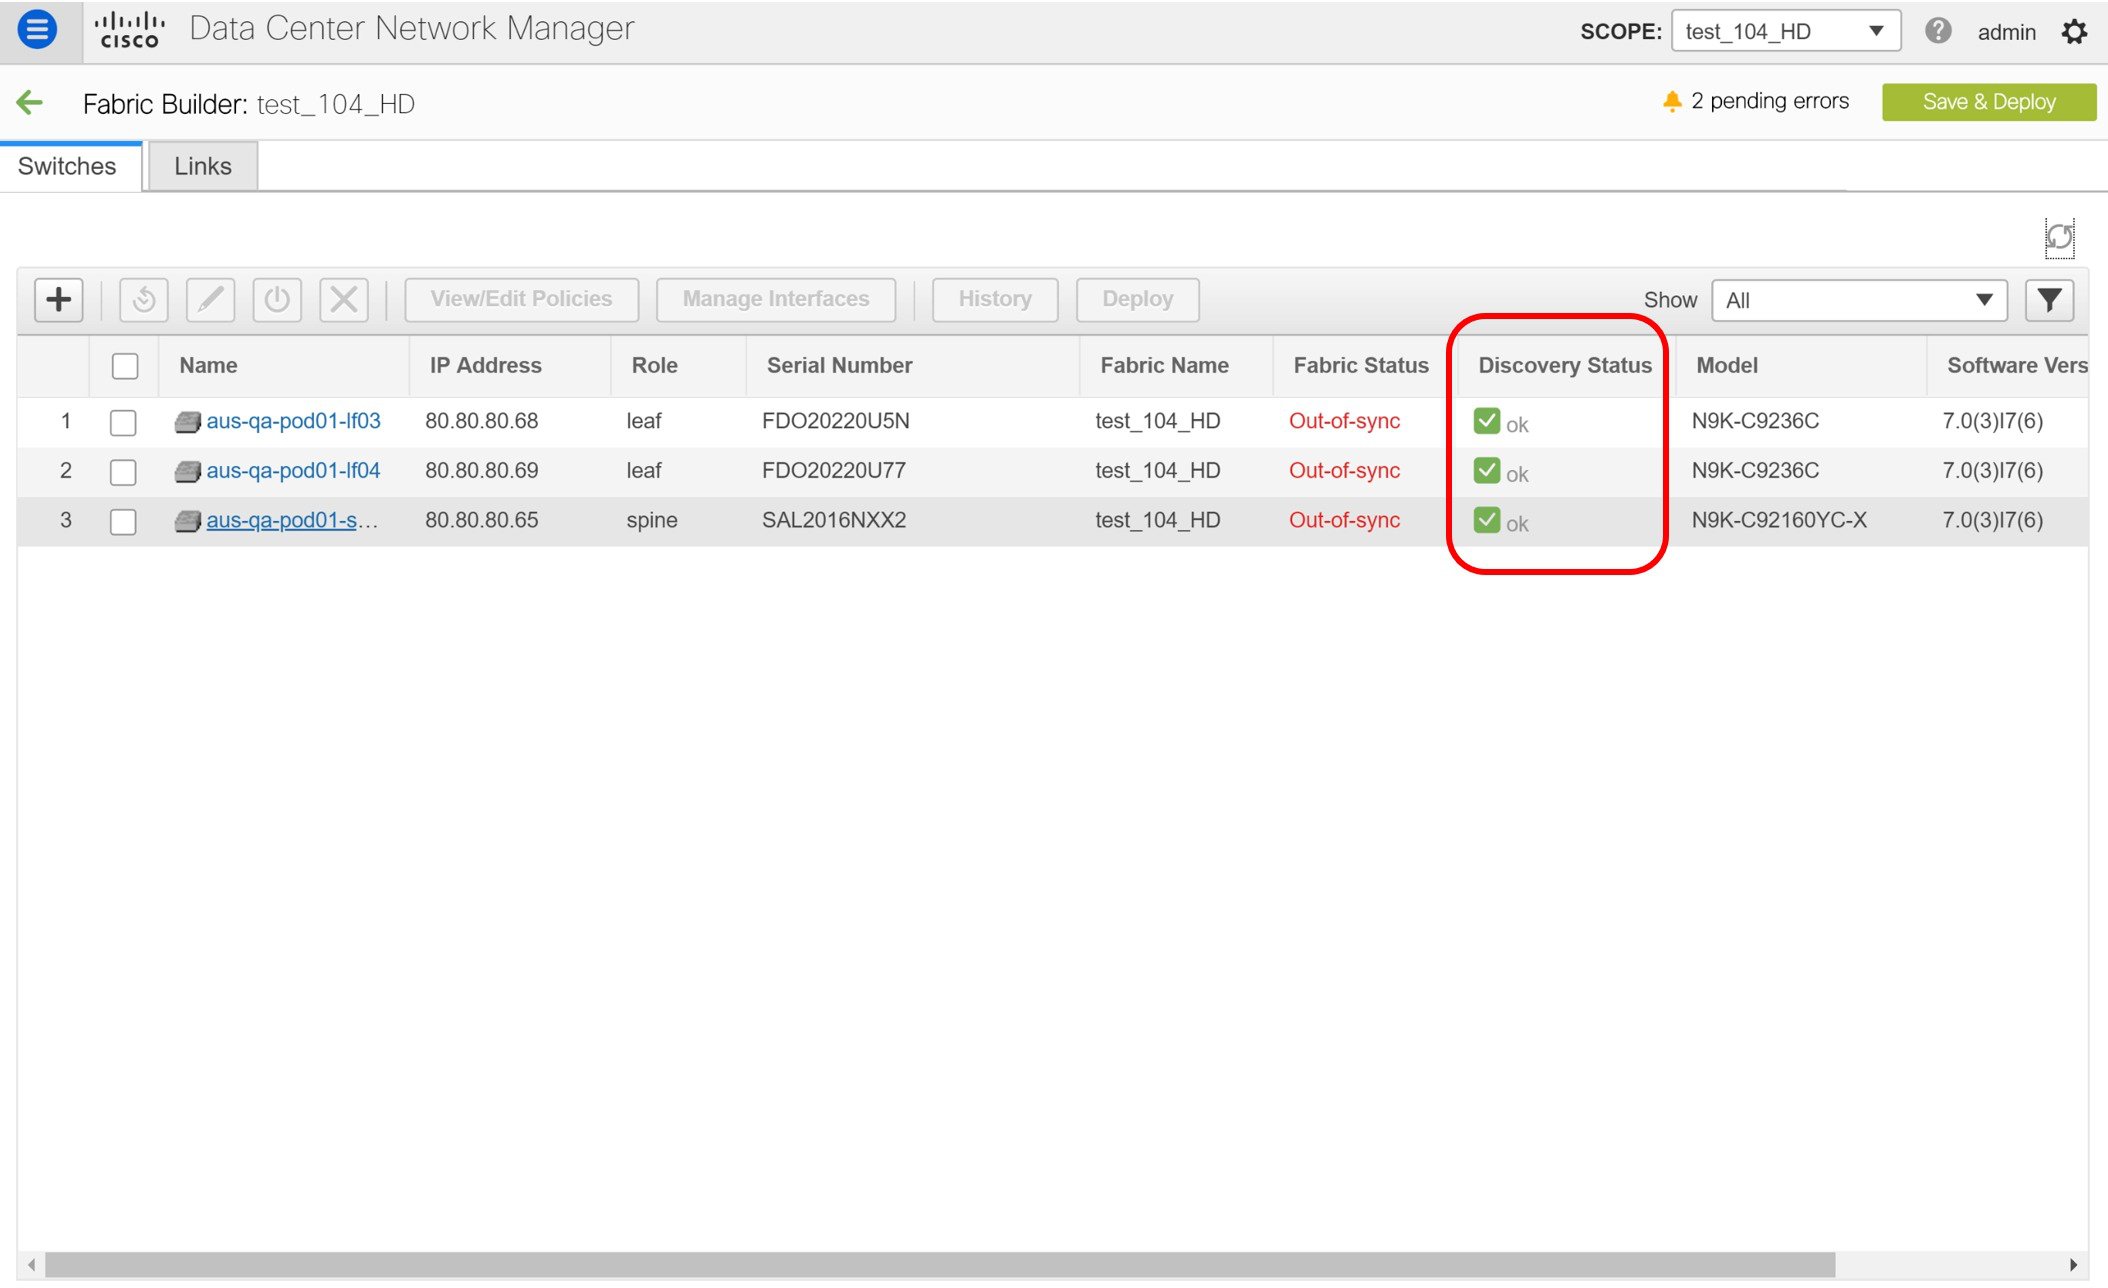
  4. Wait for the switches to complete the reload operation. Click Tabular view under the Actions menu to view the status of the switches.

  5. (Optional) Rediscovery of the reloaded switches occurs every 5 minutes. If you want to manually rediscover switches, select the switches and click the Rediscover switch icon.


    Note


    Click the Refresh icon to refresh the Fabric Builder window and see the updated discovery status of switches.


  6. Check the Discovery Status of the switches after the reloading and rediscovering operations are completed. Make sure that the status for all the switches is ok.


    Note


    When a switch is in Unreachable discovery status, the last available information of the switch is retained in other columns.


  7. Click Save & Deploy again to sync configurations between the switches and DCNM.

    The Saving Fabric Configuration message comes up immediately. This indicates that overlay and underlay network migration, and switch and port channel settings migration to DCNM is initiated.

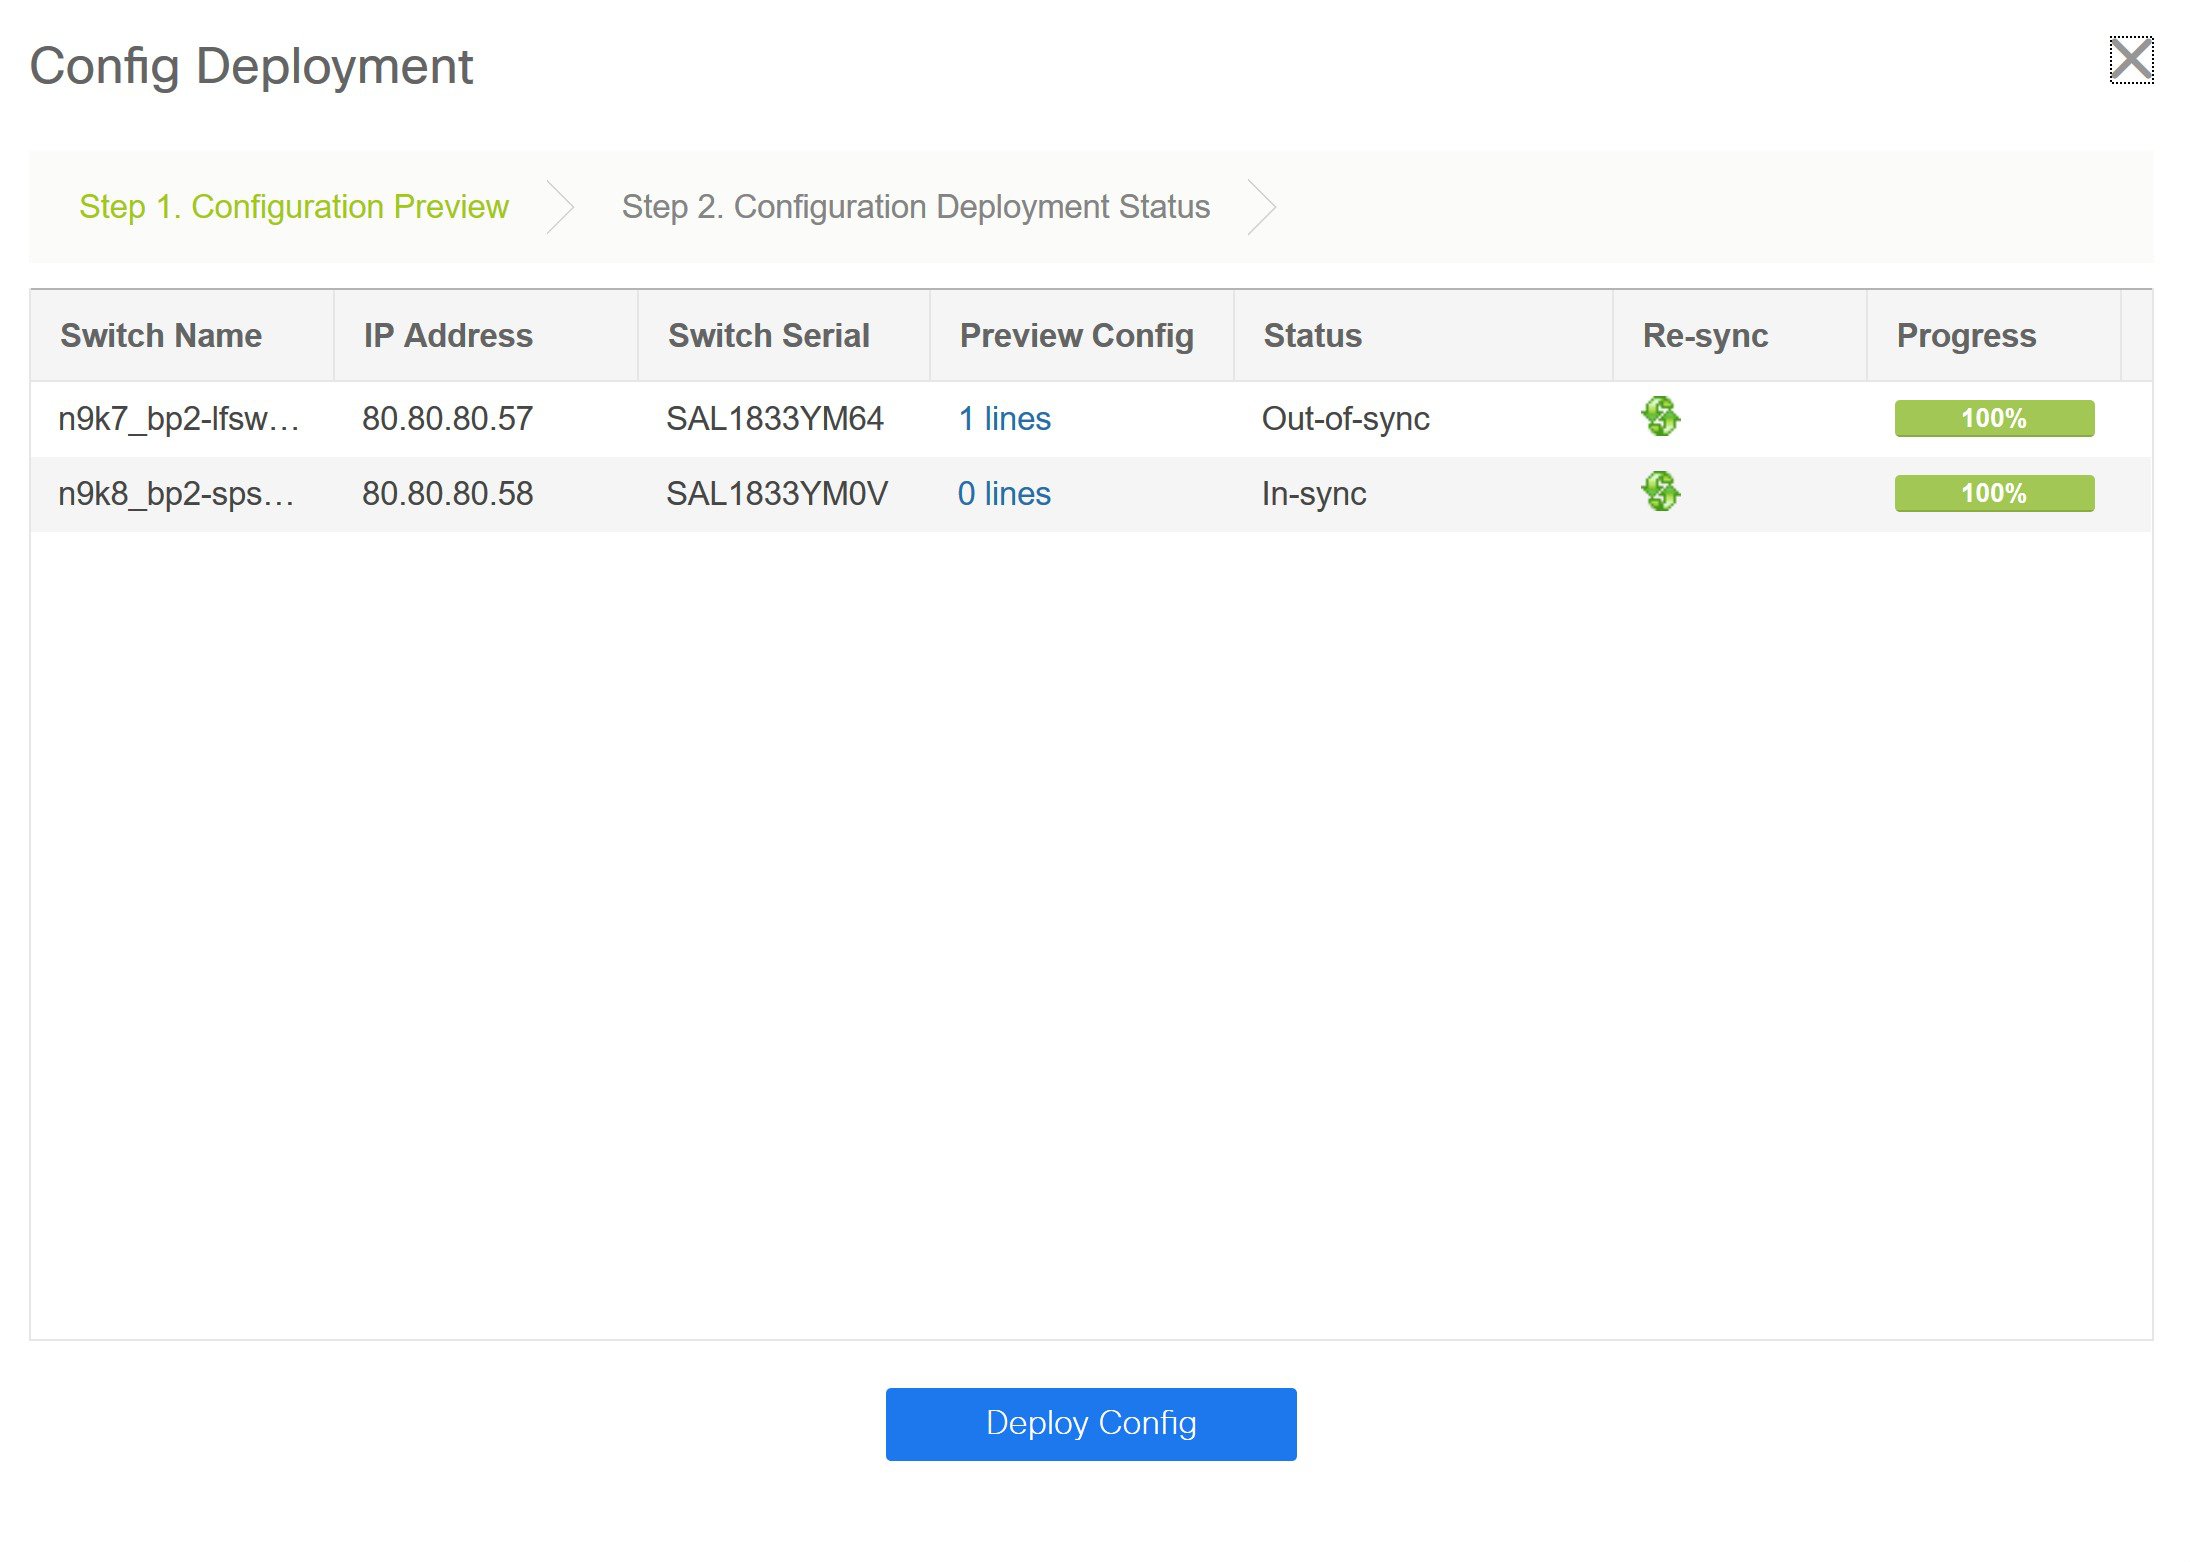
    After the migration of underlay and overlay networks, the Config Deployment window is displayed.

    The Preview Config column is updated with entries denoting a specific number of lines.

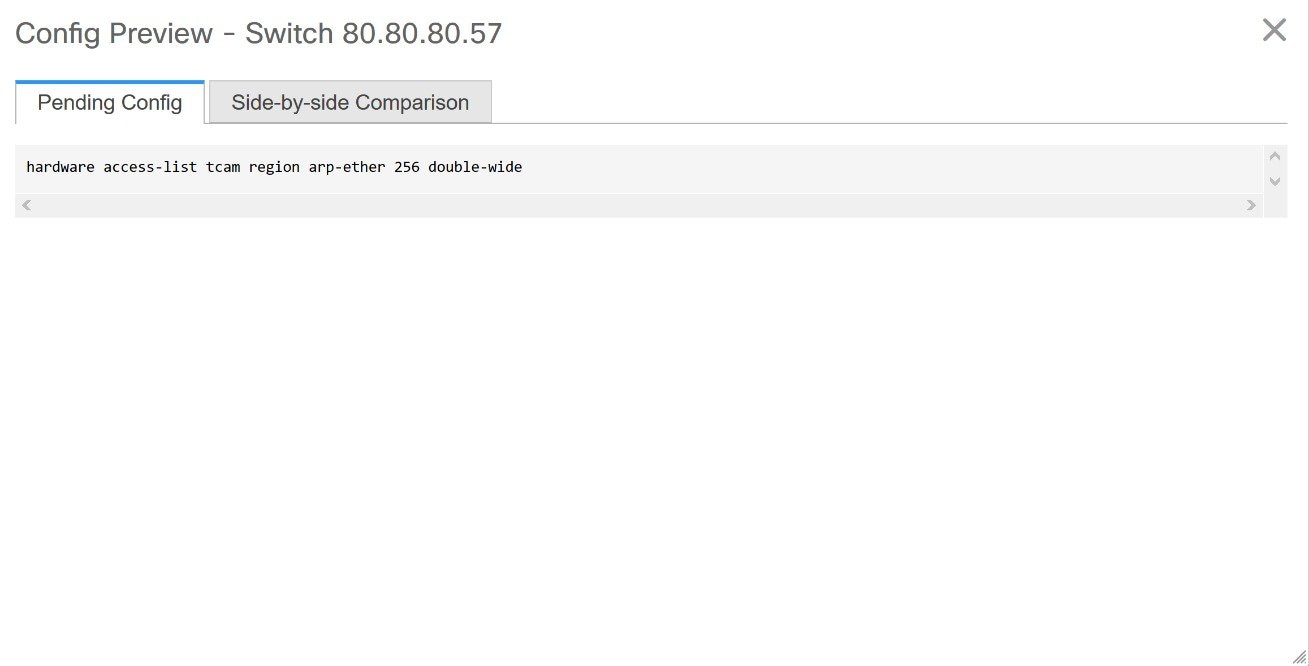
    We strongly recommend that you preview the configuration before proceeding to deploy it on the switches. Click a Preview Config column entry. The Config Preview window is displayed. This window lists the pending configurations on the switch. The Side-by-side Comparison tab displays the running configuration and expected configuration side-by-side.

    Close the Config Preview window.

  8. Click Deploy Config at the bottom part of the Config Deployment window to initiate pending configuration onto the switch. The Status column displays the completion state. For a failed state, investigate the reason for failure to address the issue.

    The progress bar shows 100% for each switch. After correct provisioning and successful configuration compliance, close the Config Deployment window.

    In the fabric topology window, all imported switch instances are displayed in green color, indicating successful configuration. Also, the Migration Mode label is not displayed on any switch icon.

    This completes the migration process of bottom-up VXLAN fabric to DCNM.

    Now, you can add new switches and provision overlay networks for your fabric. For details, refer the respective section in the Fabrics topic in the configuration guide.

You can also verify the migrated networks by following the below steps.

  1. Choose Control > Fabrics > Networks.

  2. Select the fabric from the SCOPE drop-down list in the Networks window.

  3. Check the networks that are migrated from the bottom-up VXLAN fabric and their deployment status.

Resolving Config Compliance Error on Switches with Cisco NX-OS Release 7.0(3)I4(8b) and 7.0(4)I4(x) Images

After brownfield deployment of Cisco Nexus 9300 Series switches and Cisco Nexus 9500 Series switches with X9500 line cards with Cisco NX-OS Release 7.0(3)I4(8b) and 7.0(4)I4(x) images, config compliance difference is displayed. You need to remove the tcam_pre_config_vxlan policy from these switches to resolve the config compliance error.

Resolving Config Compliance Error on Switches Post Brownfield Deployment

The following procedure shows how to remove the tcam_pre_config_vxlan policy from switches after brownfield deployment.

  1. Choose Control > Fabrics > Fabric Builder.

  2. Click the brownfield fabric that contains a Cisco Nexus 9300 Series switch or Cisco Nexus 9500 Series switches with X9500 line cards in the Fabric Builder window.

  3. (Optional) Click Save & Deploy to see the Config Compliance error.

  4. (Optional) Click the entry showing 1 lines under the Preview Config column.

    You can see the TCAM command under the Pending Config tab in the Config Preview window.

    Close the Config Preview window.

  5. Right-click a switch and click View/Edit Policies.

  6. Search for the tcam_pre_config_vxlan policy in the Template search field.

  7. Select the tcam_pre_config_vxlan policy and click the Delete icon to delete the policy.

    Close the View/Edit Policies window.

  8. (Optional) Click Save & Deploy to verify whether there are any pending configs.

Resolving Config Compliance Error on Switches for RMA, and Write Erase and Reload Operations

Perform the following procedure before you perform RMA or Write Erase and Reload operation on Cisco Nexus 9300 Series switches and Cisco Nexus 9500 Series switches with X9500 line cards with the Cisco NX-OS Release 7.0(3)I4(8b) and 7.0(4)I4(x) images.

  1. Choose Control > Fabrics > Fabric Builder.

  2. Click the brownfield fabric that contains the specified switches with Cisco images.

  3. Right-click the switch and click View/Edit Policies.

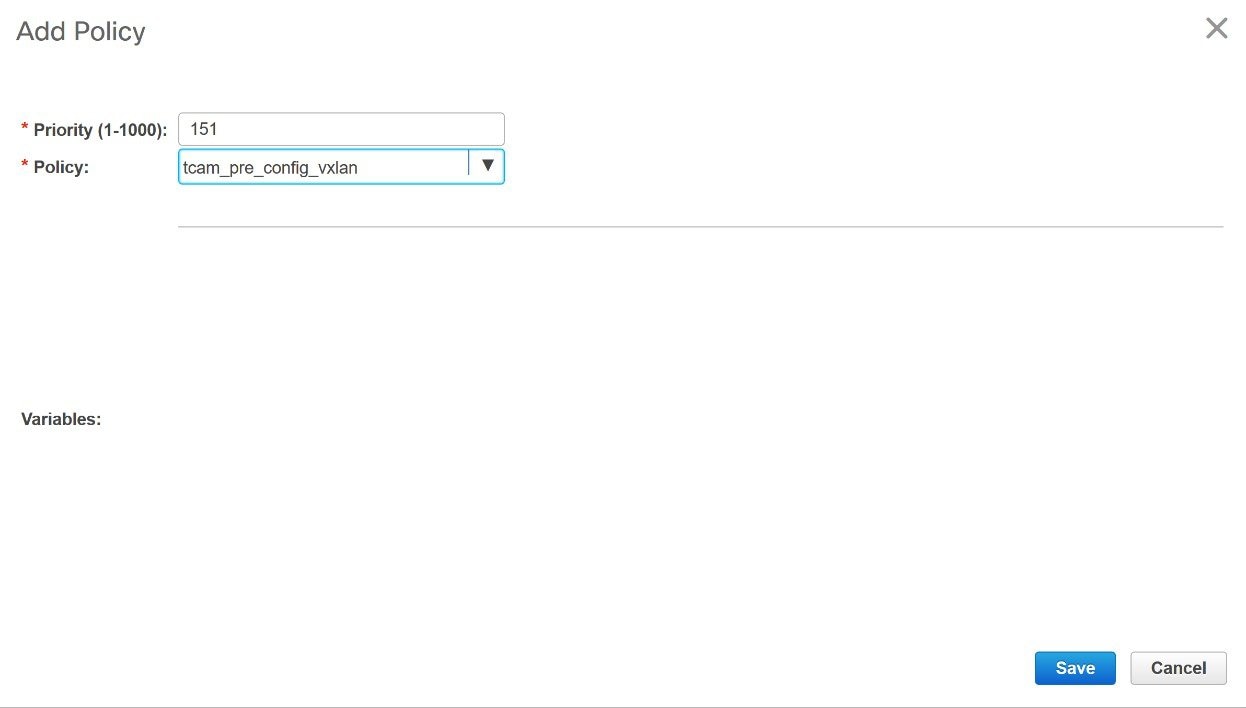
  4. Click the Add icon.

  5. Enter 151 in the Priority (1-1000) field and select tcam_pre_config_vxlan from the Policy drop-down list.

  6. Click Save.

  7. Complete the RMA or Write Erase and Reload operation.

    After the switch is online, it will be Out-of-Sync.

  8. Right-click a switch and click View/Edit Policies.

  9. Search for the tcam_pre_config_vxlan policy in the Template search field.

  10. Select the tcam_pre_config_vxlan policy and click the Delete icon to delete the policy.

    Close the View/Edit Policies window.

Modifying VLAN Names in a Switch with Cisco NX-OS Release 7.0(3)I4(8b) and 7.0(4)I4(x) Images

Post brownfield migration, the VLAN name for the network or VRF is not captured in the overlay profile if at least one of the non-spine switches have the Cisco NX-OS Release 7.0(3)I4(8b) and 7.0(4)I4(x) images.

This procedure shows how to check the VLAN name and modify it.

Procedure


Step 1

Choose Control > Fabrics > Networks.

Step 2

From the SCOPE drop-down list, select a fabric containing the non-spine switches with the Cisco NX-OS Release 7.0(3)I4(8b) and 7.0(4)I4(x) images.

Step 3

Select a check box for a network in the Networks window and click the Edit Network icon.

In the Edit Network window, the Vlan Name field is empty because DCNM has not captured this info in the overlay profile. Instead, the VLAN name is captured in the freeform config associated with the overlay network or VRF.

Note


If a VLAN did not have a name before the brownfield migration, you can add the name in the Vlan Name field in the Edit Network window.

Close the Edit Network window.

Step 4

Click Continue in the Networks window.

Step 5

Double-click a switch in the Topology View window.

Step 6

In the Network Attachment window for a switch, click the Freeform config button under the CLI Freeform column.

Step 7

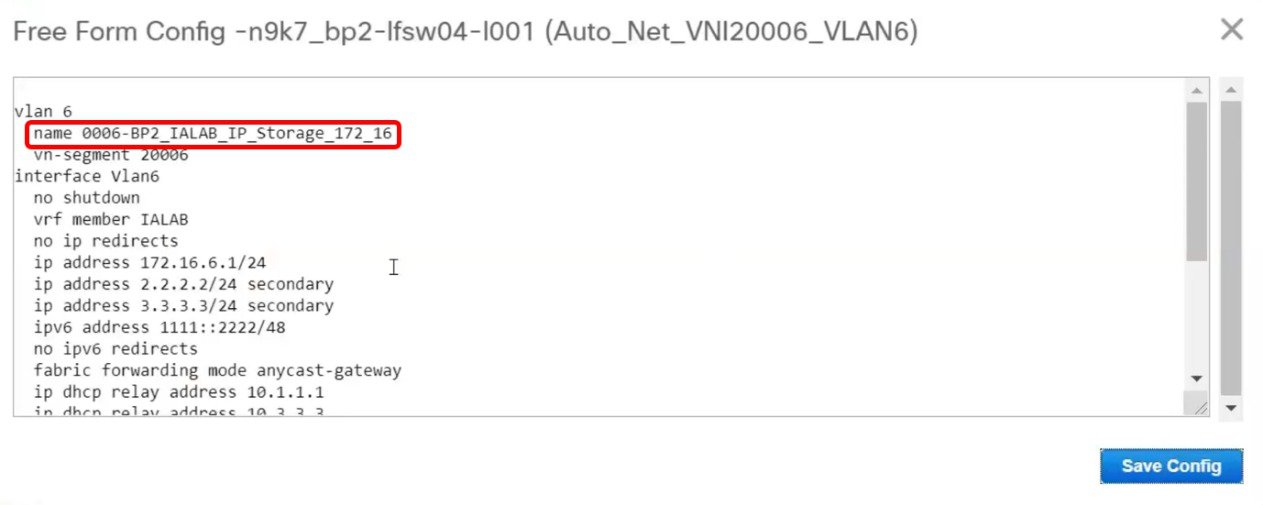
Verify the VLAN name in the Free Form Config window.

Step 8

Modify the VLAN name in the Free Form Config window and click Save Config.

Here is an example:


vlan 6
  name Storage_172_16_Deb
  vn-segment 20006
interface Vlan6
.
.
.

Step 9

Click Save in the Network Attachment window.

Step 10

Click Deploy in the Networks window.

The modified VLAN name in the selected network is deployed on the switch.


Changing a Brownfield Imported BIDIR Configuration

This procedure shows how to change a brownfield imported BIDIR configuration to use the configuration generated by Fabric Builder.

Procedure


Step 1

Choose Control > Fabrics > Networks.

Step 2

Click the brownfield fabric.

Step 3

Click Tabular View under the Actions Panel in the Fabric Builder window.

Step 4

Select all the devices and click the View/Edit Policies icon.

Step 5

Delete the following policies for all the devices in the View/Edit Policies window

  • base_pim_bidir_11_1

  • If there is 1 RP in the fabric, delete the rp_lb_id policy.

    If there are 2 RPs in the fabric, delete the phantom_rp_lb_id1 and phantom_rp_lb_id2 policies.

Step 6

Close the View/Edit Policies window.

Step 7

Click the Manage Interfaces button in the Fabric Builder window.

Step 8

Delete all the RP loopback interfaces in the Interfaces window and close this window.

Step 9

Click Save & Deploy in the Fabric Builder window.

This action generates a new set of BIDIR-related configuration based on the fabric settings for the devices.


Manually Adding PIM-BIDIR Configuration for Leaf or Spine Post Brownfield Migration

After brownfield migration, if you add new spine or leaf switches, you should manually configure the PIM-BIDIR feature.

The following procedure shows how to manually configure the PIM-BIDIR feature for a new Leaf or Spine:

Procedure


Step 1

Check the base_pim_bidir_11_1 policies that are created for an RP added through the brownfield migration. Check the RP IP and Multicast Group used in each ip pim rp-address RP_IP group-list MULTICAST_GROUP bidir command.

Step 2

Add respective base_pim_bidir_11_1 policies from the View/Edit Policies window for the new Leaf or Spine, push the config for each base_pim_bidir_11_1 policy.


Migrating an MSD Fabric with Border Gateway Switches

When you migrate an existing MSD fabric with a border gateway switch into DCNM, make sure to note the following guidelines:

  • Uncheck all Auto IFC creation related fabric settings. Review the settings and ensure they are unchecked as follows:

    • Easy_Fabric_11_1 fabric

    • MSD_Fabric_11_1 fabric

  • Underlay Multisite peering: The eBGP peering and corresponding routed interfaces for underlay extensions between sites are captured in switch_freeform and routed_inerfaces, and optionally in the interface_freeform configs. This configuration includes all the global configs for multisite. Loopbacks for EVPN multisite are also captured via the appropriate interface templates.

  • Overlay Multisite peering: The eBGP peering is captured as part of switch_freeform as the only relevant config is under router bgp.

  • Overlays containing Networks or VRFs: The corresponding intent is captured with the profiles on the Border Gateways with extension_type = MULTISITE.

  1. Create all the required fabrics including the Easy_Fabric_11_1 and External_Fabric_11_1 fabrics with the required fabric settings. Disable the Auto VRF-Lite options as mentioned above. For more information, refer to Creating VXLAN EVPN Fabric and External Fabric sections.

  2. Import all the switches into all the required fabrics and set roles accordingly.

  3. Click Save & Deploy in each of the fabrics and ensure that the Brownfield Migration process reaches the 'Deployment' phase. Now, do not click Deploy Config.

  4. 4. Create an MSD_Fabric_11_1 fabric with the required fabric settings and disable the Auto MultiSite IFC options as shown in Guidelines. For more information, see Creating an MSD Fabric in Cisco DCNM LAN Fabric Configuration Guide.

  5. Move all the member fabrics into the MSD. Do not proceed further till this step is completed successfully. For more information, see Moving the Member1 Fabric Under MSD-Parent-Fabric in Cisco DCNM LAN Fabric Configuration Guide.


    Note


    The Overlay Networks and VRFs definitions in each of the Easy Fabrics must be symmetric for them to get added successfully to the MSD. Errors will be reported if any mismatches are found. These must be fixed by updating the overlay information in the fabric(s) and added to the MSD.


  6. Create all the Multisite Underlay IFCs such that they match the IP address and settings of the deployed configuration. Navigate to Tabular View and edit the IFC links.

    Below is an example IFC Edit Link window.


    Note


    Additional interface configurations must be added to the Source/Destination interface freeform fields in the Advanced section as needed.


    For more information, see Configuring Multi-Site Overlay IFCs.

  7. Create all the Multisite Overlay IFCs such that they match the IP address and settings of the deployed configuration. You will need to add the IFC links. For more information, see Configuring Multi-Site Overlay IFCs.

  8. If there are VRF-Lite IFCs also, create them as well.


    Note


    If the Brownfield Migration is for the case where Configuration Profiles already exist on the switches, the VRF-Lite IFCs will be created automatically in Step #3.


  9. If Tenant Routed Multicast (TRM) is enabled in the MSD fabric, edit all the TRM related VRFs and Network entries in MSD and enable the TRM parameters.

    This step needs to be performed if TRM is enabled in the fabric. If TRM is not enabled, you still need to edit each Network entry and save it.

  10. Now click Save & Deploy in the MSD fabric, but, do not click Deploy Config.

  11. Navigate to each member fabric, click Save & Deploy, and then click Deploy Config.

This completes the Brownfield Migration. You can now manage all the networks or VRFs for BGWs by using the regular DCNM Overlay workflows.

When you migrate an existing MSD fabric with border gateway switches (BGW) that has a Layer-3 port-channel for Underlay IFCs, make sure to do the following steps:


Note


Ensure that the child fabrics are added into MSD before migrating an MSD fabric.


  1. Click on appropriate MSD child fabric and navigate to Fabrics > Interfaces to view the BGW. Choose an appropriate Layer-3 port channel to use for underlay IFC.

  2. On Policy column, choose int_port_channel_trunk_host_11_1 from drop-down list. Enter the associated port-channel interface members and then click Save.

  3. Navigate to the Tabular view of the MSD fabric. Edit layer-3 port link, choose the multisite underlay IFC link template, enter source and destination IP addresses. These IP addresses are the same as existing configuration values on the switches

  4. Do the steps from step 7 to 11 from above procedure.