Cisco EPN Manager 8.0 Installation

This chapter provides the information required for planning your installation of Cisco EPN Manager 8.0, ensuring you meet all necessary prerequisites. It includes detailed procedures for installing Cisco EPN Manager 8.0 in a standard, non-high availability environment. For high availability installation procedures, please refer to Cisco EPN Manager High Availability Installation.

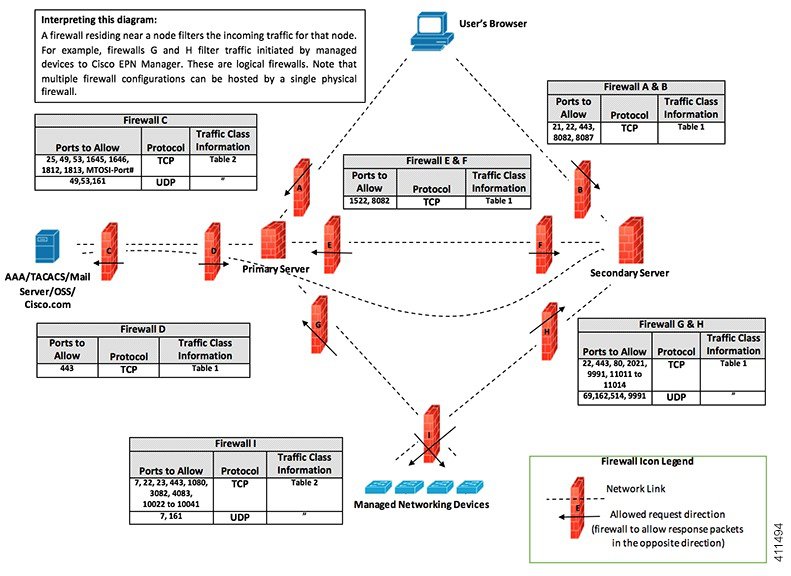
Installation Overview

Cisco EPN Manager 8.0 can be installed as a fresh installation on a virtual machine. If you are already using a previous version of Cisco EPN Manager, you can upgrade to Cisco EPN Manager 8.0, and thereby retain your data.

The following topics provide an overview of the Cisco EPN Manager 8.0 installation and upgrade options and provide additional installation-related information.


Note


After installing any release or maintenance pack, it is recommended to check the Software Download site on Cisco.com for point patches and to install the latest available point patch for that release or maintenance pack. Information about the point patch and installation instructions can be found in the readme file that is supplied with the patch file on Software Download site on Cisco.com.

Installation Options

VMWare VM Installation

You can install Cisco EPN Manager 8.0 on a virtual machine (VM). VM installation includes installation of the Open Virtual Appliance (OVA) file on a dedicated server that complies with the requirements listed in OVA/VM Requirements. We recommend that you run only one Cisco EPN Manager VM instance per server hardware.


Note


To install Cisco EPN Manager on non-Cisco hardware, use VMware and install the OVA file. Using VMware will minimize hardware non-compliance issues, however, you must ensure that your hardware has the resources required to allow provisioning of the VM.

OVA Installation

The OVA (Open Virtualization Archive) installation package for Cisco EPN Manager simplifies the deployment process by bundling all necessary components into a single file. This requires:

  • Red Hat Enterprise Linux 8.9 as the underlying operating system.

  • Oracle Database 19c Enterprise Edition: Serves as the database management system for Cisco EPN Manager.


Note


Cisco EPN Manager does not support independent user-installed Linux/Oracle patches. Any necessary patches are included in Cisco EPN Manager releases or point patches.

Firmware Upgrade

Cisco EPN manager does not support Firmware or any product upgrades. If you need any support on the upgrades, please contact your Cisco Advanced Services representative.

Upgrade Options

You can upgrade to Cisco EPN Manager 8.0 by following the valid upgrade path relevant for your existing deployment. See Valid Upgrade Paths.

Backup-Restore Upgrade—This requires new hardware (although it is possible to use an existing hardware). There is less downtime when performing this upgrade as the current version of Cisco EPN Manager remains operational while you install the new version on the new hardware. However, after the installation, you must restore your data from a backup. After starting the restore process, there will be a period during which some data will not be available on the new server until all the data has been copied over. For more information, see Backup-Restore Upgrade.


Note


Cisco EPN Manager does not support automatic rollback to the previous version after an upgrade but you can manually revert to the previous version. See Revert to the Previous Version of Cisco EPN Manager for more information.

Users Created During Installation

The following types of users are created during the installation process:

  • Cisco EPN Manager CLI admin user—Used for advanced administrative operations such as stopping and restarting the application, and creating remote backup repositories. Provides access to the Cisco EPN Manager Admin CLI, a Cisco proprietary shell which provides secure and restricted access to the system (as compared to the Linux shell).

    The password for the CLI admin user is user defined during installation but can be changed at a later stage by entering the following command:
    
    admin# change-password
    
  • Linux CLI admin user—Used for Linux-level administration purposes. Provides access to the Linux CLI, a Linux shell which provides all Linux commands. The Linux shell should only be used by Cisco technical support representatives. Regular system administrators should not use the Linux shell. The Linux shell can only be reached through the Cisco EPN Manager admin shell and CLI. The Linux CLI admin user can get Linux root-level privileges, primarily for debugging product-related operational issues. The user can be named differently than admin during initial installation.

  • Cisco EPN Manager web GUI root user—Required for first-time login to the web GUI, and for creating other user accounts. The root user password is user-defined at the time of installation.

  • ftp-user—Used for internal operations like image distribution to device or other operations that access external servers using FTP. The password is randomly generated and is changed periodically. Users with Admin privileges can change the ftp user password but this user-defined password will expire after a few months. Use this command to change the ftp user password:

    
    admin# ncs password ftpuser username password password
    
  • scpuser—Used for internal operations like image distribution to device or other operations that access external servers using SCP. The password is randomly generated and is changed periodically.

  • prime—The system-generated account under which all the application processes run. No changes can be made.

  • oracle—The system-generated account used by the Oracle process. No changes can be made.


Note


The first four user accounts are associated with actual network users. Cisco EPN Manager uses the scpuser, prime, and oracle user accounts to perform internal operations and they cannot be changed in any way.

For more information about user types and managing users, see the User Permissions and Device Access section in the Cisco Evolved Programmable Network Manager 8.0 User and Administrator Guide.

System Requirements

The following sections list the requirements that must be met before installing Cisco EPN Manager 8.0:

OVA/VM Requirements

The following table summarizes the OVA/VM system requirements:

Server Type

Item

Extended

Professional

Virtual Machine

VMWare ESXi version

Note


Installations using an OVA image are supported on VMWare ESXi, on your own hardware. In all cases your server must meet or exceed the requirements listed in this table.

6.7, 7.0.1, 8

6.7, 7.0.1, 8

Appliance image format

OVA

OVA

Hardware

Virtual CPU (vCPU)

24

16

Memory (DRAM)

128 GB

64 GB

Disk Capacity

Note


Reported disk size does not consider RAID configurations.

4 TB

2.8 TB

Disk I/O speed

Minimum: Greater than 900 MBPS Full Scale: Greater than 1150 MBPS

Minimum: Greater than 700 MBPS Full Scale: Greater than 900 MBPS

  • Extended: Recommended for scale network configuration in production environments.

  • Professional: Recommended for nonscale network configuration in production environments.

It is not recommended to use the Very-Large profile. It is intended to be used only when requested by Cisco TAC and not to be used in standard installations.


Note


External storage is supported for OVA/VM installations.


Web Client Requirements

The client and browser requirements for the Cisco EPN Manager Web GUI are:

  • Hardware—Use a Mac or Windows laptop/desktop with one of these supported browsers:

    • Google Chrome (version 70 or later)

    • Mozilla Firefox ESR (version 78)

    • Mozilla Firefox (version 70 or later)


    Note


    You can have up to three Cisco EPN Manager tabs open simultaneously in a single browser session.
  • Recommended display resolution—1600x900 pixels or higher (minimum: 1366x768).

To enhance loading speed and reduce network bandwidth usage, Cisco EPN Manager now caches static files such as JavaScript and CSS in the Firefox browser. These files are cached for the same version of Cisco EPN Manager, ensuring faster access and improved performance.


Note


Google Chrome ignores all caching directives and reloads page content because of known limitations regarding self-signed certificates.

Ports Used by Cisco EPN Manager

Table 1 lists the ports that Cisco EPN Manager uses for connection requests from devices. For security hardening, this table also specifies whether it is safe to disable the port without any adverse effects to the product.

As a general policy, any ports that are not needed and are not secure should be disabled. You must first know which ports are enabled, and then decide which of these ports can be safely disabled without disrupting the normal functioning of Cisco EPN Manager. You can do this by listing the ports that are open and comparing it with a list of ports that are safe to disable. The built-in firewall in Cisco EPN Manager does not expose some of the listening ports. To view a list of the ports used in your deployment, log in as a Cisco EPN Manager CLI admin user and run the show security-status command.

In addition to the built-in firewall, you can also deploy additional network firewalls to block other unused ports and their traffic.


Note


The installation process uses the server's eth0 and eth1 Ethernet ports. If you use a different port, the system might not work properly.
Table 1. Listening Ports That Are Open Through Built-in Firewall

Port

Protocol

Usage

Safe to Disable?

Notes

21

TCP

To transfer files to and from devices using FTP.

Yes

Disable FTP from the web GUI under Administration > Settings > System Settings, then choose General > Server. After disabling FTP, as the CLI admin user, stop and restart the server.

22

TCP

To initiate SSH connections with the Cisco EPN Manager server, and to copy files to the Cisco EPN Manager server using SCP or SFTP.

Depends

Only if alternative protocols like SCP or SFTP or HTTPS are used for image distribution, and if supported by the managed devices.

69

UDP

To distribute images to devices using TFTP.

Depends

This might be still needed by older managed devices that only support TFTP and not SFTP or SCP.

162

UDP

To receive SNMP traps from network devices.

No

443

TCP

For browser access to the Cisco EPN Manager server via HTTPS.

No

514

UDP

To receive syslog messages from network devices.

No

1522

TCP

For High Availability (HA) communication between active and standby Cisco EPN Manager servers.

Used to allow Oracle JDBC traffic for Oracle database synchronization.

Yes

If at least one Cisco EPN Manager server is not configured for HA, this port is automatically disabled.

2021

TCP

To distribute images to devices using FTP.

No

8082

TCP

For the HA Health Monitor web interface (via HTTP).

Used by primary and secondary servers to monitor their health status via HTTP.

No (If HA configured)

8085

TCP

Used by the Health Monitor process to check network bandwidth speed between primary and secondary servers,when the user executes readiness test under high availability.

No (If HA configured)

8087

TCP

To update software on the HA secondary backup server (uses HTTPS as transport).

No

9991

UDP

To receive Netflow data packets.

Yes

Cisco EPN Manager does not support Netflow. You should disable this traffic in the network firewall.

9992

TCP

To manage M-Lync using HTTP or HTTPS.

Yes

Cisco EPN Manager does not support M-Lync. You should disable this traffic in the network firewall.

11011 to 11014

TCP

For PnP operations for proprietary Cisco Network Service (CNS) protocol traffic.

Yes

Cisco EPN Manager does not support PnP. You should disable this traffic in the network firewall by entering the following commands in this sequence (as the Cisco EPN Manager CLI admin user):

ncs pnp-gateway disable

ncs stop

ncs start

The following table lists the destination ports on external devices that may be protected by a firewall. These ports are used by Cisco EPN Manager to connect to network devices. You must open the required ports to allow Cisco EPN Manager to connect to these devices.

Table 2. Destination Ports Used by Cisco EPN Manager

Port

Protocol

Used to:

7

TCP/UDP

Discover endpoints using ICMP.

22

TCP

Initiate SSH connections with managed devices.

23

TCP

Communicate with managed devices using Telnet.

25

TCP

Send email using an SMTP server.

49

TCP/UDP

Authenticate Cisco EPN Manager users using TACACS.

53

TCP/UDP

Connect to DNS service.

161

UDP

Poll using SNMP.

443

TCP

Upload or download images and perform configuration backup-restore for Cisco NCS 2000 devices using HTTPS.

1522

TCP

Communicate between primary and secondary HA servers (allows Oracle JDBC traffic for Oracle database synchronization between primary and secondary servers).

1080

TCP

Communicate with Cisco Optical Networking System (ONS) and Cisco NCS 2000 series devices using Socket Secure (SOCKS) protocol.

1645, 1646, and 1812, 1813

UDP

Authenticate Cisco EPN Manager users using RADIUS.

3082

TCP

Communicate with Cisco ONS and Cisco NCS 2000 devices using TL1 protocol.

4083

TCP

Communicate with Cisco ONS and Cisco NCS 2000 series devices using secure TL1 protocol.

8082

TCP

Communicate between primary and secondary HA servers to monitor each other's health using HTTPS.

10022 to

10041

TCP

Passive FTP file transfers (for example, device configurations and report retrievals).

RESTCONF TCP port number

TCP

Listen at NBI client connected to the Cisco EPN Manager server (after this port is configured by NBI client system, a registration notification message containing the port number is sent to Cisco EPN Manager server); refer to the RESTCONF API guide for more information.

The following figure illustrates the port information listed in the previous tables. Use this illustration to decide on the appropriate firewall configuration (allowing correct incoming traffic) for your network infrastructure. To identify the class of traffic, refer to the Usage column in Table 1 Listening Ports That Are Open Through Built-in Firewall. We recommend that you disable the ports that are used by services that are not supported in Cisco EPN Manager.

Installation Prerequisites

This section provides detailed requirements and conditions that must be met before beginning the installation process. It includes:

  • Licensing: Information on obtaining and configuring the necessary licenses for using Cisco EPN Manager.

  • Prerequisites for OVA/VM Installations: Specific requirements and configurations needed for deploying Cisco EPN Manager as an OVA or in a virtual machine environment, including hardware and software specifications.

  • Verify the OVA Package: Instructions for verifying the integrity and authenticity of the OVA package before installation.

Licensing

Cisco EPN Manager includes a 90-day trial license that is automatically activated for first-time installations. To use the application beyond the trial period, you must obtain and install the necessary Cisco EPN Manager licenses for production and non-production environments, as follows:

For a production environment:

  • The Right-to-Use (RTU) License, also known as the base license (required)

  • Standby (SBY) license (optional)—Obtain this license if you have a high availability deployment with two Cisco EPN Manager servers configured in a redundancy configuration.

  • Device Right-to-Manage (RTM) licenses—For management of specific types and corresponding numbers of devices.

For a non-production environment (for example, lab validation or development environment), please obtain and install a Cisco EPN Manager lab license for each Cisco EPN Manager lab installation. The lab license covers all Cisco EPN Manager options, including redundancy (HA), and unlimited right-to-manage scope.

To purchase Cisco EPN Manager licenses, please contact your local sales representative.

For more information on the types of licenses available for Cisco EPN Manager, see the Licenses and Software Updates section in the Cisco Evolved Programmable Network Manager 8.0 User and Administrator Guide.

Prerequisites for OVA/VM Installations

Before installing Cisco EPN Manager, ensure that:

  • Your deployment meets the general hardware and software requirements listed in System Requirements.

  • Hardware resources are reserved for the Cisco EPN Manager server to ensure optimal performance. CPU minimum clock is 2.2 Ghz per CPU.

  • VMware ESXi is installed and configured on the machine you plan to use as the Cisco EPN Manager server. Ensure that the installed VMware ESXi host is reachable.

  • The Cisco EPN Manager OVA is saved to the same machine where vSphere web interface is launched.

  • Verify the downloaded OVA package as described in Verify the OVA Package.

Verify the OVA Package

Before installing Cisco EPN Manager, you must verify the OVA package. You do not need to verify the individual UBF files that are bundled inside the OVA package.

Procedure


Verify the publisher and certificate chain using the VMware vSphere client.

  1. Verify that Cisco Systems is the publisher:

    1. In the VMware vSphere client, choose File > Deploy OVF Template.

    2. Browse to the OVA installation file (*.ova) and select it, then click Next.

    3. Check whether the Publisher field in the OVF Template Details window displays Cisco Systems, Inc with a green check mark next to it. Do not proceed if the Publisher field displays No certificate present. This indicates that the image is not signed or the file is not from Cisco Systems or the file has been tampered with. Contact your Cisco representative.

      Note

       
      Do not validate the image using the information in the Vendor field. This field does not authenticate Cisco Systems as the publisher.
  2. Check the certificate chain:

  3. In the OVF Template Details window, click the Cisco Systems, Inc. hyperlink in the Publisher field.

  4. In the Certificate window, click the Certification Path tab.

  5. In the Certification Path tab (which lists the certificate chain), ensure that the Certification Path area displays Cisco Systems, Inc. and the Certificate Status displays This certificate is OK, as shown in the following figure.


Install Cisco EPN Manager 8.0 (Non-HA) Using an OVA/VM

This section provides instructions for installing Cisco EPN Manager 8.0 in a non-high availability (Non-HA) environment using an Open Virtual Appliance (OVA) or virtual machine (VM). To install:

  1. Ensure that your deployment meets all the criteria specified in System Requirements.

  2. Confirm that all prerequisites listed under Prerequisites for OVA/VM Installations are fulfilled.

  3. Use the VMware vSphere Client to deploy the OVA to your virtual infrastructure. See Deploy the OVA from the VMware cSphere Client.

  4. Configure the system time on the deployed OVA to ensure accurate timekeeping. See Set the System Time of the Deployed OVA

  5. Begin the Cisco EPN Manager setup process following the deployment. See Start Cisco EPN Manager Setup Process.

Deploy the OVA from the VMware vSphere Client

Procedure


Step 1

Launch the VMware vSphere client.

Step 2

Choose File > Deploy OVF Template.

Step 3

In the Deploy OVF Template window, click Browse.

Step 4

Navigate to the OVA file, select it, then click Next.

Step 5

Accept the End User License Agreement, and in the OVF Template Details window, verify the OVA file details including the product name, version, and size, then click Accept.

Step 6

In the Name and Location window:

  1. Specify a name and location for the template that you are deploying. The name must be unique within the inventory folder, and can contain up to 80 characters.

  2. Select the configuration type as Professional, Extended, or Very-Large based on your network size (see System Requirements).

  3. Click Next.

Step 7

Select the cluster or host on which to install the OVA, then click Next.

Step 8

Select the destination storage for the OVA to be deployed, then click Next.

Step 9

Select the disk format as Thick Provision Lazy Zeroed, then click Next.

Step 10

Select the network mapping based on the configured IP address, then click Next.

Step 11

In the Ready to Complete window:

  1. Verify your selections.

  2. (Optional) If you want the virtual machine to automatically start after the OVA deployment has finished, check the Power on after deployment check box.

  3. Click Finish.

This process might take a few minutes to complete. Check the progress bar in the Deploying Virtual Application window to monitor the task status. When the deployment task has successfully completed, a confirmation window appears.

Step 12

Click Close. The virtual appliance that you deployed is listed under the host, in the left pane of the VMware vSphere client.


Set the System Time of the Deployed OVA

Procedure


Step 1

In the VMware vSphere client, select the VM in the left pane.

Step 2

Access the Boot Settings options (Edit Settings>VM Options> Boot Settings.

Step 3

Select the check box in the Force BIOS Setup area so that the BIOS setup screen will appear the next time the VM boots.

Step 4

Click Save.

Step 5

Boot the VM.

Step 6

In the BIOS setup screen, set the system time and date to the current UTC time.

Step 7

Press F10 to save your changes and exit the screen.


Start Cisco EPN Manager Setup Process

Procedure


Step 1

In the VMware vSphere, click the Console tab, and at the local host login prompt, enter setup.

Step 2

Enter the following parameters as you are prompted for them:

Parameter

Description

Hostname

Host name of the virtual machine.

IP Address

IP address of the virtual machine.

IP default netmask

Default subnet mask for the virtual machine IP address.

IP default gateway

IP address of the default gateway.

Default DNS domain

Default DNS domain name.

Primary nameserver

IP address of the primary DNS server.

The console will prompt you to add a secondary nameserver. Enter:

  • Y to enter a secondary nameserver.

  • N to proceed to the next step of the installation.

Another nameserver

IP address of the another DNS server you want to use if the primary server cannot be reached.

Primary NTP server

IP address or host name of the primary Network Time Protocol server you want to use (the default is time.nist.gov).

The console will prompt you to add a secondary NTP server. Enter:

  • Y to enter a secondary NTP server.

  • N to proceed to the next step of the installation.

Another NTP servers

IP address of the another NTP server you want to use if the primary NTP server cannot be reached.

System Time Zone

The time zone you want to use.

Clock time

The clock time (based on the selected System Time Zone). This is the time that will be shown in the machine. Check that the time is correct based on your time zone and change it if necessary.

The console will prompt you to change the system clock time. Enter:

  • Y to change the clock time.

  • N to proceed to the next step of the installation.

Username

The name of the first administrative user (admin by default). This is the Cisco EPN Manager CLI admin user that logs into the Cisco EPN Manager server using SSH.

Password

The password for the first administrative user. The password must be at least 8 characters long, and must contain at least one number and one upper-case letter.

Note


At the time of installation the user must use the IP subnet which is planned to be used for UI access. This IP will be configured on the eth0 interface known as GigabitEthernet0 in the admin CLI.

Step 3

You will be prompted to choose whether you want the newly installed server to act as a secondary server in an HA implementation.

Step 4

Enter a password for the Cisco EPN Manager web GUI root user (you have to enter it twice). You will use this password to log into the web GUI for the first time and create other user accounts. (This account should be disabled after you create a new user account with the same level of privileges.)

Step 5

Review your settings and:

  • If the settings are correct, select Y to apply them.

  • If any settings are incorrect, select N, edit them, and then apply them.


Multi NIC Installation

This section provides guidelines for installing Cisco EPN Manager with multiple network interface cards (NICs). Follow these steps to set up and optimize Cisco EPN Manager in a multi-NIC environment.


Note


For multiple network adapter based systems, ensure that at the time of installation, only a single adapter is enabled (one used for UI). Once the Cisco EPN Manager is installed, power OFF the system, enable the additional network adapters, and power it back ON.

You can also leave only the main interface (one used for UI) wired (connected), install Cisco EPN Manager, and once it starts reconnect the adapters without rebooting the system.


Prerequisites

For a High Availability (HA) environment:

  1. Temporarily disable the existing HA setup to allow additional configuration changes.

  2. Add and configure the new network interface card (NIC) as needed for your deployment.

  3. Re-establish the High Availability configuration by performing the registration process between the primary and secondary servers.

Configure Additional NIC on Primary and Secondary Servers

To add a new network interface card (NIC), enter these configuration commands in the admin CLI for both primary and secondary servers:

storm-ha-194/admin# configure terminal 
Enter configuration commands, one per line. End with CNTL/Z.
storm-ha-194/admin(config)# interface GigabitEthernet 1
storm-ha-194/admin(config-GigabitEthernet)# ip address 172.23.222.32 255.255.255.0
Changing the hostname or IP may result in undesired side effects,
such as installed application(s) being restarted.
Are you sure you want to proceed? [y/n] y
storm-ha-194/admin(config-GigabitEthernet)# end

Add Static Route for Device Subnets on Primary and Secondary Servers

To ensure proper routing for device subnets, enter the following commands to add a static route on both the primary and secondary servers:

storm-ha-194/admin# configure terminal 
Enter configuration commands, one per line. End with CNTL/Z.
storm-ha-194/admin(config)# interface GigabitEthernet 1
storm-ha-194/admin(config-GigabitEthernet)# ip address 172.23.222.32 255.255.255.0
Changing the hostname or IP may result in undesired side effects,
such as installed application(s) being restarted.
Are you sure you want to proceed? [y/n] y
storm-ha-194/admin(config-GigabitEthernet)# end

Remove IP Configuration

To remove the IP configuration, enter the following commands:

storm-ha-194/admin# configure terminal 
Enter configuration commands, one per line. End with CNTL/Z.
storm-ha-194/admin(config)# interface gigabitEthernet 1
storm-ha-194/admin(config-GigabitEthernet)# no ip 172.23.222.32 255.255.255.0

Enable Multi NIC Monitoring

Cisco EPN Manager allows you to add multiple interfaces that can be monitored. Upon registration the configuration of the monitored NICs will be copied into the secondary server and starting this point, the system will monitor the interfaces. If the primary server's monitored interfaces go down, the system performs failover into the secondary server (only if all monitored interfaces are up and running on the secondary server). In case of failback to a new primary server, monitored NICs will be copied to the new primary server. If the primary server and the secondary server have different amount of enabled NICs, registration and failback to fresh primary operations will be prohibited (the system will notify this).

To enable multiple NIC (monitoring) support:

  • Log into the server as the Cisco EPN Manager CLI admin user.

  • Enter the following command to add an interface:

     ncs ha monitor interface add <interface-name> 
  • (Optional) Verify the configuration by running the following command:

    show run
  • In case you want to delete an interface, enter the following command:
    ncs ha monitor interface del <interface-name>

Multi-NIC Server Operation and Failover Handling

Static routes are not automatically migrated during the Backup and Restore process. Therefore, these routes must be manually reconfigured after restoring from a backup. However, when using the Backup Restore Upgrade process, the static route configurations are retained.

In an HA environment:

  • The failure of the first interface, which is used for heartbeat communication between the primary and secondary servers, will trigger a HA failover.

  • Depending on the configuration, the failure of any additional NICs may also trigger a failover. For more details, refer to Enable Multi NIC Monitoring.

Uninstall Cisco EPN Manager (OVA/VM)

Before You Begin

Perform a backup. Uninstalling Cisco EPN Manager will permanently delete all your data on the server, including server settings and local backups. You cannot restore your data unless you have a remote backup. For Backup related information, refer to the Backup and Restore section in the Cisco Evolved Programmable Network Manager User and Administrator Guide.

Procedure


Step 1

In the VMware vSphere client, right-click the Cisco EPN Manager virtual machine.

Step 2

Power off the virtual machine.

Step 3

Click Delete from Disk to remove the Cisco EPN Manager virtual appliance.