Set up Cisco Optical Site Manager

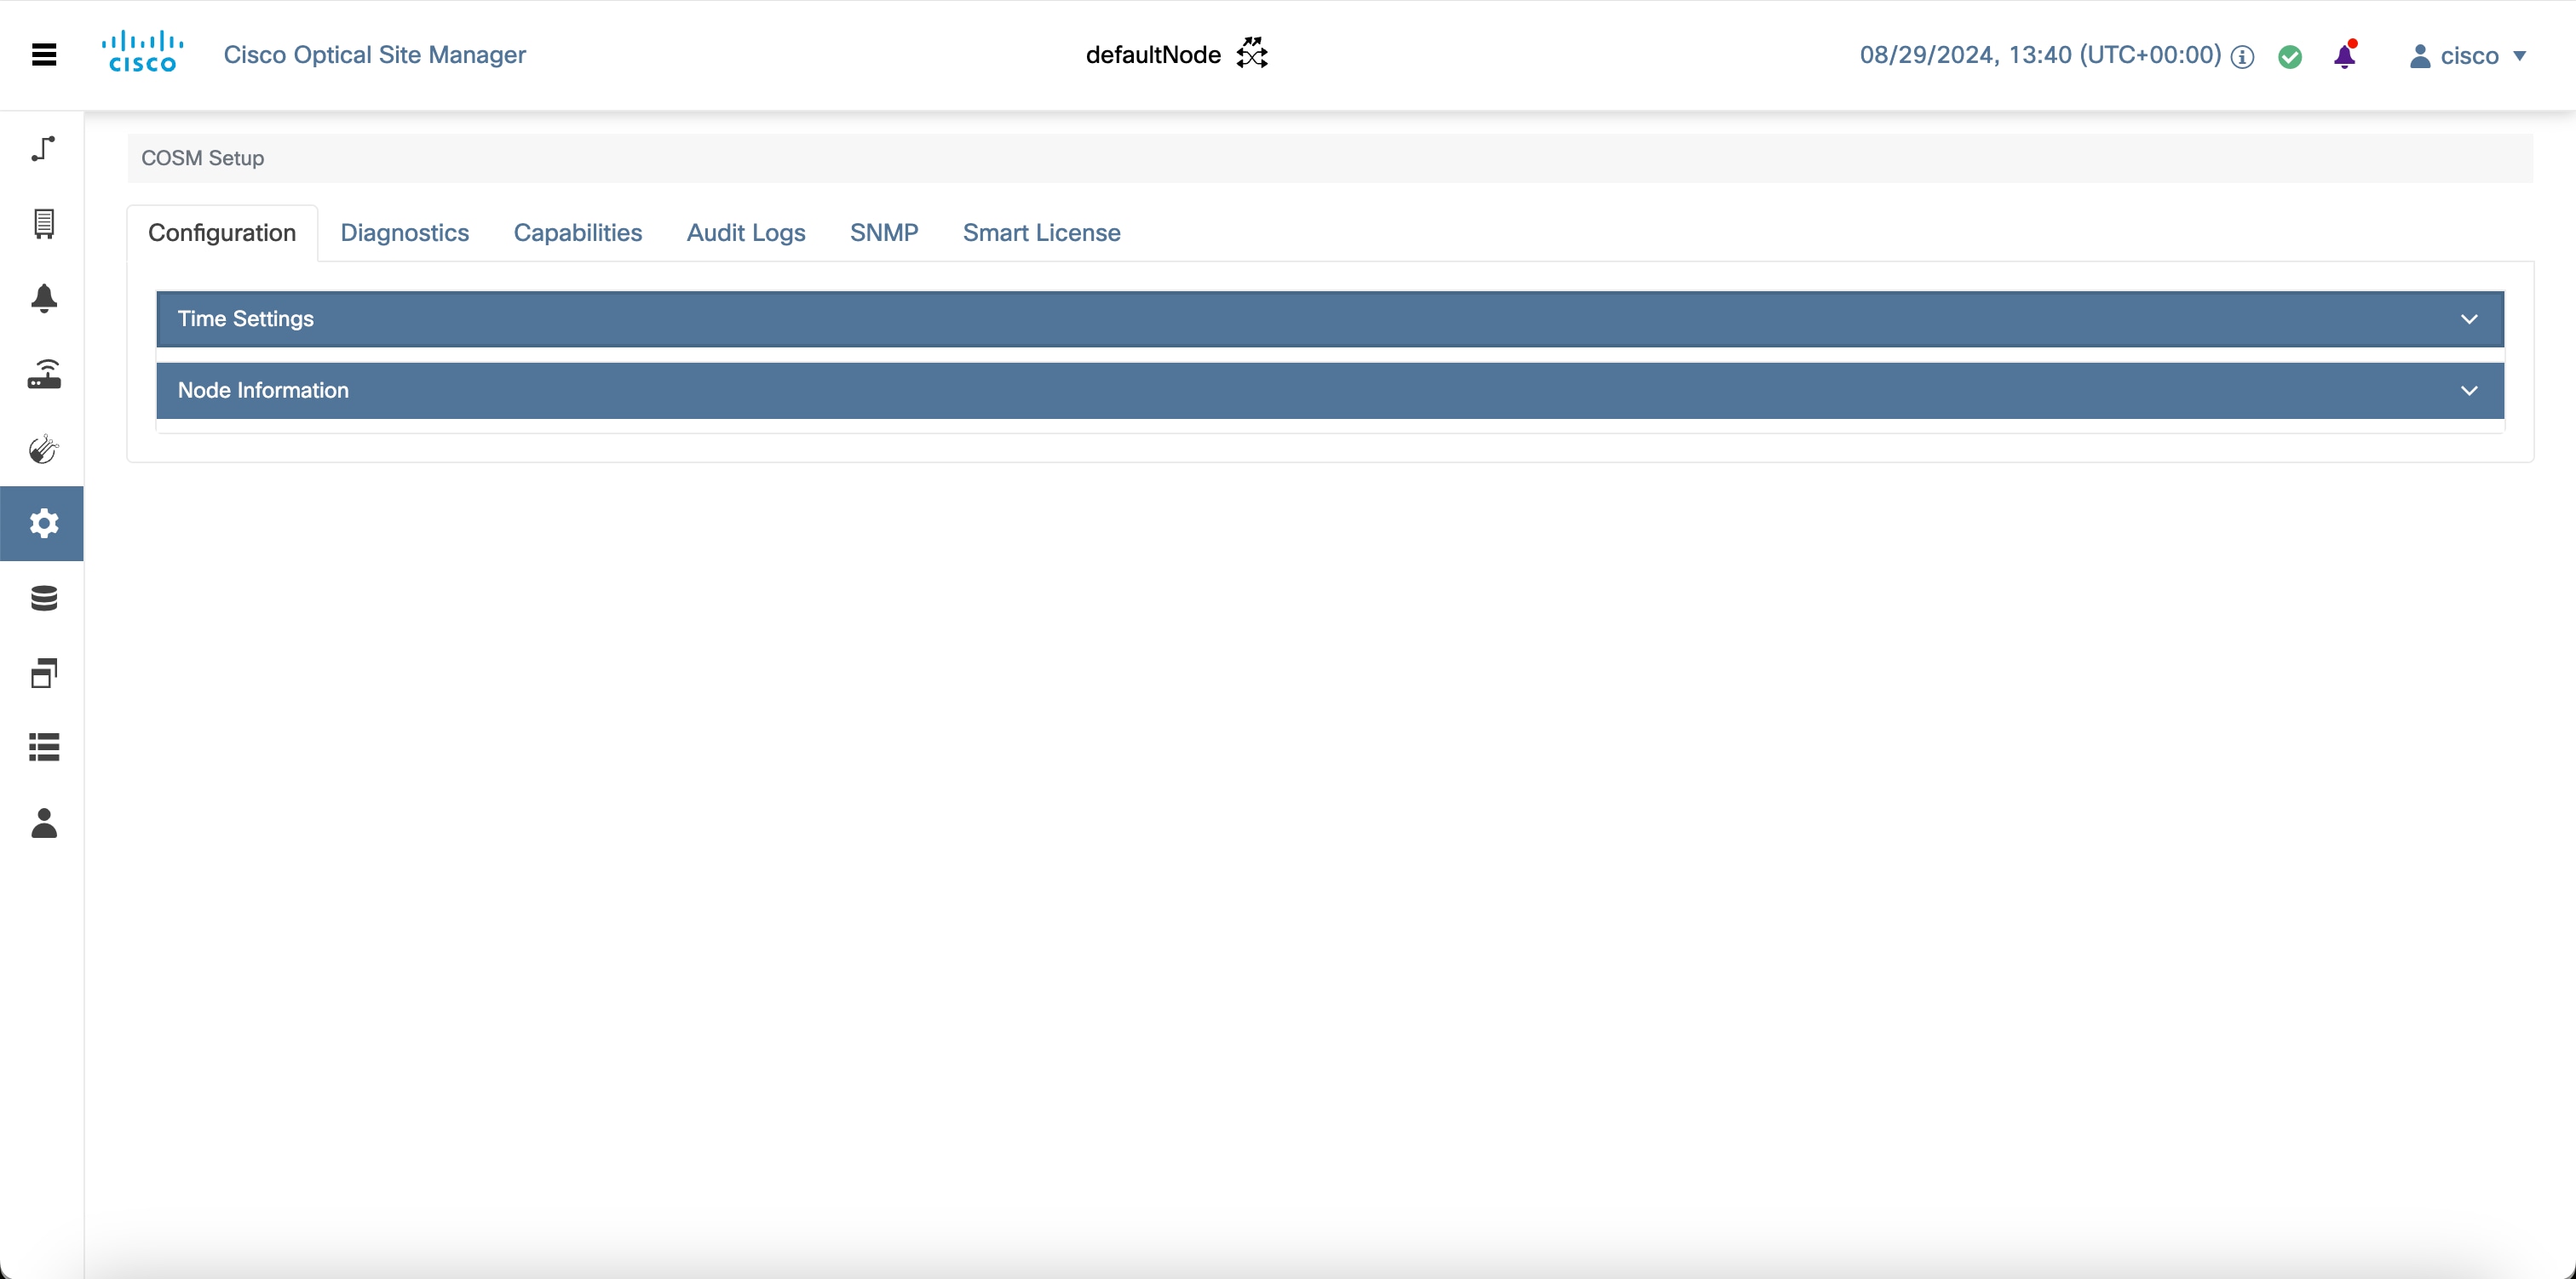
This chapter covers the tasks for configuring the Cisco Optical Site Manager's timezone and node information. Additionally, you'll learn how to view diagnostic and audit logs, as well as configure smart licensing.

Figure 1. Set up Cisco Optical Site Manager

Configure Timezone

Use this task to configure the time zone.

Before you begin

Log into Cisco Optical Site Manager

Procedure


Step 1

Click COSM Setup in the left panel.

Step 2

Click the Configuration tab and then click Time Settings to expand it.

Step 3

Type the name of the city or press space in the Time Zone field and select a time zone from the drop-down list.

Step 4

Click Apply.

A confirmation message appears.

Step 5

Click Yes.


View Cisco Optical Site Manager Diagnostics

Use this task to retrieve and download Cisco Optical Site Manager diagnostics information.

Before you begin

Log into Cisco Optical Site Manager

Procedure


Step 1

Click COSM Setup in the left panel.

The COSM Configuration page appears.

Step 2

Click the Diagnostics tab.

Step 3

To retrieve Cisco Optical Site Manager diagnostic logs, perform these steps:

  1. Select the check boxes for which you want to retrieve the logs.

    Note


    By default, all the check boxes are selected except NCS Callback Log.

    Table 1. Fields Description

    Fields

    Description

    Alarms

    Collects the active alarms

    Audit Logs

    Collects NSO audit logs

    Conditions

    Collects the active conditions

    Admin Logs

    Collects the Admin logs

    Engineer Logs

    Collects all the system software logs

    History Logs

    Collects the alarms history logs

    Inventory Logs

    Collects the hardware inventory logs

    NCS Callback Log

    Collects information about the implementation status and return values of entire NSO data tree

  2. Click Retrieve to retrieve the diagnostics report.

    A confirmation message appears.

  3. Click Yes.

  4. Click Download to download the diagnostics report.

A zip file containing the logs is downloaded.


View Audit Logs

Use this task to retrieve and download Cisco Optical Site Manager audit logs.

Before you begin

Log into Cisco Optical Site Manager

Procedure


Step 1

Click COSM Setup in the left panel.

The COSM Configuration page appears.

Step 2

Click the Audit Logs tab.

Step 3

Select the search criteria from the Search filters section and click Search.

Details of each event including the date, user type, SID and event details are displayed in a table.


Smart Licensing for Cisco Optical Site Manager

Table 2. Feature History

Feature Name

Release Information

Feature Description

Cisco Optical Site Manager Smart Licensing

Cisco IOS XR Release 24.3.1

Cisco Optical Site Manager now supports the smart licensing. It enables you to automate the time-consuming manual licensing tasks and allows you to easily track the status of your license and software usage trends.

This chapter provide information about Smart Licensing (SL) solutions and their deployment on Cisco Optical Site Manager.

Smart Software Licensing is a solution for managing software across the Cisco portfolio and your organization. It provides complete visibility into your software usage and gives you full control over your licensing status.

Efficient Cloud-Based Software Licensing with Smart Licensing

Smart Licensing (SL) is a cloud-based, flexible software licensing model that allows you to activate and manage Cisco software licenses across your organization. This solution enables you to easily track the status of your licenses and software usage trends. Smart Licensing allows pooling of licenses or entitlements that you can use across the entire organization in a flexible and automated manner.

Benefits of Smart Licensing

These are the key benefits of Smart Licensing.

  • Easy activation: establishes a pool of software licenses that can be used across your company.

  • Unified management: provides a complete view into all of your products and services in an user-friendly portal.

  • License flexibility: enables you to transfer licenses as needed easily, because the software is not restricted to a specific hardware.

Key Features of Smart Licensing

These are the key features of Smart Licensing:

  • Direct and proxy registration: registers your device directly with the Cisco Smart Software Manager (CSSM) portal or through a proxy for restricted internet access environments.

  • Centralized management: manages your license inventory using CSSM, simplifying software asset tracking and management.

  • License portability: moves or transfers your licenses easily between devices, offering flexibility in deploying software assets within the organization.

  • Simplified activation: simplifies this process by using a pool of licenses that aren’t tied to a specific device as against Traditional licensing.

  • Automatic license renewal: renews licenses automatically, reducing the administrative burden of tracking license expiration dates and manual renewals.

  • Usage reporting: generates detailed reports on license usage to understand device software consumption, optimizing your license investments.

  • Compliance assurance: provides visibility into license entitlements versus actual usage, helping that you stay compliant.

  • Support for hybrid environments: supports both on-premises and cloud-based environments, allowing for consistent license management across different deployment models.

  • Real-time updates: receives real-time updates from Cisco, ensuring that you have access to the latest features and compliance information.

Deploying Smart Licenses

Smart Licensing solution makes it easier for you to procure, deploy, and manage your license. Cisco Smart Software Manager (CSSM) is your primary licensing server and portal where you can create your smart accounts and manage licenses.

Smart Software Manager On-Prem is your locally installed on-premises user portal that work with CSSM.


Note


For the NCS 1010, the license count is based on the chassis, whereas for the NCS 1014, the license count is based the number of line cards available on Cisco Optical Site Manager application.


Smart Licensing Workflow

These are the stages for deploying Smart Licenses:

Procedure


Step 1

Order licenses

  1. Order your license from Cisco Commerce Workspace (CCW).

  2. Access CSSM and create the smart account and virtual accounts to organize your licenses.

Step 2

Activate licenses.

  1. Select the deployment methods.

  2. Configure the smart license transport mode and register the device with CSSM.

Step 3

Manage licenses.

  1. Generate your report from the device. Synchronize the report with CSSM either automatically or manually.

  2. Monitor the license usage and compliance status through the CSSM portal.


Smart Transport

Devices send usage information directly over the internet to the Cisco Smart Software Manager (CSSM).

Configure Smart Transport method

Before you begin

Create a Token

Use this task to create a new token using Cisco Smart Software Manager.
Procedure

Step 1

Log in to the Cisco Smart Software Manager.

https://software.cisco.com/software/csws/ws/platform/home#SmartLicensing-Inventory

Step 2

Click the Inventory tab, and select your virtual account from the Virtual Account drop-down list.

The Create Registration Token pane appears.

Step 3

Click the General tab, and click New Token.

Step 4

Enter the token description. Specify the number of days the token must be active.

Step 5

Check the Allow export-controlled functionality on the products registered with this token check box.

Step 6

Click Create Token.

Step 7

Copy the token and register Cisco Optical Site Manager with the same token ID.

An example of the token ID: YzY2ZjYyNjktY2NlOS00NTc4LWIxNTAtMjZkNmNiNzMxMTY1LTE2NjAzNjQ3 %0ANzY4Njl8ZVJSckxKN2pFV2tIeHVoMUkxbGxTazFDVm9kc1B5MGlHQmlFWUJi%0Ac3VNRT0%3D%0A


Configure DNS to Access Cisco Optical Site Manager

Provide Domine Name System(DNS) must be configure, as Cisco Optical Site Manager will not be accessible from outside the network.

Procedure

Use this sample configuration to connect to the Cisco Optical Site Manager from your network.

Example:
Config
admin server-information networking dns-configuration dns-server <ipaddress> of DNS
commit
exit

Configuring Smart Transport mode

Use this task to configure Smart Transport Licensing Mode.
Procedure

Step 1

Click Cisco Optical Site Manager Setup in the left pane, and then click Smart License.

Step 2

Click the Configuration to expand it.

Step 3

Under Transport Settings, select the Transport Mode as Smart Transport from the drop-down list.

Go to Smart Transport User Interface Field descriptions for field descriptions.

Step 4

Add https://smartreceiver.cisco.com/licservice/license under Smart Transport URL field.

Step 5

Under the Proxy Setting

  1. Populate these fields.

    1. HTTPS Proxy (Optional)

    2. HTTP Proxy (Optional)

    3. Username (Optional)

    4. Password (Optional)

Step 6

Under Reports Settings, add Reporting Interval (days)

Step 7

Check the Send Hostname check box to receive the hostname information.

Step 8

Check the Send Product Version check box to receive the product version.

Step 9

Click Apply to apply the settings.

Step 10

Click Check Connection to check the connection with the new settings.

If the Check Connection button turns Green, it indicates that the connection good.

If the Check Connection button turns Yellow, it indicates that there is an issue with the connection.


Smart Transport User Interface Field descriptions
Table 3. CSLU UI field descriptions

Field name

Field descriptions

Transport Mode

Specifies the mode of transport.

CSLU URL

Specifies the CSLU URL

HTTPS Proxy(Optional)

Specifies the HTTPS Proxy Address.

HTTP Proxy(Optional)

Specifies the HTTP Proxy Address.

Username(Optional)

Specifies the Username.

Password(Optional)

Specifies the Password

Reporting Interval (Days)

Specifies the reporting interval in days.

Hostname

Specifies the hostname that will be included in the report.

Product Version

Specifies the product version that will be included in the report.

Establish Trust for Smart Transport

Use this procedure to establish trust for smart transport.
Procedure

Step 1

Navigate to Information Tab, click Establish Trust.

The Establish Trust dialog box appears.

Step 2

Copy the Token text from the Virtual Account, paste under the ID Token dialog box and click Trust.

Step 3

Configuration Verification

  • Under Trust tab Trust Established time and Last Attempt Result as Success displays, indicating that the Trust Established.

  • Click Sync, under Reporting it displays Last Report Pushed time and Last Acknowledgment Received time indicating synchronization is done.

  • Under License Usage, license count displays.


Cisco Smart License Utility

Cisco Smart License Utility (CSLU) is a application that enables customers to administer licenses and their associated Product Instances from their premises instead of having to directly connect their Smart Licensed enabled Product Instances to Cisco Smart Software Manager (CSSM).

Configure CSLU

Before you begin

  1. Install CSLU Application on Windows or Linux System.

Configure CSLU Licensing Mode

Use this task to configure CSLU licensing mode.

Procedure

Step 1

Click Settings in the left panel, and then click Smart License.

Step 2

Click the Configuration to expand it.

Step 3

Under Transport Settings, select the CSLU/OnPrem from the drop-down list.

Go to CSLU User Interface Field descriptions for field descriptions.

Step 4

Under the CSLU URL enter http://<Device IP>:8182/cslu/v1/pi under.

Device IP is the Ethernet2 IP address of the computer in which the CSLU application is installed.

Step 5

Under Proxy Setting

  1. Perform these steps as needed.

    1. HTTPS Proxy (Optional)

    2. HTTP Proxy (Optional)

    3. Username (Optional)

    4. Password (Optional)

Step 6

Under Reports Settings, add Reporting Interval (Days)

  1. Enter <1–30>

Step 7

Check the check box Send Hostname to receive the hostname information.

Step 8

Check the check box Send Product Version to receive the product version.

Step 9

Click Apply to apply the settings.

Step 10

Click Check Connection to check the connection with the new settings.

If the Check Connection button turns Green, it indicates that the connection good.

If the Check Connection button turns Yellow, it indicates that there is an issue with the connection.


CSLU User Interface Field descriptions
Table 4. CSLU UI field descriptions

Field name

Field descriptions

Transport Mode

Specifies the mode of transport.

CSLU URL

Specifies the CSLU URL

HTTPS Proxy(Optional)

Specifies the HTTPS Proxy Address.

HTTP Proxy(Optional)

Specifies the HTTP Proxy Address.

Username(Optional)

Specifies the Username.

Password(Optional)

Specifies the Password

Reporting Interval (Days)

Specifies the reporting interval in days.

Hostname

Specifies the hostname that will be included in the report.

Product Version

Specifies the product version that will be included in the report.

Establish Trust for CSLU

Establishing trust enables you to access and view license usage data.

  1. In the Cisco Optical Site Manager application, click the Sync button.

  2. CSLU displays COMPLETE: Sync response acknowledgement to product instance when the Sync is complete from the CSLU.

Configuration Verification
Verify the configuration to check trust is established.
Procedure

Step 1

Under Trust tab Trust Established time and Last Attempt Result as Success displays, indicating that the Trust Established.

Step 2

When Sync is done, under Reporting it displays Last Report Pushed time and Last Acknowledgement Received time indicating synchronization is done.

Step 3

Under License Usage, license count displays indicating trust is established.


Offline

Offline mode allows you to manage your devices on premises without connecting to CSSM. You can set up your devices without internet access, and they do not require communication with Cisco, making it suitable for highly secure environments.

Configure Offline

Use this task to configure offline licensing mode.

Procedure


Step 1

Click Settings in the left panel, and then click Smart License.

Step 2

Click the Configuration tab to expand it.

Step 3

Under Transport Settings, select Offline mode fromTransport Mode drop-down list.

Step 4

Check the Send Hostname check box to receive the hostname information.

Step 5

Check the Send Product Version check box to receive the product version.

Step 6

Click Apply to apply the settings.

Check Connection is disabled for Offline mode.

Perform Offline Trust at CSSM

Perform these steps at CSSM.
Procedure

Step 1

Go to Cisco Smart Software Manager then go to Reports then click Usage Data Files then click Upload Usage Data and select the Virtual Account and click Ok.

Step 2

Upload Usage Data window opens, click the Browse button and upload the trust-request file.

Step 3

Check under the Reporting Status tab to see No Errors.

It may take a few minuets to show No Errors. If it shows Errors, you have to fix them.


Perform Offline Trust at COSM

Perform these steps at Cisco Optical Site Manager.
Procedure

Step 1

Click Download under Acknowledgment tab.

Step 2

In the Cisco Optical Site Manager click Import button, it opens a Establish Trust window.

Step 3

Click Select files... and upload Ack_trust-request-xxxx click Open then click Upload.

Step 4

Click Save, then Usage, it opens a Select what to save window, then choose any one option.

  • unreported

  • all

  • days

rum-report-xxx downloads


Perform Offline Trust at CSSM

Perform these steps at CSSM.
Procedure

Step 1

In the CSSM, under Usage Data Files click Upload Usage Data.

Step 2

It opens a Upload Usage Data window, click Browse and select rum-report-xxx click Open then click Upload Data In the Select Virtual Accounts window, select the appropriate account and click ok.

It may take a few minuets to show No Errors. If it shows Errors, you have to fix them.

Step 3

When No Errors appears, Download the Ack_rum-report-xxx.

Step 4

In the Cisco Optical Site Manager click Import button, it opens Establish Trust click Select files.. and select Ack_rum-report-xxx click Open then click Done.

Step 5

Click the Refresh button to see updated information.

Step 6

Configuration Verification

  • Under the Trust tab, you will see a Trust Established time, indicating that the trust has been established.

  • Under Reporting it displays ACK Report Time .

  • Under License Usage, license count displays.