TLS Proxy for Encrypted Voice Inspection
This chapter describes how to configure the ASA for the TLS Proxy for Encrypted Voice Inspection feature.
This chapter includes the following sections:
Information about the TLS Proxy for Encrypted Voice Inspection
End-to-end encryption often leaves network security appliances “blind” to media and signaling traffic, which can compromise access control and threat prevention security functions. This lack of visibility can result in a lack of interoperability between the firewall functions and the encrypted voice, leaving businesses unable to satisfy both of their key security requirements.
The ASA is able to intercept and decrypt encrypted signaling from Cisco encrypted endpoints to the Cisco Unified Communications Manager (Cisco UCM), and apply the required threat protection and access control. It can also ensure confidentiality by re-encrypting the traffic onto the Cisco UCM servers.
Typically, the ASA TLS Proxy functionality is deployed in campus unified communications network. This solution is ideal for deployments that utilize end to end encryption and firewalls to protect Unified Communications Manager servers.
Decryption and Inspection of Unified Communications Encrypted Signaling
With encrypted voice inspection, the security appliance decrypts, inspects and modifies (as needed, for example, performing NAT fixup), and re-encrypts voice signaling traffic while all of the existing VoIP inspection functions for Skinny and SIP protocols are preserved. Once voice signaling is decrypted, the plaintext signaling message is passed to the existing inspection engines.
The security appliance acts as a TLS proxy between the Cisco IP Phone and Cisco UCM. The proxy is transparent for the voice calls between the phone and theCisco UCM. Cisco IP Phones download a Certificate Trust List from the Cisco UCM before registration which contains identities (certificates) of the devices that the phone should trust, such as TFTP servers and Cisco UCM servers. To support server proxy, the CTL file must contain the certificate that the security appliance creates for the Cisco UCMs. To proxy calls on behalf of the Cisco IP Phone, the security appliance presents a certificate that the Cisco UCM can verify, which is a Local Dynamic Certificate for the phone, issued by the certificate authority on the security appliance.
TLS proxy is supported by the Cisco Unified CallManager Release 5.1 and later. You should be familiar with the security features of the Cisco UCM. For background and detailed description of Cisco UCM security, see the Cisco Unified CallManager document:
http://www.cisco.com/univercd/cc/td/doc/product/voice/c_callmg/5_0/sec_vir/ae/sec504/index.htm
TLS proxy applies to the encryption layer and must be configured with an application layer protocol inspection. You should be familiar with the inspection features on the ASA, especially Skinny and SIP inspection.
Supported Cisco UCM and IP Phones for the TLS Proxy
Cisco Unified Communications Manager
The following releases of the Cisco Unified Communications Manager are supported with the TLS proxy:
- Cisco Unified CallManager Version 4. x
- Cisco Unified CallManager Version 5.0
- Cisco Unified CallManager Version 5.1
- Cisco Unified Communications Manager 6.1
- Cisco Unified Communications Manager 7.0
- Cisco Unified Communications Manager 8.0
Cisco Unified IP Phones
The following IP phones in the Cisco Unified IP Phones 7900 Series are supported with the TLS proxy:
- Cisco Unified IP Phone 7985
- Cisco Unified IP Phone 7975
- Cisco Unified IP Phone 7971
- Cisco Unified IP Phone 7970
- Cisco Unified IP Phone 7965
- Cisco Unified IP Phone 7962
- Cisco Unified IP Phone 7961
- Cisco Unified IP Phone 7961G-GE
- Cisco Unified IP Phone 7960
- Cisco Unified IP Phone 7945
- Cisco Unified IP Phone 7942
- Cisco Unified IP Phone 7941
- Cisco Unified IP Phone 7941G-GE
- Cisco Unified IP Phone 7940
- Cisco Unified Wireless IP Phone 7921
- Cisco Unified Wireless IP Phone 7925
- Cisco IP Communicator (CIPC) for softphones
CTL Client Overview
The CTL Client application supplied by Cisco Unified CallManager Release 5.1 and later supports a TLS proxy server (firewall) in the CTL file. Figure 14-1 through Figure 14-4 illustrate the TLS proxy features supported in the CTL Client.
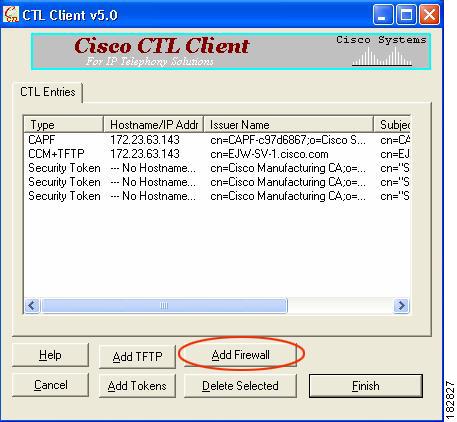
Figure 14-1 CTL Client TLS Proxy Features — Add Firewall
Figure 14-1 shows support for adding a CTL entry consisting of the security appliance as the TLS proxy.
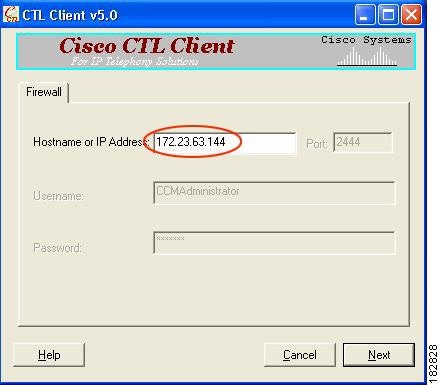
Figure 14-2 CTL Client TLS Proxy Features — ASA IP Address or Domain Name
Figure 14-2 shows support for entering the security appliance IP address or domain name in the CTL Client.
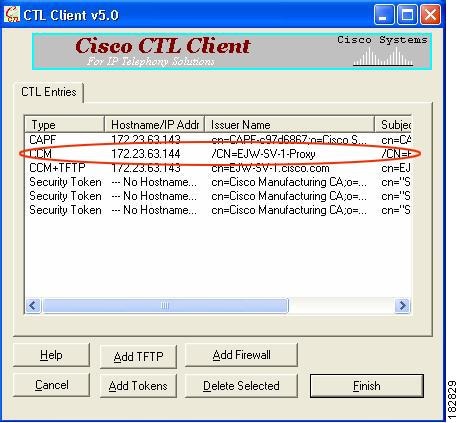
Figure 14-3 CTL Client TLS Proxy Features — CTL Entry for ASA
Figure 14-3 shows that the CTL entry for the security appliance as the TLS proxy has been added. The CTL entry is added after the CTL Client connects to the CTL Provider service on the security appliance and retrieves the proxy certificate.
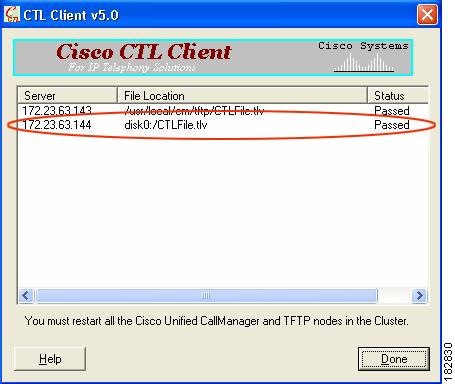
Figure 14-4 CTL Client TLS Proxy Features — CTL File Installed on the ASA
The security appliance does not store the raw CTL file in the flash, rather, it parses the CTL file and installs appropriate trustpoints. Figure 14-4 indicates the installation was successful.
Licensing for the TLS Proxy
The TLS proxy for encrypted voice inspection feature supported by the ASA require a Unified Communications Proxy license.
The following table shows the Unified Communications Proxy license details by platform:
Note This feature is not available on No Payload Encryption models.
|
|
|
ASA 5505 |
Base License and Security Plus License: 2 sessions. Optional license: 24 sessions. |
ASA 5512-X |
Base License or Security Plus License: 2 sessions. Optional licenses: 24, 50, 100, 250, or 500 sessions. |
ASA 5515-X |
Base License: 2 sessions. Optional licenses: 24, 50, 100, 250, or 500 sessions. |
ASA 5525-X |
Base License: 2 sessions. Optional licenses: 24, 50, 100, 250, 500, 750, or 1000 sessions. |
ASA 5545-X |
Base License: 2 sessions. Optional licenses: 24, 50, 100, 250, 500, 750, 1000, or 2000 sessions. |
ASA 5555-X |
Base License: 2 sessions. Optional licenses: 24, 50, 100, 250, 500, 750, 1000, 2000, or 3000 sessions. |
ASA 5585-X with SSP-10 |
Base License: 2 sessions. Optional licenses: 24, 50, 100, 250, 500, 750, 1000, 2000, or 3000 sessions. |
ASA 5585-X with SSP-20, -40, or -60 |
Base License: 2 sessions. Optional licenses: 24, 50, 100, 250, 500, 750, 1000, 2000, 3000, 5000, or 10,000 sessions. |
ASASM |
Base License: 2 sessions. Optional licenses: 24, 50, 100, 250, 500, 750, 1000, 2000, 3000, 5000, or 10,000 sessions. |
ASAv with 1 Virtual CPU |
Standard and Premium Licenses: 250 sessions. |
ASAv with 4 Virtual CPUs |
Standard and Premium Licenses: 1000 sessions. |
Table 14-1 shows the default and maximum TLS session details by platform.
Table 14-1 Default and Maximum TLS Sessions on the Security Appliance
|
Security Appliance Platform
|
|
|
ASA 5505 |
10 |
80 |
For more information about licensing, see the general operations configuration guide.
Prerequisites for the TLS Proxy for Encrypted Voice Inspection
Before configuring TLS proxy, the following prerequisites are required:
- You must set clock on the security appliance before configuring TLS proxy. To set the clock manually and display clock, use the clock set and show clock commands. We recommend that the security appliance use the same NTP server as the Cisco Unified CallManager cluster. TLS handshake may fail due to certificate validation failure if clock is out of sync between the security appliance and the Cisco Unified CallManager server.
- 3DES-AES license is needed to interoperate with the Cisco Unified CallManager. AES is the default cipher used by the Cisco Unified CallManager and Cisco IP Phone.
- Import the following certificates which are stored on the Cisco UCM. These certificates are required by the ASA for the phone proxy.
– Cisco_Manufacturing_CA
– CAP-RTP-001
– CAP-RTP-002
– CAPF certificate (Optional)
If LSC provisioning is required or you have LSC enabled IP phones, you must import the CAPF certificate from the Cisco UCM. If the Cisco UCM has more than one CAPF certificate, you must import all of them to the ASA.
See Chapter13, “Cisco Phone Proxy”For example, the CA Manufacturer certificate is required by the phone proxy to validate the IP phone certificate.
Configuring the TLS Proxy for Encrypted Voice Inspection
This section includes the following topics:
Task flow for Configuring the TLS Proxy for Encrypted Voice Inspection
To configure the security appliance for TLS proxy, perform the following steps:
Step 1 (Optional) Set the maximum number of TLS proxy sessions to be supported by the security appliance using the following command, for example:
hostname(config)# tls-proxy maximum-sessions 1200
Note The tls-proxy maximum-sessions command controls the memory size reserved for cryptographic applications such as TLS proxy. Crypto memory is reserved at the time of system boot. You may need to reboot the security appliance for the configuration to take effect if the configured maximum sessions number is greater than the currently reserved.
Step 2 Create trustpoints and generate certificates for the TLS Proxy for Encrypted Voice Inspection. See Creating Trustpoints and Generating Certificates.
Step 3 Create the internal CA to sign the LDC for Cisco IP Phones. See Creating an Internal CA.
Step 4 Create the CTL provider instance. See Creating a CTL Provider Instance.
Step 5 Create the TLS proxy instance. See Creating the TLS Proxy Instance.
Step 6 Enable the TLS proxy y with SIP and Skinny inspection. See Enabling the TLS Proxy Instance for Skinny or SIP Inspection.
Step 7 Export the local CA certificate (ldc_server) and install it as a trusted certificate on the Cisco UCM server.
a. Use the following command to export the certificate if a trust-point with proxy-ldc-issuer is used as the signer of the dynamic certificates, for example:
hostname(config)# crypto ca export ldc_server identity-certificate
b. For the embedded local CA server LOCAL-CA-SERVER, use the following command to export its certificate, for example:
hostname(config)# show crypto ca server certificate
Save the output to a file and import the certificate on the Cisco UCM. For more information, see the Cisco Unified CallManager document: http://www.cisco.com/univercd/cc/td/doc/product/voice/c_callmg/5_0/iptp_adm/504/iptpch6.htm#wp1040848
After this step, you may use the Display Certificates function on the Cisco Unified CallManager GUI to verify the installed certificate:
http://www.cisco.com/univercd/cc/td/doc/product/voice/c_callmg/5_0/iptp_adm/504/iptpch6.htm#wp1040354
Step 8 Run the CTL Client application to add the server proxy certificate (ccm_proxy) to the CTL file and install the CTL file on the security appliance. See the Cisco Unified CallManager document for information on how to configure and use CTL Client:
http://www.cisco.com/univercd/cc/td/doc/product/voice/c_callmg/5_1/nci/p08/secuauth.htm
Note You will need the CTL Client that is released with Cisco Unified CallManager Release 5.1 to interoperate with the security appliance. See CTL Client Overview for more information regarding TLS proxy support.
Creating Trustpoints and Generating Certificates
The Cisco UCM proxy certificate could be self-signed or issued by a third-party CA. The certificate is exported to the CTL client.
Prerequisites
Import the required certificates, which are stored on the Cisco UCM. See Certificates from the Cisco UCM and the Importing Certificates from the Cisco UCM.
|
|
|
Step 1 |
hostname(config)#
crypto key generate rsa label
key-pair-label
modulus
size
hostname(config)# crypto key generate rsa label ccm_proxy_key modulus 1024
hostname(config)# crypto key generate rsa label ldc_signer_key modulus 1024
hostname(config)# crypto key generate rsa label phone_common modulus 1024
|
Creates the RSA keypair that can be used for the trustpoints. The keypair is used by the self-signed certificate presented to the local domain containing the Cisco UP (proxy for the remote entity). Note We recommend that you create a different key pair for each role. |
Step 2 |
hostname(config)# crypto ca trustpoint
trustpoint_name
hostname(config)# ! for self-signed CCM proxy certificate
hostname(config)# crypto ca trustpoint ccm_proxy
|
Enters the trustpoint configuration mode for the specified trustpoint so that you can create the trustpoint for the Cisco UMA server. A trustpoint represents a CA identity and possibly a device identity, based on a certificate issued by the CA. |
Step 3 |
hostname(config-ca-trustpoint)# enrollment self
|
Generates a self-signed certificate. |
Step 4 |
hostname(config-ca-trustpoint)# fqdn none
|
Specifies not to include a fully qualified domain name (FQDN) in the Subject Alternative Name extension of the certificate during enrollment. |
Step 5 |
hostname(config-ca-trustpoint)# subject-name
X.500_name
hostname(config-ca-trustpoint)# subject-name cn=EJW-SV-1-Proxy
|
Includes the indicated subject DN in the certificate during enrollment Cisco IP Phones require certain fields from the X.509v3 certificate to be present to validate the certificate via consulting the CTL file. Consequently, the subject-name entry must be configured for a proxy certificate trustpoint. The subject name must be composed of the ordered concatenation of the CN, OU and O fields. The CN field is mandatory; the others are optional.
Note Each of the concatenated fields (when present) are separated by a semicolon, yielding one of the following forms:
CN=xxx;OU=yyy;O=zzz
CN=xxx;OU=yyy
CN=xxx;O=zzz
CN=xxx
|
Step 6 |
hostname(config-ca-trustpoint)#
keypair
keyname
hostname(config-ca-trustpoint)# keypair ccm_proxy_key
|
Specifies the key pair whose public key is to be certified. |
Step 7 |
hostname(config-ca-trustpoint)#
exit
|
Exits from the CA Trustpoint configuration mode. |
Step 8 |
hostname(config)#
crypto ca enroll
trustpoint
hostname(config)# crypto ca enroll ccm_proxy
|
Starts the enrollment process with the CA and specifies the name of the trustpoint to enroll with. |
What to Do Next
Once you have created the trustpoints and generated the certificates, create the internal CA to sign the LDC for Cisco IP Phones. See Creating an Internal CA.
Creating an Internal CA
Create an internal local CA to sign the LDC for Cisco IP Phones.
This local CA is created as a regular self-signed trustpoint with proxy-ldc-issuer enabled. You can use the embedded local CA LOCAL-CA-SERVER on the ASA to issue the LDC.
|
|
|
Step 1 |
hostname(config)# crypto ca trustpoint
trustpoint_name
hostname(config)# ! for the internal local LDC issuer
hostname(config)# crypto ca trustpoint ldc_server
|
Enters the trustpoint configuration mode for the specified trustpoint so that you can create the trustpoint for the LDC issurer. |
Step 2 |
hostname(config-ca-trustpoint)# enrollment self
|
Generates a self-signed certificate. |
Step 3 |
hostname(config-ca-trustpoint)# proxy-ldc-issuer
|
Issues TLS proxy local dynamic certificates. The proxy-ldc-issuer command grants a crypto trustpoint the role as local CA to issue the LDC and can be accessed from crypto ca trustpoint configuration mode. The proxy-ldc-issuer command defines the local CA role for the trustpoint to issue dynamic certificates for TLS proxy. This command can only be configured under a trustpoint with "enrollment self." |
Step 4 |
hostname(config-ca-trustpoint)# fqdn
fqdn
hostname(config-ca-trustpoint)# fqdn my-ldc-ca.exmaple.com
|
Includes the indicated FQDN in the Subject Alternative Name extension of the certificate during enrollment. |
Step 5 |
hostname(config-ca-trustpoint)# subject-name
X.500_name
hostname(config-ca-trustpoint)# subject-name cn=FW_LDC_SIGNER_172_23_45_200
|
Includes the indicated subject DN in the certificate during enrollment |
Step 6 |
hostname(config-ca-trustpoint)#
keypair
keyname
hostname(config-ca-trustpoint)# keypair ldc_signer_key
|
Specifies the key pair whose public key is to be certified. |
Step 7 |
hostname(config-ca-trustpoint)#
exit
|
Exits from the CA Trustpoint configuration mode. |
Step 8 |
hostname(config)#
crypto ca enroll
trustpoint
hostname(config)# crypto ca enroll ldc_server
|
Starts the enrollment process with the CA and specifies the name of the trustpoint to enroll with. |
What to Do Next
Once you have created the internal CA, create the CTL provider instance. See Creating a CTL Provider Instance.
Creating a CTL Provider Instance
Create a CTL Provider instance in preparation for a connection from the CTL Client.
The default port number listened by the CTL Provider is TCP 2444, which is the default CTL port on the Cisco UCM. Use the service port command to change the port number if a different port is used by the Cisco UCM cluster.
|
|
|
Step 1 |
hostname(config)#
ctl-provider
ctl_name
hostname(config)# ctl-provider my_ctl
|
Enters the CTL provider configuration mode so that you can create the Certificate Trust List provider instance. |
Step 2 |
hostname(config-ctl-provider)#
client interface
if_name
ipv4_addr
hostname(config-ctl-provider)# client interface inside address 172.23.45.1
|
Specifies clients allowed to connect to the Certificate Trust List provider. Where interface if_name specifies the interface allowed to connect and ipv4_addr specifies the IP address of the client. More than one command may be issued to define multiple clients. |
Step 3 |
hostname(config-ctl-provider)# client
username
user_name
password
password
encrypted
hostname(config-ctl-provider)# client username CCMAdministrator password XXXXXX encrypted
|
Specifies the username and password for client authentication. The username and password must match the username and password for Cisco UCM administration. |
Step 4 |
hostname(config-ctl-provider)# export certificate
trustpoint_name
hostname(config-ctl-provider)# export certificate |
Specifies the certificate to be exported to the client. The certificate will be added to the Certificate Trust List file composed by the CTL client. The trustpoint name in the export command is the proxy certificate for the Cisco UCM server. |
Step 5 |
hostname(config-ctl-provider)# ctl install
|
Enables the CTL provider to parse the CTL file from the CTL client and install trustpoints for entries from the CTL file. Ttrustpoints installed by this command have names prefixed with "_internal_CTL_<ctl_name>." |
What to Do Next
Once you have created the CTL provider instance, create the TLS proxy instance. See Creating the TLS Proxy Instance.
Creating the TLS Proxy Instance
Create the TLS proxy instance to handle the encrypted signaling.
|
|
|
Step 1 |
hostname(config)# tls-proxy
proxy_name
hostname(config)# tls-proxy my_proxy
|
Creates the TLS proxy instance. |
Step 2 |
hostname(config-tlsp)# server trust-point
proxy_trustpoint
hostname(config-tlsp)# server trust-point ccm_proxy
|
Specifies the proxy trustpoint certificate to present during TLS handshake. The server command configures the proxy parameters for the original TLS server. In other words, the parameters for the ASA to act as the server during a TLS handshake, or facing the original TLS client. |
Step 3 |
hostname(config-tlsp)# client ldc issuer
ca_tp_name
hostname(config-tlsp)# client ldc issuer ldc_server
|
Sets the local dynamic certificate issuer. The local CA to issue client dynamic certificates is defined by the crypto ca trustpoint command and the trustpoint must have proxy-ldc-issuer configured, or the default local CA server (LOCAL-CA-SERVER). Where ldc issuer ca_tp_name specifies the local CA trustpoint to issue client dynamic certificates. |
Step 4 |
hostname(config-tlsp)# client ldc key-pair
key_label
hostname(config-tlsp)# client ldc key-pair phone_common
|
Sets the keypair. The keypair value must have been generated with the crypto key generate command. |
Step 5 |
hostname(config-tlsp)# client cipher-suite
cipher_suite
hostname(config-tlsp)# client cipher-suite aes128-sha1 aes256-sha1
|
Sets the user-defined cipher suite. For client proxy (the proxy acts as a TLS client to the server), the user-defined cipher suite replaces the default cipher suite, or the one defined by the ssl encryption command. You can use this command to achieve difference ciphers between the two TLS sessions. You should use AES ciphers with the CallManager server. |
What to Do Next
Once you have created TLS proxy instance, enable the TLS proxy instance for Skinny and SIP inspection. See Enabling the TLS Proxy Instance for Skinny or SIP Inspection.
Enabling the TLS Proxy Instance for Skinny or SIP Inspection
Enable TLS proxy for the Cisco IP Phones and Cisco UCMs in Skinny or SIP inspection. The following procedure shows how to enable the TLS proxy instance for Skinny inspection.
|
|
|
Step 1 |
hostname(config)#
class-map
class_map_name
hostname(config)# class-map sec_skinny
|
Configures the secure Skinny class of traffic to inspect. Where class_map_name is the name of the Skinny class map. |
Step 2 |
hostname(config-cmap)# match port tcp eq 2443
|
Matches the TCP port 2443 to which you want to apply actions for secure Skinny inspection |
Step 3 |
hostname(config-cmap)#
exit
|
|
Step 4 |
hostname(config)#
policy-map type inspect skinny
policy_map_name
hostname(config)# policy-map type inspect skinny skinny_inspect
|
Defines special actions for Skinny inspection application traffic. |
Step 5 |
hostname(config-pmap)# parameters
hostname(config-pmap-p)# ! Skinny inspection parameters
|
Specifies the parameters for Skinny inspection. Parameters affect the behavior of the inspection engine. The commands available in parameters configuration mode depend on the application. |
Step 6 |
hostname(config-pmap-p)# exit |
Exits from Policy Map configuration mode. |
Step 7 |
hostname(config)#
policy-map
name
hostname(config)# policy-map global_policy
|
Configure the policy map and attach the action to the class of traffic. |
Step 8 |
hostname(config-pmap)# class inspection_default
|
Specifies the default class map. The configuration includes a default Layer 3/4 class map that the ASA uses in the default global policy. It is called inspection_default and matches the default inspection traffic, |
Step 9 |
hostname(config-pmap-c)# inspect skinny
skinny_map
hostname(config-pmap-c)# inspect skinny skinny_inspect
|
Enables SCCP (Skinny) application inspection. |
Step 10 |
hostname(config-pmap)# class
classmap_name
hostname(config-pmap)# class sec_skinny
|
Assigns a class map to the policy map where you can assign actions to the class map traffic. |
Step 11 |
hostname(config-pmap-c)# inspect skinny
skinny_map tls-proxy
proxy_name
hostname(config-pmap-c)# inspect skinny skinny_inspect tls-proxy my_proxy
|
Enables TLS proxy for the specified inspection session. |
Step 12 |
hostname(config-pmap-c)#
exit
|
Exits from the Policy Map configuration mode. |
Step 13 |
hostname(config)# service-policy
policymap_name global
hostname(config)# service-policy global_policy global
|
Enables the service policy on all interfaces. |
Monitoring the TLS Proxy
You can enable TLS proxy debug flags along with SSL syslogs to debug TLS proxy connection problems. For example, using the following commands to enable TLS proxy-related debug and syslog output only:
hostname(config)# debug inspect tls-proxy events
hostname(config)# debug inspect tls-proxy errors
hostname(config)# logging enable
hostname(config)# logging timestamp
hostname(config)# logging list loglist message 711001
hostname(config)# logging list loglist message 725001-725014
hostname(config)# logging list loglist message 717001-717038
hostname(config)# logging buffer-size 1000000
hostname(config)# logging buffered loglist
hostname(config)# logging debug-trace
The following is sample output reflecting a successful TLS proxy session setup for a SIP phone:
hostname(config)# show log
Apr 17 2007 23:13:47: %ASA-6-725001: Starting SSL handshake with client outside:133.9.0.218/49159 for TLSv1 session.
Apr 17 2007 23:13:47: %ASA-7-711001: TLSP cbad5120: Set up proxy for Client outside:133.9.0.218/49159 <-> Server inside:195.168.2.201/5061
Apr 17 2007 23:13:47: %ASA-7-711001: TLSP cbad5120: Using trust point 'local_ccm' with the Client, RT proxy cbae1538
Apr 17 2007 23:13:47: %ASA-7-711001: TLSP cbad5120: Waiting for SSL handshake from Client outside:133.9.0.218/49159.
Apr 17 2007 23:13:47: %ASA-7-725010: Device supports the following 4 cipher(s).
Apr 17 2007 23:13:47: %ASA-7-725011: Cipher[1] : RC4-SHA
Apr 17 2007 23:13:47: %ASA-7-725011: Cipher[2] : AES128-SHA
Apr 17 2007 23:13:47: %ASA-7-725011: Cipher[3] : AES256-SHA
Apr 17 2007 23:13:47: %ASA-7-725011: Cipher[4] : DES-CBC3-SHA
Apr 17 2007 23:13:47: %ASA-7-725008: SSL client outside:133.9.0.218/49159 proposes the following 2 cipher(s).
Apr 17 2007 23:13:47: %ASA-7-725011: Cipher[1] : AES256-SHA
Apr 17 2007 23:13:47: %ASA-7-725011: Cipher[2] : AES128-SHA
Apr 17 2007 23:13:47: %ASA-7-725012: Device chooses cipher : AES128-SHA for the SSL session with client outside:133.9.0.218/49159
Apr 17 2007 23:13:47: %ASA-7-725014: SSL lib error. Function: SSL23_READ Reason: ssl handshake failure
Apr 17 2007 23:13:47: %ASA-7-717025: Validating certificate chain containing 1 certificate(s).
Apr 17 2007 23:13:47: %ASA-7-717029: Identified client certificate within certificate chain. serial number: 01, subject name: cn=SEP0017593F50A8.
Apr 17 2007 23:13:47: %ASA-7-717030: Found a suitable trustpoint _internal_ejw-sv-2_cn=CAPF-08a91c01 to validate certificate.
Apr 17 2007 23:13:47: %ASA-6-717022: Certificate was successfully validated. serial number: 01, subject name: cn=SEP0017593F50A8.
Apr 17 2007 23:13:47: %ASA-6-717028: Certificate chain was successfully validated with warning, revocation status was not checked.
Apr 17 2007 23:13:47: %ASA-6-725002: Device completed SSL handshake with client outside:133.9.0.218/49159
Apr 17 2007 23:13:47: %ASA-6-725001: Starting SSL handshake with server inside:195.168.2.201/5061 for TLSv1 session.
Apr 17 2007 23:13:47: %ASA-7-725009: Device proposes the following 2 cipher(s) to server inside:195.168.2.201/5061
Apr 17 2007 23:13:47: %ASA-7-725011: Cipher[1] : AES128-SHA
Apr 17 2007 23:13:47: %ASA-7-725011: Cipher[2] : AES256-SHA
Apr 17 2007 23:13:47: %ASA-7-711001: TLSP cbad5120: Generating LDC for client 'cn=SEP0017593F50A8', key-pair 'phone_common', issuer 'LOCAL-CA-SERVER', RT proxy cbae1538
Apr 17 2007 23:13:47: %ASA-7-711001: TLSP cbad5120: Started SSL handshake with Server
Apr 17 2007 23:13:47: %ASA-7-711001: TLSP cbad5120: Data channel ready for the Client
Apr 17 2007 23:13:47: %ASA-7-725013: SSL Server inside:195.168.2.201/5061 choose cipher : AES128-SHA
Apr 17 2007 23:13:47: %ASA-7-717025: Validating certificate chain containing 1 certificate(s).
Apr 17 2007 23:13:47: %ASA-7-717029: Identified client certificate within certificate chain. serial number: 76022D3D9314743A, subject name: cn=EJW-SV-2.inside.com.
Apr 17 2007 23:13:47: %ASA-6-717022: Certificate was successfully validated. Certificate is resident and trusted, serial number: 76022D3D9314743A, subject name: cn=EJW-SV-2.inside.com.
Apr 17 2007 23:13:47: %ASA-6-717028: Certificate chain was successfully validated with revocation status check.
Apr 17 2007 23:13:47: %ASA-6-725002: Device completed SSL handshake with server inside:195.168.2.201/5061
Apr 17 2007 23:13:47: %ASA-7-711001: TLSP cbad5120: Data channel ready for the Server
Use the show tls-proxy commands with different options to check the active TLS proxy sessions. The following are some sample outputs:
hostname(config-tlsp)# show tls-proxy
Maximum number of sessions: 1200
TLS-Proxy 'sip_proxy': ref_cnt 1, seq# 3
Local dynamic certificate issuer: LOCAL-CA-SERVER
Local dynamic certificate key-pair: phone_common
Cipher suite: aes128-sha1 aes256-sha1
Proxy 0xcbae1538: Class-map: sip_ssl, Inspect: sip
Active sess 1, most sess 3, byte 3456043
TLS-Proxy 'proxy': ref_cnt 1, seq# 1
Local dynamic certificate issuer: ldc_signer
Local dynamic certificate key-pair: phone_common
Cipher-suite: <unconfigured>
Proxy 0xcbadf720: Class-map: skinny_ssl, Inspect: skinny
Active sess 1, most sess 1, byte 42916
hostname(config-tlsp)# show tls-proxy session count
hostname(config-tlsp)# show tls-proxy session
outside 133.9.0.211:50437 inside 195.168.2.200:2443 P:0xcbadf720(proxy) S:0xcbc48a08 byte 42940
outside 133.9.0.218:49159 inside 195.168.2.201:5061 P:0xcbae1538(sip_proxy) S:0xcbad5120 byte 8786
hostname(config-tlsp)# show tls-proxy session detail
outside 133.9.0.211:50437 inside 195.168.2.200:2443 P:0xcbadf720(proxy) S:0xcbc48a08 byte 42940
Client: State SSLOK Cipher AES128-SHA Ch 0xca55e498 TxQSize 0 LastTxLeft 0 Flags 0x1
Server: State SSLOK Cipher AES128-SHA Ch 0xca55e478 TxQSize 0 LastTxLeft 0 Flags 0x9
Local Dynamic Certificate
Certificate Serial Number: 29
Certificate Usage: General Purpose
Public Key Type: RSA (1024 bits)
start date: 09:25:41 PDT Apr 16 2007
end date: 09:25:41 PDT Apr 15 2008
outside 133.9.0.218:49159 inside 195.168.2.201:5061 P:0xcbae1538(sip_proxy) S:0xcbad5120 byte 8786
Client: State SSLOK Cipher AES128-SHA Ch 0xca55e398 TxQSize 0 LastTxLeft 0 Flags 0x1
Server: State SSLOK Cipher AES128-SHA Ch 0xca55e378 TxQSize 0 LastTxLeft 0 Flags 0x9
Local Dynamic Certificate
Certificate Serial Number: 2b
Certificate Usage: General Purpose
Public Key Type: RSA (1024 bits)
cn=F1-ASA.default.domain.invalid
start date: 23:13:47 PDT Apr 16 2007
end date: 23:13:47 PDT Apr 15 2008
Feature History for the TLS Proxy for Encrypted Voice Inspection
Table 14-2 lists the release history for this feature.
Table 14-2 Feature History for Cisco Phone Proxy
|
|
|
|
TLS Proxy |
8.0(2) |
The TLS proxy feature was introduced. |

 Feedback