Procedure with the Local Manager

After the Initial configuration, proceed to the steps described in this section.

Access the IOx Local Manager

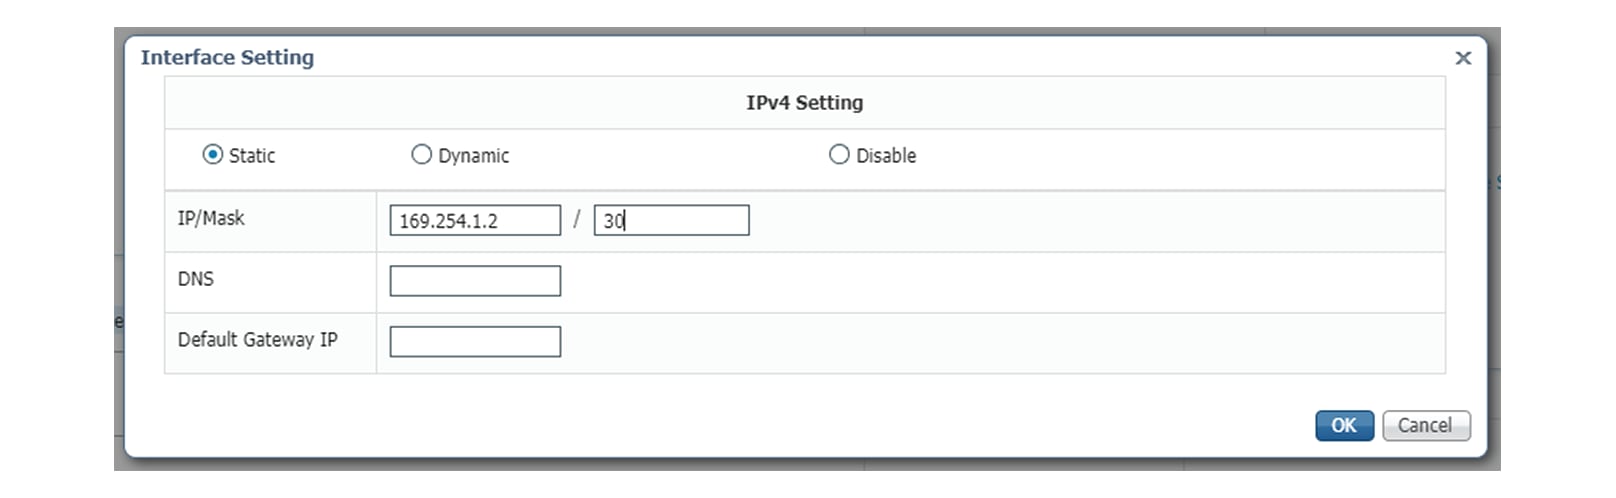
  1. Open a browser and navigate to the IP address you configured on the interface you are connected to.

  2. Log in using the Cisco IR1101 admin user account and password.

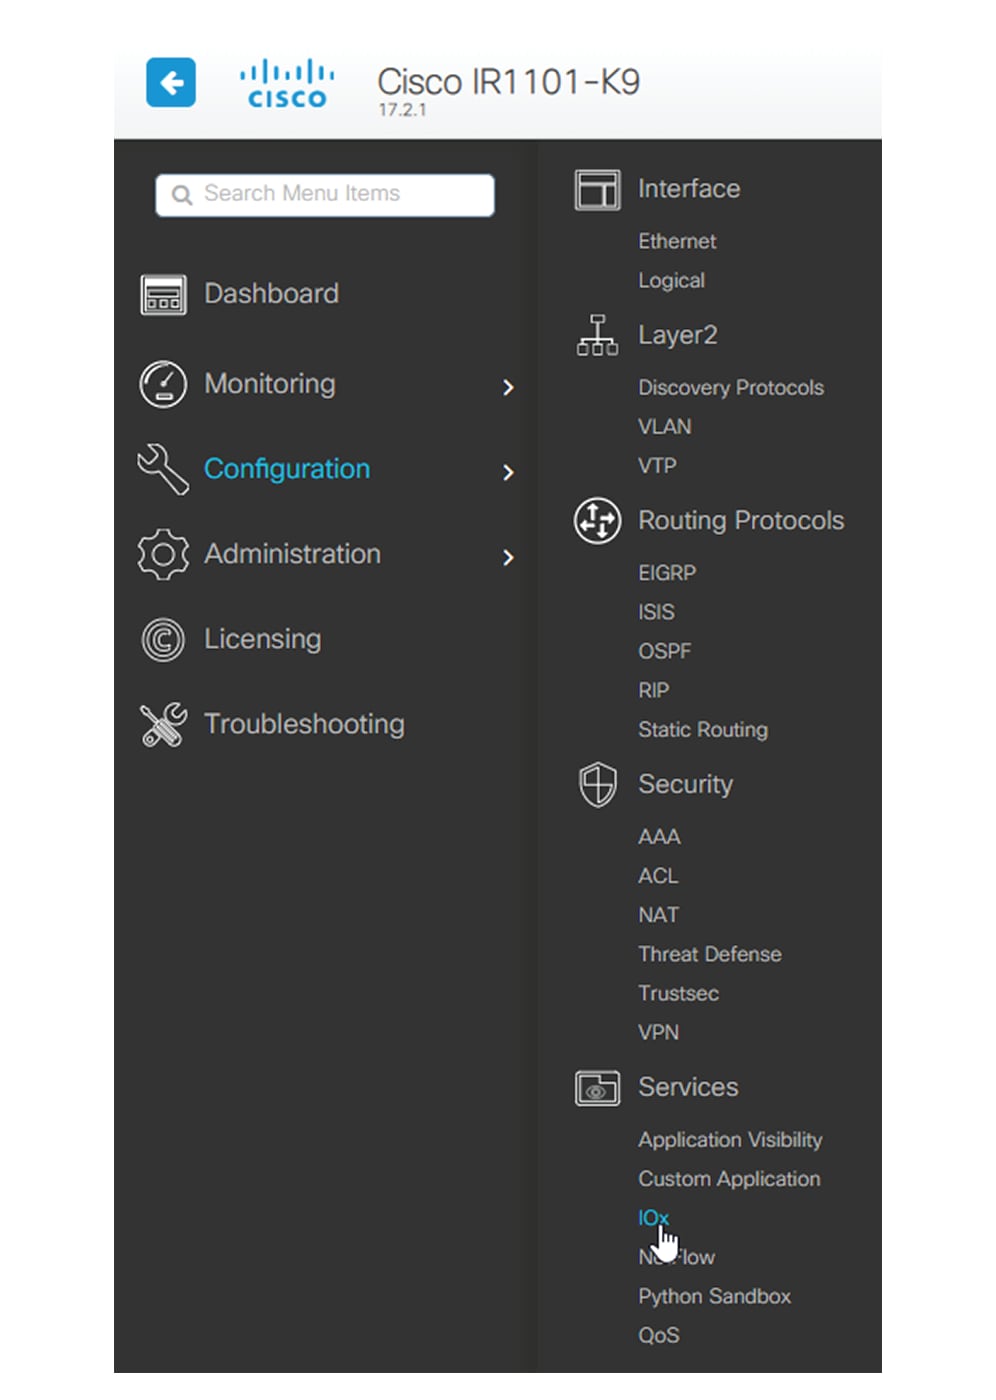
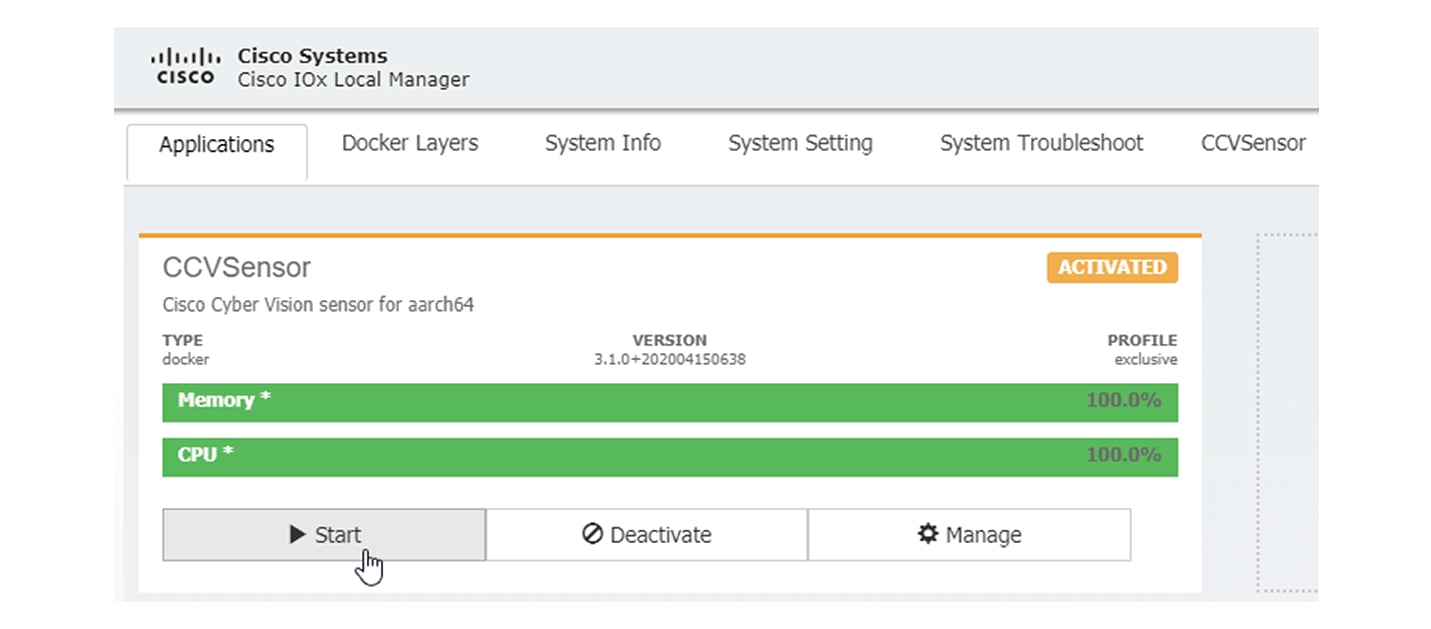
  3. Once logged into the Local Manager, navigate to Configuration > Services > IOx.

  4. Log in using the user account and password.

Install the sensor virtual application

Once logged in, the following menu appears:

  1. Click Add New.

  2. Add an Application id name (e.g. CCVSensor).

  3. Select the application archive file

    (i.e. "CiscoCyberVision-IOx-aarch64-<version>.tar").


    Note


    If you aim to install a sensor with Active Discovery, select the required application archive file


    (i.e. "CiscoCyberVision-IOx-Active-Discovery-aarch64-<version>.tar").

    The installation takes a few minutes.

    When the application is installed, the following message is displayed and the sensor application appears:

Configure the sensor virtual application

Procedure


Step 1

Click Activate to launch the configuration of the sensor application.

Step 2

Deploy the Resource Profile menu and set the disk size. The procedure differs whether the device has a SSD or not:

  • If the device has a SSD, set the necessary disk size. It should be at least 4GB.

  • If the device has no SSD, set the disk size to 384MB, then deploy the Advanced Settings menu and configure tmpfs by filling the docker options text area with:

    --tmpfs /tmp:rw,size=128m

Step 3

Bind the eth0 and eth1 interfaces in the container to an interface on the host in the Network Configuration menu.

eth0:

  1. Click edit in the eth0 line.

  2. Select the VPG1 interface.

  3. Click Interface setting.

    The Interface Setting window pops up.

  4. Apply the following configurations:

    • Set IPv4 as Static.

    • IP/Mask: 169.254.0.2 / 30

    • Default gateway: 169.254.0.1

  5. Check that IPV6 is set to Disable.

  6. Click OK to save the interface settings.

    You're back to the Network Configuration menu.

  7. Click OK to save the network configurations.

    A popup that confirms changes appears.

  8. Click OK.

Step 4

eth1:

  1. Click edit in the eth1 line.

  2. Select the VPG0 interface.

  3. Click Interface setting.

  4. Apply the following configurations:

    • Set IPv4 as Static.

    • IP/Mask: 169.254.1.2 / 30

  5. Disable IPv6.

  6. Click OK, and click OK again when you're back to the Network Configuration menu to save the interface settings.

Step 5

Click the Activate App button.

The operation takes several seconds.

Step 6

Go to the Applications menu to see the application's status.

The application is activated and needs to be started.

Step 7

Click the Start button.

The operation takes several seconds.

The applications' status changes to RUNNING.


Generate the provisioning package

  1. In Cisco Cyber Vision, navigate to Admin > Sensors > Sensor Explorer and click Install sensor, then Manual install.

    The manual install wizard appears.

  2. Select Cisco IOx Application and click Next.

  3. Fill the fields to configure the sensor provisioning package:

    • The serial number of the hardware.

    • Center IP: leave blank.

    • Gateway: add if necessary.

    • Optionally, select a capture mode.

    • Optionally, select RSPAN (only with Catalyst 9x00 and if using ERSPAN is not possible).

  4. Click Create sensor.

  5. Click the link to download the provisioning package.

    This will download the provisioning package which is a zip archive file with the following name structure: sbs-sensor-config-<serialnumber>.zip (e.g. "sbs-sensor-configFCW23500HDC.zip").

  6. Click Finish.

  7. A new entry for the sensor appears in the Sensor Explorer list.

    The sensor status will switch from Disconnected to New.

Import the provisioning package

  1. In the Local Manager, in the IOx configuration menu, click Manage.

  2. Navigate to App-DataDir.

  3. Click Upload.

  4. Choose the provisioning package downloaded (i.e. "sbs-sensor-config-FCW23500HDC.zip"), and add the exact file name in the path field (i.e. "sbs-sensor-config-FCW23500HDC.zip").

  5. Click OK.

  6. After a few seconds, the sensor appears as Connected in Cisco Cyber Vision.